Course
Introduction to Deep Learning with PyTorch
4 hr
91.8K
Unsloth’s NVIDIA collaboration focuses on making fine-tuning faster by reducing hidden training overhead. Instead of only relying on bigger GPUs or smaller models, the improvements target bottlenecks inside the training process, such as repeated metadata construction, activation reload delays, and inefficient token routing. For users, this means faster training and a smoother fine-tuning workflow on supported NVIDIA GPUs.
In this guide, we will learn about these new Unsloth performance improvements and apply Unsloth’s optimized fine-tuning workflow to a practical vision-language task. We will fine-tune Qwen3.5 Vision 4B for medical OCR, where the model learns to extract structured text from medical document images using a small medical-looking subset of an OCR dataset.
We will use:
Before we start fine-tuning, it is useful to understand what Unsloth’s NVIDIA collaboration improves and how it connects to this guide.
Unsloth reports that its NVIDIA collaboration makes LLM training around 25% faster, with no loss in accuracy, on top of its existing 2–5x fine-tuning speedups. These gains come from reducing hidden overhead around the main training process rather than changing the model’s learning objective. In other words, the goal is to make fine-tuning faster and more efficient while keeping accuracy unchanged.
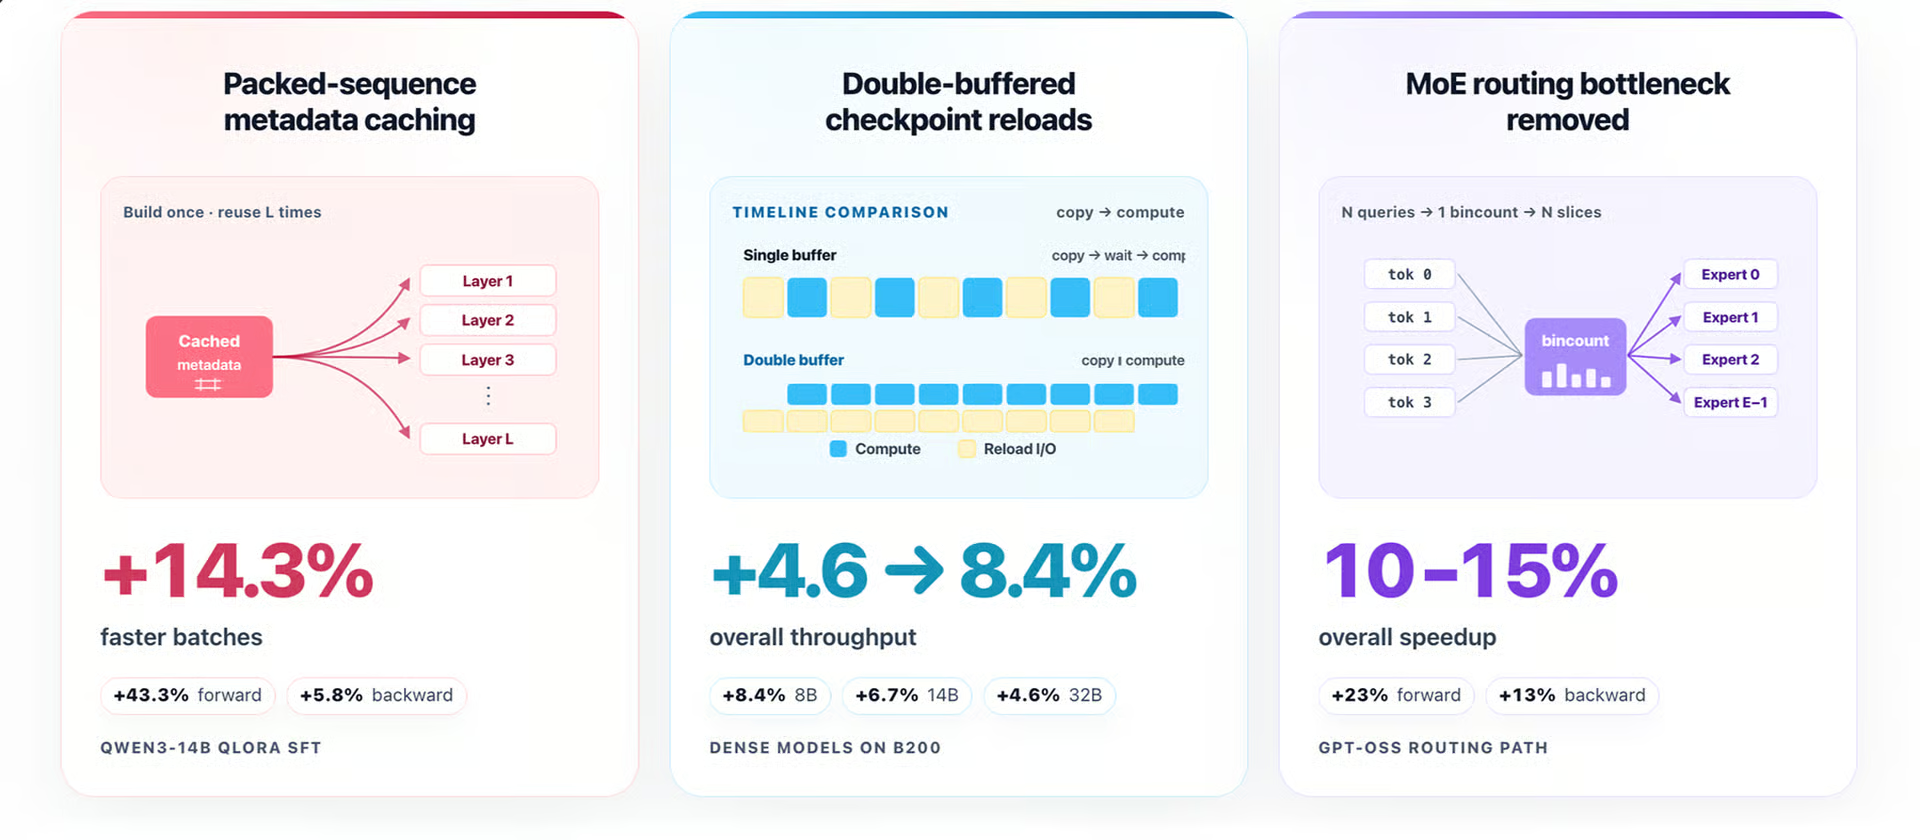
Source: How to Make LLM Training Faster with Unsloth and NVIDIA
Learn how to work with LLMs in Python right in your browser
The collaboration reports several performance improvements, including:
Some of the largest performance gains from the Unsloth and NVIDIA collaboration apply to packed text-only training and Mixture-of-Experts models. We are not using those in this guide because our workflow focuses on Qwen3.5 Vision OCR fine-tuning.
In this guide, we are using an NVIDIA RTX 3090 GPU, so the workflow is built around NVIDIA GPU acceleration and Unsloth’s optimized fine-tuning path. We are not benchmarking Unsloth against another trainer, so this guide should not be read as independent proof of the reported speedups. Instead, we are applying Unsloth’s optimized fine-tuning workflow to a real vision-language task.
For this workflow, the most relevant optimization is Unsloth’s gradient checkpointing. It helps reduce memory usage during training by avoiding the need to store every activation in GPU memory. This is especially useful for vision-language fine-tuning, where the model has to process both image inputs and text outputs.
To run this guide, you need access to an NVIDIA GPU. You can rent one from platforms such as RunPod, Vast.ai, or any other cloud GPU provider. I initially tried using RunPod because it is usually fast and reliable, but the available RTX 3090 options were limited at the time. I therefore used a Vast.ai RTX 3090 GPU machine for this workflow.
For a comparison of the different platforms, check out our guide to the best GPU cloud providers.
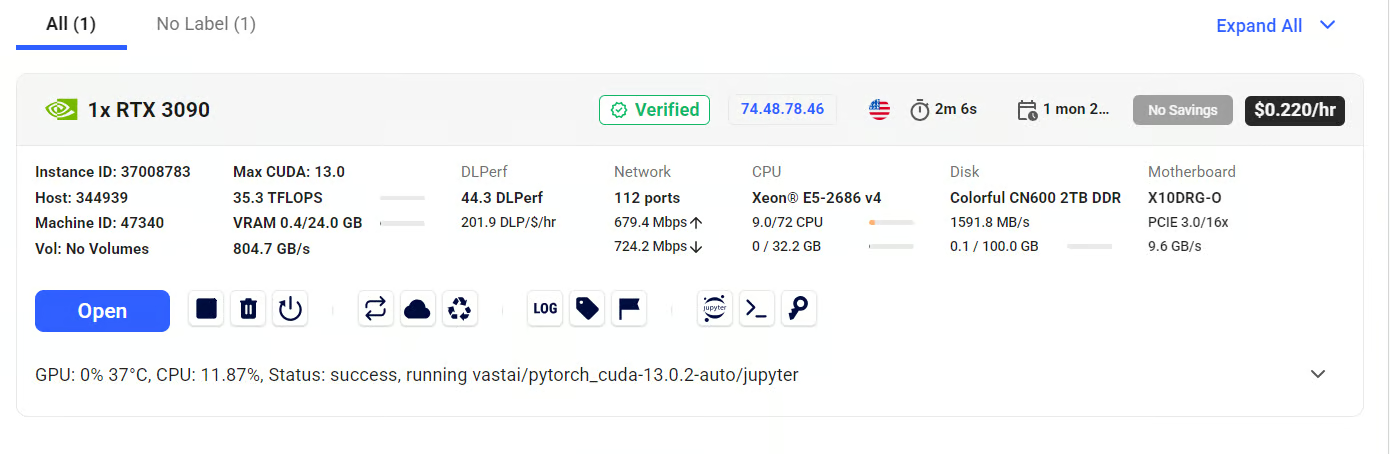
Source: Vast.ai | Console
After launching the instance, I opened Jupyter Notebook and created a new notebook. On Vast.ai, I selected the available main environment kernel to install the required Python packages in the notebook environment without affecting system-level dependencies.
First, install the required packages for Unsloth, PyTorch, vision model training, dataset loading, and Hugging Face integration:
!pip install --upgrade \
    "torch>=2.8.0" "triton>=3.4.0" \
    numpy pillow torchvision bitsandbytes \
    unsloth "unsloth_zoo>=2026.4.6" \
    "datasets>=4.0.0" huggingface_hub hf_transfer pandas \
    transformers==5.2.0 torchcodec timm
These packages are based on the official Unsloth notebook setup and include the main libraries needed to load Qwen3.5 Vision, prepare image-text data, and fine-tune the model with Unsloth.
Next, we configure the CUDA device and verify that the correct NVIDIA GPU is available. Since this guide uses an RTX 3090, the code checks whether CUDA is enabled, confirms the selected GPU, prints the CUDA and PyTorch versions, and verifies that the machine has enough VRAM for this experiment.
import os
import platform

CUDA_DEVICE_INDEX = 0
TARGET_GPU_NAME = "3090"

# Must be set before CUDA / Unsloth are initialized. Restart the kernel if you change these.
os.environ["CUDA_VISIBLE_DEVICES"] = str(CUDA_DEVICE_INDEX)

# RunPod + Qwen3.5 Vision OCR can hit Torch Dynamo fullgraph recompile limits.
# This disables Unsloth's torch.compile path while keeping Unsloth model loading,
# LoRA, gradient checkpointing, collator, and 8-bit optimizer benefits.
os.environ["UNSLOTH_COMPILE_DISABLE"] = "1"
os.environ["TORCH_COMPILE_DISABLE"] = "1"

import torch

DEVICE = torch.device("cuda:0")

print("Python:", platform.python_version())
print("PyTorch:", torch.__version__)
print("CUDA available:", torch.cuda.is_available())

if not torch.cuda.is_available():
    raise RuntimeError("CUDA is not available. Select a GPU instance before continuing.")

torch.cuda.set_device(0)
props = torch.cuda.get_device_properties(0)
gpu_name = torch.cuda.get_device_name(0)
total_gpu_memory_gb = props.total_memory / 1024**3

print("Selected device:", DEVICE)
print("GPU:", gpu_name)
print("CUDA version:", torch.version.cuda)
print("BF16 supported:", torch.cuda.is_bf16_supported())
print("Total GPU memory:", round(total_gpu_memory_gb, 2), "GB")

if TARGET_GPU_NAME not in gpu_name:
    raise RuntimeError(f"Expected an RTX {TARGET_GPU_NAME}, but CUDA device 0 is: {gpu_name}")

if total_gpu_memory_gb < 20:
    raise RuntimeError(f"Expected a 24 GB class 3090, but only found {total_gpu_memory_gb:.2f} GB VRAM.")
In my setup, the environment returned the following GPU configuration:
Python: 3.12.13
PyTorch: 2.12.0+cu130
CUDA available: True
Selected device: cuda:0
GPU: NVIDIA GeForce RTX 3090
CUDA version: 13.0
BF16 supported: True
Total GPU memory: 23.56 GB
This confirms that the notebook is running on an NVIDIA GeForce RTX 3090 with enough VRAM for the fine-tuning experiment.
After verifying the GPU, we define the model, dataset, training settings, output directories, image size, and OCR prompts.
MODEL_NAME = "unsloth/Qwen3.5-4B"
DATASET_NAME = "naazimsnh02/medocr-vision-dataset"

SAMPLE_COUNT = 300
EVAL_INDEX = 0
MAX_LENGTH = 4096
MAX_STEPS = 30

PER_DEVICE_BATCH_SIZE = 4
GRADIENT_ACCUMULATION_STEPS = 2
LEARNING_RATE = 2e-4
SEED = 3407

OUTPUT_DIR = "outputs/qwen35_vision_medical_ocr"
ADAPTER_DIR = "qwen35-vision-medical-ocr-lora"

# Medical document images vary heavily in size. Fixed-size canvases avoid
# repeated Torch Dynamo recompiles during vision training.
# 768x1024 is a practical portrait-page compromise for a 24 GB 3090 smoke test.
FIXED_IMAGE_SIZE = (768, 1024)

# Official Unsloth Qwen3.5 Vision notebook uses False here for 16-bit LoRA.
# Set True only if you hit VRAM limits.
LOAD_IN_4BIT = True

SYSTEM_PROMPT = "You are a medical OCR transcription engine. Return only the exact text visible in the medical document image."
INSTRUCTION = "Extract all readable text from this medical document exactly. Preserve structure when possible. Return only the OCR text, with no explanation, no diagnosis, no medical advice, and no reasoning."
Here, we use Qwen3.5 Vision 4B from Unsloth and the medical OCR vision dataset. For this guide, we select 300 samples and train for 30 steps, which keeps the run lightweight while still showing how the model adapts to the target OCR format.
The fixed image size of 768×1024 helps keep the image inputs consistent during training. Medical documents can vary heavily in resolution and aspect ratio, so resizing them into a fixed canvas makes the workflow smoother and reduces shape-related issues during vision-language fine-tuning.
Now that the environment is ready, we can load the Qwen3.5 Vision 4B model using Unsloth’s FastVisionModel.
import unsloth
from unsloth import FastVisionModel
torch.cuda.set_device(0)

model, tokenizer = FastVisionModel.from_pretrained(
    MODEL_NAME,
    load_in_4bit=LOAD_IN_4BIT,
    use_gradient_checkpointing="unsloth",
)

print("Loaded:", MODEL_NAME)
print("4-bit:", LOAD_IN_4BIT)
print("Model device:", next(model.parameters()).device)
After loading the model, the output confirms that the correct model has been loaded, 4-bit mode is enabled, and the model is placed on the GPU:
Loaded: unsloth/Qwen3.5-4B
4-bit: True
Model device: cuda:0
Here, FastVisionModel.from_pretrained() loads the vision-language model and applies Unsloth’s optimizations for faster and more memory-efficient fine-tuning. We also enable load_in_4bit, which reduces VRAM usage by loading the model in 4-bit precision. This is useful when working with a 24 GB GPU such as the RTX 3090.
We also enable Unsloth gradient checkpointing with use_gradient_checkpointing="unsloth"
This helps reduce memory usage during training, which is especially important for vision-language models because they process both image and text inputs.
Next, we add LoRA adapters to the model. LoRA allows us to fine-tune a smaller set of trainable parameters instead of updating the full model. This makes training faster, more memory efficient, and easier to run on a single GPU.
model = FastVisionModel.get_peft_model(
    model,
    finetune_vision_layers=True,
    finetune_language_layers=True,
    finetune_attention_modules=True,
    finetune_mlp_modules=True,
    r=16,
    lora_alpha=16,
    lora_dropout=0,
    bias="none",
    random_state=SEED,
    use_rslora=False,
    loftq_config=None,
)
For this guide, the adapters are added across both the vision and language parts of the model. This helps the model learn how to read medical document images and produce the expected structured OCR text. After this step, the model is ready to be trained on the medical OCR dataset.
Now we load the medical OCR dataset from Hugging Face and prepare a small subset for fine-tuning.
from datasets import load_dataset
from PIL import Image

raw_dataset = load_dataset(DATASET_NAME, split="train")

MEDICAL_KEYWORDS = [
    "doctor", "dr.", "clinic", "hospital", "patient", "medication",
    "medications", "prescription", "signature", "department", "report",
    "diagnosis", "lab", "laboratory", "blood", "hemoglobin", "mg", "dose",
    "<s_ocr>",
]
The dataset contains document images and their corresponding OCR text. Since we only want medical-style OCR examples for this guide, we filter the dataset using a simple keyword-based approach. The code searches for terms commonly found in medical documents, such as doctor, clinic, patient, medication, prescription, diagnosis, and dosage-related words.
def looks_medical(sample):
    text = str(sample.get("text", "")).lower()
    return any(keyword in text for keyword in MEDICAL_KEYWORDS)

medical_indices = []
for idx, sample in enumerate(raw_dataset):
    if looks_medical(sample):
        medical_indices.append(idx)
        if len(medical_indices) >= SAMPLE_COUNT:
            break

if not medical_indices:
    raise RuntimeError("No medical-looking OCR samples found. Broaden MEDICAL_KEYWORDS or inspect the dataset text field.")

print(f"Selected {len(medical_indices)} medical-looking samples.")
This gives us a lightweight way to select examples that look relevant to the medical OCR task. For this run, we select 300 medical-looking samples.
Next, we normalize each image into a fixed 768×1024 canvas. Medical document images can have different sizes and aspect ratios, so this step helps make the training data more consistent. The image is resized while keeping its original aspect ratio, then placed on a white background.
def normalize_ocr_image(image, size=FIXED_IMAGE_SIZE):
    image = image.convert("RGB")
    target_w, target_h = size
    scale = min(target_w / image.width, target_h / image.height)
    new_w = max(1, int(image.width * scale))
    new_h = max(1, int(image.height * scale))
    resized = image.resize((new_w, new_h), Image.Resampling.LANCZOS)

    canvas = Image.new("RGB", size, "white")
    left = (target_w - new_w) // 2
    top = (target_h - new_h) // 2
    canvas.paste(resized, (left, top))
    return canvas
Instead of using datasets.map, we manually build a simple Python list. This avoids potential hanging issues in some cloud notebook environments when rewriting PIL images.
dataset = []
for idx in medical_indices:
    sample = raw_dataset[idx]
    dataset.append(
        {
            "image": normalize_ocr_image(sample["image"]),
            "text": sample["text"],
        }
    )

print("Examples:", len(dataset))
print("Columns:", list(dataset[0].keys()))
print("Fixed image size:", dataset[EVAL_INDEX]["image"].size)
print("Sample text:", dataset[EVAL_INDEX]["text"])
After preprocessing, each example contains two fields: the normalized image and the target OCR text.
Examples: 300
Columns: ['image', 'text']
Fixed image size: (768, 1024)
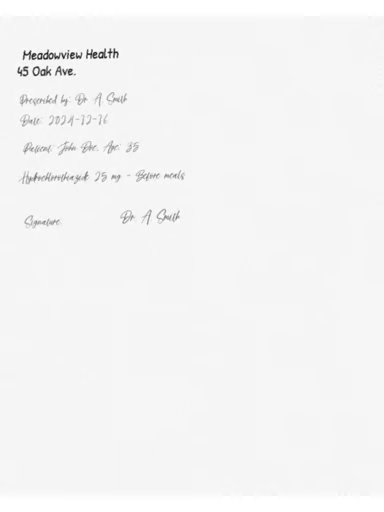
Sample text: <s_ocr> doctor_name: Dr. A. Smith clinic_name: Meadowview Health clinic_address: 45 Oak Ave. patient_name: John Doe patient_age: 35 date: 2024-12-16 medications: - Hydrochlorothiazide 25 mg - Before meals signature: Dr. A. Smith </s>
We can also preview one of the resized examples:
dataset[EVAL_INDEX]["image"].resize((384, 512))The preview shows a medical-style document image with clinic details, doctor name, patient information, medication, and signature. This confirms that the dataset is suitable for the OCR fine-tuning task.
Now that the dataset is loaded and the images are normalized, we need to convert each example into the conversation format expected by Qwen3.5 Vision.
Each training sample should include three parts:
def build_ocr_messages(image=None, target_text=None, instruction=INSTRUCTION):
    user_content = [
        {"type": "image"},
        {"type": "text", "text": instruction},
    ]

    if image is not None:
        user_content[0]["image"] = image

    messages = [
        {"role": "system", "content": [{"type": "text", "text": SYSTEM_PROMPT}]},
        {"role": "user", "content": user_content},
    ]

    if target_text is not None:
        messages.append(
            {
                "role": "assistant",
                "content": [{"type": "text", "text": target_text}],
            }
        )

    return messages
The helper function above creates the message structure for both training and inference. During training, we include the target OCR text as the assistant response. During inference, we only provide the image and instruction, then ask the model to generate the OCR text.
Next, we convert every dataset sample into this conversation format:
def convert_to_conversation(sample):
    return {
        "messages": build_ocr_messages(
            image=sample["image"],
            target_text=sample["text"],
        )
    }


converted_dataset = [convert_to_conversation(sample) for sample in dataset]
converted_dataset[0]
After conversion, each sample contains a list of messages. The first example includes the system prompt, the medical document image, the OCR instruction, and the expected structured OCR transcription. This format allows the model to learn how to map an image and an instruction to the correct text output.
{'messages': [{'role': 'system',
   'content': [{'type': 'text',
     'text': 'You are a medical OCR transcription engine. Return only the exact text visible in the medical document image.'}]},
  {'role': 'user',
   'content': [{'type': 'image',
     'image': <PIL.Image.Image image mode=RGB size=768x1024>},
    {'type': 'text',
     'text': 'Extract all readable text from this medical document exactly. Preserve structure when possible. Return only the OCR text, with no explanation, no diagnosis, no medical advice, and no reasoning.'}]},
  {'role': 'assistant',
   'content': [{'type': 'text',
'text': '<s_ocr> doctor_name: Dr. A. Smith clinic_name: Meadowview Health clinic_address: 45 Oak Ave. patient_name: John Doe patient_age: 35 date: 2024-12-16 medications: - Hydrochlorothiazide 25 mg - Before meals signature: Dr. A. Smith </s>'}]}]}Before training, we should test the base model on one OCR example. This gives us a reference point so we can compare the model’s output before and after fine-tuning.
First, we define a helper function to apply the model’s chat template. Some tokenizer versions support enable_thinking=False, while others do not, so the function includes a fallback to keep the code compatible.
def render_ocr_chat_template(tokenizer, messages):
    try:
        return tokenizer.apply_chat_template(
            messages,
            tokenize=False,
            add_generation_prompt=True,
            enable_thinking=False,
        )
    except TypeError:
        return tokenizer.apply_chat_template(
            messages,
            tokenize=False,
            add_generation_prompt=True,
        )
Next, we define the generation function. It builds the OCR prompt, passes both the image and text instructions to the tokenizer, generates the model output, and decodes only the newly generated tokens.
def generate_ocr_text(model, tokenizer, image, instruction=INSTRUCTION, max_new_tokens=512):
    messages = build_ocr_messages(instruction=instruction)
    input_text = render_ocr_chat_template(tokenizer, messages)
    inputs = tokenizer(
        images=image,
        text=input_text,
        add_special_tokens=False,
        return_tensors="pt",
    ).to(DEVICE)

    with torch.inference_mode():
        outputs = model.generate(
            **inputs,
            max_new_tokens=max_new_tokens,
            use_cache=True,
            do_sample=False,
            temperature=None,
            top_p=None,
        )

    prompt_length = inputs["input_ids"].shape[-1]
    generated_tokens = outputs[:, prompt_length:]
    return tokenizer.batch_decode(generated_tokens, skip_special_tokens=True)[0]
Now we switch the model into inference mode and generate OCR text for the first evaluation image:
FastVisionModel.for_inference(model)
eval_image = dataset[EVAL_INDEX]["image"]
base_output = generate_ocr_text(model, tokenizer, eval_image)

print("Target:")
print(dataset[EVAL_INDEX]["text"])
print("\nBase model output:")
print(base_output)
The base model output is readable, but it does not follow the target structure exactly:
Target:
<s_ocr> doctor_name: Dr. A. Smith clinic_name: Meadowview Health clinic_address: 45 Oak Ave. patient_name: John Doe patient_age: 35 date: 2024-12-16 medications: - Hydrochlorothiazide 25 mg - Before meals signature: Dr. A. Smith </s>

Base model output:
Meadowview Health
45 Oak Ave.
Prescribed by: Dr. A. Smith
Date: 2024-12-16
Patient: John Doe, Age: 35
Hydrochlorothiazide 25 mg - Before meals
Signature: Dr. A. Smith
This is a useful starting point. The base model can already read much of the document, but it outputs the text in a natural OCR style rather than the structured format used in the dataset. Fine-tuning should help align the model with the target format and make its responses more consistent.
Now that the dataset is in the correct vision-conversation format, we can train the model using TRL’s SFTTrainer with Unsloth’s vision data collator.
from unsloth.trainer import UnslothVisionDataCollator
from trl import SFTTrainer, SFTConfig

FastVisionModel.for_training(model)

trainer = SFTTrainer(
    model=model,
    tokenizer=tokenizer,
    data_collator=UnslothVisionDataCollator(model, tokenizer),
    train_dataset=converted_dataset,
    args=SFTConfig(
        per_device_train_batch_size=PER_DEVICE_BATCH_SIZE,
        gradient_accumulation_steps=GRADIENT_ACCUMULATION_STEPS,
        warmup_steps=5,
        max_steps=MAX_STEPS,
        learning_rate=LEARNING_RATE,
        logging_steps=1,
        optim="adamw_8bit",
        weight_decay=0.001,
        lr_scheduler_type="linear",
        seed=SEED,
        output_dir=OUTPUT_DIR,
        report_to="none",
        remove_unused_columns=False,
        dataset_text_field="",
        dataset_kwargs={"skip_prepare_dataset": True},
        max_length=MAX_LENGTH,
    ),
)
trainer_stats = trainer.train()
First, we switch the model into training mode with FastVisionModel.for_training(model). Then, we create the trainer using the converted OCR dataset.
The important part here is the UnslothVisionDataCollator. Since this is a vision-language task, the trainer needs to handle both the medical document images and the target OCR text correctly. The collator prepares these multimodal examples for passing to the model during supervised fine-tuning.
For this guide, we train for 30 steps with a per-device batch size of 4 and gradient accumulation of 2, giving an effective batch size of 8. This keeps the run lightweight while still showing how the model begins to adapt to the structured OCR format.
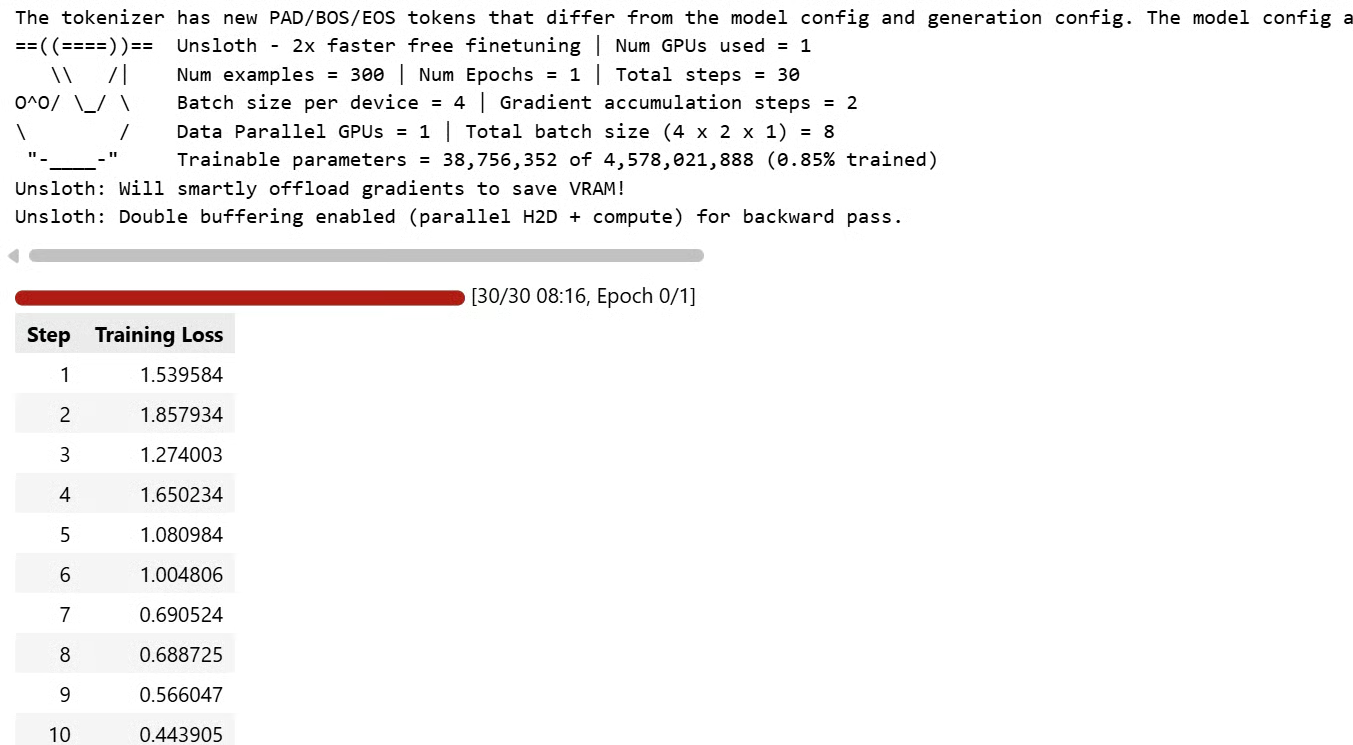
During training, Unsloth prints useful information about the setup, including the number of examples, steps, and batches, the number of trainable parameters, and memory-saving features. In this run, Unsloth reports that double buffering is enabled for the backward pass, which helps reduce waiting time during gradient checkpointing.
After training, we switch the model back into inference mode and generate OCR text for the same evaluation image used before fine-tuning.
FastVisionModel.for_inference(model)
fine_tuned_output = generate_ocr_text(model, tokenizer, eval_image)

print("Target:")
print(dataset[EVAL_INDEX]["text"])
print("\nBase model output:")
print(base_output)
print("\nFine-tuned output:")
print(fine_tuned_output)
After fine-tuning, the model output is much closer to the dataset’s target structure:
Target:
<s_ocr> doctor_name: Dr. A. Smith clinic_name: Meadowview Health clinic_address: 45 Oak Ave. patient_name: John Doe patient_age: 35 date: 2024-12-16 medications: - Hydrochlorothiazide 25 mg - Before meals signature: Dr. A. Smith </s>

Base model output:
Meadowview Health
45 Oak Ave.
Prescribed by: Dr. A. Smith
Date: 2024-12-16
Patient: John Doe, Age: 35
Hydrochlorothiazide 25 mg - Before meals
Signature: Dr. A. Smith


Fine-tuned output:
<s_ocr> doctor_name: Dr. A. Smith clinic_name: Meadowview Health clinic_address: 45 Oak Ave. patient_name: John Doe patient_age: 35 date: 2024-12-16 medications: - Hydrochlorothiazide 25 mg - Before meals signature: Dr. A. Smith </s>
This shows that the fine-tuned model has learned the expected OCR response format. The base model could already extract most of the visible text, but fine-tuning helped align the output with the structured format used in the training data.
We can also test the model on another example from the dataset:
EVAL_INDEX_2 = 35
eval_image_2 = dataset[EVAL_INDEX_2]["image"]

fine_tuned_output = generate_ocr_text(model, tokenizer, eval_image_2)

print("Target:")
print(dataset[EVAL_INDEX]["text"])
print("\nFine-tuned output:")
print(fine_tuned_output)
For this second example, the model follows the expected structure, but it makes a small OCR mistake by generating Amoxicillin instead of Amlodipine:
Target:
<s_ocr> doctor_name: Dr. C. Rossi clinic_name: Riverside Clinic clinic_address: 45 Oak Ave. patient_name: Wei Li patient_age: 70 date: 2024-12-16 medications: - Acetaminophen 20 mg - Take twice daily - Amlodipine 20 mg - After meals signature: Dr. C. Rossi </s>

Fine-tuned output:
<s_ocr> doctor_name: Dr. C. Rossi clinic_name: Riverside Clinic clinic_address: 45 Oak Ave. patient_name: Wei Li patient_age: 70 date: 2024-12-16 medications: - Acetaminophen 20 mg - Take twice daily - Amoxicillin 20 mg - After meals signature: Dr. C. Rossi </s>
This is a useful reminder that the model is improving in format alignment, but OCR accuracy still depends on data quality, image clarity, training size, and the number of fine-tuning steps. For a production OCR system, you would train on a larger, more diverse dataset and evaluate accuracy across a wide range of examples.
Once training is complete, we save the LoRA adapter and tokenizer locally.
model.save_pretrained(ADAPTER_DIR)
tokenizer.save_pretrained(ADAPTER_DIR)

print("Saved adapter to:", ADAPTER_DIR)
The output confirms that the adapter has been saved:
Saved adapter to: qwen35-vision-medical-ocr-loraThis saves only the fine-tuned adapter weights, not a full copy of the base model. Later, you can reload the base Qwen3.5-4B model and apply this adapter to reuse the fine-tuned OCR behavior. This makes the saved model lightweight and easier to store, share, or deploy.
The training process was lightweight and practical on a single NVIDIA RTX 3090. Even though vision-language fine-tuning is usually memory-intensive, the run used far less VRAM than expected. The maximum VRAM usage was around 14 GB, while the average stayed closer to 9 GB, which is impressive for fine-tuning a Qwen3.5 Vision model.
The model also adapted quickly. After only a few training steps, the output became much closer to the target OCR structure. The base model could already read the document, but after fine-tuning, it followed the dataset format more consistently.
That said, the setup experience was not perfect. Installing Unsloth took a lot of trial and error. It can be difficult to configure correctly, especially when working across different local environments, virtual environments, CUDA versions, and cloud GPU providers.
In some cases, CUDA compatibility issues can break the environment, and debugging those problems can take more time than expected. Even starting with an Unsloth Docker image on a cloud GPU platform can be time-consuming if the environment does not work cleanly out of the box.
Another important lesson is that the model template matters. If the dataset is not converted into the correct chat or vision-conversation format, the model may not learn properly. For Qwen3.5 Vision, using the correct image-text message structure is essential. Without the right template, training may run, but the model may not actually adapt to the task.
Overall, Unsloth is a strong option for users with limited GPU access who want to fine-tune models efficiently on local machines or rented GPUs. It reduces memory usage, makes smaller hardware more useful, and can speed up experimentation. However, for users who regularly fine-tune and train models, the setup complexity can be frustrating. Standard Transformers-based training is often more stable, easier to install, and simpler to reproduce across environments.
If the installation friction is the part that puts you off, I recommend reading our guide to Unsloth Studio, which shows you how to fine-tune Qwen3.5-9B without manual environment setup in Unsloth’s local web UI.
Top AI Courses
Course
Course
Course
Tutorial
Abid Ali Awan
9 min
Tutorial
Abid Ali Awan
11 min
Tutorial
Abid Ali Awan
9 min
Tutorial
Abid Ali Awan
6 min
Tutorial
Abid Ali Awan
12 min
Tutorial
Abid Ali Awan
8 min