
Track
Developing Large Language Models
19 hr
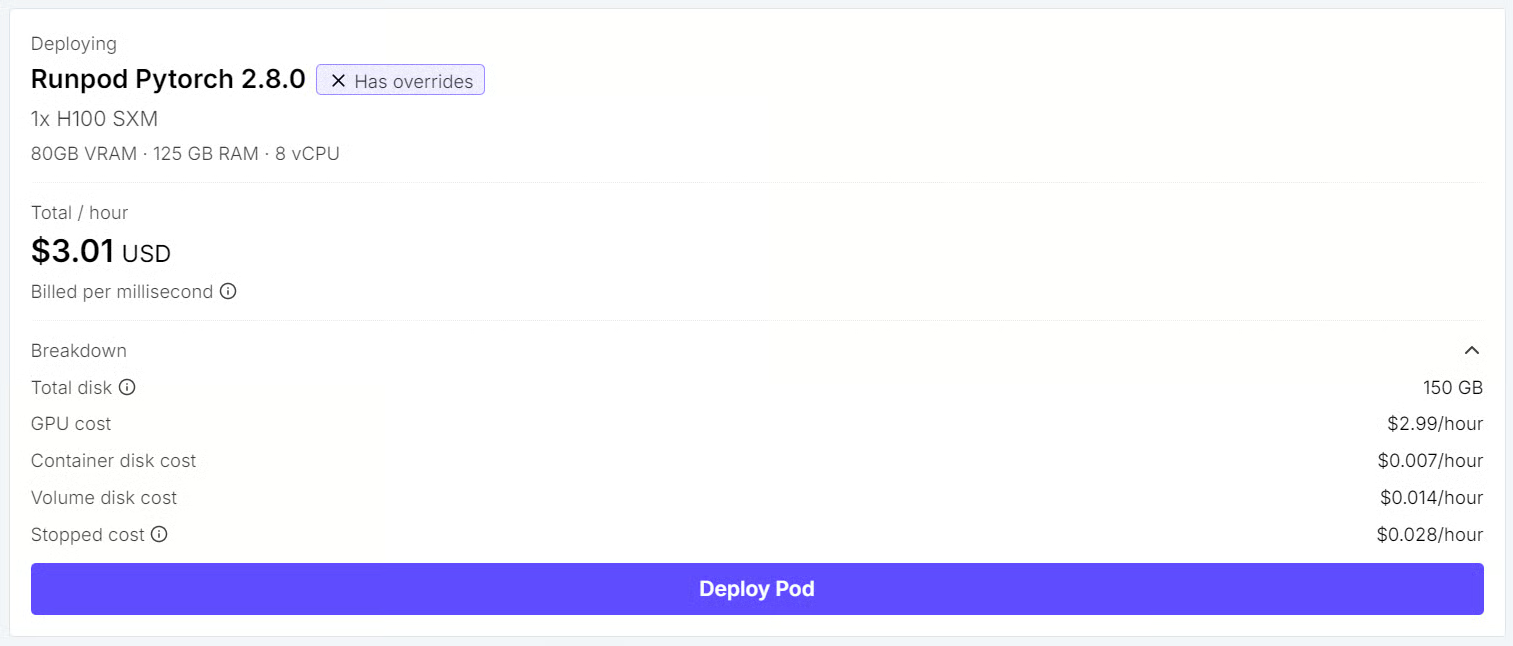
Create a new RunPod pod with an NVIDIA H100 GPU and select a PyTorch/Jupyter template. Configure at least 100 GB of persistent storage so your model files and training outputs are not lost when the pod stops.
Add your Hugging Face access token as an environment variable:
HF_TOKEN=your_hugging_face_token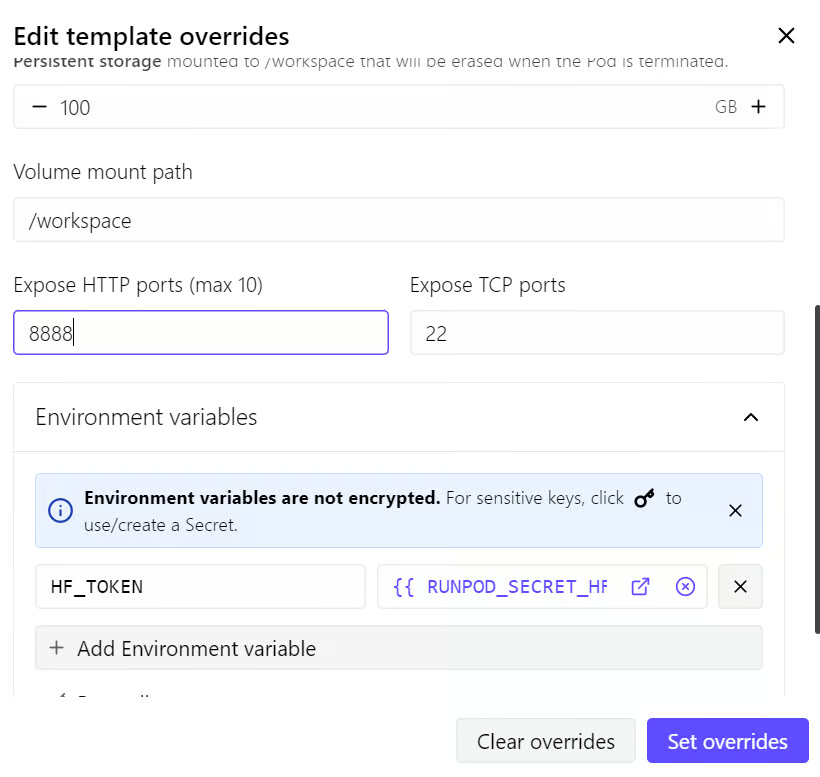
This allows models and datasets to download faster and lets you upload the saved LoRA adapter to Hugging Face without logging in manually from the notebook.
The configured pod should cost approximately $3 per hour, although the final price may vary depending on GPU availability and the selected pod type.
Once the pod is running, open JupyterLab or Jupyter Notebook from the RunPod interface and create a new notebook named diffusiongemma_pubmedqa.ipynb.
Run the following commands in the first notebook cell to install Unsloth and the libraries required for loading, fine-tuning, and saving DiffusionGemma.
%%capture
%pip install --upgrade pip wheel setuptools packaging ninja
%pip install unsloth
%pip install --no-deps --upgrade --force-reinstall git+https://github.com/unslothai/unsloth-zoo.git git+https://github.com/unslothai/unsloth.git
%pip install sentencepiece protobuf "datasets==4.3.0" "huggingface_hub>=0.34.0" hf_transfer
%pip install --no-deps bitsandbytes accelerate peft trl triton
%pip install --no-deps --upgrade "torchao>=0.16.0"
%pip install --no-deps transformers==5.11.0 "tokenizers>=0.22.0,<=0.23.0"
The %%capture command hides the lengthy installation output. The package versions are pinned to avoid compatibility issues between DiffusionGemma, Transformers, Unsloth, and the training libraries.
Once the installation finishes, restart the notebook kernel before continuing.
Import the libraries required for dataset preparation, model loading, training, and evaluation.
import copy
import os
import random
import time

import torch
from datasets import load_dataset
from unsloth import FastModel

os.environ["HF_HUB_ENABLE_HF_TRANSFER"] = "1"
torch._dynamo.config.recompile_limit = 64

print("Torch:", torch.__version__)
print("CUDA available:", torch.cuda.is_available())
print(
    "GPU:",
    torch.cuda.get_device_name(0)
    if torch.cuda.is_available()
    else "None",
)
HF_HUB_ENABLE_HF_TRANSFER enables faster downloads from the Hugging Face Hub, while increasing the Dynamo recompilation limit helps prevent interruptions when working with the model.
When the cell runs successfully, Unsloth will patch the training environment, and the output should confirm that CUDA is available and that the H100 GPU has been detected.
🦥 Unsloth: Will patch your computer to enable 2x faster free fine-tuning.
🦥 Unsloth Zoo will now patch everything to make training faster!
Torch: 2.10.0+cu128
CUDA available: True
GPU: NVIDIA H100 80GB HBM3Define the model, dataset, training parameters, evaluation settings, and output directory in one place.
MODEL_NAME = "unsloth/diffusiongemma-26B-A4B-it"
DATASET_NAME = "qiaojin/PubMedQA"

TRAIN_SUBSET = "pqa_artificial"
EVAL_SUBSET = "pqa_labeled"

N_TRAIN = 3000
N_EVAL = 200

MAX_CONTEXT_CHARS = 2500

STEPS = 60
GRAD_ACCUM = 4
LR = 1e-4
T_LO = 0.1

EVAL_TOTAL = 50
EVAL_DENOISING_STEPS = 16

OUTPUT_DIR = "diffusiongemma_pubmedqa_lora"
We will use 3,000 artificial examples for training and 200 manually labeled examples for evaluation. To keep the experiment fast, the model will train for 60 steps and evaluate 50 examples using 16 denoising steps.
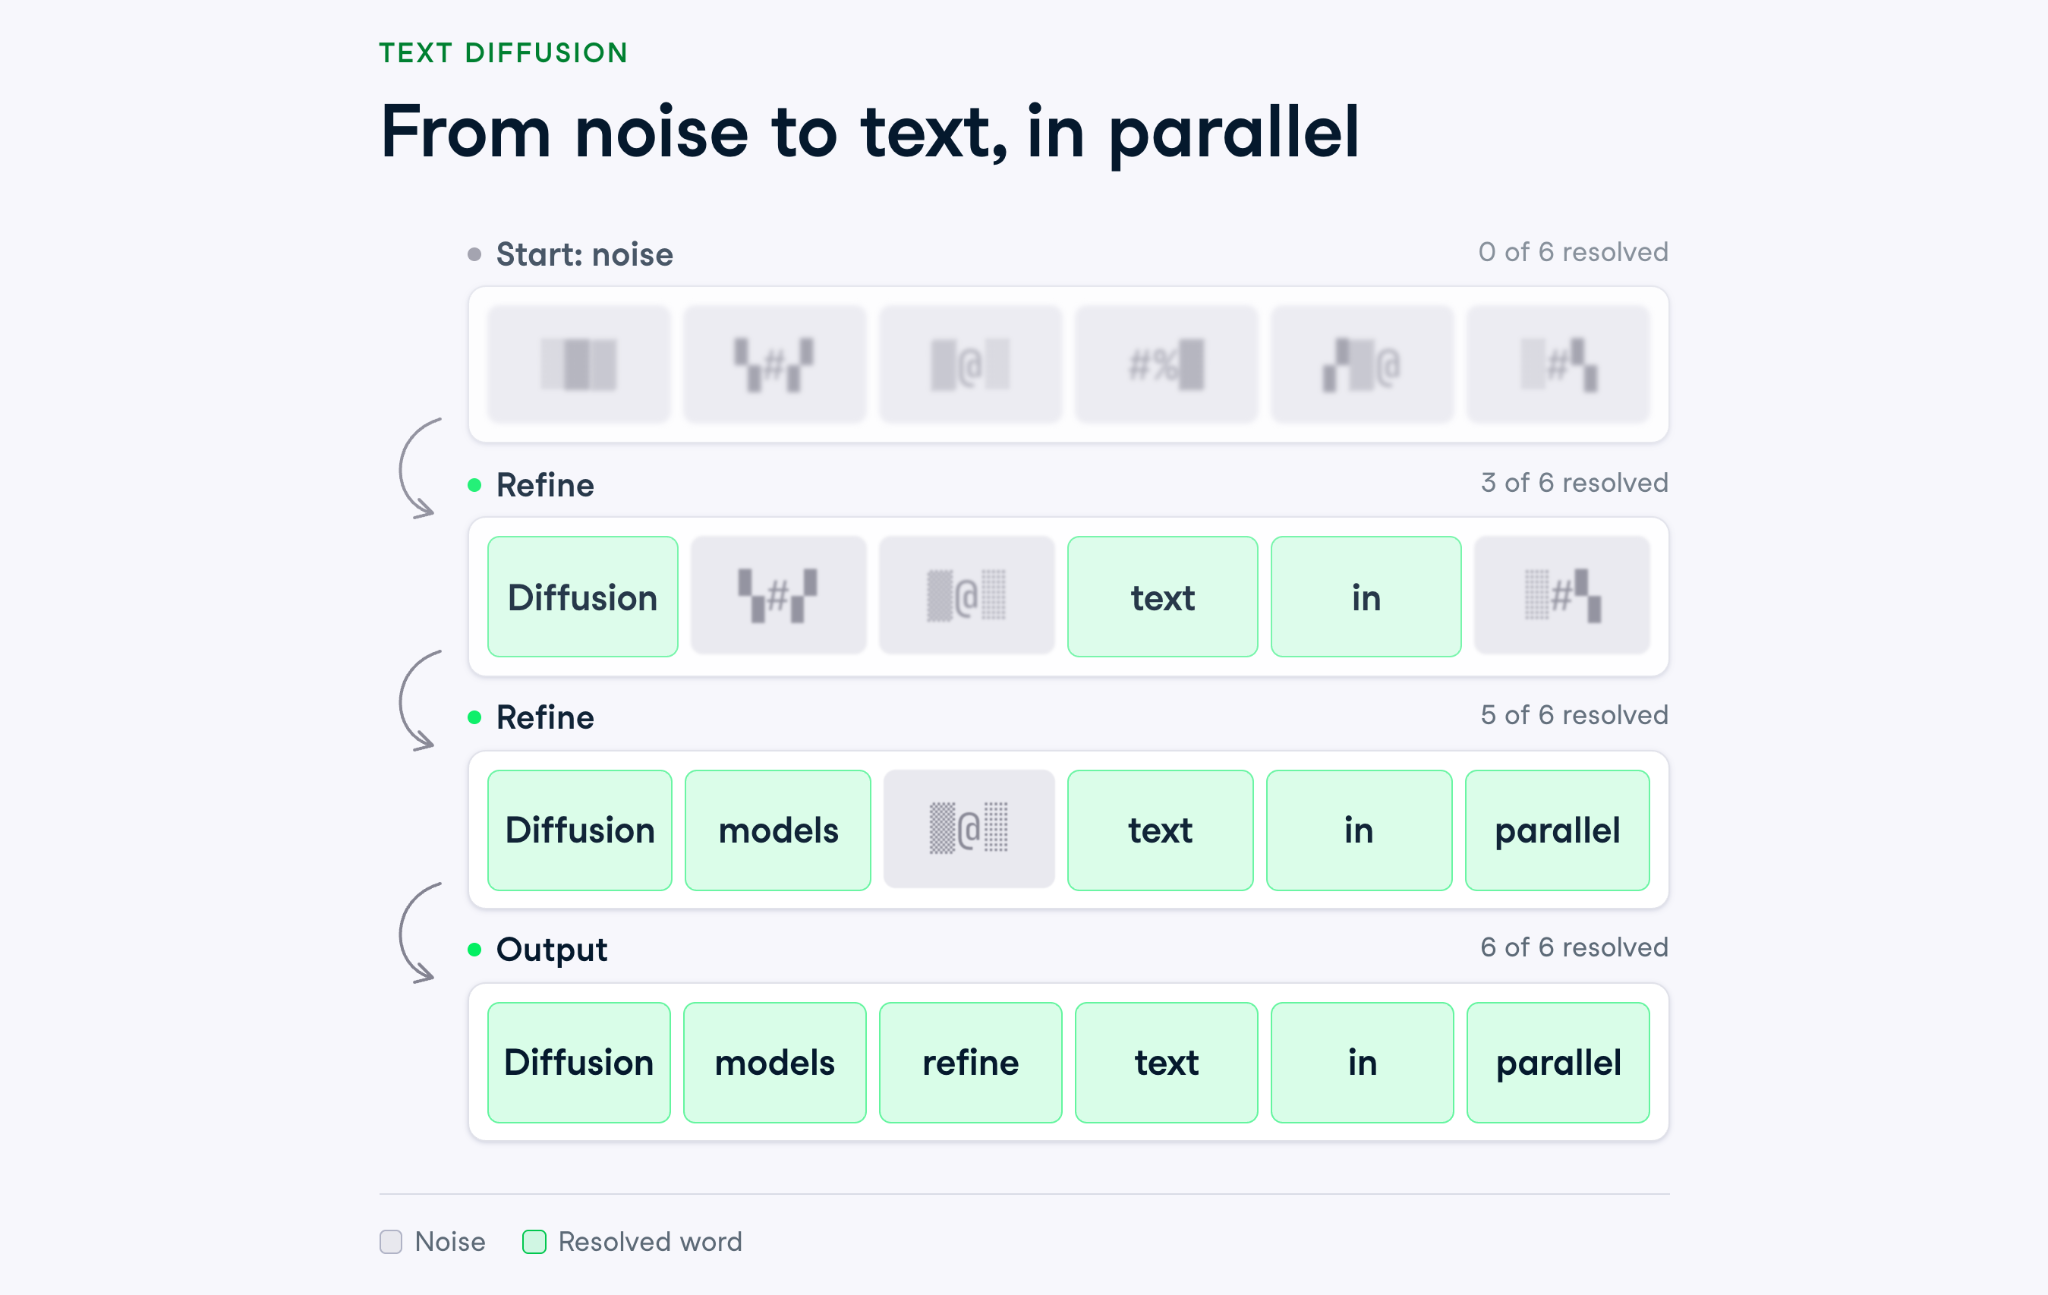
Before we load the model, it's worth picturing how DiffusionGemma actually produces an answer. Instead of writing tokens one after another, it starts with a fixed-length canvas of tokens and refines them over several denoising steps, updating many positions at once until the text resolves into a coherent response.
The code below reports a canvas length of 256, the size of a single block. For our short yes/no/maybe answers, one canvas is more than enough, while longer outputs are generated by chaining canvases together block by block. The diagram below shows this refinement process at a high level:
Load the instruction-tuned DiffusionGemma model in bfloat16 precision. We will not use 4-bit quantization because the H100 GPU has enough memory to load the model at higher precision.
model, tokenizer = FastModel.from_pretrained(
    model_name=MODEL_NAME,
    dtype=torch.bfloat16,
    load_in_4bit=False,
)

processor = tokenizer
tok = processor.tokenizer if hasattr(processor, "tokenizer") else processor

vocab = model.config.text_config.vocab_size
canvas_len = model.config.canvas_length

dev = next(
    (p.device for p in model.parameters() if p.device.type != "meta"),
    torch.device("cuda"),
)

print("Vocab size:", vocab)
print("Canvas length:", canvas_len)
print("Model device:", dev)
The vocabulary size is used when adding random noise during diffusion training. The canvas length determines the maximum number of tokens the model can refine in a single generation block.
You should see output similar to:
Vocab size: 262144
Canvas length: 256
Model device: cuda:0Add a LoRA adapter so that only a small set of additional parameters is trained instead of updating the entire 26-billion-parameter model.
model = FastModel.get_peft_model(
    model,
    r=64,
    lora_alpha=128,
    use_gradient_checkpointing=False,
)
This significantly reduces the memory and compute required for fine-tuning. Gradient checkpointing is disabled because the H100 has sufficient GPU memory for this experiment.
Load the artificial PubMedQA subset for training and the manually labeled subset for evaluation.
train_data = load_dataset(
    DATASET_NAME,
    TRAIN_SUBSET,
    split="train",
)

eval_data = load_dataset(
    DATASET_NAME,
    EVAL_SUBSET,
    split="train",
)

print("Train size:", len(train_data))
print("Eval size:", len(eval_data))
print(train_data[0])
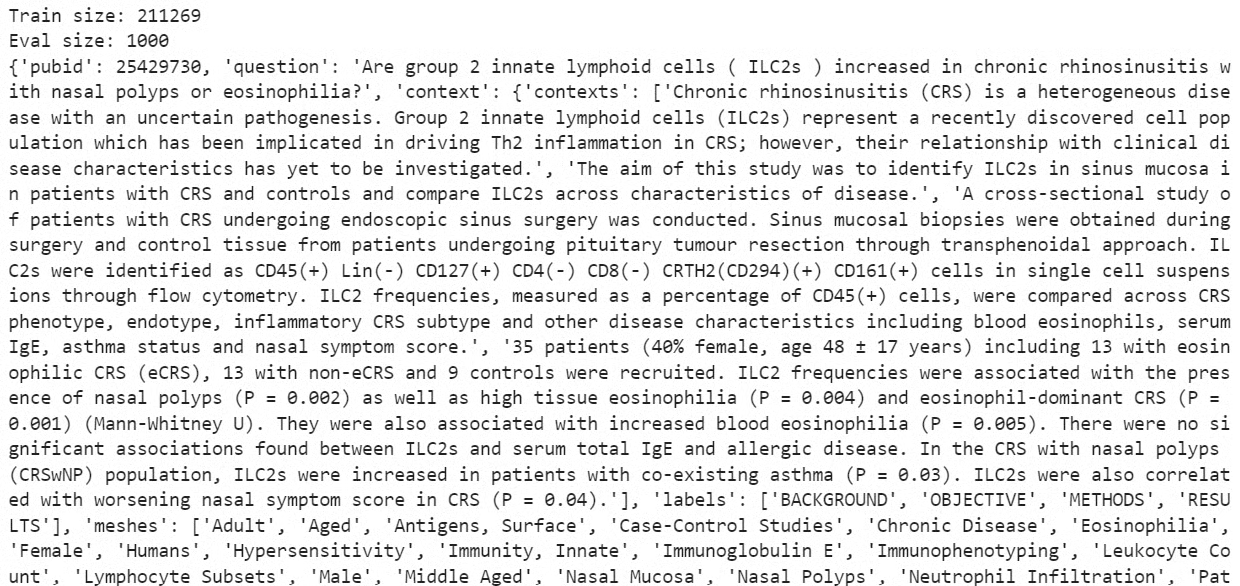
The training subset contains automatically generated examples, while the evaluation subset contains expert-labeled biomedical questions.
Printing the first row lets us inspect the question, abstract context, and final decision before formatting the data.
You should see:
Train size: 211269
Eval size: 1000
Each example contains a biomedical question, one or more supporting abstract passages, and a final answer of yes, no, or maybe.
Convert each PubMedQA example into a chat-style format containing a user prompt and an assistant answer.
def make_prompt(row):
    context = " ".join(row["context"]["contexts"])
    context = context[:MAX_CONTEXT_CHARS]
    question = row["question"]

    return f"""Answer the biomedical research question using only the context.

Context:
{context}

Question:
{question}

Answer with only one word: yes, no, or maybe."""


def make_answer(row):
    return row["final_decision"].strip().lower()


def convert_row(row):
    answer = make_answer(row)

    if answer not in ["yes", "no", "maybe"]:
        return None

    return {
        "messages": [
            {"role": "user", "content": make_prompt(row)},
            {"role": "assistant", "content": answer},
        ]
    }


train_rows = []

for row in train_data.select(range(N_TRAIN)):
    item = convert_row(row)

    if item is not None:
        train_rows.append(item)


eval_rows = []

for row in eval_data.select(range(N_EVAL)):
    item = convert_row(row)

    if item is not None:
        eval_rows.append(item)


print("Prepared train examples:", len(train_rows))
print("Prepared eval examples:", len(eval_rows))
print(train_rows[0]["messages"][0]["content"])
print("Answer:", train_rows[0]["messages"][1]["content"])
The context passages are combined into a single string and limited to 2,500 characters to keep the input manageable. Each answer is converted to lowercase, and examples with labels outside yes, no, or maybe are removed.
Printing the first converted example helps confirm that the context, question, and answer have been formatted correctly before training.
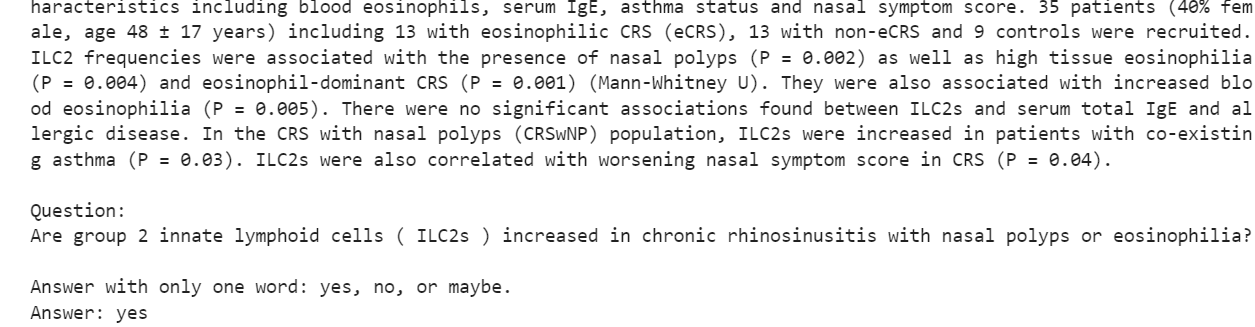
DiffusionGemma requires the target answer to be placed inside a fixed-length canvas. This function tokenizes the prompt, converts the answer into token IDs, pads it to the model’s canvas length, and creates a mask showing which tokens should contribute to the loss.
eos = model.generation_config.eos_token_id or [1]
eos = eos[0] if isinstance(eos, (list, tuple)) else eos

pad = tok.pad_token_id if tok.pad_token_id is not None else eos


def build_examples(rows):
    examples = []

    for row in rows:
        user_message = row["messages"][0]
        assistant_message = row["messages"][1]

        prompt_ids = processor.apply_chat_template(
            [user_message],
            tokenize=True,
            add_generation_prompt=True,
            return_tensors="pt",
        )[0]

        answer_ids = tok.encode(
            assistant_message["content"],
            add_special_tokens=False,
        )

        content = answer_ids + [eos]
        n = len(content)

        if n > canvas_len:
            continue

        x0 = torch.tensor(
            content + [pad] * (canvas_len - n),
            dtype=torch.long,
        )

        loss_mask = torch.zeros(canvas_len, dtype=torch.bool)
        loss_mask[:n] = True

        examples.append((prompt_ids, x0, loss_mask))

    return examples


examples = build_examples(train_rows)
The end-of-sequence token is added after each answer, while the remaining canvas positions are filled with padding tokens. The loss mask ensures that training focuses only on the answer and end-of-sequence tokens rather than the padded positions.
Next, define the functions used to generate answers, clean the model’s output, and calculate evaluation accuracy.
The answer_question() function formats the prompt, generates a response through several denoising steps, and decodes the generated tokens into text.
def answer_question(prompt, steps=64):
    input_ids = processor.apply_chat_template(
        [{"role": "user", "content": prompt}],
        tokenize=True,
        add_generation_prompt=True,
        return_tensors="pt",
    ).to(dev)

    gen_config = copy.deepcopy(model.generation_config)
    gen_config.max_denoising_steps = steps
    gen_config.max_new_tokens = canvas_len

    model.eval()

    with torch.no_grad():
        output = model.generate(
            input_ids=input_ids,
            generation_config=gen_config,
        )

    generated = output.sequences[0, input_ids.shape[1]:]
    text = tok.decode(
        generated.tolist(),
        skip_special_tokens=True,
    )

return text.strip().lower()Although the prompt requests a single-word answer, the model may occasionally generate additional text. This function extracts the first valid yes, no, or maybe prediction.
def clean_prediction(text):
    text = text.lower().strip()

    if text.startswith("yes"):
        return "yes"

    if text.startswith("no"):
        return "no"

    if text.startswith("maybe"):
        return "maybe"

    words = text.replace(".", " ").replace(",", " ").split()

    for word in words:
        if word in ["yes", "no", "maybe"]:
            return word

return "unknown"The evaluation function compares each cleaned prediction with the correct answer, prints the result for every example, and returns the overall accuracy together with the individual predictions.
def evaluate_model(
    rows,
    total=50,
    steps=64,
    title="Evaluation",
):
    correct = 0
    results = []
    total = min(total, len(rows))

    print(title)
    print("-" * len(title))

    for i, row in enumerate(rows[:total], start=1):
        prompt = row["messages"][0]["content"]
        gold = row["messages"][1]["content"]

        raw_pred = answer_question(prompt, steps=steps)
        pred = clean_prediction(raw_pred)

        is_correct = pred == gold
        correct += int(is_correct)

        results.append({
            "index": i,
            "gold": gold,
            "prediction": pred,
            "raw_prediction": raw_pred,
            "correct": is_correct,
        })

        print(
            f"{i:02d}. Gold: {gold} | "
            f"Pred: {pred} | Correct: {is_correct}"
        )

    accuracy = correct / total if total else 0

    print()
    print("Accuracy:", accuracy)
    print()

    return {
        "accuracy": accuracy,
        "correct": correct,
        "total": total,
        "results": results,
}Run the evaluation before training to establish a baseline.
before_eval = evaluate_model(
    eval_rows,
    total=EVAL_TOTAL,
    steps=EVAL_DENOISING_STEPS,
    title="Before Fine-Tuning Evaluation",
)
This evaluates 50 examples using 16 denoising steps per answer. In this experiment, the base model correctly answered 30 out of 50 questions.
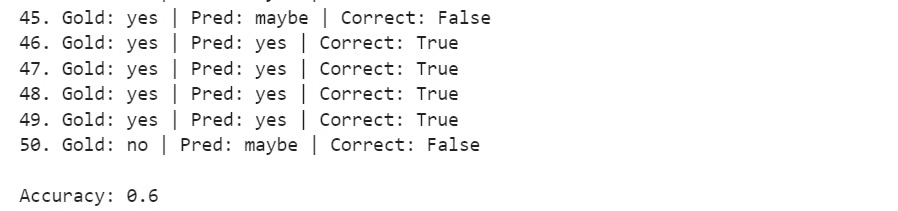
This baseline will later be compared with the model’s accuracy after fine-tuning.
Switch the model to training mode, create the optimizer and learning-rate scheduler, and define how clean answer tokens will be corrupted during diffusion training.
model.config.use_cache = True
model.train()

opt = torch.optim.AdamW(
    [p for p in model.parameters() if p.requires_grad],
    lr=LR,
    betas=(0.9, 0.95),
    weight_decay=0.0,
)

sched = torch.optim.lr_scheduler.OneCycleLR(
    opt,
    max_lr=LR,
    total_steps=STEPS,
    pct_start=0.03,
    anneal_strategy="cos",
)
Only parameters with requires_grad=True are passed to the optimizer, which means the training process updates the LoRA adapter rather than the full model.
Next, create a corruption function that replaces a random proportion of the answer canvas with random tokens.
def corrupt(x0):
    noise_level = random.uniform(T_LO, 1.0)

    xt = x0.to(dev).clone()

    noise_mask = (
        torch.rand(canvas_len, device=dev) < noise_level
    )

    xt[noise_mask] = torch.randint(
        0,
        vocab,
        (canvas_len,),
        device=dev,
    )[noise_mask]

    return xt.unsqueeze(0)
The amount of noise changes for every example. During training, the model learns to reconstruct the original answer from these corrupted canvas tokens.
The following loop trains the LoRA adapter for 60 steps using gradient accumulation.
order = list(range(len(examples)))
ptr = 0
start_time = time.time()

opt.zero_grad(set_to_none=True)

for step in range(1, STEPS + 1):
    step_loss = 0.0

    for _ in range(GRAD_ACCUM):
        if ptr >= len(order):
            random.shuffle(order)
            ptr = 0

        prompt_ids, x0, loss_mask = examples[order[ptr]]
        ptr += 1

        output = model(
            input_ids=prompt_ids.unsqueeze(0).to(dev),
            canvas_ids=corrupt(x0),
            self_conditioning_logits=None,
        )

        logits = output.logits[0].float()
        mask = loss_mask.to(dev)

        loss = torch.nn.functional.cross_entropy(
            logits[mask],
            x0.to(dev)[mask],
        )

        (loss / GRAD_ACCUM).backward()
        step_loss += loss.item() / GRAD_ACCUM

    torch.nn.utils.clip_grad_norm_(
        [
            p
            for p in model.parameters()
            if p.requires_grad
        ],
        1.0,
    )

    opt.step()
    sched.step()
    opt.zero_grad(set_to_none=True)

    if step % 20 == 0:
        elapsed = time.time() - start_time

        print(
            f"step {step}/{STEPS} | "
            f"loss {step_loss:.4f} | "
            f"{elapsed:.0f}s"
        )
For each training example, the model receives the biomedical prompt and a corrupted answer canvas. Cross-entropy loss is calculated only for the real answer tokens selected by the loss mask.
Gradient accumulation combines four examples before updating the model. Gradient clipping is also applied to keep training stable.
In this experiment, training was completed in approximately two minutes:
step 20/60 | loss 0.0019 | 43s
step 40/60 | loss 0.0003 | 85s
step 60/60 | loss 0.0001 | 126s
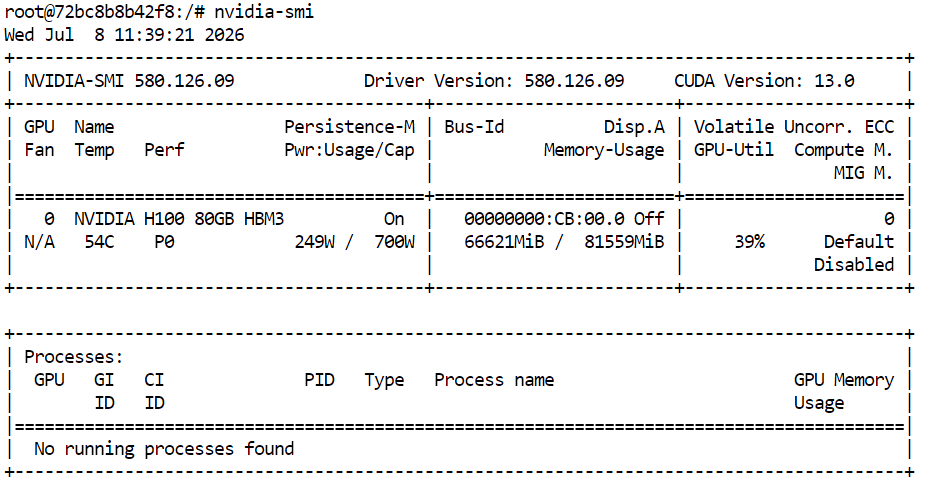
The steadily decreasing loss indicates that the adapter is learning to reconstruct the expected answers from the corrupted canvas. During training, you can also run nvidia-smi in the RunPod terminal to monitor GPU memory usage and utilization.
Run the same evaluation again after training to measure whether fine-tuning improved the model’s performance.
after_eval = evaluate_model(
    eval_rows,
    total=EVAL_TOTAL,
    steps=EVAL_DENOISING_STEPS,
    title="After Fine-Tuning Evaluation",
)
The fine-tuned model is evaluated on the same 50 examples and using the same 16 denoising steps as in the baseline evaluation.
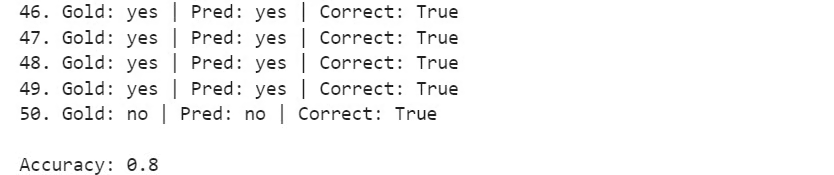
Next, compare the accuracy before and after fine-tuning.
before_accuracy = before_eval["accuracy"]
after_accuracy = after_eval["accuracy"]
improvement = after_accuracy - before_accuracy

print("Before fine-tuning accuracy:", before_accuracy)
print("After fine-tuning accuracy:", after_accuracy)
print("Improvement:", improvement)
Before fine-tuning accuracy: 0.6
After fine-tuning accuracy: 0.8
Improvement: 0.2In this experiment, the model’s accuracy increased from 0.60 to 0.80.
This represents a 20 percentage-point improvement, with the model correctly answering 40 out of 50 questions after fine-tuning, compared with 30 out of 50 before training.
Save the trained LoRA adapter and processor files to the output directory defined earlier.
model.save_pretrained(OUTPUT_DIR)
processor.save_pretrained(OUTPUT_DIR)

print(f"Saved LoRA adapter to: {OUTPUT_DIR}")
You should see:
Saved LoRA adapter to: diffusiongemma_pubmedqa_loraThis saves only the lightweight LoRA adapter rather than another complete copy of the 26-billion-parameter base model.
Next, upload the adapter and processor files to the Hugging Face Hub:
REPO_ID = "kingabzpro/diffusiongemma_pubmedqa"

model.push_to_hub(REPO_ID)
processor.push_to_hub(REPO_ID)
Because the HF_TOKEN environment variable was added during the RunPod pod configuration, Hugging Face should authenticate automatically. You only need to run notebook_login() when the token has not already been configured:
from huggingface_hub import notebook_login

notebook_login()
After the upload finishes, the repository will contain the LoRA adapter and the processor configuration required to load the fine-tuned model later.
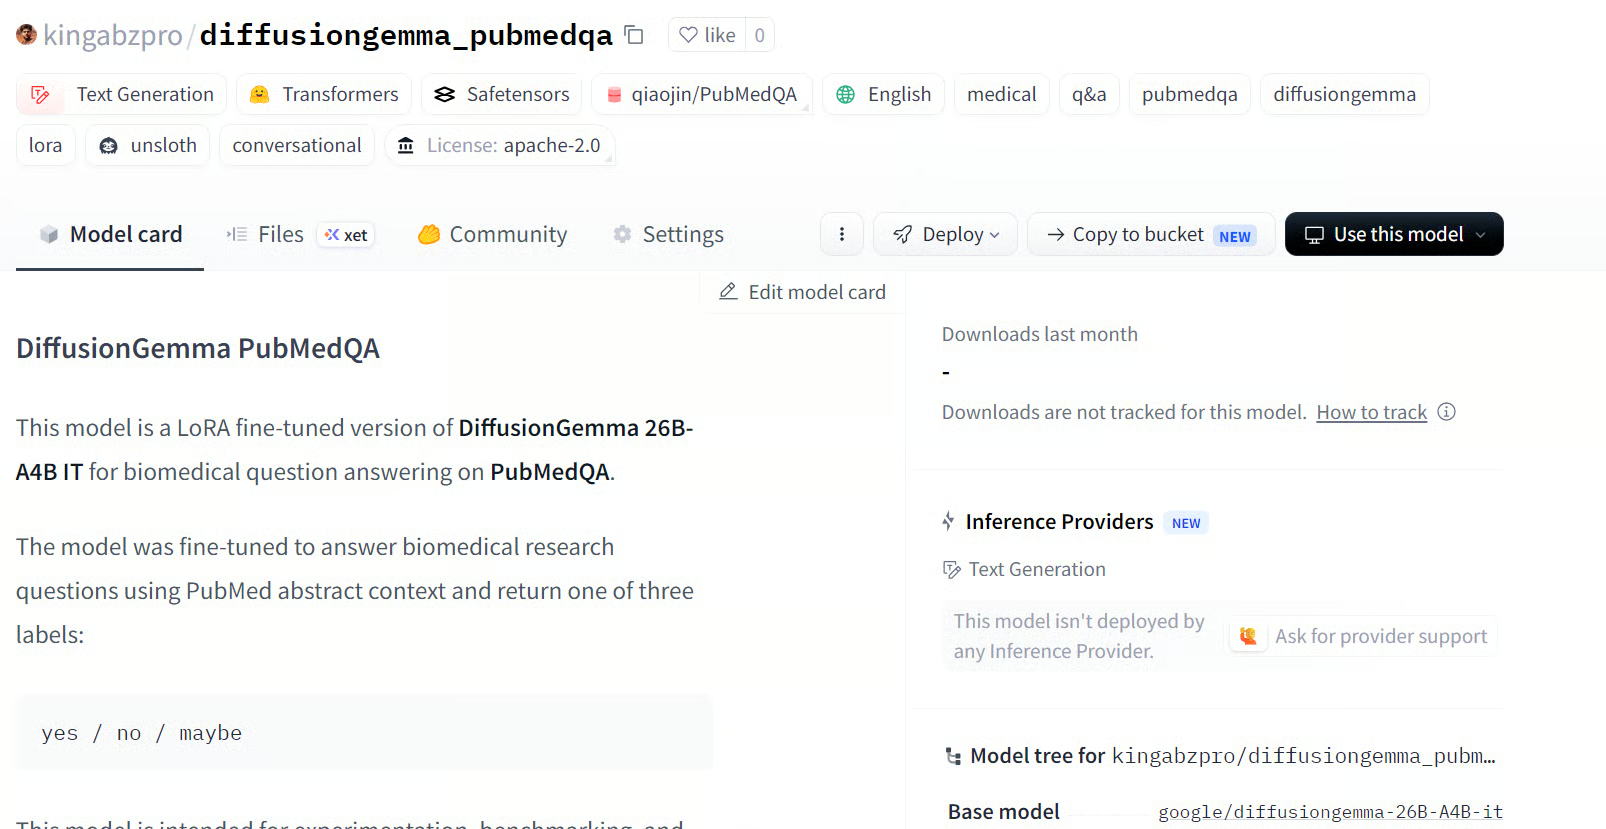
Source: kingabzpro/diffusiongemma_pubmedqa · Hugging Face
Fine-tuning DiffusionGemma with Unsloth was surprisingly easy. The most time-consuming part was installing the correct dependencies and figuring out how the diffusion-specific training process works. Once the environment was set up, loading the model, training the LoRA adapter, evaluating it, and uploading the results to Hugging Face were all very smooth.
I found DiffusionGemma especially interesting because it does not generate text one token at a time like a traditional language model. Instead, it works with a fixed canvas and gradually refines noisy tokens through denoising steps. Understanding this different generation process and fine-tuning it on a biomedical question-answering task made the experiment particularly valuable for me.
Even with a small setup, accuracy on the 50-example sample rose from 0.60 to 0.80—though on a sample that size, the margin of error is wide, and a "always yes" baseline already scores around 55% on this evaluation set.
It's also worth noting that the artificial training subset contains almost no "maybe" labels, so the model has little chance to learn that class even though it appears in the evaluation data. Treat this as a quick experiment in how the fine-tuning process works, not as evidence that the model is ready for real medical use.
Ready to go beyond a single fine-tuning run? Our Developing Large Language Models track takes you from PyTorch and transformers fundamentals to building and deploying your own LLMs.
Top LLM Courses
Track
Course
Course
Tutorial
Abid Ali Awan
9 min
Tutorial
Abid Ali Awan
10 min
Tutorial
Abid Ali Awan
11 min
Tutorial
Abid Ali Awan
12 min
Tutorial
Abid Ali Awan
Tutorial
Abid Ali Awan
11 min