Course
How to Delete a GitHub Repository: The Complete Guide
If you've been in the industry for a while, you know repositories often accumulate in your GitHub account as you experiment with new technologies or complete one-time projects. These abandoned repositories can clutter your profile and make it difficult to showcase your best work. That's where deleting repositories comes in, and knowing how to do it properly is essential for maintaining a clean GitHub presence.
GitHub's repository deletion process is straightforward, but it includes important safeguards to prevent accidental deletions. Understanding these safety measures helps make sure you only delete repositories you truly intend to remove.
In this article, I'll walk you through the complete process of deleting a GitHub repository while highlighting important considerations to keep in mind before taking this irreversible action.
>Not familiar with Git and GitHub? Our complete guide for beginners covers all the fundamentals you'll need.
TL;DR: How to Delete a GitHub Repository
- Go to the repository on GitHub.
- Click Settings (tab near the top of the repo page).
- Scroll to the bottom of the Settings page.
- Click “Delete this repository” under the Danger Zone section.
- Confirm the repository name when prompted.
- Click “I understand…” and then Delete.
Warning: Deleting a GitHub repository permanently removes all your code, issues, wikis, and project history, with no way to recover it.
Keep reading to learn everything you need to know about deleting a GitHub repository.
What Happens When You Delete a Repository on GitHub?
When you delete a GitHub repository, you're permanently removing all content associated with that project.
This includes not just your code, but also all issues, pull requests, wikis, discussion threads, releases, and the entire commit history. GitHub doesn't maintain backups of deleted repositories, so once you confirm deletion, there's no "undo" button or recovery option available.
The deletion affects all repository content stored on GitHub's servers, but, of course, it doesn't automatically remove local copies you or your collaborators may have on your machines. It's worth remembering that if someone else has cloned or forked your repository, those copies will still exist even after you delete the original.
When to delete a repository
There are several valid reasons why you might want to delete a GitHub repository:
- Project abandonment: You've created experimental or learning repositories that you no longer need to maintain or showcase.
- Cleanup and organization: Your GitHub profile has become cluttered with old or irrelevant projects, and you want to improve your profile's focus.
- Sensitive information: You accidentally committed sensitive data like API keys, passwords, or personal information that can't be completely purged any other way.
- Fresh start: You want to completely rebuild a project from scratch rather than continuing to modify an existing repository.
- Duplicate repositories: You've created multiple repositories for the same project and want to consolidate them.
While deletion is permanent, it's often the cleanest solution when you no longer need a repository and want to ensure no traces remain.
Backup considerations before deletion
Before you delete a repository, I strongly recommend creating a backup. Even if you're certain you won't need the code again, you might later realize there were useful snippets or documentation you'd like to reference.
Here are three ways to backup your GitHub repository:
- Clone the repository: The simplest option is to create a complete local copy with the
git clone
command. This preserves all code and commit history. - Download as ZIP: For a quick backup without Git history, go to your repository on GitHub, click the Code button, and select "Download ZIP".
- Archive the repository: Instead of deleting, consider archiving the repository first. This makes it read-only for all users but keeps it accessible. Go to Settings > Archive this repository.
Remember that these methods primarily back up your code. For issues, pull requests, and wikis, you might need to use GitHub's API or third-party tools to export that data before deletion.
Taking these backup steps gives you peace of mind that you won't lose anything important when you permanently delete your repository.
Learn Git Fundamentals Today
How to Delete a Repository on GitHub
Deleting a GitHub repository is easy, but GitHub has built-in a couple of confirmation steps to ensure you don't accidentally delete something important.
>Want to delete a branch instead of an entire repo? Here's a guide on how to do it.
I'll guide you through each step of the process with clear instructions so you can safely remove unwanted repositories from your account.
Step 1: Navigate to the repository settings
To begin deleting a repository, you first need to access its settings:
- Log into your GitHub account and navigate to the repository you want to delete.
- In the top navigation bar underneath the repository name, locate and click on the "Settings" tab (represented by a gear icon).
This will take you to the repository's settings page, where you can manage different aspects of your repository:
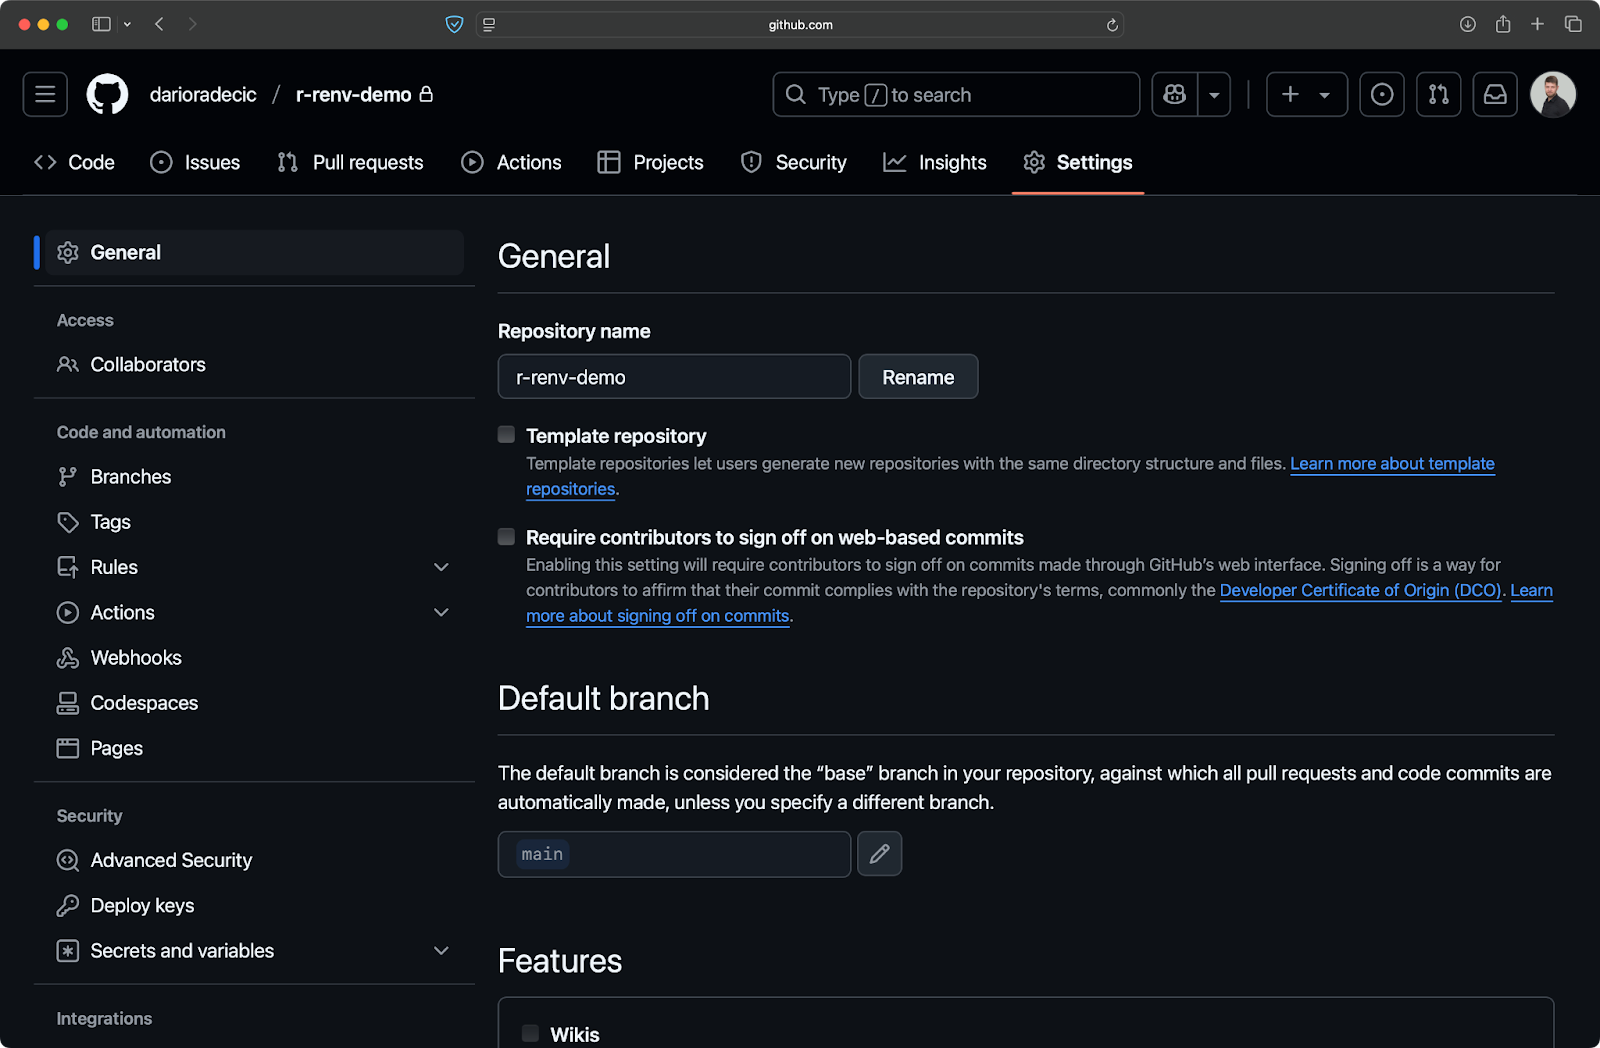
Image 1 - GitHub repo settings
Make sure you have the proper permissions for the repository. If you're not the owner or don't have admin privileges, you won't be able to access these settings or delete the repository.
Step 2: Locate the "Danger Zone"
GitHub groups its most destructive actions in a clearly marked section. To get to it:
- Scroll all the way down to the bottom of the settings page.
- Look for the section with a red outline labeled "Danger Zone."
This section contains a couple of potentially destructive actions, such as repository visibility changes, transfers, and deletion options:
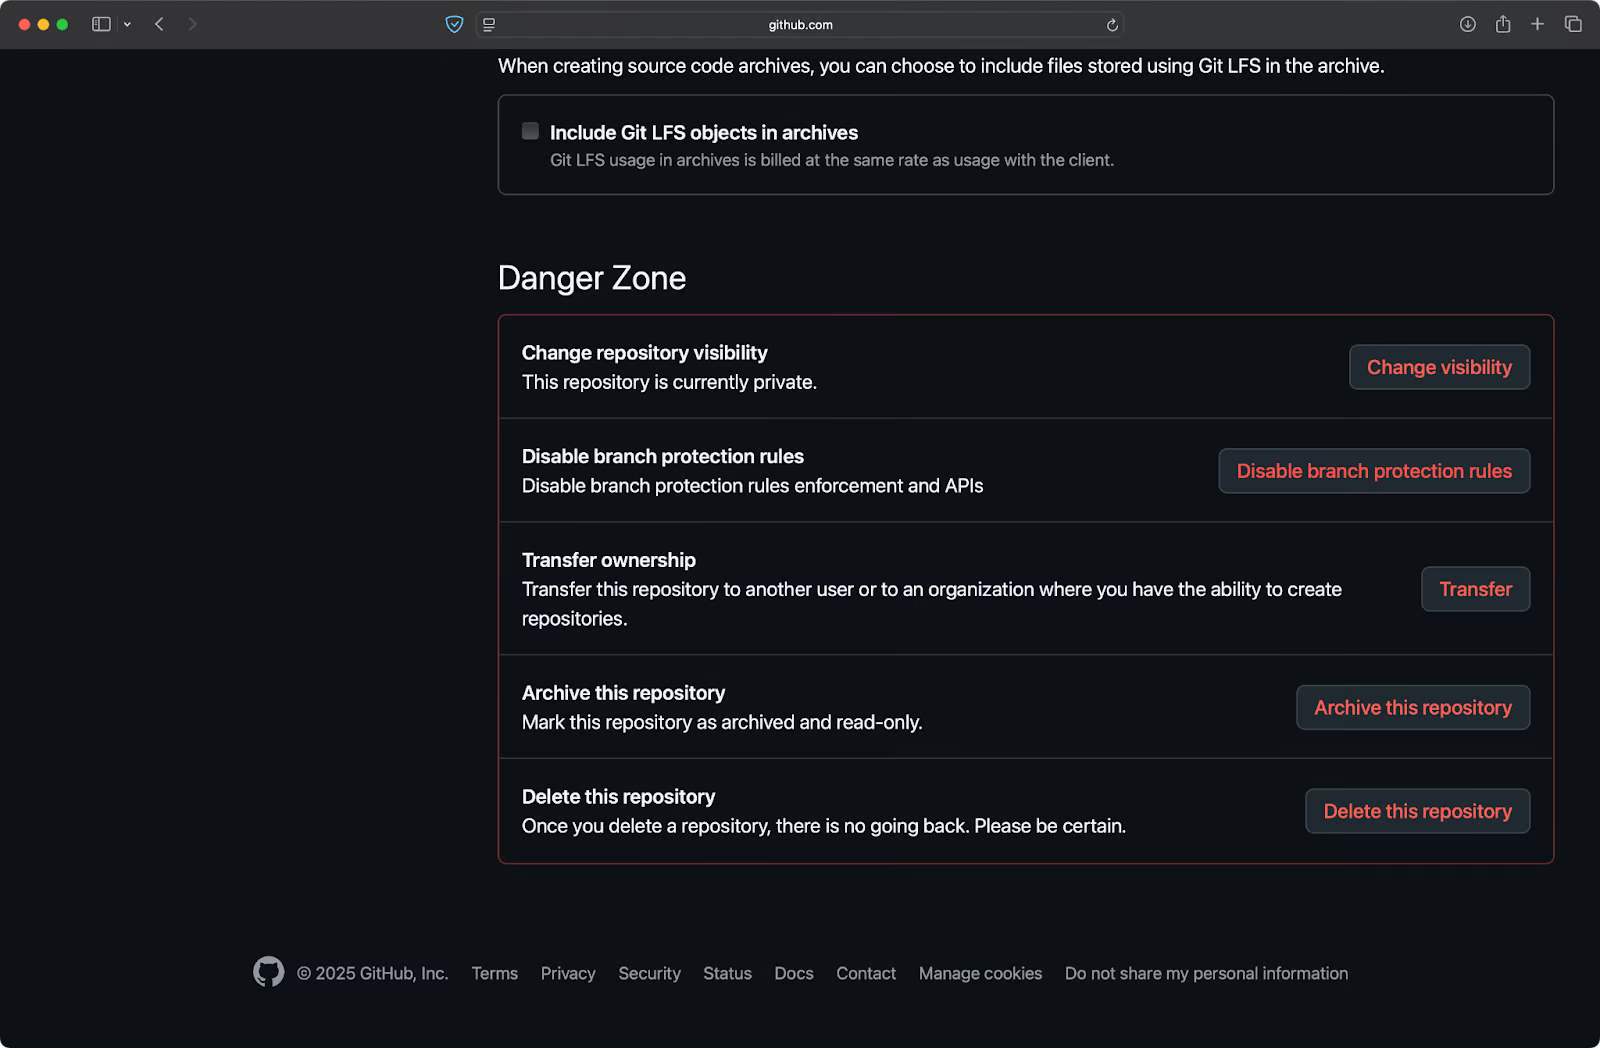
Image 2 - GitHub repo danger zone settings
The "Danger Zone" is intentionally placed at the bottom of the page and highlighted in red to prevent accidental access. This is your first visual warning that you're about to perform actions that could have significant consequences.
Step 3: Click "Delete this repository"
Now that you've found the Danger Zone, you can start the deletion process:
- Within the Danger Zone section, locate the "Delete this repository" button.
- Click this button to begin the deletion process.
A popup dialog will appear, asking you to confirm your intentions:
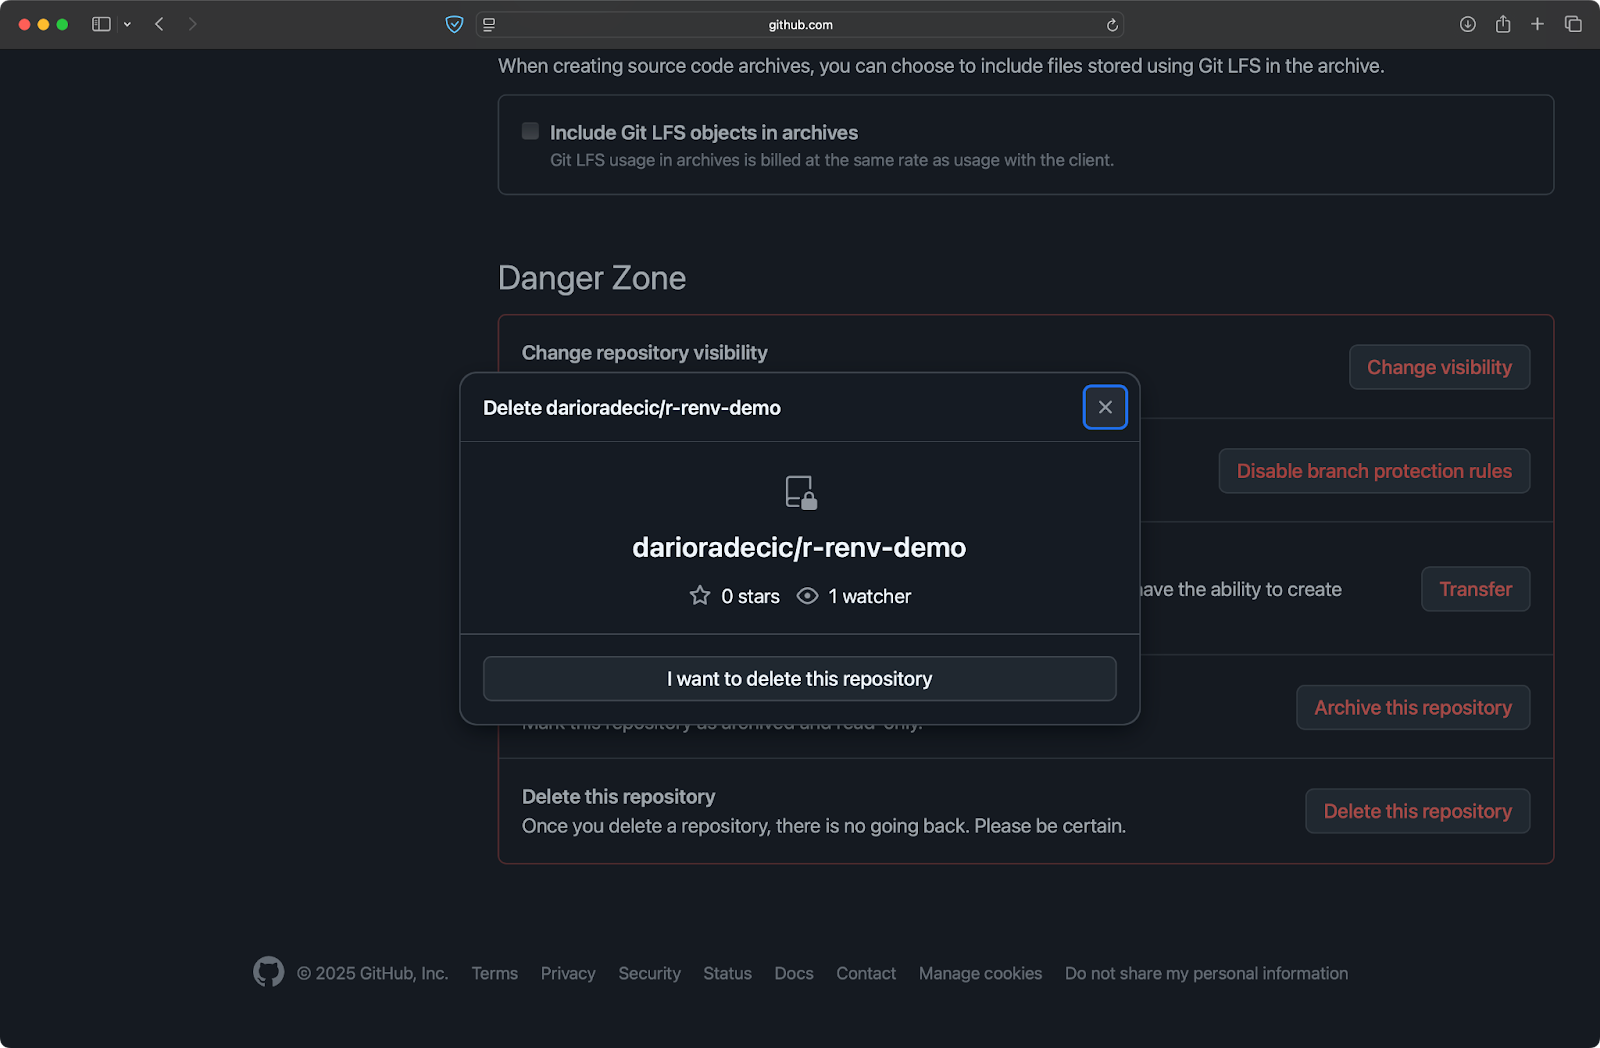
Image 3 - Initiating a GitHub repo deletion
If you're sure you want to proceed, an additional GitHub's warning message emphasizes that this action cannot be undone:
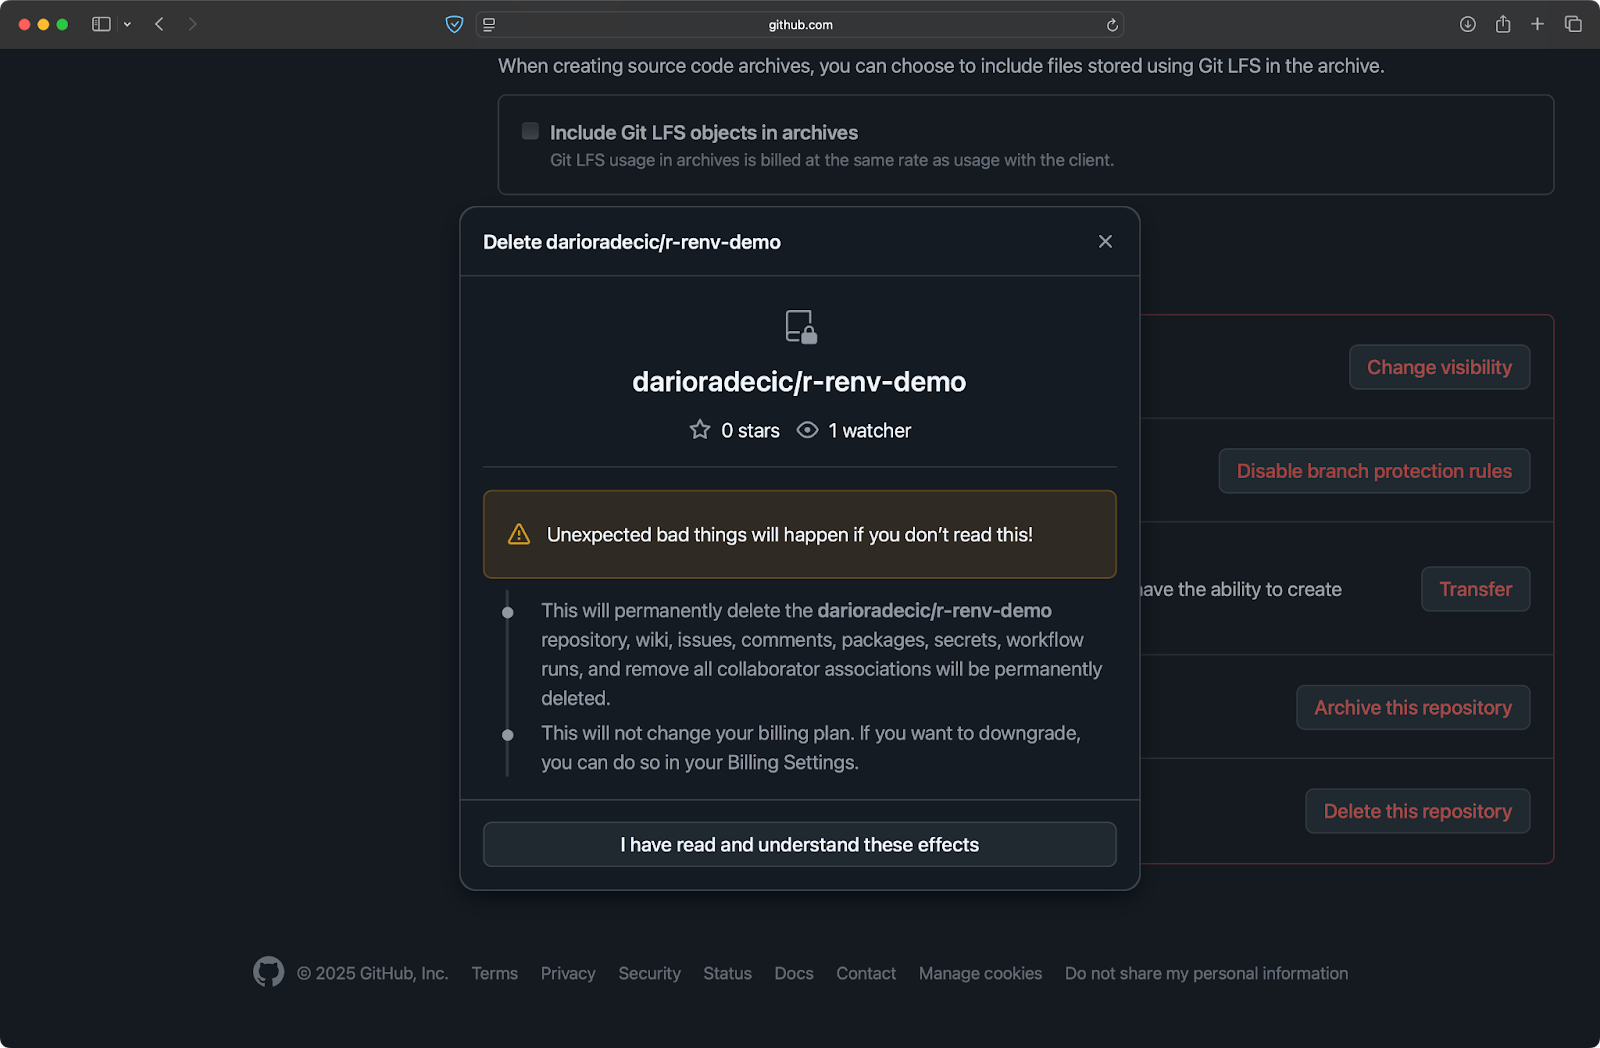
Image 4 - Initiating a GitHub repo deletion (2)
Take a moment at this point to confirm that you really want to proceed with deleting this repository.
Step 4: Confirm deletion
GitHub implements a verification step to prevent accidental deletions:
- In the confirmation dialog box, you'll be asked to type the full name of your repository (including your username).
- Carefully type the exact repository name as shown in the dialog.
- The delete button will remain disabled until you've entered the name correctly.
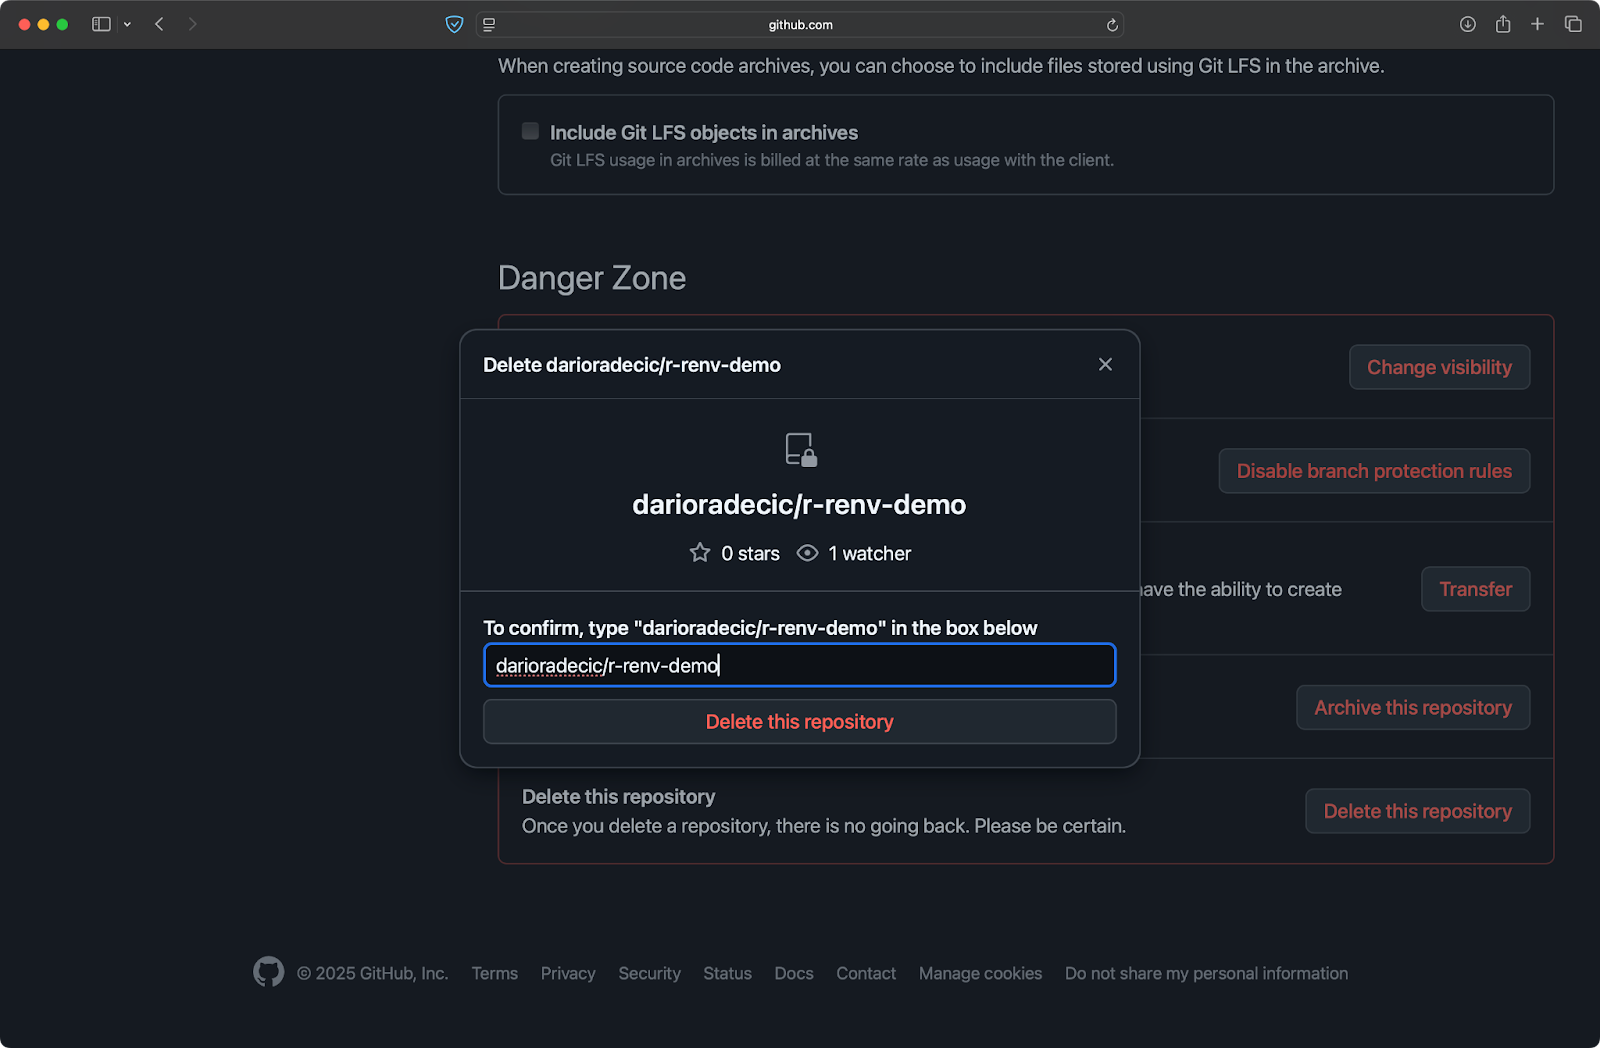
Image 5 - Initiating a GitHub repo deletion (3)
By requiring you to manually type the repository name, GitHub makes sure you're making a deliberate decision rather than clicking through prompts without reading them. This helps prevent accidentally deleting the wrong repository, especially if you have multiple tabs open.
Step 5: Finalize deletion
Once you've confirmed your intention to delete the repository, you might be asked to log in to your GitHub account once again or to verify your credentials via 2FA:
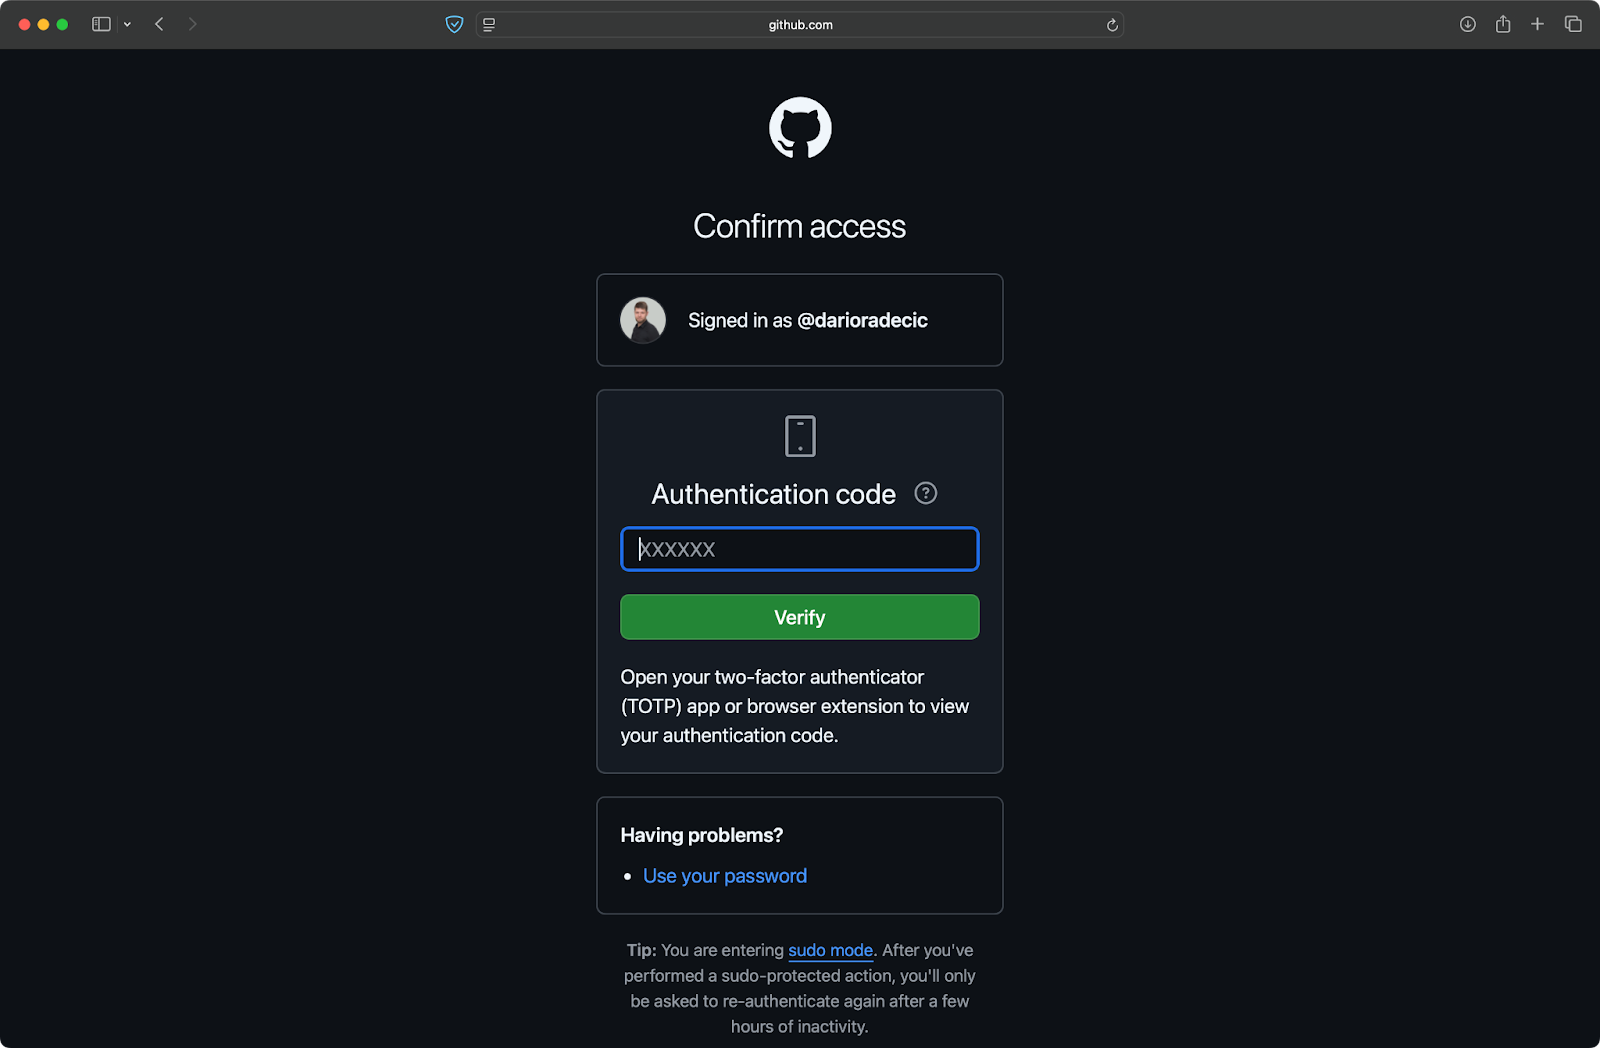
Image 6 - GitHub 2FA prompt
In my case, I need to enter an authenticator code. As soon as that's done, you'll get a success message indicating the deletion process was completed:
Image 7 - Successful GitHub repo deletion
That's it! Your repository has now been completely removed from GitHub, along with all its issues, pull requests, wikis, and other associated data. Remember that this action is permanent, and GitHub cannot restore deleted repositories, so make sure you've backed up any important data before completing this process.
Things to Consider Before Deleting a Repository
Before you hit that final delete button, there are a couple of important factors to consider.
>Can you remove untracked files on Git and GitHub? The git clean command is what you're looking for.
Deleting a repository has ripple effects beyond just removing files from your own account. You should always take a moment to review these considerations and avoid unexpected consequences.
Impact on forks
When you delete a repository, any forks that other users have created from your repository will continue to exist independently.
In other words, deleting your repository doesn't affect or delete forks that others have created. These forks will lose their connection to your original repository and become standalone repositories.
If the fork owners try to submit pull requests or sync with your original repository, they'll encounter errors.
This can create confusion for developers who have forked your project and are actively contributing to it. If you're concerned about all copies of your repository being removed from GitHub, you'll need to coordinate with fork owners to delete their copies individually. There's no automatic way to delete all forks when you delete the parent repository.
Checking for collaborators
Always review who has access to your repository before deleting it.
To do so, go to Settings > Collaborators to view everyone who has access:
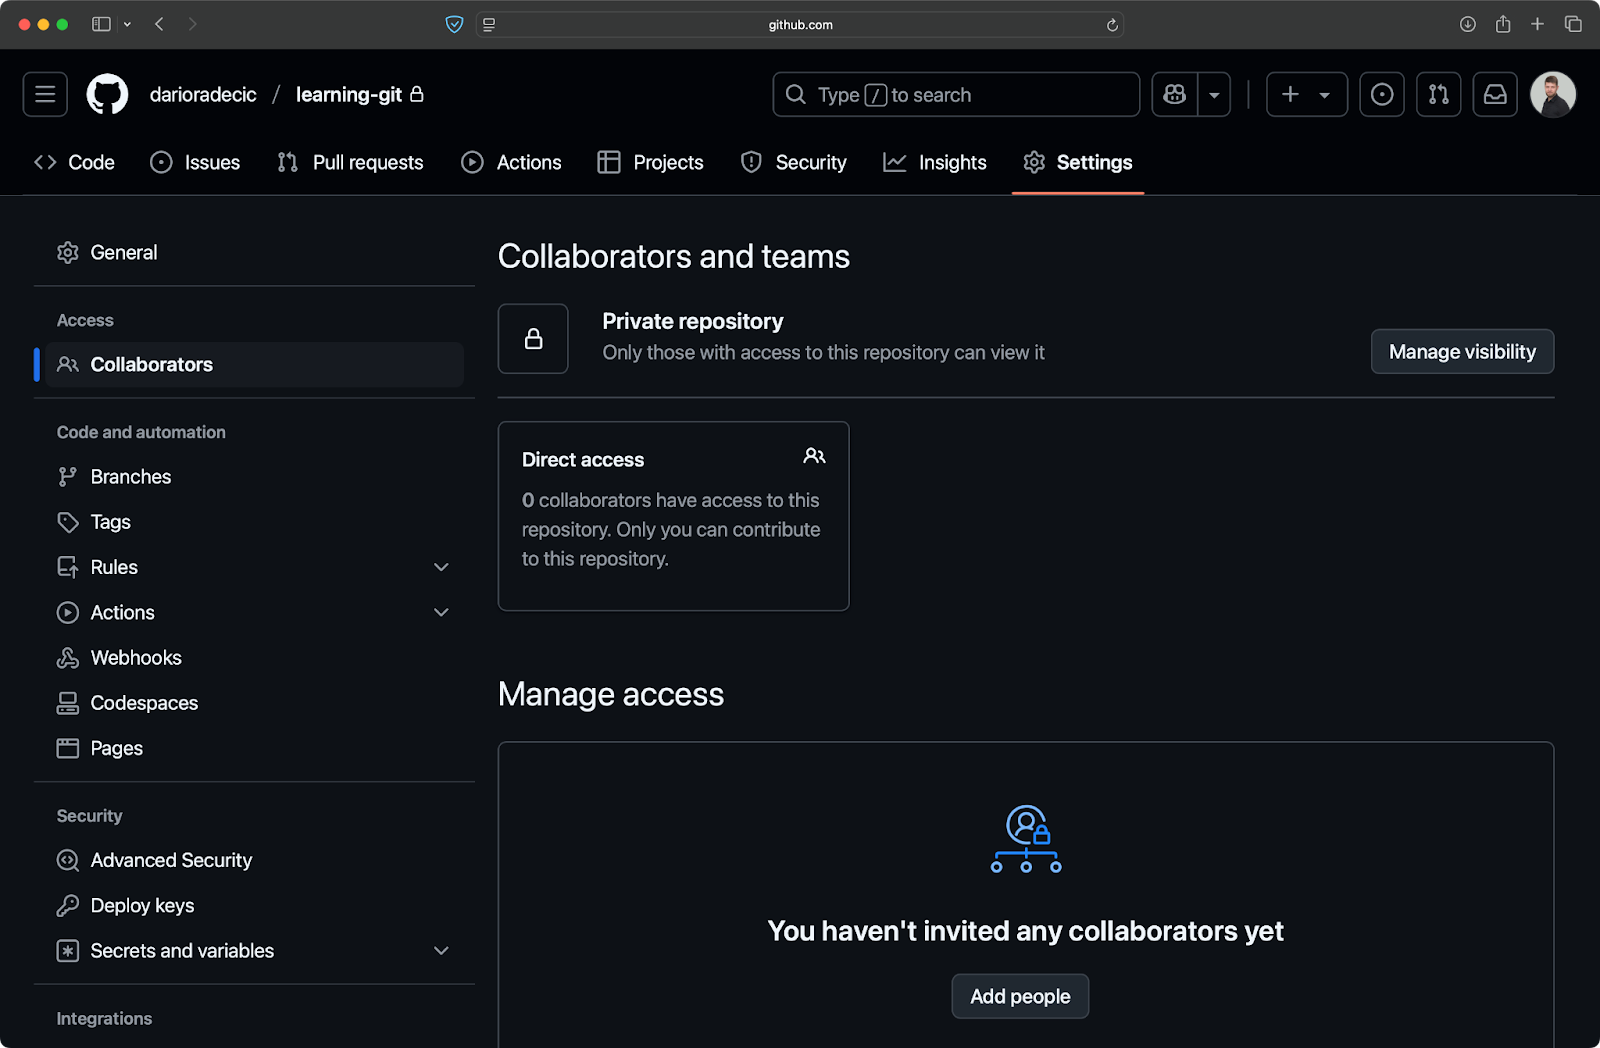
Image 8 - People with access to the repository
Consider reaching out to active collaborators to inform them of your decision. Remember that once the repo is deleted, these collaborators will immediately lose access to the project.
It's a professional courtesy to give collaborators advance notice before deleting a shared repository. This gives them time to clone the code if needed or save any important information they're actively working with.
Repository cloning
If you anticipate needing any part of your repository in the future, clone it locally before deletion:
git clone https://github.com/yourusername/your-repository.git
When you clone a repository, you get:
- All the source code.
- The complete commit history.
- All branches.
- All tags.
However, cloning doesn't preserve:
- Issues.
- Pull requests.
- Wiki pages.
- GitHub-specific features like Actions workflows.
If you need to preserve these additional elements, consider using GitHub's API to back them up, or look into third-party tools designed to archive GitHub repositories. Even if you think you'll never need the code again, it's better to have a backup and not need it than to need it and not have it.
Remember that even if you have the code locally, deleting the GitHub repository means losing the public URL, any GitHub Pages deployments, and the collaborative features that GitHub provides. Make sure you're truly ready to let go of all these features before proceeding with deletion.
Troubleshooting and Common Issues
Even with GitHub's easy deletion process, you might occasionally encounter unexpected issues. In this section, I'll walk you through some of the most frequent challenges users face when trying to delete repositories.
>Learn how the git reset command can help you manage your project history.
Repository deletion is not working
If you've followed all the steps but your repository isn't being deleted, there are several potential causes:
- Insufficient permissions: Verify you have admin privileges for the repository. Only repository owners and organization administrators can delete repositories.
- Organization restrictions: Some organizations implement protection policies that prevent repository deletion. Check with your organization administrator if deletion is restricted.
- GitHub Actions running: If there are active GitHub Actions workflows running, you might need to cancel them before deleting the repository. Go to the Actions tab and cancel any in-progress workflows.
- GitHub Apps or OAuth integrations: Certain third-party integrations might be preventing deletion. Try temporarily disabling any GitHub Apps or OAuth applications connected to the repository.
- Browser issues: Clear your browser cache or try using a different browser. Sometimes cached data can interfere with GitHub operations.
If you encounter an error message during deletion, note exactly what the error message says. This can provide important clues about what's preventing the deletion, and your answer is typically one Google search away.
For persistent issues, GitHub's support team can help identify organization-level restrictions or account-related problems that might be causing the issue.
Recovering from an accidental deletion
I've said it before, and I'll say it again: GitHub cannot restore repositories once they've been deleted. This permanent deletion is clearly stated in GitHub's documentation and the confirmation dialogs during the deletion process.
If you've accidentally deleted a repository, your options are limited:
- Check for local clones: If you or a team member have a recent local clone of the repository, you can push it to a new GitHub repository. This will preserve your code and commit history.
- Forked repositories: If someone forked your repository before deletion, you might be able to get a copy from them, though it might not include the most recent changes.
- GitHub Enterprise customers: If you're using GitHub Enterprise, your administrator might have backup options that are not available to regular GitHub users.
To prevent future problems, I strongly recommend implementing these preventive measures:
- Regular backups: Set up automated scripts to clone and back up your important repositories regularly.
- Consider archiving instead of deleting: When possible, archive repositories instead of deleting them. This preserves them in a read-only state.
- Document your repositories: Maintain a catalog of important repositories with descriptions and reasons for keeping them. This will make it easier to make informed decisions about repository deletion.
Unfortunately, there's no "recycle bin" for GitHub repositories, so deletion should always be approached with caution. When in doubt, choose archiving over deletion to give yourself more options in the future.
Best Practices After Deleting a Repository
After successfully deleting a repository, take this opportunity to conduct a broader review of your GitHub presence.
Repo deletion shouldn't be an isolated action. It should be a part of an ongoing strategy to maintain a clean GitHub profile. I'll share a couple of best practices to consider after you've removed a repository.
Clean up your GitHub profile
Repository deletion is often just the first step in a more comprehensive cleanup process.
Here's what you should do on a regular basis:
- Audit remaining repositories: Review all your repositories and identify others that are outdated, redundant, or no longer relevant to your work or interests.
- Update repository descriptions: For repositories you're keeping, ensure their descriptions and READMEs are current and clearly explain the project's purpose and status.
- Pin your best work: Use GitHub's pinned repositories feature to highlight your most impressive or representative projects at the top of your profile.
- Organize with topics: Add relevant topics to your repositories to improve their discoverability and show how they relate to your overall body of work.
In short, going through these steps creates a more professional GitHub profile that represents your current skills and interests accurately.
A well-maintained GitHub profile with 5-10 high-quality repositories often makes a better impression than one with dozens of abandoned or half-finished projects.
Review repository permissions
Repository deletion is a good reminder to review permissions across your GitHub account:
- Audit collaborator access: Check who has access to your remaining repositories and remove collaborators who no longer need access.
- Review organization memberships: If you belong to organizations, ensure your role and access levels are appropriate.
- Check third-party integrations: Review and prune any GitHub Apps, OAuth applications, or webhooks that have access to your repositories.
- Update default repository settings: If you frequently create new repositories, update your default repository settings to start with your preferred visibility and collaboration settings.
Regular security audits like this help prevent unwanted access to your code and reduce your exposure to potential security risks. It's particularly important if the repository you deleted contained sensitive information or was part of a larger project with shared access.
Archive before deleting
For future repository cleanups, consider archiving instead of immediately deleting repositories.
Archiving makes a repository read-only, prevents new commits, issues, or pull requests while preserving all existing content and making it still accessible.
You should archive repositories for completed projects that you might reference in the future, projects you want to showcase but are no longer actively developing, or temporarily inactive projects.
To conclude, archiving gives you a middle ground between keeping a repository active and permanently deleting it. I've found it useful for client projects or coursework that I don't actively maintain but need to reference occasionally.
Summing up How to Delete a GitHub Repository
Your GitHub profile shouldn't become a swamp. Deleting old and unused repos is a great way to showcase yourself as a professional and showcase your best work.
In this article, I've walked you through the entire repository deletion process —from understanding what happens when you delete a repository to the step-by-step deletion procedure, important considerations before deletion, troubleshooting common issues, and best practices to follow afterward.
You've learned everything about permanent repository deletion, the importance of considering the impact on forks and collaborators, and the necessity of creating backups before removal.
I've also shared practical advice for troubleshooting deletion issues and strategies for recovering from accidental deletions, along with recommendations for maintaining a clean and secure GitHub profile through regular audits and the strategic use of archiving.
If you want to learn more about Git and GitHub, these courses from DataCamp are an excellent starting points:
Learn Git Fundamentals Today
FAQs
What happens to forks when I delete a GitHub repository?
When you delete a repository, any forks that others have created will continue to exist independently. These forks will lose their connection to your original repository and become standalone repositories. You'll need to coordinate with fork owners to delete their copies individually.
Can GitHub restore my repository after I've deleted it?
No, GitHub cannot restore repositories once they've been deleted. This deletion is permanent, which is why it's crucial to back up any important repositories before deletion by cloning them locally or using other backup methods.
What should I do if I can't delete my repository?
If you can't delete your repository, verify you have admin privileges, check for organization restrictions, cancel any running GitHub Actions workflows, and temporarily disable any third-party integrations. If problems persist, contact GitHub support for assistance.
Should I archive or delete my old GitHub repositories?
Consider archiving instead of deleting if you might need to reference the project in the future. Archiving makes a repository read-only while preserving all existing content. Delete repositories only when you're certain you no longer need the code or when they contain sensitive information.
How do I notify collaborators before deleting a shared repository?
Check who has access to your repository by going to Settings > Collaborators and teams. It's good practice to contact active collaborators before deletion to give them time to clone the code or save important information they're working with.
Learn more about Git and GitHub with these courses!
Course
Introduction to GitHub Concepts
Course
Intermediate GitHub Concepts
Tutorial
Git Delete Branch: How to Remove Local and Remote Branches

Ashlyn Brooks
15 min
Tutorial
Git Remote: A Complete Guide with Examples
Tutorial
Git Setup: The Definitive Guide
Olivia Smith
7 min
Tutorial
Git Clean: Remove Untracked Files and Keep Repos Tidy

Allan Ouko
8 min

Tutorial
Git Init: How to Initialize and Set Up a Git Repository

Khalid Abdelaty
15 min
Tutorial
Git Prune: What Is Git Pruning and How to Use Git Prune

François Aubry
5 min