Course
Developing LLM Applications with LangChain
3 hr
46.2K
In this tutorial, we will learn to fine-tune the Gemma 2 model on the patient and doctor conversation dataset. We will also convert the model into GGUF format so that it can be used locally on the laptop offline.
We will learn about Gemma 2 and its improvements over previous generations before fine-tuning the Gemma 2 model on the patient-doctor conversion dataset. We will then merge the saved adapter with the base model, push the full model to the Hugging Face Hub, and use a Hugging Face Space to convert and quantize the model. Finally, we will download the quantized model and use it locally with the Jan application.
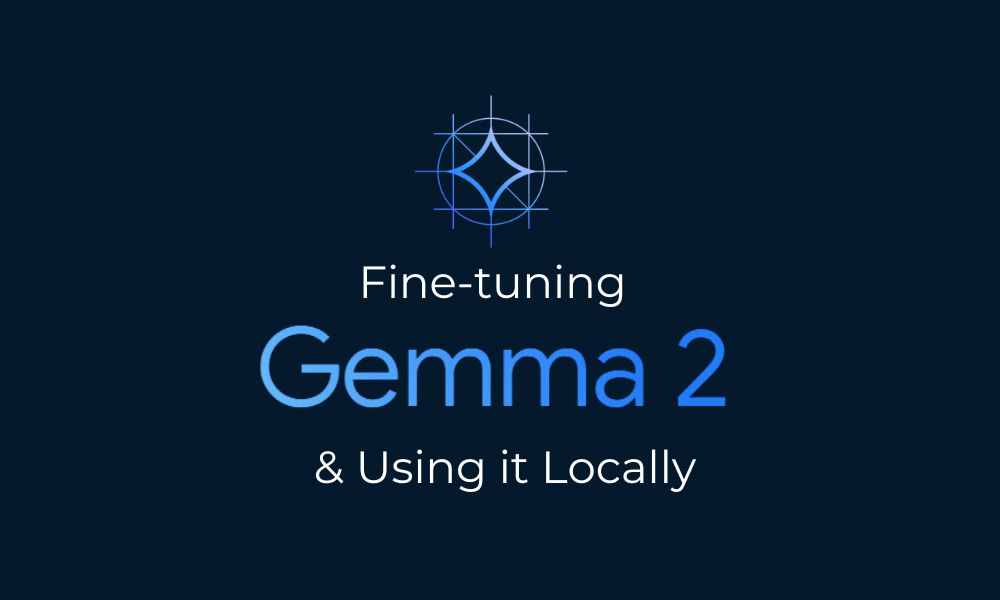
Image by Author
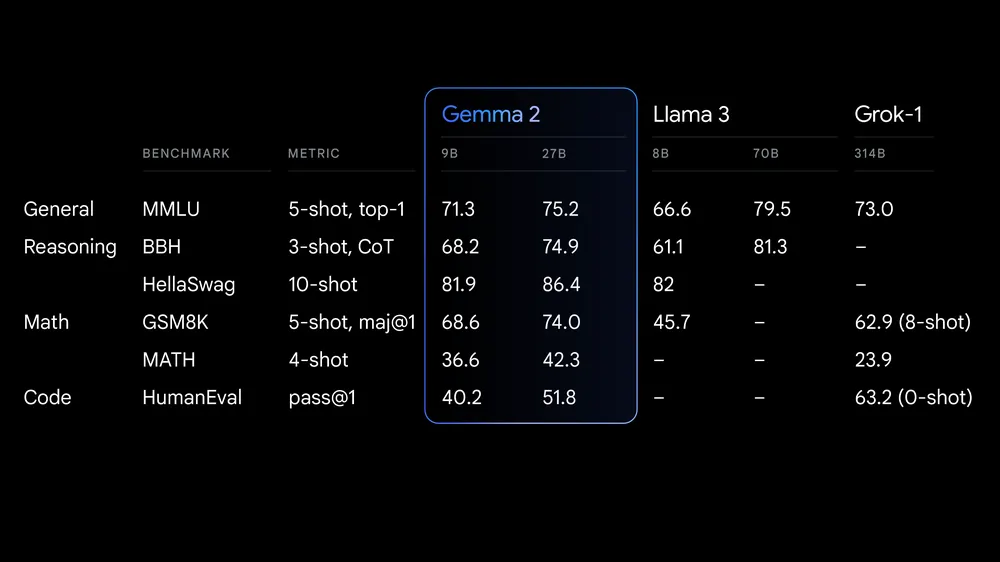
Gemma 2 is the latest release in the Gemma family of open large language models (LLMs) by Google. It is available to researchers and developers in two sizes, 9 billion (9B) and 27 billion (27B) parameters, under a commercially-friendly license. This means that you can fine-tune it on your private dataset and deploy the fine-tuned model to production without any restrictions.
Source: Google launches Gemma 2
Gemma 2 offers significant advancements in performance and inference efficiency. The redesigned architecture ensures blazing-fast inference across various hardware setups and seamless integration with major AI frameworks like Hugging Face Transformers, JAX, PyTorch, and TensorFlow.
Gemma 2 also includes robust safety measures and tools for ethical AI deployment. It outperforms Llama 3 and Groq-1 on various benchmarks and comes with improved Keras 3 integration for seamless fine-tuning and model inference.
If you want to learn about the first generation of Gemma models, a great resource is our tutorial, Fine Tuning Google Gemma: Enhancing LLMs with Customized Instructions. This resource provides comprehensive guidance on how to fine-tune Gemma models, such as the Gemma 7b-it, on specific datasets and tasks.
In this section, we will download the model, load it in 4-bit quantization, and then run the inference on a GPU.
%%capture
%pip install -U bitsandbytes
%pip install -U transformers
%pip install -U accelerate
from huggingface_hub import login
from kaggle_secrets import UserSecretsClient
user_secrets = UserSecretsClient()

hf_token = user_secrets.get_secret("HUGGINGFACE_TOKEN")
login(token = hf_token)Note: The Gemma 2 9B-It model is large, and even with 16GB GPU memory, we cannot load the full model. That’s why we are loading the model in 4-bit quantization.
import torch
from transformers import AutoModelForCausalLM, AutoTokenizer, BitsAndBytesConfig, AutoConfig

modelName = "google/gemma-2-9b-it"

bnbConfig = BitsAndBytesConfig(
    load_in_4bit = True,
    bnb_4bit_quant_type="nf4",
    bnb_4bit_compute_dtype=torch.bfloat16,
)

tokenizer = AutoTokenizer.from_pretrained(modelName)

model = AutoModelForCausalLM.from_pretrained(
    modelName,
    device_map = "auto",
    quantization_config=bnbConfig
)from IPython.display import Markdown, display
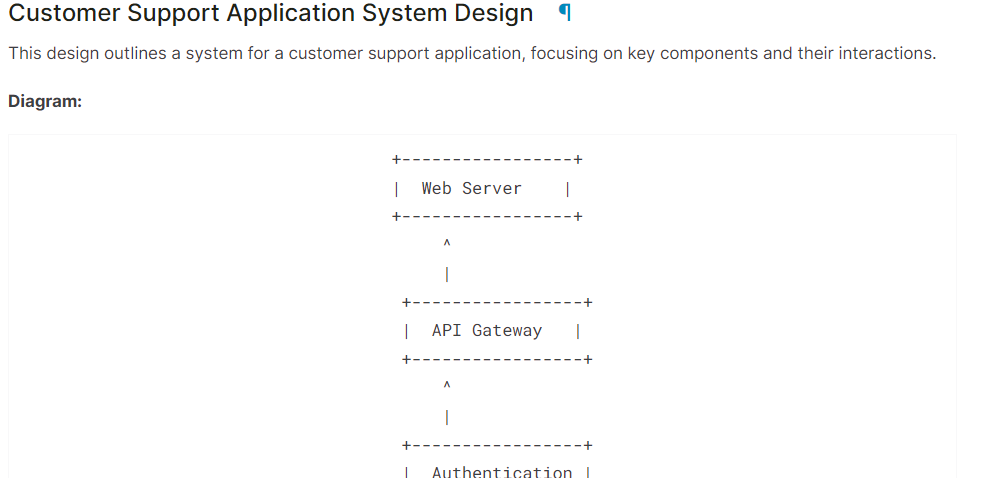
system = "You are a skilled software architect who consistently creates system designs for various applications."
user = "Design a system with the ASCII diagram for the customer support application."
prompt = f"System: {system} \n User: {user} \n AI: "
inputs = tokenizer(prompt, return_tensors='pt', padding=True, truncation=True).to("cuda")
outputs = model.generate(**inputs, max_length=500, num_return_sequences=1)
text = tokenizer.decode(outputs[0], skip_special_tokens=True)
Markdown(text.split("AI:")[1])As we can see, the Gemma 2 model has done a great job.
If you are having trouble running the above code, please refer to the Kaggle Notebook: Gemma 2 Simple Inference on GPU.
In this section, we will fine-tune the Gemma 2 9B-It model on the healthcare dataset, which consists of conversations between patients and doctors. We will load the model and tokenizer, load the dataset, convert the dataset, set up the model using training arguments, and track the model performance using Weights and Biases API.
If you are interested in understanding how fine-tuning theory works, read our guide, An Introductory Guide to Fine-Tuning LLMs.
Install the necessary Python packages for loading, fine-tuning, and evaluating the model on the medical dataset.
%%capture
%pip install -U transformers
%pip install -U datasets
%pip install -U accelerate
%pip install -U peft
%pip install -U trl
%pip install -U bitsandbytes
%pip install -U wandb
Load the necessary Python packages and the functions.
from transformers import (
    AutoModelForCausalLM,
    AutoTokenizer,
    BitsAndBytesConfig,
    HfArgumentParser,
    TrainingArguments,
    pipeline,
    logging,
)
from peft import (
    LoraConfig,
    PeftModel,
    prepare_model_for_kbit_training,
    get_peft_model,
)
import os, torch, wandb
from datasets import load_dataset
from trl import SFTTrainer, setup_chat_format
Log in to Hugging Face CLI using the API key that we have saved using the Kaggle Secrets.
from huggingface_hub import login
from kaggle_secrets import UserSecretsClient
user_secrets = UserSecretsClient()

hf_token = user_secrets.get_secret("HUGGINGFACE_TOKEN")
login(token = hf_token)
Load the Weights and Biases API key from Kaggle secrets to initiate the project for model performance tracking.
wb_token = user_secrets.get_secret("wandb")

wandb.login(key=wb_token)
run = wandb.init(
    project='Fine-tune Gemma-2-9b-it on HealthCare Dataset',
    job_type="training",
    anonymous="allow"
)
Setting the model and dataset ID so that we can load them from the Hugging Face Hub. Additionally, we need to set the name of the fine-tuned model in order to create a model repository on Hugging Face and push the fine-tuned model.
base_model = "google/gemma-2-9b-it"
dataset_name = "lavita/ChatDoctor-HealthCareMagic-100k"
new_model = "Gemma-2-9b-it-chat-doctor"Setting the data type and attention implementation based on GPU.
if torch.cuda.get_device_capability()[0] >= 8:
    !pip install -qqq flash-attn
    torch_dtype = torch.bfloat16
    attn_implementation = "flash_attention_2"
else:
    torch_dtype = torch.float16
    attn_implementation = "eager"
We must create the QLoRA configuration so that we can load the model with 4-bit precision, reducing memory usage and speeding up the fine-tuning process.
# QLoRA config
bnb_config = BitsAndBytesConfig(
    load_in_4bit=True,
    bnb_4bit_quant_type="nf4",
    bnb_4bit_compute_dtype=torch_dtype,
    bnb_4bit_use_double_quant=True,
)
Using the Model URL, LoRA configuration, and attention implementation, load the Gemma 2 9B-It model and the tokenizer.
# Load model
model = AutoModelForCausalLM.from_pretrained(
    base_model,
    quantization_config=bnb_config,
    device_map="auto",
    attn_implementation=attn_implementation
)

# Load tokenizer
tokenizer = AutoTokenizer.from_pretrained(base_model, trust_remote_code=True)Create the Python function that will use the model and extract the names of all the linear modules.
import bitsandbytes as bnb

def find_all_linear_names(model):
    cls = bnb.nn.Linear4bit
    lora_module_names = set()
    for name, module in model.named_modules():
        if isinstance(module, cls):
            names = name.split('.')
            lora_module_names.add(names[0] if len(names) == 1 else names[-1])
    if 'lm_head' in lora_module_names:  # needed for 16 bit
        lora_module_names.remove('lm_head')
    return list(lora_module_names)

modules = find_all_linear_names(model)
Fine-tuning the full model will take a lot of time, so to accelerate the training process, we will create and attach the adapter layer, resulting in a faster and more memory-efficient process.
The adoption layer is created using the target modules and task type. Next, we set up the chat format for the model and tokenizer. Finally, we attach the base model to the adapter to create a Parameter Efficient Fine-Tuning (PEFT) model.
# LoRA config
peft_config = LoraConfig(
    r=16,
    lora_alpha=32,
    lora_dropout=0.05,
    bias="none",
    task_type="CAUSAL_LM",
    target_modules=modules
)
model, tokenizer = setup_chat_format(model, tokenizer)
model = get_peft_model(model, peft_config)We will now load the lavita/ChatDoctor-HealthCareMagic-100k dataset from the Hugging Face hub. The dataset consists of three columns:
After loading the dataset, we will shuffle it and select 1000 samples to reduce the training time even further. In the end, we will create the chat format using the default chat template and use it to create the “text” column.
#Importing the dataset
dataset = load_dataset(dataset_name, split="all")
dataset = dataset.shuffle(seed=65).select(range(1000)) # Only use 1000 samples for quick demo

def format_chat_template(row):
    row_json = [{"role": "system", "content": row["instruction"]},
               {"role": "user", "content": row["input"]},
               {"role": "assistant", "content": row["output"]}]
    row["text"] = tokenizer.apply_chat_template(row_json, tokenize=False)
    return row

dataset = dataset.map(
    format_chat_template,
    num_proc= 4,
)

dataset
Output:
Dataset({
    features: ['instruction', 'input', 'output', 'text'],
    num_rows: 1000
})
Let’s review the “text” column of row 3.
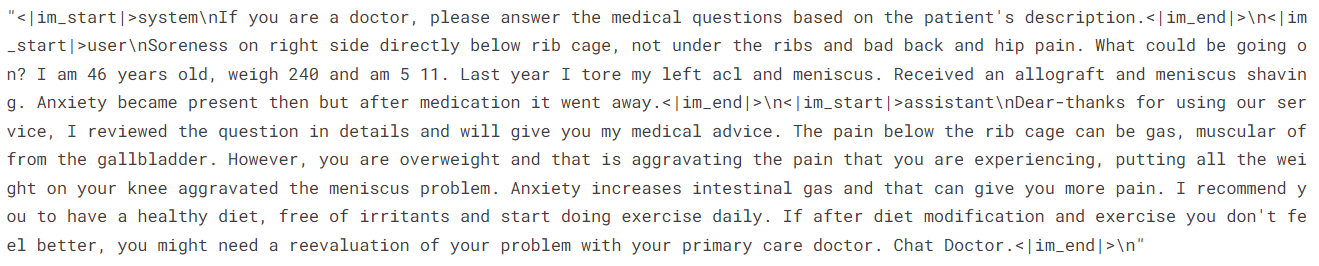
dataset['text'][3]The “text” column has instructions, the patient's query, and the doctor's response in the OpenAI style.
For model evaluation, we will split out the dataset into training and test split.
dataset = dataset.train_test_split(test_size=0.1)We will now set the training argument and STF parameters and then start the training process.
You can change the various hyperparameters based on your environment, compute, and memory. The hyperparameters below are optimized for the Kaggle Notebook. So, if you want to run the same thing on Google Colab, please consider experimenting with training algorithms.
# Setting Hyperparamter
training_arguments = TrainingArguments(
output_dir=new_model,
per_device_train_batch_size=1,
per_device_eval_batch_size=1,
gradient_accumulation_steps=2,
optim="paged_adamw_32bit",
num_train_epochs=1,
eval_strategy="steps",
eval_steps=0.2,
logging_steps=1,
warmup_steps=10,
logging_strategy="steps",
learning_rate=2e-4,
fp16=False,
bf16=False,
group_by_length=True,
report_to="wandb"
)
# Setting sft parameters
trainer = SFTTrainer(
model=model,
train_dataset=dataset["train"],
eval_dataset=dataset["test"],
peft_config=peft_config,
max_seq_length= 512,
dataset_text_field="text",
tokenizer=tokenizer,
args=training_arguments,
packing= False,
)
model.config.use_cache = False
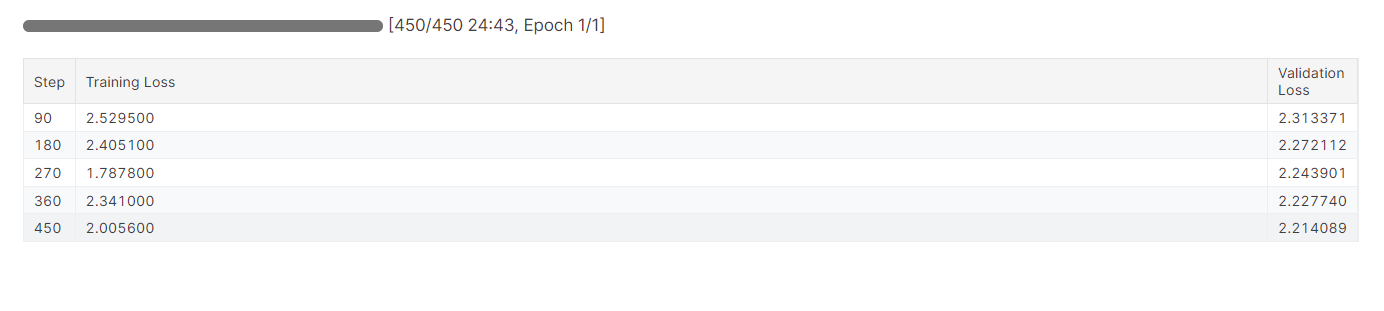
trainer.train()It took almost 25 minutes to fine-tune the model, and as we can see, the training and validation loss has gradually reduced. For better performance, try fine-tuning the model on the full dataset for at least three epochs.
 Fine-tuning can be a bit technical for beginners and non-technical individuals. If you are looking for a simpler solution, you should check out the Fine-Tuning OpenAI's GPT-4: A Step-by-Step Guide tutorial. It covers a simple way of fine-tuning a state-of-the-art model using the OpenAI API.
We will finish the Weights and Biases experiment, which will generate an evaluation report.
wandb.finish()
model.config.use_cache = True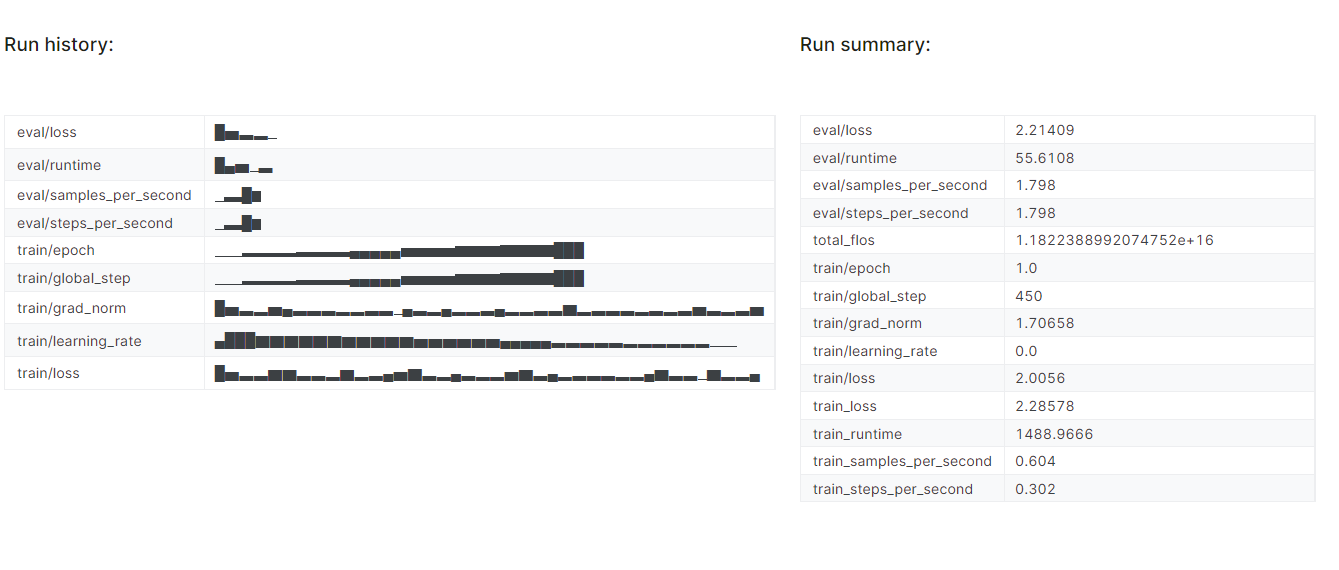
To view the detailed report, go to your Weights and Biases account and click on the "Fine-tune Gemma-2-9b-it on Healthcare Dataset" project name.
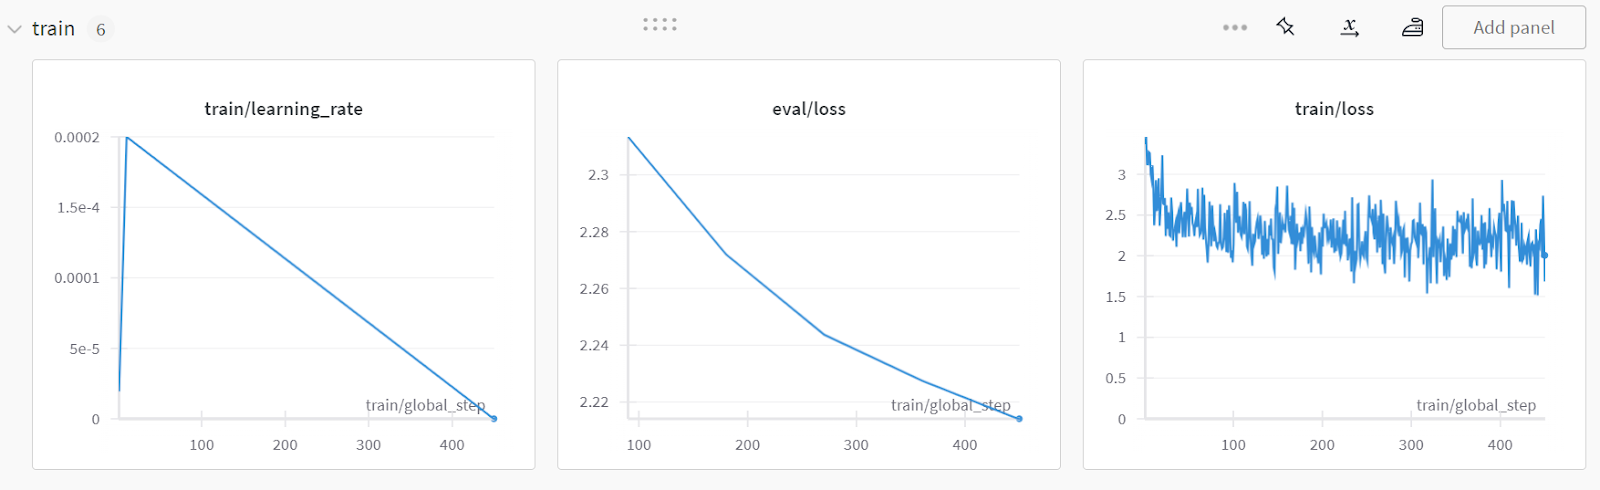
Screenshot is from wandb.ai
We will now save the fine-tuned adopter locally and also push it to the Hugging Face hub.
trainer.model.save_pretrained(new_model)
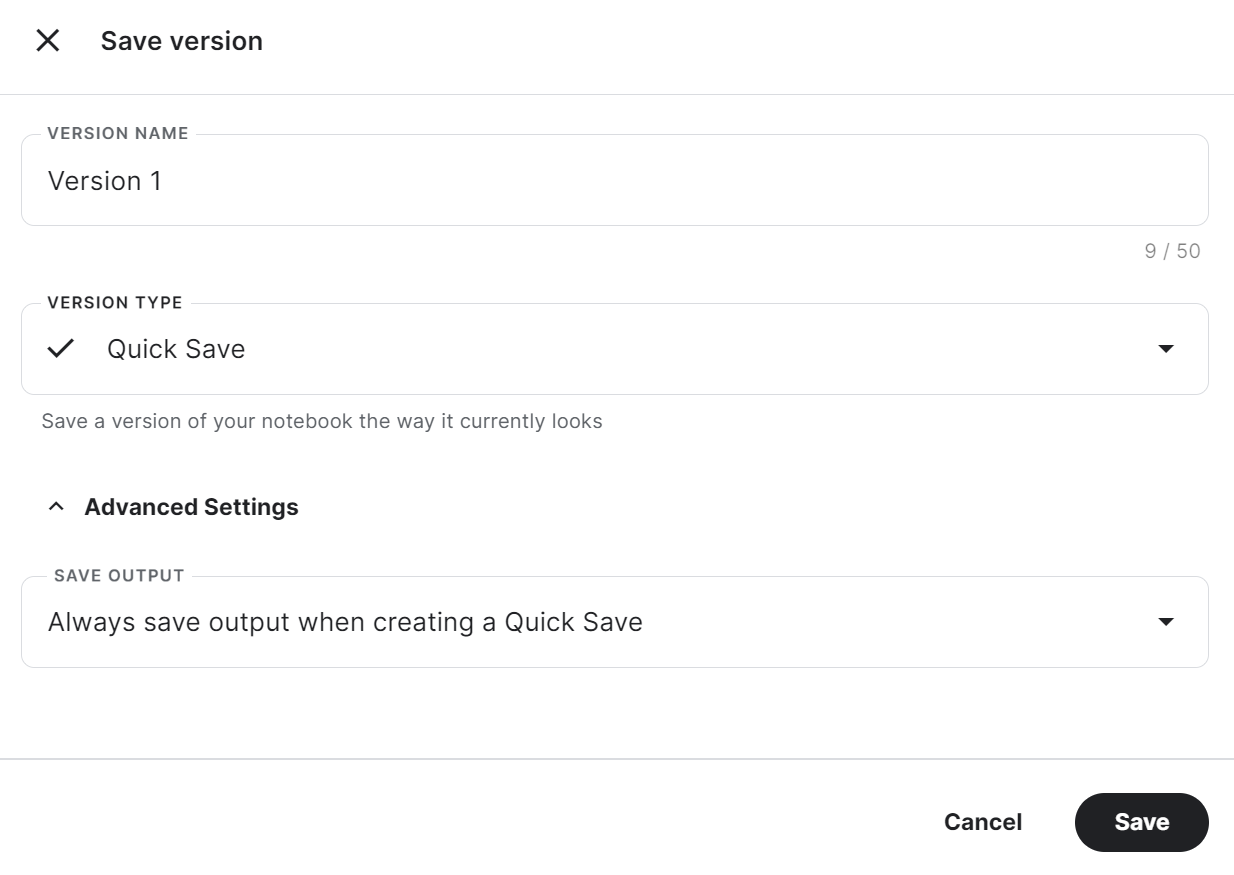
trainer.model.push_to_hub(new_model, use_temp_dir=False)To use the saved adopter in another Kaggle notebook, we have to save the notebook. We can do that by clicking on “Save Version” at the top right. After that, select “Quick Save” and “Always save output when creating a Quick Save,” and then press the “Save” button.
If you have trouble running the code, please clone the Kaggle Notebook and run it. You must set up the Hugging Face and Weights & Biases API key using the Kaggle Secrets.
To determine whether fine-tuning or Retrieval-Augmented Generation (RAG) is more suitable for your specific use case, I highly recommend you read the RAG vs Fine-Tuning blog.
Now, we will merge the adapter with the base model and push the full model to the Hugging Face hub.
Create a new Kaggle notebook with a CPU as an accelerator and install the necessary Python packages.
Why are we using the CPU as an accelerator? Won't it be slow? Yes, but the GPU machine on Kaggle only provides us with 16 GB of GPU memory, which is enough for a 7 billion parameter model but not for a 9 billion parameter model. Meanwhile, the CPU machine provides 30GB, which is enough to load both the base model and the adapter.
%%capture
%pip install -U bitsandbytes
%pip install -U transformers
%pip install -U accelerate
%pip install -U peft
%pip install -U trl
Get the API key from the Kaggle Secrets and log in to the Hugging Face CLI.
from huggingface_hub import login
from kaggle_secrets import UserSecretsClient
user_secrets = UserSecretsClient()
hf_token = user_secrets.get_secret("HUGGINGFACE_TOKEN")
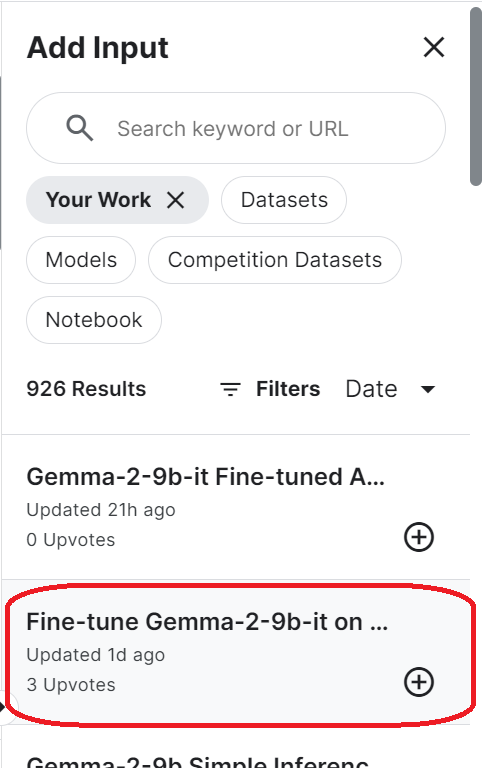
login(token = hf_token)To access the saved model, you have to import the saved Kaggle notebook. To do that, click the “Add Input” button at the top right and select the tab “Your Work.” Then, click the plus button of the saved notebook to access all the files it has.
Set up the base model URL by providing the Hugging Face repository name. Additionally, configure the adapter URL by specifying the local directory where the adapter is saved.
base_model_url = "google/gemma-2-9b-it"
new_model_url = "/kaggle/input/fine-tune-gemma-2-9b-it-on-healthcare-dataset/Gemma-2-9b-it-chat-doctor/"
Load the tokenizer and full model using the base model URL. Make sure you set the device “cpu” and dtype “float16”.
from transformers import AutoModelForCausalLM, AutoTokenizer, BitsAndBytesConfig, pipeline
from peft import PeftModel
import torch
from trl import setup_chat_format


# Reload tokenizer and model
tokenizer = AutoTokenizer.from_pretrained(base_model_url)

base_model_reload= AutoModelForCausalLM.from_pretrained(
    base_model_url,
    low_cpu_mem_usage=True,
    return_dict=True,
    torch_dtype=torch.float16,
    device_map="cpu",
)
Set the chat format to the newly loaded base model and combine it with the adopter. In the end, we will load and merge the adopter to the base model.
The merge_and_unload() function will help us merge the adapter weights with the base model and use it as a standalone model.
base_model_reload, tokenizer = setup_chat_format(base_model_reload, tokenizer)
model = PeftModel.from_pretrained(base_model_reload, new_model_url)

model = model.merge_and_unload()
Save the full model and tokenizer locally.
model.save_pretrained("Gemma-2-9b-it-chat-doctor")
tokenizer.save_pretrained("Gemma-2-9b-it-chat-doctor")
Also, push all the model files and tokenizer to the Hugging Face hub.
model.push_to_hub("Gemma-2-9b-it-chat-doctor", use_temp_dir=False)
tokenizer.push_to_hub("Gemma-2-9b-it-chat-doctor", use_temp_dir=False)
You can go to your Hugging Face model repository and view all the files.
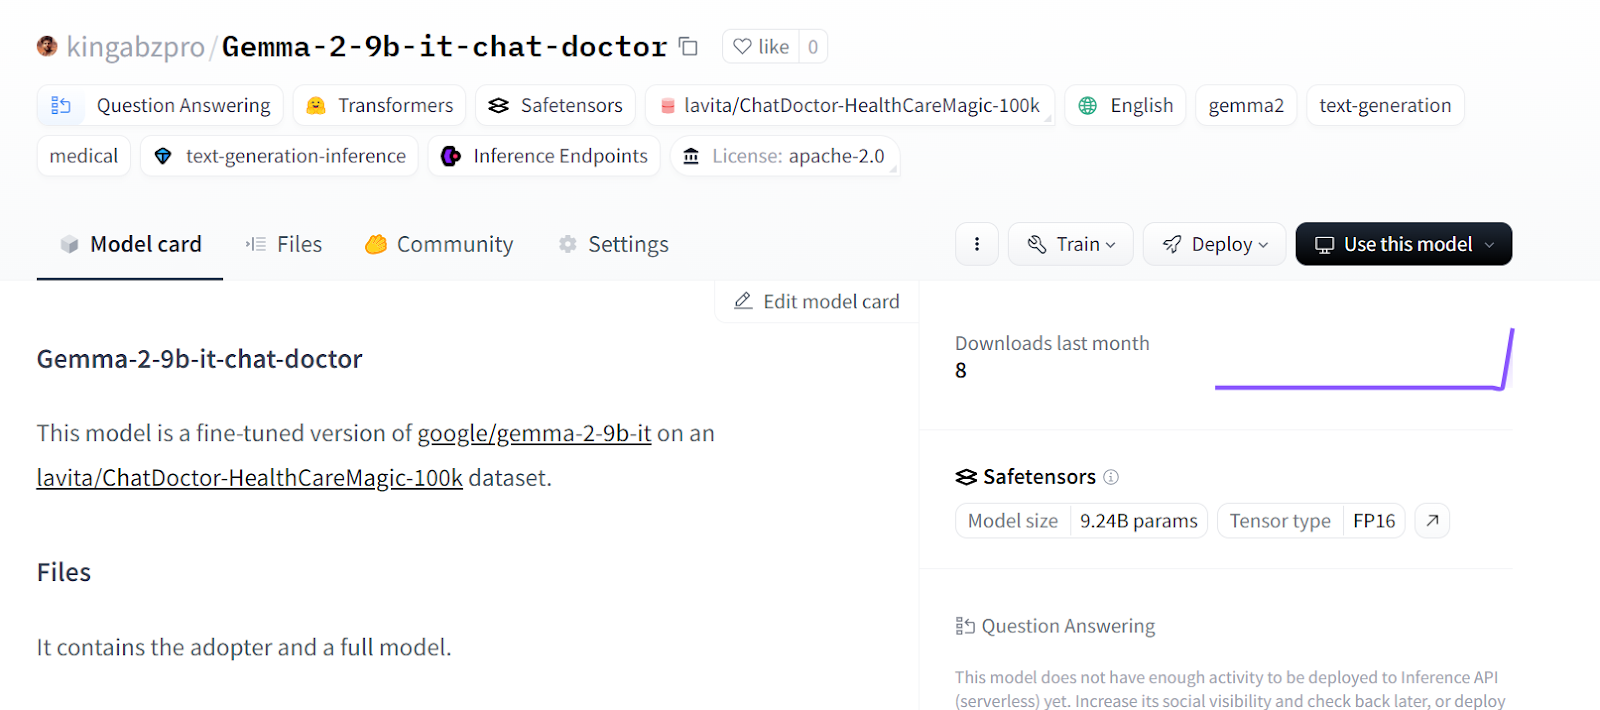
Source: kingabzpro/Gemma-2-9b-it-chat-doctor · Hugging Face
If you are facing issues in merging models using CPU, please refer to the Kaggle Notebook.
With the GGUF My Repo Hugging Face Space, model conversion and quantization have become easy and fast. All you have to do is log in and provide the model ID.
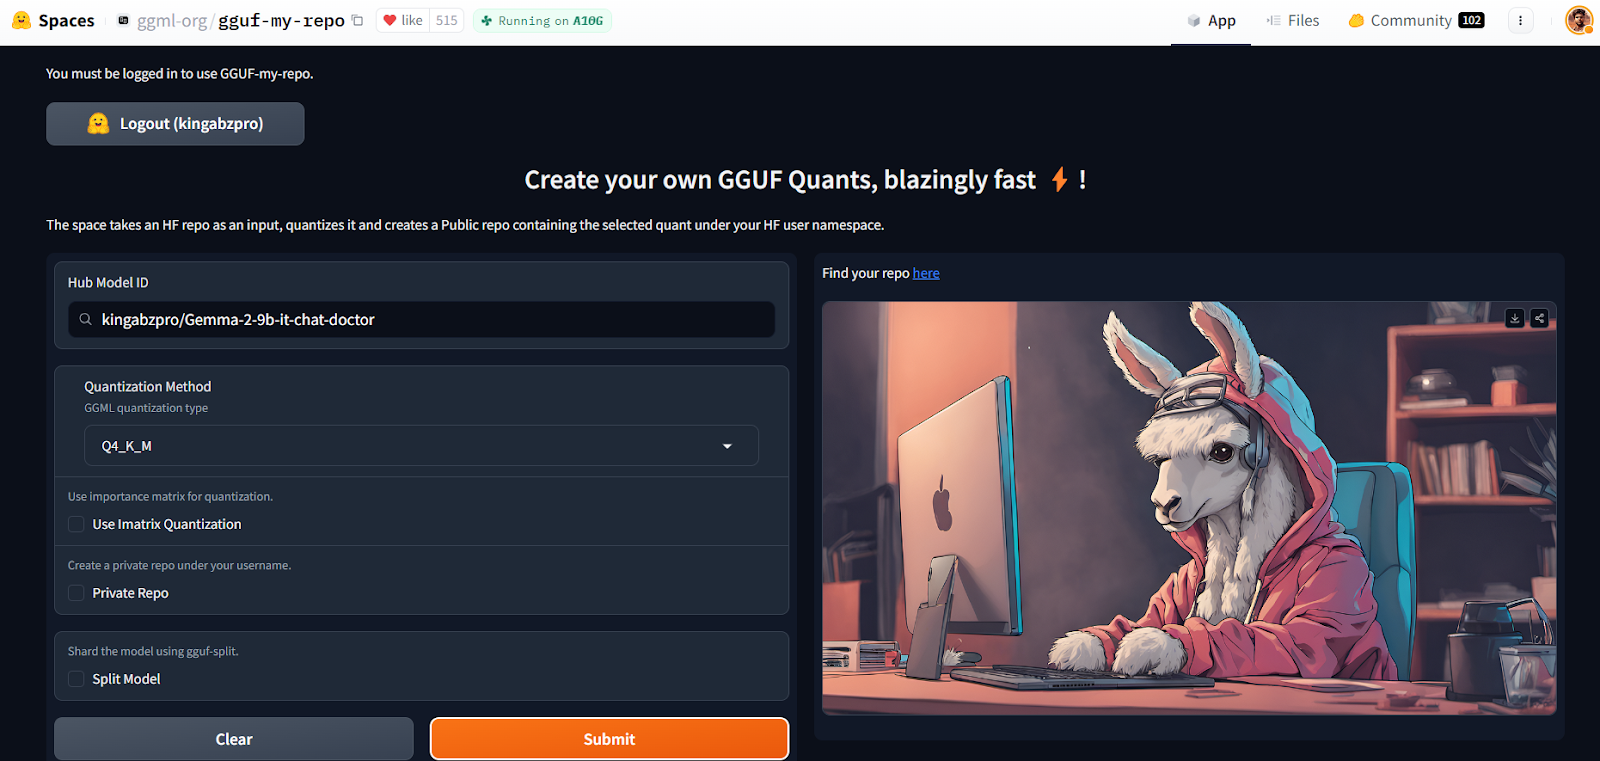
Source: GGUF My Repo - a Hugging Face Space by ggml-org
It will create a new model repository for you with a quantized model file that you can download later to use it locally. It is that simple.
You can learn the theory behind the quantization by reading our article on Quantization for Large Language Models (LLMs): Reduce AI Model Sizes Efficiently.
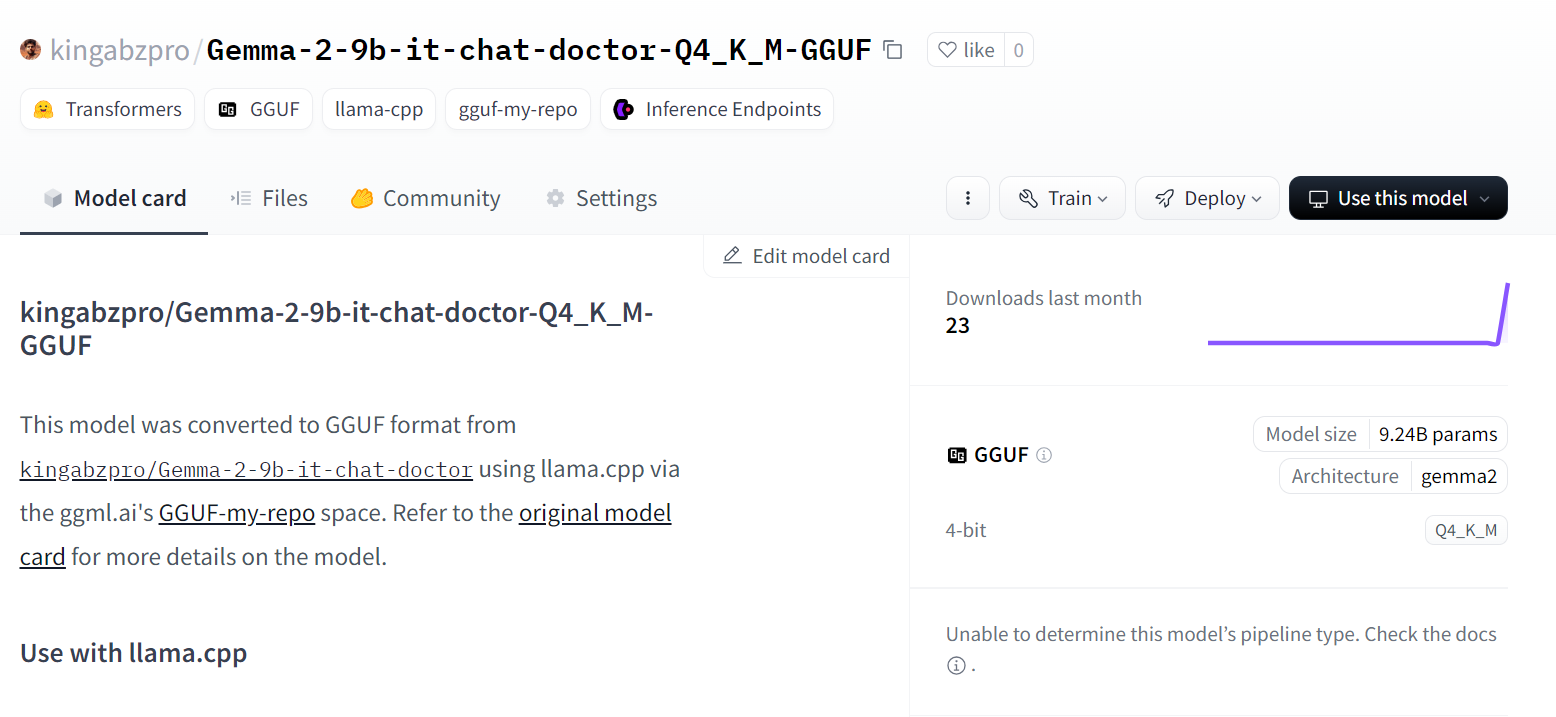
Source: kingabzpro/Gemma-2-9b-it-chat-doctor-Q4_K_M-GGUF · Hugging Face
But if you want to get your hands dirty and run llama.cpp scripts on your own, then you should check out the Fine-Tuning Llama 3 and Using It Locally tutorial.
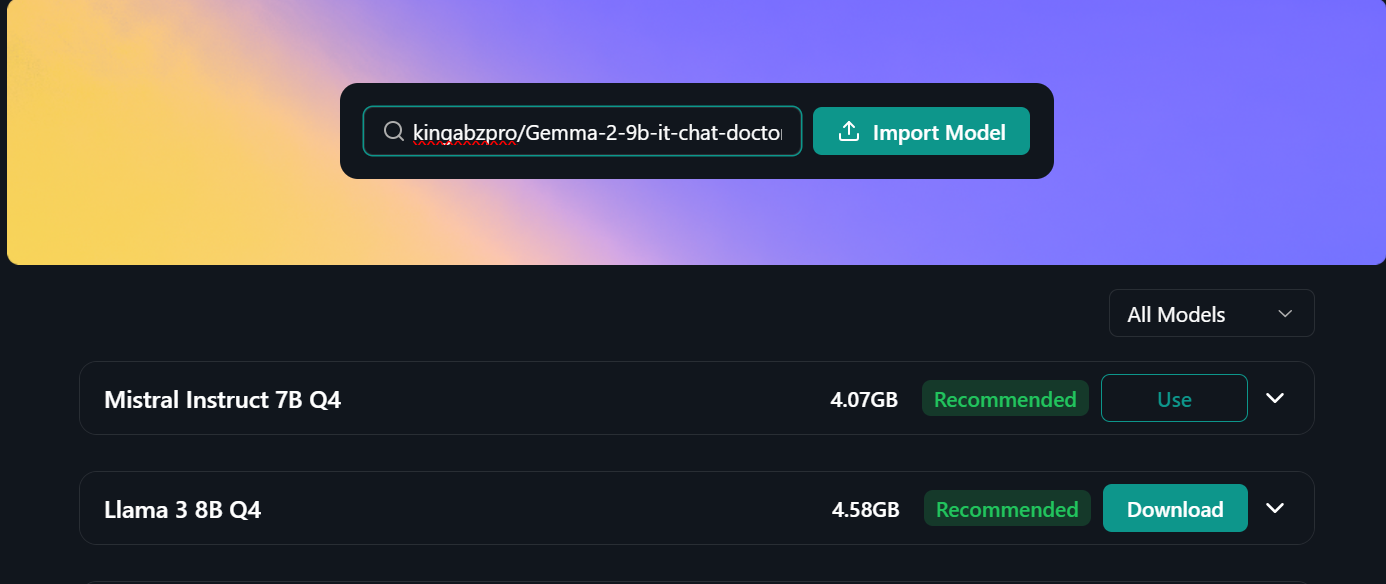
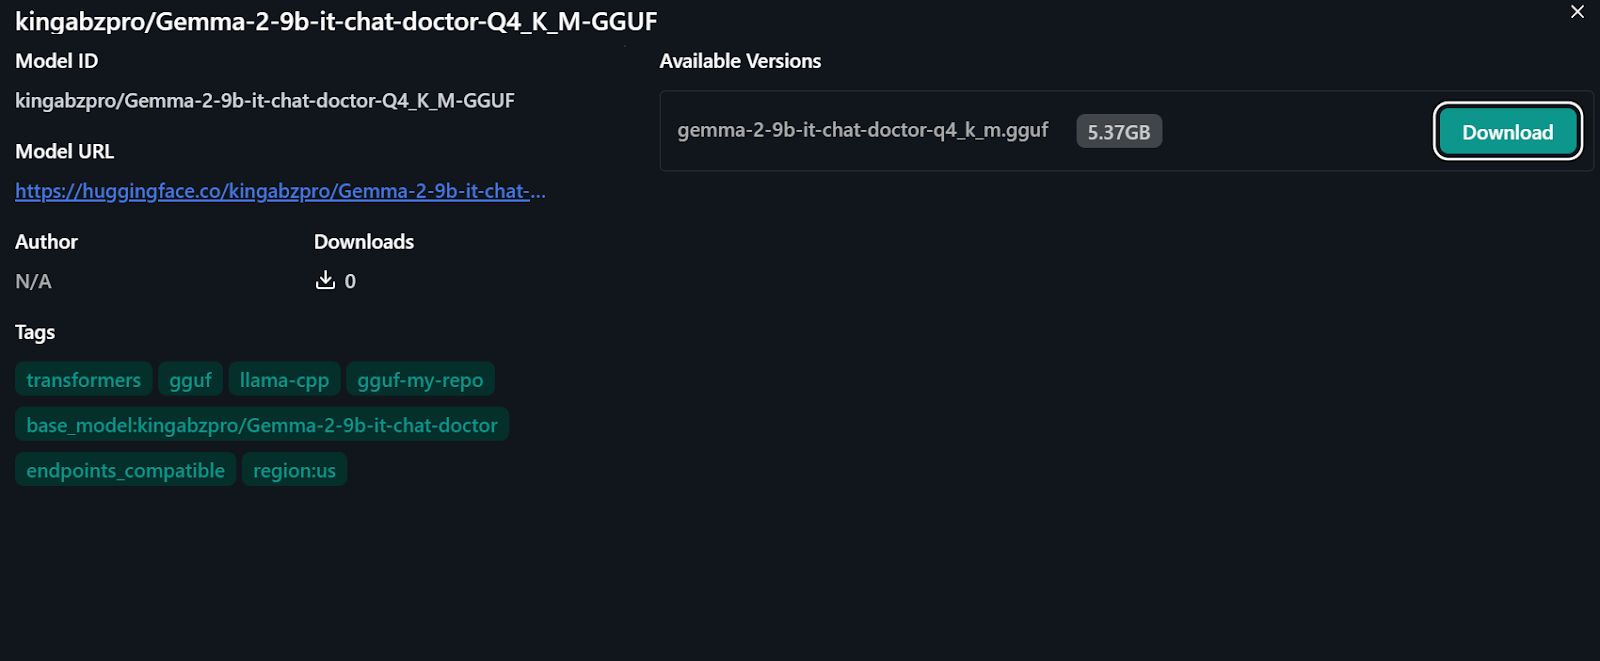
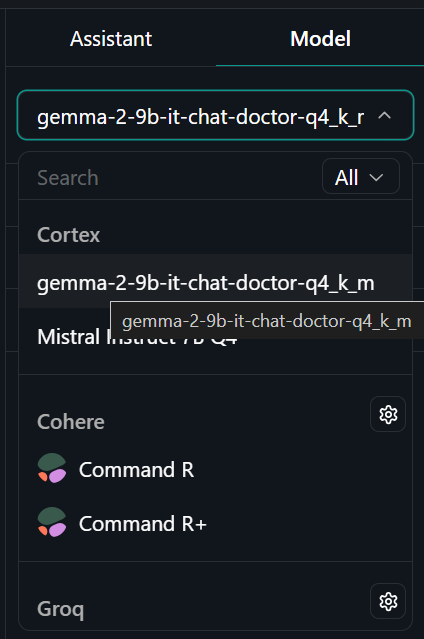
To use the quantized model locally:
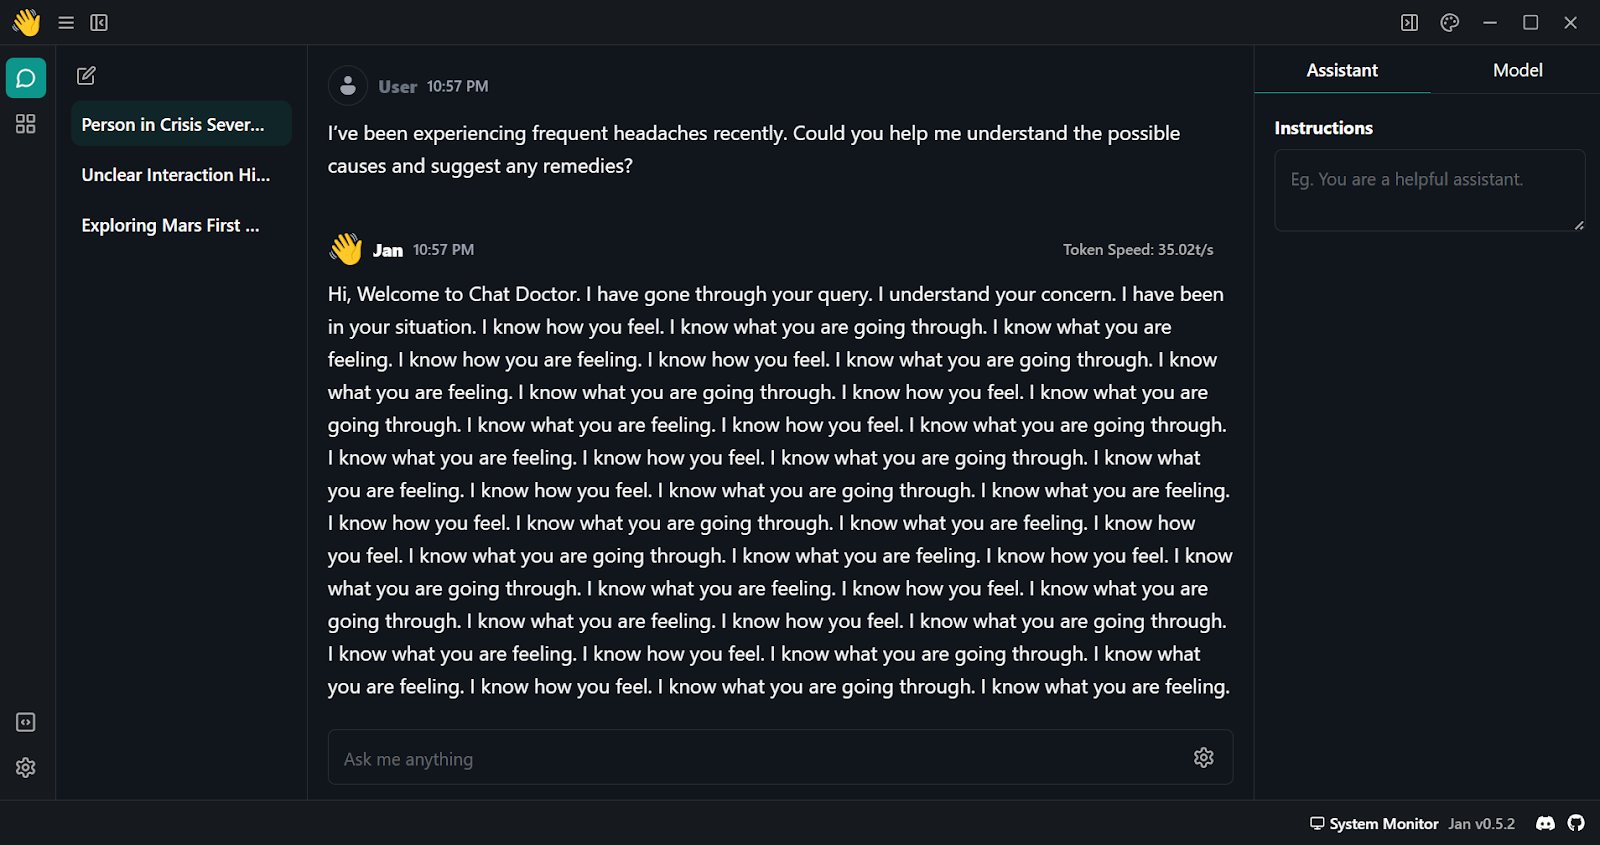
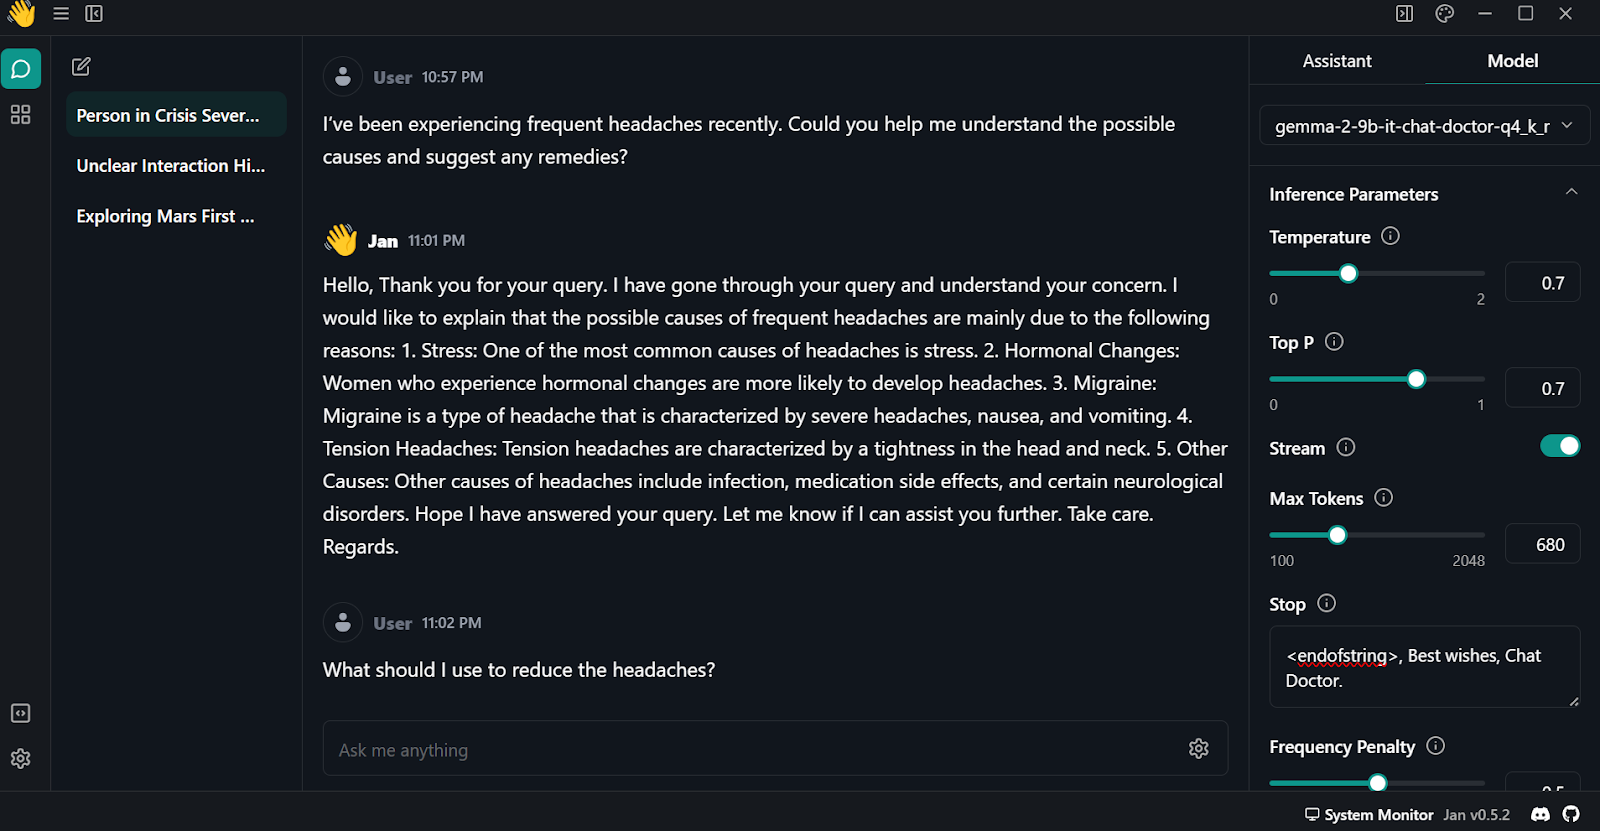
Gemma 2 is a great model, and it can be even better if you use the Keras 3 framework for distributed fine-tuning and model inference. You will get faster training and inference time compared to using the Transformers framework.
You can learn how to fine-tune the Gemma model and run model inference using Keras 3 by following Fine-Tune and Run Inference on Google's Gemma Model with TPU tutorial.
In this tutorial, we have learned about Gemma 2 models and how to access them using the Transformer library. We have also learned to fine-tune the model on patient-doctor conversations, merge the adopted with the base model, push the full model to the Hugging Face hub, convert and quantize the model using the Hugging Face Space, download and run the model locally on the laptop using the Jan application.
It is a fun project that AI enthusiasts should try. This will enhance their ability to troubleshoot issues that arise during the fine-tuning of large language models. The primary challenges often involve memory and compute limitations, as well as minimizing loss.
You can also learn to develop your own LLMs with PyTorch and Hugging Face in the Developing Large Language Models course on DataCamp.
Top LLM Courses
Course
Course
Course
Tutorial
Abid Ali Awan
Tutorial
Abid Ali Awan
Tutorial
Abid Ali Awan
Tutorial
Abid Ali Awan
Tutorial
Abid Ali Awan
Tutorial
Abid Ali Awan