Track
Developing Large Language Models
16 hr
Google's new open-source model family, Gemma 3, is swiftly gaining popularity due to its impressive performance, comparable to some of the latest proprietary models. Gemma 3 introduces multimodal capabilities, enhanced reasoning skills, and supports over 140 languages.
In this tutorial, we will explore the capabilities of Gemma 3 and learn how to fine-tune it on a financial reasoning question-answering dataset. This fine-tuning process will significantly enhance the model's accuracy in understanding complex financial questions and enable it to provide precise, contextually relevant answers.
Are you new to fine-tuning LLMs? Don’t worry; we have you covered! Follow our easy-to-understand tutorial, Fine-Tuning LLMs: A Guide With Examples, to learn how fine-tuning works.
You can also take the course Introduction to LLMs in Python to learn more about how LLMs function, how to fine-tune them, and how to evaluate their performance.

Image by Author
The Gemma family of open models represents a significant advancement in making cutting-edge AI technology accessible to everyone. Built using the research and technology behind the Gemini 2.0 models, Gemma 3 offers state-of-the-art performance while remaining lightweight and efficient.
With sizes ranging from 1 billion to 27 billion parameters, Gemma 3 provides flexibility in hardware and performance requirements, making it easier than ever to integrate advanced AI into real-world applications.
Gemma 3 sets a new benchmark for performance in its class, outperforming competitors such as Llama3-405B, DeepSeek-V3, and o3-mini in human preference evaluations on the LMArena leaderboard. Its lightweight design does not compromise on power, allowing developers to achieve industry-leading results while maintaining efficiency.
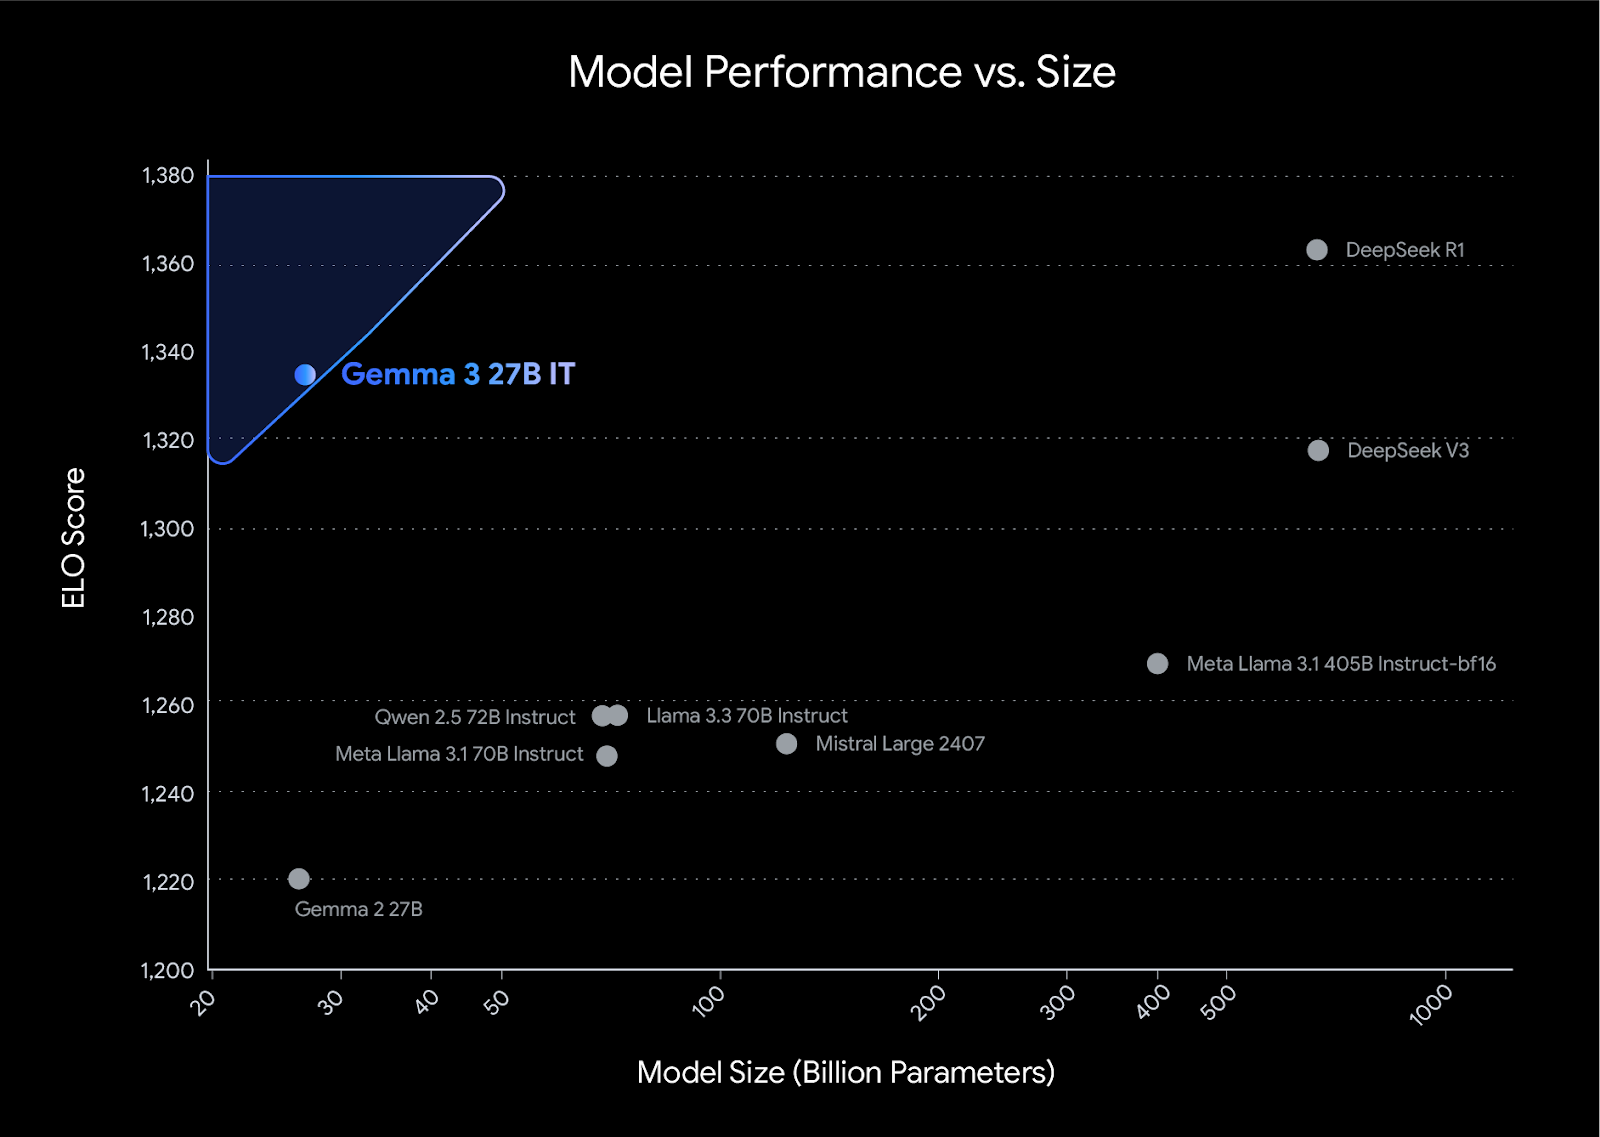
Source: Introducing Gemma 3
In this project, we will load the Gemma 3 from Kaggle and retrieve the data from Hugging Face. Then, we will use the Transformers and TRL libraries to fine-tune our model. For comparison, we will generate the response before and after fine-tuning.
If you want to learn how to use the Unsloth library to fine-tune your model on reasoning data, check out the Fine-Tuning DeepSeek R1 (Reasoning Model) guide.
Install all the necessary Python libraries, ensuring that you update the transformer library.
%%capture
!pip install -U datasets
!pip install -U accelerate
!pip install -U peft
!pip install -U trl
!pip install -U bitsandbytes
!pip install git+https://github.com/huggingface/transformers@v4.49.0-Gemma-3
Log in to the Hugging Face client using your API key. The API key is securely stored in the Kaggle secrets, and we will extract and apply it to the Hugging Face client.
from huggingface_hub import login
from kaggle_secrets import UserSecretsClient
user_secrets = UserSecretsClient()

hf_token = user_secrets.get_secret("HUGGINGFACE_TOKEN")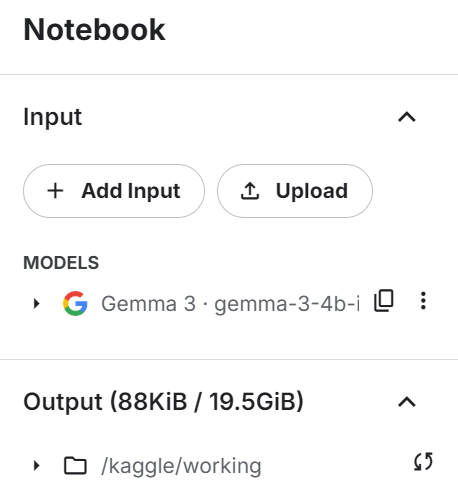
login(hf_token)Add the Gemma 3 4B IT model to the Kaggle notebook similarly to how you add the dataset by clicking on the “+ Add Input” button.
Load the model and tokenizer using the transformers library. Make sure the model is set to device_map="auto" to effectively use a dual GPU setup.
from transformers import AutoTokenizer, Gemma3ForConditionalGeneration

import torch

GEMMA_PATH = "/kaggle/input/gemma-3/transformers/gemma-3-4b-it/1"

model = Gemma3ForConditionalGeneration.from_pretrained(
    GEMMA_PATH, device_map="auto",attn_implementation='eager'
).eval()

tokenizer = AutoTokenizer.from_pretrained(GEMMA_PATH)Before loading the dataset, we will create the training prompt style and provide three placeholders that we will fill with dataset columns. This prompt style will help us generate reasoning text.
train_prompt_style="""
Below is an instruction that describes a task, paired with an input that provides further context.
Write a response that appropriately completes the request.
Before answering, think carefully about the question and create a step-by-step chain of thoughts to ensure a logical and accurate response.

### Question:
{}

### Response:
<think>
{}
</think>
{}
"""
Next, we will create the formatting function that uses the columns from the dataset and applies them to the training prompt style to create the "text" column. Ensure you are adding the EOS token at the end of the response.
def formatting_prompts_func(examples):
    inputs = examples["Open-ended Verifiable Question"]
    complex_cots = examples["Complex_CoT"]
    outputs = examples["Response"]
    texts = []
    for question, cot, response in zip(inputs, complex_cots, outputs):
        # Append the EOS token to the response if it's not already there
        if not response.endswith(tokenizer.eos_token):
            response += tokenizer.eos_token
        text = train_prompt_style.format(question, cot, response)
        texts.append(text)
    return {"text": texts}
We will now load the TheFinAI/Fino1_Reasoning_Path_FinQA dataset, which is a financial reasoning dataset based on FinQA, enhanced with GPT-4o generated reasoning paths for structured financial question answering. After this, we will apply the formatting function to the dataset and create the new text column shaped by the prompt style.
from datasets import load_dataset
dataset = load_dataset("TheFinAI/Fino1_Reasoning_Path_FinQA", split = "train[0:500]",trust_remote_code=True)
dataset = dataset.map(formatting_prompts_func, batched = True,)
dataset["text"][0]
The new STF trainer doesn't accept the tokenizers, so we have to create our data collection using the tokenizer and provide it to the trainer later.
from transformers import DataCollatorForLanguageModeling

data_collator = DataCollatorForLanguageModeling(
    tokenizer=tokenizer,
    mlm=False  # we're doing causal LM, not masked LM
)Before we start fine-tuning the model, we will test our original model to see how good it is at generating responses. We will create the prompt style with two placeholders instead of three.
prompt_style = """Below is an instruction that describes a task, paired with an input that provides further context.
Write a response that appropriately completes the request.
Before answering, think carefully about the question and create a step-by-step chain of thoughts to ensure a logical and accurate response.

### Question:
{}

### Response:
<think>
{}
"""
Then, we will apply the prompt style to the question, convert it into tokens, and provide it to the model. After that, we will generate the response and convert the tokens back into text.
question = dataset[0]['Open-ended Verifiable Question']
inputs = tokenizer(
[prompt_style.format(question, "") + tokenizer.eos_token],
return_tensors="pt"
).to("cuda")
outputs = model.generate(
input_ids=inputs.input_ids,
attention_mask=inputs.attention_mask,
max_new_tokens=1200,
eos_token_id=tokenizer.eos_token_id,
use_cache=True,
)
response = tokenizer.batch_decode(outputs, skip_special_tokens=True)
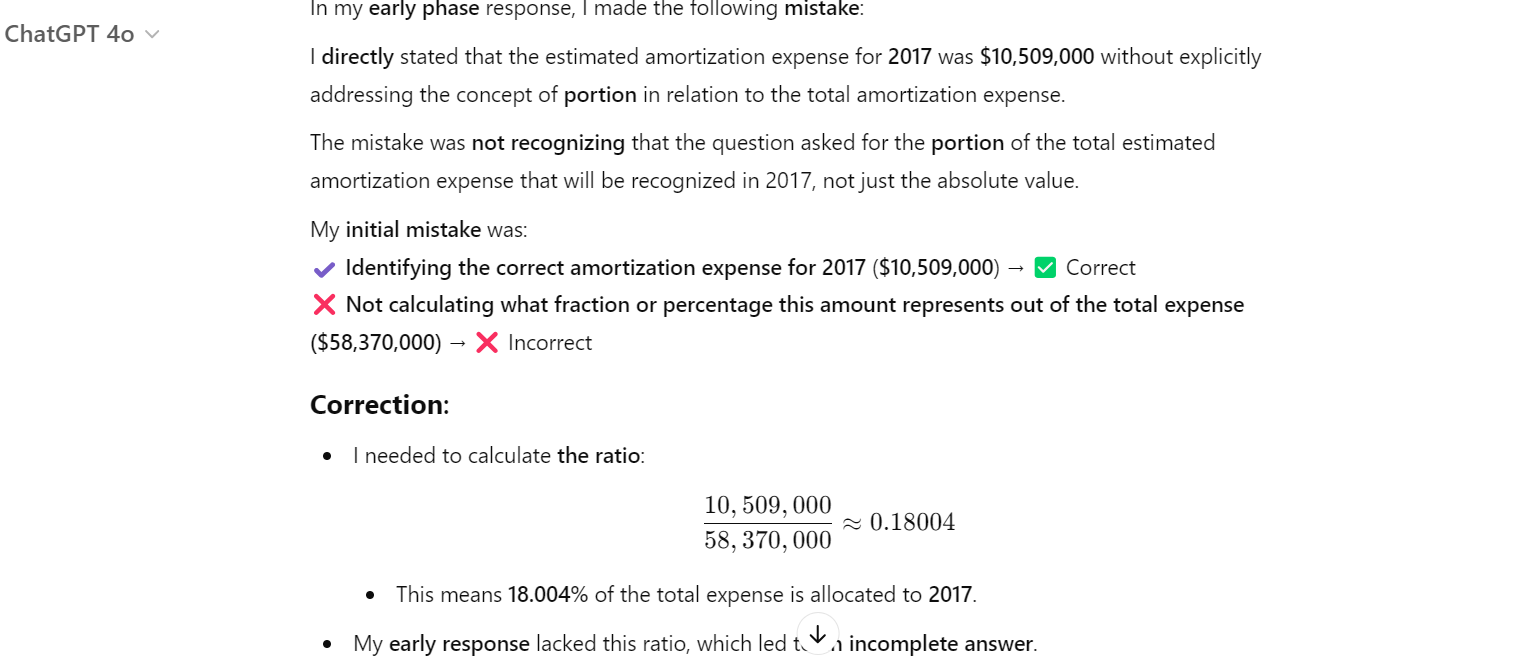
print(response[0].split("### Response:")[1])The response is short and far from accurate.
<think>

The question asks for the portion of the estimated amortization expense that will be recognized in 2017.
The provided table shows the estimated amortization expense for intangible assets for the years 2017, 2018, 2019, 2020, 2021, and 2022 and thereafter.
The amortization expense for 2017 is $10,509.
</think>
$10,509
Here is the answer from the dataset. The answer should be a ratio, not the amount.

Even ChatGPT got it wrong, and we had to ask it to fix the mistake. After that, it understood that it made a mistake and corrected it.
We will now provide the dataset, model, data collection, training arguments, and LoRA configuration to the SFTTrainer.
from trl import SFTTrainer
from transformers import TrainingArguments
from peft import LoraConfig

# LoRA Configuration
peft_config = LoraConfig(
    lora_alpha=16,                           # Scaling factor for LoRA
    lora_dropout=0.05,                       # Add slight dropout for regularization
    r=64,                                    # Rank of the LoRA update matrices
    bias="none",                             # No bias reparameterization
    task_type="CAUSAL_LM",                   # Task type: Causal Language Modeling
    target_modules=[
        "q_proj",
        "k_proj",
        "v_proj",
        "o_proj",
        "gate_proj",
        "up_proj",
        "down_proj",
    ],  # Target modules for LoRA
)


# Training Arguments
training_arguments = TrainingArguments(
    output_dir="output",
    per_device_train_batch_size=1,
    per_device_eval_batch_size=1,
    gradient_accumulation_steps=2,
    optim="paged_adamw_32bit",
    num_train_epochs=1,
    logging_steps=0.2,
    warmup_steps=10,
    logging_strategy="steps",
    learning_rate=2e-4,
    fp16=False,
    bf16=False,
    group_by_length=True,
    report_to="none"
)

# Initialize the Trainer
trainer = SFTTrainer(
    model=model,
    args=training_arguments,
    train_dataset=dataset,
    peft_config=peft_config,
    data_collator=data_collator,
)Clear the CUDA cache before initiating the straining process.
torch.cuda.empty_cache()
trainer_stats = trainer.train()
It took almost 1 hour and 20 minutes to complete 1 epoch. As we can see, the loss has gradually reduced.

Now, let's test our fine-tuned model by providing a sample question as we did before.
question = dataset[0]['Open-ended Verifiable Question']

inputs = tokenizer(
    [prompt_style.format(question, "") + tokenizer.eos_token],
    return_tensors="pt"
).to("cuda")

outputs = model.generate(
    input_ids=inputs.input_ids,
    attention_mask=inputs.attention_mask,
    max_new_tokens=1200,
    eos_token_id=tokenizer.eos_token_id,
    use_cache=True,
)
response = tokenizer.batch_decode(outputs, skip_special_tokens=True)
print(response[0].split("### Response:")[1])
The reasoning part is now detailed and correct. The answer is also accurate.
<think>


Alright, let's figure out what portion of the estimated amortization expense will be recognized in 2017. First, I need to see what the total estimated amortization expense is for the years 2017 through 2022. Looking at the numbers, it's $58,370.

Now, I need to find out how much of that is specifically for 2017. The table shows that the estimated amortization expense for 2017 is $10,509.

So, to find out what portion of the total expense is for 2017, I'll divide the 2017 expense by the total expense. That's $10,509 divided by $58,370.

Let's do the math: $10,509 divided by $58,370 gives me approximately 0.1805.

Now, to express this as a percentage, I'll multiply by 100. So, 0.1805 times 100 gives me 18.05%.

Therefore, about 18.05% of the estimated amortization expense for the years 2017 through 2022 will be recognized in 2017.

</think>
About 18.05% of the estimated amortization expense for the years 2017 through 2022 will be recognized in 2017.
Let’s ask another question.
question = dataset[10]['Open-ended Verifiable Question']

inputs = tokenizer(
    [prompt_style.format(question, "") + tokenizer.eos_token],
    return_tensors="pt"
).to("cuda")

outputs = model.generate(
    input_ids=inputs.input_ids,
    attention_mask=inputs.attention_mask,
    max_new_tokens=1200,
    eos_token_id=tokenizer.eos_token_id,
    use_cache=True,
)
response = tokenizer.batch_decode(outputs, skip_special_tokens=True)
print(response[0].split("### Response:")[1])
As we can see, we have successfully fine-tuned the model on the new dataset. It is now accurate and follows the reasoning and answer style.
<think>


Alright, let's figure out the total purchase price of Impella Cardiosystems. First, we know the purchase price was $45.1 million, but there's a contingent payment of $5.6 million that could be earned. So, we need to see if we can figure out how much of that $5.6 million is actually likely to be paid.

Now, the question mentions that the contingent payment is triggered by FDA approvals. Since we're dealing with a medical device, getting FDA clearance is pretty important. Let's assume that the FDA approval for the Impella 2.5 is a good sign that the contingent payments will be made.

Okay, so if we assume all the contingent payments are earned, we just need to add the $5.6 million to the original $45.1 million. Let's do the math: $45.1 million plus $5.6 million equals $50.7 million.

Hmm, let's double-check our work. We're adding $45.1 million to $5.6 million, which gives us $50.7 million. Yep, that seems right.

So, if we assume all the contingent payments are earned, the total purchase price of Impella Cardiosystems would be $50.7 million.

</think>
The total purchase price of Impella Cardiosystems, assuming all contingent consideration is earned, would be $50.7 million.
Fine-tuning a model requires expertise, money, and time. In some cases, you might just need a better RAG pipeline to meet your needs. Please read the guide RAG vs Fine-Tuning: A Comprehensive Tutorial with Practical Examples to understand your requirements.
First, we will save the model and tokenizer locally.
new_model_online = "kingabzpro/Gemma-3-4B-Fin-QA-Reasoning"
new_model_local = "Gemma-3-4B-Fin-QA-Reasoning"
model.save_pretrained(new_model_local) # Local saving
tokenizer.save_pretrained(new_model_local)
Then, we will push the model to the Hugging Face Hub.
model.push_to_hub(new_model_online) # Online saving
tokenizer.push_to_hub(new_model_online) # Online saving
This process will first create the model repository and then push all the model, tokenizer, and configuration fields to the remote server.
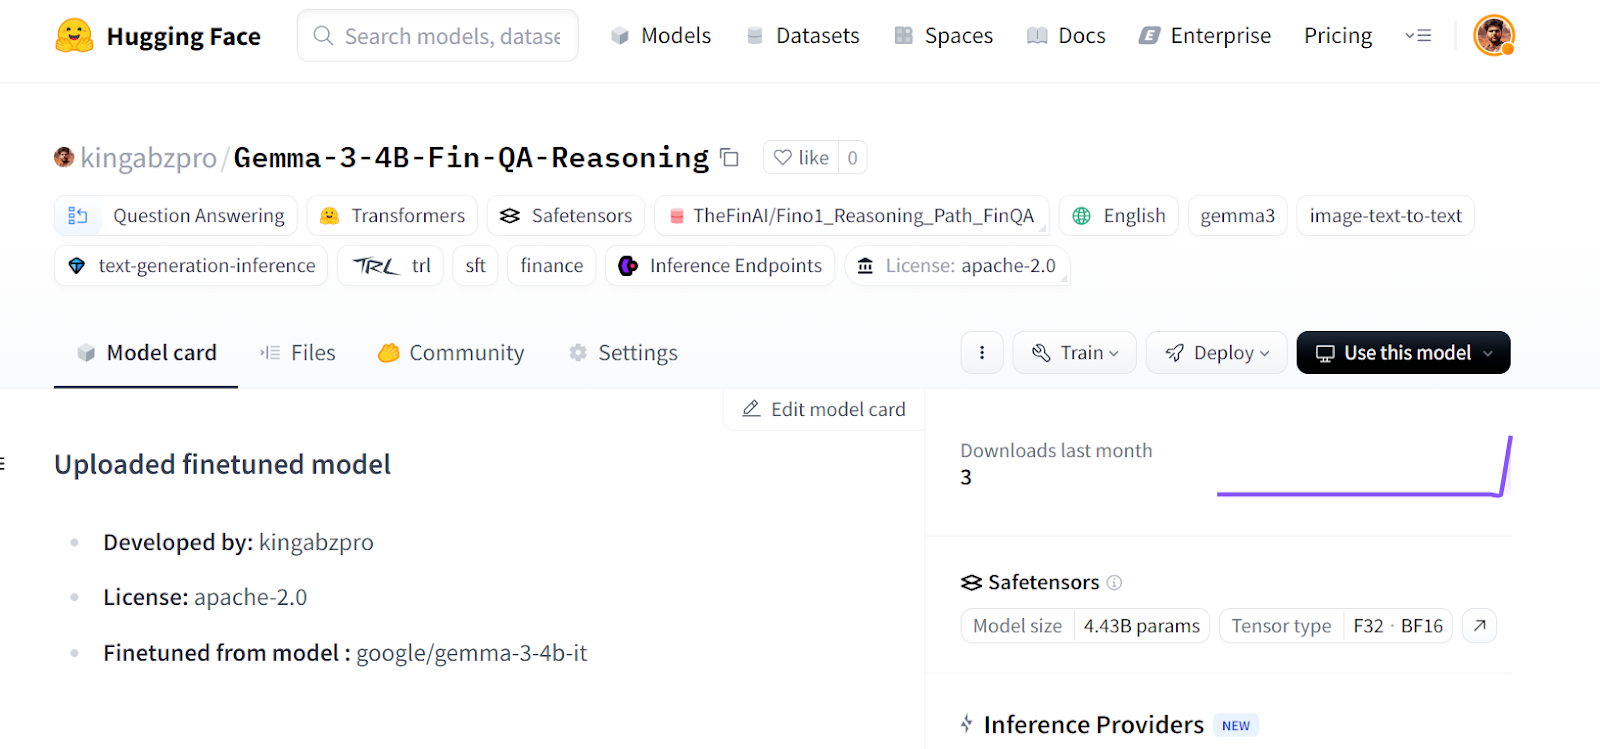
Source: kingabzpro/Gemma-3-4B-Fin-QA-Reasoning · Hugging Face
If you are facing issues running the above code, we have created a Kaggle notebook for anyone to clone and run on their own to understand the process better.
Fine-tuning the Gemma 3 model comes with challenges; you may encounter hardware issues, library issues, memory fragmentation issues, and more. This guide provides a simpler implementation of how you can convert any model into a reasoning model and avoid facing any future issues related to software and hardware.
In this tutorial, we have covered the features of the Gemma 3 model and how we can easily fine-tune it to the reasoning dataset using free GPU resources available on Kaggle.
Take the Fine-tuning with Llama 3 course to tackle fine-tuning tasks using TorchTune, and learn efficient fine-tuning techniques such as quantization.
Top DataCamp Courses
Track
Course
Course
Tutorial
Abid Ali Awan
Tutorial
Abid Ali Awan
Tutorial
Abid Ali Awan
Tutorial
Abid Ali Awan
Tutorial
Josep Ferrer
Tutorial
Aashi Dutt