Course

Introduction
When building a machine learning model, you may forget to take into account the infrastructure needed to train and serve the model in production. For end-to-end machine learning workflows, it can be challenging to manage all the application, platform, and resource considerations.
Compared to conventional web deployments, machine learning applications have a different footprint. For example, a training phase is resource intensive, while an inference phase is lightweight and speedy. You will also need the tools and frameworks to run all of these pieces. One very popular open-source framework that can be used to develop a standard for delivering end-to-end machine learning applications is Kubeflow.
What is Kubeflow?
Kubeflow is an open-source project that contains a curated set of tools and frameworks. The primary goal of Kubeflow is to make it easy to develop, deploy, and manage portable, scalable machine learning workflows.
Kubeflow is built on top of Kubernetes, an open-source platform for running and orchestrating containers. Kubernetes is constructed to run consistently across different environments, which is key to how Kubeflow operates. Kubeflow is designed to let Kubernetes do what it is good at, allowing you to focus on defining and running ML workflows, including managing data, running notebooks, training models, and serving them.
Kubeflow evolved from Google’s internal project called TensorFlow Extended. It began as just a simpler way to run TensorFlow jobs on Kubernetes but has since expanded into a multi-architecture, multi-cloud framework for running end-to-end machine learning workflows.
Kubeflow and Machine Learning Workflows
Kubeflow is a platform for data scientists and machine learning engineers containing the best of both worlds’ functionalities. Data scientists can use Kubeflow to experiment with ML models and orchestrate their experiments on Kubernetes in the most efficient way.
Machine learning engineers can use Kubeflow to deploy ML systems to various environments for development, testing, and production serving.
The diagram below is an example of two distinct phases in a machine learning project: (i) the Experimental Phase and (ii) the Production Phase.
Kubeflow has a lot of different components to support nearly all the steps in the pipeline below. For example, for tuning the hyperparameters of the model, Kubeflow has a component called “Katib.” We will discuss Kubeflow’s key components later in this tutorial.
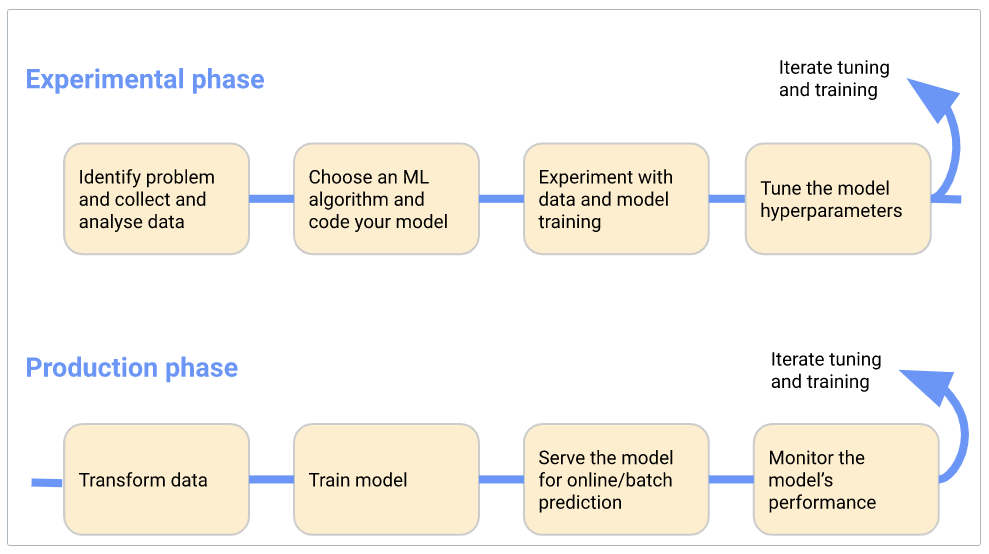
Kubeflow - Machine Learning Workflow
Installing Kubeflow
There are two ways to get up and running with Kubeflow:
- Install it with packaged distribution (simple and straightforward).
- Install it with manifests (advanced).
Packaged distributions are developed and supported by respective maintainers. For example, Kubeflow on Azure is maintained by Microsoft. See a complete list of distributions in the table below:

Kubeflow Packaged Distributions
Three Principles of Kubeflow
Composability
Composability is a system design principle to deal with the interrelationships of the components. Kubeflow is highly composable, so you can easily use different versions of TensorFlow for different parts of your machine learning pipeline if needed.
Portability
Portability means you can run your entire machine learning project anywhere you are running Kubeflow. It is platform agnostic and abstracts away all difficulties for the user. You just have to write your code once, and Kubeflow will handle the abstraction so you can run the code on your laptop or on a cluster in the cloud.
Scalability
Scalability means your project can access more resources when they are needed and release them when they are not. Every environment can have different computing resources like CPUs, GPUs, and TPUs.
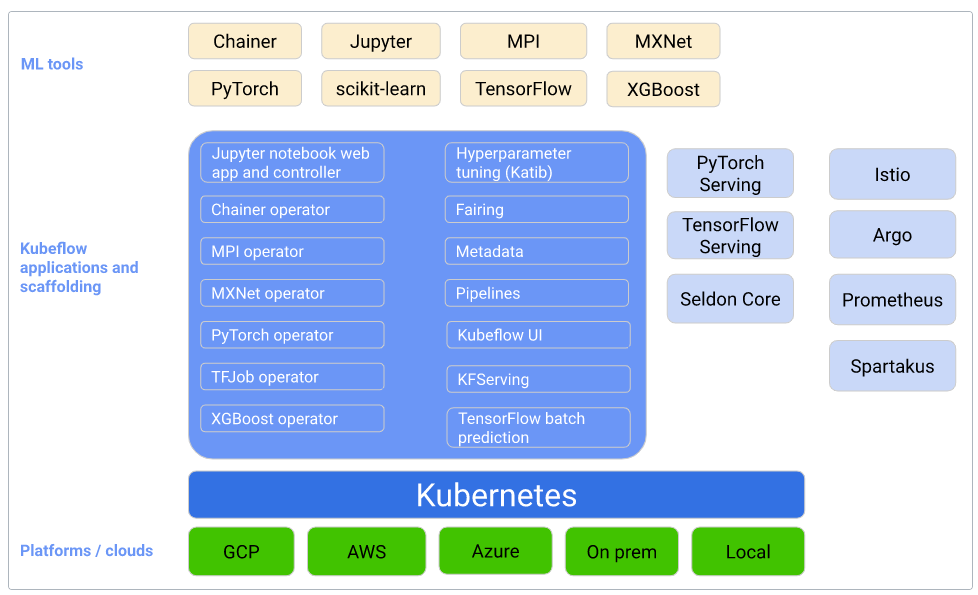
Kubeflow Components
Kubeflow components are logical blocks that together make up Kubeflow. Generally, you will find yourself using one or more components in a machine learning project.
Dashboard
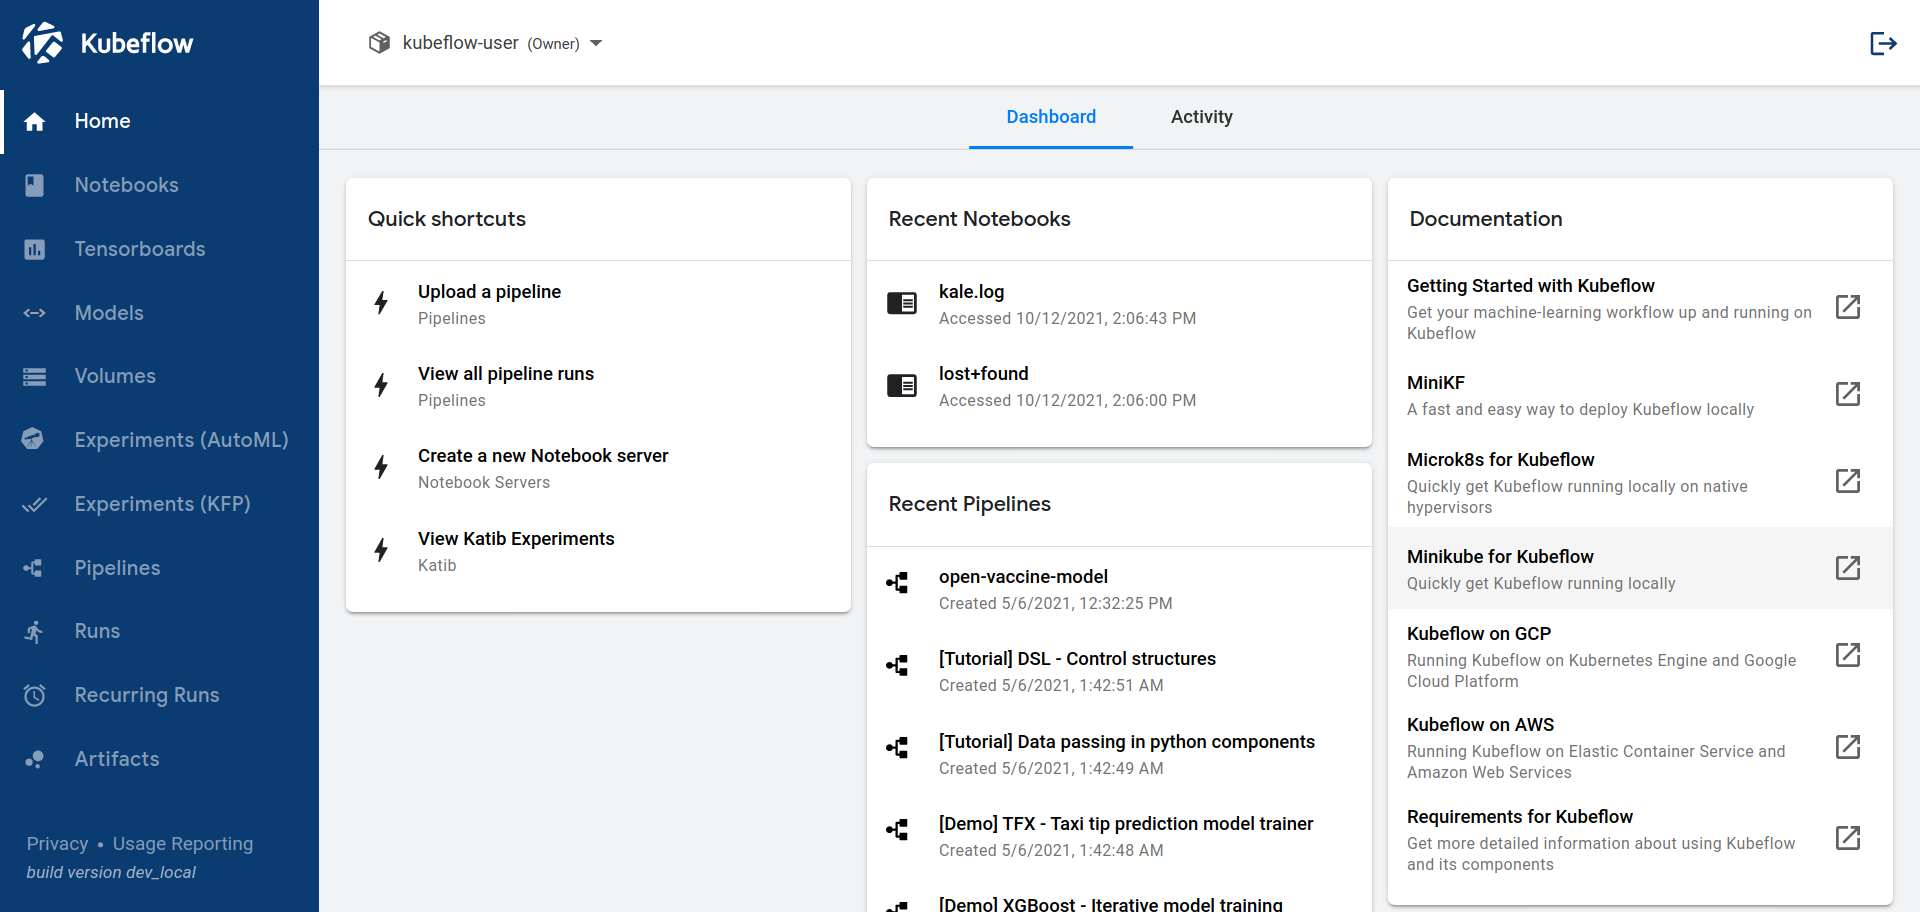
Above all, the Central Dashboard provides quick access to other Kubeflow components. Some of the useful components are:
- Notebooks: To manage Notebook servers.
- Pipelines: To manage Kubeflow pipelines.
- Experiments: To manage Katib experiments.
Notebooks
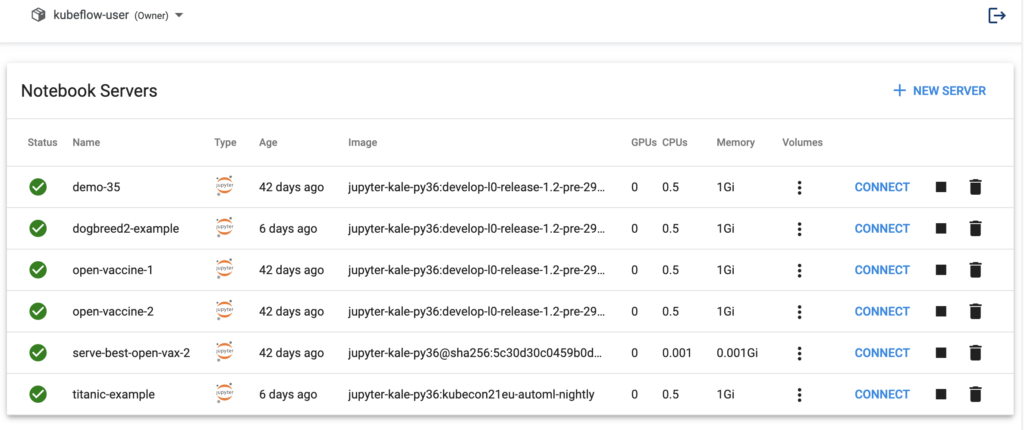
Kubeflow comes with an integrated Jupyter notebook environment. Notebooks are useful for doing quick tests, developing models, and even writing ML applications.
It is not uncommon for ML engineers and data scientists to run their notebooks locally and be constrained by resources. Having notebooks in the cluster makes it easy to run jobs where resources can be dynamically scaled.
Pipelines
Kubeflow Pipelines is a powerful Kubeflow component for building end-to-end portable and scalable machine learning pipelines based on Docker containers.
Machine Learning Pipelines are a set of steps capable of handling everything from collecting data to serving machine learning models. Each step in a pipeline is a Docker container, hence portable and scalable. Each step in the pipeline is independent, allowing you to reuse the pipeline components.
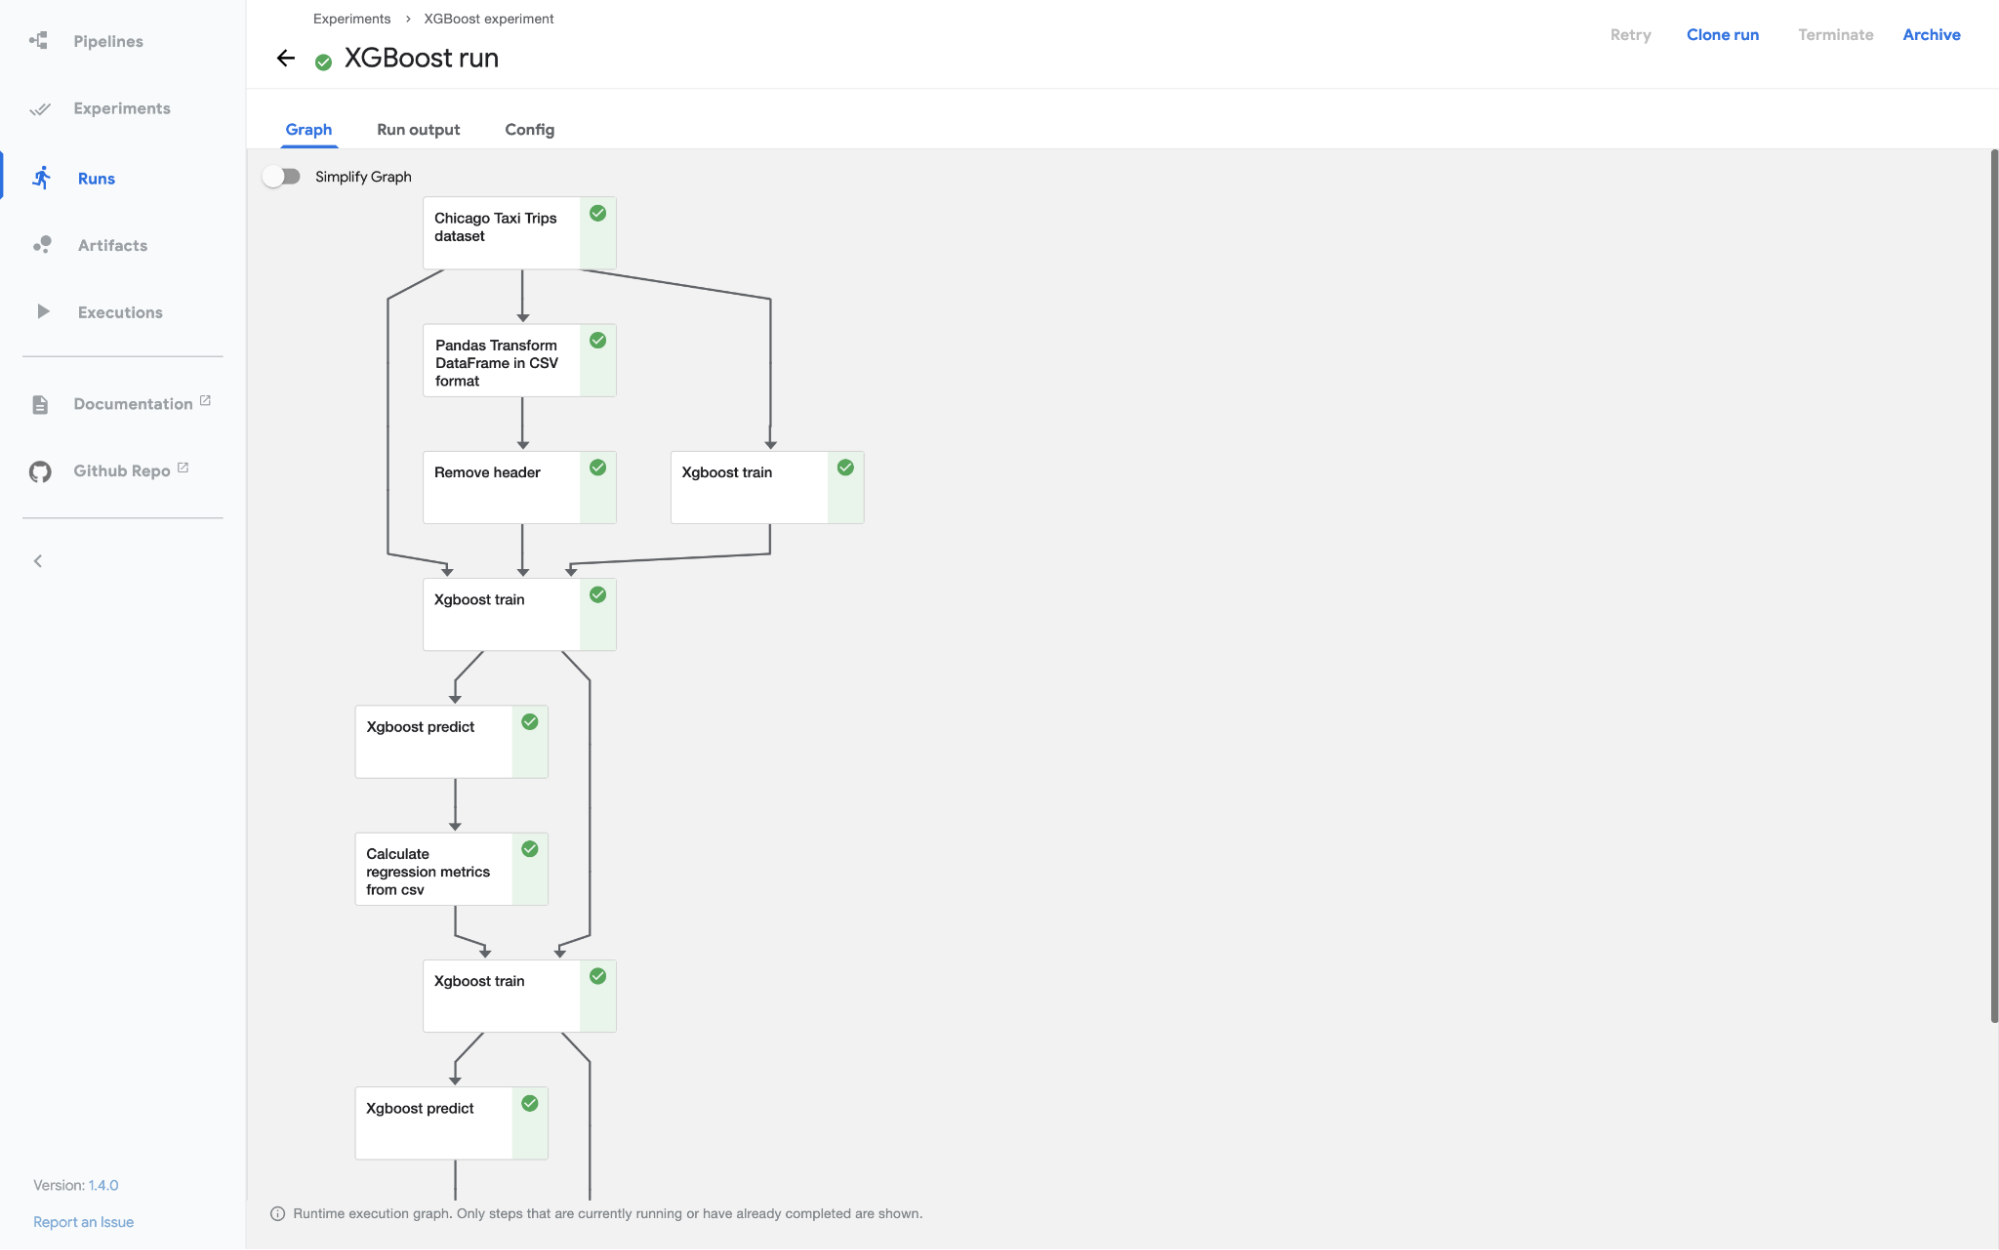
In this tutorial, we will walk through the Kubeflow Pipelines component in detail and see the code example of how to build and execute a machine learning pipeline using Kubeflow.
Katib
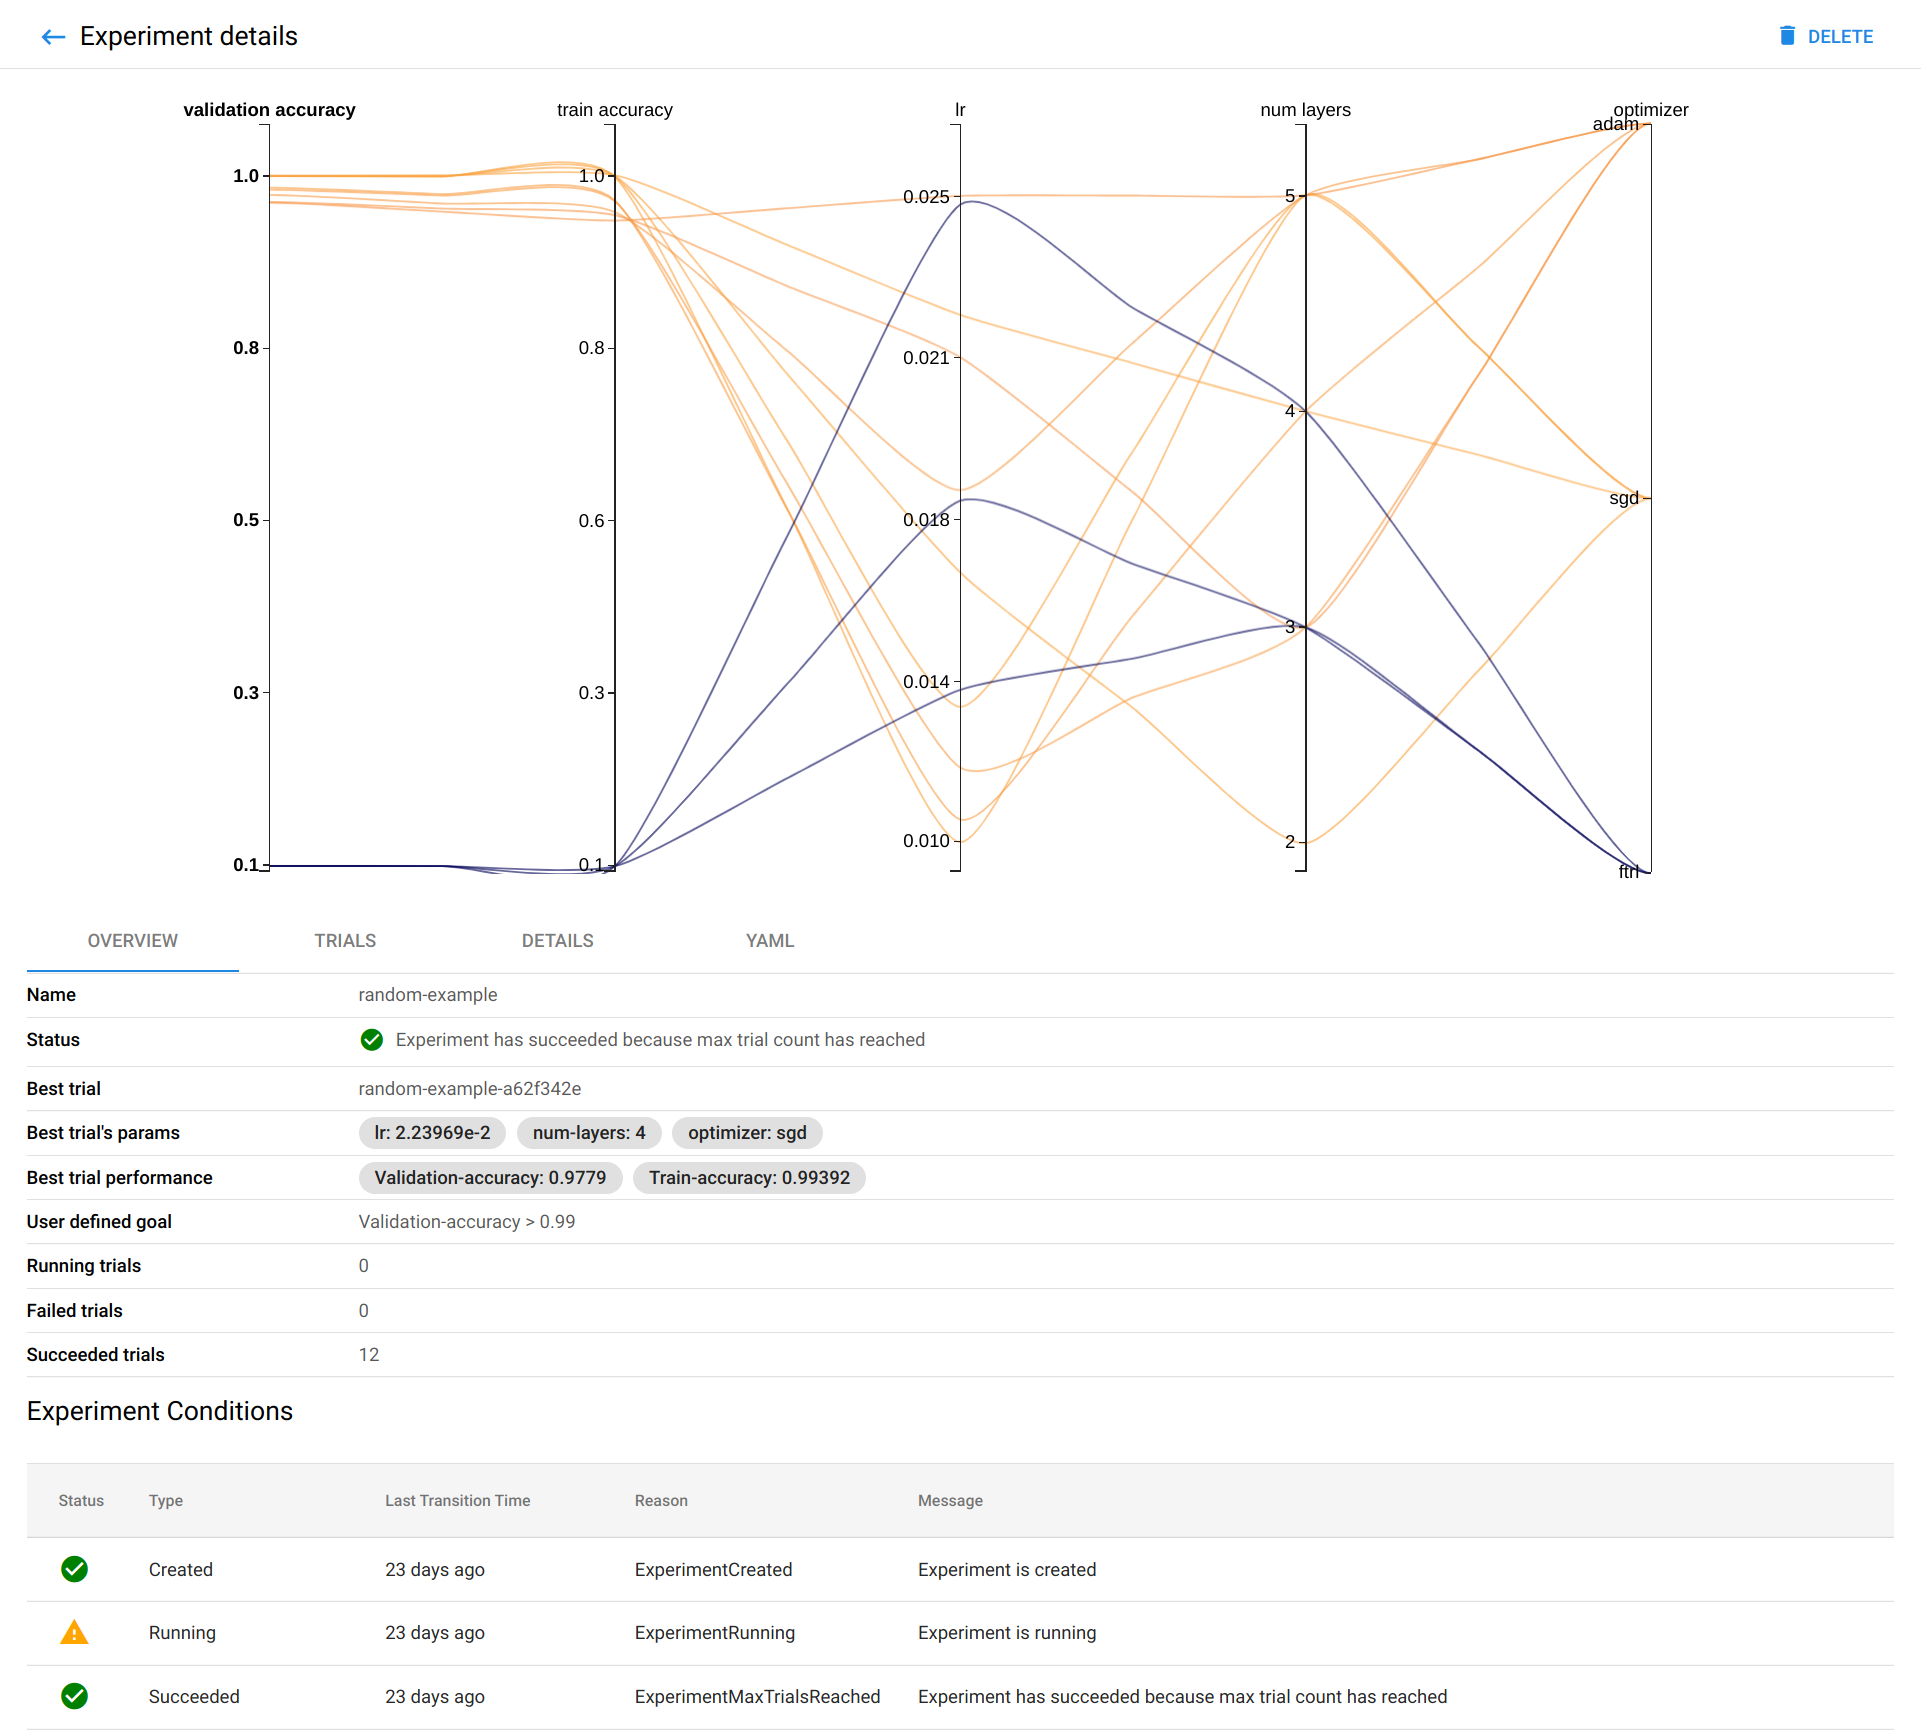
Katib is a Kubeflow component designed for automated hyperparameter tuning at scale. Hyperparameter tuning plays a major part in developing good models, as manually searching a hyperparameter space can take a lot of effort.
Katib helps you optimize your hyperparameter values around a defined metric (such as AUC or RMSE). It is a helpful way to find and visualize the optimum configuration to prepare your model for production.
Kubeflow Pipelines
A machine learning workflow can involve many steps, from data preparation to model training to model evaluation and more. It is hard to track these in an ad hoc manner.
Experiment logging and model version tracking without a proper tooling is another challenge for data scientists to overcome. Kubeflow Pipelines let data scientists develop machine learning workflows using standards that are composable, shareable, and reproducible.
Kubeflow is a Kubernetes native solution that helps data scientists to adopt a disciplined pipeline mindset when developing machine learning code and scaling it up to the cloud. The ultimate goals of Kubeflow Pipelines are to:
- Simplify Orchestration of Machine Learning Pipelines at scale
- Allow Faster Experimentation, Reproducibility, and Collaboration through Multi-tenancy. Kubeflow UI can be used to create groups and add users to groups with access control.
- Be reusable and offer standardization of different ML components (steps in pipelines).
Using Kubeflow, you can create end-to-end machine learning solutions without rebuilding every time, like building blocks. Kubeflow also supports several other things like execution monitoring, workflow scheduling, metadata logging, and versioning.
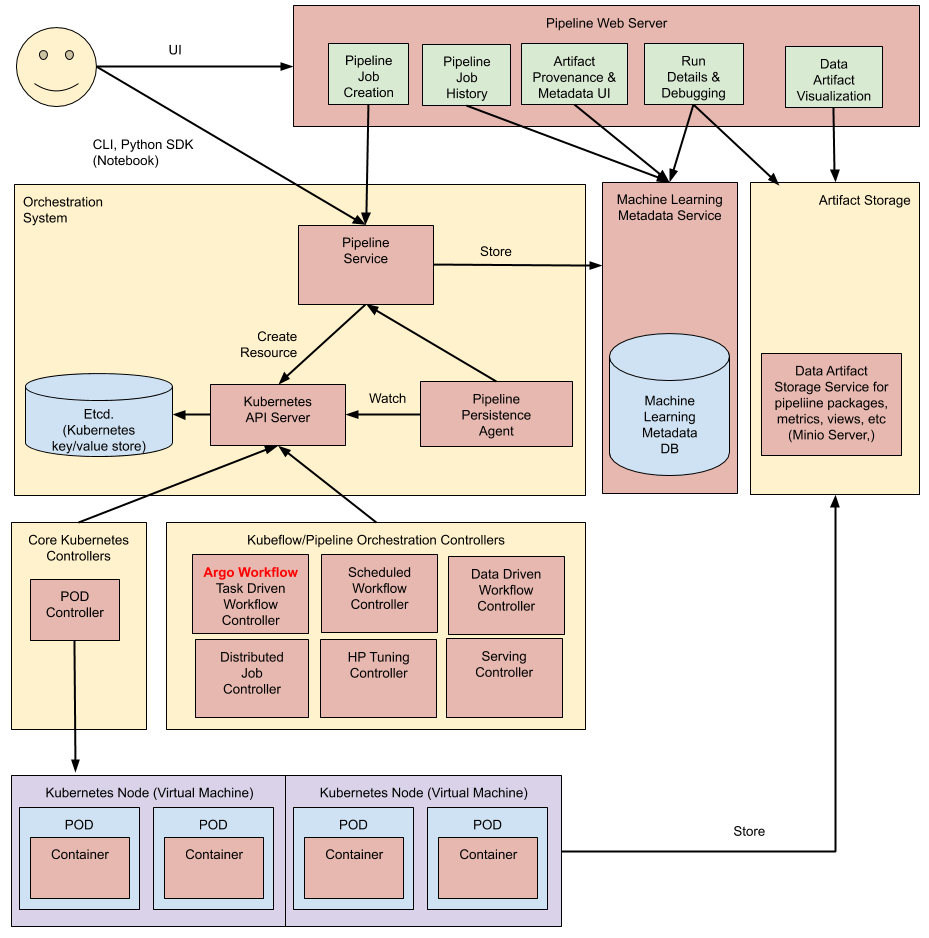
Kubeflow Architectural overview
Important Concepts in Kubeflow Pipelines
Pipeline
A pipeline is a sequence of clearly defined steps in a machine learning (ML) workflow. The pipeline must have a definition of the inputs (parameters) required to run the pipeline and the inputs and outputs of each component. Each component in a pipeline takes an input, processes it, and provides the output to the next component.
One very important concept to understand here is each step (component) in a Kubeflow pipeline is basically a Docker container. When you execute a pipeline, Kubeflow launches one or more Kubernetes Pods corresponding to the components in the pipeline. The pods then start the docker container, which, in turn, executes the code you have written in the component.
Component
A pipeline component is a self-contained code that performs one step in the machine learning workflow, such as missing value imputation, data scaling, or machine learning model fitting.
A component in a Kubeflow pipeline is similar to a function. As such, each component has a name, input parameters, and an output.
Each component in a pipeline must be packaged as a Docker image so that each step of the pipeline is independent of the other, and you can mix and match different frameworks and tools in different parts of your ML workflows.
Experiment
An experiment allows you to run different configurations of the same pipeline and compare and analyze the results. Normally in machine learning, you have to try different parameters to see which one works best. Kubeflow Pipeline Experiment is designed to achieve that.
Graph
A graph is a visual presentation in the Kubeflow UI. It shows the steps, which a pipeline run has executed or is executing, with arrows indicating the parent/child relationships between the pipeline components represented by each step.
Three ways to build pipelines in Kubeflow
Hopefully, it is now clear what Kubeflow pipelines are and what the benefits of using this framework for designing and deploying machine learning workflows in production are. Let’s quickly review three ways you can use Kubeflow to build and deploy pipelines.
User Interface (UI)
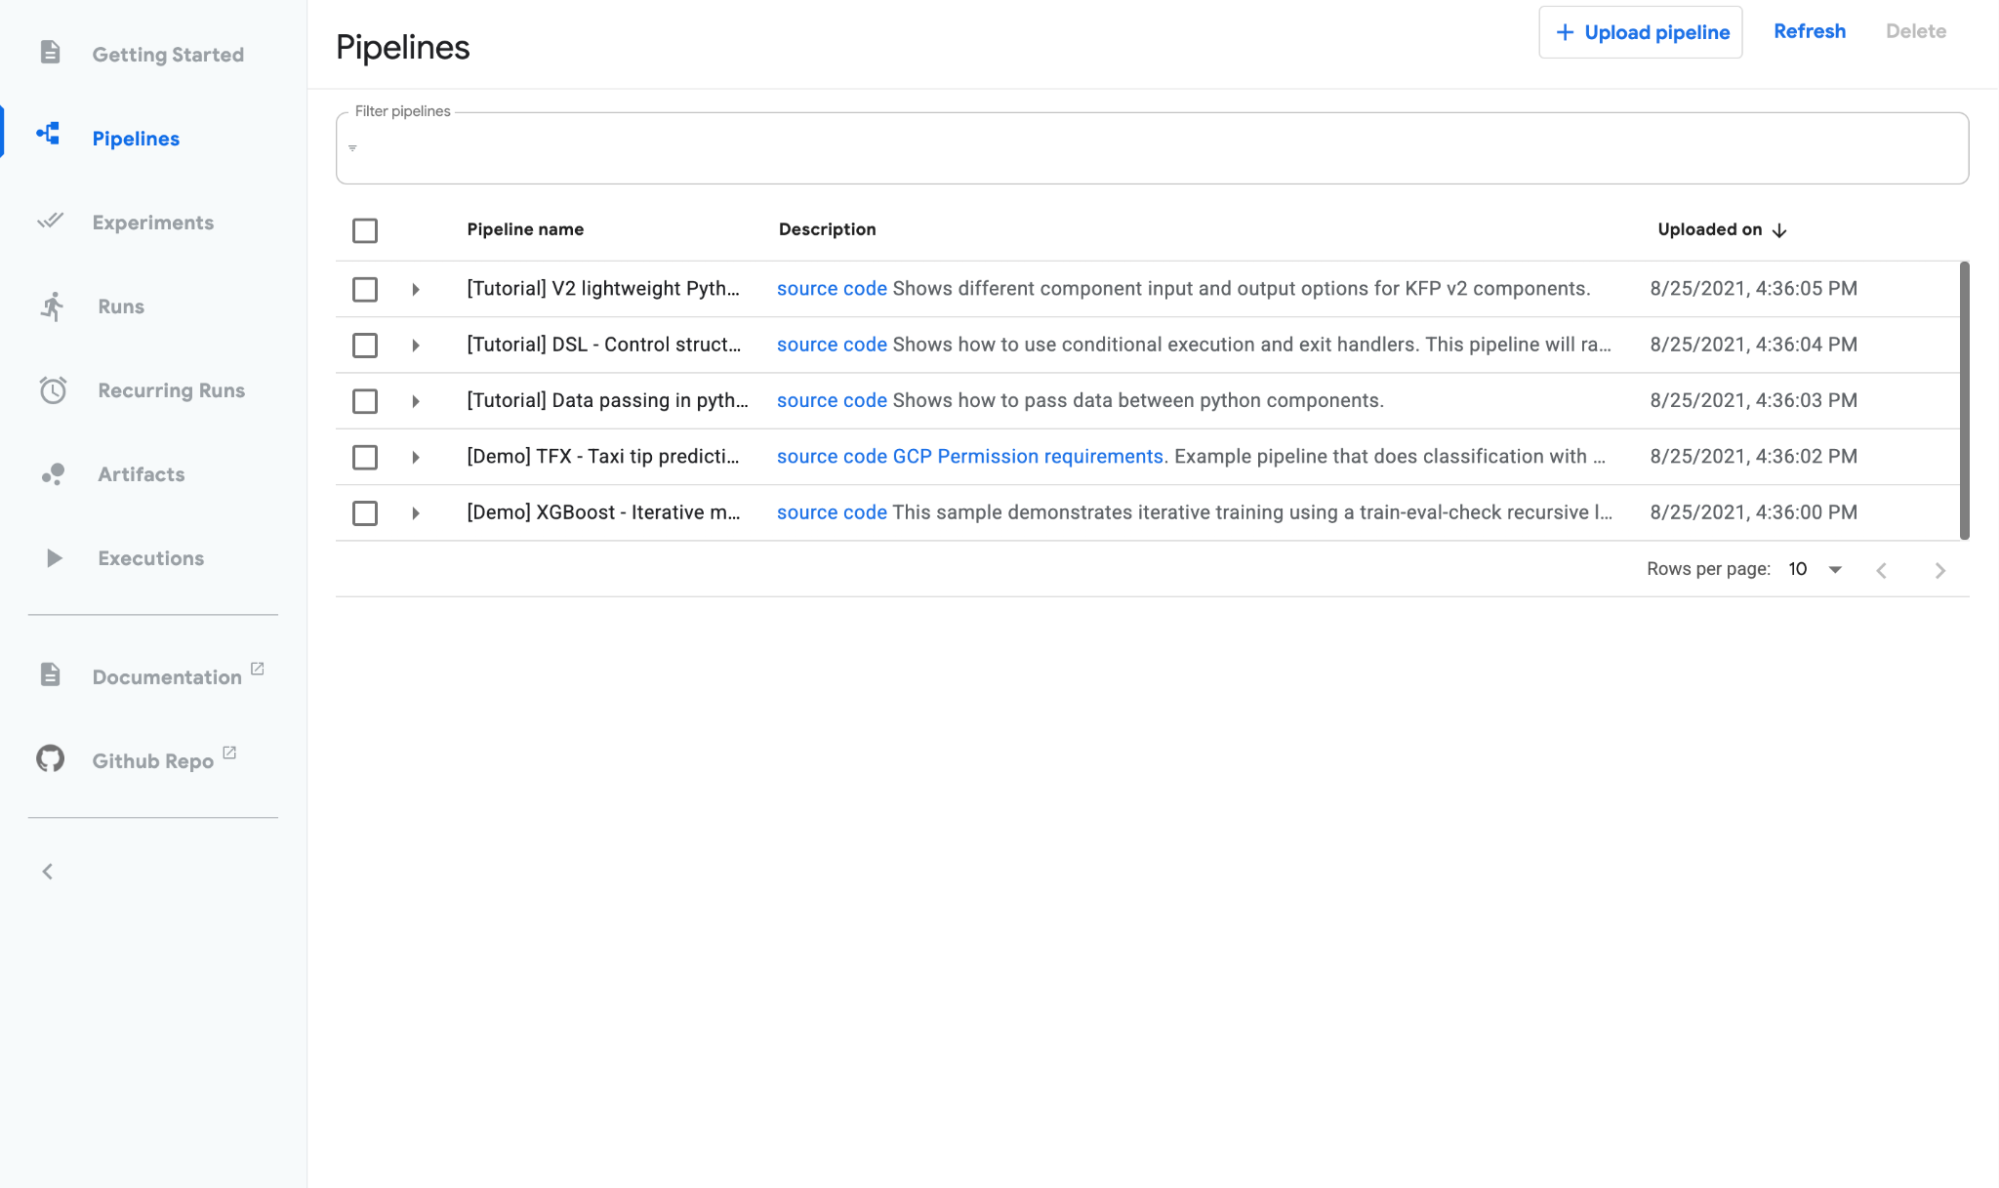
You can use the Kubeflow UI to run pipelines, upload pipelines that somebody has shared with you, view artifacts and output of runs, and schedule the automated runs. This is what Pipeline UI looks like:
Official Python SDK
Kubeflow provides a set of Python libraries that you can use to programmatically develop and execute ML pipelines. This is the most common way of usage for Kubeflow pipelines.
REST API
Kubeflow also provides REST APIs for continuous integration/deployment systems. Imagine a use-case where you want to integrate any of the Kubeflow Pipeline functionalities in downstream enterprise systems or processes.
Kubeflow Pipeline Tutorial
The easiest way to get started with Kubeflow is to use a packaged distribution, which is basically like a managed service on the cloud. Here, we are using Kubeflow service on GCP. You can follow this official guide to learn how to deploy the service on GCP.
Once the deployment is successful, you can access this dashboard from your GCP endpoint.
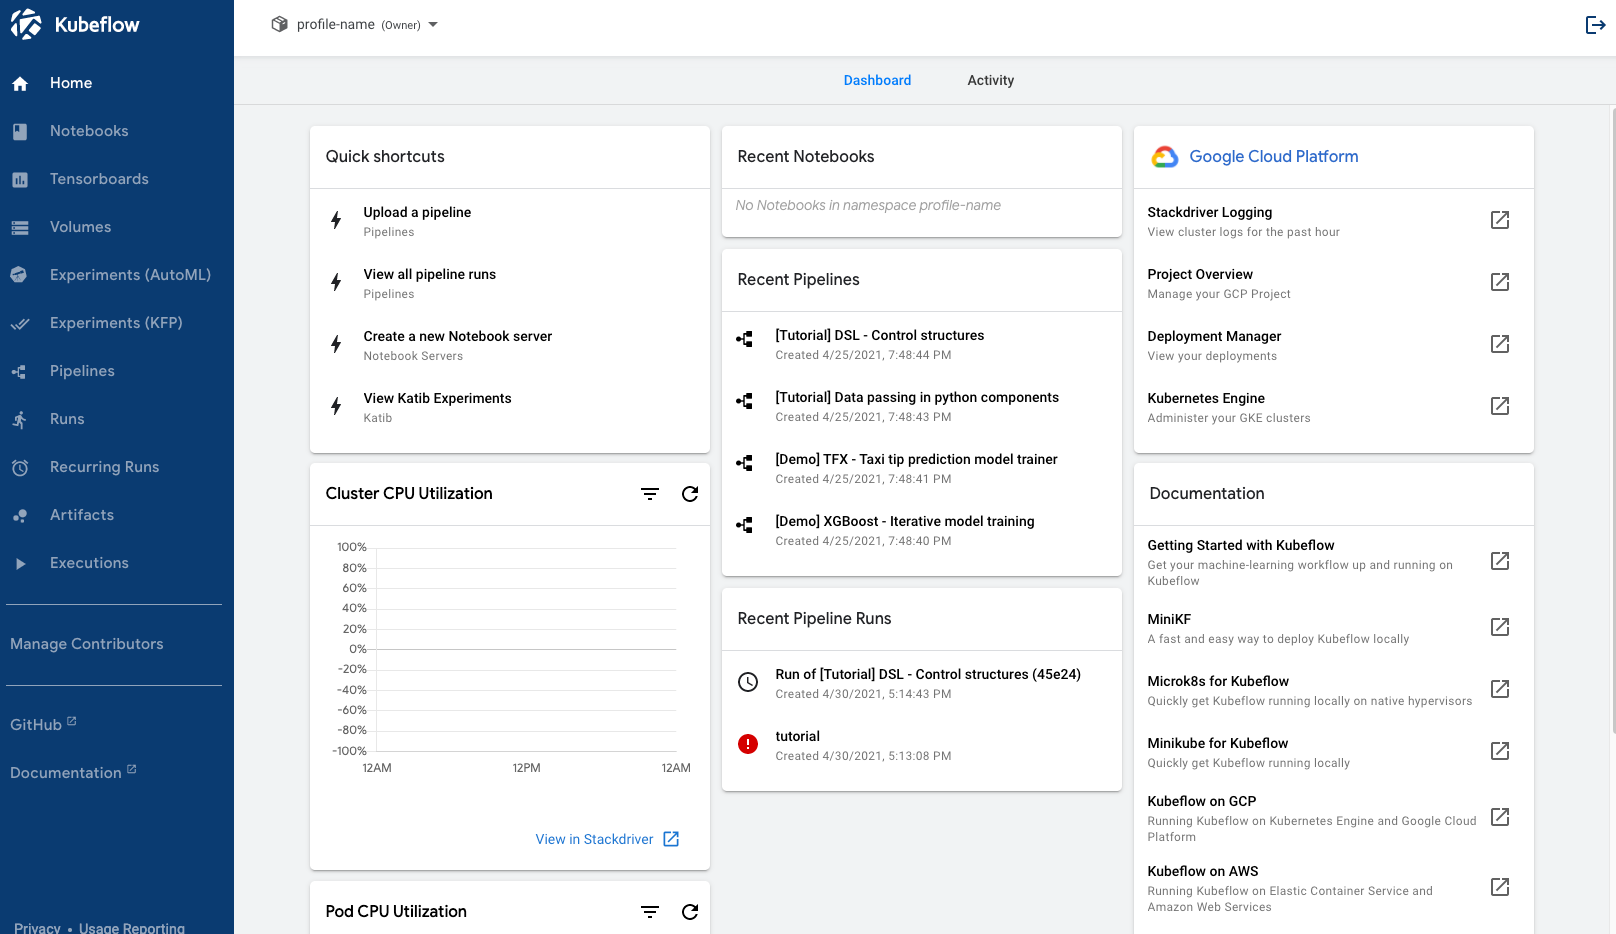
Kubeflow Dashboard - Deployment on GCP
Kubeflow Pipelines come with a few sample pipelines. Let’s try a basic data preprocessing pipeline in Python. Click on the pipeline on the left-hand side toolbar.
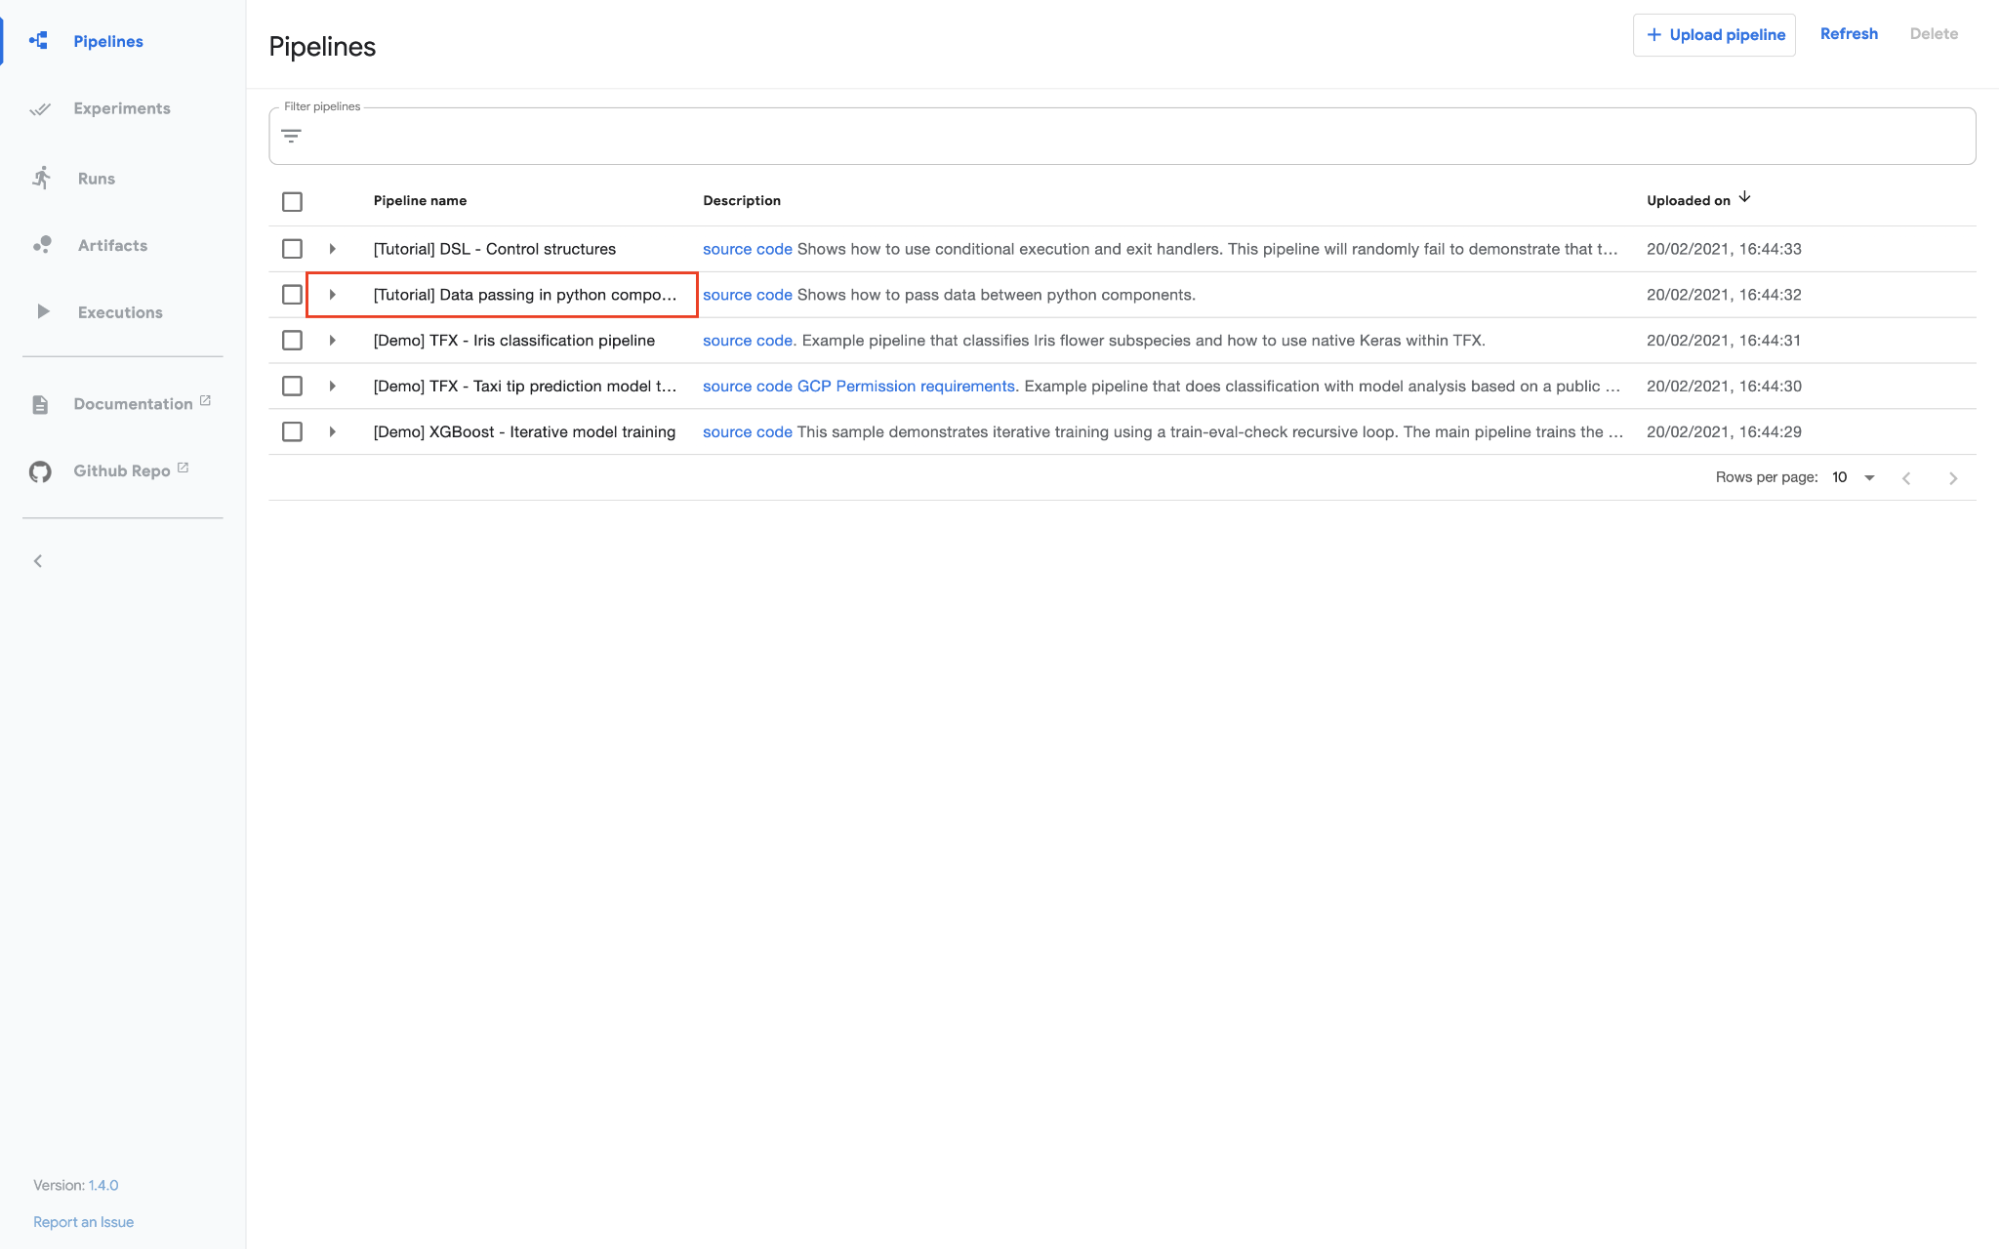
Kubeflow Pipelines - Deployment on GCP
Click on create experiment:
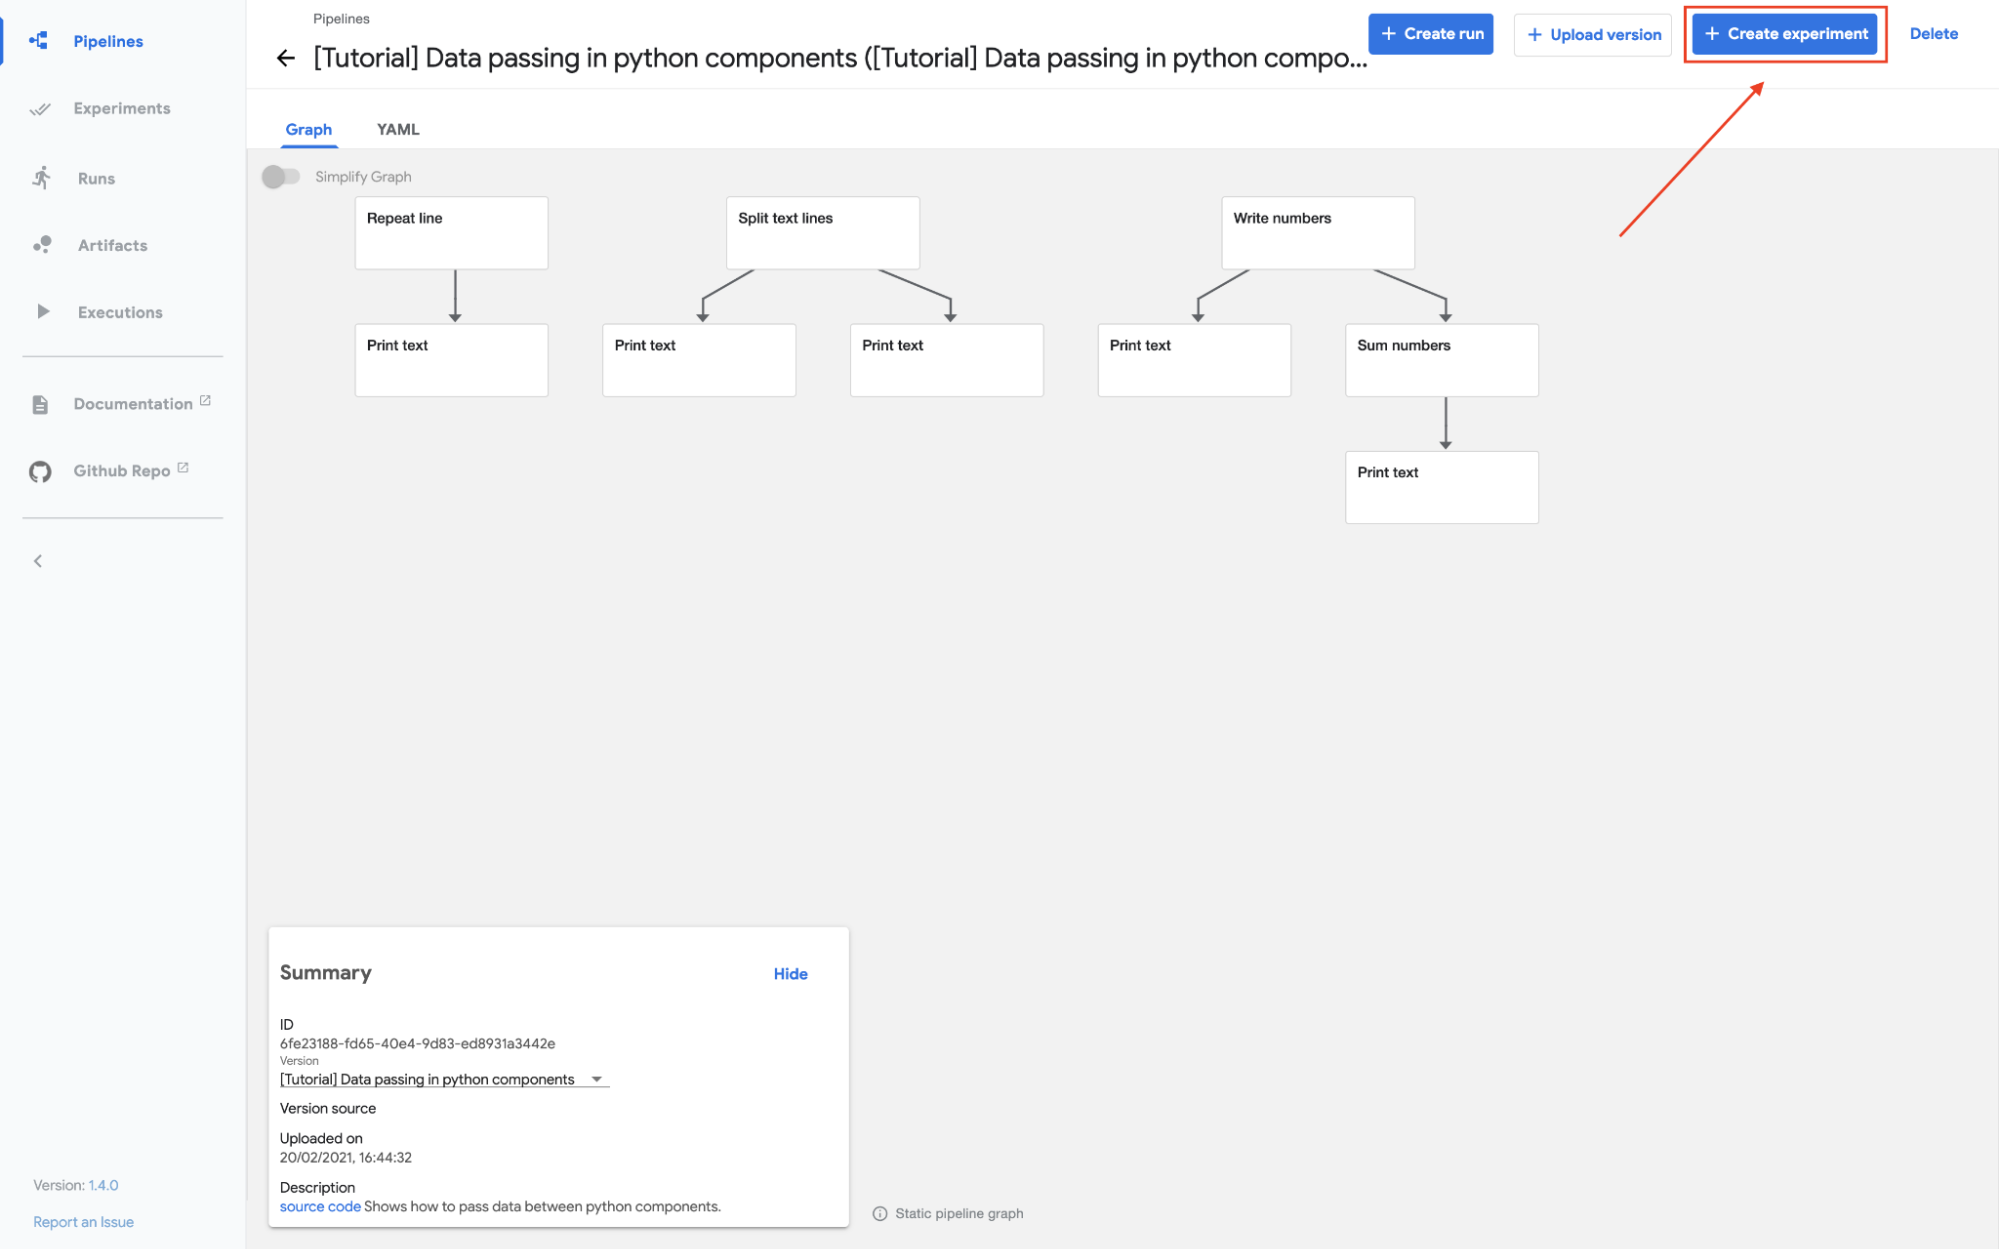
Kubeflow Pipelines - Deployment on GCP
Follow the prompts and then click on the start button on the run screen to run the pipeline.
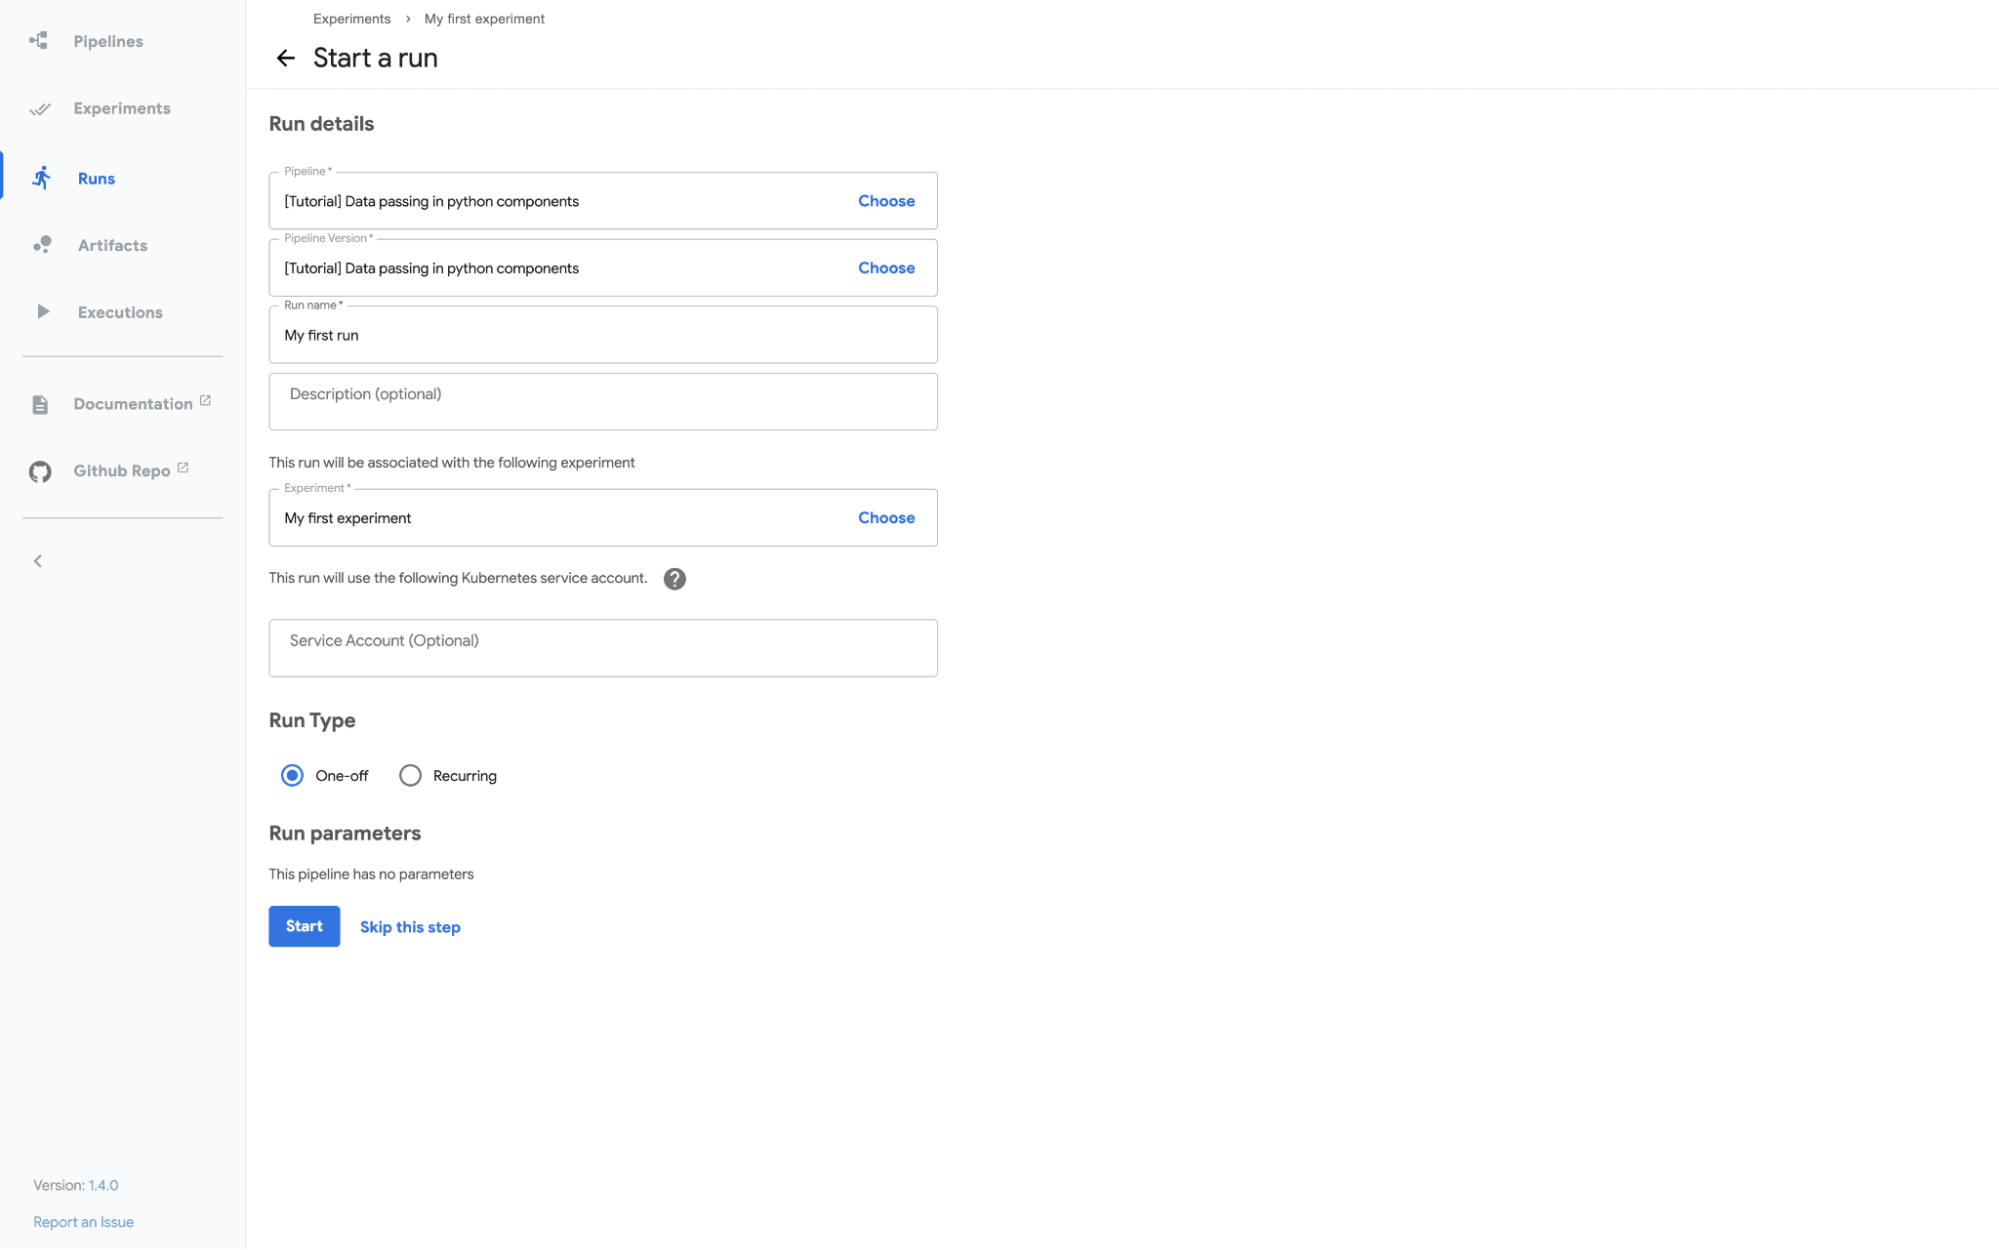
Kubeflow Pipelines - Deployment on GCP
The experiment will show up in the dashboard:
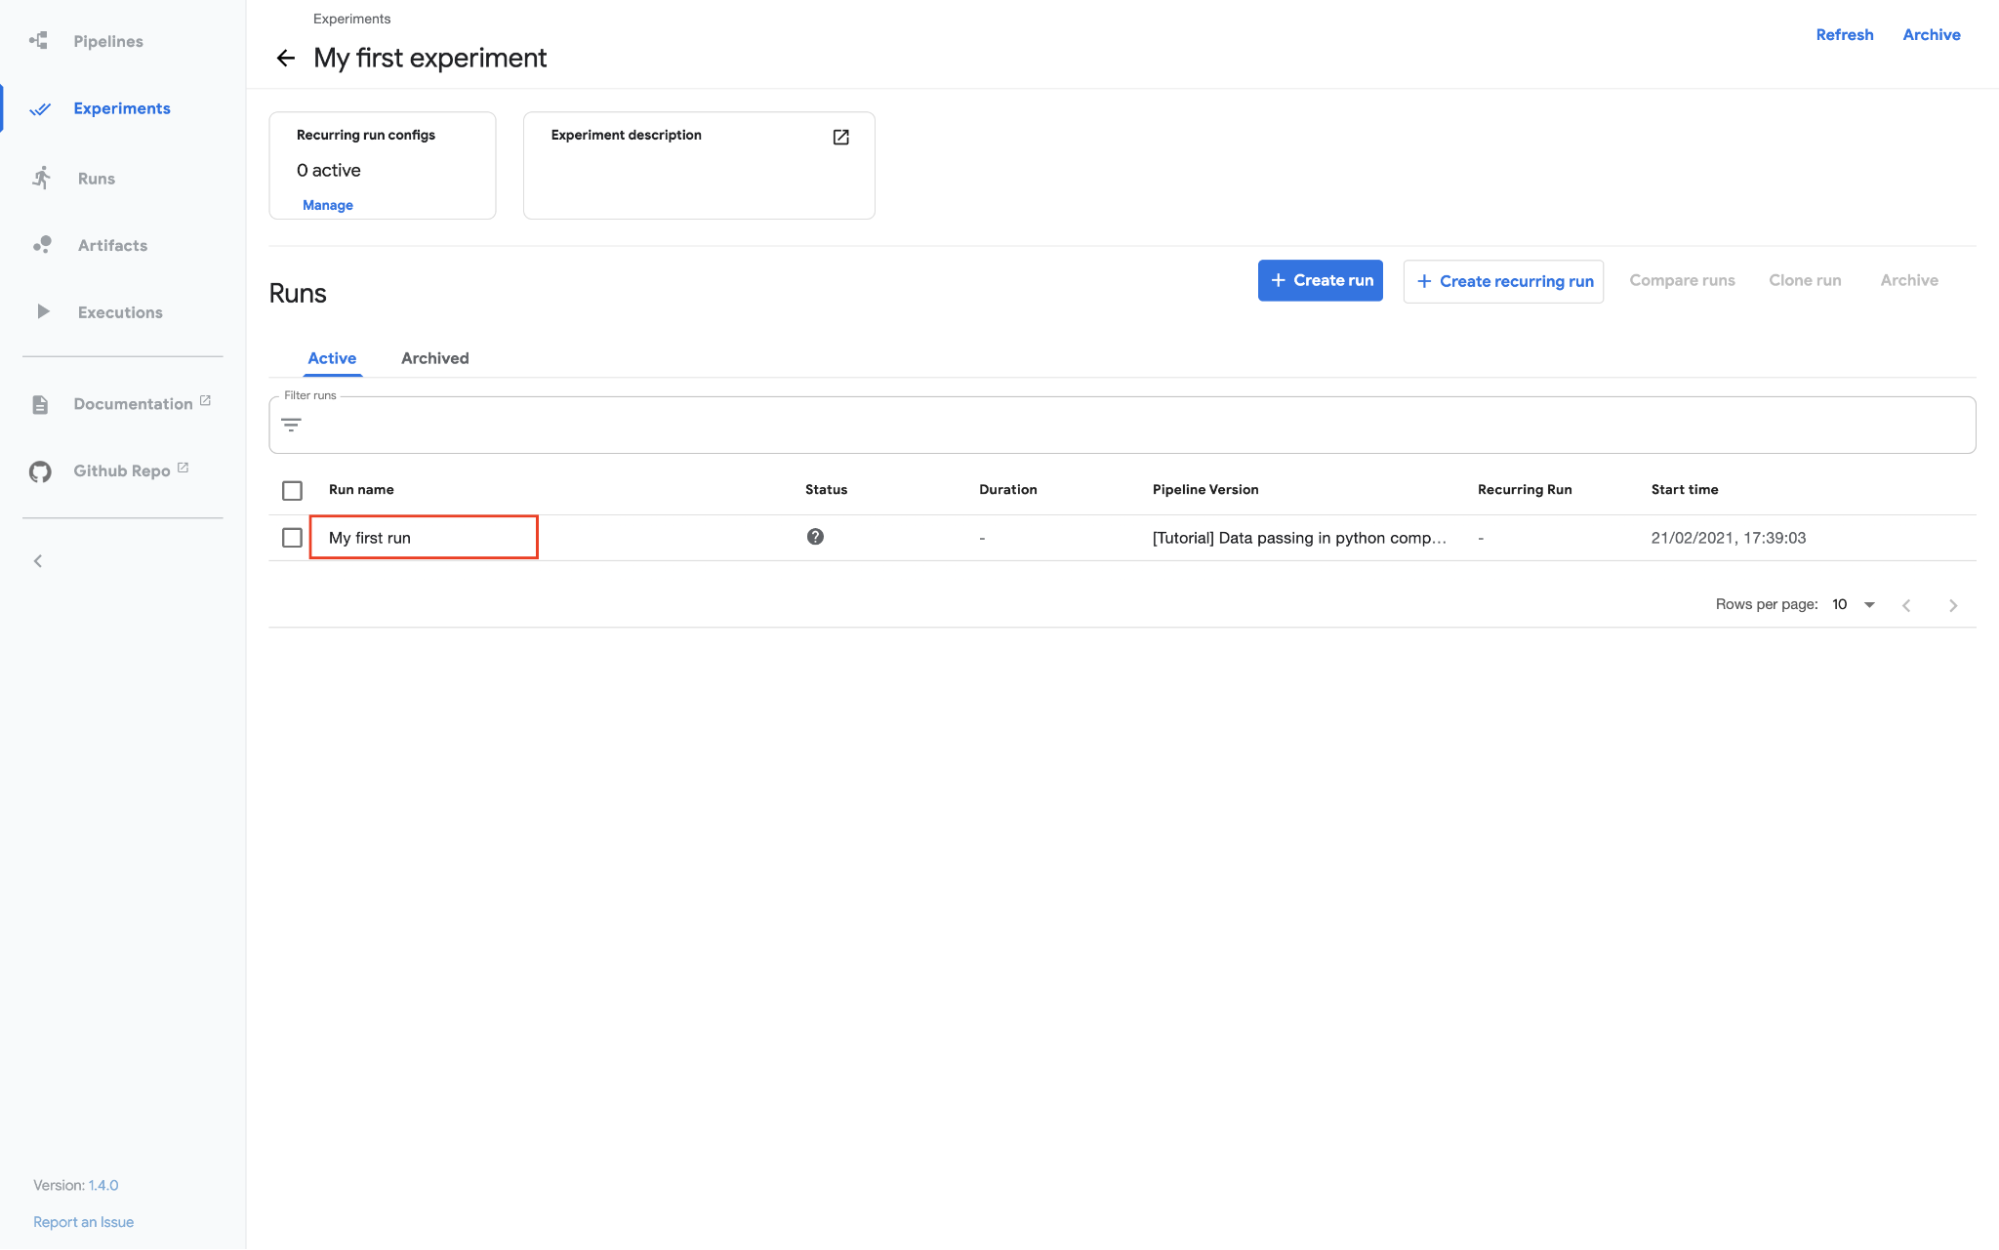
Kubeflow Pipelines - Deployment on GCP
Click on the experiment to see the output once the run finishes:
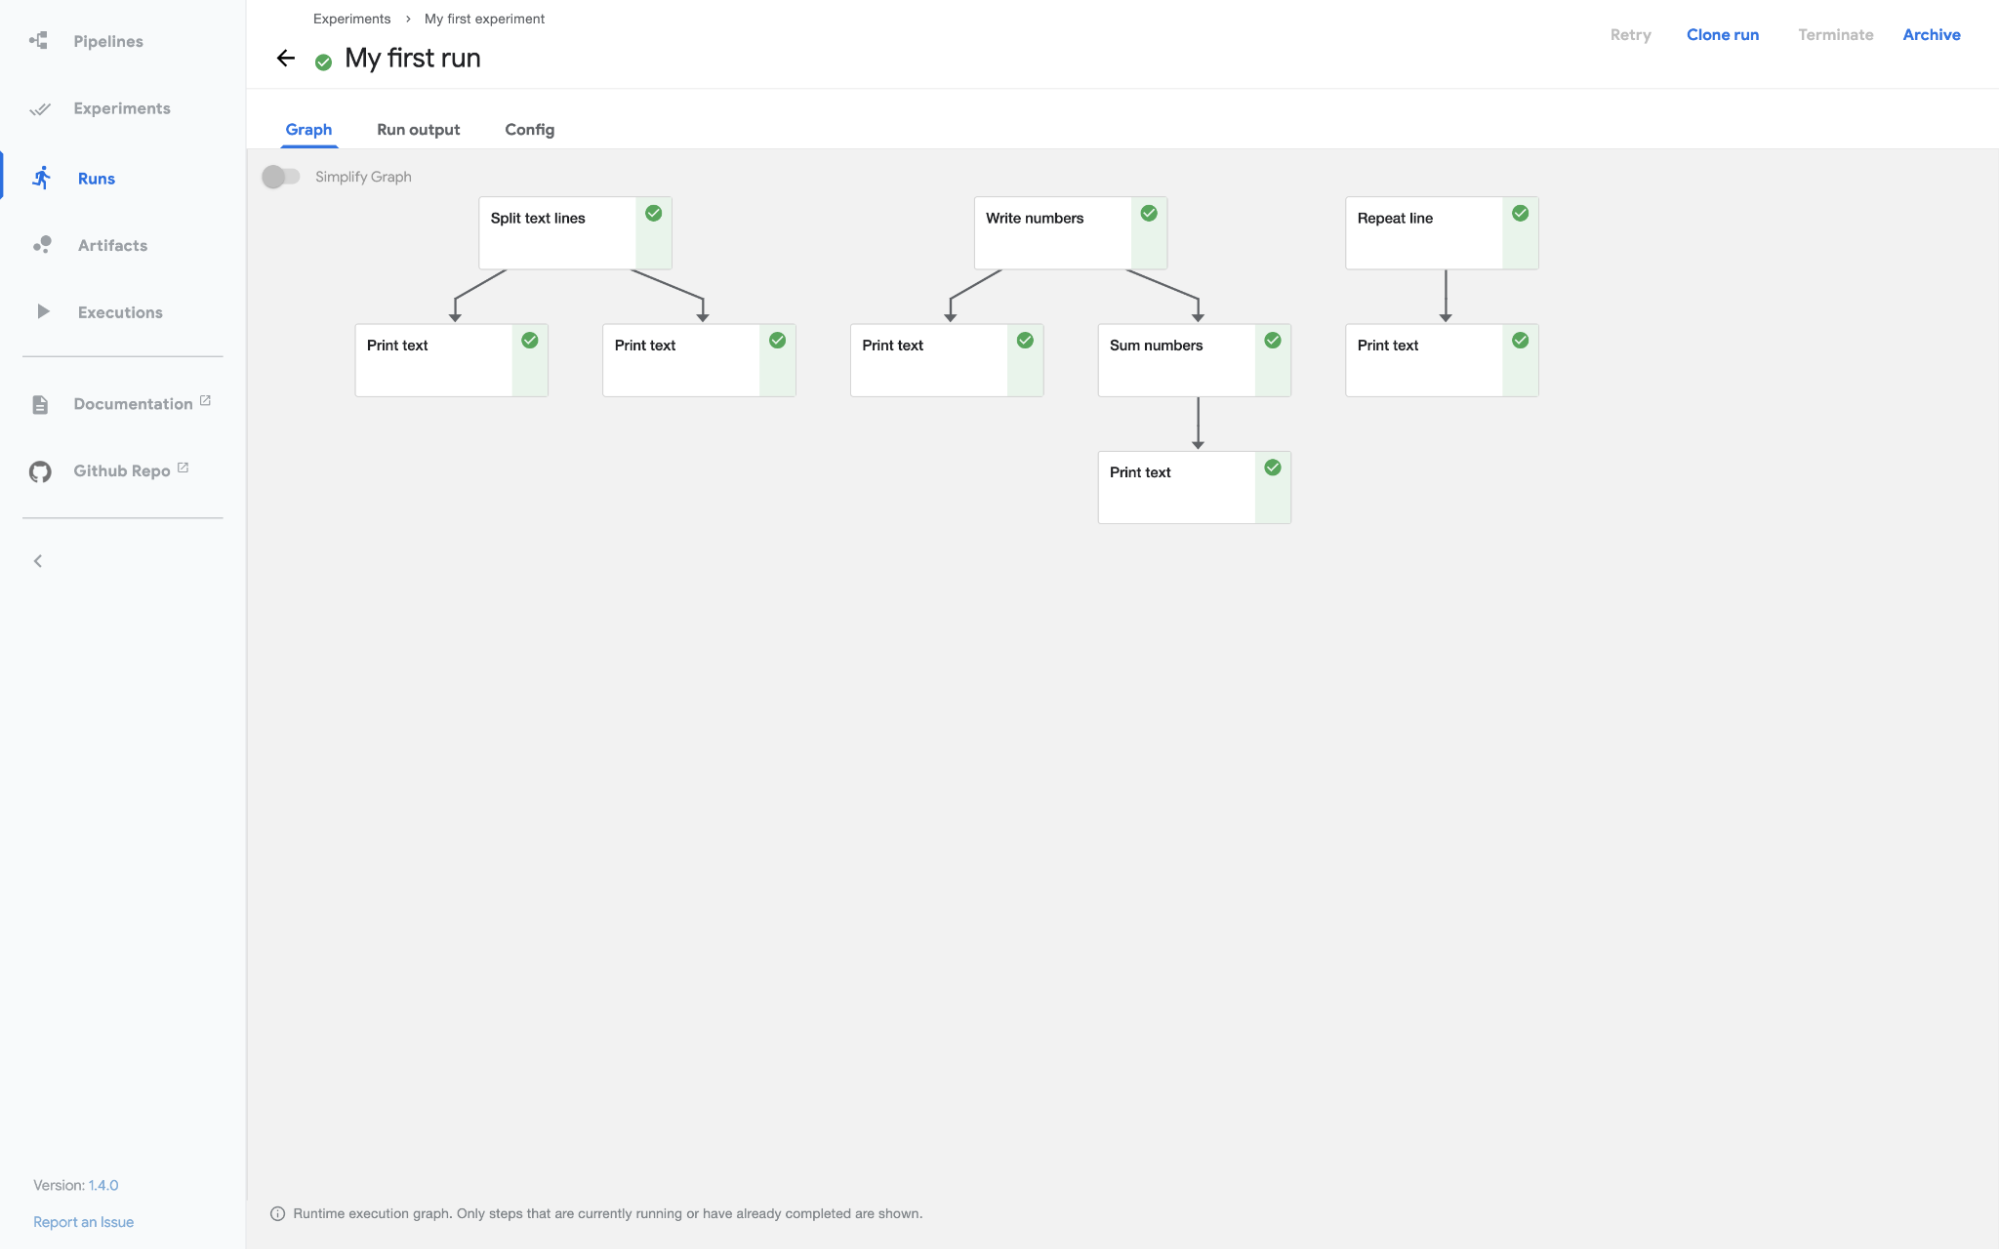
Kubeflow Pipelines - Deployment on GCP
Now that you know how you can execute pipelines using Kubeflow UI. Each component in the pipeline above is just a simple, self-isolated Python script. In the example above, the steps are simple such as “Print Text” or “Sum Numbers.”
Let’s see a more complex example of how you can code and compile these components in Python.
Build a Kubeflow Pipeline via Python SDK
In this example, we will create a Kubeflow pipeline with two components:
- Download the zipped tar file based on the url passed as input,
- Extract all csv files and create a single pandas dataframe using the `pd.concat` function.
Theoretically, instead of breaking this pipeline into two steps, we can also create one function that takes the url, downloads the zipped file, and then merges all csv files into one single file.
However, the benefit of doing it in two steps is that you can create a step for downloading the zipped file, and then you can reuse it in other projects as well.
In Kubeflow, you can define the component as a yaml file and use the `kfp.components.load_component_from_url` function to load the component directly from the url.
For the first step, let’s load the component from this open-source url.
```

web_downloader_op = kfp.components.load_component_from_url(

    'https://raw.githubusercontent.com/kubeflow/pipelines/master/components/web/Download/component-sdk-v2.yaml')

```
For the second step, we will define a Python function:
```

@component(

    packages_to_install=['pandas==1.1.4'],

    output_component_file='component.yaml'

)

def merge_csv(tar_data: Input[Artifact], output_csv: Output[Dataset]):

  import glob

  import pandas as pd

  import tarfile


  tarfile.open(name=tar_data.path, mode="r|gz").extractall('data')

  df = pd.concat(

      [pd.read_csv(csv_file, header=None)

       for csv_file in glob.glob('data/*.csv')])

  df.to_csv(output_csv.path, index=False, header=False)


```
As you can see, the function is decorated with the `kfp.dsl.component` annotation. We can use this annotation to define the container image, any package dependencies (in this example pandas[1.1.4]), and the location to save the component specification to (component.yaml)
Now you can link these two components together in a pipeline using the `pipeline` operator.
Define a pipeline and create a task from a component:
@dsl.pipeline(

    name='my-pipeline',

    # You can optionally specify your own pipeline_root

    # pipeline_root='gs://my-pipeline-root/example-pipeline',

)

def my_pipeline(url: str):

  web_downloader_task = web_downloader_op(url=url)

  merge_csv_task = merge_csv(tar_data=web_downloader_task.outputs['data'])

  # The outputs of the merge_csv_task can be referenced using the

  # merge_csv_task.outputs dictionary: merge_csv_task.outputs['output_csv']

```
Once the pipeline is defined, we can compile it. There are two ways to compile it. The first one is through Kubeflow UI.
```

kfp.compiler.Compiler(mode=kfp.dsl.PipelineExecutionMode.V2_COMPATIBLE).compile(

    pipeline_func=my_pipeline,

    package_path='pipeline.yaml')

```
We can now upload and run this `pipeline.yaml` file using the Kubeflow Pipeline’s user interface. Alternatively, we can run the pipeline using the Kubeflow Pipeline’s SDK client.
```

client = kfp.Client()


client.create_run_from_pipeline_func(

    my_pipeline,

    mode=kfp.dsl.PipelineExecutionMode.V2_COMPATIBLE,

    # You can optionally override your pipeline_root when submitting the run too:

    # pipeline_root='gs://my-pipeline-root/example-pipeline',

    arguments={

        'url': 'https://storage.googleapis.com/ml-pipeline-playground/iris-csv-files.tar.gz'

    })

```
If we have to extend this pipeline to include a machine learning model, we will create a python function that takes `Input[Dataset]` and fit the model using any framework we would like, for example sklearn, Tensorflow, or PyTorch.
Once a function is created, we have to edit the `my_pipeline` function to include the third task and then recompile the pipeline either using `kfp.Client` or UI.
Tutorial Reproduced from Kubeflow Official.
Conclusion
Experimenting in a Jupyter Notebook with a few million rows of data is one thing. Training a machine learning model on billions of rows remotely on the cloud is another. Machine Learning gets really difficult when it comes to training large models in a scalable and distributed environment.
Kubernetes is one of the most popular and widely-used orchestration frameworks for machine learning jobs; and Kubeflow is a framework built on top of Kubernetes to abstract away a lot of difficult details for the users. However, it is good to know that it is not your only option. Just like with everything else, there are alternatives.
One example of this kind of platform is Databricks. It has its own proprietary orchestration engine (which is different from Kubernetes) and comes with a pretty UI that supports Notebooks, Experiment Logging, Model Registry, Job Scheduling, and Monitoring.
Amazon Sagemaker is another example of an alternative to Kubernetes / Kubeflow. Amazon SageMaker is a fully managed machine learning service that data scientists and developers can use to quickly and easily build and train machine learning models and directly deploy them into a production-ready hosted environment. It provides an integrated Jupyter Notebook environment for exploration and analysis.
Do you feel overwhelmed by all the continuously evolving engineering concepts? Fear not, Datacamp offers a Understanding Data Engineering course. In this course, you will learn about a data engineer’s core responsibilities, how they differ from those of data scientists and facilitate the flow of data through an organization. In addition, you will learn how data engineers lay the groundwork that makes data science possible for data scientists. No coding involved!
Kubeflow FAQ's
What is the difference between Kubeflow and Kubernetes?
Kubernetes is an open-source container orchestration system for automating software deployment, scaling, and management. Kubeflow, on the other hand, is an open-source project that contains a curated set of tools and frameworks to make it easy to develop, deploy, and manage portable, scalable machine learning workflow on Kubernetes. Kubeflow is built on top of Kubernetes.
Is Kubeflow part of Kubernetes?
No, Kubeflow is a separate library. You can install it just like any other Python library using pip install.
Is Kubeflow an open-source framework?
Yes, Kubeflow is completely open source, available for use under Apache-2.0 license.
What is the difference between Airflow and Kubeflow?
Apache Airflow is a generic task orchestration platform, while Kubeflow focuses on machine learning tasks. Both tools allow you to define tasks using Python, but Kubeflow primarily runs tasks on Kubernetes.
What is the difference between Kubeflow and MLFlow?
They are two very different open-source frameworks. Kubeflow is a container orchestration system that makes it easy to develop, deploy, and manage portable, scalable machine learning workflow on Kubernetes; and MLFlow is a library for experiment tracking and model versioning.

