
Kurs
Einführung in das Data Engineering
4 Std.
127.6K
Cloud-native solutions are increasingly popular across industries due to their security, flexibility, and scalability. One such solution is AWS Glue, which simplifies data processing—a core component in making informed decisions and optimizing business operations.
In this tutorial, we will use AWS Glue to demonstrate a common ETL (Extract, Transform, Load) task: converting CSV files stored in an S3 bucket into Parquet format. Using Parquet enhances both data processing efficiency and query performance.
We'll introduce AWS Glue, its core features, and the benefits of automating data preparation. Next, we'll walk through setting up your AWS account, creating IAM roles, and configuring access to your S3 bucket. Finally, we'll guide you in creating a Glue crawler to scan your datasets and generate Parquet files.
Before proceeding with the practical steps, let's first understand what AWS Glue is and why it's useful for data processing tasks.
AWS Glue is a fully managed ETL service that makes preparing and loading your data for analytics easy. It provides a serverless environment to create, run, and monitor ETL jobs. AWS Glue automatically discovers and profiles your data via the AWS Glue Data Catalog, recommends and generates ETL code, and provides a flexible scheduler to handle dependency resolution, job monitoring, and retries.
Understanding the benefits of AWS Glue will help you appreciate its value in the data processing workflow. There are several compelling reasons to use AWS Glue and some of them are illustrated below:
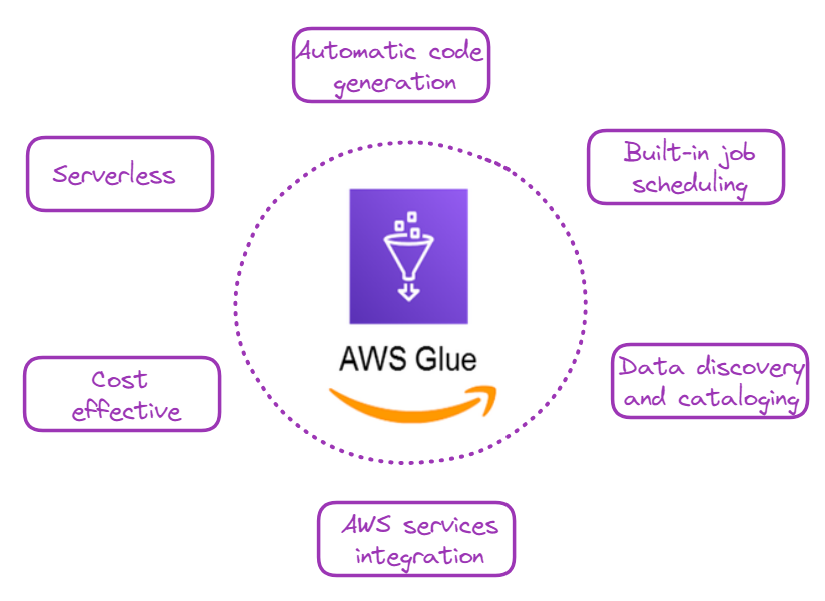
Why choose AWS Glue? Image by author
Here comes the exciting part: let’s learn how to use Glue for a very common data processing task: converting CSV files to Parquet.
For those new to AWS, the first step would be to create an account and then log in to the management console.
AWS Identity and Access Management (IAM) allows users to securely manage access to AWS services and resources.
We need to create an IAM role to allow Glue to access relevant services. In our case, the main service we are accessing is S3, which hosts our CSV files.
The AWS Storage Tutorial is a great way for new AWS users to learn more about systems like S3.
The main steps to creating that IAM role are described below, starting from the Management Console:
AWSGlueServiceRoleAmazonS3FullAccess (Note: In a production environment, you should create a more restrictive policy).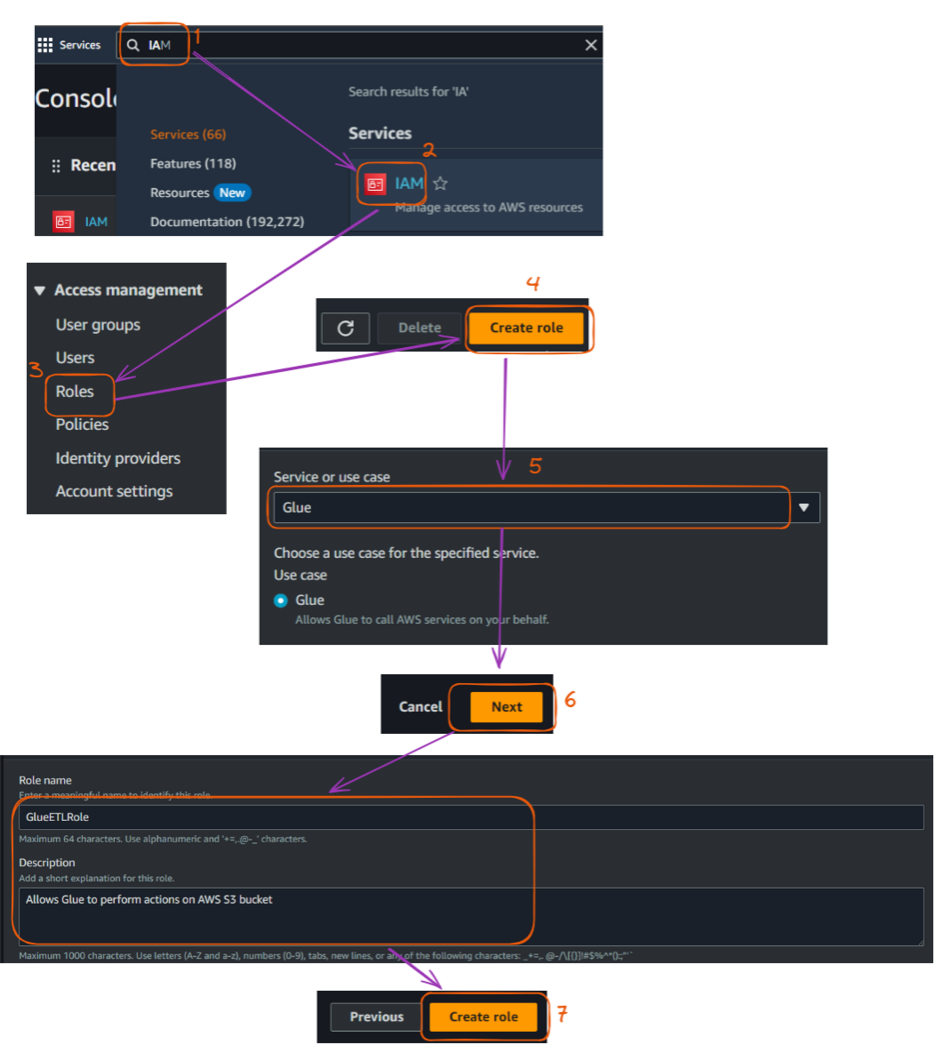
Steps to create an IAM role in the AWS console. Image by author
The Complete Guide to AWS IAM walks through the steps to use IAM to secure AWS environments, manage access with users, groups, and roles, and outline best practices for robust security.
We'll store both input CSV files and output Parquet files on Amazon S3.
The input data for this example was created for illustration purposes and can be found in the author’s GitHub repository:
athletes.csv: Contains information about athletes, including their ID, name, country, sport, and age.events.csv: Lists various events, including event ID, sport, event name, date, and venue.medals.csv: Records medal information, linking events and athletes to the medals they won.Now, we can set up our S3 bucket as follows:
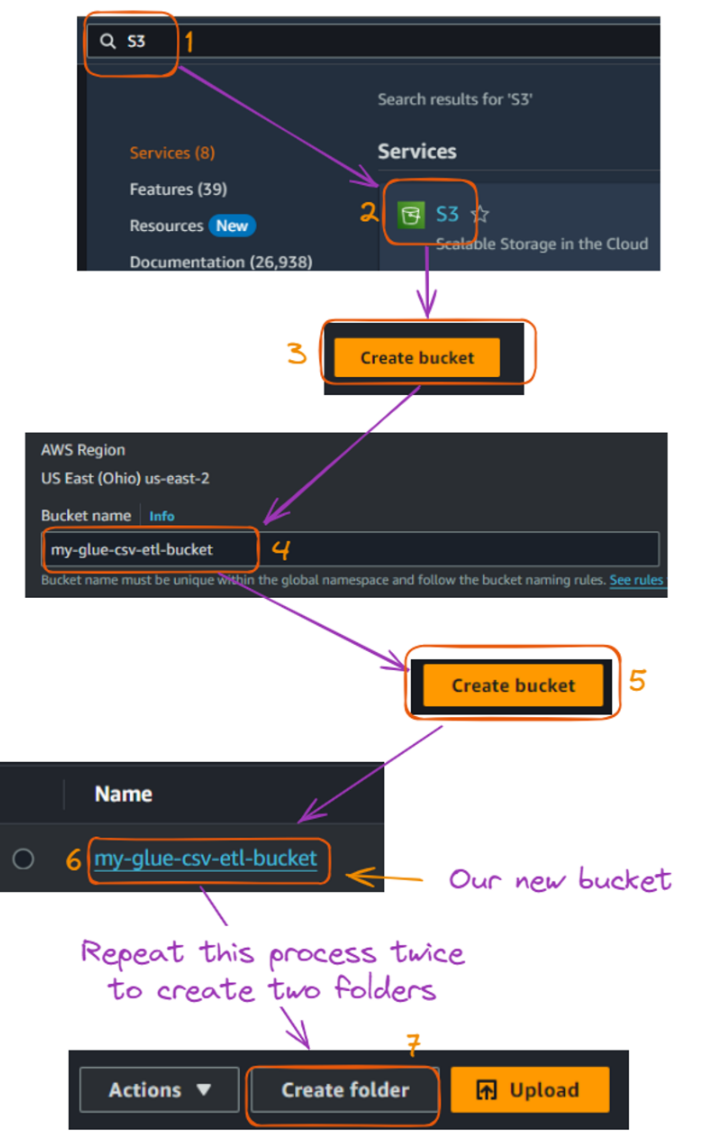
S3 bucket and folder creations flow. Image by author
After creating the two folders, the content of your bucket should look like this:
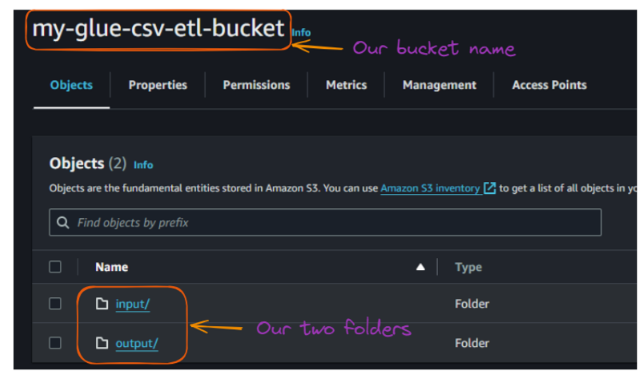
View of the folders inside the S3 bucket. Image by author
Now, we can upload these input CSV files to the "input" folder.
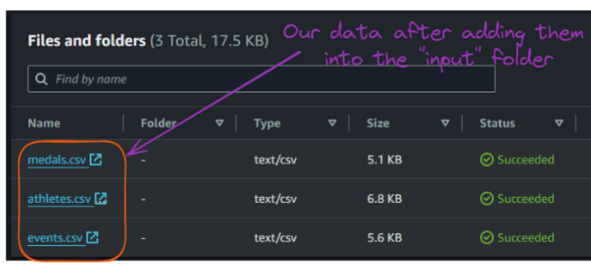
Contents of the S3 bucket “input” folder. Image by author
A Glue crawler is used to discover and catalog our data automatically. This section explains how to create a crawler that scans all the input CSV files.
The main steps are explained below:
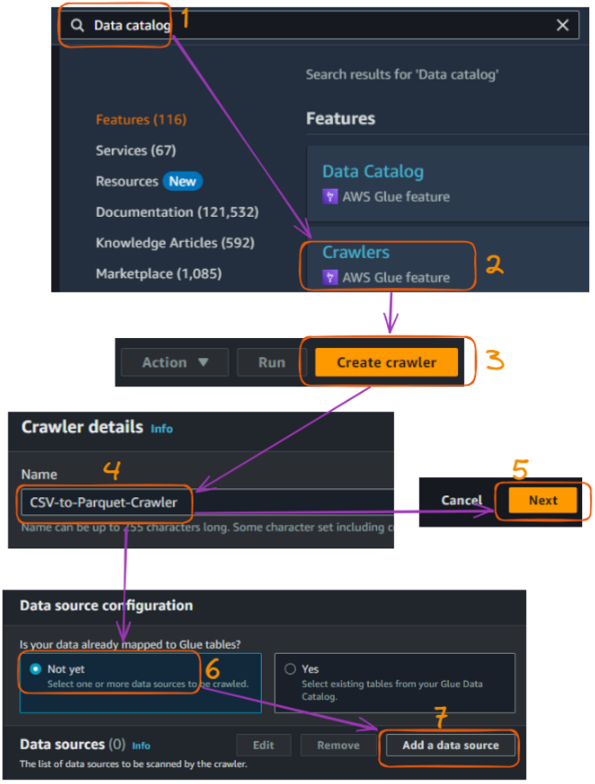
AWS Glue crawler creation flow in the console - part 1. Image by author
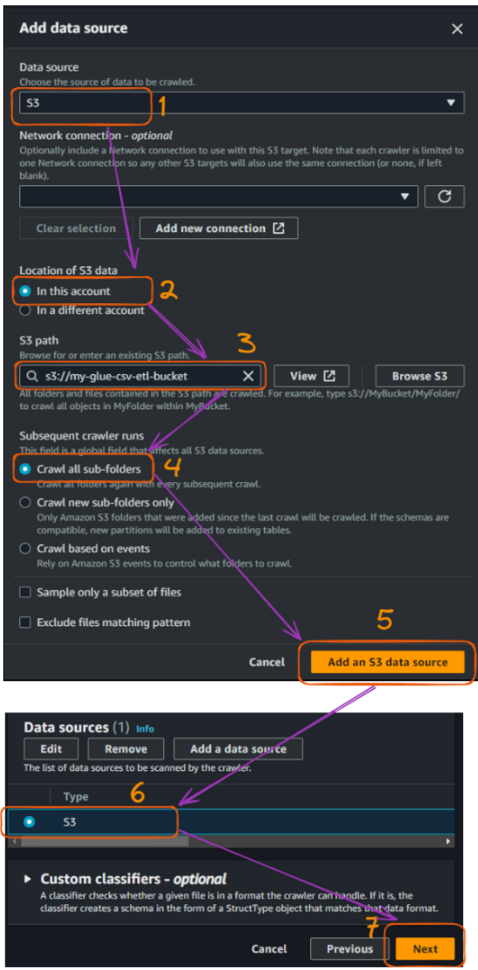
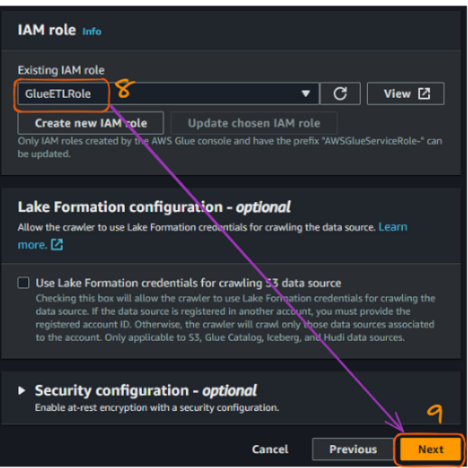
AWS Glue crawler creation flow in the console - part 2. Image by author
Once we have connected the S3 bucket, we need to connect the IAM role that was previously created to allow Glue to access S3 buckets. The name of our role is “GlueETLRole.”
AWS Glue crawler creation flow in the console - part 3. Image by author
The next step is to create a database. The “paris_olympics_db” database we will create serves as a central repository in the AWS Glue Data Catalog to store and organize metadata about our CSV files.
The catalog will enable efficient data discovery and simplifying our ETL process for combining and converting the athletes, events, and medals data into Parquet format.
At this moment, we do not have any database yet, and the creation steps are illustrated below:
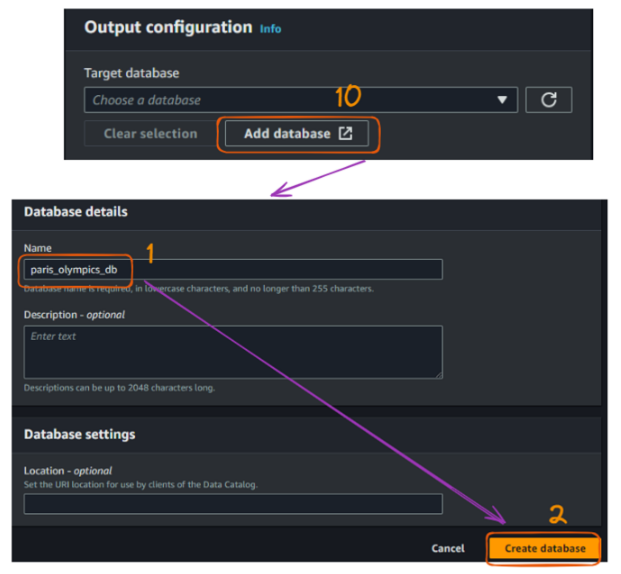
AWS Glue crawler creation flow in the console - part 4. Image by author
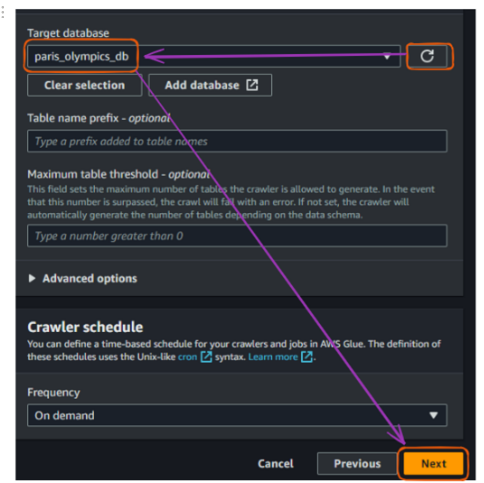
From the original tab where we connect a database, refresh the “Target database” section and choose the newly created database. Then click “Next.”
AWS Glue crawler creation flow in the console - part 5. Image by author
Finally, review everything and click “Create crawler.”
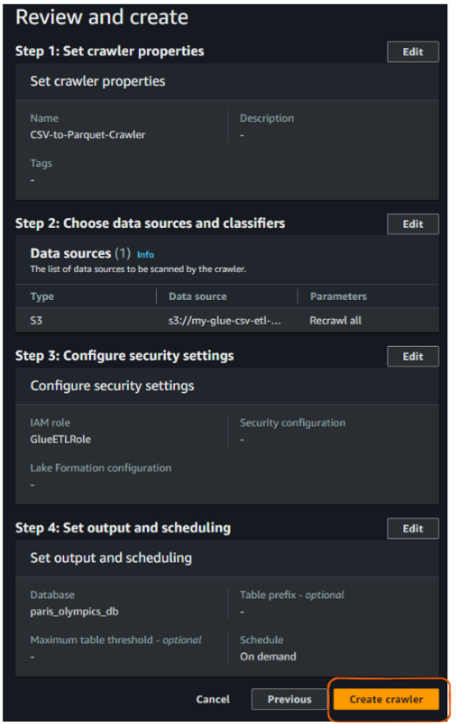
AWS Glue crawler “Review and create” view. Image by author
After the previous action of creating a crawler, we should see the following result confirming its creation:
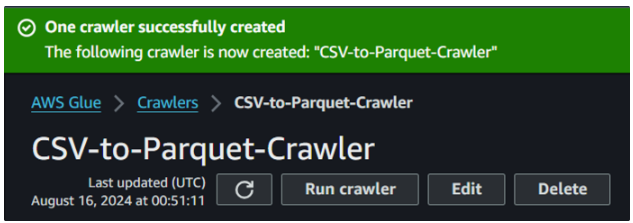
Glue crawler successful creation. Image by author
Now that we've created our crawler, it's time to run it and see how it catalogs our data.
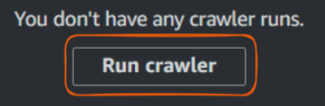
Glue “Run crawler” button. Image by author
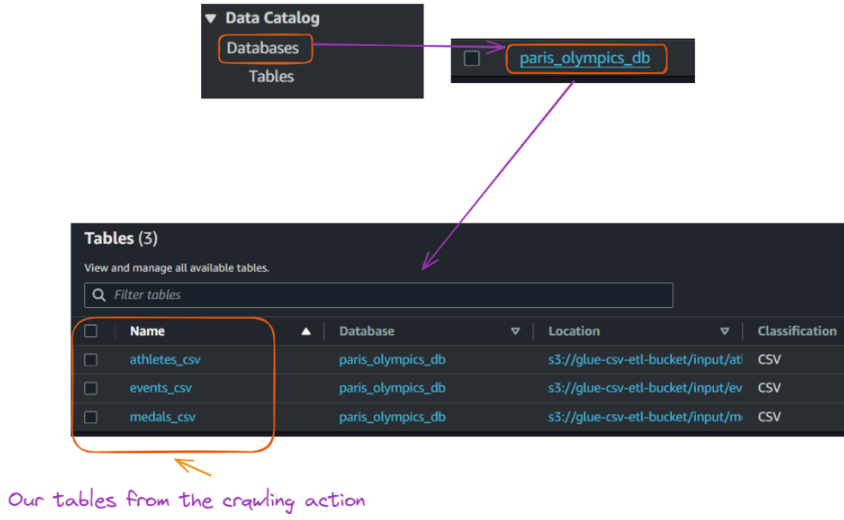
View of tables created in the database from Glue crawler execution. Image by author
With our data catalog created, we can now create a Glue job to combine our CSV files and convert them to Parquet format. This section walks you through creating the Glue job and provides the necessary Python code.
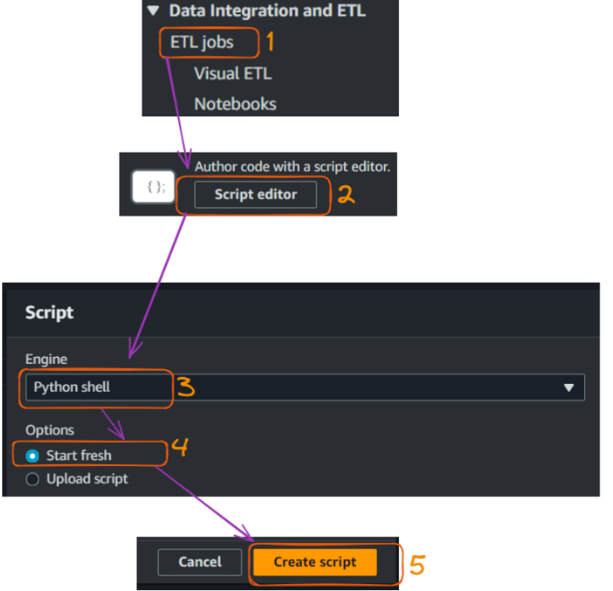
Creating and running a Glue job - part 1. Image by author
The action of creating the script opens the following script tab where we can give the job a name, which is “CS” in our case.

Creating and running a Glue job - part 2. Image by author
The corresponding Python code is given below:
import sys
from awsglue.transforms import *
from awsglue.utils import getResolvedOptions
from pyspark.context import SparkContext
from awsglue.context import GlueContext
from awsglue.job import Job
from pyspark.sql.functions import col, to_date

# Initialize the Spark and Glue contexts
sc = SparkContext()
glueContext = GlueContext(sc)
spark = glueContext.spark_session
job = Job(glueContext)

# Set Spark configurations for optimization
spark.conf.set("spark.sql.adaptive.enabled", "true")
spark.conf.set("spark.sql.adaptive.coalescePartitions.enabled", "true")

# Get job parameters
args = getResolvedOptions(sys.argv, ['JOB_NAME'])

# Set the input and output paths
input_path = "s3://glue-csv-etl-bucket/input/"
output_path = "s3://glue-csv-etl-bucket/output/"

# Function to read CSV and write Parquet
def csv_to_parquet(input_file, output_file):
    try:
        # Read CSV
        df = spark.read.option("header", "true") \
                       .option("inferSchema", "true") \
                       .option("mode", "PERMISSIVE") \
                       .option("columnNameOfCorruptRecord", "_corrupt_record") \
                       .csv(input_file)

        # Print schema for debugging
        print(f"Schema for {input_file}:")
        df.printSchema()

        # Convert date column if it exists (assuming it's in the format M/d/yyyy)
        if "date" in df.columns:
            df = df.withColumn("date", to_date(col("date"), "M/d/yyyy"))

        # Write Parquet
        df.write.mode("overwrite").parquet(output_file)

        print(f"Successfully converted {input_file} to Parquet at {output_file}")
        print(f"Number of rows processed: {df.count()}")
    except Exception as e:
        print(f"Error processing {input_file}: {str(e)}")

# List of files to process
files = ["athletes", "events", "medals"]

# Process each file
for file in files:
    input_file = f"{input_path}{file}.csv"
    output_file = f"{output_path}{file}_parquet"
    csv_to_parquet(input_file, output_file)

job.commit()
print("Job completed.")
Let’s briefly understand what is happening in the code:
csv_to_parquet() function to read a CSV file, print its schema, convert a date column if it exists, and write the data as a Parquet file. Handles exceptions during processing.athletes, events, medals) by calling the csv_to_parquet() function on each file.Before running the job, we need to fill in the following additional configurations in the “Job details” section:
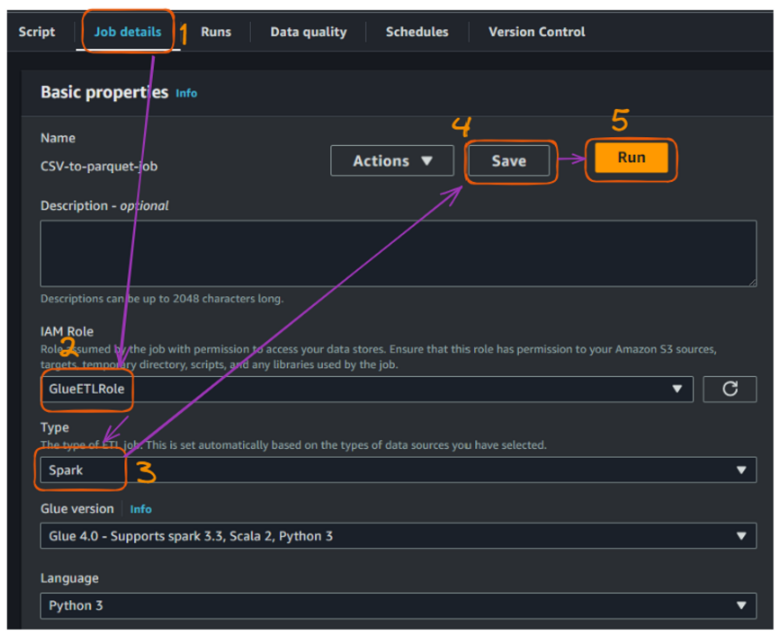
Creating and running a Glue job - part 3. Image by author
After successfully running the job, we can see more details about the status of the execution:
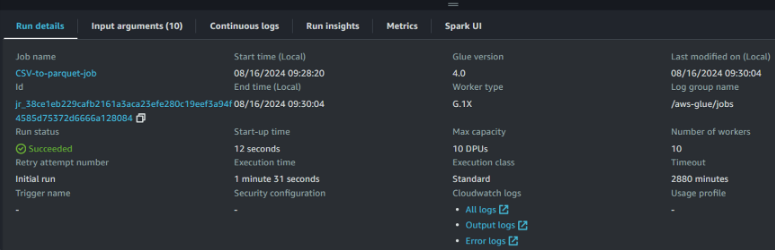
AWS Glue job run details view. Image by author
Access to and monitoring the run details is important for maintaining efficient and reliable data pipelines. These metrics provide valuable insights and help us with the following:
The successful execution of this job converted each CSV file into its corresponding Parquet file and stored them in the “output” folder as shown below:
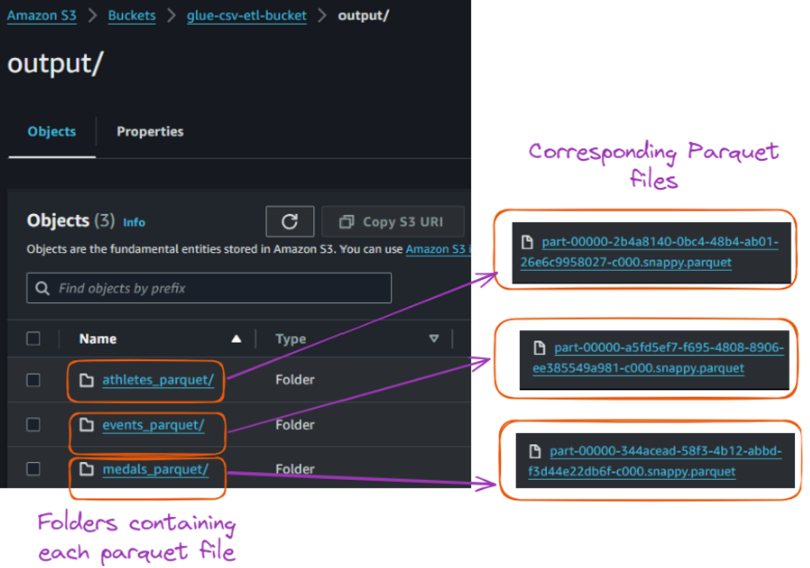
Contents of the output folder inside the S3 bucket. Image by author
This tutorial covered AWS Glue and its features. It guided you through setting up an AWS environment and exploring the AWS Glue interface. It also showed you how to build and run a Glue crawler to catalog data, create a Glue job to transform it, and successfully convert CSV files to Parquet format.
You can expand on what you've learned by setting up triggers to automate workflows, implementing error handling and logging, and optimizing Parquet files for even better performance. You can also explore querying your data with AWS Athena or Amazon Redshift Spectrum.
Additionally, monitor your AWS usage and costs and clean up resources when they're no longer needed to avoid unnecessary charges.
The courses Introduction to AWS and AWS Cloud Technology and Services could be excellent next steps for further learning!
The first offers a solid AWS and cloud computing foundation, ideal for beginners or those brushing up on key concepts. The second focuses on hands-on learning, helping you deepen your practical knowledge of AWS services.
Our certification programs help you stand out and prove your skills are job-ready to potential employers.
Learn more about AWS and data engineering with these courses!
Kurs
Kurs
Kurs
Tutorial
Joleen Bothma
Tutorial
Tim Lu
Tutorial
DataCamp Team
Tutorial
Zoumana Keita
Tutorial
Alexis Perrier
Tutorial
Jake Roach