Course
The Identity and Access Management (IAM) service sets the foundation for everything you do in AWS. It keeps your data safe and lets you control who can access your AWS resources and what they can do with them.
Without IAM, anyone accessing your AWS account could mess things up by changing configurations, deleting resources, or accessing sensitive data.
This guide contains everything you need to know to set up and use IAM to secure your AWS environment.
If you’re new to AWS, consider taking our Introduction to AWS course to get familiar with the basics.
What Is AWS IAM?
IAM stands for Identity and Access Management. It was released in 2011 and is a tool for managing who can access your AWS resources and what they can do with them.
These are the four essential components of IAM:
- Users are individuals or applications that need access to your AWS resources. Each user receives unique credentials, such as passwords and access keys.
- Groups are collections of users. Instead of assigning permissions to each user individually, you can put users in groups and assign permissions to the group. This makes it easier to manage permissions for multiple users at once.
- Roles are meant to be assumed by anyone who needs them instead of being associated with a single person. For example, an EC2 instance can “assume a role” to access S3 buckets without needing permanent credentials. Roles use temporary security credentials that automatically expire, which is great in terms of security.
- Policies are JSON documents that define permissions. They specify what actions are allowed or denied on which resources. Policies can be attached to users, groups, or roles.
If you’re new to AWS, consider taking our Introduction to AWS course to familiarize yourself with the basics of this extensive platform.
Getting Started With IAM
If you haven’t done so already, create an AWS account and sign in.
To find the IAM service, enter the keyword “iam” into the search bar at the top of the AWS console and select the first result for IAM.
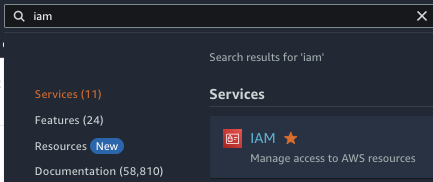
Searching for the IAM service in the AWS console
This will bring you to the IAM dashboard, where you can create and manage all IAM components.
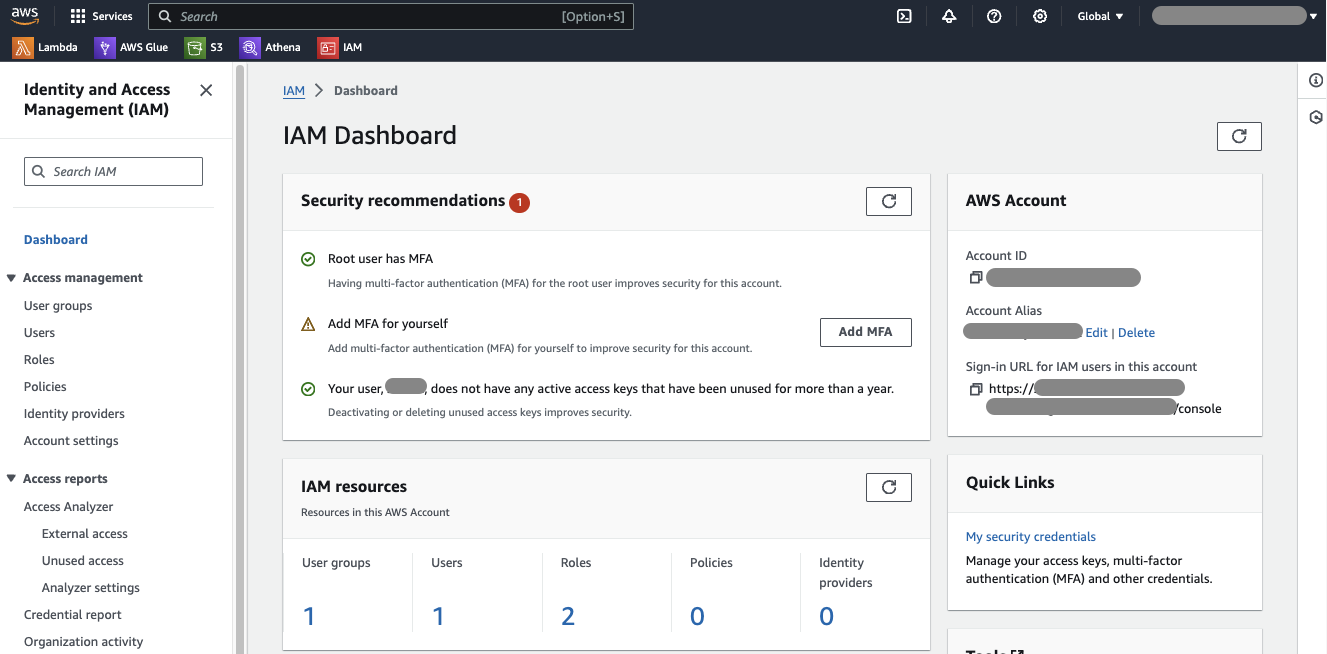
IAM Dashboard
The left-hand panel of the dashboard allows you to create users, roles, and policies, as well as reports and tools for management and monitoring.
Security recommendations are usually found in the center of the IAM dashboard. AWS offers extensive guidance on security best practices and makes it easy to take corrective action if necessary.
AWS IAM Policies
Now, let’s review one of the most important concepts of IAM: policies.
What are IAM policies?
Policies define who can have what permissions to access your AWS resources.
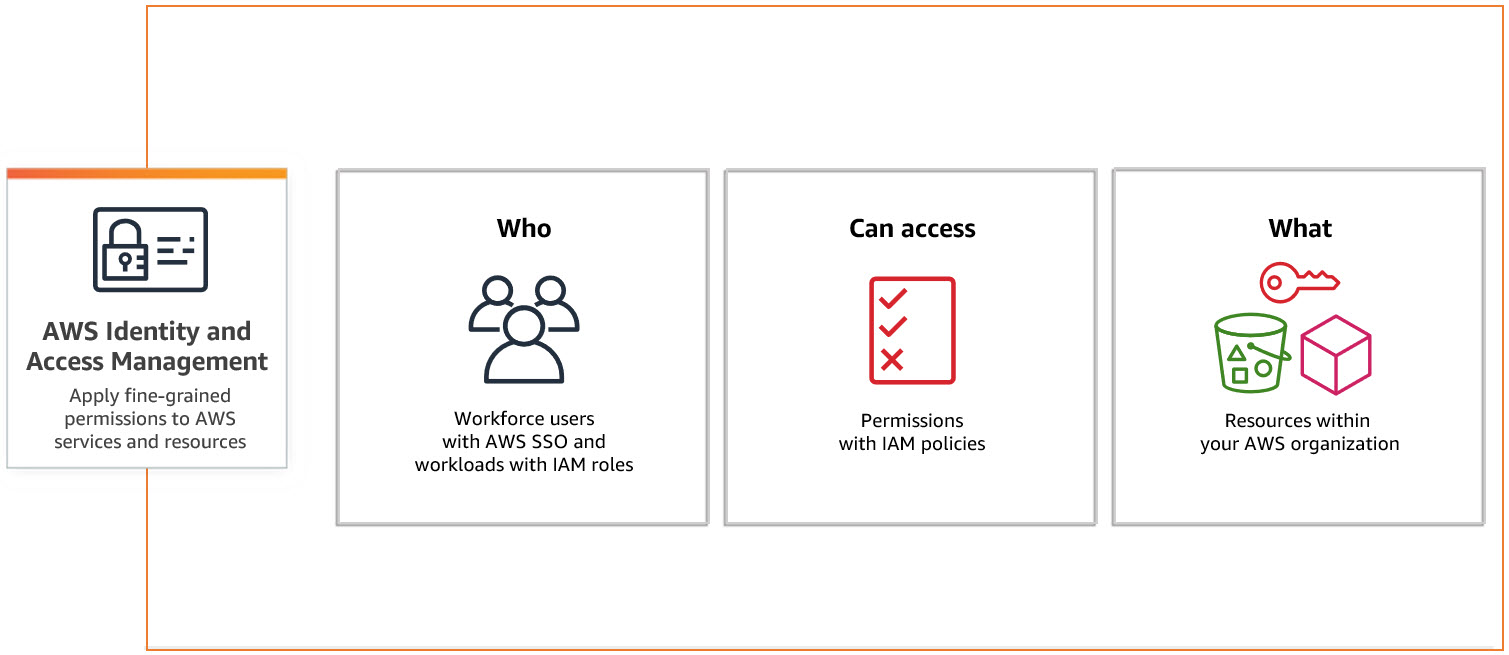
IAM policies overview
Policies are written in JSON format and consist of a few key elements.
As an example, here’s the JSON document for the AWS-managed policy named “AmazonS3FullAccess”:
{
"Version": "2012-10-17",
"Statement": [
{
"Effect": "Allow",
"Action": "s3:*",
"Resource": "*"
}
]
}- The
Versionelement specifies the policy's language version. - The
Statementis where the “meat” of the policy is. A single policy can have multiple statements. Each statement includes a few essential fields: Effect: This field specifies whether the statement allows or denies access. It can be either "Allow" or "Deny."Action: This defines what actions are allowed or denied. Actions are usually the operations you can perform on a resource. AWS has specific actions for each service, so you must specify them correctly.Resource: This specifies the AWS resources the actions apply to. Resources are identified using Amazon Resource Names (ARNs), which uniquely identify a resource.
Policy types: Managed versus inline policies
Now, let’s talk about policy types, starting with the managed ones can be either AWS-managed or customer-managed.
AWS-managed policies are created and maintained by AWS, making them a great starting point for commonly used permission sets. Customer-managed policies are ones you create and manage yourself, giving you more flexibility to write custom JSON documents.
Inline policies, on the other hand, are directly attached to a single user, group, or role. They’re helpful for specific, tightly controlled permissions that shouldn’t be reused. However, managing inline policies can become tricky as they grow in number, so they’re generally less preferred than managed policies.
Creating and attaching policies to users, groups, and roles
Creating and attaching policies to users, groups, and roles in AWS is pretty straightforward. Here’s a step-by-step guide:
1. Creating a policy
To create a policy, click “Policies” in the IAM console left-hand menu and click “Create Policy.”
You can define your policy using the visual editor or the JSON tab. The visual editor is easier if you’re not familiar with JSON. For example, to create a policy that allows read-only access to S3, you can select the “S3 service” and then choose the “read-only” actions.
If you want to learn more about S3, make sure to check our AWS storage tutorial.
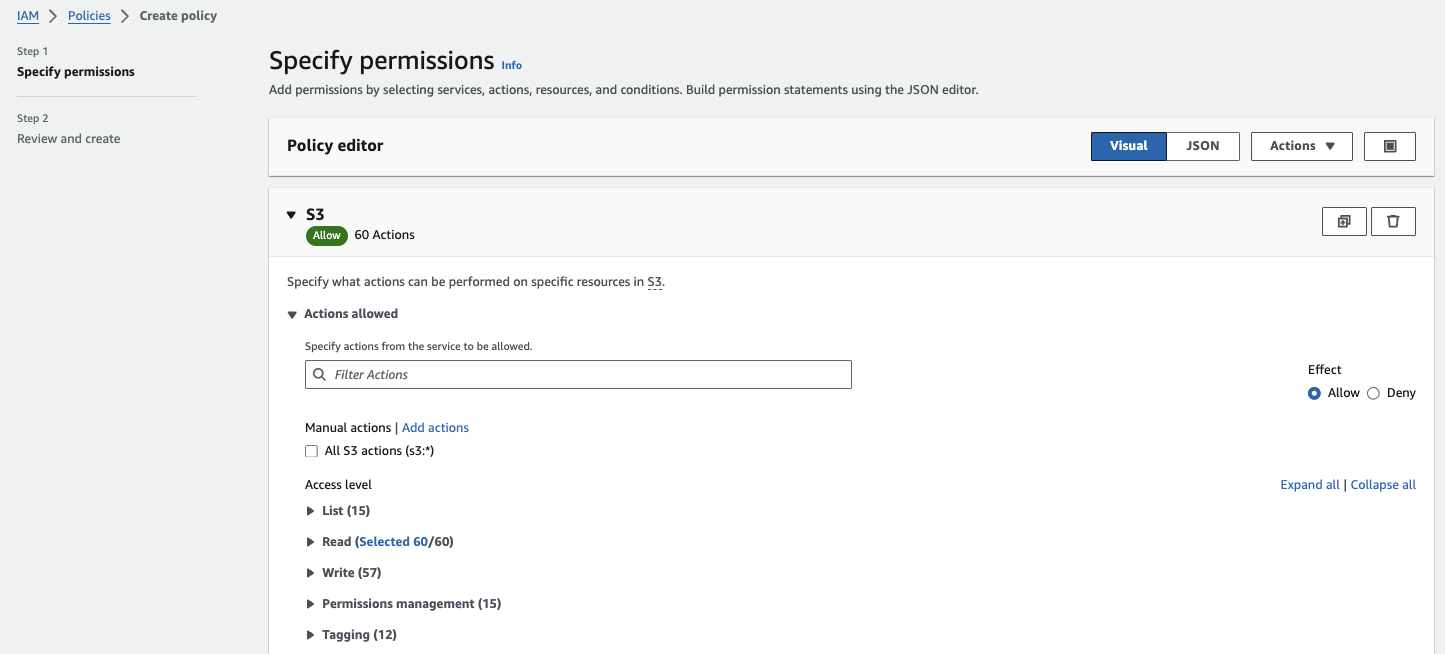
Create a new policy
Once you’ve defined the policy, click “Review policy.” Then, give your policy a name and description and click “Create policy.” At this point, your custom policy should be created.
Note that there are over a thousand AWS-managed policies that should cover most of your use cases. So, you may not ever need to create custom policies.
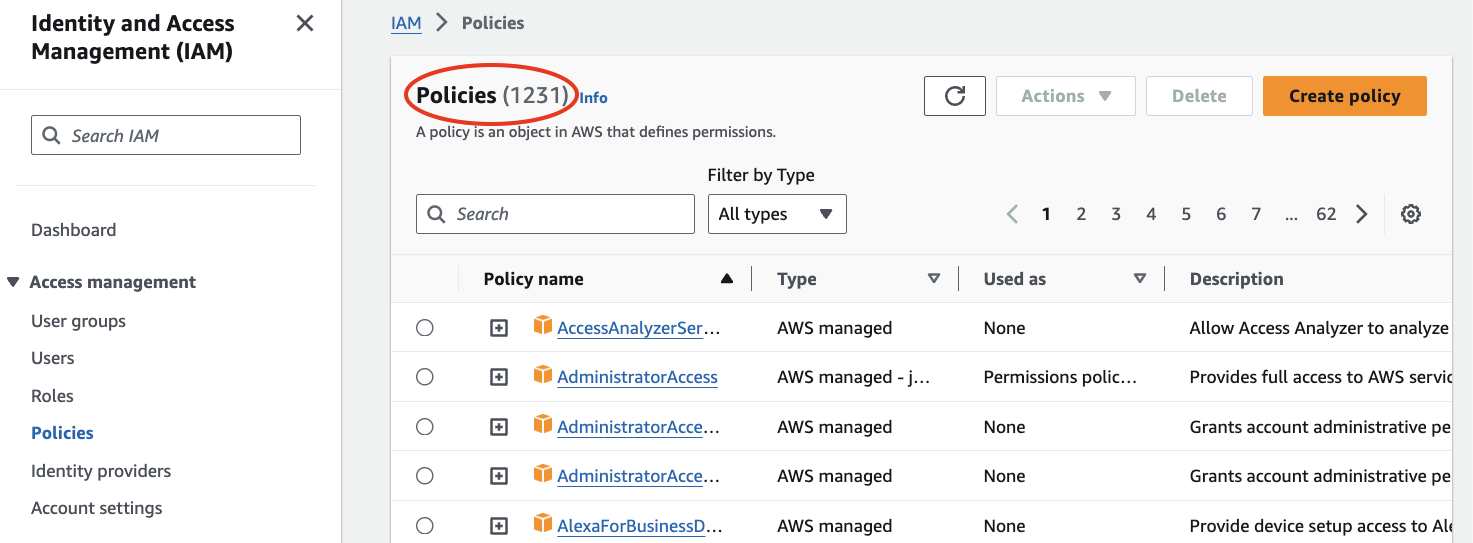
List of AWS-managed policies
2. Attaching policies to users
If you want to attach a policy to a user, go to “Users” in the IAM console and select the user to whom you want to attach the policy.
Click on the “Permissions” tab and then click “Add permissions.”
Select “Attach policies directly,” find the policy you created (or any existing policy you want to attach) and choose it.
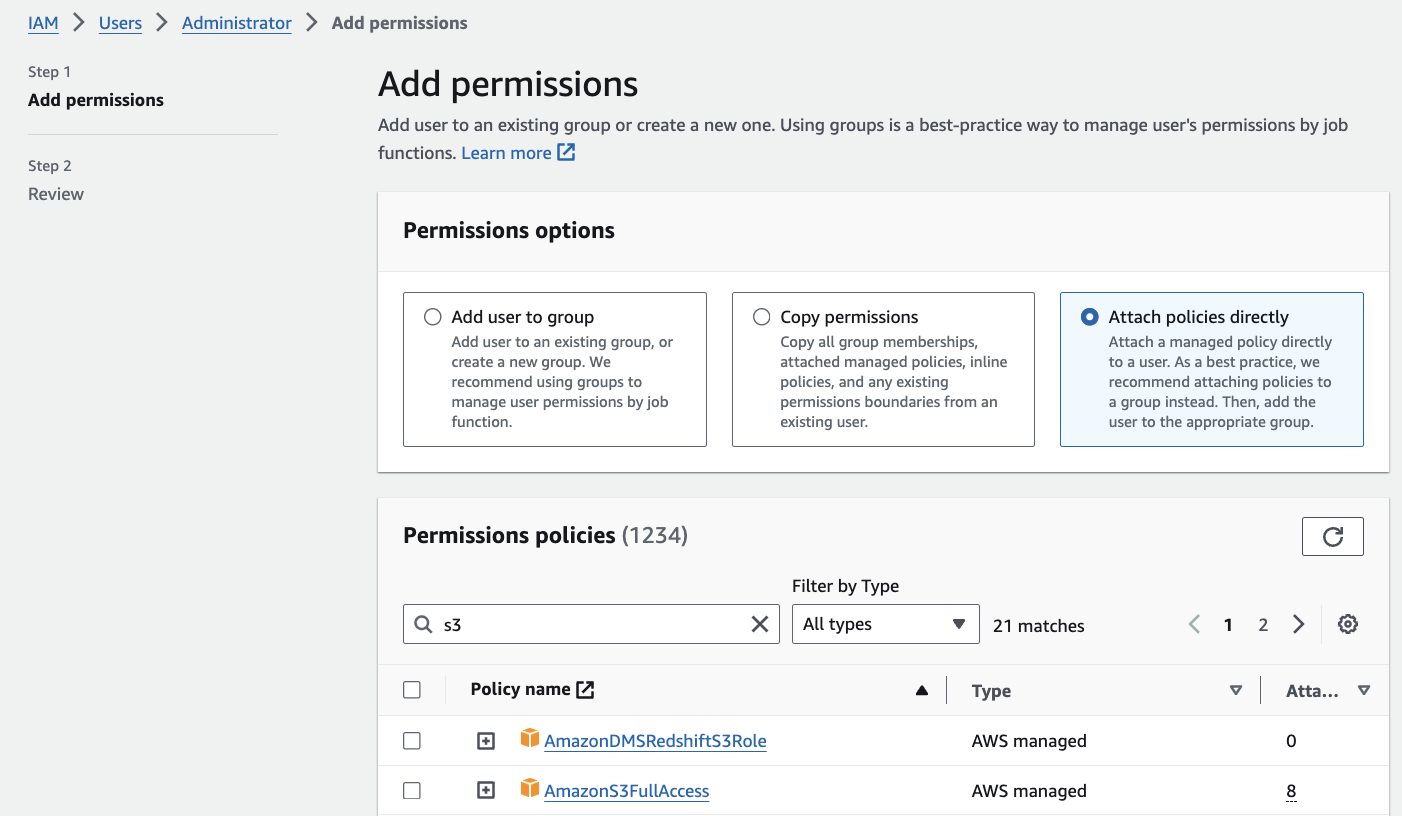
Attach a policy to a user
Click “Next” to review the permissions, then click “Add permissions.”
3. Attaching policies to groups
If you want to attach a policy to a group instead, go to “User groups” in the IAM console and select the group to attach the policy, or click “Create new group” to create a new group.
Click on the “Permissions tab” and “Add permissions.”
Similar to attaching policies to users, you need to select “Attach policies directly” and then find and choose the policy you created (or any existing policy).
Click “Next” to review the permissions, then click “Add permissions.”
4. Attaching policies to roles
Go to “Roles” in the IAM console and select the role to which you want to attach a policy.
Click on the “Permissions” tab and then click ”Add permissions.” This step is slightly different from what we’ve encountered previously. You’re shown the current permission policies and the complete list of other policies you can attach.
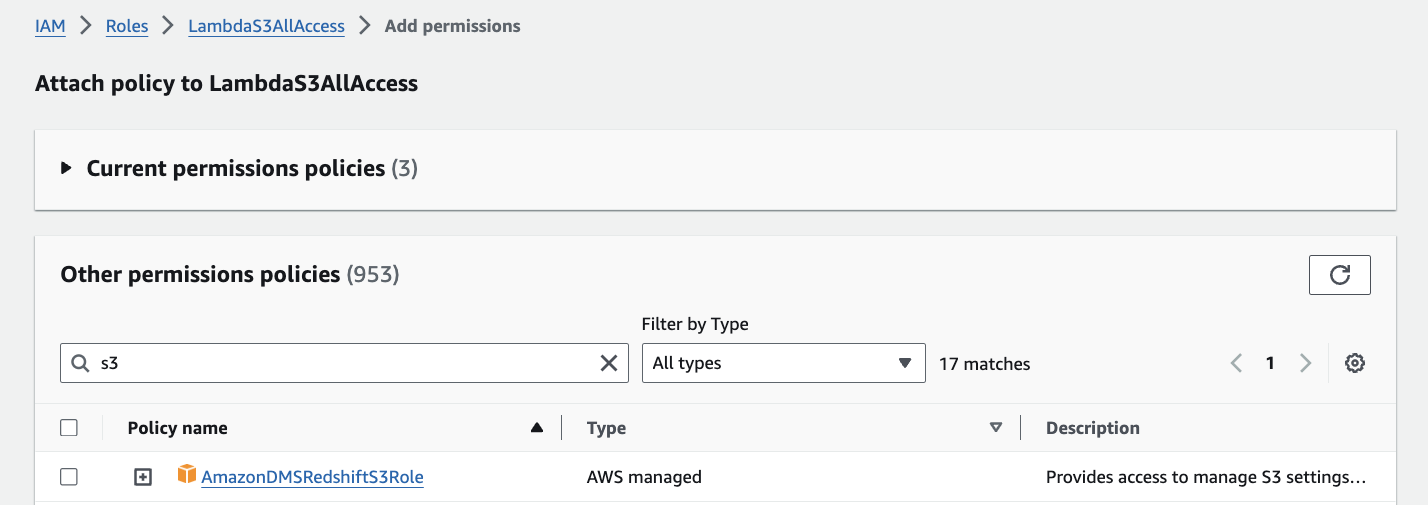
Attach a policy to a role
Select the policies you want to attach and select “Add permissions.” Remember that you can only add up to 10 managed policies to a role.
AWS IAM Roles
IAM roles help you manage permissions for your services and applications.
Unlike IAM users, which are associated with a specific person, roles are designed to be assumed by anyone who needs them, making them incredibly flexible.
Consider a role as a set of permissions that can be temporarily assigned to entities like AWS services (e.g., EC2, Lambda) or even users from another AWS account. This is great for security because roles use temporary credentials that expire automatically.
Check out our tutorial on mastering step functions in AWS, where you can see how IAM roles are an essential component in orchestrating workflows.
How do IAM roles work?
When you create a role, you define two main things: trust policies and permissions policies:
- Trust policies define who can assume the role. For example, you might create a trust policy that allows an EC2 instance or an AWS Lambda function to assume the role. This policy specifies the trusted entities (like services or users) that can use the role.
- Permissions policies define what actions are allowed or denied when the role is assumed. They work just like the policies you attach to IAM users, specifying what resources the role can access and what actions it can perform.
An entity must assume a role to use it. When an EC2 instance or Lambda function assumes a role, it gets temporary security credentials that it can use to make requests to AWS services.
Here's a simple example: Suppose you have an application running on an EC2 instance that needs to read from an S3 bucket. Instead of storing access keys on the instance, you can create an IAM role with a policy that allows reading from S3. You then attach this role to your EC2 instance. When the instance runs, it assumes the role and gets temporary credentials to access the S3 bucket.
Temporary credentials are provided to the instance through the AWS Security Token Service (STS). These credentials include an access key ID, secret access key, and session token, and they’re valid for a short duration, typically a few hours.
Using roles also makes it easier to manage permissions because you can update the role’s policies in one place, which automatically applies to all entities assuming the role.
How to create an IAM role
To create an IAM role, click on “Roles” in the IAM console left-hand menu and then click “Create Role.” Then, follow these steps to complete role creation:
1. Choose the trusted entity
You’ll need to choose who or what will use this role. You have several options: AWS services (e.g., EC2, Lambda), another AWS account, or web identity. For now, let’s say we’re creating a role that grants us full access to S3.
Select “S3” as the service and “S3” as the use case. Click “Next.”
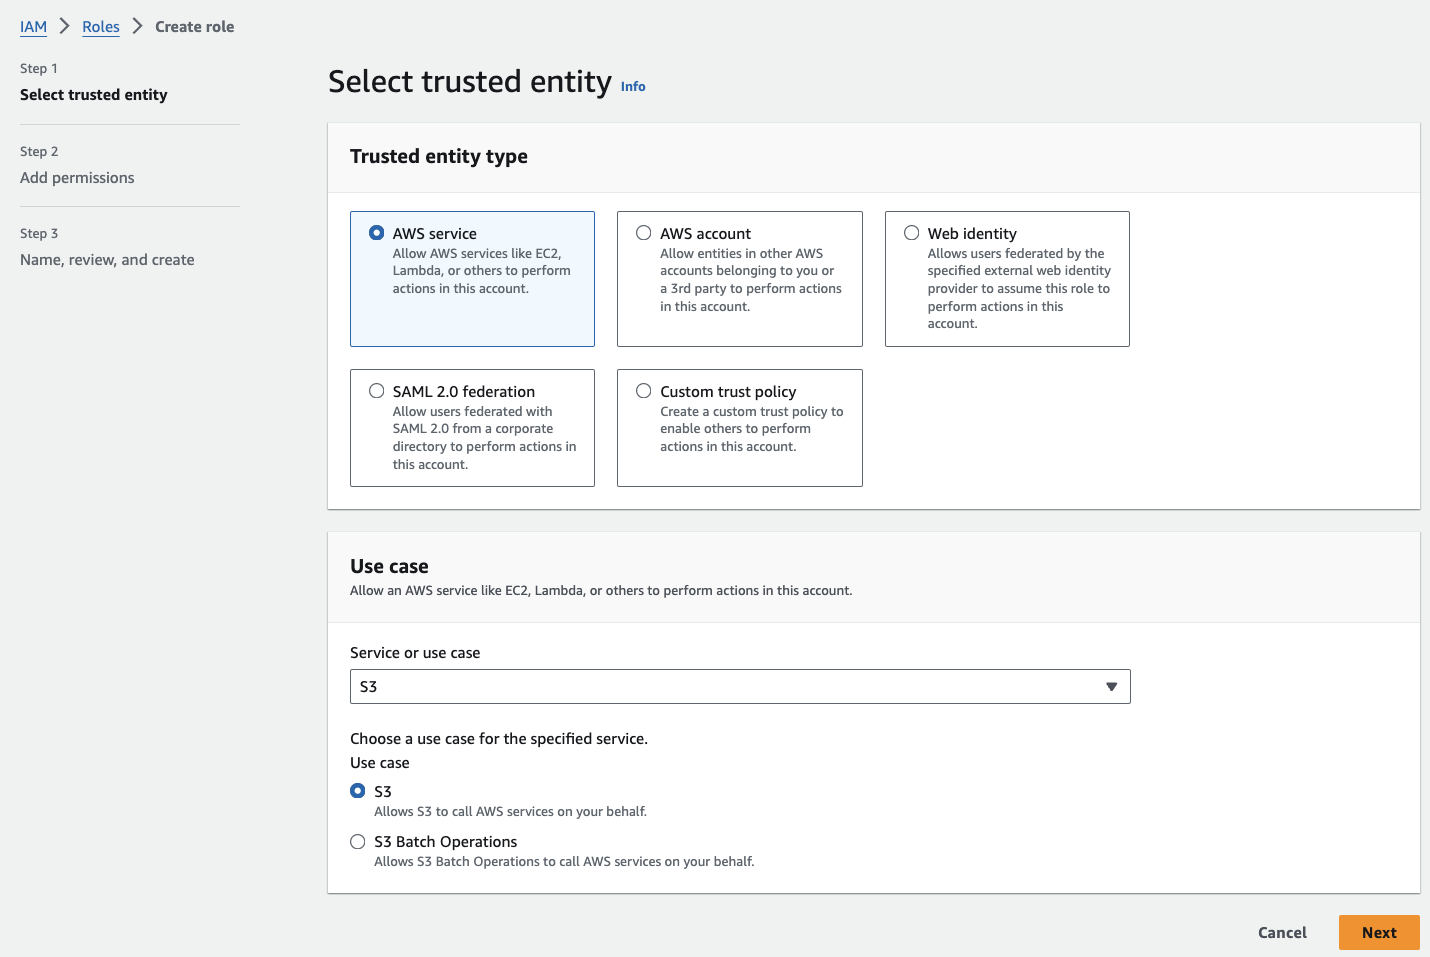
Select a trusted entity
2. Attach policies
Here, you’ll add permissions to your role. You can choose from existing policies or create a new one.
For this role, we find and select the “AmazonS3FullAccess” policy and then click “Next.”
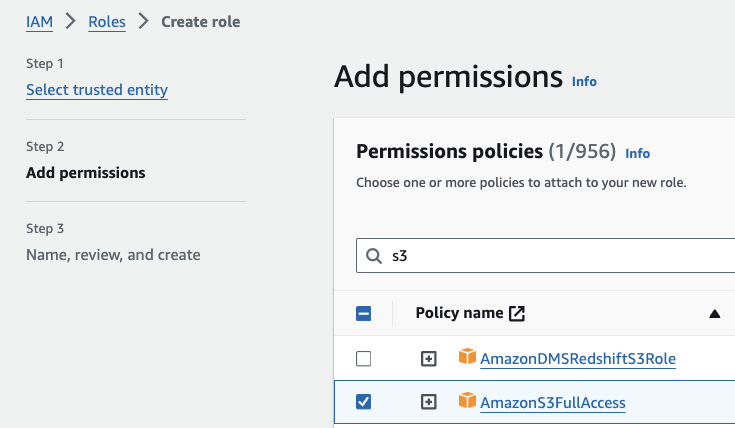
Add permissions to an IAM role
3. Name, review, and create
Give your role a name that clarifies what it’s for, like “FullS3Access.”
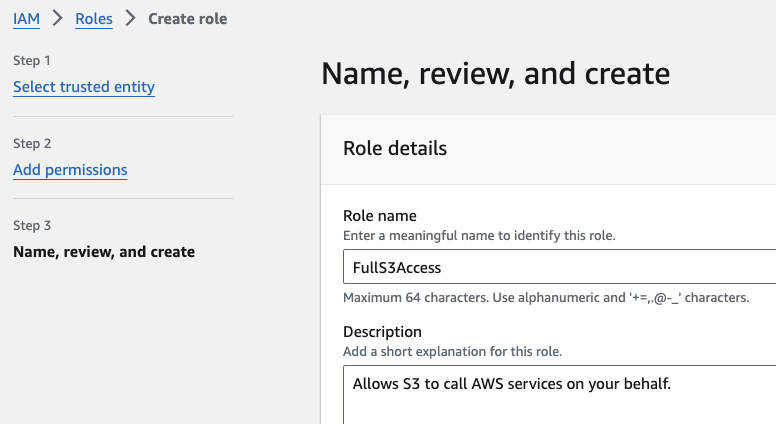
Name, review, and create a role
Review the details of your role to make sure everything looks good. You’ll see the trusted entity, attached policies, and any tags you added.
Tags are optional, but they can help organize and manage your roles. For example, you can add a tag with a key of "Environment" and a value of "Production."
Click “Create role.”
How to manage IAM roles
Managing IAM roles can get chaotic if you have many, but there are ways to keep things organized:
- Use descriptive names for your roles. This makes it easier to know what each role is for just by looking at the name. For example, instead of a generic name like “Role1,” use something like “EC2_S3_ReadOnly” to indicate that it’s for EC2 instances with read-only access to S3.
- Group similar roles together. You can use tags to organize roles by department, project, or environment. For example, add tags like “Environment: Production” or “Department: Finance.”
- Regularly review your roles. Periodically check all your roles to see if they’re still needed. Remove any that are no longer in use. This reduces clutter and minimizes security risks by ensuring only necessary roles exist.
- Use AWS IAM Access Analyzer. This tool helps you identify roles and policies that grant broad access and might pose security risks. It provides insights into your roles, making it easier to refine permissions and ensure your roles are as specific as possible.
Use case: Cross-account access
Cross-account access with IAM roles is a handy feature that allows you to grant permissions to users or resources in one AWS account to access resources in another account.
Imagine you have two AWS accounts: “Account A” is your production environment, and “Account B” is your development environment. You may need users or applications in “Account B” to access resources in “Account A,” but you don’t want to create separate IAM users in “Account” A for everyone.
You can create a role in “Account A” that grants the necessary permissions and then allow users or resources in “Account B” to assume that role.
These are the steps you need to take to manage the above scenario:
- Create a role in “Account A” by going to the IAM console in “Account A” and click on “Roles”.
- Click “Create role" and choose "AWS account" as the trusted entity. Enter the account ID of “Account B.” This sets up a trust relationship, allowing users from “Account B” to assume the role.
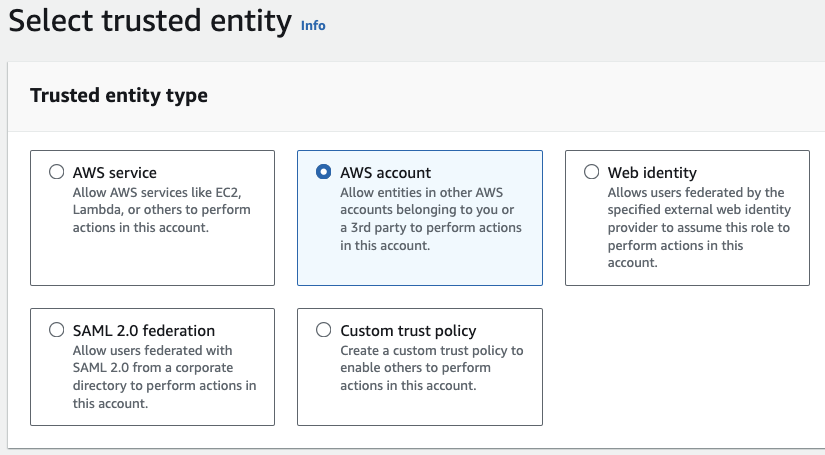
IAM cross-account access
- Attach the necessary permissions policies to the role. For example, if you want to allow access to an S3 bucket, you might attach the “AmazonS3ReadOnlyAccess” policy.
- In “Account B,” create an IAM policy that allows assuming the role in “Account A.” The policy will look something like this:
{
  "Version": "2012-10-17",
  "Statement": [
    {
      "Effect": "Allow",
      "Action": "sts:AssumeRole",
      "Resource": "arn:aws:iam::AccountA_ID:role/RoleName"
    }
  ]
}- Replace
AccountA_IDwith the actual AWS account ID of “Account A” andRoleNamewith the role name you created. - Attach this policy to the users or groups in “Account B” that need access.
Users or applications in “Account B” can now assume the role of “Account A” in accessing the resources. This can be done using the AWS CLI, SDKs, or the console.
AWS IAM Best Practices
IAM best practices are essential for keeping your AWS environment secure. Here’s what you should focus on:
Enable Multi-Factor Authentication (MFA)
MFA adds an extra layer of security to your AWS account. Even if someone gets hold of your password, they’d need the second verification form to get in. Set this up for your root account and any other important users.
Use IAM roles instead of IAM users when possible
Roles provide temporary credentials that automatically rotate, reducing the risk of long-term credential exposure. For instance, use roles rather than hardcoding access keys for applications running on EC2 instances.
Follow the principle of least privilege
Only give users and roles the permissions they absolutely need. This minimizes the risk of accidental or malicious actions. Regularly review and update permissions to make sure they’re still necessary.
Regularly rotate access keys
If you have to use access keys, rotate them regularly. AWS allows you to create two active access keys per user, so you can create a new key, update your applications, and then deactivate the old key without downtime.
Use IAM groups to manage permissions
Instead of assigning permissions to individual users, create groups and assign permissions to the groups. This makes it easier to manage permissions, especially as the number of users grows.
Monitor and audit IAM activities
Enable AWS CloudTrail to log all API calls, including those made by IAM users. Review these logs regularly to detect any unusual or unauthorized activity. This helps maintain security and compliance.
Apply strong password policies
Enforce password policies that require strong passwords. This includes a mix of uppercase and lowercase letters, numbers, and special characters. Also, you should enforce regular password changes and prevent reusing old passwords.
Limit the use of the root account
The root account has unrestricted access to all resources in your AWS account. Use it sparingly and create individual IAM users for day-to-day tasks. Always enable MFA on the root account.
Advanced AWS IAM Features
If you’re using AWS IAM in a corporate environment, you should be aware of a couple of advanced features.
Identity federation
Identity federation lets you use existing identities from other identity providers (like your corporate directory or social identity providers) to access AWS resources. Instead of creating separate IAM users for everyone, you can let users sign in with their existing credentials.
To use identity federation, you must establish a trust relationship between AWS and the identity provider.
When users try to access AWS, they first authenticate with the identity provider. If the authentication is successful, they get temporary security credentials to access AWS resources.
These credentials are managed by the AWS Security Token Service (STS) and are valid for a short time, reducing the risk of long-term credential exposure.
IAM Identity Center
The IAM Identity Center, also known as AWS Single Sign-On (SSO), is a central hub for controlling who can access what in your AWS environment without having to manage multiple usernames and passwords.
You can connect to your existing identity sources like Microsoft Active Directory or other identity providers that support SAML 2.0. Your users can use their corporate login credentials to sign in to AWS.
Once set up, users can access a personalized portal where they see all the AWS accounts and applications for which they have permissions. They just log in once, and from there, they can switch between different AWS accounts and applications without having to log in again.
You can set up the IAM Identity Center by enabling it in the AWS Management Console, connecting it to your identity source, and configuring user access. AWS provides step-by-step tutorials to help you through the process, making it easy even if you’re new to IAM or SSO.
Conclusion
Mastering IAM is crucial because it sets the foundation for everything you do in AWS. It helps you control what resources users can access, keeps your data safe, and ensures you’re not opening the door to hackers.
To learn more about AWS, start by signing up for our AWS Cloud Technology and Services course. After that, you can work your way up in your career by getting AWS certified!
Additionally, check out our webinar, which will introduce you to data science in the cloud with Python, AWS, and boto3.
FAQs
What is the difference between IAM roles and IAM users in AWS?
IAM users are specific individuals or applications that have permanent credentials and are typically associated with a particular person or service. IAM roles, on the other hand, are meant to be assumed by anyone who needs them, providing temporary security credentials that expire after a short period. This makes roles more flexible and secure for tasks that require temporary access, such as applications running on EC2 instances.
How do I create a custom IAM policy in AWS?
To create a custom IAM policy, navigate to the IAM console, click on "Policies" in the left-hand menu, and then click "Create Policy." You can define your policy using either the visual editor or the JSON editor. After determining the permissions, click "Review policy," give your policy a name and description, and click "Create policy." This custom policy can then be attached to users, groups, or roles.
Why is it important to enable Multi-Factor Authentication (MFA) for my AWS account?
Enabling MFA adds an extra layer of security to your AWS account. Even if someone gains access to your password, they still need the second verification form (such as a code from your smartphone) to log in. This significantly reduces the risk of unauthorized access and helps protect your sensitive data and resources.
How can IAM groups help me manage permissions more effectively in AWS?
IAM groups allow you to assign permissions to multiple users simultaneously, making it easier to manage and update permissions. Instead of assigning policies to individual users, you can create groups based on roles or departments (e.g., Admins, Developers) and attach the necessary policies to these groups. This approach simplifies permissions management, especially as the number of users grows.
What are the benefits of using AWS IAM roles for cross-account access?
Using AWS IAM roles for cross-account access allows you to grant permissions to users or resources in one AWS account to access resources in another account without creating separate IAM users in the target account. This method enhances security by using temporary credentials that expire automatically, reduces the management overhead of maintaining multiple user accounts, and simplifies granting and revoking access across accounts.

