programa
Associate AI Engineer para desarrolladores
26 h
Meta acaba de lanzar la serie Llama 4, que incluye dos modelos avanzados: Llama 4 Explorador y Llama 4 Maverick. Ambos son de peso abierto, pero para ajustar Llama 4 Scout se necesitan cuatro GPU H100, y Llama 4 Maverick necesita ocho. Esto significa que sólo las empresas con recursos sustanciales pueden permitirse afinarlos.
En este blog, te mostraré cómo poner a punto Llama 4 Scout por sólo 10 $ utilizando la plataforma RunPod. Aprenderás:
Mantenemos a nuestros lectores al día de lo último en IA enviándoles The Median, nuestro boletín gratuito de los viernes que desglosa las noticias clave de la semana. Suscríbete y mantente alerta en sólo unos minutos a la semana:
Ir a RunPod y crea una cuenta. Después, ve a Facturación de Runpod y añade 25 $ utilizando la tarjeta de crédito. También puedes pagar con criptomoneda.

Navega hasta Mis Pods para empezar a configurar tu pod. El pod funciona como un servidor virtual que te proporciona las CPU, GPU, memoria y almacenamiento necesarios para tus tareas.
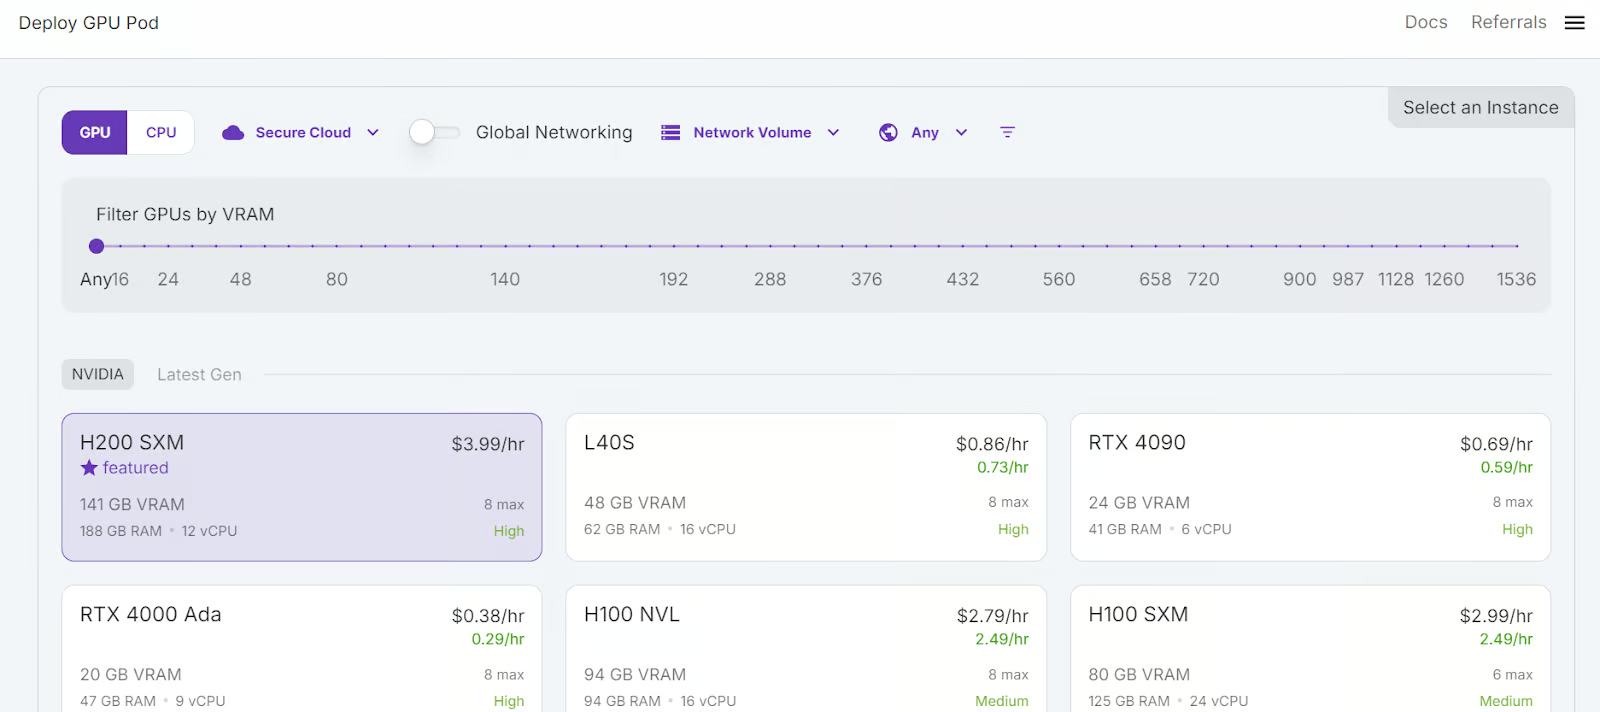
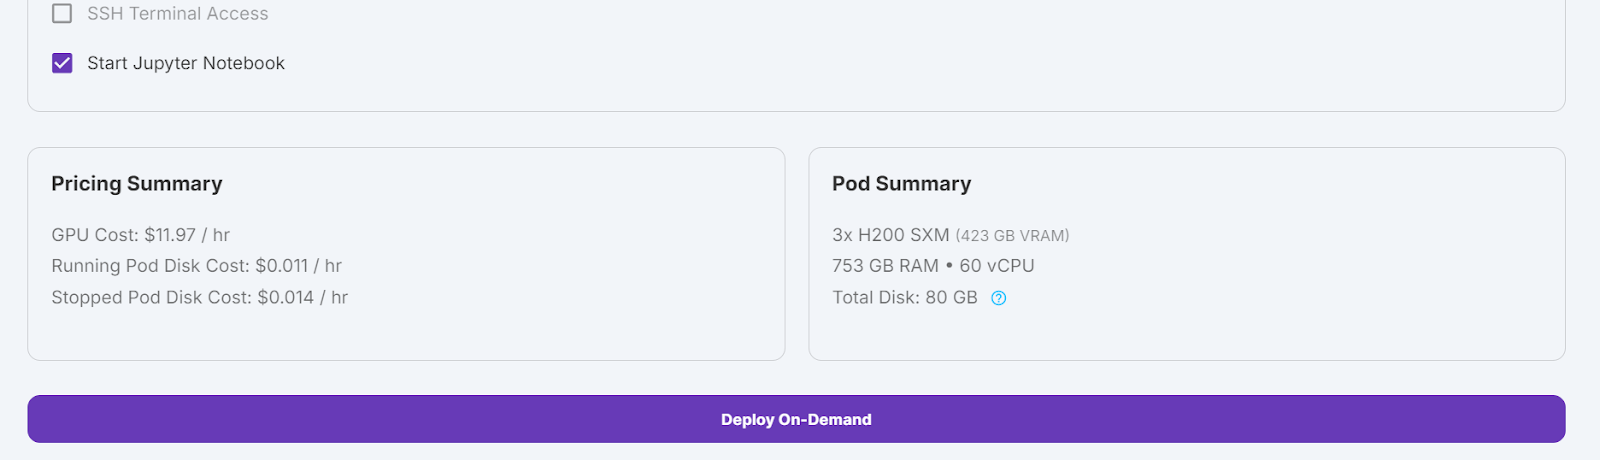
Seleccionaremos 3 GPUs H200 SXM, que proporcionarán memoria suficiente para cargar el modelo , cuantizarlo cuantificarlo y ajustarlo en el nuevo conjunto de datos. Alternativamente, puedes utilizar la función Unsloth para ejecutar el modelo en un único H100; sin embargo, este método no me ha funcionado eficazmente.
Para configurar tu pod, sigue estos pasos:
Modificaremos nuestro pod aumentando el tamaño del disco del contenedor a 300 GB y añadiendo la variable de entorno HF_TOKEN, que es tu token de acceso a Cara Abrazada. Este token es esencial para cargar y guardar eficazmente el modelo.
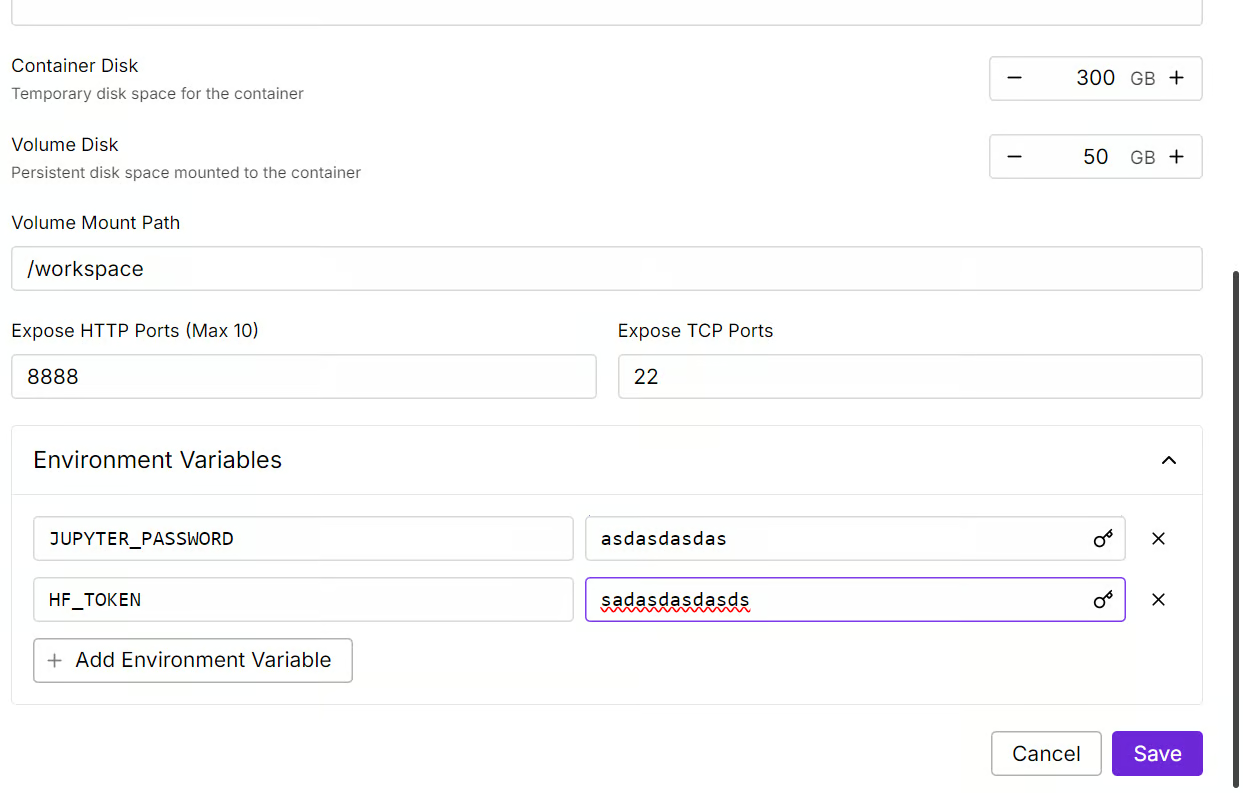
Llevará algún tiempo preparar el contenedor. Una vez que todo esté configurado, haz clic en el botón "Conectar" e inicia la Instancia de JupyterLab.

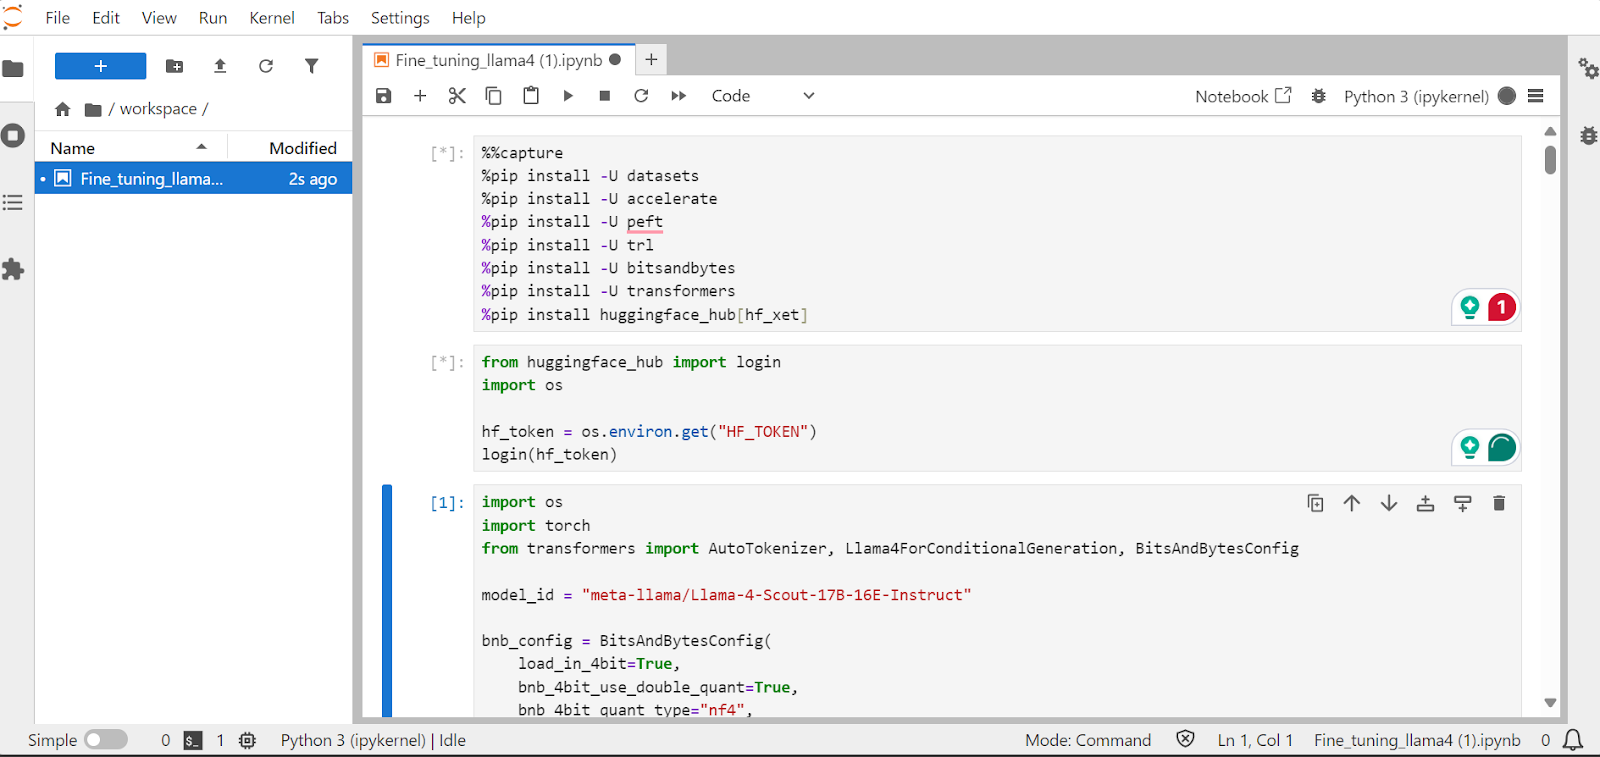
Crea un nuevo bloc de notas y empieza a utilizar este nuevo entorno, similar a tu configuración local.
En esta sección, aprenderemos a abordar los retos más comunes al poner a punto el nuevo modelo Llama 4, como los problemas de falta de memoria y los errores de la biblioteca Transformers. También veremos cómo cargar, ajustar y guardar sin problemas el adaptador LoRA. Siguiendo estos pasos, puedes centrarte en el proceso de puesta a punto sin preocuparte de los obstáculos técnicos.
Instalaremos los paquetes Python necesarios para afinar los grandes modelos lingüísticos.
Nota:
xet que es más rápida que Git-LFS. Esta integración mejorará tres veces la velocidad de descarga.%%capture
!pip install transformers==4.51.0
%pip install -U datasets
%pip install -U accelerate
%pip install -U peft
%pip install -U trl
%pip install -U bitsandbytes
%pip install huggingface_hub[hf_xet]Carga la clave API desde la variable de entorno para iniciar sesión en Cara Abrazada. Al iniciar sesión, puedes acceder a los modelos cerrados y también guardar modelos y tokenizadores ajustados.
from huggingface_hub import login
import os

hf_token = os.environ.get("HF_TOKEN")
login(hf_token)Carga el Llama-4-Scout-17B-16E-Instruct con cuantificación de 4 bits para un uso eficiente de la memoria. Asegúrate de que has configurado device_map en auto para utilizar las tres GPU H200.
Nota: Asegúrate de que tienes acceso al modelo, ya que este modelo está cerrado y requiere que rellenes el formulario yendo a la página meta-llama/Llama-4-Scout-17B-16E-Instruir URL.
import os
import torch
from transformers import AutoTokenizer, Llama4ForConditionalGeneration, BitsAndBytesConfig


model_id = "meta-llama/Llama-4-Scout-17B-16E-Instruct"

bnb_config = BitsAndBytesConfig(
    load_in_4bit=True,
    bnb_4bit_use_double_quant=False,
    bnb_4bit_quant_type="nf4",
    bnb_4bit_compute_dtype=torch.bfloat16,
)


model = Llama4ForConditionalGeneration.from_pretrained(
    model_id,
    device_map="auto",
    torch_dtype=torch.bfloat16,
    quantization_config=bnb_config,
    trust_remote_code=True,
)

model.config.use_cache = False
model.config.pretraining_tp = 1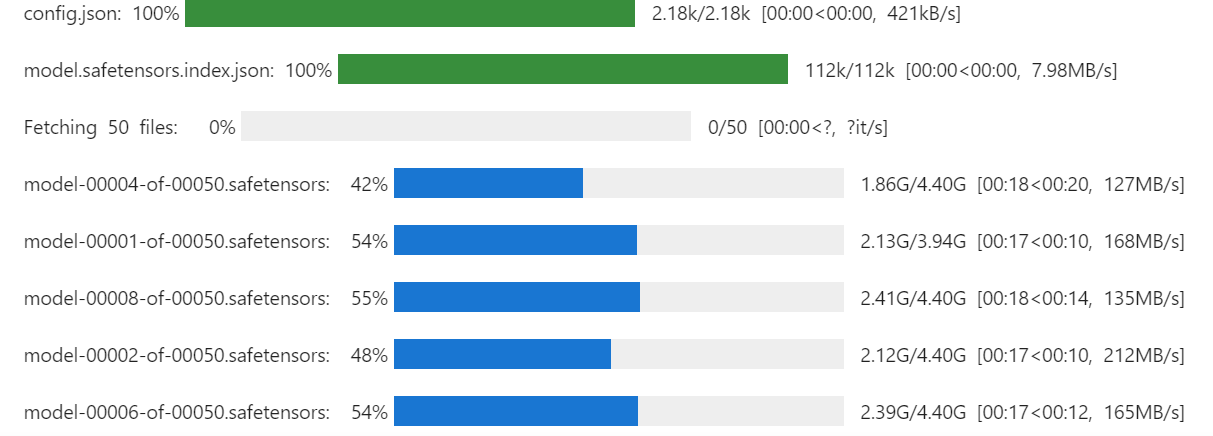
También cargaremos el tokenizador utilizando el mismo ID de modelo.
# Load tokenizer
tokenizer = AutoTokenizer.from_pretrained(model_id, trust_remote_code=True)
Ejecutando el comando siguiente, puedes comprobar cuánta memoria nos queda para configurar el entrenador y ajustar el modelo.
!nvidia-smi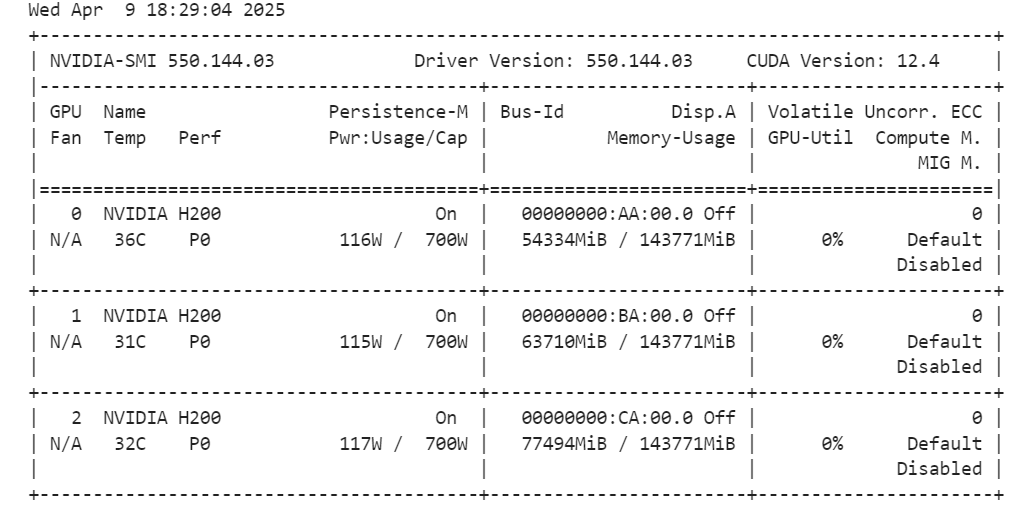
Crearemos un estilo de aviso para el modelo, incluyendo un aviso del sistema con marcadores de posición para la pregunta, cadena de pensamientoy respuesta. Esta indicación ayudará al modelo a pensar paso a paso y a dar respuestas claras y precisas.
train_prompt_style = """Below is an instruction that describes a task, paired with an input that provides further context.
Write a response that appropriately completes the request.
Before answering, think carefully about the question and create a step-by-step chain of thoughts to ensure a logical and accurate response.

### Instruction:
You are a medical expert with advanced knowledge in clinical reasoning, diagnostics, and treatment planning.
Please answer the following medical question.

### Question:
{}

### Response:
<think>
{}
</think>
{}"""
A continuación, crearemos la función Python para generar la columna “text” utilizando el estilo de aviso de entrenamiento y las columnas del conjunto de datos.
EOS_TOKEN = tokenizer.eos_token  # Must add EOS_TOKEN

def formatting_prompts_func(examples):
    inputs = examples["Question"]
    complex_cots = examples["Complex_CoT"]
    outputs = examples["Response"]
    texts = []
    for question, cot, response in zip(inputs, complex_cots, outputs):
        # Append the EOS token to the response if it's not already there
        if not response.endswith(tokenizer.eos_token):
            response += tokenizer.eos_token
        text = train_prompt_style.format(question, cot, response)
        texts.append(text)
    return {"text": texts}
Cargaremos las primeras 500 muestras del FreedomIntelligence/medical-o1-razonamiento-SFT disponible en el Hub Cara Abrazada y, a continuación, aplicaremos la función formatting_prompts_func para crear la columna “text”.
from datasets import load_dataset


dataset = load_dataset("FreedomIntelligence/medical-o1-reasoning-SFT","en", split = "train[0:500]",trust_remote_code=True)
dataset = dataset.map(formatting_prompts_func, batched = True,)
dataset["text"][0]
La columna "texto" tiene una indicación del sistema, instrucciones, pregunta, cadena de pensamiento y la respuesta.
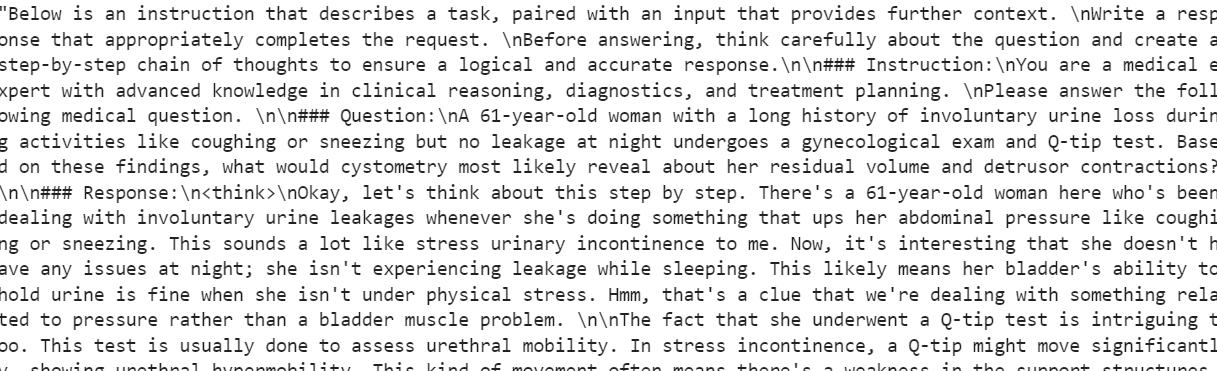
El nuevo entrenador STF no acepta tokenizadores, así que convertiremos el tokenizador en un recopilador de datos y proporcionaremos al entrenador el recopilador de datos en lugar del tokenizador.
from transformers import DataCollatorForLanguageModeling

data_collator = DataCollatorForLanguageModeling(
    tokenizer=tokenizer,
    mlm=False
)Ahora crearemos un estilo de aviso de prueba que incluya todo lo del estilo de aviso de entrenamiento excepto la cadena de pensamiento y respuesta.
prompt_style = """Below is an instruction that describes a task, paired with an input that provides further context.
Write a response that appropriately completes the request.
Before answering, think carefully about the question and create a step-by-step chain of thoughts to ensure a logical and accurate response.

### Instruction:
You are a medical expert with advanced knowledge in clinical reasoning, diagnostics, and treatment planning.
Please answer the following medical question.

### Question:
{}

### Response:
<think>{}"""
Tomaremos la primera pregunta del conjunto de datos, la convertiremos en pregunta utilizando el estilo de pregunta de prueba y, a continuación, la prepararemos para que el modelo genere la respuesta.
question = dataset[0]['Question']
inputs = tokenizer(
    [prompt_style.format(question, "") + tokenizer.eos_token],
    return_tensors="pt"
).to("cuda")

outputs = model.generate(
    input_ids=inputs.input_ids,
    attention_mask=inputs.attention_mask,
    max_new_tokens=1200,
    eos_token_id=tokenizer.eos_token_id,
    use_cache=True,
)
response = tokenizer.batch_decode(outputs, skip_special_tokens=True)
print(response[0].split("### Response:")[1])
La cadena de pensamiento del modelo es larga, y la respuesta que proporciona es bastante breve, difiriendo significativamente del conjunto de datos.
<think>assistant

To approach this question, let's break down the key elements provided and analyze them step by step:

1. **Symptoms**: The patient experiences involuntary urine loss during activities like coughing or sneezing but has no leakage at night. This pattern of urinary incontinence is suggestive of stress urinary incontinence (SUI), which is characterized by the involuntary leakage of urine on effort or exertion, or on sneezing or coughing.

2. **Diagnostic Tests Mentioned**:
   - **Gynecological Exam**: This is likely performed to assess the pelvic anatomy, including the position and support of the urethra and bladder neck, and to check for any pelvic organ prolapse.
   - **Q-tip Test**: This test is used to assess urethral mobility. A Q-tip (cotton swab) is inserted into the urethra, and its angle of movement is measured. Increased mobility (an angle change of more than 30 degrees) is often associated with stress urinary incontinence.

3. **Cystometry (Cystometrogram)**: This test measures the pressure within the bladder during filling and helps assess bladder function, including the residual volume and detrusor muscle contractions. The detrusor muscle is the smooth muscle in the wall of the bladder that contracts to allow urine to be expelled.

Given that the patient likely has stress urinary incontinence (SUI) based on her symptoms:
- **Residual Volume**: In patients with SUI, the bladder usually functions normally, and thus, the residual volume (the amount of urine left in the bladder after urination) is typically not significantly affected. Therefore, one would expect the residual volume to be normal or near-normal.

- **Detrusor Contractions**: In SUI, the problem primarily lies with the urethral sphincter mechanism and support rather than with the detrusor muscle itself. Hence, detrusor contractions are usually normal. The patient does not have symptoms suggestive of an overactive bladder (like urgency, urge incontinence, or nocturia), which would be more indicative of detrusor overactivity.

Based on this analysis, cystometry in this patient would most likely reveal:
- A **normal residual volume**, as her symptoms do not suggest a problem with bladder emptying.
- **Normal detrusor contractions**, as her condition (stress urinary incontinence) primarily involves issues with urethral support and continence mechanisms rather than detrusor function.

Therefore, cystometry would likely show that she has a normal residual volume and normal detrusor contractions.

</think>

The final answer is: $\boxed{Normal residual volume and normal detrusor contractions}$Ahora implementaremos LoRA (Adaptación de Bajo Rango) para un ajuste fino eficiente de los parámetros y lo aplicaremos al modelo. LoRA es una técnica diseñada para afinar grandes modelos lingüísticos congelando la mayoría de los parámetros del modelo y entrenando sólo un pequeño subconjunto de parámetros adicionales.
Este enfoque es eficiente en memoria, más rápido y rentable, al tiempo que mantiene una alta precisión comparable al ajuste fino completo.
from peft import LoraConfig, get_peft_model

# LoRA config
peft_config = LoraConfig(
    lora_alpha=16,                           # Scaling factor for LoRA
    lora_dropout=0.05,                       # Add slight dropout for regularization
    r=64,                                    # Rank of the LoRA update matrices
    bias="none",                             # No bias reparameterization
    task_type="CAUSAL_LM",                   # Task type: Causal Language Modeling
    target_modules=[
        "q_proj",
        "k_proj",
        "v_proj",
        "o_proj",
        "gate_proj",
        "up_proj",
        "down_proj",
    ],  # Target modules for LoRA
)

model = get_peft_model(model, peft_config)
Ahora configuraremos e inicializaremos el SFTTrainer (Entrenador Supervisado de Ajuste Fino) proporcionándole el conjunto de datos, el modelo, el recopilador de datos, los argumentos de entrenamiento y la configuración de LoRA. El SFTTrainer simplifica el proceso de ajuste integrando todos estos componentes en un único flujo de trabajo racionalizado, lo que facilita el entrenamiento de grandes modelos lingüísticos como Llama 4 con LoRA.
from trl import SFTTrainer
from transformers import TrainingArguments


# Training Arguments
training_arguments = TrainingArguments(
    output_dir="output",
    per_device_train_batch_size=1,
    per_device_eval_batch_size=1,
    gradient_accumulation_steps=2,
    optim="paged_adamw_32bit",
    num_train_epochs=1,
    logging_steps=0.2,
    warmup_steps=10,
    logging_strategy="steps",
    learning_rate=2e-4,
    fp16=False,
    bf16=False,
    group_by_length=True,
    report_to="none"
)

# Initialize the Trainer
trainer = SFTTrainer(
    model=model,
    args=training_arguments,
    train_dataset=dataset,
    peft_config=peft_config,
    data_collator=data_collator,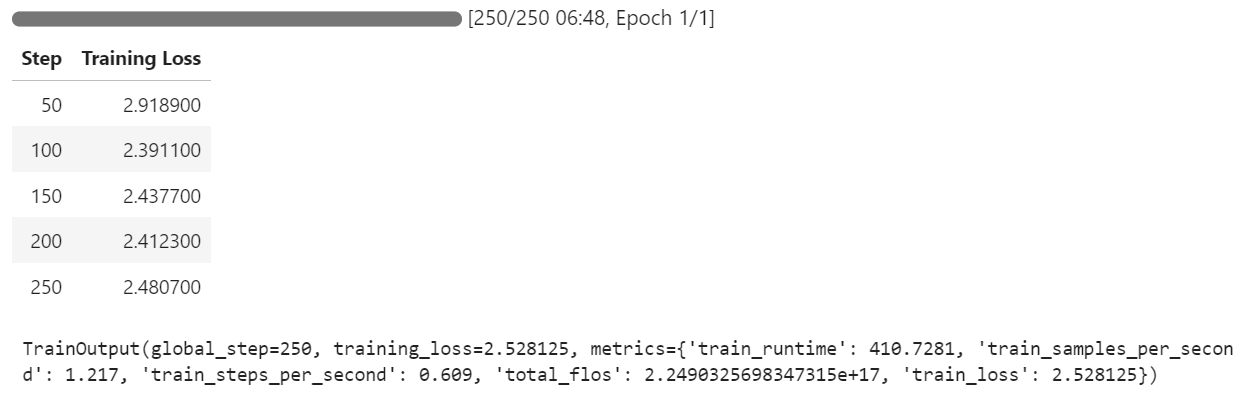
)Inicia el proceso de entrenamiento ejecutando el siguiente comando:
trainer.train()Si cambias a tu panel de Pod, verás que el entrenador está utilizando las tres GPUs para el entrenamiento.
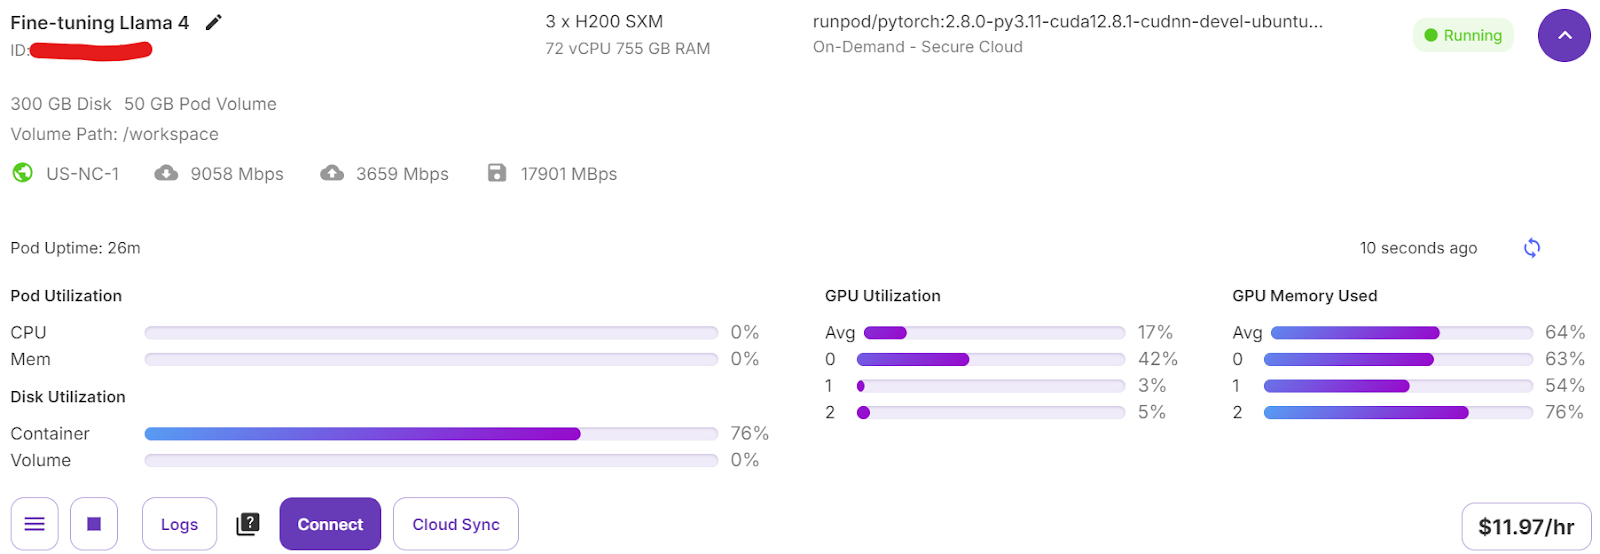
Sólo tardamos 7 minutos en afinar el modelo y, en total, 30 minutos en ejecutar todo el proyecto de principio a fin.
Ahora probaremos el modelo afinado utilizando la misma muestra que antes para comparar su rendimiento tras el afinamiento. Esto nos ayudará a evaluar lo bien que ha mejorado el modelo a la hora de razonar y generar respuestas detalladas.
question = dataset[0]['Question']
inputs = tokenizer(
    [prompt_style.format(question, "") + tokenizer.eos_token],
    return_tensors="pt"
).to("cuda")

outputs = model.generate(
    input_ids=inputs.input_ids,
    attention_mask=inputs.attention_mask,
    max_new_tokens=1200,
    eos_token_id=tokenizer.eos_token_id,
    use_cache=True,
)
response = tokenizer.batch_decode(outputs, skip_special_tokens=True)
print(response[0].split("### Response:")[1])
El proceso de razonamiento del modelo es preciso, y la respuesta es detallada y lógica:
<think>
Alright, let's think about what's going on with this 61-year-old woman. She's experiencing involuntary urine loss when she coughs or sneezes, which is classic for stress urinary incontinence. But there's no leakage at night, which is interesting. That detail might help us rule out other types of incontinence, like overactive bladder.

Now, let's think about the tests she's had. The gynecological exam and the Q-tip test are usually done to check for any anatomical issues that could be causing her symptoms. If the Q-tip test is positive, it means there's some mobility in the urethra, which can be a sign of stress incontinence.

Okay, so we've got stress urinary incontinence in mind. What does cystometry tell us? It's a test that looks at how well the bladder functions by measuring pressure and volume during filling and voiding.

For someone with stress incontinence, the cystometry would probably show that her bladder is doing its job properly. The residual volume, which is the amount of urine left in the bladder after she pees, should be normal. This means her bladder is emptying well enough.

Also, with stress incontinence, you wouldn't expect to see abnormal detrusor contractions. These are like muscle spasms in the bladder that can cause urgency and urge incontinence. But in stress incontinence, the problem is more about the urethral support and pressure control during activities, not the bladder muscle itself.

So, putting it all together, the cystometry should show a normal residual volume and no abnormal detrusor contractions. This fits perfectly with what we know about stress urinary incontinence. Yep, that's what I'd expect to see in this case.
</think>
In this scenario, the cystometry would most likely reveal a normal residual volume and no abnormal detrusor contractions. This is because stress urinary incontinence, as indicated by the patient's symptoms and the positive Q-tip test, is primarily related to issues with urethral support and pressure control during activities, not with the bladder muscle's function or emptying ability.
Probemos el modelo con una muestra diferente del conjunto de datos para evaluar mejor su rendimiento.
question = dataset[10]['Question']
inputs = tokenizer(
    [prompt_style.format(question, "") + tokenizer.eos_token],
    return_tensors="pt"
).to("cuda")

outputs = model.generate(
    input_ids=inputs.input_ids,
    attention_mask=inputs.attention_mask,
    max_new_tokens=1200,
    eos_token_id=tokenizer.eos_token_id,
    use_cache=True,
)
response = tokenizer.batch_decode(outputs, skip_special_tokens=True)
print(response[0].split("### Response:")[1])
La respuesta es lógica, detallada y demuestra la capacidad del modelo para aplicar eficazmente el razonamiento médico:
<think>
Alright, let's break this down. So, we have a 42-year-old guy who's just recovered from pneumonia, and his T3 levels are low. Now, his TSH is slightly elevated at 4.7 µU/mL, which isn't too high but is definitely not normal. T4 is at 6 µg/dL, which is kind of in the middle range, and T3 is 68 ng/dL, which is low. Hmm, these numbers make me think of a condition called sick euthyroid syndrome. It's like when the body gets sick, the thyroid function tests can get all wonky, even if the thyroid itself is working fine.

In this syndrome, T3 usually drops first, and T4 might stay normal or even rise a bit. This makes sense here because his T3 is low, but T4 is still around 6 µg/dL. Now, the TSH is slightly elevated, which is a bit puzzling, but in sick euthyroid syndrome, TSH can be normal or even slightly elevated. So, this fits.

But wait, what about the other hormones? In sick euthyroid syndrome, we often see an increase in reverse T3 (rT3). This is because the body might convert T4 to rT3 instead of T3 when it's stressed. So, if I were to guess, I'd say the reverse T3 level is probably elevated in this case.

This all makes sense because the clinical picture and lab results are lining up nicely with sick euthyroid syndrome. So, if I had to pick an additional hormone that's likely elevated, it would be the reverse T3. Yeah, that seems to fit the scenario perfectly.
</think>
In this scenario, considering the clinical context of a 42-year-old man recovering from pneumonia with decreased T3 levels and slightly elevated TSH, along with normal T4 levels, the likely condition is sick euthyroid syndrome. In this condition, the body often converts T4 to reverse T3 (rT3) instead of T3 during stress or illness. Therefore, the additional hormone level that is likely to be elevated in this patient is reverse T3 (rT3).Ahora enviaremos el modelo ajustado (adaptador LoRA) y el tokenizador al Hub Cara Abrazada. Este proceso creará automáticamente un repositorio para ti y subirá todos los archivos del modelo necesarios, haciendo que el modelo sea accesible públicamente para su uso posterior o para compartirlo.
model.push_to_hub("Llama-4-Scout-17B-16E-Instruct-Medical-ChatBot")
tokenizer.push_to_hub("Llama-4-Scout-17B-16E-Instruct-Medical-ChatBot")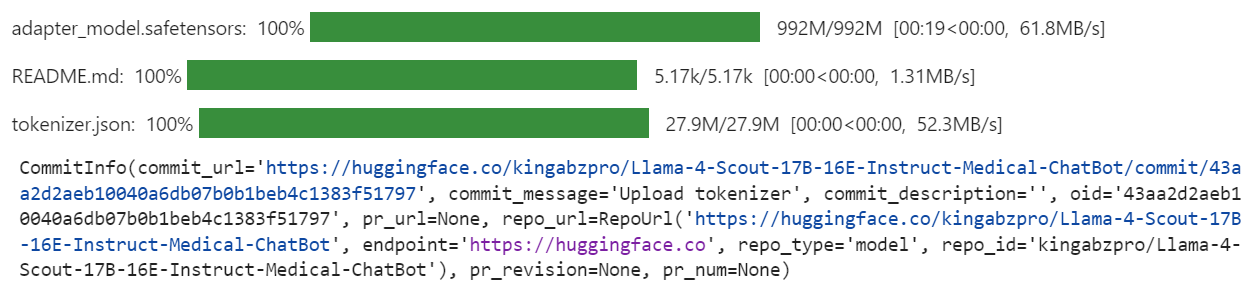
Una vez completado el proceso, puedes acceder al repositorio de modelos en el siguiente enlace: kingabzpro/Llama-4-Scout-17B-16E-Instruir-Médico-ChatBot
Aquí tienes el cuaderno complementario que contiene todo el código necesario, salidas e instrucciones detalladas para ayudarte a poner a punto tu propio modelo de Llama 4.
Crear este tutorial fue una experiencia desafiante pero gratificante. Mientras trabajaba con Llama 4, me encontré con varios problemas que ponían de manifiesto las complejidades de utilizar este modelo. En mi opinión, Llama 4 aún no está totalmente optimizado para un uso generalizado, especialmente para las personas que dependen de GPU de consumo. He aquí algunos de los principales retos a los que me enfrenté:
A pesar de estos retos, si sigues esta guía paso a paso, deberías poder afinar Llama 4 en cualquier nuevo conjunto de datos con relativa facilidad.
Para saber más sobre Llama 4, consulta estos recursos:
Aprende IA con estos cursos
programa
programa
Curso
Tutorial
Abid Ali Awan
Tutorial
Zoumana Keita
Tutorial
Abid Ali Awan
Tutorial
Zoumana Keita
Tutorial
Ryan Ong
Tutorial
Dimitri Didmanidze