Track
Associate AI Engineer for Developers
26 hr
Meta has just launched the Llama 4 series, which includes two advanced models: Llama 4 Scout and Llama 4 Maverick. Both are open-weight, but fine-tuning Llama 4 Scout requires four H100 GPUs, and Llama 4 Maverick needs eight. This means only companies with substantial resources can afford to fine-tune them.
In this blog, I will show you how to fine-tune Llama 4 Scout for just $10 using the RunPod platform. You will learn:
We keep our readers updated on the latest in AI by sending out The Median, our free Friday newsletter that breaks down the week’s key stories. Subscribe and stay sharp in just a few minutes a week:
Go to the RunPod website and create an account. After that, go to the Runpod Billing menu and add $25 using the credit card. You can also pay with cryptocurrency.

Navigate to the My Pods menu to begin configuring your pod. The pod serves as a virtual server that provides you with the necessary CPUs, GPUs, memory, and storage for your tasks.
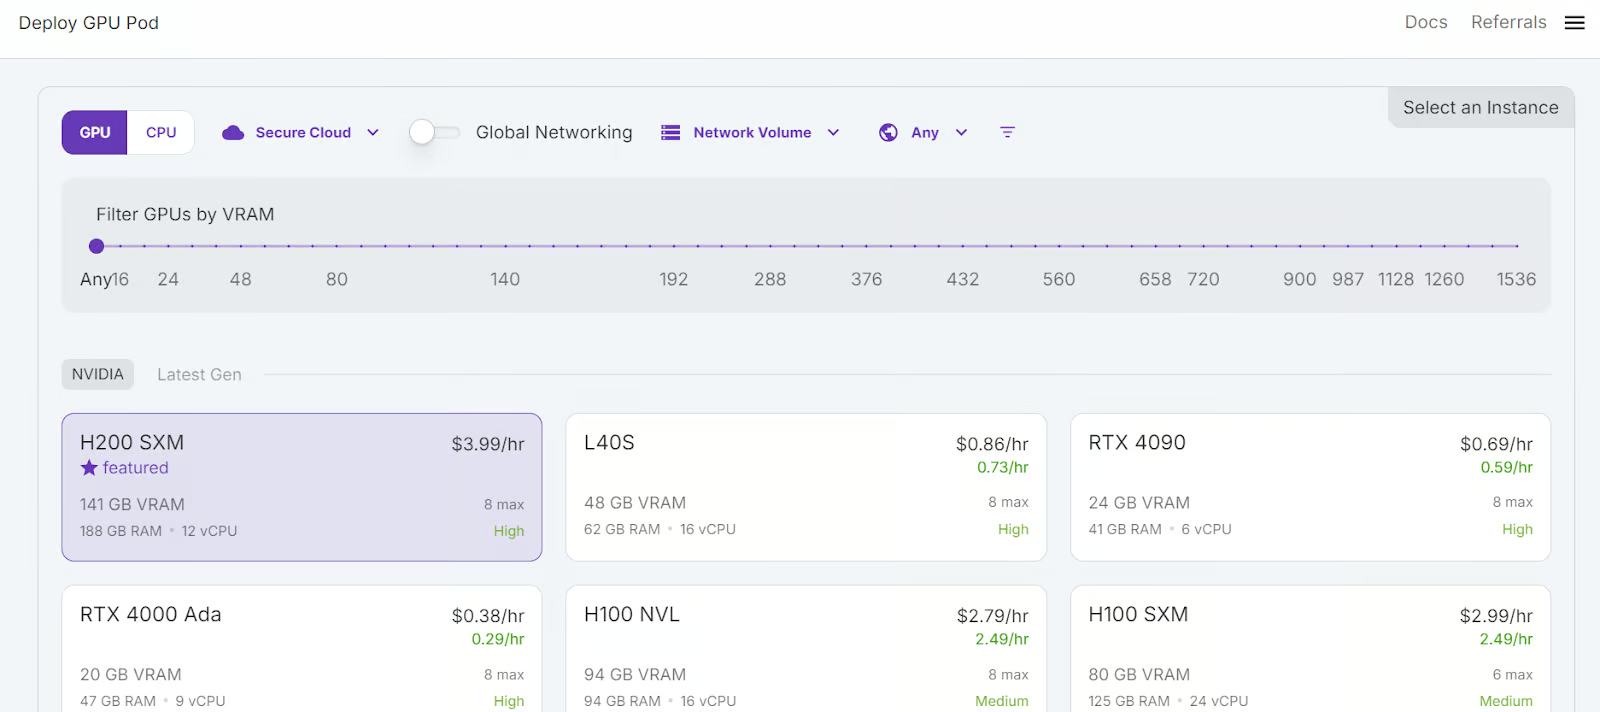
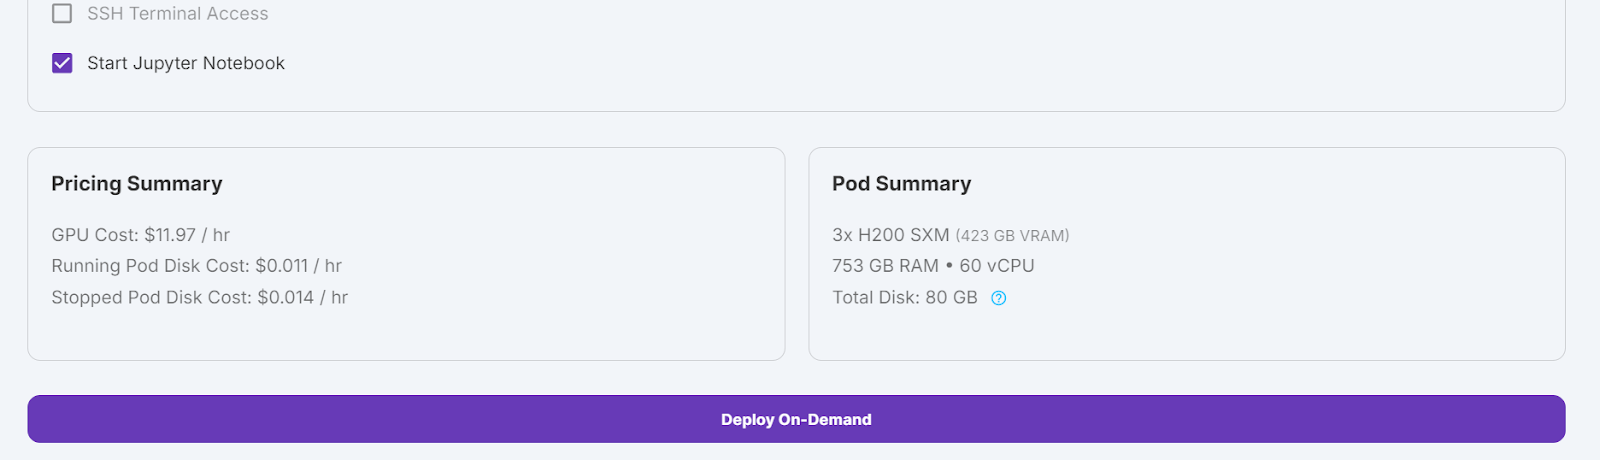
We will select 3x H200 SXM GPUs, which will provide sufficient memory to load the model, quantize it, and fine-tune it on the new dataset. Alternatively, you can use the Unsloth framework to run the model on a single H100—however, this approach didn’t work effectively for me.
To set up your pod, follow these steps:
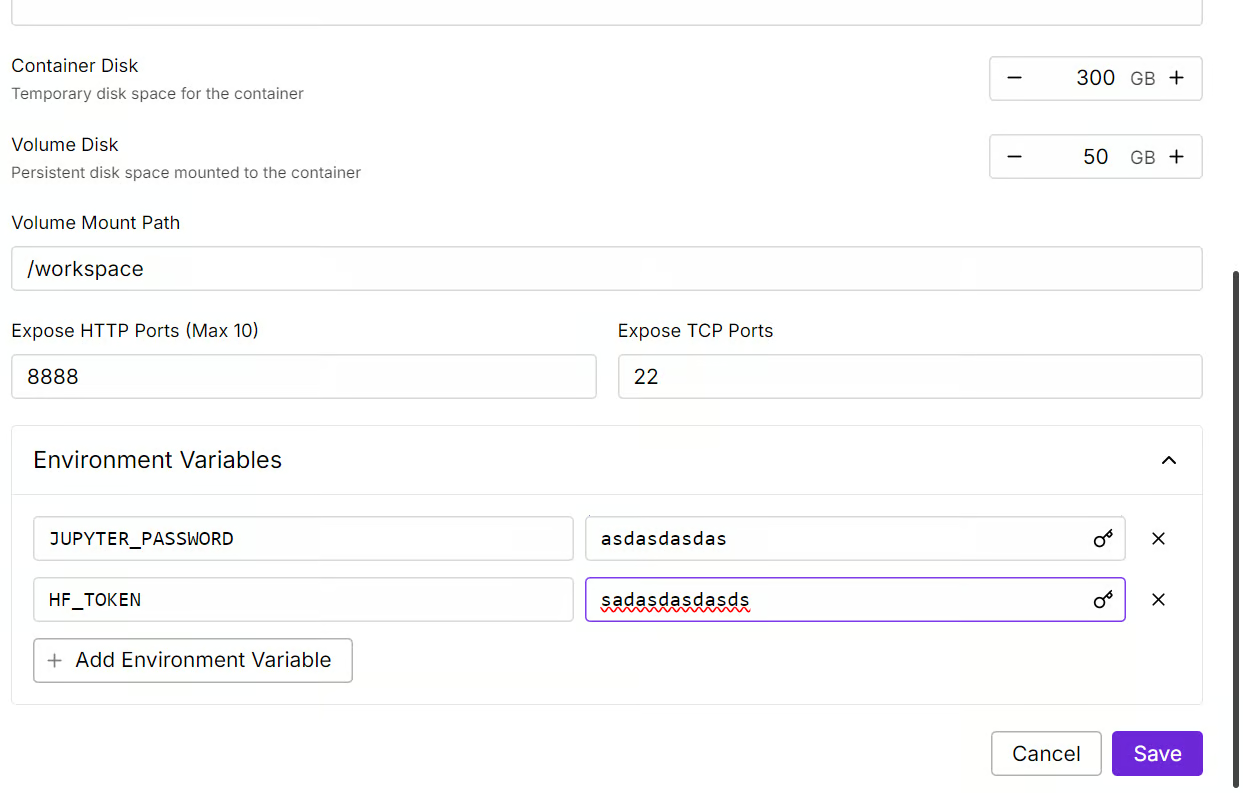
We will edit our pod by increasing the container disk size to 300GB and adding the HF_TOKEN environment variable, which is your Hugging Face access token. This token is essential for effectively loading and saving the model.
It will take some time to set up the container. Once everything is set up, click on the “Connect” button and launch the JupyterLab Instance.

Create a new notebook and start using this new environment, similar to your local setup.
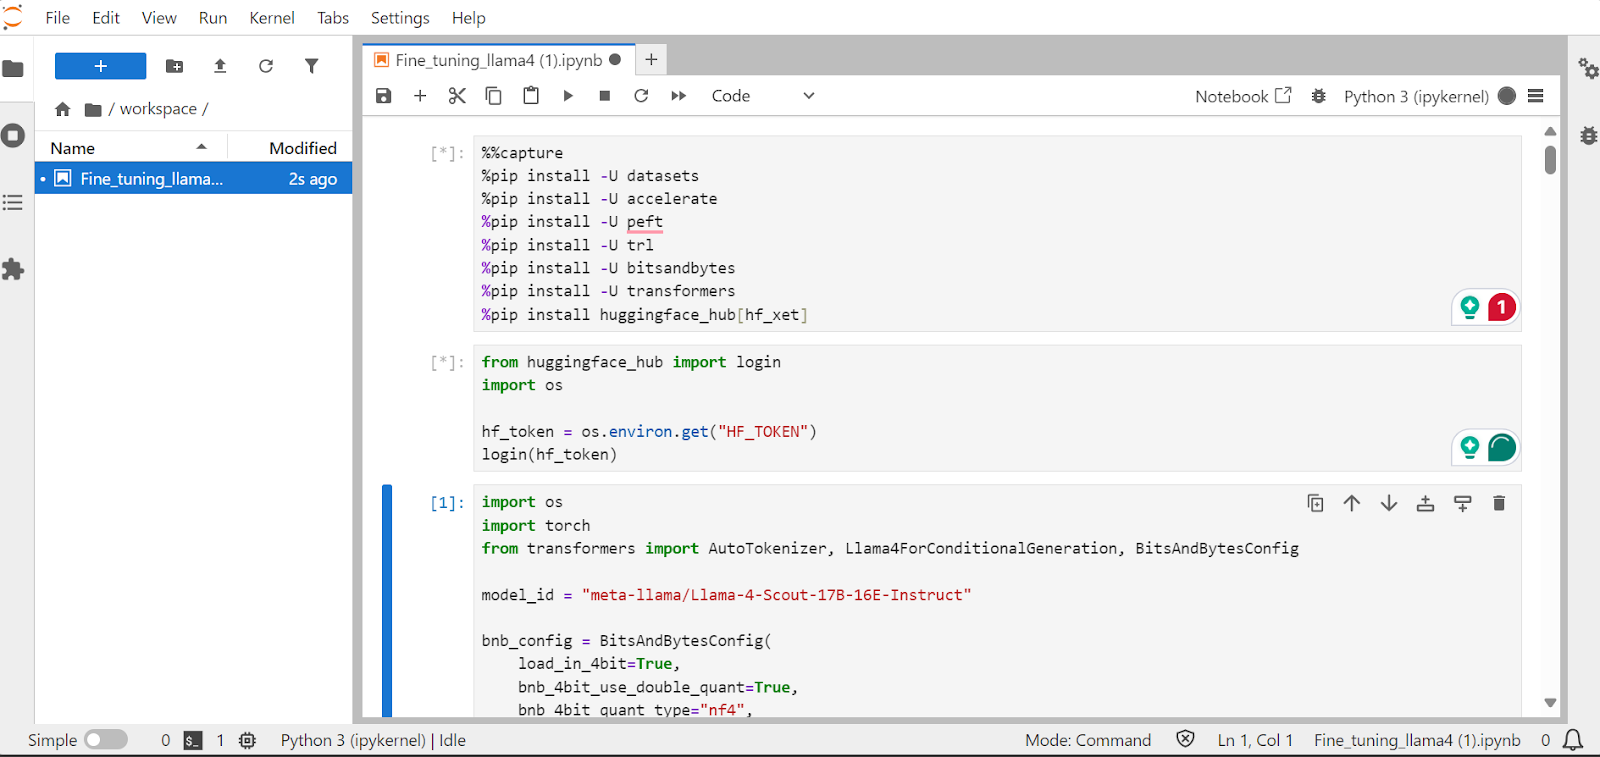
In this section, we will learn how to address common challenges when fine-tuning the new Llama 4 model, such as out-of-memory issues and bugs in the Transformers library. We will also cover how to seamlessly load, fine-tune, and save the LoRA adapter. By following these steps, you can focus on the fine-tuning process without worrying about technical hurdles.
We will install the necessary Python packages to fine-tune the large language models.
Note:
xet integration that is faster than Git-LFS. This integration will improve the download speed by three times.%%capture
!pip install transformers==4.51.0
%pip install -U datasets
%pip install -U accelerate
%pip install -U peft
%pip install -U trl
%pip install -U bitsandbytes
%pip install huggingface_hub[hf_xet]Load the API key from the environment variable to log in to Hugging Face. By logging in, you can gain access to gated models and also save fine-tuned models and tokenizers.
from huggingface_hub import login
import os

hf_token = os.environ.get("HF_TOKEN")
login(hf_token)Load the Llama-4-Scout-17B-16E-Instruct model with 4-bit quantization for efficient memory usage. Make sure you have set the device_map to auto to use all three H200 GPUs.
Note: Ensure you have access to the model, as this model is gated and requires you to fill out the form by going to the meta-llama/Llama-4-Scout-17B-16E-Instruct URL.
import os
import torch
from transformers import AutoTokenizer, Llama4ForConditionalGeneration, BitsAndBytesConfig


model_id = "meta-llama/Llama-4-Scout-17B-16E-Instruct"

bnb_config = BitsAndBytesConfig(
    load_in_4bit=True,
    bnb_4bit_use_double_quant=False,
    bnb_4bit_quant_type="nf4",
    bnb_4bit_compute_dtype=torch.bfloat16,
)


model = Llama4ForConditionalGeneration.from_pretrained(
    model_id,
    device_map="auto",
    torch_dtype=torch.bfloat16,
    quantization_config=bnb_config,
    trust_remote_code=True,
)

model.config.use_cache = False
model.config.pretraining_tp = 1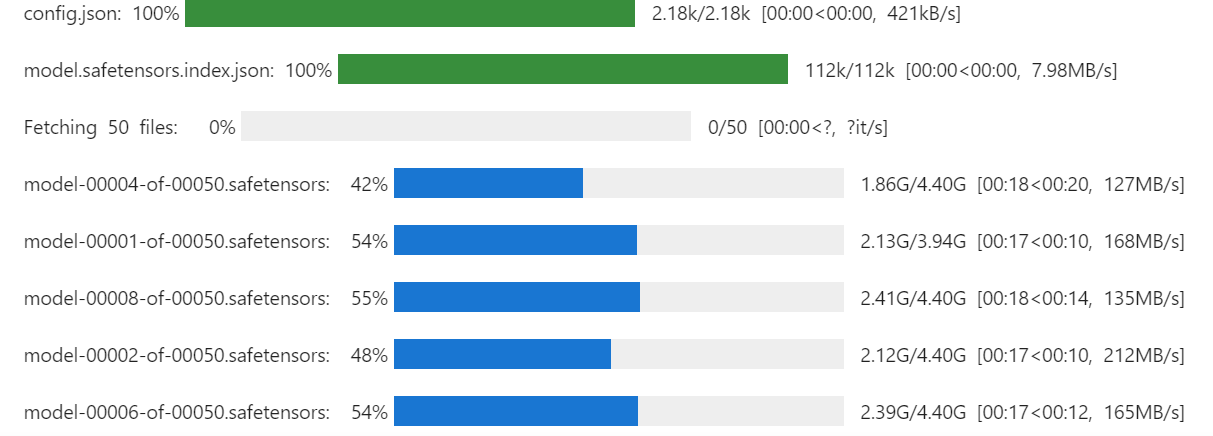
We will also load the tokenizer using the same model ID.
# Load tokenizer
tokenizer = AutoTokenizer.from_pretrained(model_id, trust_remote_code=True)
By running the command below, you can check how much memory we have left for setting up the trainer and fine-tune the model.
!nvidia-smi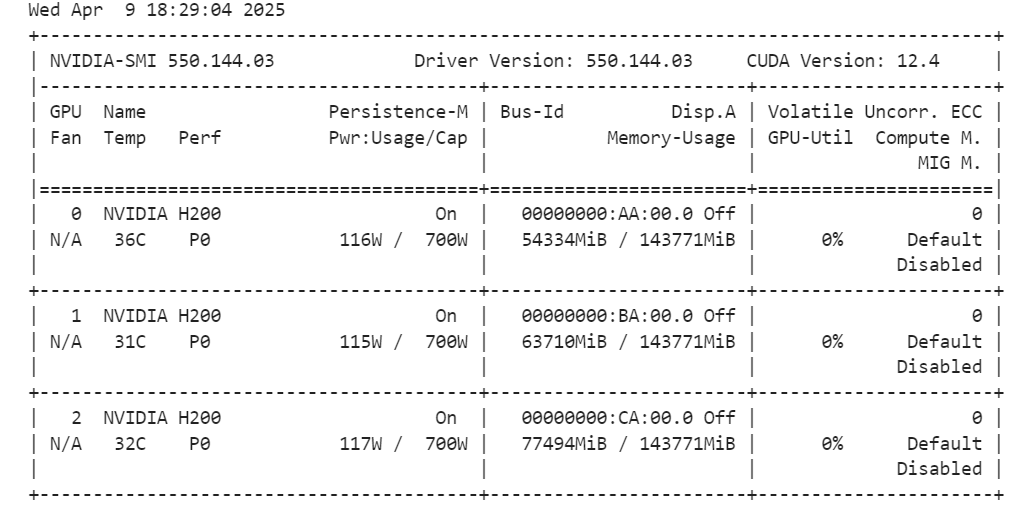
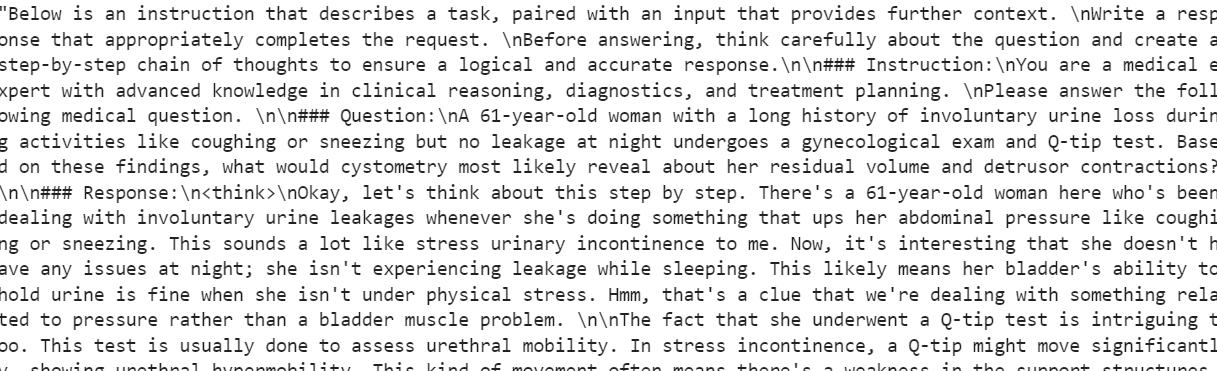
We will create a prompt style for the model, including a system prompt with placeholders for the question, chain of thought, and response. This prompt will help the model think step-by-step and give clear and accurate answers.
train_prompt_style = """Below is an instruction that describes a task, paired with an input that provides further context.
Write a response that appropriately completes the request.
Before answering, think carefully about the question and create a step-by-step chain of thoughts to ensure a logical and accurate response.

### Instruction:
You are a medical expert with advanced knowledge in clinical reasoning, diagnostics, and treatment planning.
Please answer the following medical question.

### Question:
{}

### Response:
<think>
{}
</think>
{}"""
Next, we will create the Python function to generate the “text” column using the training prompt style and columns from the dataset.
EOS_TOKEN = tokenizer.eos_token  # Must add EOS_TOKEN

def formatting_prompts_func(examples):
    inputs = examples["Question"]
    complex_cots = examples["Complex_CoT"]
    outputs = examples["Response"]
    texts = []
    for question, cot, response in zip(inputs, complex_cots, outputs):
        # Append the EOS token to the response if it's not already there
        if not response.endswith(tokenizer.eos_token):
            response += tokenizer.eos_token
        text = train_prompt_style.format(question, cot, response)
        texts.append(text)
    return {"text": texts}
We will load the first 500 samples from the FreedomIntelligence/medical-o1-reasoning-SFT dataset available on the Hugging Face Hub and then apply the formatting_prompts_func function to create the “text” column.
from datasets import load_dataset


dataset = load_dataset("FreedomIntelligence/medical-o1-reasoning-SFT","en", split = "train[0:500]",trust_remote_code=True)
dataset = dataset.map(formatting_prompts_func, batched = True,)
dataset["text"][0]
The “text” column has a system prompt, instructions, question, chain of thought, and the response.
The new STF trainer doesn't accept tokenizers, so we will convert the tokenizer into a data collator and provide the trainer with the data collator instead of the tokenizer.
from transformers import DataCollatorForLanguageModeling

data_collator = DataCollatorForLanguageModeling(
    tokenizer=tokenizer,
    mlm=False
)We will now create a testing prompt style that includes everything from the training prompt style except for the chain of thought and response.
prompt_style = """Below is an instruction that describes a task, paired with an input that provides further context.
Write a response that appropriately completes the request.
Before answering, think carefully about the question and create a step-by-step chain of thoughts to ensure a logical and accurate response.

### Instruction:
You are a medical expert with advanced knowledge in clinical reasoning, diagnostics, and treatment planning.
Please answer the following medical question.

### Question:
{}

### Response:
<think>{}"""
We will take the first question from the dataset, convert it into the prompt using the testing prompt style, and then prepare it for the model to generate the response.
question = dataset[0]['Question']
inputs = tokenizer(
    [prompt_style.format(question, "") + tokenizer.eos_token],
    return_tensors="pt"
).to("cuda")

outputs = model.generate(
    input_ids=inputs.input_ids,
    attention_mask=inputs.attention_mask,
    max_new_tokens=1200,
    eos_token_id=tokenizer.eos_token_id,
    use_cache=True,
)
response = tokenizer.batch_decode(outputs, skip_special_tokens=True)
print(response[0].split("### Response:")[1])
The model's chain of thought is long, and the answer it provides is quite brief, differing significantly from the dataset.
<think>assistant

To approach this question, let's break down the key elements provided and analyze them step by step:

1. **Symptoms**: The patient experiences involuntary urine loss during activities like coughing or sneezing but has no leakage at night. This pattern of urinary incontinence is suggestive of stress urinary incontinence (SUI), which is characterized by the involuntary leakage of urine on effort or exertion, or on sneezing or coughing.

2. **Diagnostic Tests Mentioned**:
   - **Gynecological Exam**: This is likely performed to assess the pelvic anatomy, including the position and support of the urethra and bladder neck, and to check for any pelvic organ prolapse.
   - **Q-tip Test**: This test is used to assess urethral mobility. A Q-tip (cotton swab) is inserted into the urethra, and its angle of movement is measured. Increased mobility (an angle change of more than 30 degrees) is often associated with stress urinary incontinence.

3. **Cystometry (Cystometrogram)**: This test measures the pressure within the bladder during filling and helps assess bladder function, including the residual volume and detrusor muscle contractions. The detrusor muscle is the smooth muscle in the wall of the bladder that contracts to allow urine to be expelled.

Given that the patient likely has stress urinary incontinence (SUI) based on her symptoms:
- **Residual Volume**: In patients with SUI, the bladder usually functions normally, and thus, the residual volume (the amount of urine left in the bladder after urination) is typically not significantly affected. Therefore, one would expect the residual volume to be normal or near-normal.

- **Detrusor Contractions**: In SUI, the problem primarily lies with the urethral sphincter mechanism and support rather than with the detrusor muscle itself. Hence, detrusor contractions are usually normal. The patient does not have symptoms suggestive of an overactive bladder (like urgency, urge incontinence, or nocturia), which would be more indicative of detrusor overactivity.

Based on this analysis, cystometry in this patient would most likely reveal:
- A **normal residual volume**, as her symptoms do not suggest a problem with bladder emptying.
- **Normal detrusor contractions**, as her condition (stress urinary incontinence) primarily involves issues with urethral support and continence mechanisms rather than detrusor function.

Therefore, cystometry would likely show that she has a normal residual volume and normal detrusor contractions.

</think>

The final answer is: $\boxed{Normal residual volume and normal detrusor contractions}$We will now implement LoRA (Low-Rank Adaptation) for parameter-efficient fine-tuning and apply it to the model. LoRA is a technique designed to fine-tune large language models by freezing the majority of the model's parameters and training only a small subset of additional parameters.
This approach is memory-efficient, faster, and cost-effective while still maintaining high accuracy comparable to full fine-tuning.
from peft import LoraConfig, get_peft_model

# LoRA config
peft_config = LoraConfig(
    lora_alpha=16,                           # Scaling factor for LoRA
    lora_dropout=0.05,                       # Add slight dropout for regularization
    r=64,                                    # Rank of the LoRA update matrices
    bias="none",                             # No bias reparameterization
    task_type="CAUSAL_LM",                   # Task type: Causal Language Modeling
    target_modules=[
        "q_proj",
        "k_proj",
        "v_proj",
        "o_proj",
        "gate_proj",
        "up_proj",
        "down_proj",
    ],  # Target modules for LoRA
)

model = get_peft_model(model, peft_config)
We will now configure and initialize the SFTTrainer (Supervised Fine-Tuning Trainer) by providing it with the dataset, model, data collator, training arguments, and LoRA configuration. The SFTTrainer simplifies the fine-tuning process by integrating all these components into a single, streamlined workflow, making it easier to train large language models like Llama 4 with LoRA.
from trl import SFTTrainer
from transformers import TrainingArguments


# Training Arguments
training_arguments = TrainingArguments(
    output_dir="output",
    per_device_train_batch_size=1,
    per_device_eval_batch_size=1,
    gradient_accumulation_steps=2,
    optim="paged_adamw_32bit",
    num_train_epochs=1,
    logging_steps=0.2,
    warmup_steps=10,
    logging_strategy="steps",
    learning_rate=2e-4,
    fp16=False,
    bf16=False,
    group_by_length=True,
    report_to="none"
)

# Initialize the Trainer
trainer = SFTTrainer(
    model=model,
    args=training_arguments,
    train_dataset=dataset,
    peft_config=peft_config,
    data_collator=data_collator,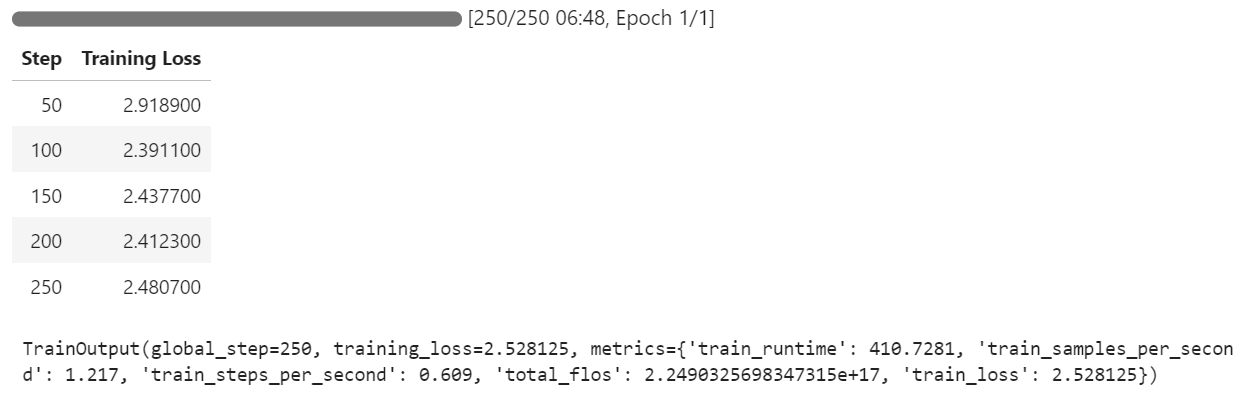
)Begin the training process by running the following command:
trainer.train()If you switch to your Pod dashboard, you will see that the trainer is utilizing all three GPUs for training.
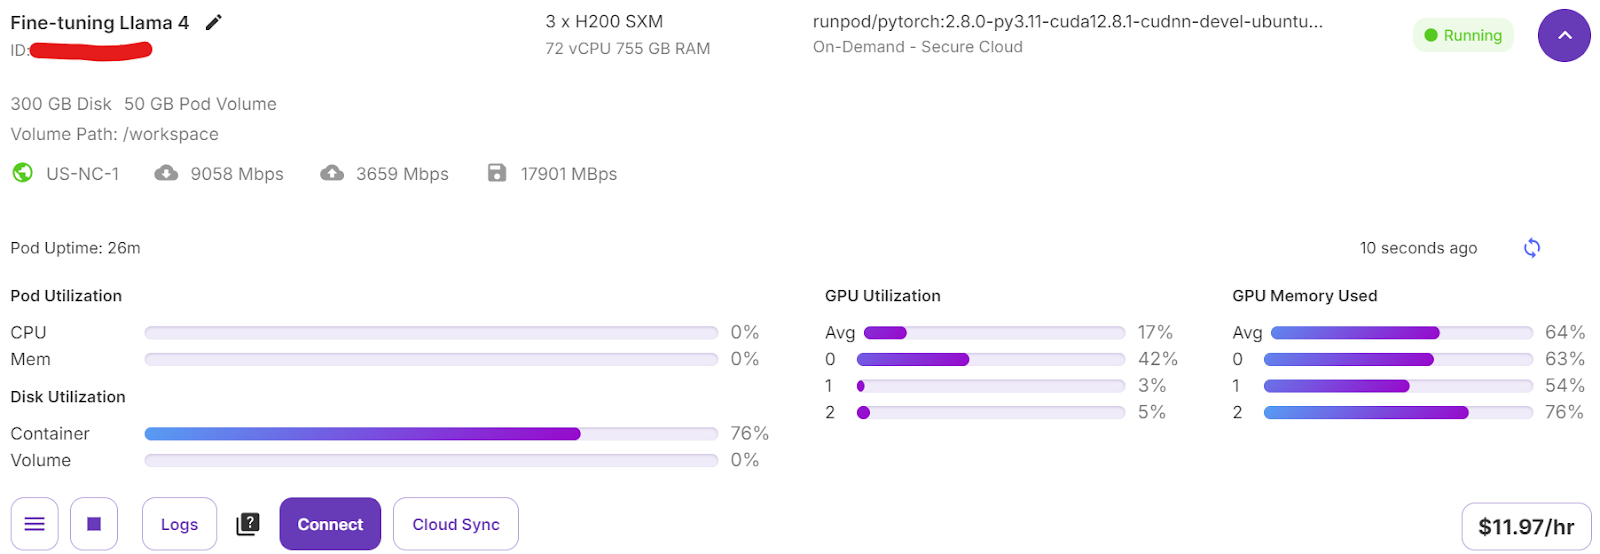
It took us only 7 minutes to fine-tune the model and overall 30 minutes to run the whole project from start to finish.
We will now test the fine-tuned model using the same sample as before to compare its performance after fine-tuning. This will help us evaluate how well the model has improved in reasoning and generating detailed responses.
question = dataset[0]['Question']
inputs = tokenizer(
    [prompt_style.format(question, "") + tokenizer.eos_token],
    return_tensors="pt"
).to("cuda")

outputs = model.generate(
    input_ids=inputs.input_ids,
    attention_mask=inputs.attention_mask,
    max_new_tokens=1200,
    eos_token_id=tokenizer.eos_token_id,
    use_cache=True,
)
response = tokenizer.batch_decode(outputs, skip_special_tokens=True)
print(response[0].split("### Response:")[1])
The model's reasoning process is accurate, and the response is detailed and logical:
<think>
Alright, let's think about what's going on with this 61-year-old woman. She's experiencing involuntary urine loss when she coughs or sneezes, which is classic for stress urinary incontinence. But there's no leakage at night, which is interesting. That detail might help us rule out other types of incontinence, like overactive bladder.

Now, let's think about the tests she's had. The gynecological exam and the Q-tip test are usually done to check for any anatomical issues that could be causing her symptoms. If the Q-tip test is positive, it means there's some mobility in the urethra, which can be a sign of stress incontinence.

Okay, so we've got stress urinary incontinence in mind. What does cystometry tell us? It's a test that looks at how well the bladder functions by measuring pressure and volume during filling and voiding.

For someone with stress incontinence, the cystometry would probably show that her bladder is doing its job properly. The residual volume, which is the amount of urine left in the bladder after she pees, should be normal. This means her bladder is emptying well enough.

Also, with stress incontinence, you wouldn't expect to see abnormal detrusor contractions. These are like muscle spasms in the bladder that can cause urgency and urge incontinence. But in stress incontinence, the problem is more about the urethral support and pressure control during activities, not the bladder muscle itself.

So, putting it all together, the cystometry should show a normal residual volume and no abnormal detrusor contractions. This fits perfectly with what we know about stress urinary incontinence. Yep, that's what I'd expect to see in this case.
</think>
In this scenario, the cystometry would most likely reveal a normal residual volume and no abnormal detrusor contractions. This is because stress urinary incontinence, as indicated by the patient's symptoms and the positive Q-tip test, is primarily related to issues with urethral support and pressure control during activities, not with the bladder muscle's function or emptying ability.
Let’s test the model on a different sample from the dataset to further evaluate its performance.
question = dataset[10]['Question']
inputs = tokenizer(
    [prompt_style.format(question, "") + tokenizer.eos_token],
    return_tensors="pt"
).to("cuda")

outputs = model.generate(
    input_ids=inputs.input_ids,
    attention_mask=inputs.attention_mask,
    max_new_tokens=1200,
    eos_token_id=tokenizer.eos_token_id,
    use_cache=True,
)
response = tokenizer.batch_decode(outputs, skip_special_tokens=True)
print(response[0].split("### Response:")[1])
The response is logical, detailed, and demonstrates the model's ability to apply medical reasoning effectively:
<think>
Alright, let's break this down. So, we have a 42-year-old guy who's just recovered from pneumonia, and his T3 levels are low. Now, his TSH is slightly elevated at 4.7 µU/mL, which isn't too high but is definitely not normal. T4 is at 6 µg/dL, which is kind of in the middle range, and T3 is 68 ng/dL, which is low. Hmm, these numbers make me think of a condition called sick euthyroid syndrome. It's like when the body gets sick, the thyroid function tests can get all wonky, even if the thyroid itself is working fine.

In this syndrome, T3 usually drops first, and T4 might stay normal or even rise a bit. This makes sense here because his T3 is low, but T4 is still around 6 µg/dL. Now, the TSH is slightly elevated, which is a bit puzzling, but in sick euthyroid syndrome, TSH can be normal or even slightly elevated. So, this fits.

But wait, what about the other hormones? In sick euthyroid syndrome, we often see an increase in reverse T3 (rT3). This is because the body might convert T4 to rT3 instead of T3 when it's stressed. So, if I were to guess, I'd say the reverse T3 level is probably elevated in this case.

This all makes sense because the clinical picture and lab results are lining up nicely with sick euthyroid syndrome. So, if I had to pick an additional hormone that's likely elevated, it would be the reverse T3. Yeah, that seems to fit the scenario perfectly.
</think>
In this scenario, considering the clinical context of a 42-year-old man recovering from pneumonia with decreased T3 levels and slightly elevated TSH, along with normal T4 levels, the likely condition is sick euthyroid syndrome. In this condition, the body often converts T4 to reverse T3 (rT3) instead of T3 during stress or illness. Therefore, the additional hormone level that is likely to be elevated in this patient is reverse T3 (rT3).We will now push the fine-tuned model (LoRA adapter) and tokenizer to the Hugging Face Hub. This process will automatically create a repository for you and upload all the necessary model files, making the model publicly accessible for further use or sharing.
model.push_to_hub("Llama-4-Scout-17B-16E-Instruct-Medical-ChatBot")
tokenizer.push_to_hub("Llama-4-Scout-17B-16E-Instruct-Medical-ChatBot")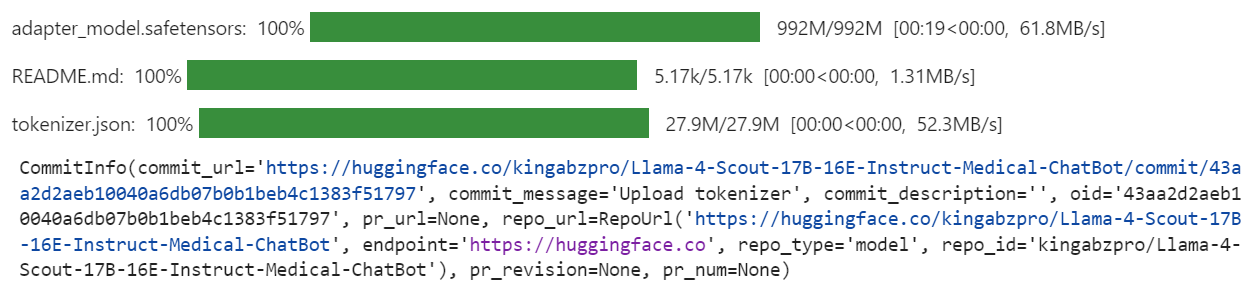
Once the process is complete, you can access the model repository at the following link: kingabzpro/Llama-4-Scout-17B-16E-Instruct-Medical-ChatBot
Here is the companion notebook that contains all the necessary code, outputs, and detailed instructions to help you fine-tune your own Llama 4 model.
Creating this tutorial was a challenging yet rewarding experience. While working with Llama 4, I encountered several issues that highlighted the complexities of using this model. In my opinion, Llama 4 is not yet fully optimized for widespread use, especially for individuals relying on consumer-grade GPUs. Here are some of the key challenges I faced:
Despite these challenges, if you follow this guide step-by-step, you should be able to fine-tune Llama 4 on any new dataset with relative ease.
To learn more about Llama 4, check out these resources:
Learn AI with these courses!
Track
Track
Course
Tutorial
Aashi Dutt
Tutorial
Abid Ali Awan
Tutorial
Abid Ali Awan
Tutorial
Abid Ali Awan
Tutorial
Abid Ali Awan
code-along
Maxime Labonne