
Corso
Create Engaging Video with Google Vids
30 min
1.6K

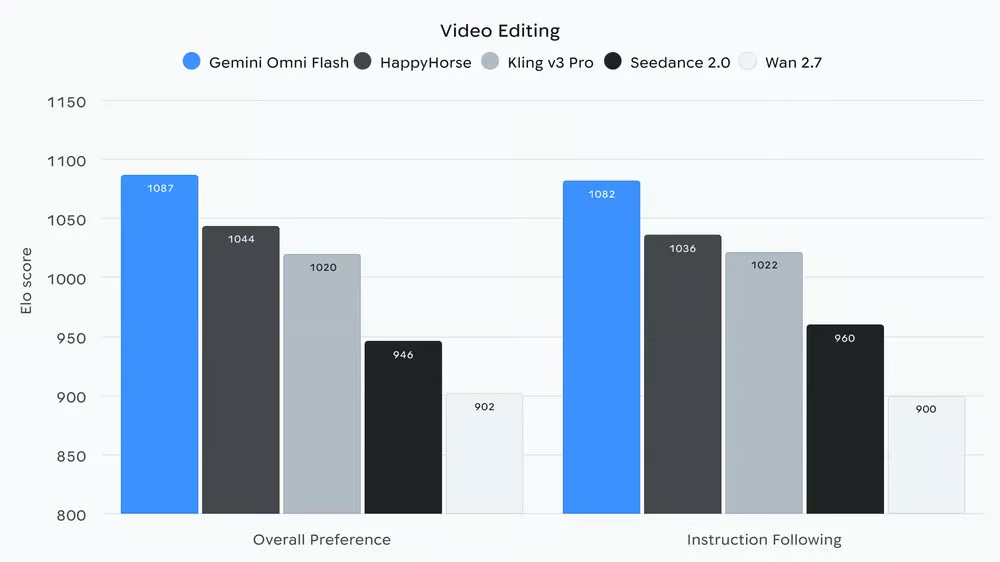
Gemini Omni Flash (gemini-omni-flash-preview) is Google's cost-efficient model for video generation and conversational video editing.
Unlike standalone video generators that rely strictly on static text prompts, Omni Flash brings Gemini’s core multimodal reasoning directly into the video creation process.
It natively accepts combinations of text, image, and video inputs, allowing programmatic control over video generation with unprecedented precision.
Before we can use the Gemini API, we need to create and set up an API key so that our code can communicate with the API.
The simplest way to do this is:
.env in the same folder where the Python code will be with the following format:GEMINI_API_KEY=replace_with_api_keyNote: Using the API incurs costs. To use it, we need to ensure we have a payment method configured on Google’s AI Studio billing page.
Before starting to code our Python AI image generator, ensure the following tools are ready:
google-genai SDK for API integration and Pillow for handling the image output.The necessary Python packages can be installed using pip:
pip install google-genai pillow python-dotenvCreate a new file (e.g., generate_image.py) and add the following imports and load sequence to set up the environment:
import io
from dotenv import load_dotenv
from google.genai import types
from PIL import Image
from google.genai import Client

# Load environment variables from the .env file
load_dotenv()To interact with the Nano Banana 2 Lite model, we must first initialize the Google GenAI client.
Since the SDK automatically checks the system environment variables for GEMINI_API_KEY (which was loaded from the .env file in the previous step), we can initialize the client without passing the API key explicitly in the code.
# Initialize the Gemini API client
client = Client()Now for the core logic of our Python script. We will write a dedicated Python function, generate_image(), that takes the initialized client and a text prompt as inputs.
Nano Banana 2 Lite is invoked by specifying model="gemini-3.1-flash-lite-image". We configure the API request to expect an image modality and specify the desired aspect ratio for the AI image generation.
def generate_image(client, prompt: str, ratio: str = "1:1") -> Image.Image | None:
    """
    Generates an AI image using the Nano Banana 2 Lite model via the Gemini API.
    """
    print(f"Generating AI image for prompt: '{prompt}'...")

    # 1. Call the Nano Banana 2 Lite model
    response = client.models.generate_content(
        model="gemini-3.1-flash-lite-image",
        contents=prompt,
        config=types.GenerateContentConfig(
            response_modalities=[types.Modality.IMAGE],
            image_config=types.ImageConfig(aspect_ratio=ratio),
        ),
    )

    # 2. Extract and convert the generated image data
    if response and response.candidates:
        for part in response.candidates[0].content.parts:
            if part.inline_data:
                # Load the bytes into a PIL Image and convert to RGB
                image = Image.open(io.BytesIO(part.inline_data.data)).convert("RGB")
                return image

    return None
Understanding the Python image generation request:
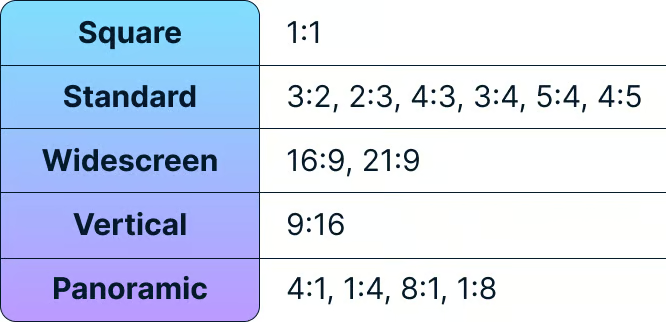
response_modalities: This forces the Google Gemini model to return an image rather than text.inline_data: The Gemini API returns the generated image as raw bytes. We use Python's io.BytesIO to wrap these bytes so that Pillow (Image.open) can read them as a standard image file.image_config: We set the aspect_ratio to "1:1" (square), but this can be easily adjusted depending on the specific AI application use case.Supported aspect ratios:
Let's put it all together and ask Nano Banana 2 Lite to generate an image!
We will prompt it for something creative, call the show() function on the resulting image to view the AI-generated artwork, and close the client to release resources.
if __name__ == "__main__":
    # Define our creative prompt for the AI model
    my_prompt = "A futuristic city skyline at sunset, cyberpunk style, highly detailed"

    # Generate the AI image
    result_image = generate_image(client, my_prompt)

    # Display the resulting image
    if result_image:
        print("AI Image generated successfully!")
        result_image.show()
    else:
        print("Failed to generate AI image.")

    # Close the client to prevent shutdown exceptions
    client.close()
Here’s the image generated by Nano Banana 2 Flash:
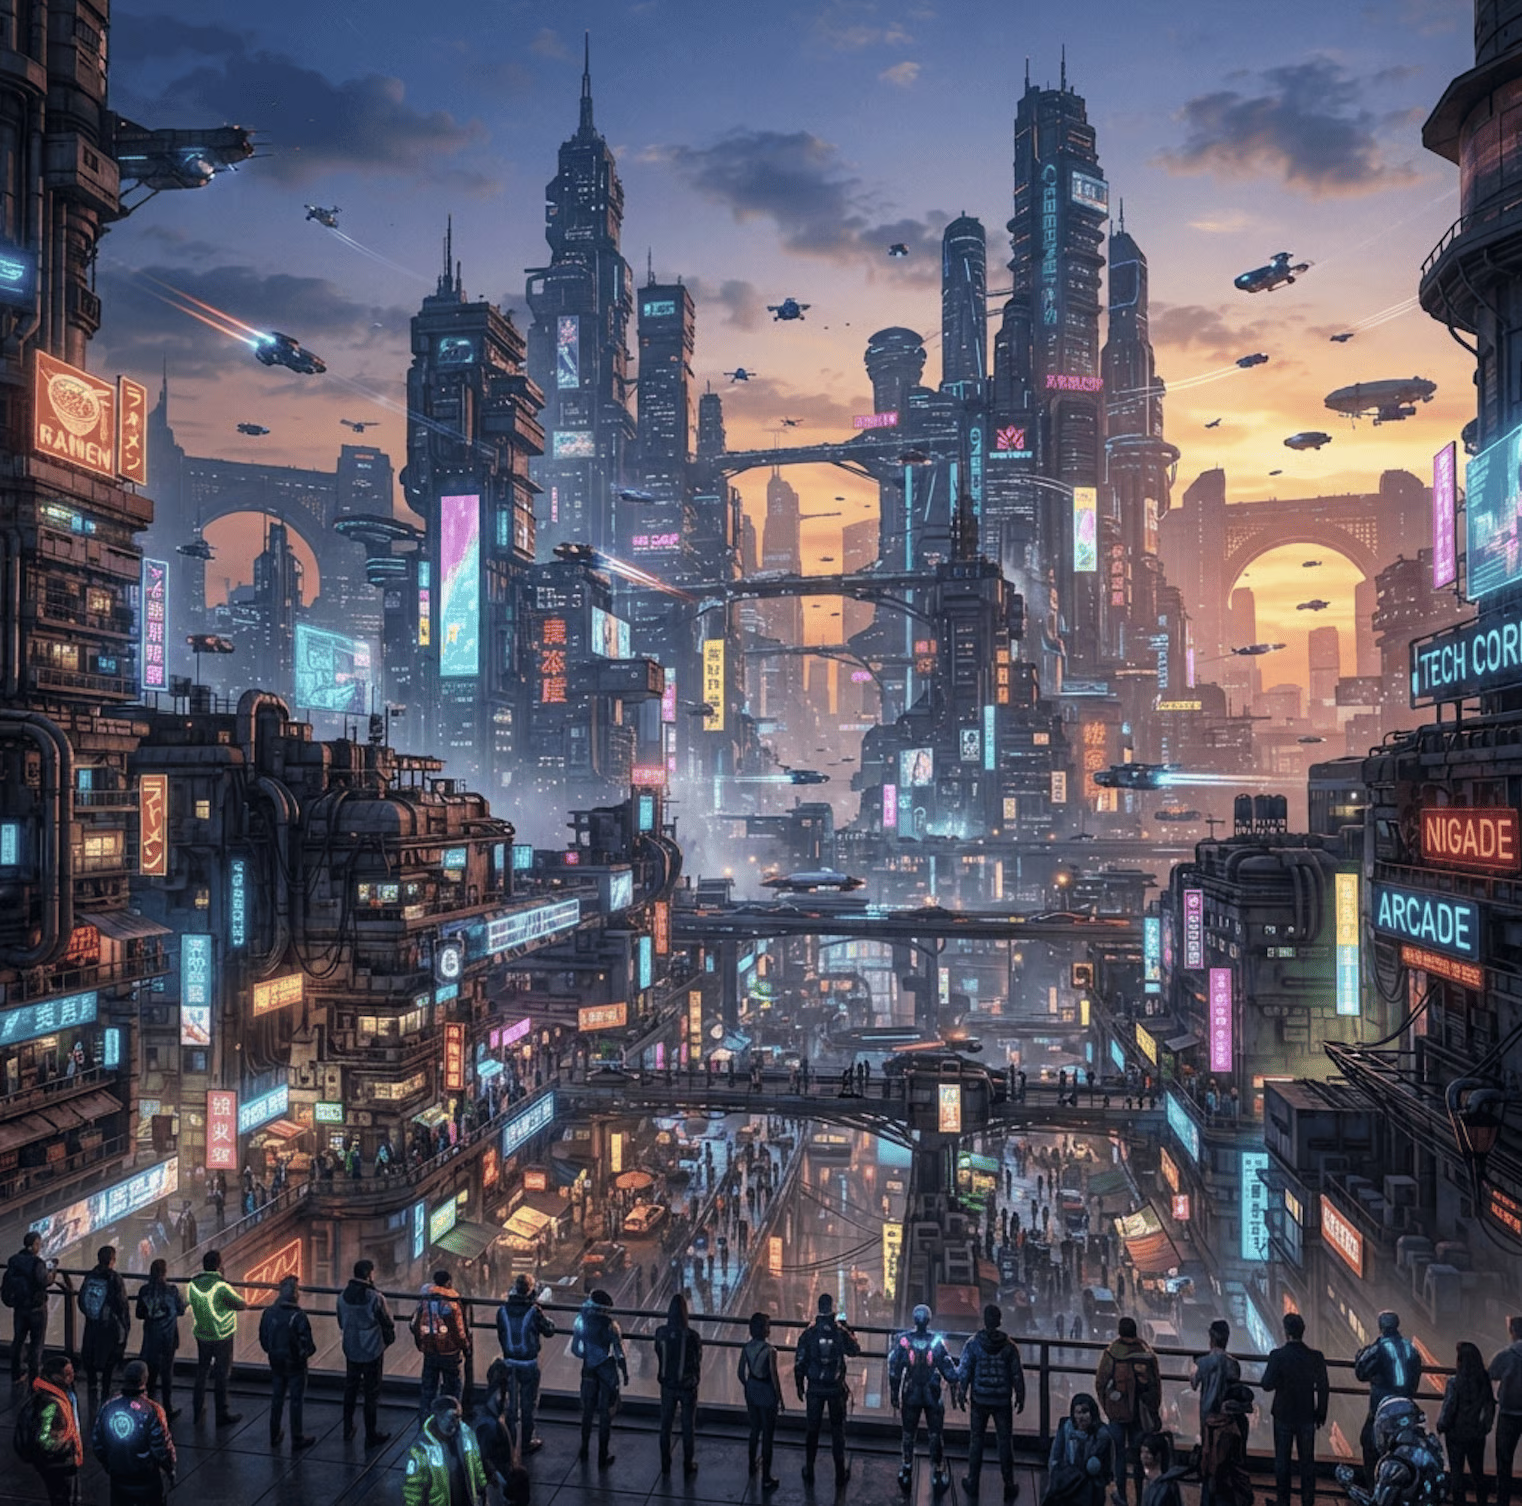
As promised by Google in their announcement, the model took just a few seconds to generate the image. At first glance, it feels much faster than any other model I’ve tried so far.
The full script can be found in the generate_image.py script from this tutorial’s repository.
Let’s write a function edit_image() that edits an image. The only thing we need to change in the request is to provide the image together with the prompt in the contents parameter as a list [image, prompt].
def edit_image(client, image: Image.Image, prompt: str, aspect_ratio: str = "1:1") -> Image.Image | None:
    """
    Edits an AI image using the Gemini 3.1 Flash Lite model via the Gemini API.
    """
    response = client.models.generate_content(
        model="gemini-3.1-flash-lite-image",
        contents=[image, prompt],
        config=types.GenerateContentConfig(
            response_modalities=[types.Modality.IMAGE],
            image_config=types.ImageConfig(aspect_ratio=aspect_ratio),
        ),
    )
    if response and response.candidates:
        for part in response.candidates[0].content.parts:
            if part.inline_data:
                return Image.open(io.BytesIO(part.inline_data.data)).convert("RGB")
return NoneWe evaluated the real-world performance of the model by conducting a series of targeted stress tests.
These evaluations focus on the model’s ability to handle complex visual tasks, such as rendering legible text, maintaining strict spatial layout, and ensuring consistency across multi-turn interactions, to determine if it truly delivers on its promise of high-fidelity generation at high speeds.
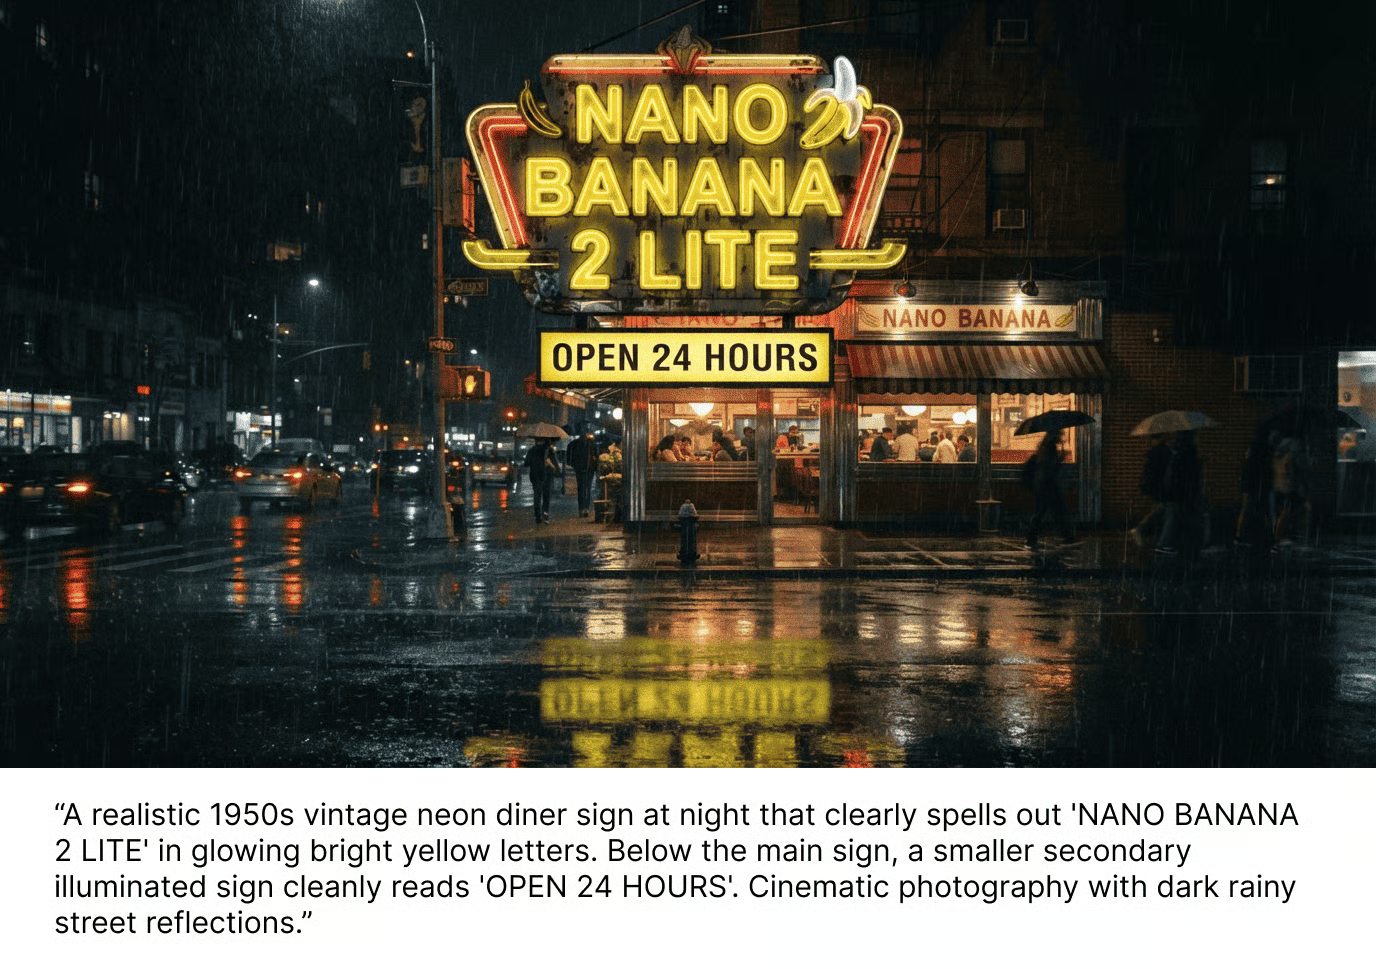

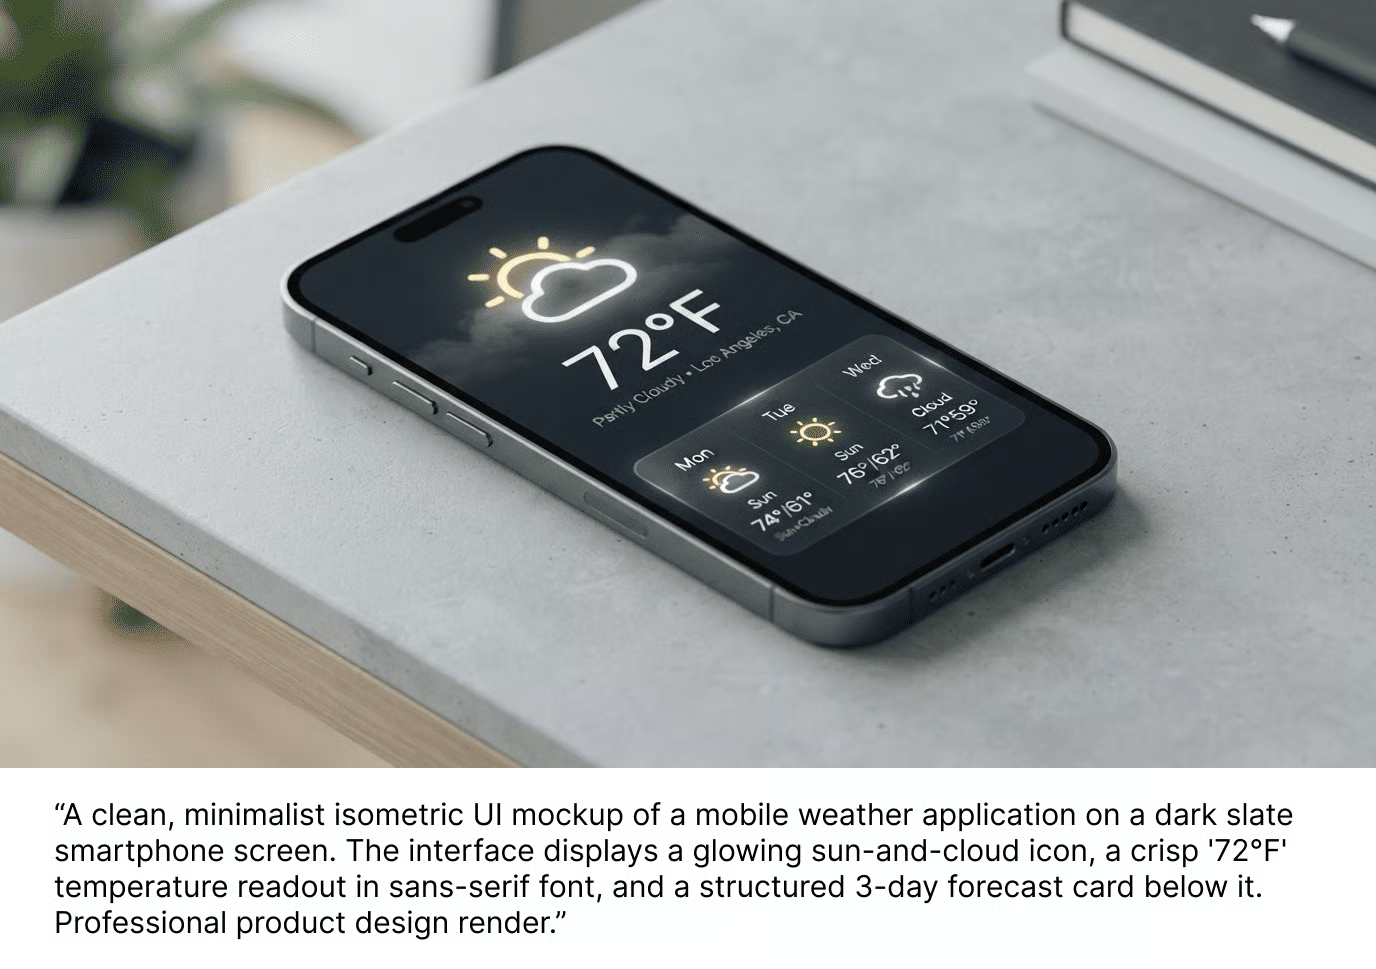
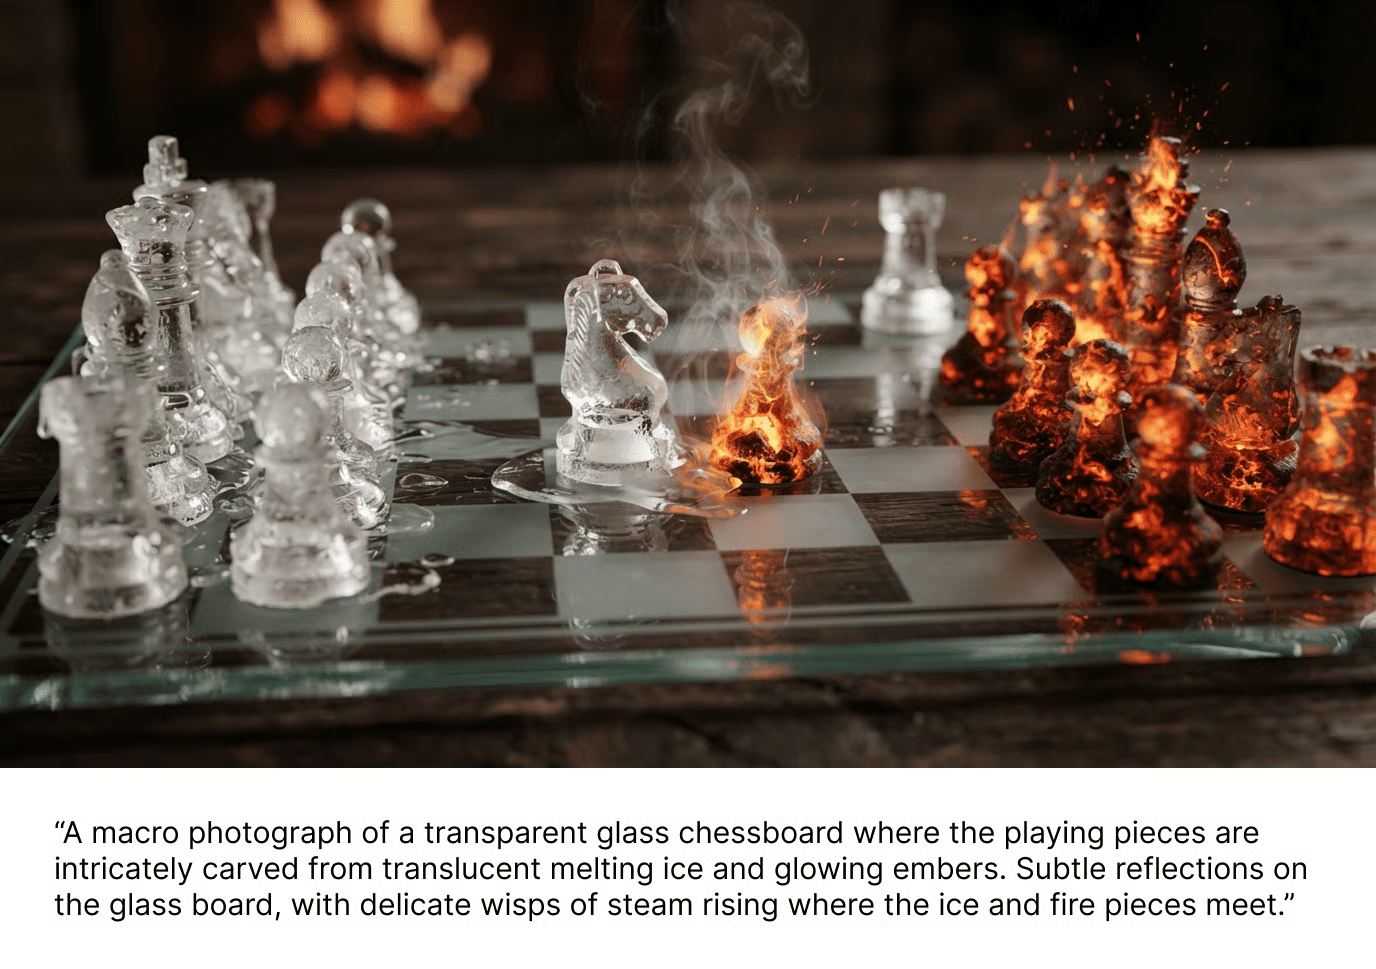
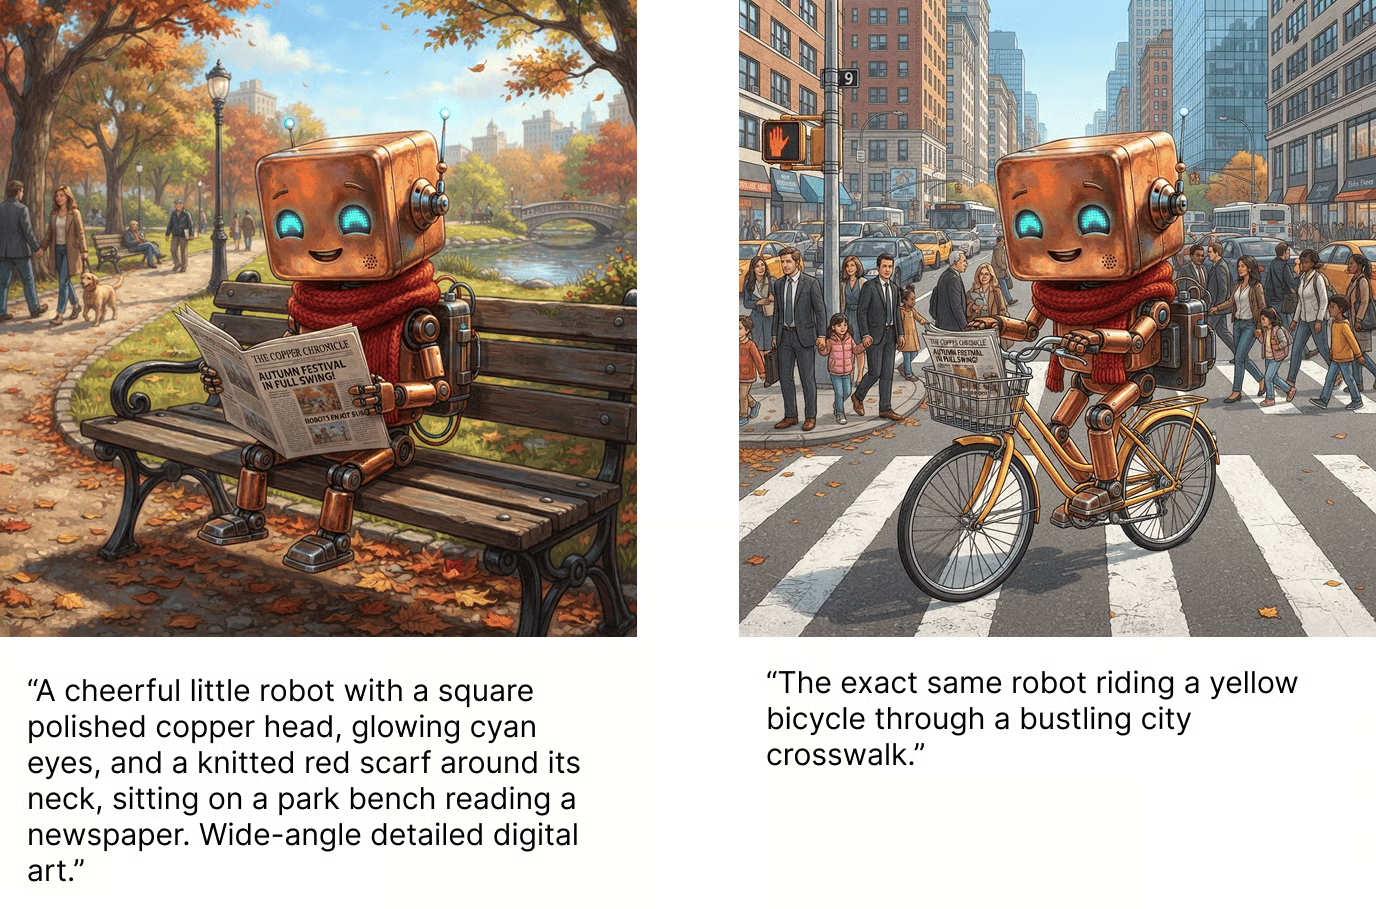
Frankly, I’m quite impressed with the results for such a fast model. In the last example, the model even managed to somewhat maintain the consistency of the text in the newspaper.
In my experience, maintaining consistency is one of the most important aspects an image generation model needs to nail to really be useful.
In this section, we will walk through how to build a Python script to generate videos, starting with a simple text-to-video prompt and then expanding it to incorporate reference images.
Unlike standard image generation, generating videos with Gemini Omni Flash is done through the SDK's Interactions API (client.interactions.create). This endpoint is specifically designed to handle rich, multi-turn, and multimodal interactions.
Since the required SDK imports, environment variable setup, and Google GenAI client initialization are identical to the image generation process detailed in the previous section, we can directly focus on writing our video generation functions.
To generate a video from a text prompt alone, we pass a single text input block to the Interactions API. We can write a simple Python function to handle this:
def text_to_video(client, prompt: str, aspect_ratio: str = "16:9", duration: str = "5s"):
    """
    Generates a video from a text prompt using Gemini Omni Flash.
    """
    interaction = client.interactions.create(
        model="gemini-omni-flash-preview",
        input=[{"type": "text", "text": prompt}],
        response_format={
            "type": "video",
            "aspect_ratio": aspect_ratio,
            "duration": duration,
        },
    )
    return interaction
We can invoke this function and save the returned video bytes to a file, like so:
if __name__ == "__main__":
    import base64

    # Define a creative video prompt
    text_prompt = """
    Generate a first person view of what daily life would look like in the year
    1000 at this location: 41.89030621184054, 12.492266126772481
    """

    # Call the video generator
    interaction = text_to_video(
        client=client,
        prompt=text_prompt,
        aspect_ratio="16:9",
        duration="5s"
    )

    # Extract and save the generated video file
    if interaction and hasattr(interaction, "output_video") and interaction.output_video:
        # Decode the base64-encoded video data returned by the API
        video_bytes = base64.b64decode(interaction.output_video.data)

        # Save the bytes locally as an MP4 file
        with open("videos/video.mp4", "wb") as f:
            f.write(video_bytes)
    else:
        print("Failed to generate video.")
The prompt we used was:
Generate a first-person view of what daily life would look like in the year 1000 at this location: 41.89030621184054, 12.492266126772481That specific location is the Roman Colosseum. I used coordinates to test the model’s world knowledge. This is the video that was generated:
Quite interesting in my opinion. Check the text_to_video.py file to see the full script.
To animate a static image or just use it as a reference to drive the video generation, we must pass both the image and a text prompt to the model.
Because the Interactions API expects image inputs to be base64-encoded, we first define a helper function to convert PIL Image objects to base64 strings:
import io
from PIL import Image
import base64

def _image_to_base64(img: Image.Image) -> str:
    """
    Converts a PIL Image object to a base64-encoded string.
    """
    buffered = io.BytesIO()
    img.save(buffered, format="PNG")
    return base64.b64encode(buffered.getvalue()).decode()
Now, we can build a more general function, generate_video(), that handles both optional images and the text prompt.
from google.genai import types

def generate_video(client, valid_images: list[Image.Image], animation_prompt: str, aspect_ratio: str):
    """
    Generates a commercial-quality AI video using Google's Gemini Omni Flash model.
    Supports image-to-video and text-to-video multimodal inputs using the Gemini API.
    """
    omni_inputs = []

    # 1. Base64 encode and append any input images
    for img in valid_images:
        img_b64 = _image_to_base64(img)
        omni_inputs.append({
            "type": "image",
            "data": img_b64,
            "mime_type": "image/png",
        })

    # 2. Append the text animation prompt
    omni_inputs.append({"type": "text", "text": animation_prompt})

    # 3. Request video generation from the interactions endpoint
    interaction = client.interactions.create(
        model="gemini-omni-flash-preview",
        input=omni_inputs,
        response_format={
            "type": "video",
            "aspect_ratio": aspect_ratio,
        },
    )
    return interaction
Finally, here’s how we can use these functions to generate a video that animates this beetle image I generated with Gemini:
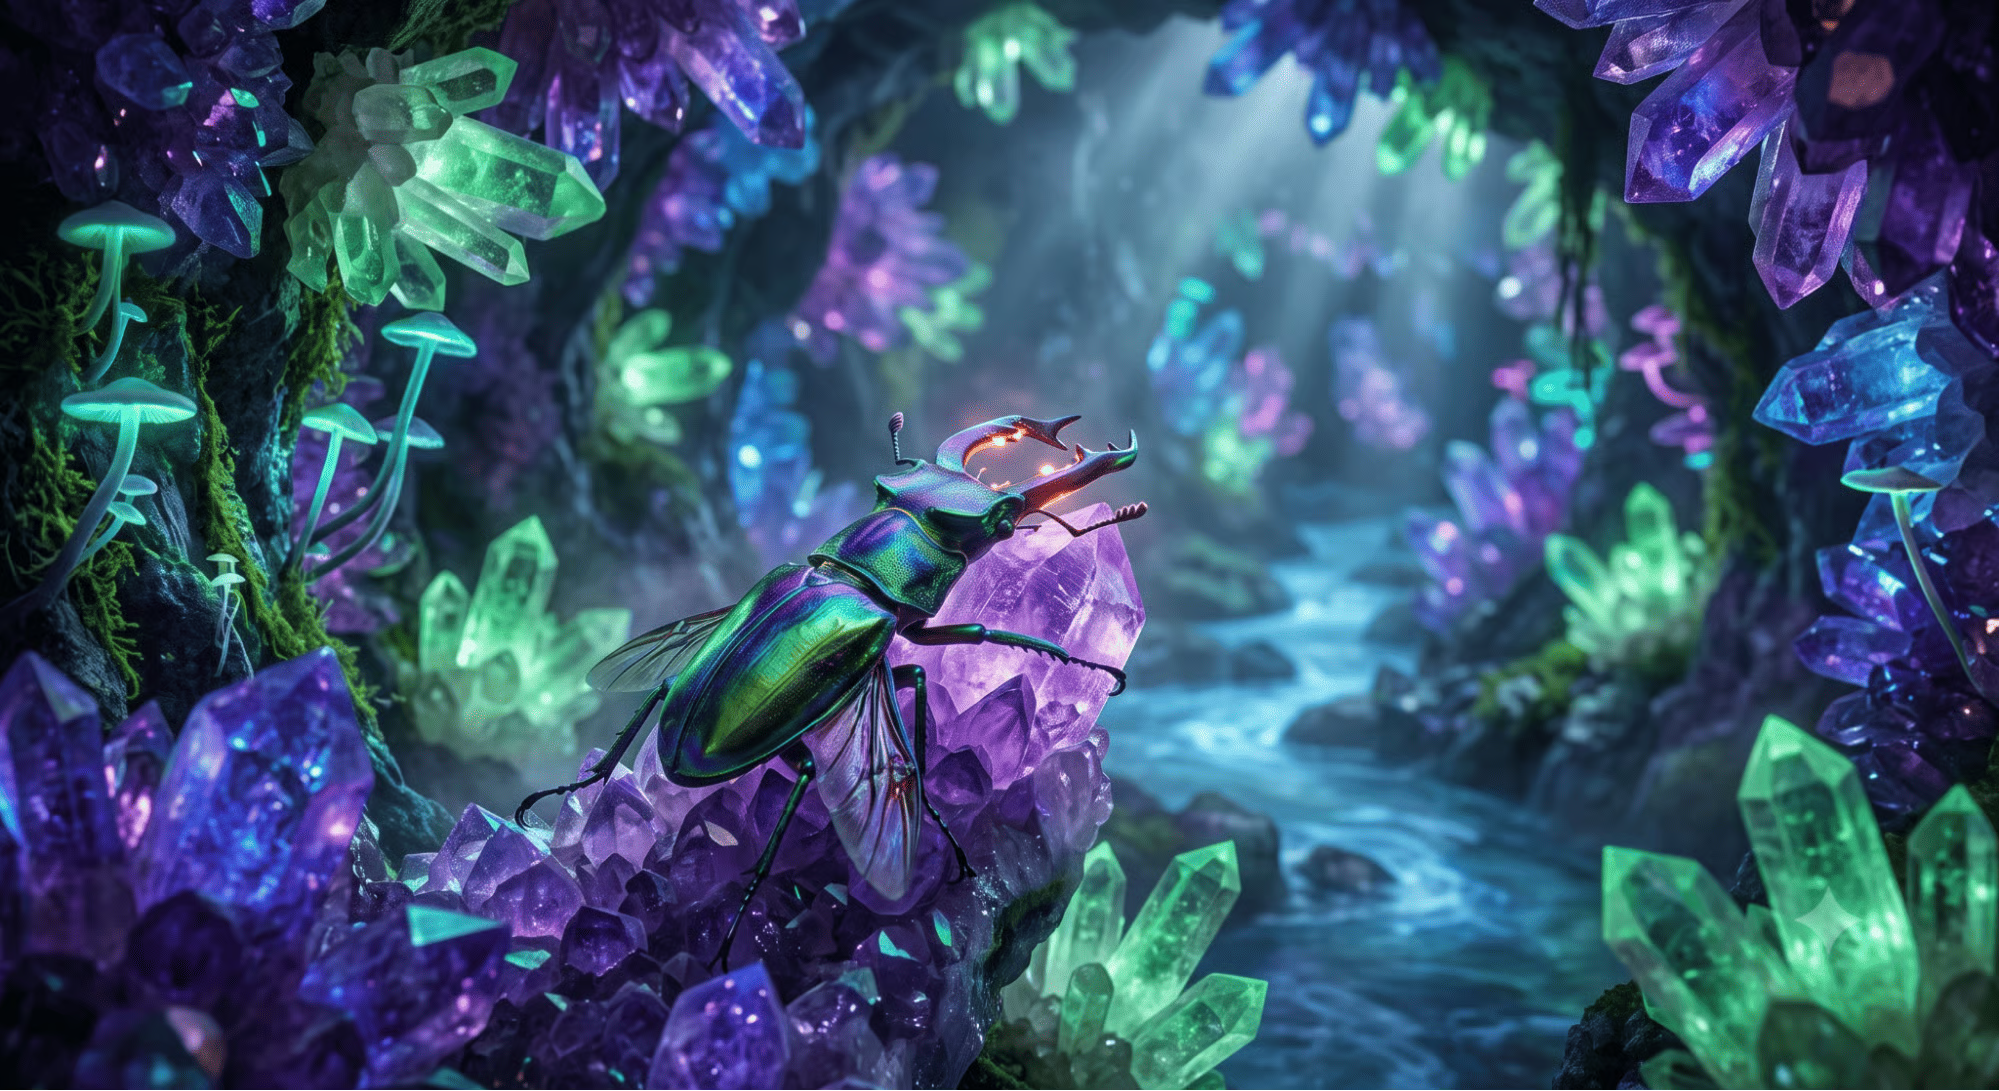
if __name__ == "__main__":
    # Load our reference image
    reference_image = Image.open("images/beetle.png").convert("RGB")

    # Describe how we want the image to be animated
    animation_prompt = """
    A detailed, close-up photograph of an iridescent biomechanical stag beetle,
    shimmering with metallic green, blue, and violet hues, as it traverses a
    rugged amethyst crystal formation in a subterranean grotto.
    The cavern walls are lined with a dense matrix of glowing crystals emitting
    deep purple, blue, and green light. The air is misty, with bioluminescent
    flora clinging to the rock. As the camera maintains focus, the beetle
    subtly activates a soft internal orange glow from its mandibles, begins
    vibrating its wings, and slowly crawls upward across the crystalline
    surface, reflecting the surrounding light.
    """

    # Call the generator with the reference image
    interaction = generate_video(
        client=client,
        valid_images=[reference_image],
        animation_prompt=animation_prompt,
        aspect_ratio="16:9"
    )

    # Extract and save the animated video
    if interaction and hasattr(interaction, "output_video") and interaction.output_video:
        video_bytes = base64.b64decode(interaction.output_video.data)
        with open("videos/video.mp4", "wb") as f:
            f.write(video_bytes)
This was the video it generated:
The full script is available here.
Editing a video conversationally with Gemini Omni Flash API is made incredibly easy by its use of interactions. When we generate a video, we get an interaction identifier which can be accessed as interaction.id.
To edit a video, we can then provide a prompt and the identifier of the previous interaction. If it’s the first edit, we provide the identifier of the interaction used to generate the video. For subsequent edits, we provide the identifier of the previous edit.
client.interactions.create(
        model="gemini-omni-flash-preview",
        input=edit_prompt,
        previous_interaction_id=previous_interaction_id,
)In the previous sections, we learned how to programmatically generate images using Nano Banana 2 Lite and videos using Gemini Omni Flash. Now, we are going to see how to bring these capabilities together into a single, cohesive, interactive web application: an AI Video Studio.
Creating high-quality AI videos usually involves a high degree of trial and error. The AI Video Studio solves this by implementing a two-stage, multi-model pipeline that leverages the unique strengths of two distinct models:
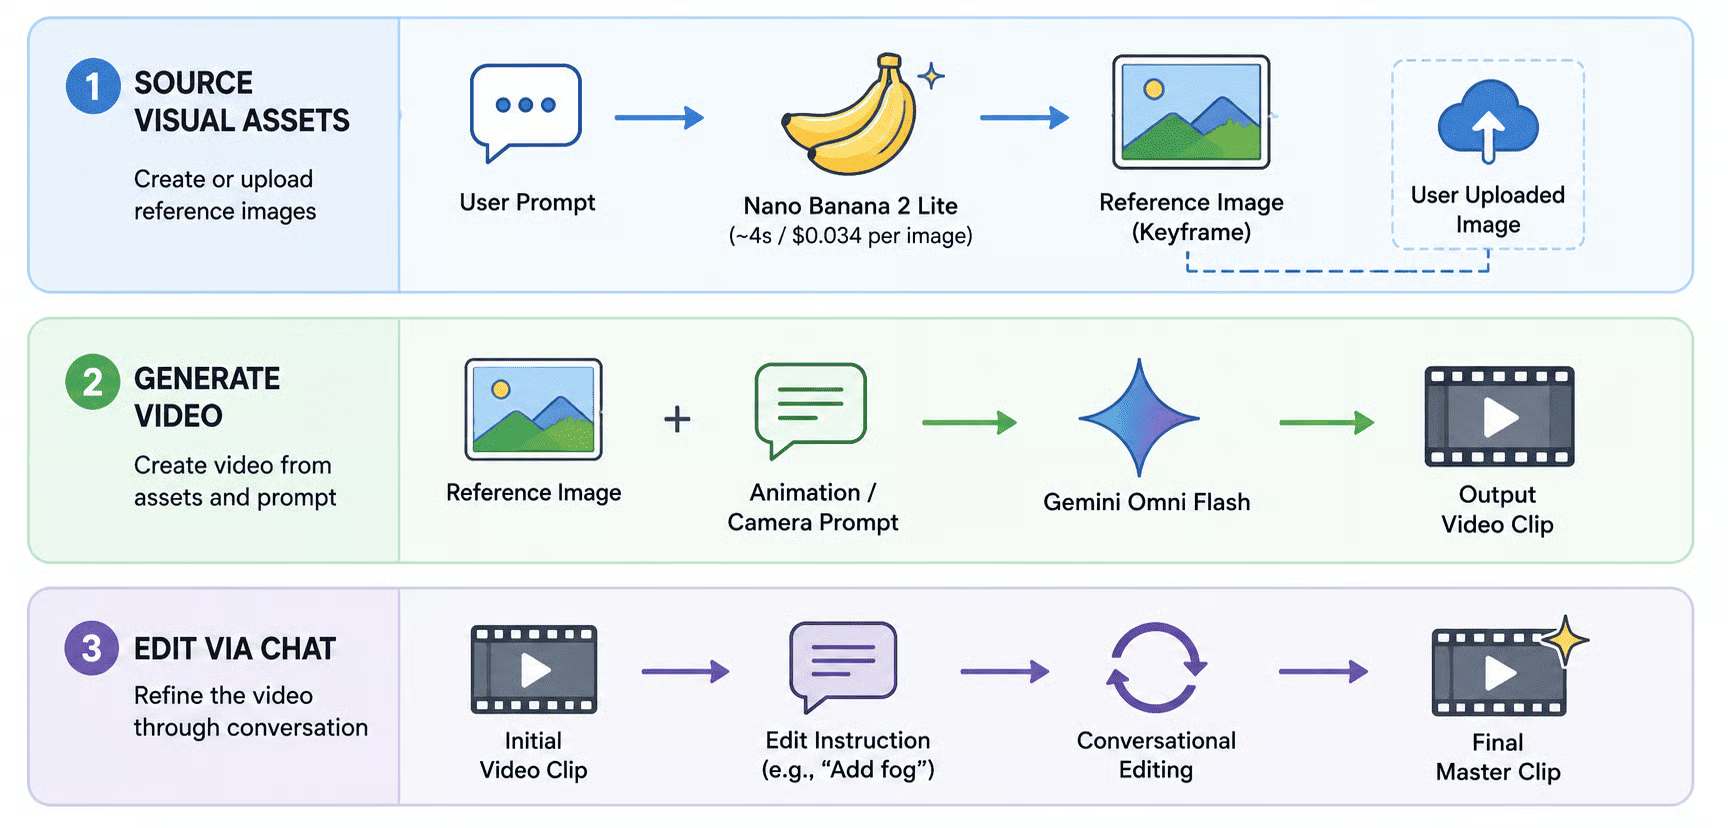
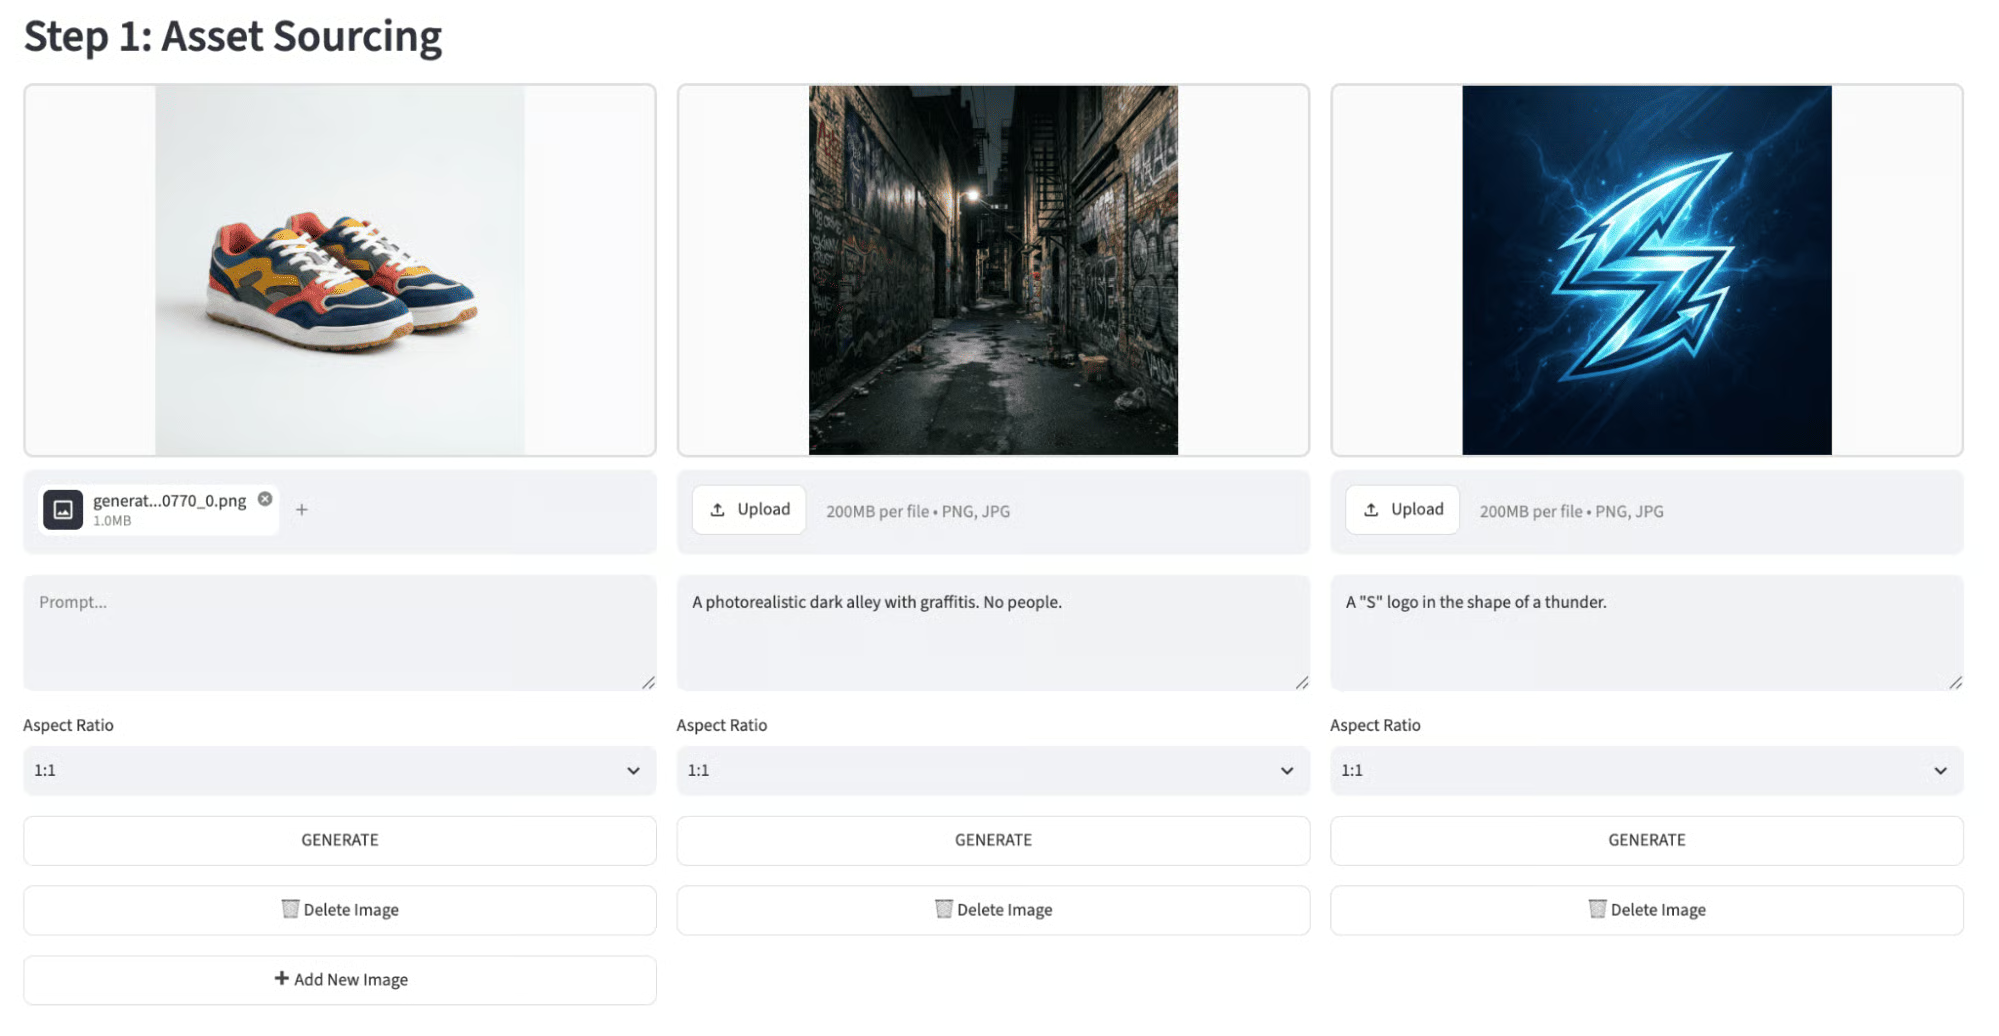
In the first stage, the application lets us source reference images (keyframes). We can either upload a local image or generate one on the fly.
This is where Nano Banana 2 Lite shines.
With a latency of under 4 seconds and costing only a fraction of a cent per image, it serves as an ultra-fast sandbox. We can rapidly prototype dozens of different visual styles, compositions, and subjects until we get the perfect keyframe.
Once we have the perfect reference image, we move to the video production stage.
The reference image and our animation prompt (e.g., describing camera motion, lighting changes, or action) are base64-encoded and sent to Gemini Omni Flash using the SDK's Interactions API.
Gemini Omni Flash processes these inputs and returns a high-fidelity video clip in widescreen (16:9) or vertical (9:16) format.

Here’s the video we got:
Top DataCamp Courses
Corso
Corso
Corso
blog
Josef Waples
7 min
Tutorial
François Aubry
11 min
Tutorial
Bexruz (Bex) Tuychiev
15 min
Tutorial
Bexruz (Bex) Tuychiev
9 min
Tutorial
Abid Ali Awan
11 min
Tutorial
François Aubry
12 min