If you’ve ever found managing cloud storage through the Azure portal a bit clunky or overwhelming, you’re not alone. That’s where Azure Storage Explorer comes in—a user-friendly desktop application that lets you interact with your Azure Storage resources without needing to navigate the full Azure interface.
In this tutorial, I’ll walk you through Microsoft’s Azure Storage Explorer: how to set it up, connect to your storage accounts, and start managing your blobs, queues, tables, and files with ease.
What is Azure Storage Explorer?
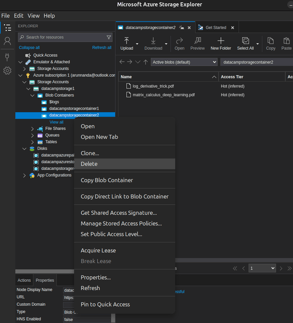
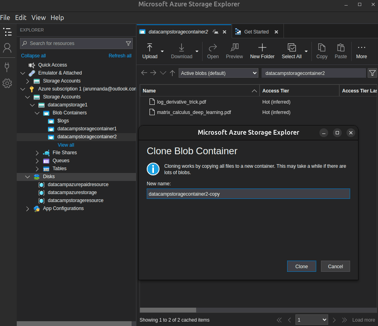
Azure Storage Explorer is a free cross-platform tool by Microsoft. It allows you to access data (like blobs, tables, queues, and files) stored in Azure Storage and provides limited management features to manage the stored data. You can upload, explore, download, and clone data entities.
Being a locally installed application, it provides a simple and familiar user interface without depending on web browsers or CLIs.
To better grasp how Storage Explorer fits into the broader cloud ecosystem, explore the Understanding Microsoft Azure Architecture and Services course.
Installing Azure Storage Explorer
In this section, I will show you how to set up Azure Storage Explorer and start using the application.
Downloading and installing
To download and install Storage Explorer:
- Go to the Azure Storage Explorer webpage and select the Download tab.
- In the Download section, choose your operating system from the dropdown.
- For Windows x64, it downloads an
.exe file.
- For macOS, it downloads a zip file with the Mac executable.
- For Linux, it downloads a
.tar file.
- You can also choose the Linux-snapstore option. This takes you to the Storage Explorer app on the Snapcraft page. Choosing your Linux distribution takes you to the distro-specific page for the Storage Explorer app. From this page, you install the app via the Snap Store (the app store for Linux).
In this tutorial, I will install the app via the Linux Snap Store. All the screenshots are based on Ubuntu Linux in dark mode. Since software packages and webpages are frequently updated, what you see may not exactly match my screenshots.
Launching Azure Storage Explorer
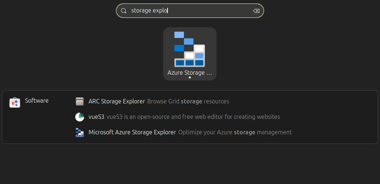
Launch the Storage Explorer like any other app on your operating system:
- On Windows and Ubuntu Linux, press the Windows key and type “Storage Explorer.” On the Mac, you can find it in the Launchpad.
The user interface is similar to that of other Microsoft applications like VSCode. You have a main window that can contain tabs. The left menu is collapsible and contains four options:
- Explorer: This shows the data in the storage account as a tree (for example, Storage account > Storage container > Blobs).
- Account management: With this option, you can sign in to your Azure account.
- Connections: You can choose to connect to various Azure resources, such as storage subscriptions, storage accounts, blob containers, and more.
- Settings: You can configure various application settings, such as the UI, network settings (proxies, hostname, etc.), language, data display options, and more.
Select each option in the left menu to expose the sidebar corresponding to that option. We will use these options and cover them in greater detail in later sections.
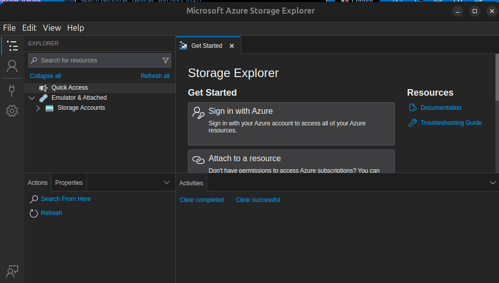
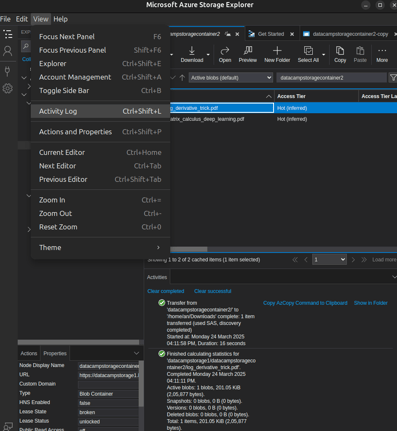
At the bottom, you have a panel that shows a log of various actions and their status.
Connecting to Azure Storage Accounts
After launching Storage Explorer, we will connect it to your Azure Storage account.
Signing in with an Azure Account
You can use your Azure account to connect Storage Explorer to Azure Storage:
- From the left menu, select the (second) Account Management tab.
- Select the Sign in with Azure option in the sidebar.
- In the pop-up window, check the radio button for the appropriate Azure environment and select the Next button at the bottom.
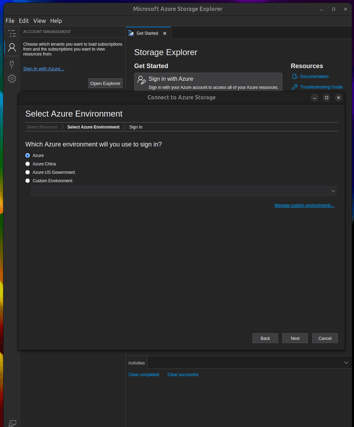
- This opens a browser window to sign in. Enter your Azure credentials.
- Come back to the Storage Explorer, where you should be signed in.
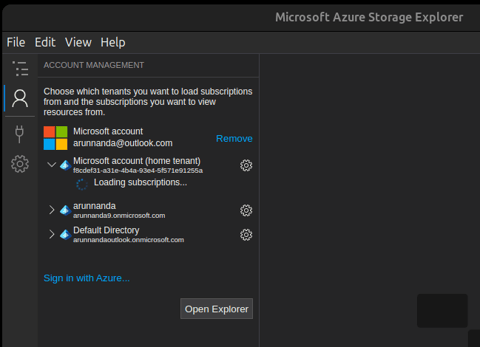
Having logged in to Azure, we will see (in the next section) how to connect to different resources from your Azure account.
Connecting to Different Types of Azure Storage
Using Storage Explorer, you can connect to various types of storage resources, such as Blobs, Files, Queues, and Tables. Let’s explore how in this section.
Connect to Blob Storage
To connect to Blob Storage:
- Select the (third) Connection option in the left menubar. When you hover over it, it reads “Open Connect Dialog”.
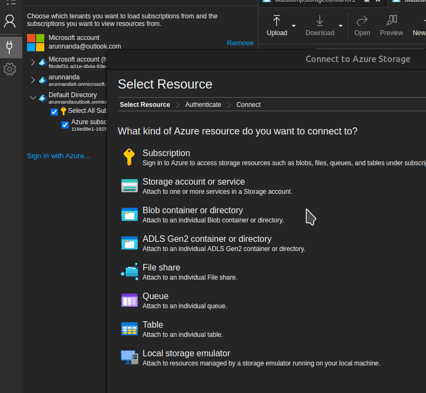
- In the Connect dialog, select Blob container or directory.
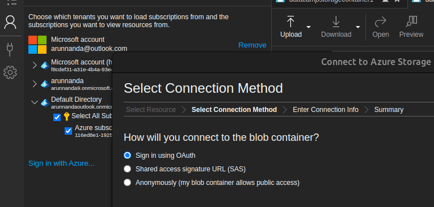
- You will see various sign-in options - OAuth, SAS, and anonymous. Select Sign in using OAuth. This method will authenticate you based on your Entra ID.
- Select the right Azure account and tenant.
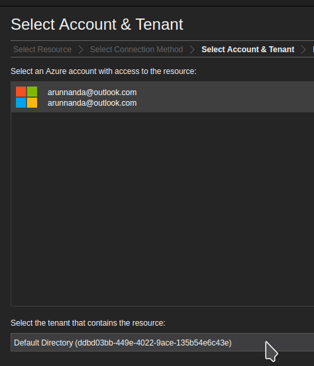
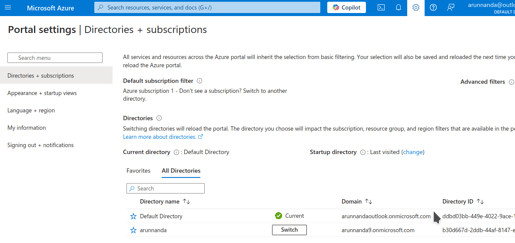
- To know the right tenant (in case of multiple options), click the Settings icon on your Azure portal. The Portal settings popover indicates the Directory ID of your current tenant. Ensure that the tenant you choose in Storage Explorer (above) matches the Directory ID of your Azure account (below).
- In the Enter Connection Info popover, enter the URL of the Blob container to which you want to connect. It will automatically fill in the display name field.
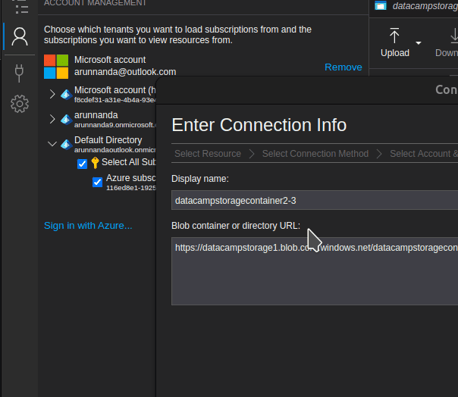
- To know the URL of the container:
- Open the Container’s page on Azure portal.
- From the left sidebar, select Settings > Properties.
- The URL field contains the URL of the container.
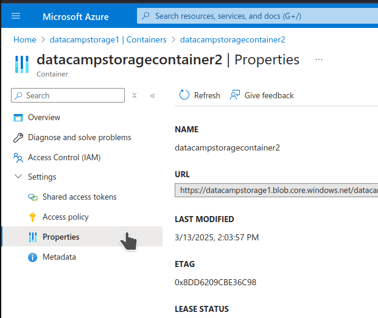
- Copy and enter this URL in Storage Explorer's Enter Connection Info popover.
- On the Summary popover, select Connect.
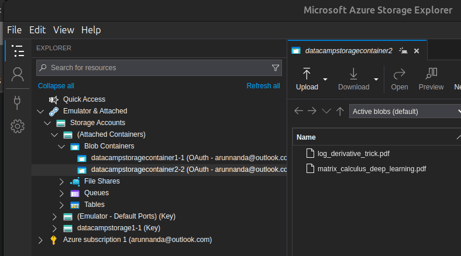
If the Entra ID linked to the Azure account you used to sign in (above) is authorized to access the Blob Container, it connects successfully. You can then open it in Storage Explorer:
- Choose the (first) Explorer option in the left menubar.
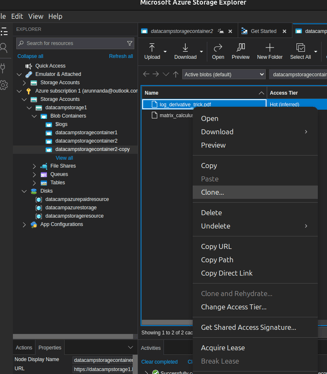
- In the Explorer tree view in the sidebar, you will see the newly added Container. Select the Container’s name to open it in the main window.
Other types of storage resources
The process of attaching other resources, such as files, queues, and tables, is similar to attaching a storage account, as shown above.
- From the left menu, select the (third) Connections option.
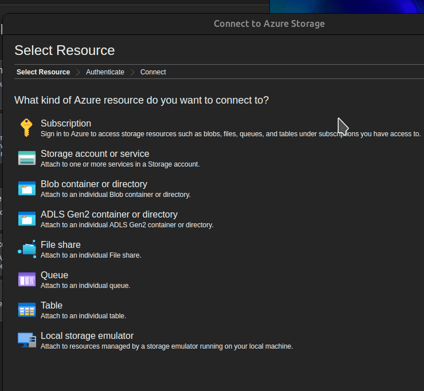
- In the Select Resource pop-up, select the appropriate resource type:
- Select the authentication method. You have two options:
- Enter the relevant credentials, such as the OAuth discussed above or the Shared Access Signature URL for SAS authentication. You can get the SAS URL from the Azure portal. We will discuss SAS authentication later in this tutorial.
- Select Explorer from the left menubar.
- The sidebar shows the newly attached resource (Files, Queue, or Table). Select the resource to open it in the main Explorer window.
Navigating and Managing Azure Storage Resources
After connecting Storage Explorer to Azure Storage, we will learn how to navigate and manage storage resources using the application.
Browsing blob storage
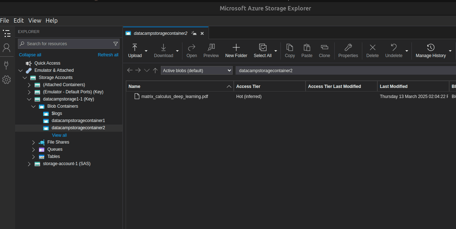
Browsing containers and blobs in Storage Explorer is similar to using the file explorer on the computer. After connecting to a storage account (as explained earlier):
- From the left menu, select Explorer (the topmost option).
- Navigate to your storage account and expand the menu tree.
- Under Blob Containers, you will find your blob containers.
- Select the appropriate container. The contents of the container will open up in a tab in the main window.
Uploading files to Azure Blob Storage
To upload files to Azure Blob Storage:
- Open the container into which you want to upload the file. The previous section describes how to do this.
- From the toolbar at the top, select the Upload button. From the drop-down menu, select Upload Files.
- In the Upload Files popover:
- Select the Selected files field.
- In the popover window, choose the files (that you want to upload) from your local computer.
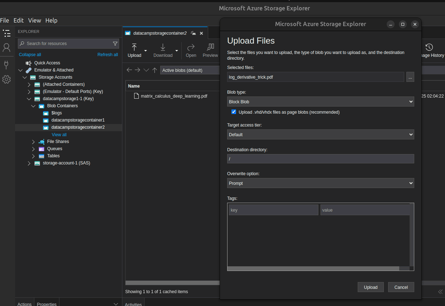
- Select the appropriate values for the other fields. You can also leave the default values.
- Select the Upload button.
The bottom panel shows the selected file's uploading status. When the upload completes, the Explorer tab automatically updates to show the newly uploaded file.
Managing Azure files and shared folders
You can also use Azure Storage Explorer to manage file shares and directories. You can upload entire folders from your local computer or directly create a folder within Azure Storage.
To upload a folder:
- Select the Upload button from the toolbar at the top.
- From the dropdown submenu, select Upload Folder.
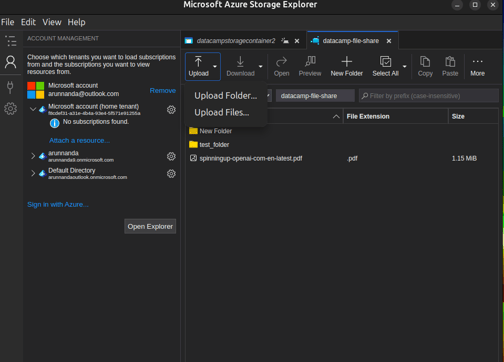
- In the Upload Folder popover:
- Select the Selected folder field.
- Choose the folder you want to upload from your local computer.
- Select the other options as necessary or leave the default options.
- Select the Upload button.
To create a new folder (without uploading):
- Select the New Folder button in the toolbar at the top.
- In the New Folder popover, enter the name of the folder you want to create.
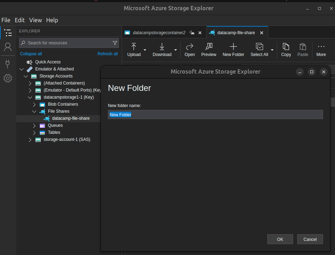
- Select OK.
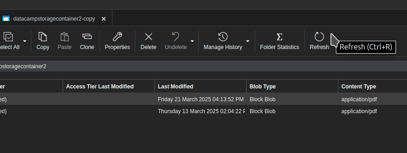
- The explorer tab automatically refreshes to show the newly created folder. To enter a folder, double-click its name.
The process of uploading a file is similar to uploading a folder:
- Double-click to enter the folder into which you want to upload the file.
- Select the Upload button in the top bar.
- Select Upload Files from the dropdown menu.
- In the Upload Files popover window:
- Select one or more files from the local computer.
- Select the Upload button.
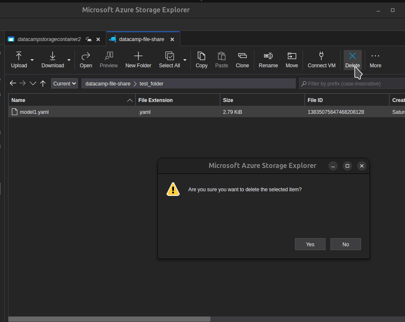
To delete a file:
- Select the file in the Explorer tab of the main window.
- Select the Delete button from the top bar.
- In the popover confirmation, select Yes.
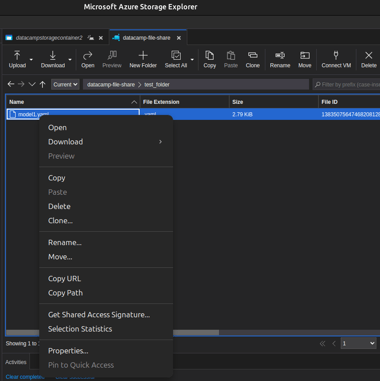
Alternatively, right-click the file name and select Delete from the context menu options.
Working with Advanced Features
Having covered the basics, I will show how to work with SAS tokens and access keys.
Generating and using Shared Access Signatures (SAS)
To access storage entities (like blobs, queues, etc.) using SAS, you need a connection string (URL) that contains the SAS token. You get the connection string from the Azure portal:
- From the Azure portal, select your storage account.
- In the left menubar, under Security + networking, select the Shared access signature.
- Select the appropriate options on the page (as shown in the screenshot below).
- Select the button Generate SAS and connection string button at the bottom.
- Copy the generated Connection string. This string includes the SAS token, its permissions, validity, and other details like the URL of the Storage account.
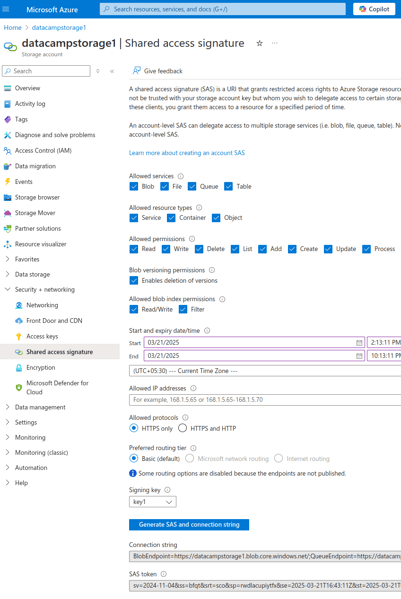
- You will enter the copied string in the Storage Explorer window (as explained below).
You can now connect to your Azure Storage account using this SAS token. To attach a Storage Account within Storage Explorer:
- Select the Connections (third) option in the left Menubar.
- In the pop-up Select Resource window, select Storage account or service.
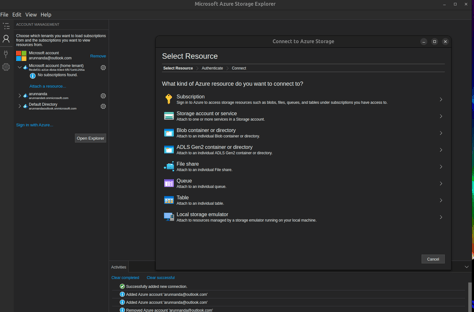
- To connect to your account, you can either use your account name and key or a SAS token.
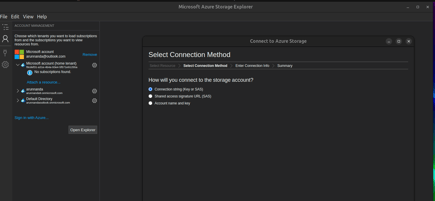
To connect using the SAS token:
- Select Connection string (Key or SAS) and select the Next button
- Enter the connection string. It will automatically fill in the Display name.
- Select Next.
- On the next window, check the details and select Connect.
After connecting, you can access the contents in Storage Explorer:
- Select the (topmost) Explorer option on the left menubar.
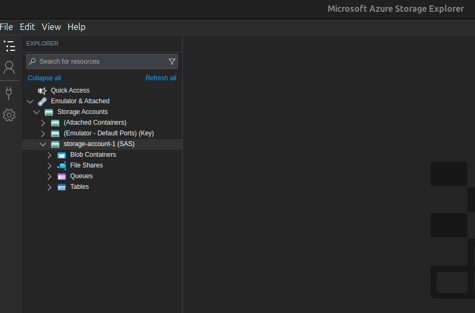
- You will find the contents of the storage account in the sidebar. Notice the suffix “(SAS)” next to the Storage account name.
- The contents are organized as an expandable tree structure. Select each item in the tree to show its contents.
Managing access keys and secrets
In addition to the methods discussed above, you can use your Azure account’s access keys to connect Storage Explorer to Azure Storage. Share the account name and key with anyone, and they can securely connect to your Storage resources without relying on Microsoft Entra ID.
If you choose to connect using the account name and access key, you will need the key from your Azure account. To get the key:
- From the Azure portal, open your Storage account.
- In the left menubar of the homepage of your storage account, select Security + networking > Access keys.
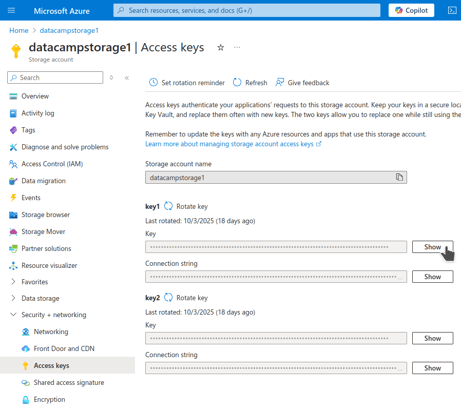
- Get the account name from the Storage account name field.
- Select Show next to either key1 or key2 to show the value of the key. Copy the key.
To connect using the
- In Storage Explorer, select the (third) Connections option from the left menubar.
- In the Select Resource popover, select Storage account or service.
- Under Select Connection Method, select Account name and key.
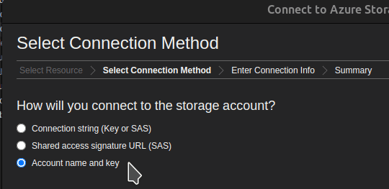
- Under Account name, enter the account name you copied from the Storage account name field in the portal. The Display name field is automatically filled after entering the Account name.
- Under Account key, enter the value of the key you copied from the portal.
- Select Next.
- In the Summary popover, select Connect.
After connecting, you can access the contents in Storage Explorer:
- Select the (topmost) Explorer option on the left menubar.
You will find the contents of the storage account in the sidebar. Notice the suffix “(Key)” next to the Storage account name. The contents are organized as an expandable tree structure. Selecting each item in the tree will show its contents.
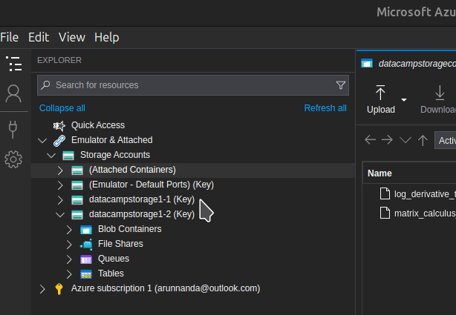
The above methods (SAS tokens and access keys) require you (as the owner of the storage entity) to use a URL or a key to access the data. While convenient, this method is not the safest. For example, keys and tokens can be intercepted during the sharing process. Using Microsoft Entra (formerly Azure Active Directory) is a better option.
In corporate environments integrated with Microsoft Entra, you can use your Microsoft Entra account to access and manage data stored in Azure Storage. Note that Microsoft Entra can be used only with blob, queue, and table data.
When using Entra ID, you can also take advantage of Role-Based Access Control (RBAC). RBAC allows you to manage access to Azure resources by assigning permissions to users, groups, and applications based on their roles. The Azure Blob Storage tutorial describes in greater detail how to set permissions for storage entities using the Azure portal.
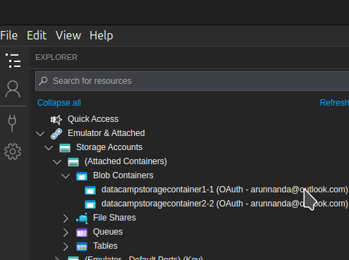
After you sign in to Storage Explorer using your Azure account, you can access Storage entities your Entra ID is authorized to access. Earlier in this article, you signed in to Blob Storage using OAuth. That method authenticated you based on the Entra ID tied to the account you used to log in via OAuth. Notice the suffix “OAuth” is beside the name of the Blob Container in the sidebar.
If you're also working with Azure SQL, our step-by-step guide helps you manage database storage.



 Laiba Siddiqui• 15 min.

 Arun Nanda• 15 min.

 Anneleen Rummens• 11 min.


If you’ve ever found managing cloud storage through the Azure portal a bit clunky or overwhelming, you’re not alone. That’s where Azure Storage Explorer comes in—a user-friendly desktop application that lets you interact with your Azure Storage resources without needing to navigate the full Azure interface.
In this tutorial, I’ll walk you through Microsoft’s Azure Storage Explorer: how to set it up, connect to your storage accounts, and start managing your blobs, queues, tables, and files with ease.
What is Azure Storage Explorer?
Azure Storage Explorer is a free cross-platform tool by Microsoft. It allows you to access data (like blobs, tables, queues, and files) stored in Azure Storage and provides limited management features to manage the stored data. You can upload, explore, download, and clone data entities.
Being a locally installed application, it provides a simple and familiar user interface without depending on web browsers or CLIs.
To better grasp how Storage Explorer fits into the broader cloud ecosystem, explore the Understanding Microsoft Azure Architecture and Services course.
Installing Azure Storage Explorer
In this section, I will show you how to set up Azure Storage Explorer and start using the application.
Downloading and installing
To download and install Storage Explorer:
.exefile..tarfile.In this tutorial, I will install the app via the Linux Snap Store. All the screenshots are based on Ubuntu Linux in dark mode. Since software packages and webpages are frequently updated, what you see may not exactly match my screenshots.
Launching Azure Storage Explorer
Launch the Storage Explorer like any other app on your operating system:
The user interface is similar to that of other Microsoft applications like VSCode. You have a main window that can contain tabs. The left menu is collapsible and contains four options:
Select each option in the left menu to expose the sidebar corresponding to that option. We will use these options and cover them in greater detail in later sections.
At the bottom, you have a panel that shows a log of various actions and their status.
Connecting to Azure Storage Accounts
After launching Storage Explorer, we will connect it to your Azure Storage account.
Signing in with an Azure Account
You can use your Azure account to connect Storage Explorer to Azure Storage:
Having logged in to Azure, we will see (in the next section) how to connect to different resources from your Azure account.
Connecting to Different Types of Azure Storage
Using Storage Explorer, you can connect to various types of storage resources, such as Blobs, Files, Queues, and Tables. Let’s explore how in this section.
Connect to Blob Storage
To connect to Blob Storage:
If the Entra ID linked to the Azure account you used to sign in (above) is authorized to access the Blob Container, it connects successfully. You can then open it in Storage Explorer:
Other types of storage resources
The process of attaching other resources, such as files, queues, and tables, is similar to attaching a storage account, as shown above.
Navigating and Managing Azure Storage Resources
After connecting Storage Explorer to Azure Storage, we will learn how to navigate and manage storage resources using the application.
Browsing blob storage
Browsing containers and blobs in Storage Explorer is similar to using the file explorer on the computer. After connecting to a storage account (as explained earlier):
Uploading files to Azure Blob Storage
To upload files to Azure Blob Storage:
The bottom panel shows the selected file's uploading status. When the upload completes, the Explorer tab automatically updates to show the newly uploaded file.
Managing Azure files and shared folders
You can also use Azure Storage Explorer to manage file shares and directories. You can upload entire folders from your local computer or directly create a folder within Azure Storage.
To upload a folder:
To create a new folder (without uploading):
The process of uploading a file is similar to uploading a folder:
To delete a file:
Alternatively, right-click the file name and select Delete from the context menu options.
Working with Advanced Features
Having covered the basics, I will show how to work with SAS tokens and access keys.
Generating and using Shared Access Signatures (SAS)
To access storage entities (like blobs, queues, etc.) using SAS, you need a connection string (URL) that contains the SAS token. You get the connection string from the Azure portal:
You can now connect to your Azure Storage account using this SAS token. To attach a Storage Account within Storage Explorer:
To connect using the SAS token:
After connecting, you can access the contents in Storage Explorer:
Managing access keys and secrets
In addition to the methods discussed above, you can use your Azure account’s access keys to connect Storage Explorer to Azure Storage. Share the account name and key with anyone, and they can securely connect to your Storage resources without relying on Microsoft Entra ID.
If you choose to connect using the account name and access key, you will need the key from your Azure account. To get the key:
To connect using the
After connecting, you can access the contents in Storage Explorer:
You will find the contents of the storage account in the sidebar. Notice the suffix “(Key)” next to the Storage account name. The contents are organized as an expandable tree structure. Selecting each item in the tree will show its contents.
Using Microsoft Entra (formerly Azure Active Directory, AAD) authentication
The above methods (SAS tokens and access keys) require you (as the owner of the storage entity) to use a URL or a key to access the data. While convenient, this method is not the safest. For example, keys and tokens can be intercepted during the sharing process. Using Microsoft Entra (formerly Azure Active Directory) is a better option.
In corporate environments integrated with Microsoft Entra, you can use your Microsoft Entra account to access and manage data stored in Azure Storage. Note that Microsoft Entra can be used only with blob, queue, and table data.
When using Entra ID, you can also take advantage of Role-Based Access Control (RBAC). RBAC allows you to manage access to Azure resources by assigning permissions to users, groups, and applications based on their roles. The Azure Blob Storage tutorial describes in greater detail how to set permissions for storage entities using the Azure portal.
After you sign in to Storage Explorer using your Azure account, you can access Storage entities your Entra ID is authorized to access. Earlier in this article, you signed in to Blob Storage using OAuth. That method authenticated you based on the Entra ID tied to the account you used to log in via OAuth. Notice the suffix “OAuth” is beside the name of the Blob Container in the sidebar.
If you're also working with Azure SQL, our step-by-step guide helps you manage database storage.