Course
SQL databases play an important role in modern data applications by providing a structured way to store, manage, and retrieve data. These databases use SQL to perform tasks ranging from simple queries to complex data transactions.
Azure SQL databases offer high availability and scalability, ensuring reliable performance for data projects. As a fully managed service, it reduces administrative overhead by handling maintenance tasks like updates and backups. Integration with other Azure services simplifies the development and deployment of your data solutions.
Azure offers a suite of SQL services that cater to diverse database needs. In this tutorial, we will explore those services but focus mainly on Azure SQL Database and go in-depth into its configuration, usage, and management.
Understanding Azure SQL Services
Microsoft Azure provides three primary SQL database services tailored to specific use cases and requirements: Azure SQL Database, Azure SQL Managed Instance, and SQL Server on Azure Virtual Machines (VMs).
1. Azure SQL Database
Azure SQL Database is a fully managed Platform as a Service (PaaS) offering. It abstracts the underlying infrastructure, enabling developers to focus on building and deploying applications without worrying about database maintenance tasks.
2. Azure SQL Managed Instance
Azure SQL Managed Instance is a managed service that offers near 100% compatibility with SQL Server on-premises, making it easier to migrate existing SQL Server applications to the cloud. It combines the benefits of PaaS with greater control over the database environment.
3. SQL Server on Azure Virtual Machines
SQL Server on Azure VMs is an Infrastructure as a Service (IaaS) offering that allows users to run full SQL Server installations on Azure VMs. This option provides complete control over the SQL Server instance and the underlying operating system, similar to on-premises deployments.
Choosing the right service for your needs
Selecting the appropriate Azure SQL service depends on your specific requirements and constraints. Here are some considerations to help you make an informed decision:
|
Consideration |
Azure SQL Database |
Azure SQL Managed Instance |
SQL Server on Azure VMs |
|
Application compatibility |
Best for modern cloud-native applications. |
Ideal for near-complete compatibility with on-premises SQL Server features. |
It provides full control and is suitable for legacy applications requiring custom configurations. |
|
Management overhead |
Minimal, with automated maintenance. |
Minimal, with automated maintenance. |
High, requires more hands-on management. |
|
Scalability needs |
Seamless scalability for fluctuating workloads. |
Seamless scalability for fluctuating workloads. |
Scalable but may require more manual intervention. |
|
Security and compliance |
Extensive built-in security and certifications. |
Extensive built-in security and certifications. |
Robust security, but compliance depends on custom configurations. |
|
Performance requirements |
Suitable for most applications with cloud performance. |
Good performance with SQL Server compatibility. |
Ideal for high-performance needs with full customization. |
In summary, Azure SQL Database is best for cloud-native applications with minimal management overhead, Azure SQL Managed Instance suits legacy applications needing SQL Server compatibility, and SQL Server on Azure VMs offers the most control for custom and high-performance workloads.
Now, let’s focus on the Azure SQL Database service.
Become a Data Engineer
Creating an Azure SQL Database
Creating an Azure SQL Database involves several steps, all of which can be done through the Azure Portal. Below is a detailed guide to help you set up your SQL database.
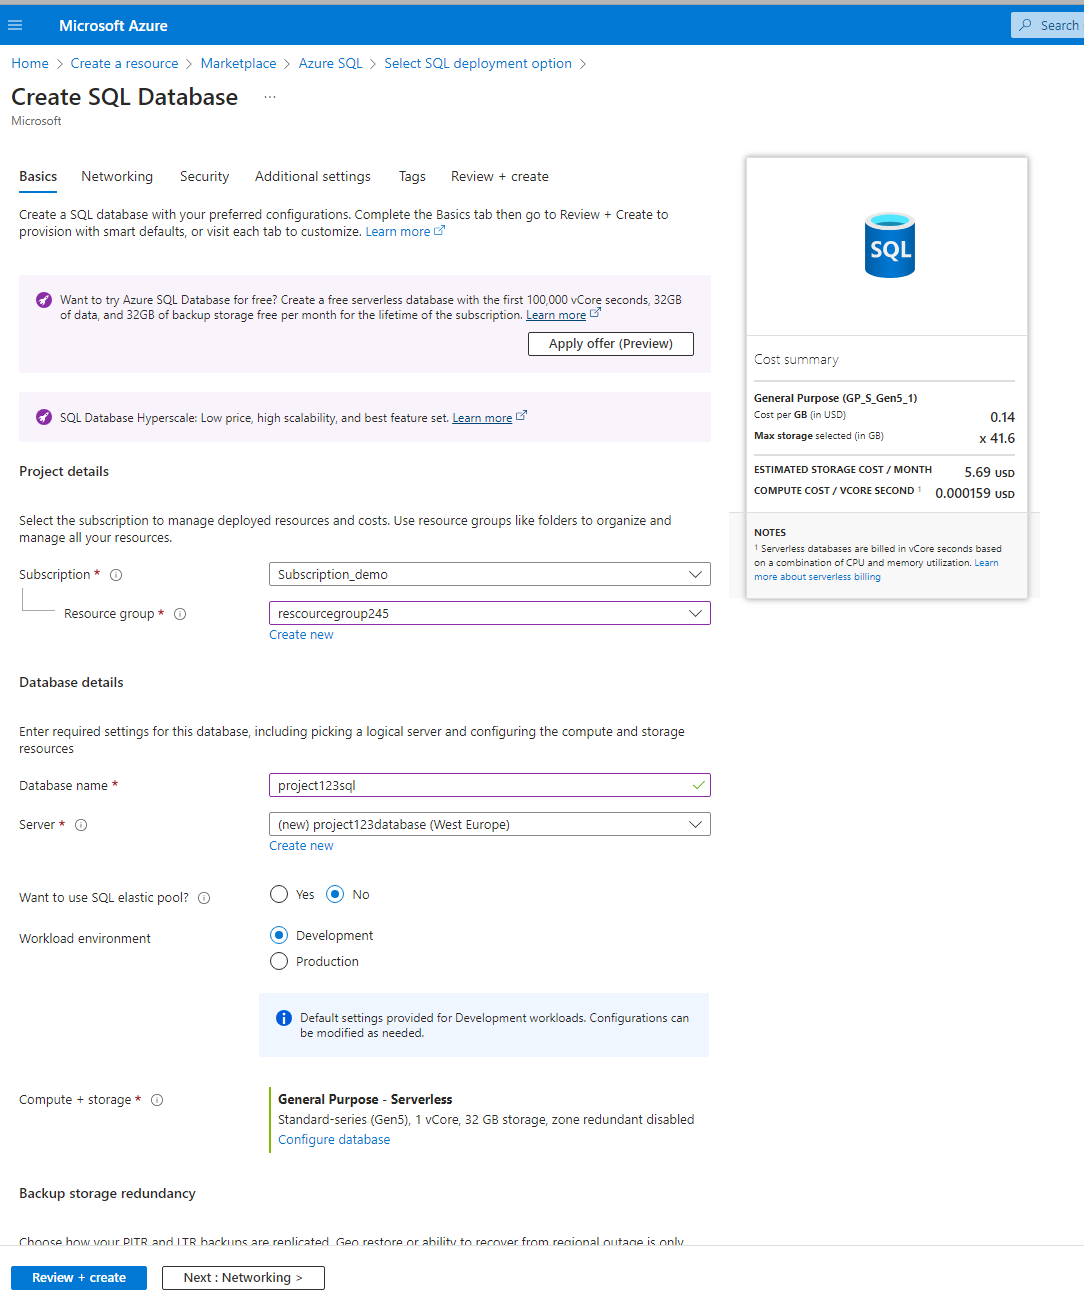
1. In the Azure Portal, click the “Create a resource” button in the homepage's upper left corner. In the new resource page, type “SQL Database’ in the search box and select it from the list of services.
2. Configure the database settings as follows:
- Subscription: Choose the appropriate subscription under which you want the database to be billed.
- Resource group: Select an existing resource group or create a new one by clicking "Create new" and entering a name.
- Database name: Enter a unique name for your new SQL database.

“Create a SQL database” screen in Azure with a cost summary on the right. Image by author
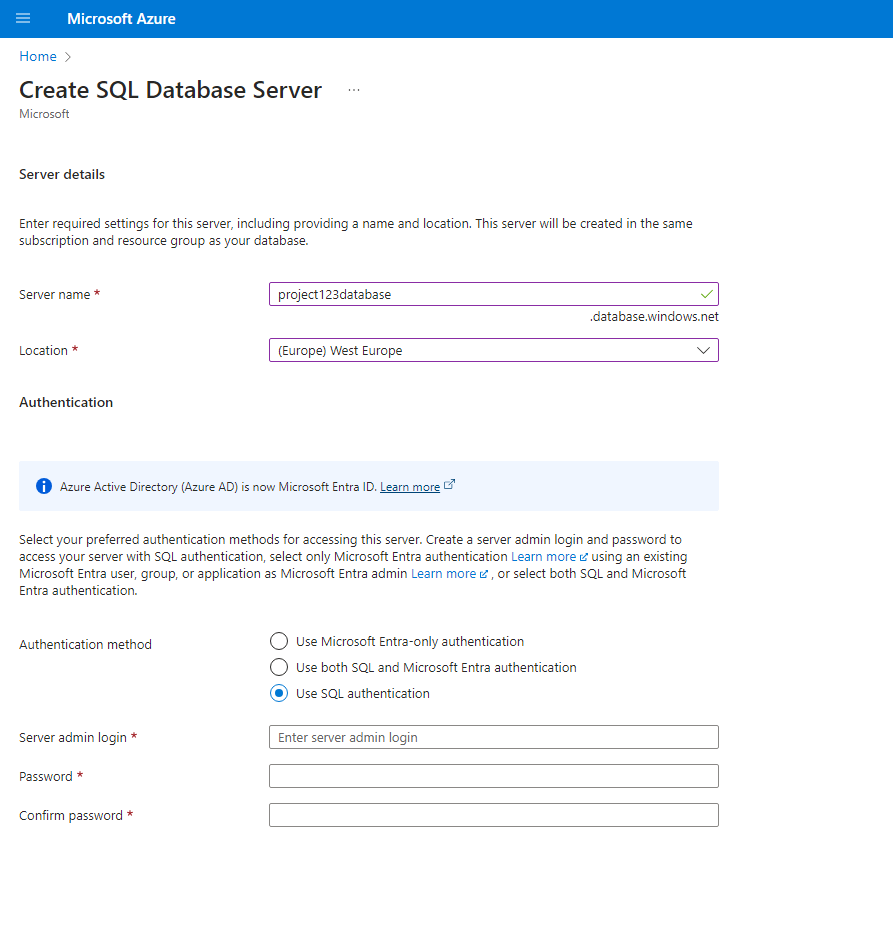
3. If you already have a SQL Server, click "Use existing" and select the server from the list. If you do not have an existing SQL Server, click "Create new" to set one up. You’ll need to configure the following settings.

Creating a new SQL Database Server in Azure. Image by author
- Server name: Enter a unique name for the server.
- Server admin login: Create a login name for the server admin.
- Password: Create a strong password and confirm it.
- Location: Choose the region closest to your users for optimal performance.
4. Next, set up the authentication method and the server admin login:
- Authentication method: Choose your preferred authentication method. SQL authentication is common, but you can also use Microsoft Entra ID (previously Azure Active Directory) authentication for added security.
- Server admin login: If creating a new server, ensure you have entered the admin login and password as described earlier.
5. Some additional settings to consider:
- Networking: Decide whether the database should be accessible over the public internet or only within a private network. Configure the necessary firewall rules and virtual networks.
- Security: Enable features like Advanced Data Security, which includes threat detection and vulnerability assessments.
- Pricing tier: Choose a tier based on your performance and budget requirements. Options include General Purpose, Business Critical, and Hyperscale tiers. Each tier offers different levels of performance, storage, and features.
6. Finally, review all the configuration settings to ensure everything is set up as desired. Click the "Review + create" button. After the validation process, click "Create" to deploy your SQL database.
If you’re interested in more in-depth knowledge about Azure, check out the Azure Architecture and Services course.
Connecting to an Azure SQL Database
Various tools and methods can be used to connect to an Azure SQL Database. This section covers the primary tools for connection and explains the use of connection strings and authentication methods.
Tools for connecting to an Azure SQL Database
Connecting via the Azure Portal
Follow these steps to connect to your SQL database and run queries directly in Azure:
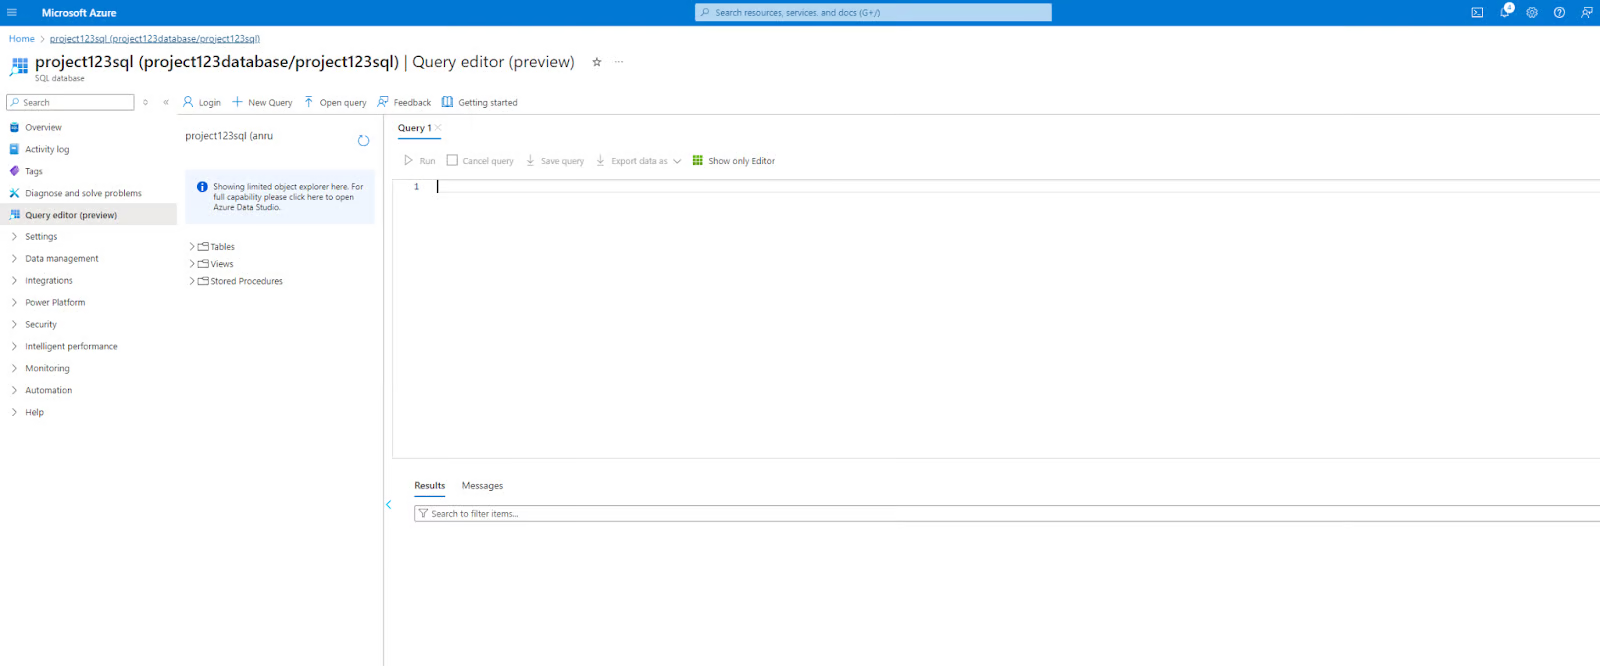
1. Open the Azure Portal and go to your SQL database resource. Click the "Query editor (preview)" in the left-hand menu.
2. Enter the server admin login and password to use SQL authentication, or if configured, use Microsoft Entra ID (previously Azure Active Directory) authentication.
3. You can directly run SQL queries against your database within the Azure Portal’s query editor.

The Azure Portal query editor. Image by author
Connecting via SQL Server Management Studio (SSMS)
SQL Server Management Studio (SSMS) is a comprehensive, integrated environment for managing SQL Server infrastructure, allowing you to configure, monitor, and administer instances of SQL Server databases.
- Installation: Download and install SSMS from the official Microsoft website.
- Connecting: Open SSMS, click "Connect," and select "Database Engine." Enter the server name (e.g., “your_server_name.database.windows.net”), the authentication method, and the credentials.
Connecting via Azure Data Studio
Azure Data Studio is a cross-platform data management tool for managing SQL Server databases on-premises or in multi-cloud environments.
- Installation: Download and install Azure Data Studio from the official Microsoft website.
- Connecting: Open Azure Data Studio, click "New Connection," and enter the server details, including the server name, database name, and authentication details.
Other tools to connect to your Azure SQL Database
- Visual Studio Code: Install the SQL Server extension for Visual Studio Code, which provides the ability to connect to Azure SQL Databases.
- Power BI: Connect to Azure SQL Database directly from Power BI Desktop for advanced data analysis and visualization.
Connection strings and authentication
Understanding connection strings
Connection strings are essential for applications to connect to your Azure SQL Database. They contain the server name, database name, authentication credentials, and other parameters.
Example connection string for SQL authentication:
Server=tcp:your_server_name.database.windows.net,1433;Initial Catalog=your_database_name;Persist Security Info=False;User ID=your_username;Password=your_password;MultipleActiveResultSets=False;Encrypt=True;TrustServerCertificate=False;Connection Timeout=30;Setting up SQL authentication
In SSMS or Azure Data Studio, connect to your Azure SQL Database and run SQL scripts to create new users and assign roles. Include the username and password in your connection string for authentication.
CREATE LOGIN mylogin WITH PASSWORD = 'StrongPassword!';
CREATE USER myuser FOR LOGIN mylogin;
ALTER ROLE db_datareader ADD MEMBER myuser;
Setting up Microsoft Entra ID (previously Azure Active Directory) authentication
Follow these steps to configure the Entra ID admin and assign users/roles:
1. In the Azure Portal, navigate to your SQL Server resource and select "Active Directory admin" to set an Entra ID user or group as the administrator.
2. Use SQL scripts to create users and assign them roles. This requires SSMS or Azure Data Studio with Entra ID authentication enabled. For example:
CREATE USER [aad_user@domain.com] FROM EXTERNAL PROVIDER;
ALTER ROLE db_datareader ADD MEMBER [aad_user@domain.com];
3. Modify your connection string to include Entra ID credentials. This often involves setting up token-based authentication:
Server=tcp:your_server_name.database.windows.net,1433;Initial Catalog=your_database_name;Persist Security Info=False;User ID=aad_user@domain.com;Authentication="Active Directory Password";Password=your_password;MultipleActiveResultSets=False;Encrypt=True;TrustServerCertificate=False;Connection Timeout=30;
Managing and Using Your Azure SQL Database
Managing and using an Azure SQL Database involves basic database operations and leveraging advanced features to optimize performance, scalability, and availability. Below are detailed steps and methods for both basic and advanced database management.
Basic database operations
1. Creating tables
Connect to your database using SSMS, Azure Data Studio, or the Azure Portal query editor, and run the following SQL command to create a table:
CREATE TABLE Employees (
    EmployeeID INT PRIMARY KEY,
    FirstName NVARCHAR(50),
    LastName NVARCHAR(50),
    Email NVARCHAR(100),
    HireDate DATE
);
2. Inserting data
Insert data into the newly created table using the following SQL code:
INSERT INTO Employees (EmployeeID, FirstName, LastName, Email, HireDate)
VALUES (1, 'John', 'Doe', 'john.doe@example.com', '2022-01-01');
3. Running basic queries
You can retrieve data from the table with a simple SELECT query. For example, to get all data from the Employees table:
SELECT * FROM Employees;Using T-SQL for database management
T-SQL (Transact-SQL) is an extension of SQL from Microsoft used for managing and manipulating relational databases. It allows you to perform a variety of tasks, including creating and altering tables, managing data, and implementing complex logic through stored procedures and triggers.
1. Creating stored procedures
CREATE PROCEDURE GetEmployeeByID
	@EmployeeID INT
AS
BEGIN
    SELECT * FROM Employees WHERE EmployeeID = @EmployeeID;
END;
In this example, the stored procedure takes an employee ID as an input parameter and returns all the columns for the employee with that specific ID from the ‘Employees’ table.
2. Executing stored procedures
Here’s how you can execute the stored procedure you just created:
EXEC GetEmployeeByID @EmployeeID = 1;Advanced database management features
Now, let’s look at more sophisticated features you can use in your Azure SQL Database, particularly in production environments.
Scaling databases with elastic pools
Elastic pools in Azure SQL Database enable you to manage and scale multiple databases with varying and unpredictable usage demands. They provide cost efficiency by sharing resources among databases within the pool. Follow these steps to create an elastic pool:
1. Navigate to the Azure Portal, select your SQL Database server, and click "Create new" under Elastic Pool.
2. Configure the pool by setting the number of DTUs (Database Transaction Units) and adding databases.
Implementing high availability and disaster recovery solutions
Azure SQL Database provides several high availability and disaster recovery options to ensure your database remains operational and data is protected:
- Built-in high availability: There is built-in high availability with a 99.99% uptime SLA. This is achieved through data replication across multiple nodes in different physical locations.
- Geo-replication: You can enable geo-replication to create readable secondary replicas in different Azure regions. This allows for failover to a secondary region in a regional outage. To do so, navigate to your SQL database from the Azure Portal, select “Geo-Replication,” and configure the secondary replicas.
- Automatic back-ups: Azure SQL Database automatically performs full, differential, and transaction log backups. You can configure backup retention policies to meet your recovery point objectives.
- Point-in-time restore: In case of accidental data loss or corruption, you can restore the database to any point within the retention period. You can do this directly from the Azure Portal by navigating to your database and selecting the "Restore" option.
Securing Your Azure SQL Database
When working with data, security is of utmost importance. This section discusses the main security features of the Azure SQL Database service.
Security best practices
To help protect your Azure SQL Database from unauthorized access and ensure secure, private connectivity within your Azure environment, you can implement these best practices:
- Configure IP firewall rules to limit access to the database from specific IP addresses or ranges. This minimizes the risk of unauthorized access by restricting database connectivity to known, trusted sources.
- Use virtual network service endpoints to restrict database access to specific virtual networks. This allows you to lock down access to the Azure SQL Database from specific VNets, enhancing security by limiting exposure to the public internet.
- Integrate the VNet with the SQL database using service or private endpoints for secure connectivity. This reduces the risk of interception or attack and exposure to the public Internet.
Using advanced data security features
To help protect your data in Azure SQL databases, consider these advanced configurations:
- Advanced threat protection is used to detect unusual activities.
- Transparent data encryption (TDE) encrypts data at rest.
- Dynamic data masking hides sensitive data in query results.
Regularly auditing and monitoring your database
To further support your SQL database's security and data protection, you can set up auditing processes to track database activities and store logs in an Azure Storage account, Log Analytics workspace, or Event Hub.
You can also use Azure Monitor to track performance and security metrics and set up alerts for specific conditions.
If you’d like to learn more about data governance in Azure, check out DataCamp’s Azure Management and Governance course.
SQL Database Pricing and Cost Management
Azure SQL Database pricing can be complex due to the different configuration options that influence it. In this section, we’ll discuss the main factors affecting costs.
1. Service tier
Each tier (Basic, Standard, and Premium) offers different performance levels and features. The choice of service tier impacts the cost, with Basic being the least expensive and Premium being the most expensive.
2. Compute resources
You can choose between DTU-based pricing or vCore-based pricing:
- DTUs (Database Transaction Units): For DTU-based pricing, the number of DTUs determines the compute, memory, and I/O resources allocated to the database. More DTUs result in higher costs.
- vCores (Virtual Cores): For vCore-based pricing, the number of vCores and the type of hardware (General Purpose, Business Critical, or Hyperscale) determine the compute costs. More vCores or higher-end hardware configurations result in higher costs.
3. Storage
The amount of data stored in the database affects the cost. Storage is billed based on the provisioned storage size, not the used space.
The amount of storage used for automated backups (up to a specific retention period) is included. Additional backup storage for longer retention periods incurs additional costs.
4. Deployment options
Depending on your deployment option, costs can vary:
- Single database: An isolated database with resources. Costs depend on the chosen service tier, compute, and storage.
- Elastic pool: A collection of databases that share resources. Costs depend on the total number of eDTUs or vCores and storage allocated to the pool.
- Managed instance: A fully managed SQL Server instance. Costs depend on the number of vCores, storage, and other features.
5. Geo-replication and high availability
Features like zone-redundant configuration or premium-tier offerings with higher availability guarantees can increase costs.
6. Network egress
Data transferred from Azure SQL Database (e.g., to external clients or other Azure regions) incurs egress charges. Internal data transfer within the same Azure region is typically free.
Tips for cost management and optimization
Here are some tips to help you optimize costs for Azure SQL databases:
- Use the pricing calculator to help calculate the costs of your Azure SQL database upfront
- Analyze spending using Azure Cost Management to identify cost optimization opportunities
- Use Azure Advisor to make personalized recommendations on cost optimization.
Conclusion
Setting up and managing an effective Azure SQL Database involves setting up robust authentication and connection tools. Using advanced security features and leveraging Azure's monitoring tools ensures the database remains secure and efficient. Understanding the pricing tiers and factors affecting costs helps make informed decisions to optimize expenses.
Following the guidelines in this tutorial, you can maintain a secure, high-performing, and cost-effective Azure SQL Database environment.
Want to learn more about Azure? Check out the Datacamp’s Azure Fundamentals track.
Master Data Governance Today
FAQs
What are the best practices for optimizing query performance in Azure SQL Database?
To optimize query performance, regularly analyze and optimize your queries using the Query Performance Insights tool. Additionally, ensure proper indexing, use parameterized queries to prevent SQL injection, and consider using database scaling options such as elastic pools for handling variable workloads.
How can I automate backups for my Azure SQL Database?
Azure SQL Database automatically handles backups, including full, differential, and transaction log backups stored in geo-redundant storage. You can configure the backup retention period in the Azure Portal under the database’s "Configure" settings, ensuring your data is backed up according to your business needs.
What are the differences between Azure SQL Database and SQL Server on Azure VMs?
Azure SQL Database is a fully managed service designed for cloud-native applications, offering automated backups, patching, and scaling. SQL Server on Azure VMs provides full control over the SQL Server environment, allowing for custom configurations and high-performance requirements, but it requires more hands-on management and maintenance.
What are the differences between single databases and elastic pools in Azure SQL Database?
Single databases are independent databases optimized for single-tenant applications. Each database has its own set of resources.
Elastic pools are a collection of databases sharing resources (eDTUs or vCores). Ideal for multi-tenant applications where resource demands vary across databases, providing cost savings and resource efficiency.
What security measures should I implement to protect sensitive data in Azure SQL Database?
To protect sensitive data, enable Transparent Data Encryption (TDE) to encrypt data at rest, and Always Encrypted to protect data in transit and at rest. Use Azure’s built-in Advanced Threat Protection (ATP) to detect and respond to potential threats, and enforce strong authentication and authorization practices with Azure Active Directory (AAD).
Anneleen is a data scientist with a background in statistics and social sciences. She currently works as a freelance data scientist in finance and is studying a postgraduate degree in Applied AI. Anneleen is the instructor of four DataCamp courses including 'Azure Management and Governance'.

