
Azure Blob Storage: How to Upload, Secure, and Manage Your Data

This tutorial is a practical, hands-on guide to Azure Blob Storage, covering everything from setup and file uploads to securing access and cutting storage costs!
Apr 2, 2025  · 15 min read

Cloud storage can feel like a black box until you actually dive in and use it—and Azure Blob Storage is a great place to start. Whether you’re dealing with images, text files, videos, or backups, Blob Storage gives you a scalable and secure way to store unstructured data in the cloud.

In this tutorial, I’ll walk you through the essentials of Azure Blob Storage—what it is, why it matters, and how to get started. We’ll go hands-on with uploading and downloading data, setting permissions, and managing lifecycle policies to keep your storage lean and efficient. Whether you're exploring Azure for the first time or adding blob storage to your cloud toolkit, this guide will help you hit the ground running.

What is Azure Blob Storage?

“Blob” stands for Binary Large Object—a term used to describe storage for unstructured data like text, images, and video. Azure Blob Storage is Microsoft Azure’s solution for storing these blobs in the cloud. 

It offers flexible storage—you only pay based on your usage. Depending on the access speed you need for your data, you can choose from various storage tiers (hot, cool, and archive). Being cloud-based, it is scalable, secure, and easy to manage. As an Azure service, it can be integrated with other Azure services like Azure Backup, Azure Synapse, Azure CDN, Azure ML, and more.

If you're new to Azure’s broader ecosystem, our course on Understanding Microsoft Azure Architecture and Services offers a structured introduction.

Setting Up Azure Blob Storage

Now, let’s get hands-on and start working with Azure Blob Storage! For this tutorial, I assume you already have an Azure account - either a trial account with free credits or a regular paid account.

Creating a storage account

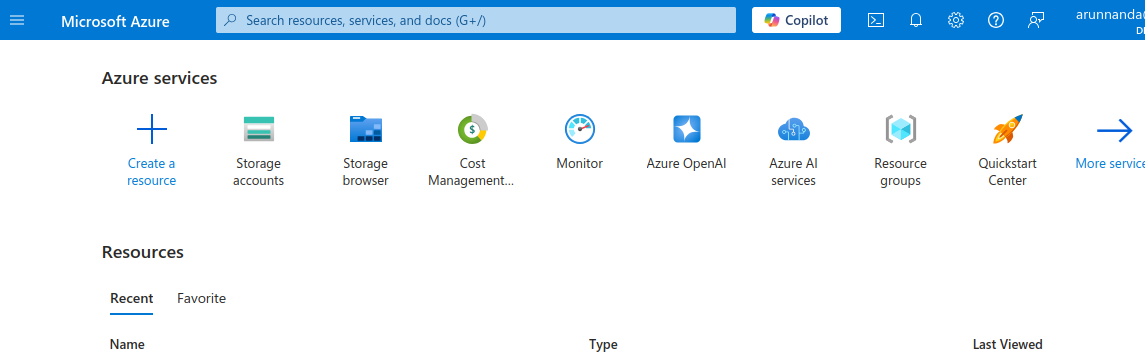
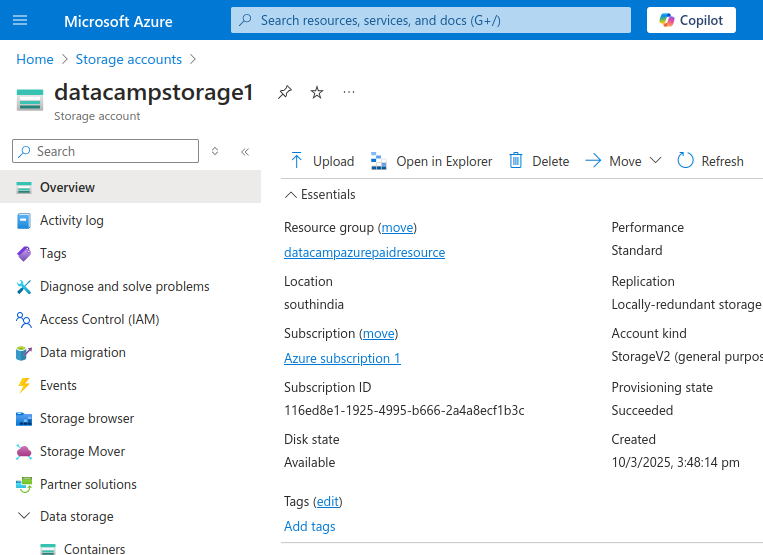
To start with, we create a Storage account on the Azure portal:

  • On the Azure homepage, select Storage accounts

Azure portal screenshot

  • The Storage account page shows a table of storage accounts under your Azure account. You can have many storage accounts under one Azure account. Select the button that says Create storage account

Azure Storage accounts

  • On the Create a storage account page, fill in the details for your new storage account:
    • Choose your subscription. 
    • Under Resource group, create a new resource group if necessary. I advise you to organize resource groups based on their intended usage or projects. 
    • Give a name for the storage account. We name our account datacampstorage1
    • Choose your geographical region. 
    • Under Performance, choose standard. It is enough for regular applications and testing purposes. Premium is for applications that specifically need low latency. 
    • Under Redundancy, choose Locally-redundant storage (LRS). This creates a backup of your data in the same geo-location. For critical applications where you want backups in different geographical regions, choose Geo-redundant storage (GRS). 

Create an Azure storage account

  • Select Next to go to Advanced settings. 
  • In the Advanced settings tab, under Security, select the checkbox for Allow enabling anonymous access on individual containers. This will allow you to allow your users (e.g., internet users) to access your data without you explicitly giving them access rights. Note that you will still need to enable anonymous access at the individual containers level. 

Azure Storage Account - advanced settings

  • After the advanced configuration (shown above), you can either:
    • Select the Review + create button to go to the Review + create tab, which shows a summary of the configuration of your new storage account. At the bottom of the page, select Create to create the new storage account.
    • Alternatively, select the Next button to go to the Networking tab for further customization. Selecting Next consecutively takes you to the configuration pages for data protection, encryption, and tagging. In this introductory tutorial, we will accept the default settings for these sections. 

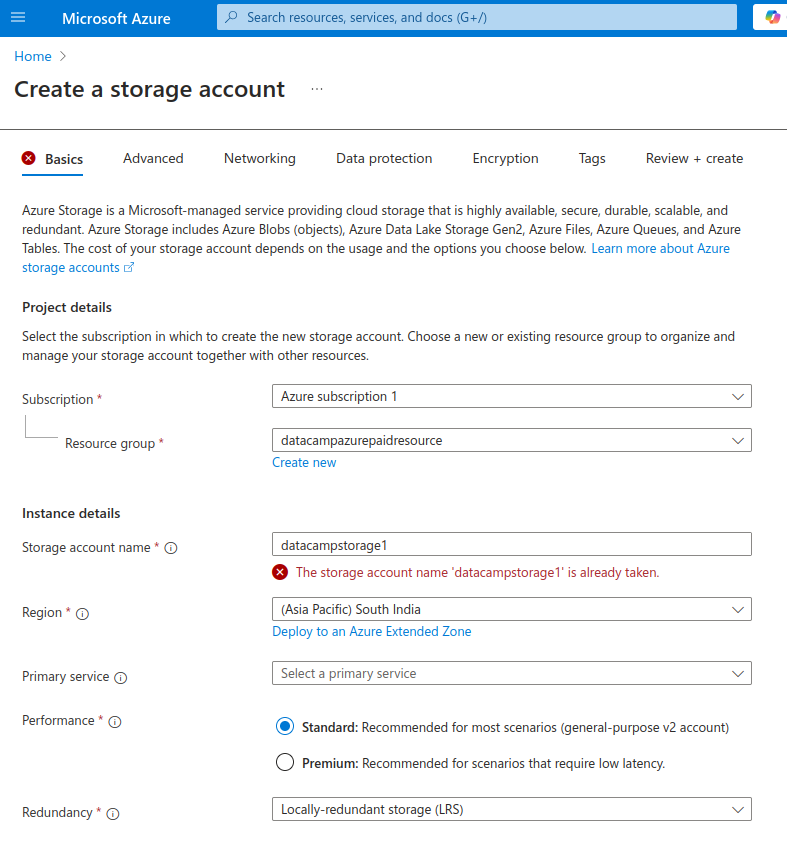
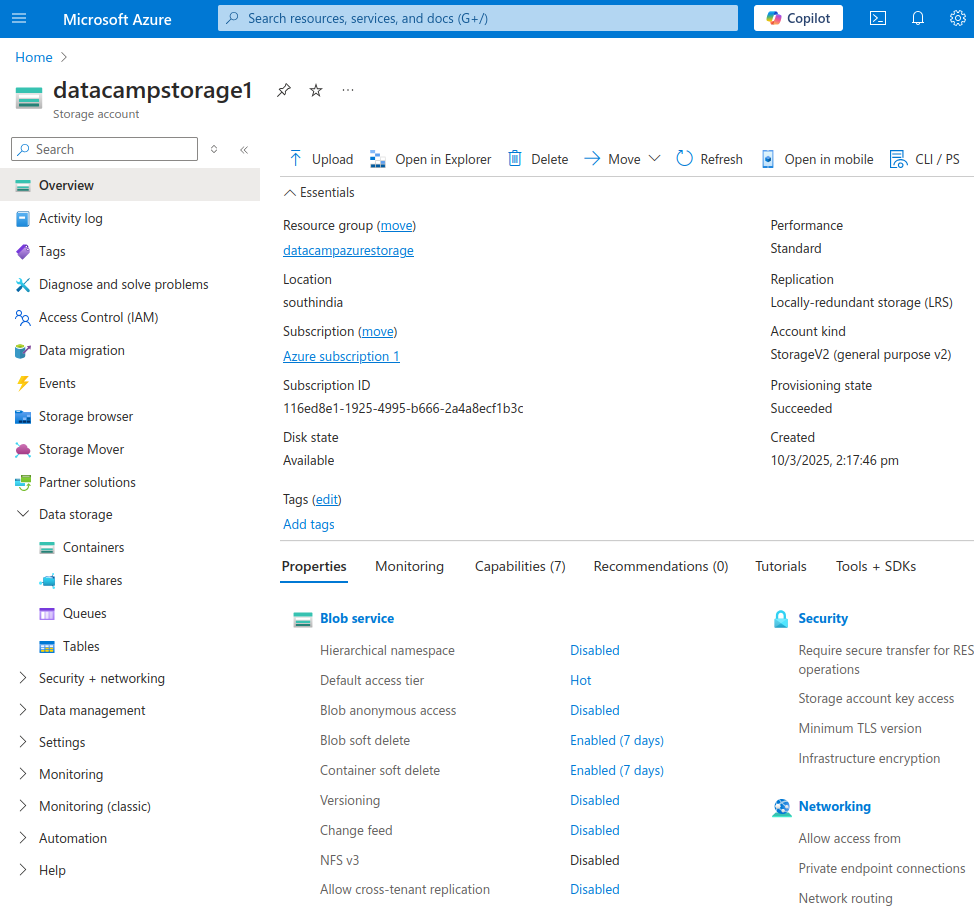
The next page confirms that the storage account is deployed. Select the Go to resource button to view the details of your new storage account and take further action. 

Fresh Azure Storage account

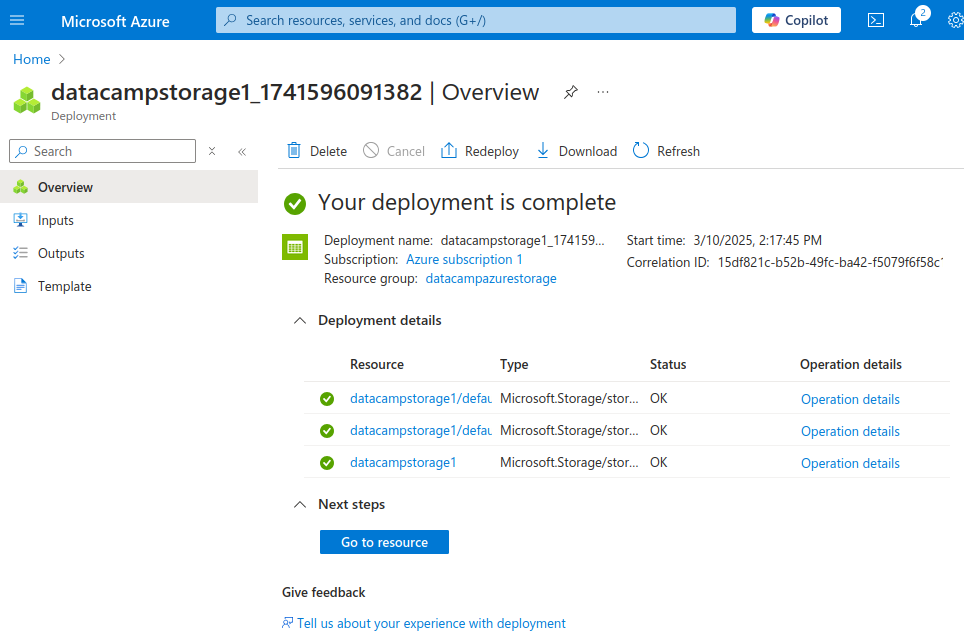
You have now created a new storage account!

Configuring blob containers

Azure Blob Storage organizes data into containers. Each container can store many blobs, similar to a directory in a file system. Blobs in a container can be of various file types, like PDFs, videos, and more. Use containers to organize your data based on regions, projects, etc. 

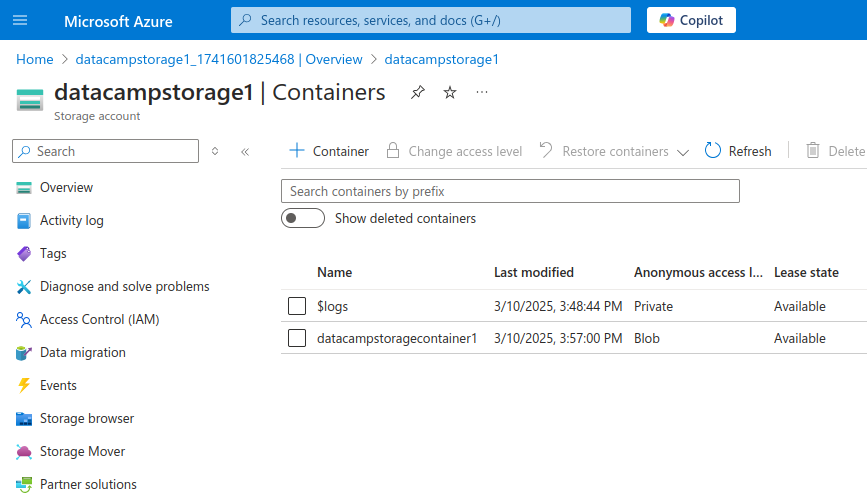
To create a container: 
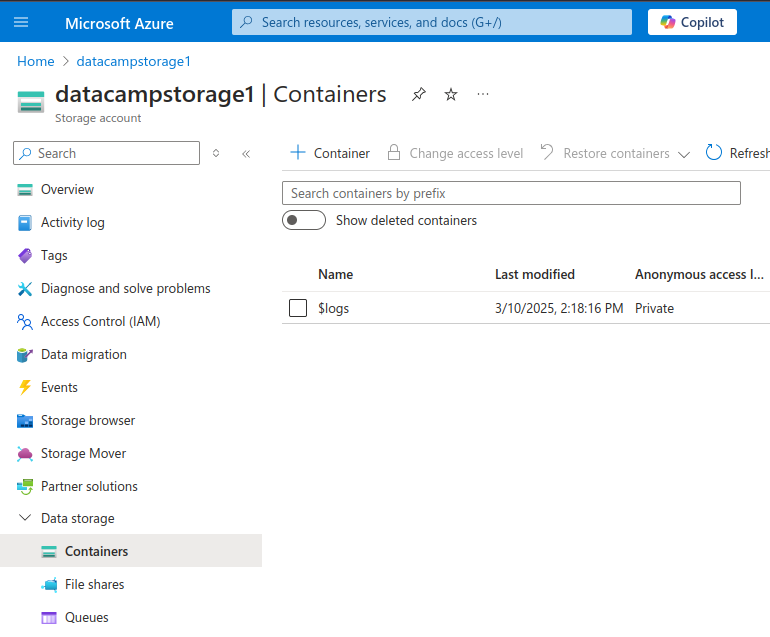
  • On the Storage account page, select Data storage from the left menu in the sidebar. This opens up a sub-menu with Containers, File shares, Queues, and Tables. Select Containers

Azure Storage account page 

  • The Containers page shows a table of containers under this storage account. To create a new container, select the + Container button at the top of the table.

Azure Storage Containers page

  • In the New container sidebar:
    • Enter the name of the new container. We create a container named datacampstoragecontainer1.
    • Select the Anonymous access level. You have three access levels:
      • Private - the data can only be accessed by the account owner.
      • Blob - Blobs (in the container) can be read-accessed anonymously over the internet. This anonymous access doesn’t extend to other data (like queues and tables) stored in the same container. Furthermore, anonymous clients cannot list the data items (such as blobs) stored within the container. They can only read a blob given its URL. In this tutorial, we select Blob.
      • Container - Allow anonymous read and list access to all data in the container.
    • Select Create (at the bottom of the sidebar). 

The Containers page now shows the new container:

Azure Storage Containers page

Uploading and Managing Blobs in Azure Blob Storage

There are three main ways to upload a blob to the storage container: the Azure portal, the Command Line Interface (CLI), and the Storage Explorer application. In this section, I will explain how to use each method to upload a file to Blob Storage. 

Using the Azure portal

To upload a file using the Azure portal: 

  • On the Containers page (as shown above), select Overview in the left menu. 
  • Select the Upload button in the top bar.

Azure Storage Container page

  • In the Upload blob sidebar, drag and drop your file(s) or use the Browse for files option. Select the container you just created (in the previous steps). 

Azure Upload blob page

  • Select the Upload button. 
  • After a while (depending on the file size), you should see a popover confirming that the upload was successful. 

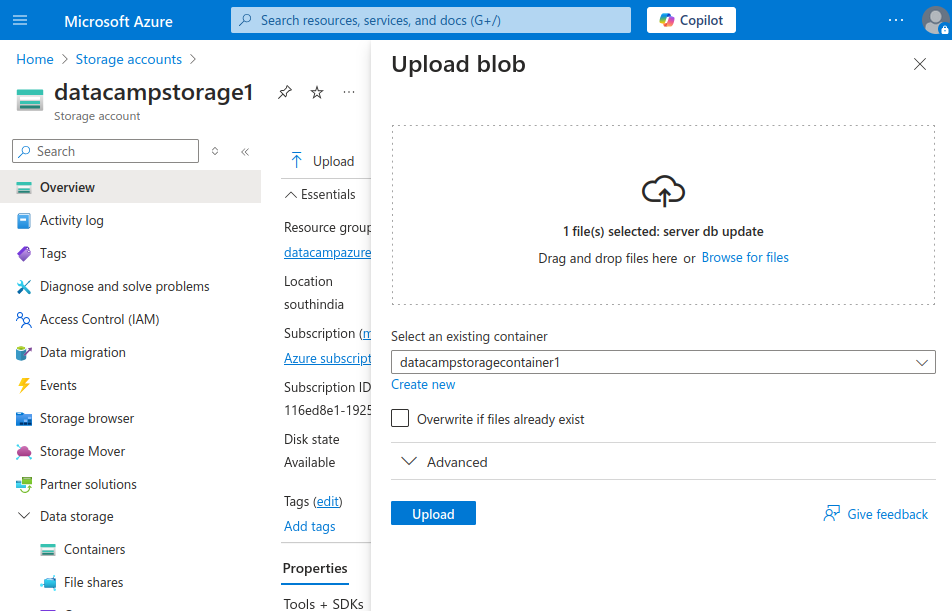
As an alternative to the steps described above, you can also select an individual container from the Containers page and then select the Upload button at the top. 

Using the Azure CLI

To upload a file to Blob Storage using the CLI: 

  • Log in to the Azure Cloud Shell. Choose your favorite shell (Bash or PowerShell) in ephemeral mode. In this tutorial, I will use a Bash shell. 
  • Log in to your Azure account from the shell and run the following command:
az login
  • Follow the login instructions on the page:
    • Click the link to open the device login webpage. 
    • Enter the given authentication code. 
    • Choose your Azure account.
    • Confirm your login. 
    • Close the window and go back to the Cloud Shell window. 
  • A numbered list of Azure subscriptions will be shown. Enter the number corresponding to the subscription you want to access. 
  • Create a text file foobar.txt to test:
nano foobar.txt 
  • Add a line to the text file, save it using Ctrl + S, and exit the Nano editor using Ctrl + X.
  • Check that the file is saved with the text you added:
less foobar.txt
  • Press Q to exit the output of less

We now need to upload this file to Blob Storage:

  • Use the following command to upload the blob:
az storage blob upload --account-name datacampstorage1 --container-name datacampstoragecontainer1  --name foobar.txt --file foobar.txt

In the command above, the name of the storage account is datacampstorage1 and the container's name is datacampstoragecontainer1. If you used different names, substitute them as appropriate. 

After it uploads the file successfully, you should see a message resembling the output below:

Finished[########################]  100.0000%

If you're using the command line, keep our handy Azure CLI cheat sheet nearby for quick reference on essential commands.

Using Storage Explorer

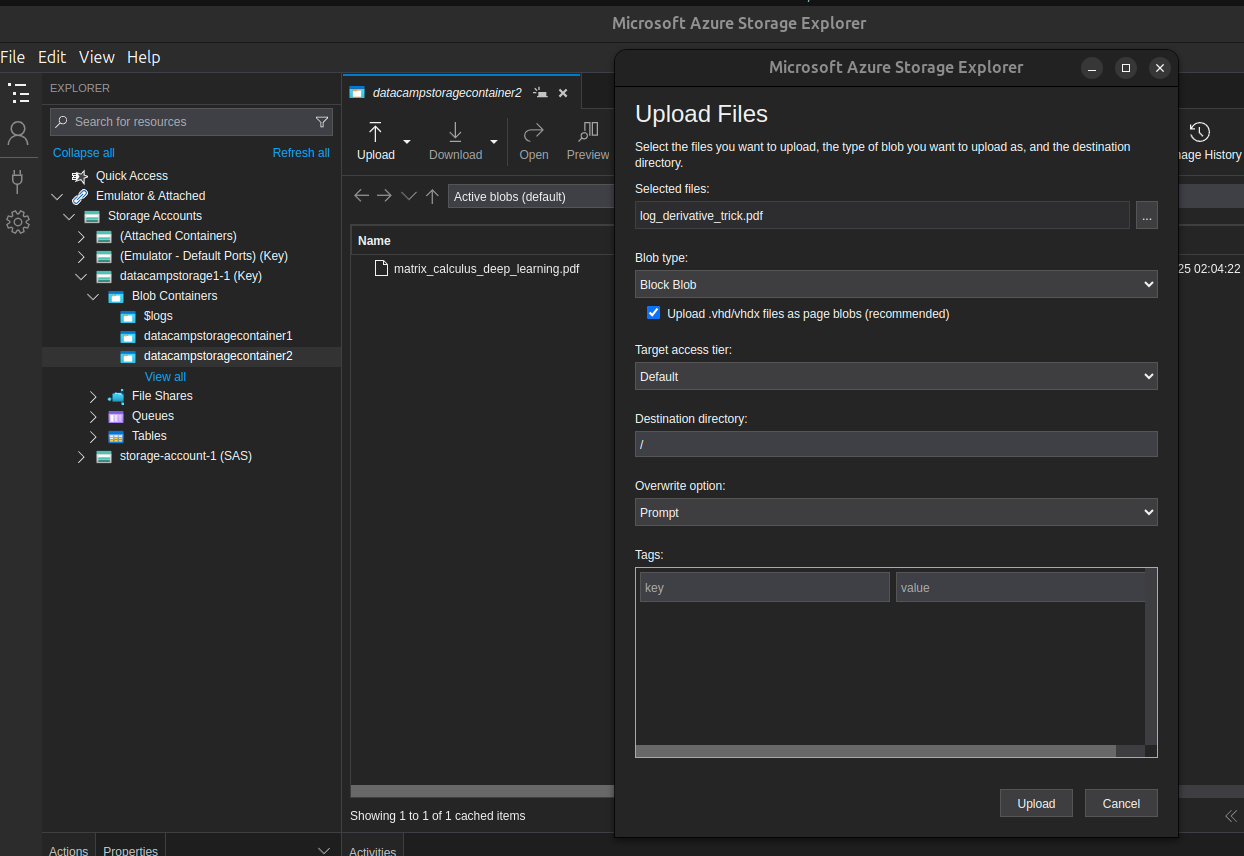
You can also use Azure’s Storage Explorer application to upload blobs to Blob Storage. To upload files to Azure Blob Storage:

  • Open the Storage Explorer application and connect to your Azure Storage account. If you are unfamiliar with this application, follow the Storage Explorer tutorial
  • From the sidebar or the Explorer window, enter the container into which you want to upload the file.
  • From the toolbar at the top, select the Upload button. From the drop-down menu, select Upload Files
  • In the Upload Files popover:
    • Click the Selected files field. 
    • Choose the files (that you want to upload) from your local computer. 

Upload files on Azure Storage Explorer

  • Select the appropriate values for the other fields. You can also leave the default values. 
  • Select the Upload button.

Viewing blobs in Storage Explorer

  • When the upload completes, the Explorer tab automatically updates to show the newly uploaded file. 

Managing blobs

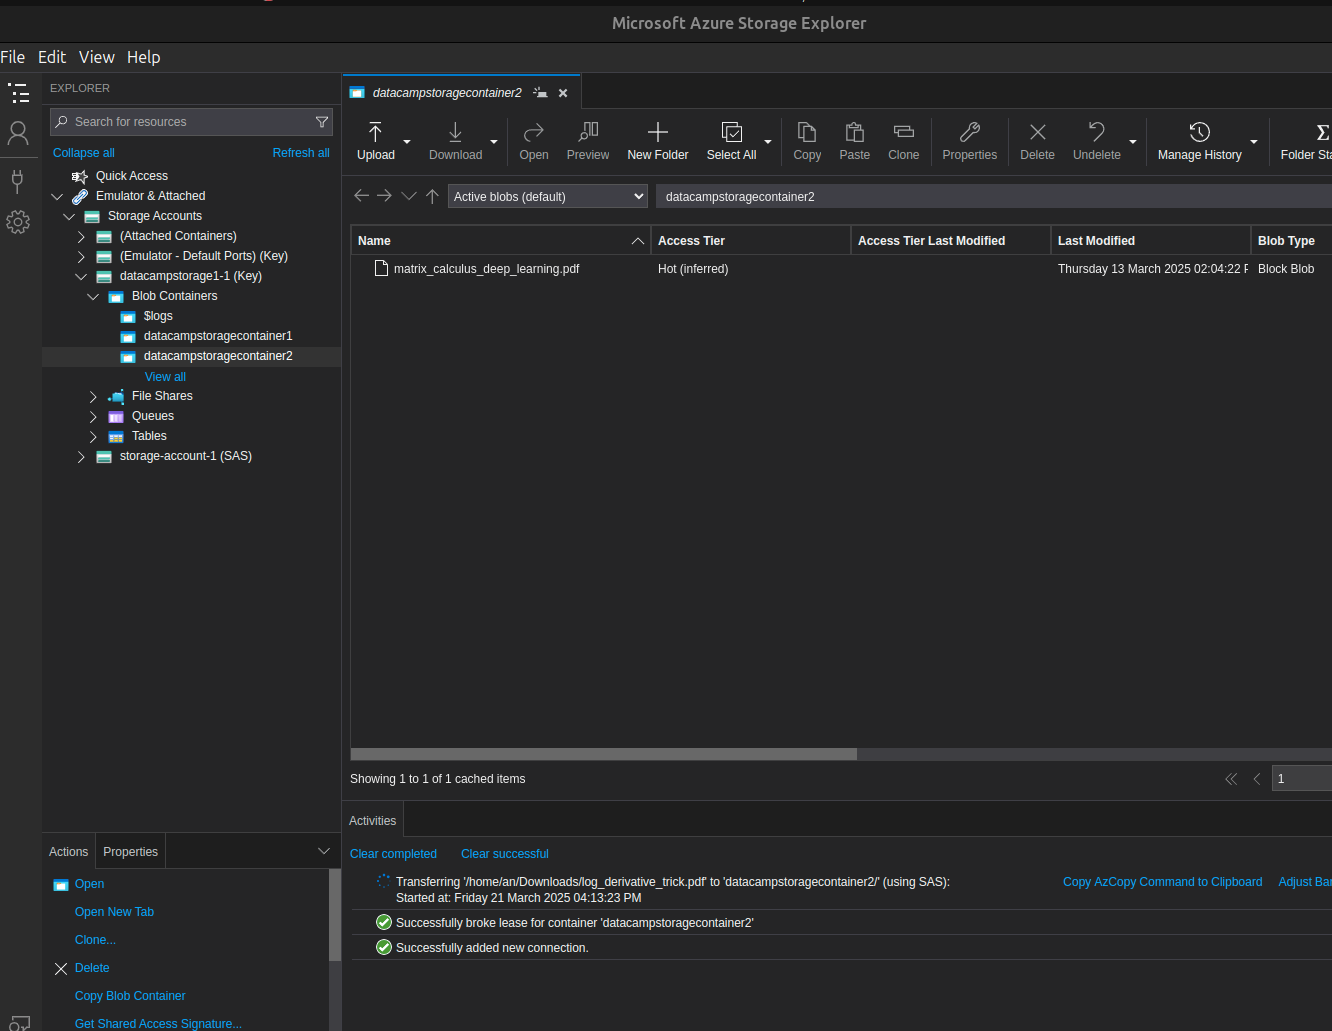
After uploading files to blob storage, I will show you how to list the blobs in a container and how to download blobs. 

Listing blobs

We will use the Azure portal and the CLI to view a list of the blobs in a container.  

Azure portal 

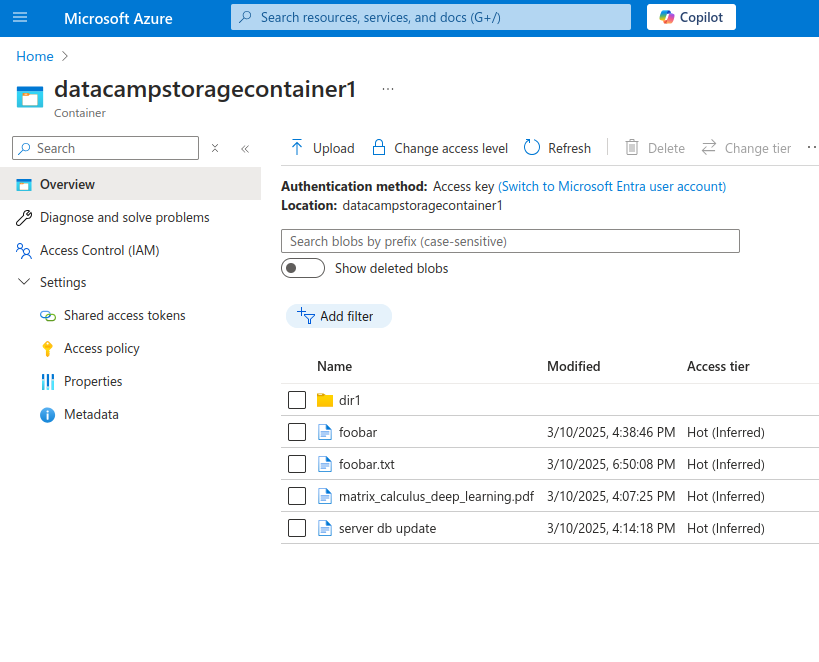
On the Azure portal, on the Containers page:

  • Select the name of the container with the blobs you want to list. 

Azure Storage Containers page

  • The Container page should have a list of all the blobs within that container.

Azure Storage Containers page with list of blobs

Azure CLI

On the Azure CLI, use the following command:

az storage blob list --account-name datacampstorage1 --container-name datacampstoragecontainer1 --output table

As before, substitute the correct values for your storage account and container names. The output resembles the example below:

Uploading blobs via the Azure CLI

Downloading blobs

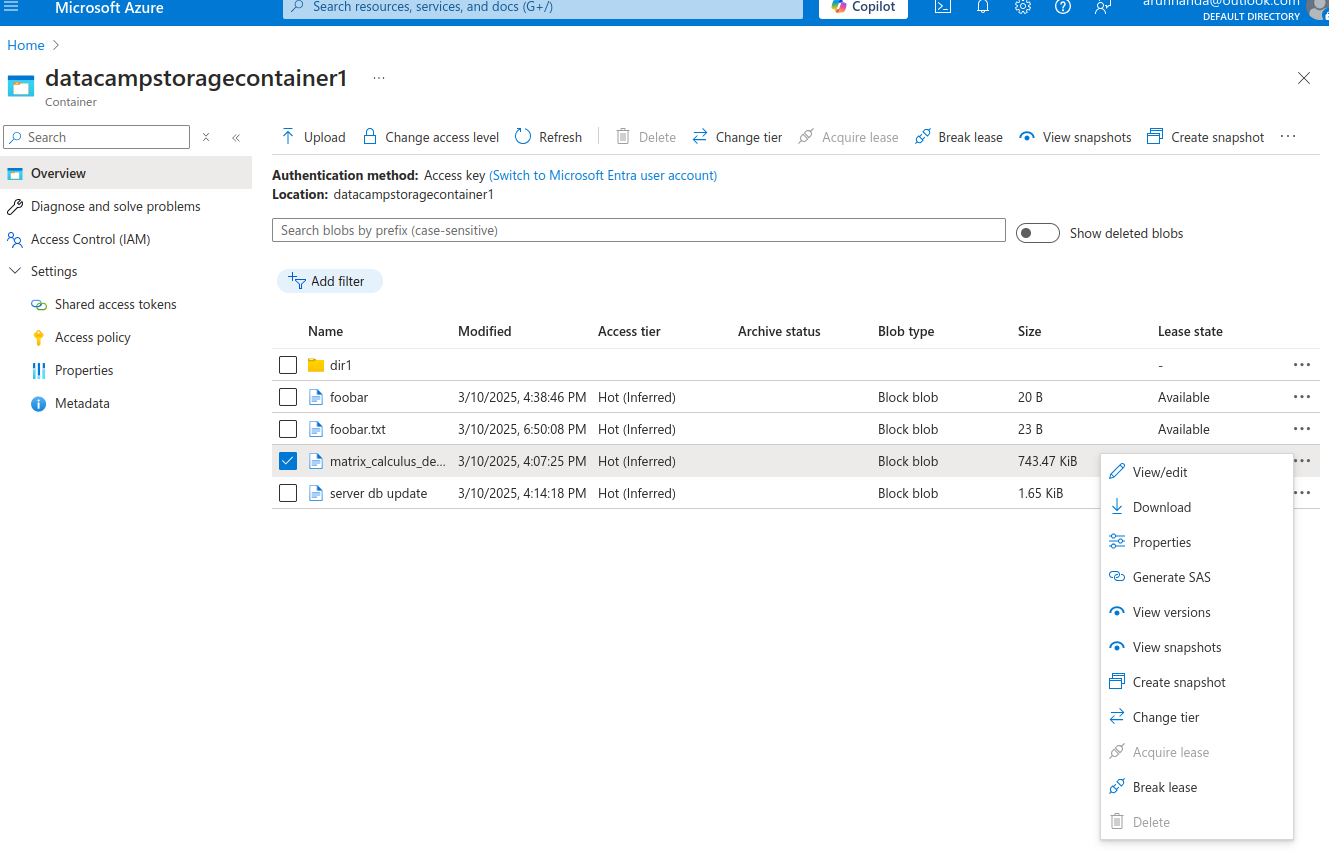
As before, you can download blobs from either the Azure portal or the CLI. 

Azure portal

To download a blob via the Azure portal:

  • Go to the Container page, which shows the table listing all the blobs. 
  • Select the three dots in the rightmost column of the row of the blob you want to download. On a smaller monitor, you may need to scroll to the right. 

Azure Blob context menu

  • In the pop-up menu, select Download
  • The blob should be downloaded to your local device. 
Azure CLI

To download a blob using the Azure CLI, use the command below:

az storage blob download --account-name datacampstorage1 --container-name datacampstoragecontainer1 --name foobar.txt --file /tmp/foobar.txt

Remember to use the correct values for the parameters in the above command. 

The blob gets downloaded to the Azure remote filesystem. For example, to view the contents of the /tmp directory used above, use the ls command in the Azure CLI:

ls /tmp

Note that the Azure CLI has neither access to nor knowledge of your local machine. 

For a deeper look into managing CI/CD pipelines in the Azure ecosystem, check out our Azure DevOps tutorial.

Organizing blobs with prefixes and virtual directories

Azure Blob Storage is organized as a flat file system. There is no directory or folder structure. All blobs are stored as individual files within containers. 

In practice, many applications need to store data in a directory structure. For example, a CCTV monitoring system might need to store each day’s videos in separate folders. To achieve this effect, you can mimic a directory system with slash-based prefixes in the filenames. 

If you have a parent directory, month1 with two subdirectories, day1 and day2, each with an image file named image1.jpg, you would list their paths as:

  • month1/day1/image1.jpg
  • month1/day2/image1.jpg

Azure Blob Storage allows you to use these paths (including parent directory names and slashes) as the blob's filenames. day1 and day2 are not directory names but part of the filenames of the respective blobs. Your application can benefit from organizing files into a directory structure using this pseudo directory structure. 

For structured data storage needs alongside blobs, you might also explore our Azure SQL Database guide.

Become Azure AZ-900 Certified

Prepare for Azure's PL-300 and get 50% off the exam fee.
Certify Your Azure Skills

Accessing and Securing Azure Blob Storage

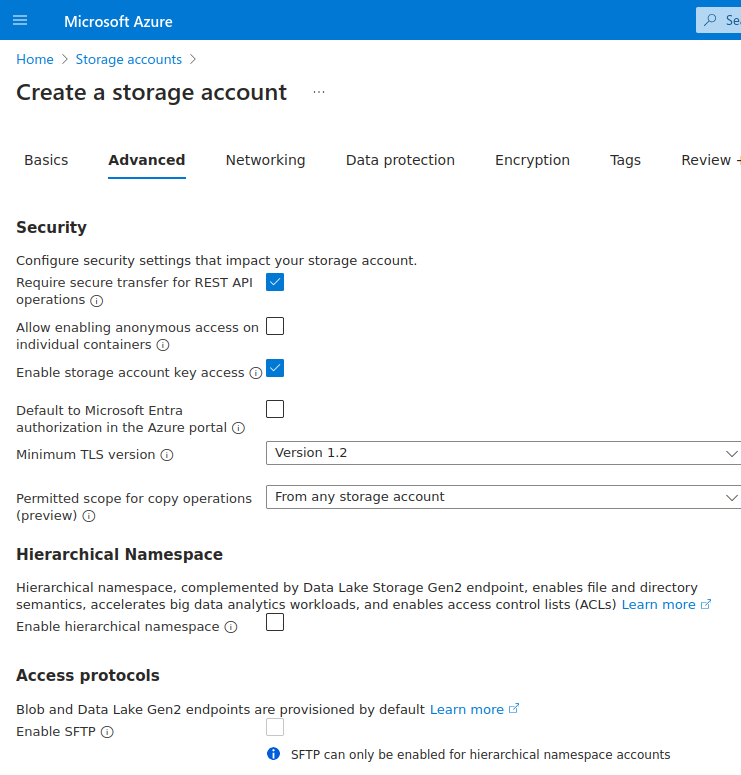
Security is paramount in enterprise storage systems. There are various ways to securely access Azure Blob Storage, such as SAS tokens, access keys, and enterprise accounts. 

Access control with SAS tokens

In production environments, you restrict access to files and data stored in Blob Storage. You generally don’t want it to be publicly accessible. Shared Access Signatures (SAS) offer a secure method of managing access to your Blob Storage data. 

SAS works via tokens, which are appended to the URL of the resource you want to share. The token includes information on the type of permission (read, write, delete, etc.), the validity of the token, and the protocols (HTTP and/or HTTPS) allowed to access the resource. 

For example, if a blob’s URL is: 

https://my_account.blob.core.windows.net/my_container/my_file

After appending the token, it looks like:

https://my_account.blob.core.windows.net/my_container/my_file?sp=r&st=TIME&OTHER_PARAMETERS

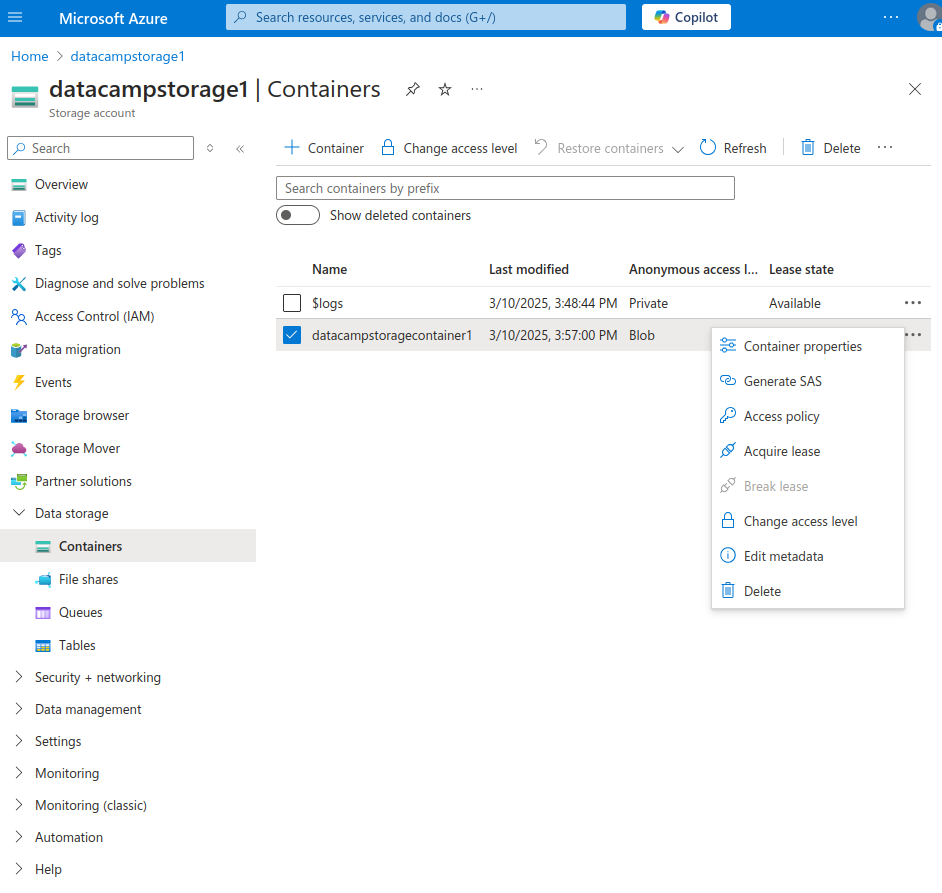
The steps below show how to use the Azure portal to generate a SAS token for a specific container. 

  • Go to the Storage account page.
  • In the left menu, under Data storage, select Containers. This page has a table with the list of containers under this storage account. 
  • Find the row with the container for which you want to generate the token. 
  • Select the three dots in the rightmost column of that row. 

Azure Storage Container context menu

  • Select Generate SAS from the pop-up menu. 

Azure Generate SAS window

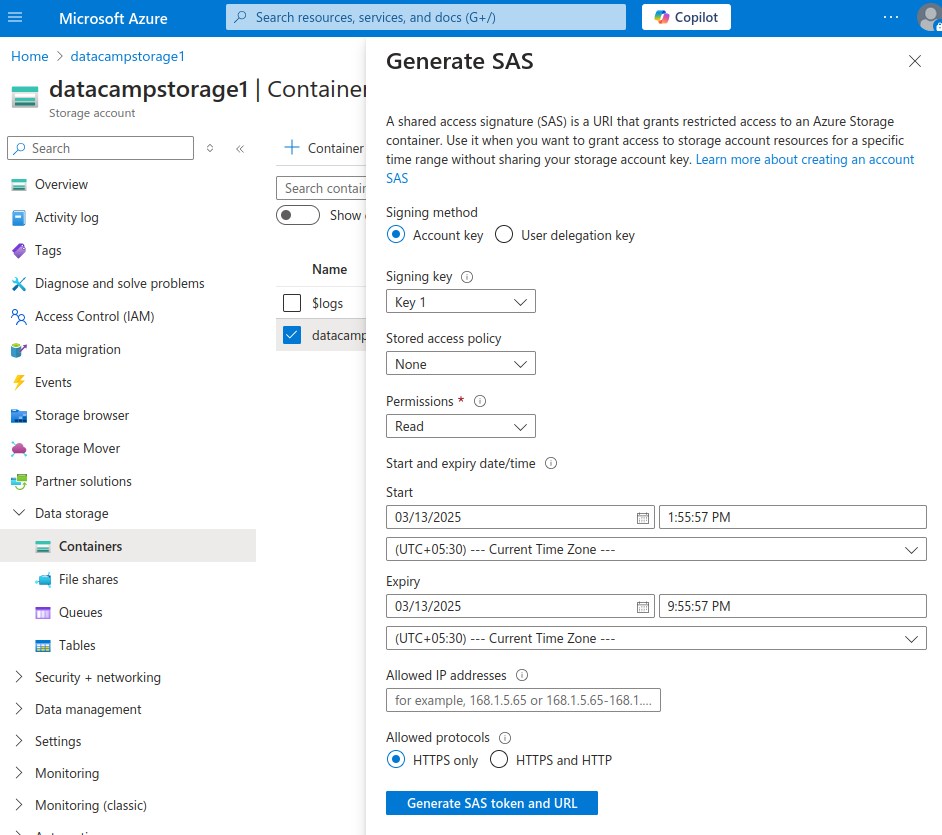
In the Generate SAS window:

  • Select the signing method: 
    • Account key or user delegation key. 
    • For this tutorial, use the account key to sign the SAS. 
    • The user delegation key is based on Azure Active Directory and linked to a specific user ID via Microsoft Entra
  • Select the type of permissions you want to authorize with this token:
    • Read, write, delete, etc. 
    • For this tutorial, grant just read access. 
  • Enter the starting and expiration times for the validity of the token.
  • Choose the IP protocols that a client can use to access your data. 
  • Select the Generate SAS token and URL button. 

You can now access a private blob using the generated token and URL. When you try to access a private blob without the proper access tokens, you get an XML error that says, “The specified resource does not exist.”

Using Microsoft Entra ID for authentication

Microsoft Entra ID manages user identities and roles in one place and allows granular access to Azure resources. In addition to SAS tokens and keys, it provides another (more secure) option for managing access to Azure Blob Storage entities. You can grant specific permissions to individual users or groups by assigning them appropriate roles. This is called Role-Based Access Control (RBAC). 

RBAC facilitates fine-grained access control by having roles such as Owner, Contributor, and Reader. You can define these permissions at various levels, such as the entire Storage account or individual containers. 

For example, for a particular storage account, you can assign a user the role of Storage Blob Data Reader. That user will then be able to read only the blobs in that account but not do anything else (like write or list all the blobs). 

You can integrate Azure Blob Storage with enterprise authentication systems, using Entra IDs to authenticate users. Enterprise Azure users and applications already have (or can get) Entra IDs, making it easier to manage authentication centrally using existing enterprise credentials. 

Note that Microsoft Entra ID is the new name for Azure Active Directory (AD).

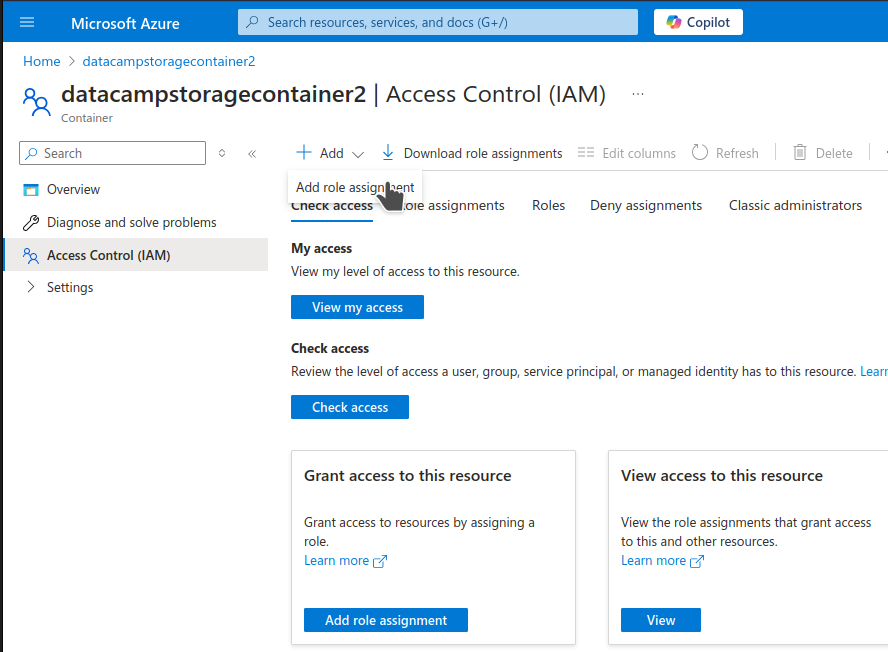
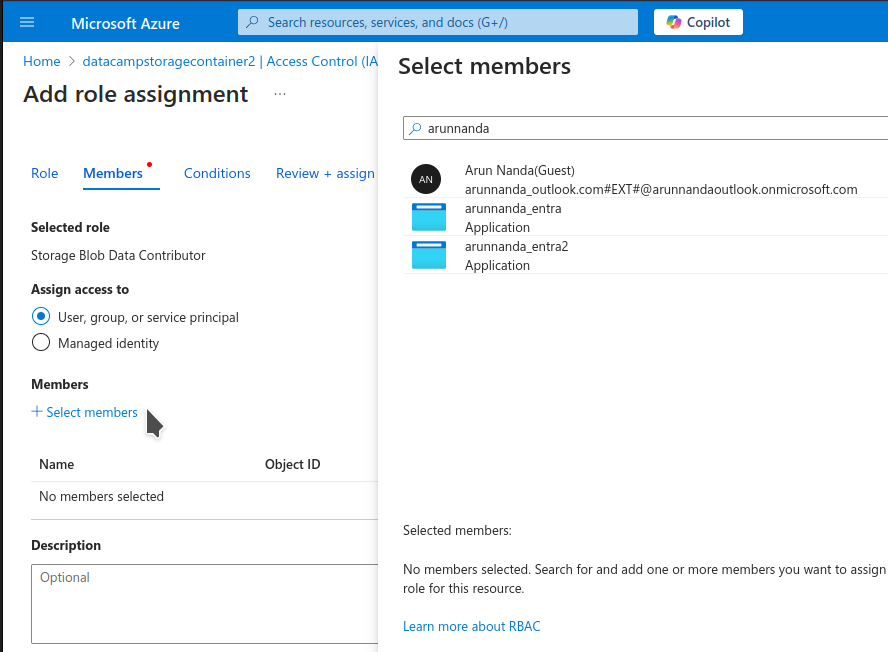
In the next section, I will show you how to assign users roles and manage access to Blob Storage entities. 

Configuring Role-Based Access Control (RBAC)

I will show you how to configure access by assigning roles for a Storage Container. The process for Storage Accounts is similar. 

  • From the sidebar on the Storage container page, select Access Control (IAM)
  • On the Access Control page, select the Add button in the top bar.
  • Select Add role assignment from the dropdown menu.

Azure Storage Container Access Control page

  • On the Add role assignment page, in the Role tab, type “blob” in the search bar. This will show you the relevant preconfigured roles applicable to Blob Storage resources. 

Azure Storage add role assignment page

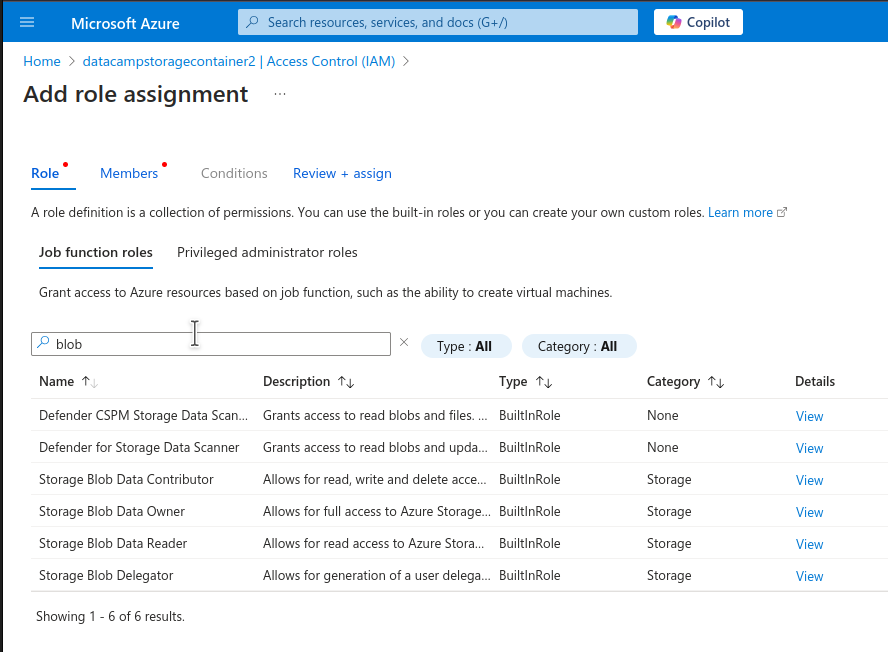
You can choose from three types of roles for Blob Storage:

  • Storage Blob Data Reader: This role has only read access to blob containers and data. 
  • Storage Blob Data Contributor: This role can read, write, and delete resources. 
  • Storage Blob Data Owner: Owners have full access to storage resources. 

Note that roles are inherited. For example, if you assign a user the “Owner” role for a Storage Account, that user also becomes the owner of the Containers in that account. 

  • To proceed with the example, choose Storage Blob Data Contributor and select Next
  • On the Add role assignment page, in the Members tab, click the Select members link to select the members to whom you want to assign the role you selected in the previous step. 

Azure Storage Add role assignment page

  • In the Select members side pane, type the name of the user or application. Select the appropriate member from the search results. Click the Select button at the bottom of the side pane. 
  • Select Review + assign to complete the role assignment. 

Advanced Features of Azure Blob Storage

We’ve reviewed the basics of Azure Blob Storage, but once you want to take it to the next level, here are some strategies to consider. 

Blob lifecycle management

Frequently accessed data should be stored in fast-access storage tiers like Hot. Rarely accessed data can be stored in slow but economical storage tiers, like Archive storage. 

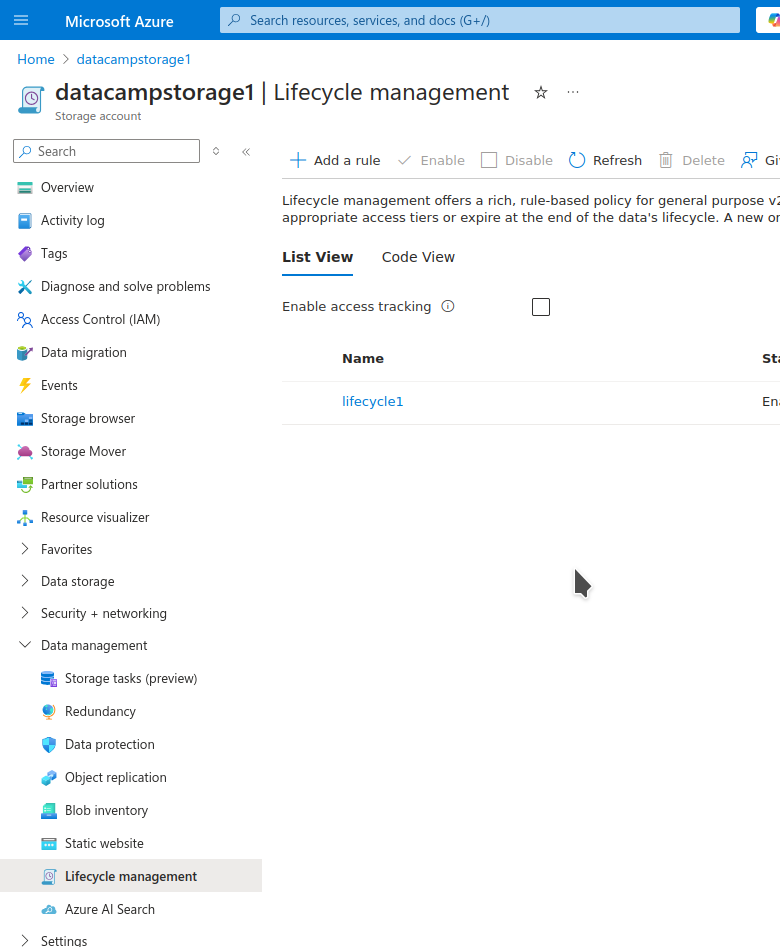
The challenge is dynamically figuring out which blobs are no longer frequently accessed and can be moved to cheaper storage. To do this automatically, Azure comes with a Lifecycle management feature. This feature lets you dynamically move blobs to cheaper storage when they are no longer actively modified.

Lifecycle management is implemented at the Storage Account level. The steps below show how to activate and use it to add a rule to move blobs from Hot to Cool storage after 30 days of inactivity: 

  • On the Storage Account page, from the left sidebar, select Data management > Lifecycle management
  • The Lifecycle management page shows a list of currently active rules. 

Azure blob storage lifecycle management

  • Select the Add a rule button from the top bar. 
  • On the Add a rule page, select:
    • A name for the rule
    • The scope of the rule
    • The type and subtype of blobs to which the rule applies
  • Select Next.
  • The rule states that if the blob was last created or modified before N days (you need to enter the value of N), Azure will take some action (of your choosing) on it:
    • Choose the condition in the first field (block), under If. In the More than (days ago) field, enter the number of days: 30.
    • In the next field (block), under Then, choose the action - Move to cool storage.

Azure blob storage update lifecycle management rule

  • Add the rule.

Versioning and soft delete

In any storage system, it is essential to recover from user errors and unintended actions. Versioning and soft delete are the two ways Azure Blob Storage uses to help you undo mistakes. 

Versioning 

It is useful to be able to restore the previous versions of a file if you accidentally save the wrong changes. Blob versioning allows you to automatically retain older versions when you modify a blob. To enable versioning:

  • On the Storage account page, select Data management > Data protection from the sidebar. 
  • On the Data protection page, under Tracking, check the box for Enable versioning for blobs
  • Select whether you want to:
    • Retain all previous versions.
    • Delete older versions after a few days. 

Azure blob storage data protection window

  • Save the changes. 

Versioning is now enabled on your storage account!

Soft-delete 

We have all accidentally deleted the wrong data. It is useful to be able to recover the lost data when this happens. 

Blob soft delete is a feature that retains the deleted data for a specified number of days. During this retention period, you can restore the soft-deleted entity. After the retention period, the data is permanently deleted. This protects data from accidental deletion and overwriting.

To activate and use soft-delete: 

  • On the Storage account page, select Data management > Data protection from the sidebar. 
  • On the Data protection page, select the checkboxes for:
    • Enable soft delete for blobs
    • Enable soft delete for containers
  • Enter the number of days for which to retain deleted data.
  • Save the changes. 

You have now activated soft-delete on your storage account!

Data encryption and secure access

By default, Azure employs AES-256 symmetric encryption at rest to keep data secure. An attacker with physical access to the hard drive on which the data is stored cannot decrypt the data without the encryption keys. Many organizations need this feature for security and compliance with privacy regulations. 

By default, the user does not need to handle the additional workload of maintaining encryption keys. Azure takes care of it under the hood. However, you can choose to use the key vault and provide your keys for added security:

  • On the Azure portal, type “key vault” in the search bar at the top.
  • Select Key vaults.

Azure Key vaults 

  • The Key vaults page shows the list of key vaults you have created. 
  • Select the Create button in the top bar. 
  • On the Create a key vault page:
    • Select the resource group for which you want the keys in this vault to be used.
    • Enter the name of the vault and the region where you want it stored.
  • Select Review + Create.Create key vault page
  • Check the details and select Create.

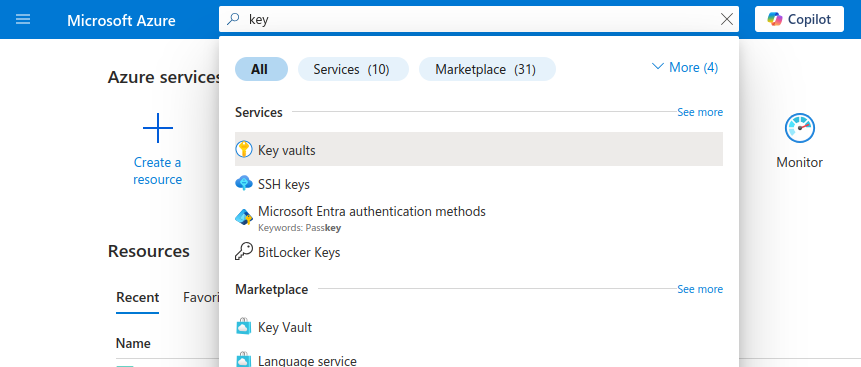
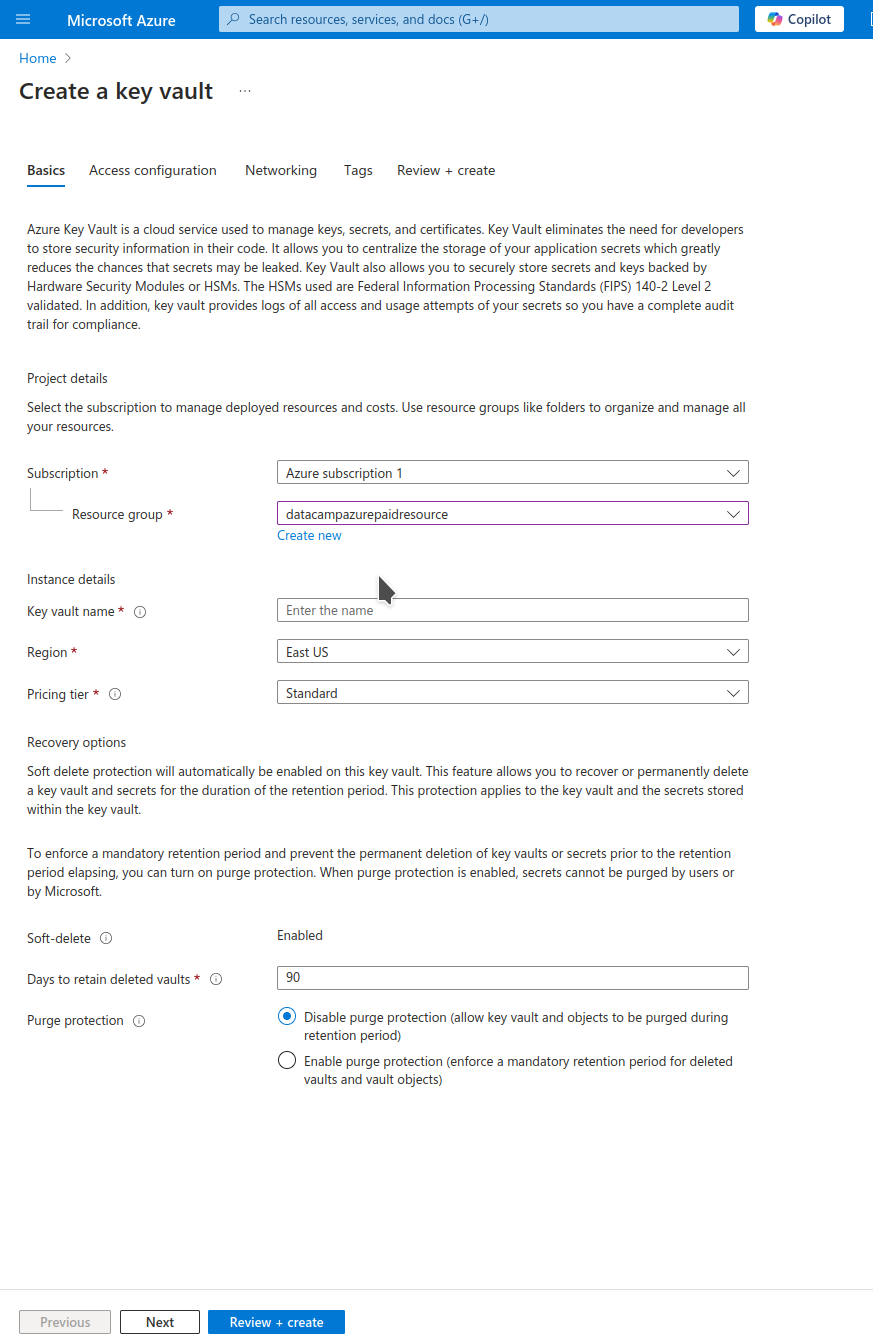
Creating the new key vault takes a while and then directs you to its page. 

Azure Key vault page

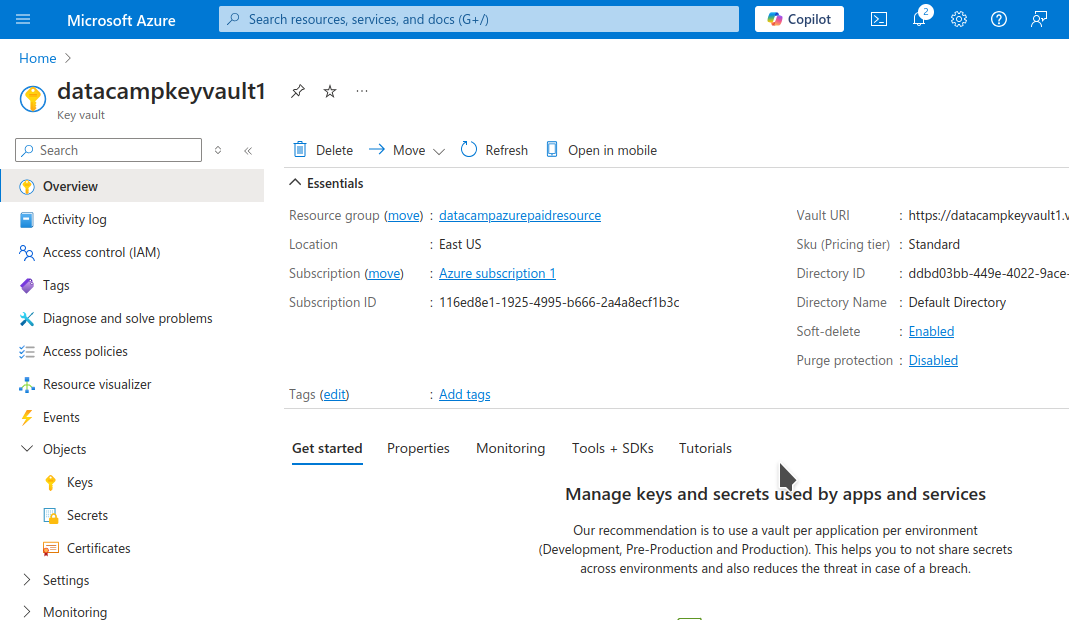
After creating the key vault, you can now add your keys and secrets:

  • From the sidebar, go to Objects > Keys.
  • Select the Generate/Import button from the top bar. 
  • Select whether you want to generate or import a new key. You can generate your key locally and upload it to Azure or generate the key on the Azure platform. 
  • Enter the name of the new key.
  • Select the appropriate details of the key (type, size, algorithm, etc.). 
  • Optionally, you can also set the activation and expiration dates of keys. 

Azure key vault create new key

  • Select Create

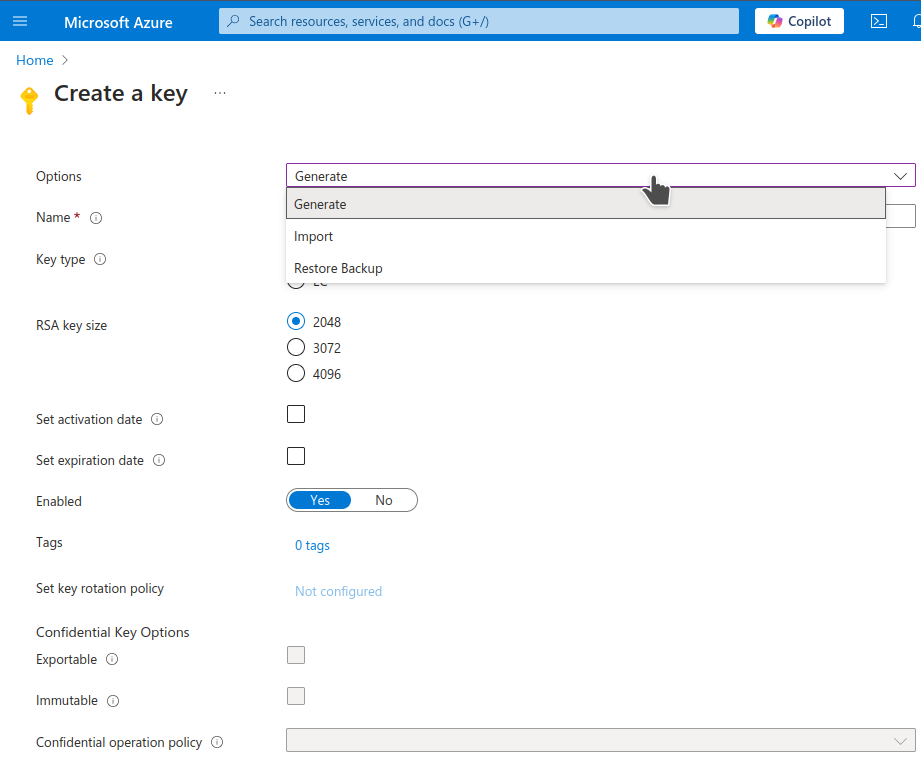
You have now added a key to your keyvault. 

Geo-replication for disaster recovery

The safer you need your data to be (from technical or natural calamities), the more redundancy you build into your storage system. Redundancy involves replicating the same data across multiple devices and/or locations and comes at a cost. You can choose from various levels of redundancy: 

  • Locally redundant storage (LRS): Data is replicated within the same data center. This is the cheapest option. 
  • Zone-redundant storage (ZRS): This creates three or more replicas across different data centers in your geographical region. 
  • Geo-redundant storage (GRS): Data centers across geographical regions keep replicas of your storage account. This is the safest option. 

Cost Management and Optimization in Azure Blob Storage

Cloud storage, for all its benefits, can become expensive if costs are not managed properly. In this section, I will give an overview of how to optimize and manage costs for Azure Blob Storage. 

Understanding Azure Blob Storage pricing

Azure Storage has various tiers of pricing depending on the options and additional services offered:

  • Frequency of access: Frequently accessed data needs to be stored on devices with faster read and write speeds. Conversely, rarely accessed data can be stored on slower and cheaper devices. 
    • Hot: This is typically built on modern SSDs, which are fast but expensive. They give the best user experience. 
    • Cool: This is suitable for infrequently accessed data like backups. It is also sometimes used for larger files like videos, which can be expensive to store on hot storage. 
    • Archive: Data that needs to be accessed only rarely is archived. Conventionally, archives are stored on tapes. So, storage costs are low, but it is expensive to retrieve data (due to sequential access). 
  • Redundancy: The safer you need your data to be (from technical or natural calamities), the more redundancy you build into your storage system. Redundancy involves replicating the same data across multiple devices and/or locations and comes at a cost.
    • Locally redundant storage (LRS): Data is replicated within the same data center. This is the cheapest option. 
    • Zone-redundant storage (ZRS): This creates three or more replicas across different data centers in your geographical region. 
    • Geo-redundant storage (GRS): Data centers across geographical regions keep replicas of your storage account. This is the safest option. 
  • Data transfer
    • Typically, you can transfer data within the same region across Azure services for free. 
    • Data ingress (transferring data into Azure Storage) is also typically free. 
    • Data egress (transferring out of Azure), such as internet users accessing your data,  incurs costs. The cost of egress is typically volume-dependent. 

Cost optimization tips

Based on the discussion above, I recommend a few best practices to prevent cloud storage costs from spiraling out of control. 

  • Take advantage of the different storage types discussed above. Move infrequently accessed data to cheaper storage tiers, like Cool or Archive
  • A caching service like a CDN can also help improve latency. This will allow you to store large files, like videos, in Cool storage. 
  • Enable and set appropriate lifecycle policies to move unused blobs to lower-cost storage tiers. 

Troubleshooting Azure Blob Storage

Although Azure Storage is a widely used product, errors sometimes occur. 

Common issues with blob uploads

Network issues and permission errors are among the most common types of problems. Slow connections and misconfigured proxies frequently lead to network errors, which can be best resolved by checking your connection and configuration. 

It is also common to get errors when trying to upload large files. A momentary loss in network connectivity can lead to the upload being stalled. To address such issues, check Azure’s retry policies and configure them as needed. Another pragmatic solution is to break up large uploads into smaller chunks. Upload each chunk separately using the Put Block operation. 

Permission errors are caused when your access keys or tokens, or Entra ID, are not authorized to perform your desired operation (e.g., read or write data) to the storage container or account. It is possible your keys have been refreshed, or your token has expired. The container manager can help you get the correct access rights. 

Monitoring blob storage usage

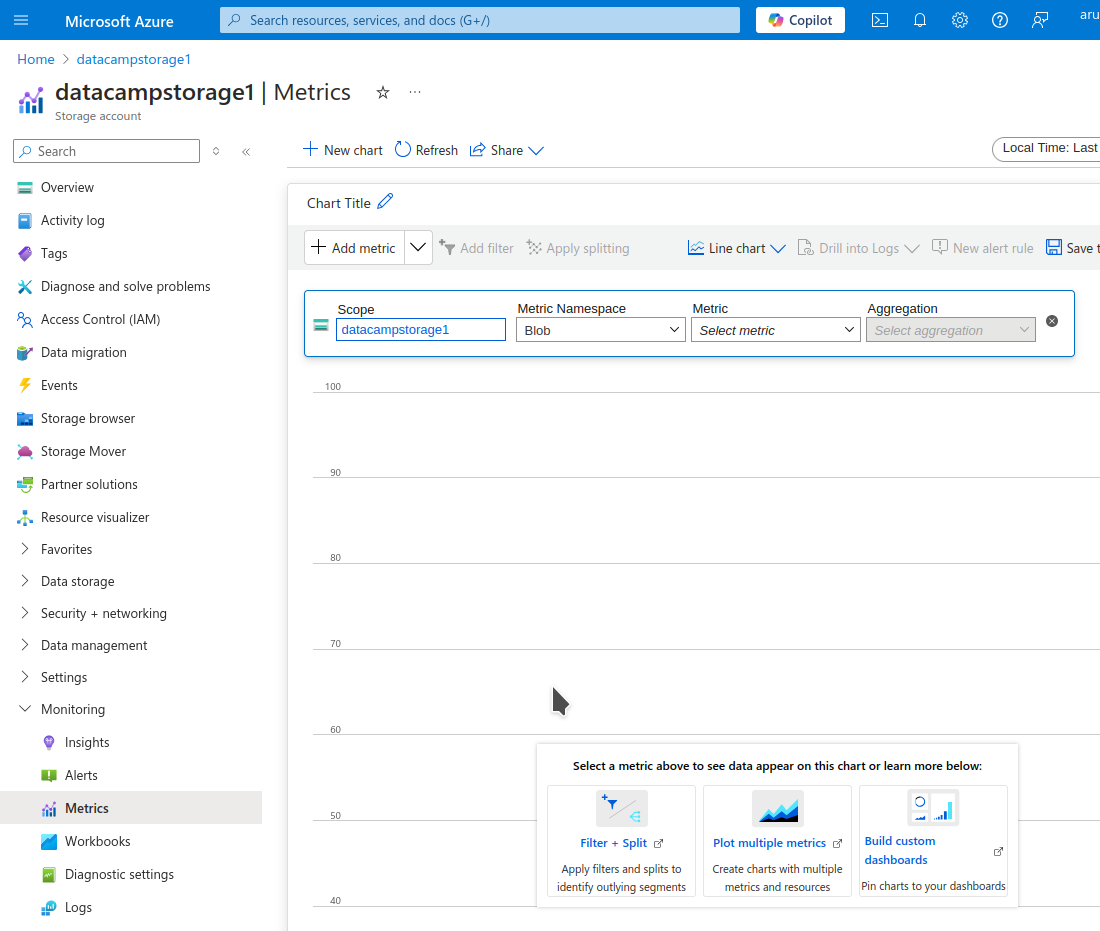
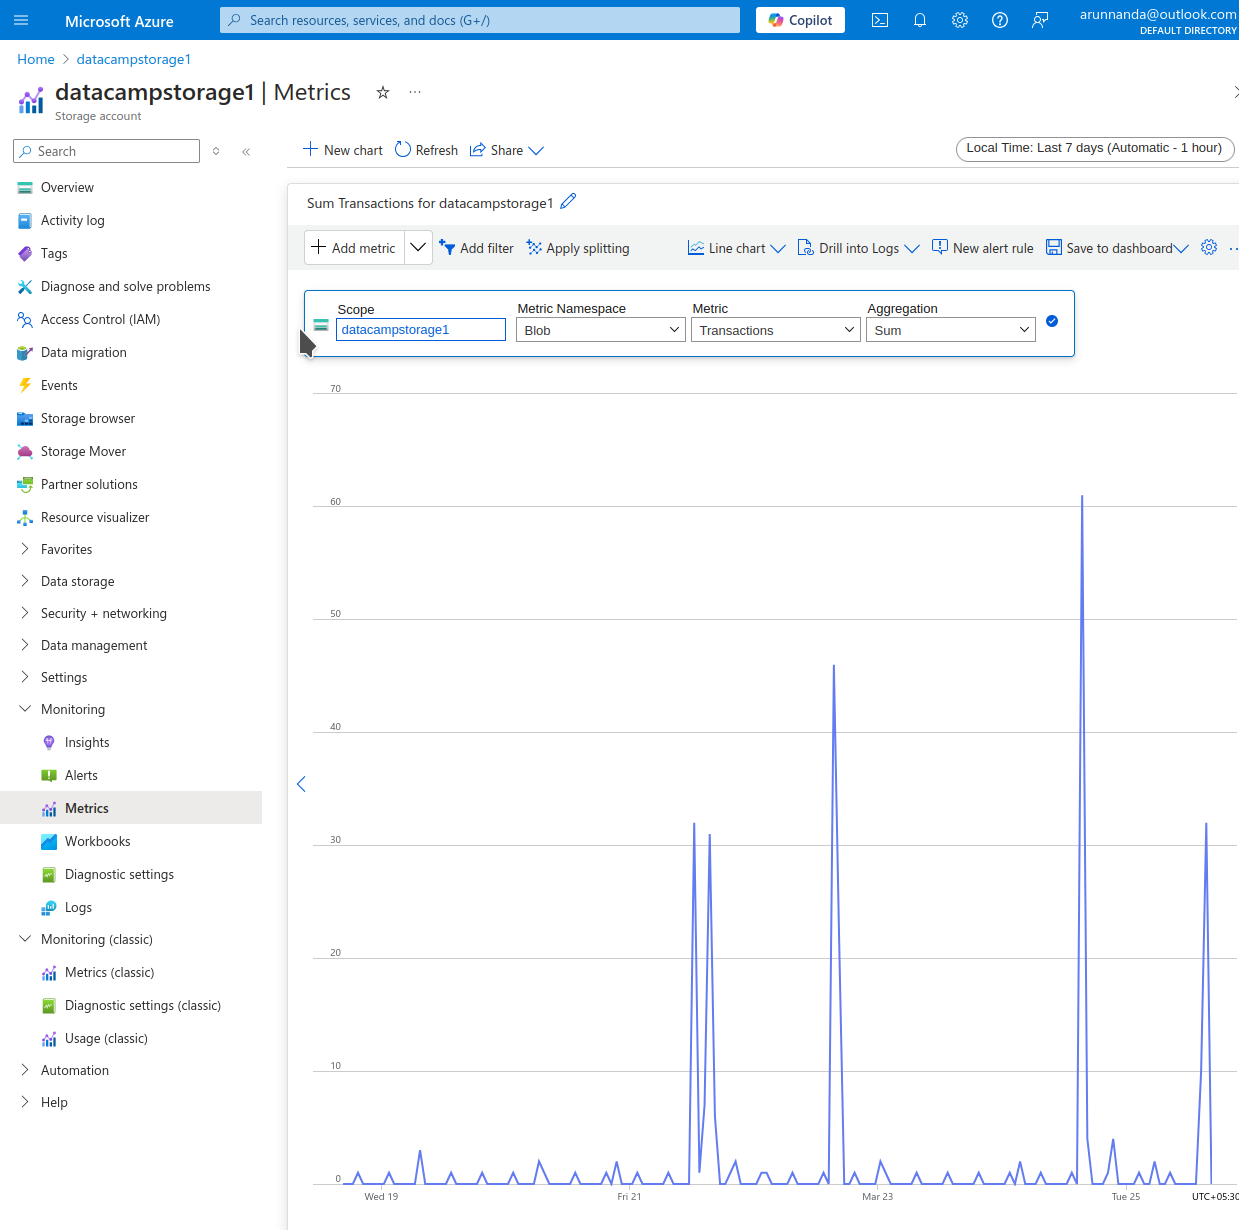
Azure includes various tools to monitor the performance of Azure Storage. We will cover two of the most common choices: 

  • Metrics under Azure Storage 
  • Azure Monitor

Azure Storage Metrics

Azure Storage comes with an integrated monitoring tool. To access it: 

  • From the Storage account page, select Monitoring > Metrics
  • The Metrics page shows a graph, which is initially empty. You need to choose what information to display in this graph. 

Azure Storage Metrics page

  • In the dropdown menu bar (under Scope) at the top of the chart, select the storage entity you want to monitor:
    • Under Metric Namespace, choose either (storage) Account or Blob.
    • Under Metric, choose a relevant metric, such as Blob count, Ingress, capacity, Transactions, etc.
    • At the top right, customize the time frame over which you want to monitor the metric.
    • The resulting chart shows the performance of the storage entity using the chosen metric over the chosen period.

Azure Storage viewing a particular metric

Azure Monitor 

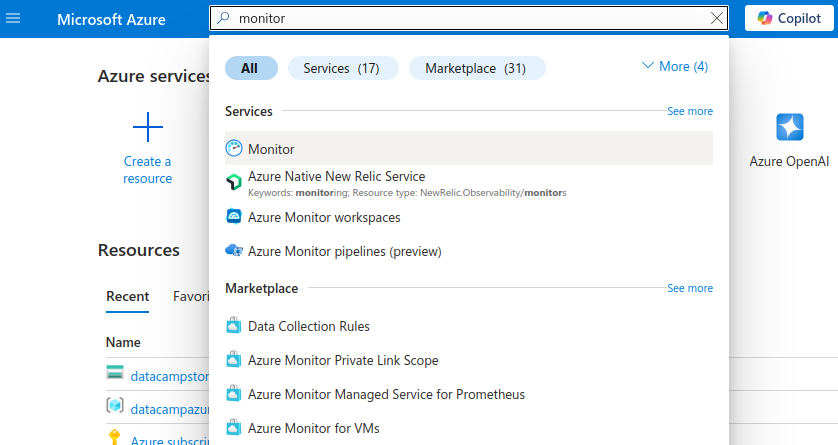
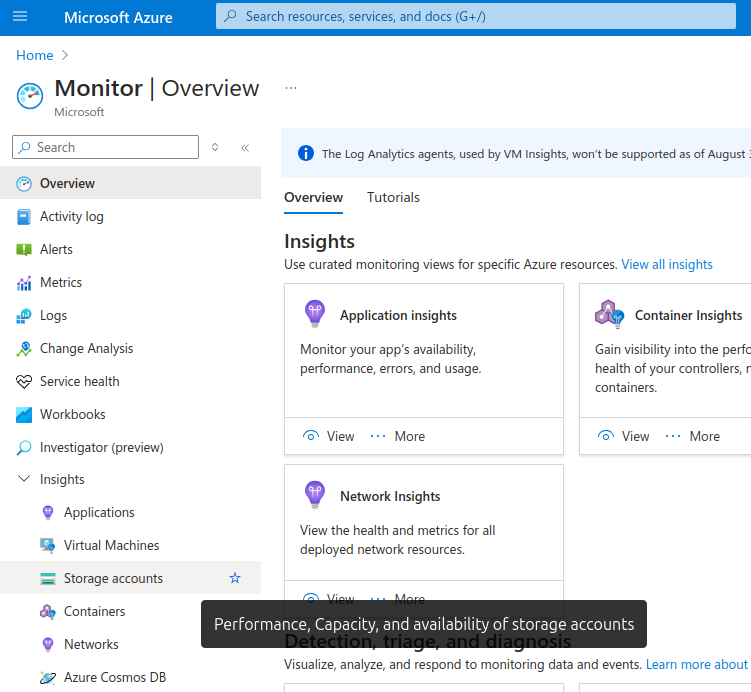
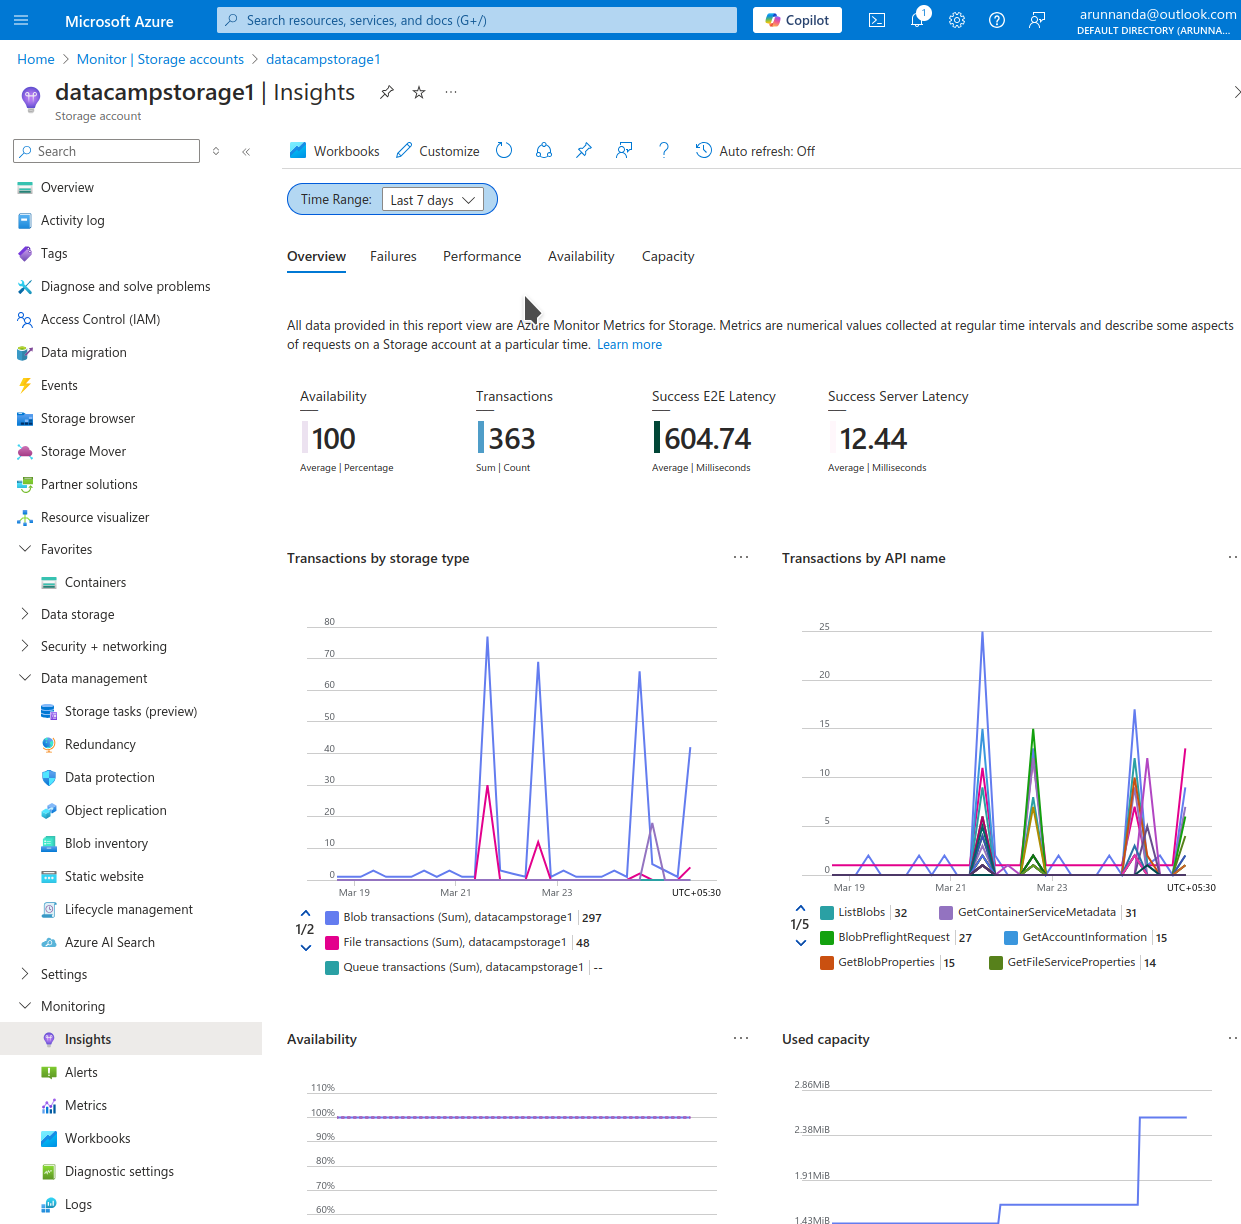
Azure Monitor is a high-level tool that you can use to monitor various Azure resources. To access Azure Monitor:

  • On the Azure portal, type monitor in the search bar at the top. 
  • Select Monitor from the search results.

Azure Monitor screenshot

  • On the Monitor homepage, from the sidebar, select Insights > Storage accounts. 

Azure Storage account insights page

  • On the Monitor | Storage accounts page, select the storage account for which you want to see the insights. 
  • The Insights page shows various useful metrics, such as transactions by storage type, latency, availability, and more. 

Viewing Azure Storage account insights

  • At the top of the page, you can customize the time range for which to show the metrics. 
  • Use the Customize button in the top bar to modify the layout of various tables on the page. 

Conclusion

Cloud storage is an integral part of modern software. In this article, we discussed how to get started with Azure Blob Storage and how to use it to upload and download blobs. We also covered many practical aspects of Blob Storage, such as managing access rights and monitoring usage to control costs. 

Microsoft’s Azure and Amazon’s AWS offer many overlapping services. To decide which better suits your individual needs, go through our AWS vs. Azure comparison. Finally, if you have an upcoming interview involving Azure services, we have a set of relevant interview questions for you!

Become Azure AZ-900 Certified

Prepare for Azure's PL-300 and get 50% off the exam fee.

Arun Nanda's photo
Author
Arun Nanda
LinkedIn

Arun is a former startup founder who enjoys building new things. He is currently exploring the technical and mathematical foundations of Artificial Intelligence. He loves sharing what he has learned, so he writes about it.

In addition to DataCamp, you can read his publications on Medium, Airbyte, and Vultr.

Topics

Learn more about Azure with these courses!

Track

Microsoft Azure Fundamentals (AZ-900)

0 min
Prepare for Microsoft’s Azure Fundamentals certification (AZ-900) by learning the fundamentals of Azure: computing, storage, and networking.
See DetailsRight Arrow
Start Course
See MoreRight Arrow
Related

blog

How to Learn Azure: A Beginner’s Guide to Microsoft’s Cloud Platform

Discover how to learn Azure, develop essential cloud computing skills, and apply them to real-world challenges. Explore beginner-friendly resources that make mastering Azure straightforward and achievable.
Josep Ferrer's photo

Josep Ferrer

14 min

Tutorial

Azure Storage Accounts: Step-by-Step Tutorial for Beginners

This guide teaches you how to set up and manage Azure Storage Accounts, step-by-step. It also explores advanced configuration options for optimal performance and cost optimization.
Anneleen Rummens's photo

Anneleen Rummens

11 min

Tutorial

Azure Storage Explorer: Connect, Upload, and Organize Files

Learn how to access and manage Azure storage resources using Storage Explorer. This tutorial shows how to install the application and connect Storage Explorer to your Azure Storage account to upload, download, and manage data.
Arun Nanda's photo

Arun Nanda

15 min

Tutorial

How to Set Up and Configure Azure: Beginner's Guide

Learn how to set up and configure Azure with this beginner's guide. Follow easy steps to navigate the Azure portal, create resources, and manage your cloud services.
Florin Angelescu's photo

Florin Angelescu

8 min

Tutorial

Azure SQL Database: Step-by-Step Setup and Management

Learn how to create, connect, manage, query, and secure your Azure SQL Database. This step-by-step guide covers all the essentials for optimal database setup.
Anneleen Rummens's photo

Anneleen Rummens

12 min

Tutorial

AWS Storage Tutorial: A Hands-on Introduction to S3 and EFS

The complete guide to file storage on AWS with S3 & EFS.
Zoumana Keita 's photo

Zoumana Keita

14 min

See MoreSee More