
Course
Introduction to AWS Boto in Python
4 hr
18.4K
AWS is a cloud service provider that offers a wide range of scalable and on-demand services, including computing power, storage, databases, machine learning, networking, analytics, and more, from its data centers worldwide. Check out the Introduction to AWS and AWS Cloud Technology and Services courses to learn more!
To interact with and configure resources on AWS, we can use either the AWS Management Console or the AWS CLI.
In this tutorial, we will walk you through installing the AWS CLI from scratch, configuring it to communicate with your AWS account, and demonstrating how to create some basic resources using the CLI.
The AWS CLI is a powerful tool that allows users to interact with AWS services directly from the command line on their computer. AWS CLI commands provide functionality equivalent to performing tasks in the AWS Management Console.
For example, to list all security groups in a specific AWS region, you would navigate to the "Security Groups" section in the EC2 service via the console.
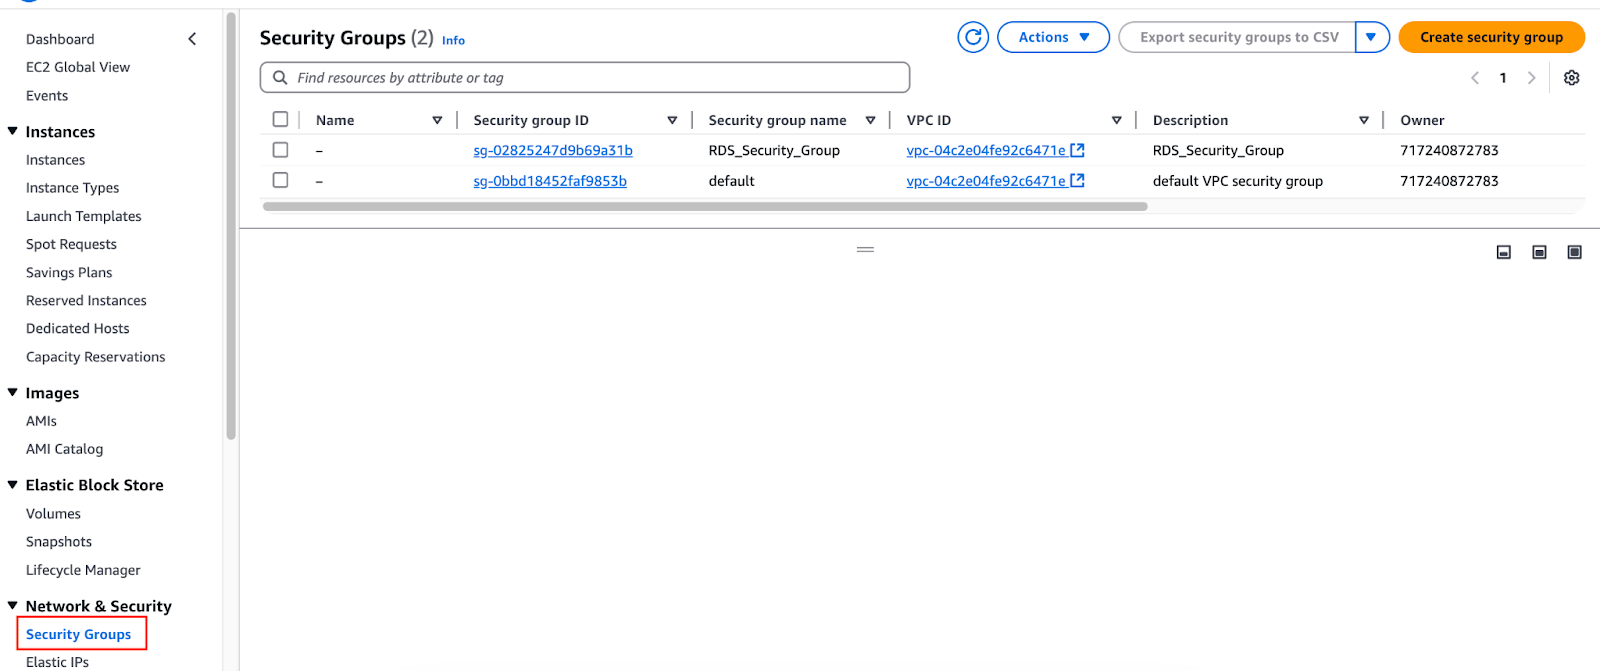
View Security Groups from the AWS console.
Similarly, you can achieve the same result using the aws ec2 describe-security-groups command in the AWS CLI.

View Security Groups via AWS CLI from the local terminal.
We will walk through installing AWS CLI on Windows, Mac, and Linux.
There are two major versions of AWS CLI, version 1 and 2. We will only discuss version 2 as it is the later version with more functionalities. For the latest information on installing or updating to the latest version of the AWS CLI, visit the AWS documentation.
Download the installer from the official AWS website. Open the “AWSCLIV2” Windows installer package, and you’ll be greeted with the window as shown below.
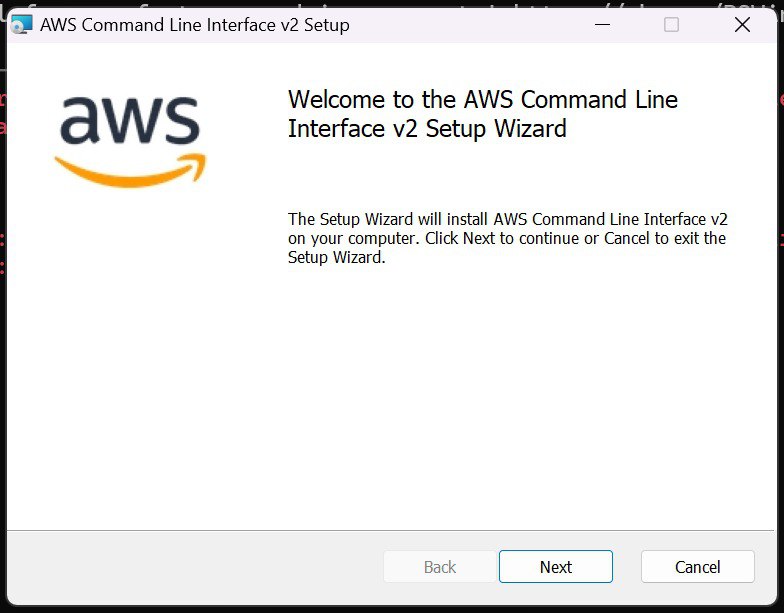
AWS CLI setup wizard.
Select “Next” and proceed to accept the license agreement.
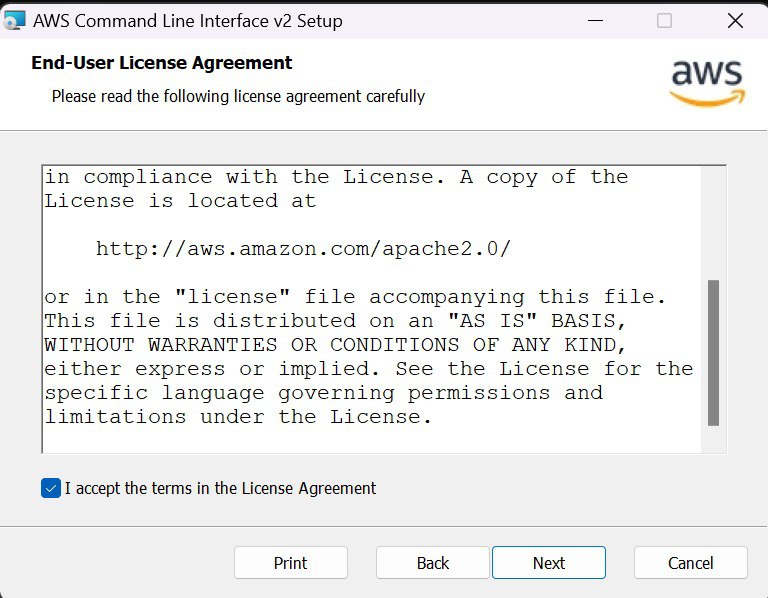
AWS CLI license agreement.
Confirm the installation location and proceed to install. The installation itself should take no more than 5 minutes.

Confirm installation location.
Installation in progress.
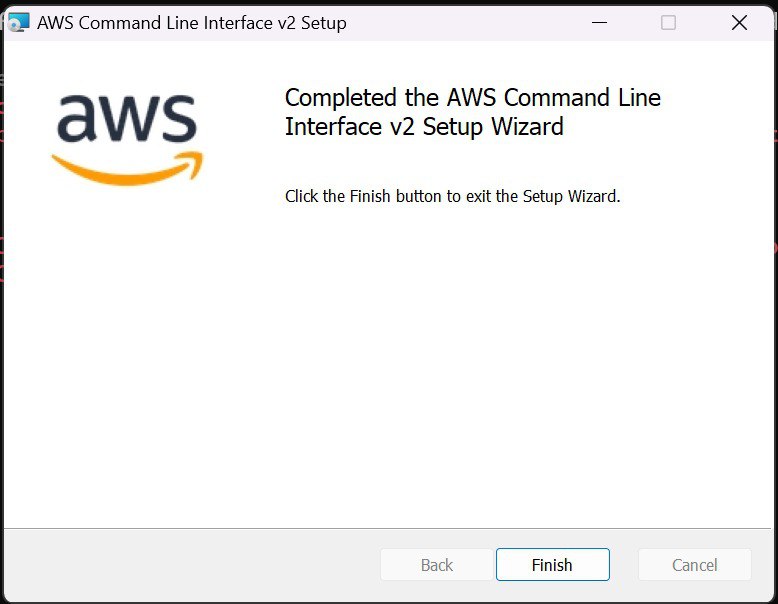
Installation completed.
To verify that the installation was successful, open the terminal and run the aws --version command. It should look similar to the output below.
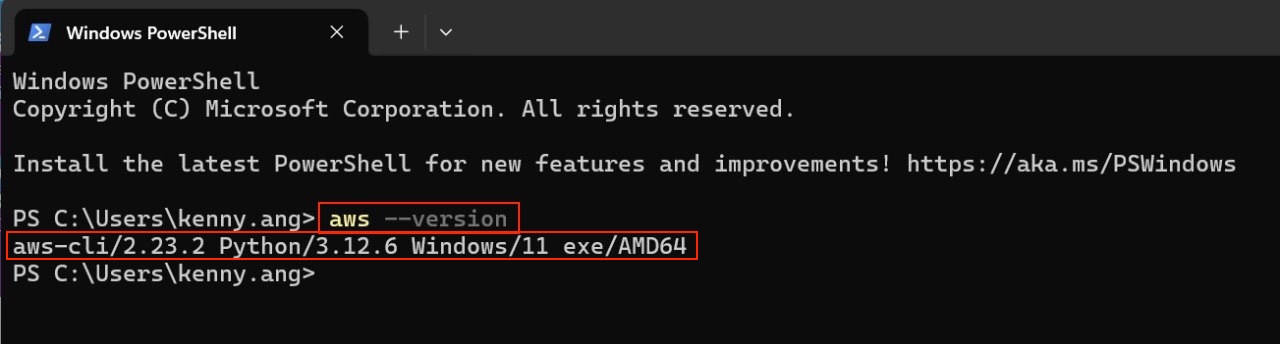
Verify AWS CLI installation on Windows.
We can install the AWS CLI on MacOS via Homebrew or the package installer. I will cover both installation methods.
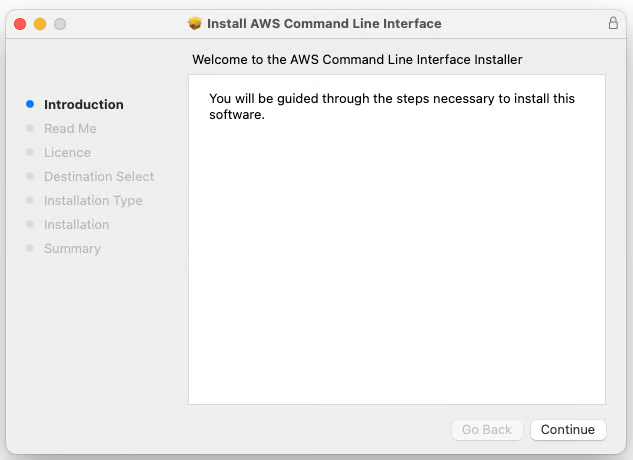
Download the .pkg installer from the official AWS website. Open the AWSCLIV2.pkg file, and you’ll be greeted with the window below.
AWS CLI Installation.
Accept the license, confirm the installation location, and proceed with the installation.
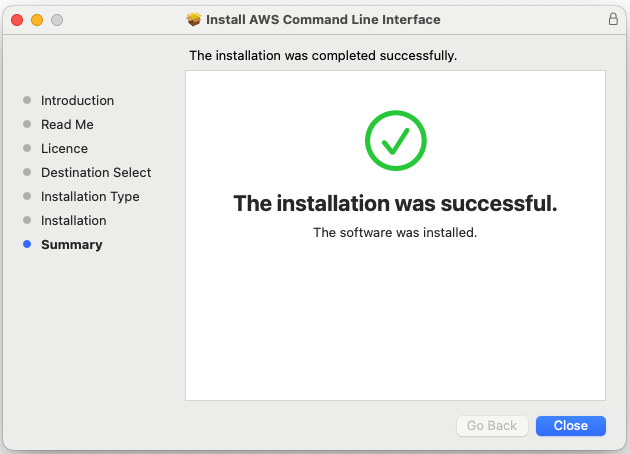
Successful Installation message.
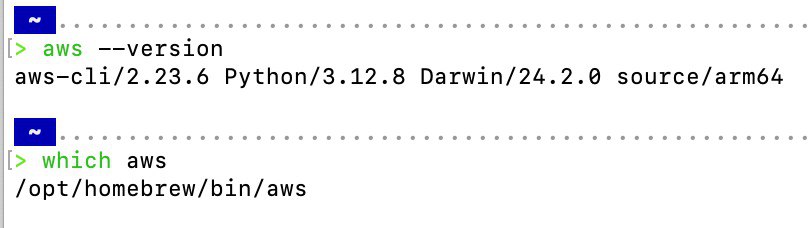
To verify that the installation was successful, open the terminal and run the aws --version command. It should look similar to the output below.

Verify AWS CLI installation on MacOS.
Ensure you have Homebrew installed locally. To verify, run brew --version. Otherwise, you can refer to the official Homebrew page for installation instructions.
Then, execute the following commands to install the CLI:
# With brew installed, update Homebrew's formulae and cask definitions
brew update

# Install AWS CLI
brew install awscli

# Verify the installation
aws --version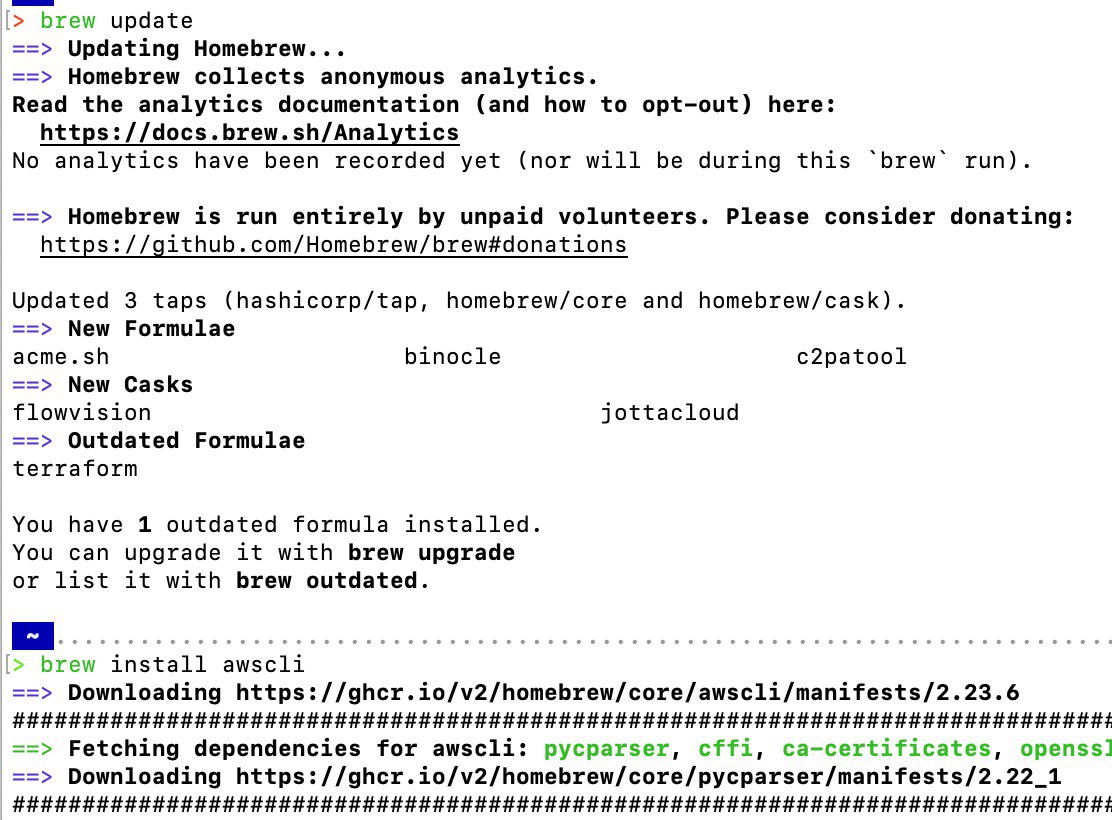
brew update and install
Verify brew installation.
To demonstrate installing on Linux, I spun up an Amazon Linux EC2 with the ami-0bd55ebedabddc3c0 AMI. Although it has AWS CLI version 2 installed by default, it is not of the latest minor version. The steps to update and install are similar.
# Switch to superuser
sudo su -
# If you’re on Amazon Linux, to install the latest version of the AWS CLI, you must first uninstall the pre-installed yum version
yum remove awscli

# Download the AWS CLI zip file
curl "https://awscli.amazonaws.com/awscli-exe-linux-x86_64.zip" -o "awscliv2.zip"

# Unzip the file
unzip awscliv2.zip

# Run the installer
./aws/install

# Verify AWS CLI
aws --version
Download and unzip the installer.
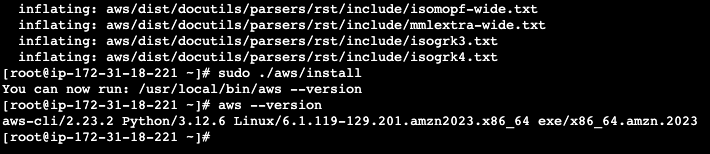
Run the installer and verify the installation.
After installing AWS CLI, we need to configure it before using it to interact with our AWS resources. Configuring it includes setting up the AWS credentials and some optional default settings.
When we log in to the AWS console, we either log in as a user or assume a role. Similarly, when we use AWS CLI to interact with our resources, we must do it as a user or assume a role.
There are two ways to log in to the AWS console. The first is to use a user created via the Identity and Access Management (IAM) service.
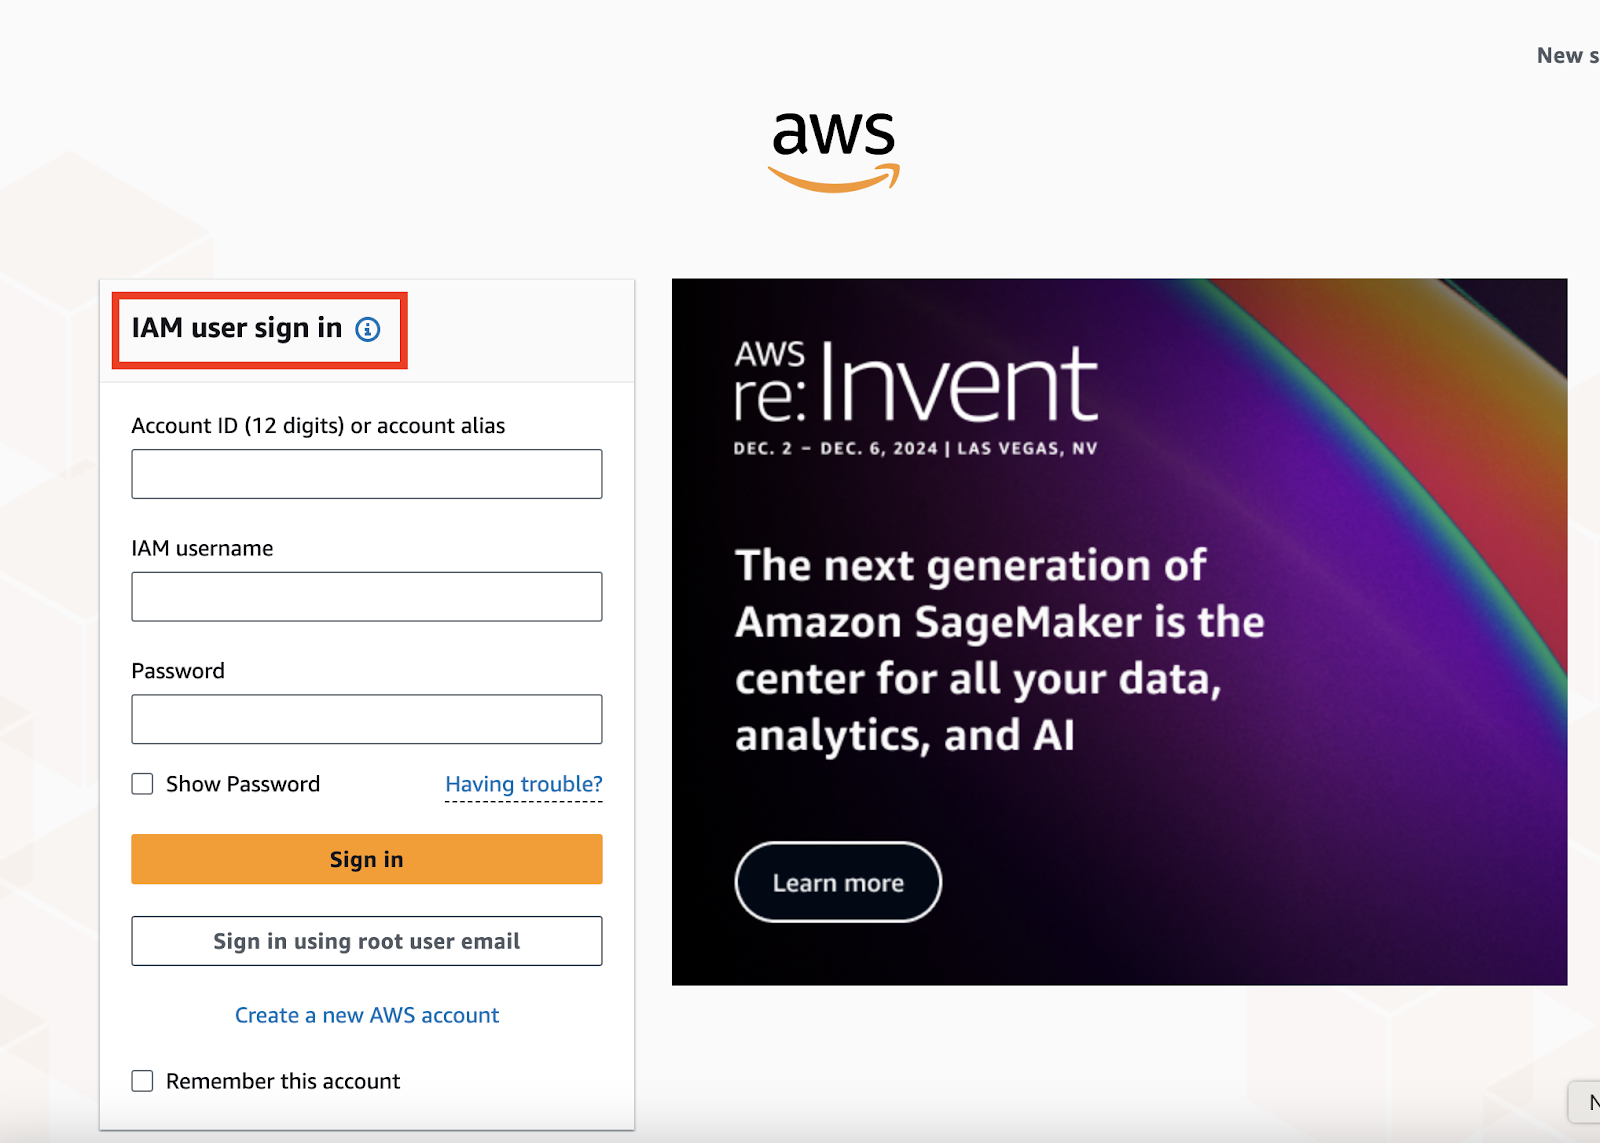
IAM user login page.
The second is using a user created via the IAM Identity Center service.
AWS Access Portal login page.
Setting up AWS CLI requires setting the aws_access_key_id and aws_secret_access_key on your local. This key pair identifies your account and grants access to AWS. Depending on which way you’re logging in, obtaining them differs slightly.
To use the AWS CLI as a user from IAM, navigate to the IAM service via the AWS console, select an existing user, or create a new one. I’ll be using an existing user.

IAM user.
Select the user and navigate to the “Security Credentials” tab. Scroll down to see the “Access keys”. For this tutorial, I’ll create another access key. Select “Create access key”.
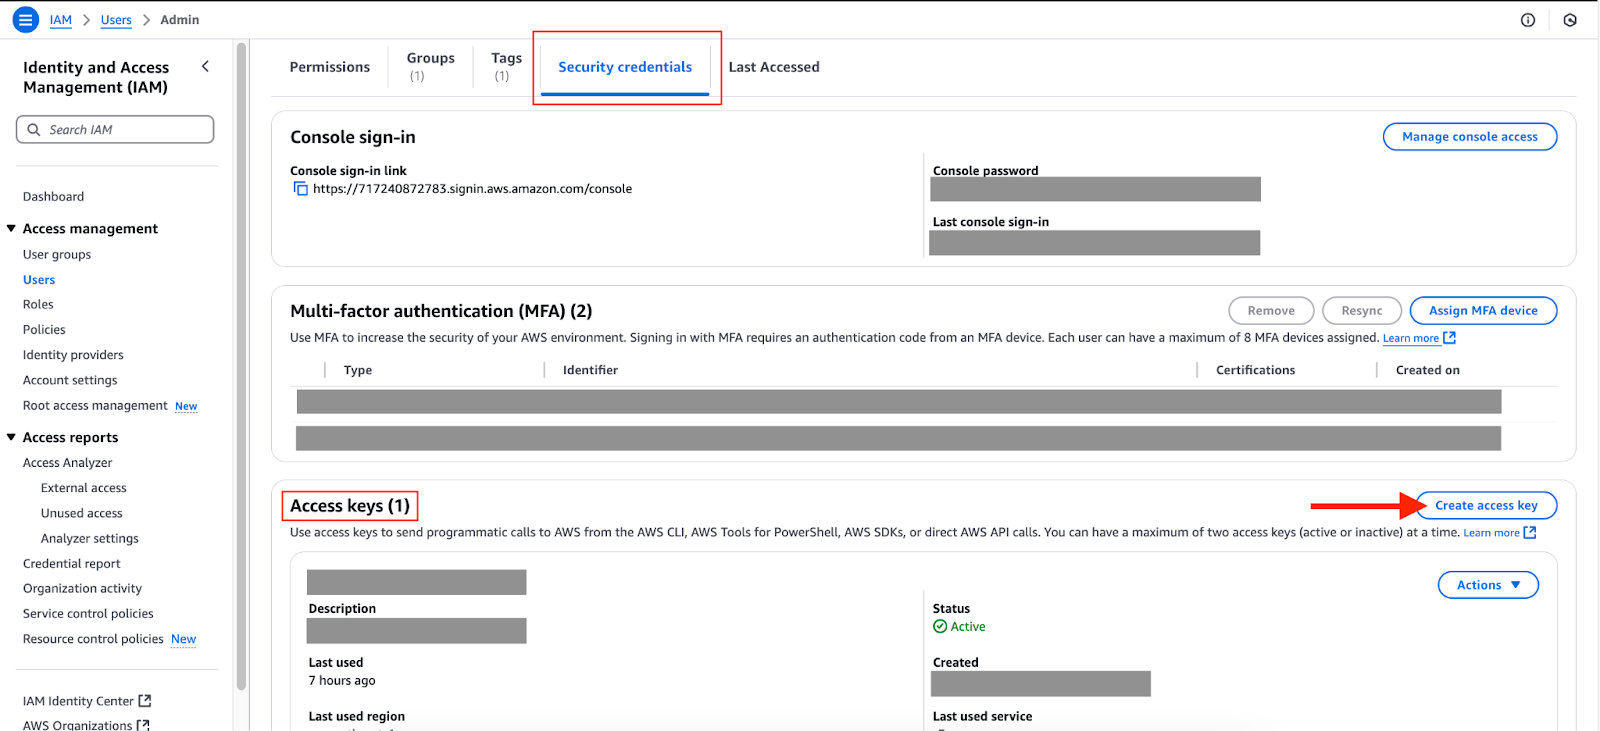
Security credentials tab of an IAM user.
Select “Command Line Interface (CLI)”.
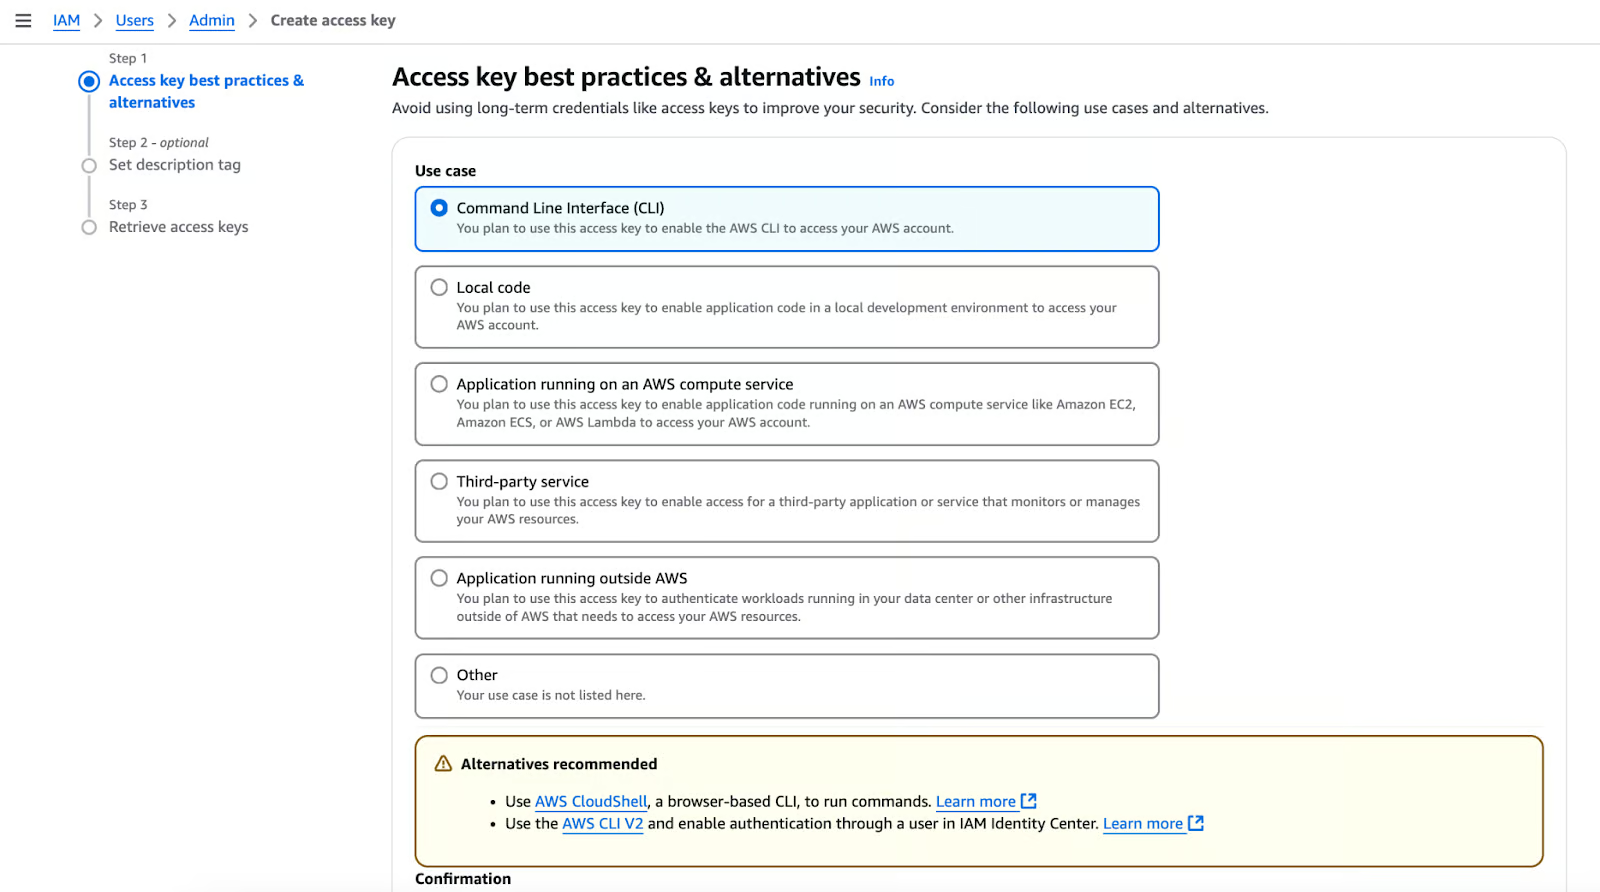
Create an access key.
Confirm and create.

Access key created.
Download the .csv file for safekeeping. Then, run the aws configure command locally and input the value for the access and secret access key. We are writing this set of credentials to the “default” profile, as we did not specify a profile with the --profile flag. We will discuss profiles in a later section.
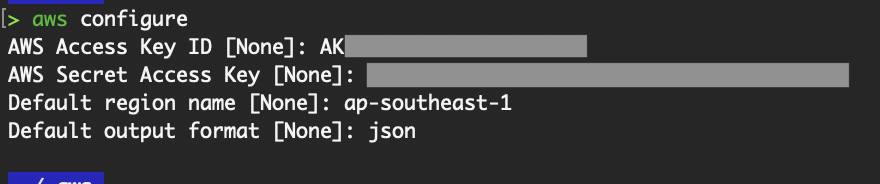
AWS configure command.
A hidden folder called “.aws” will be created in your home (~) directory.

The .aws folder.
It contains two files, config and credentials.
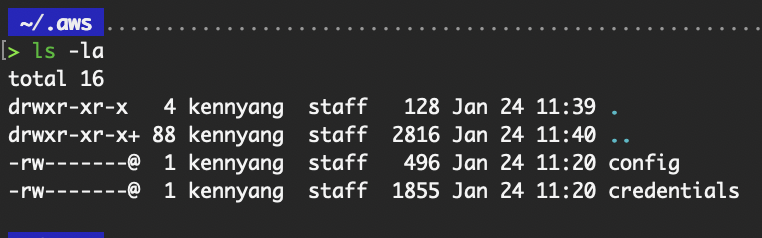
Contents in the .aws folder.
The config file stores the default region and output option you have entered above. Whereas the credentials file stores the aws_access_key_id and aws_secret_access_key. To view their contents, you can run the cat config and cat credentials commands.
Run the aws sts get-caller-identity command to validate that the credentials work and the correct IAM identity is returned.
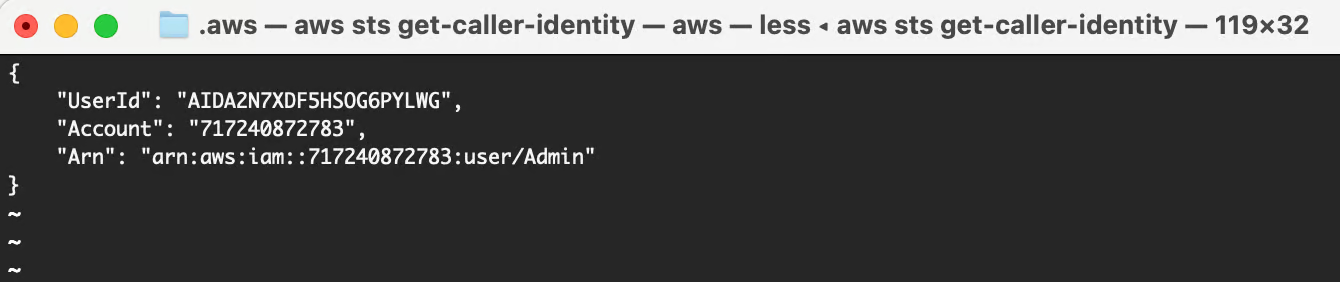
Validate credentials.
After logging in, you will be directed to the AWS Access Portal to select the AWS account and role to assume when logging in to the console. Select “Access keys” for the account and role you want to use for the AWS CLI.
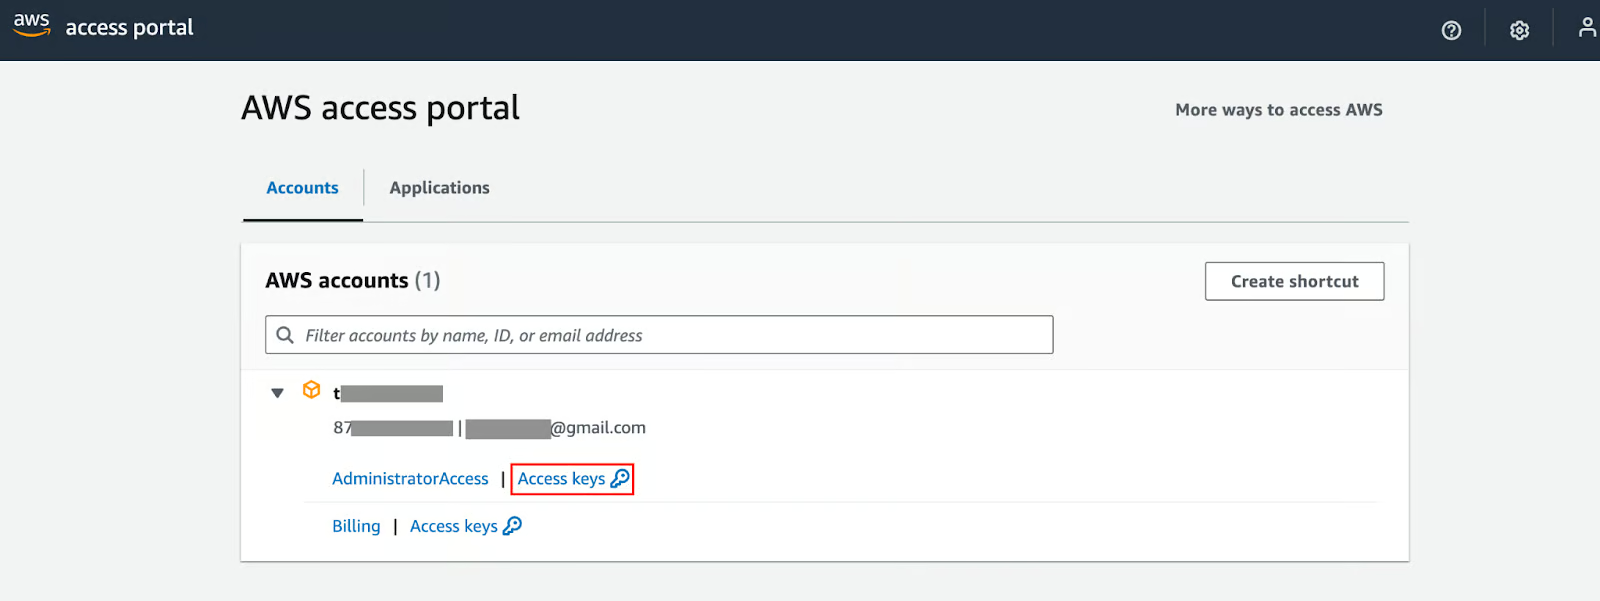
AWS Access Portal.
A window identical to the screenshot below will appear. Choose option 2, copy, and paste the provided text into your AWS credentials file.
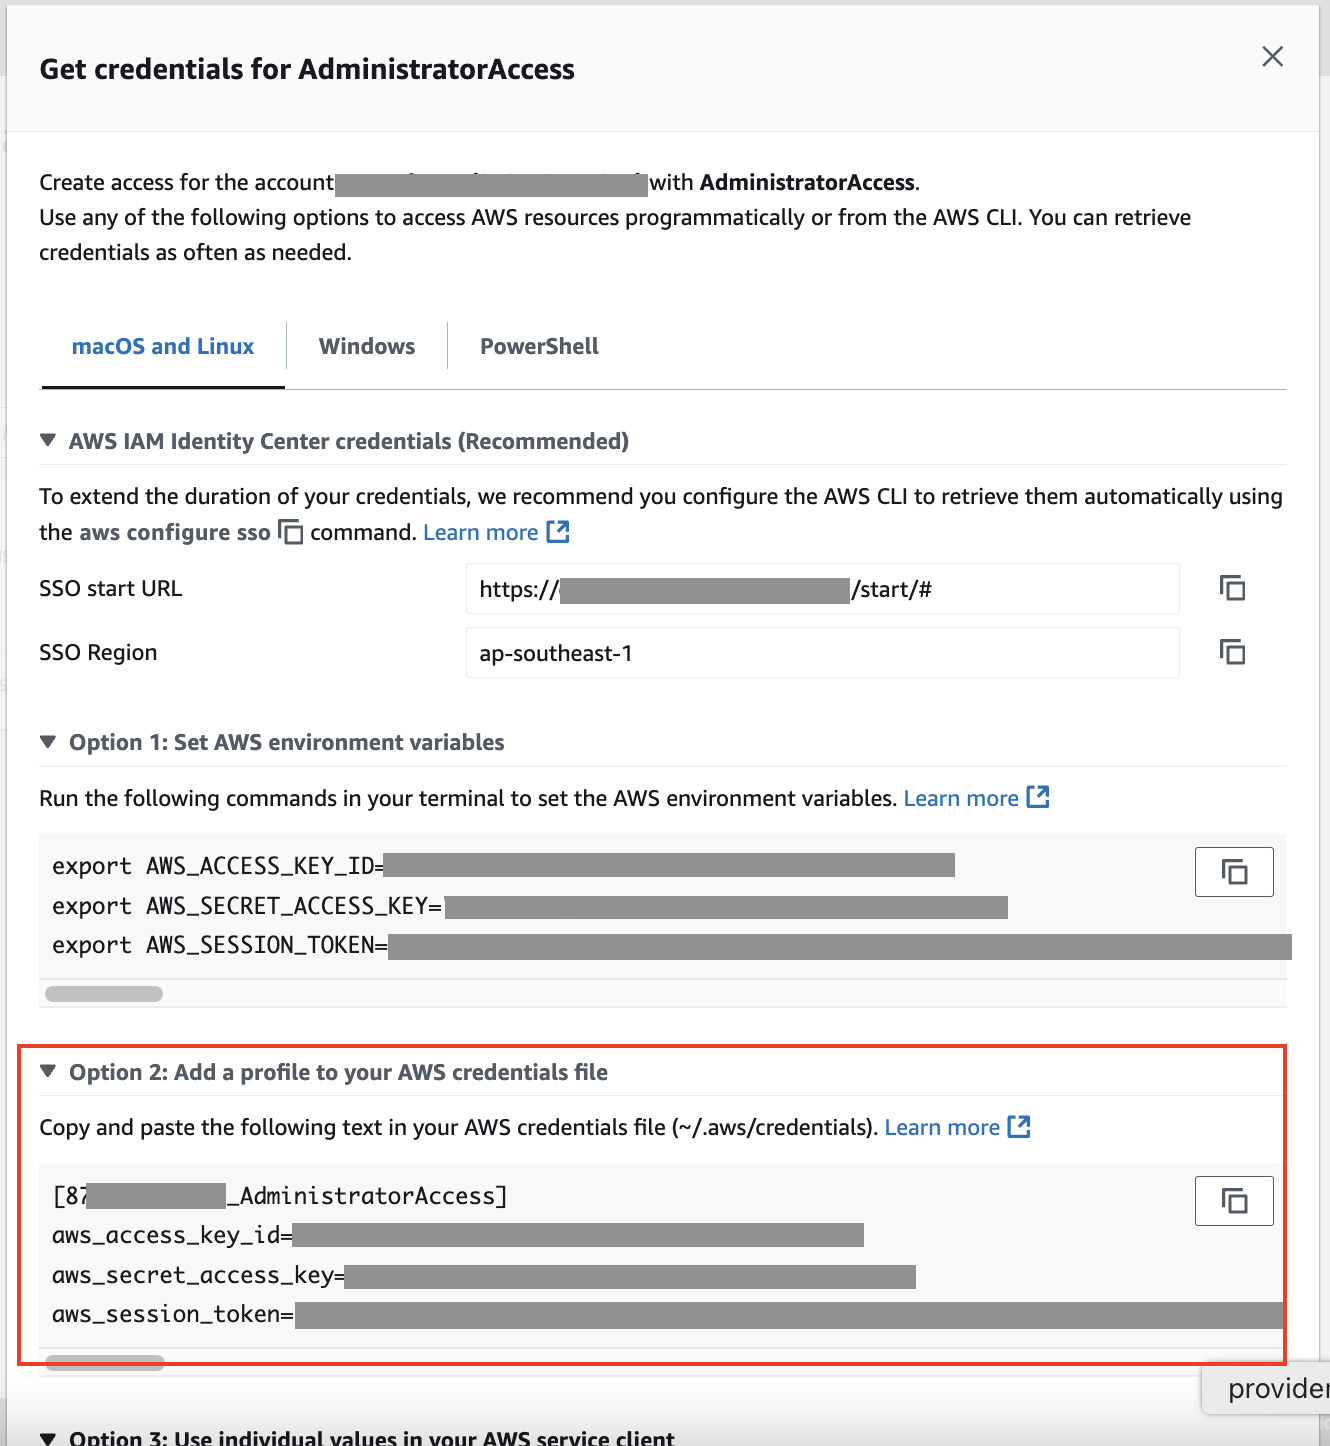
Credentials from the AWS Access Portal.
Notice that besides the aws_access_key_id and aws_secret_access_key, there’s an aws_session_token compared to the credentials for an IAM user covered in the prior section. This adds an extra layer of security to the user's credentials created via the IAM Identity Center, as the session token will expire, and the user will have to reauthenticate to refresh the token.
After pasting the text from option 2 into your AWS credentials file:
# Use the AWS profile that you have just added
export AWS_PROFILE=<<Account Number>_<Role Name>>

# Valid that the credentials work
aws sts get-caller-identity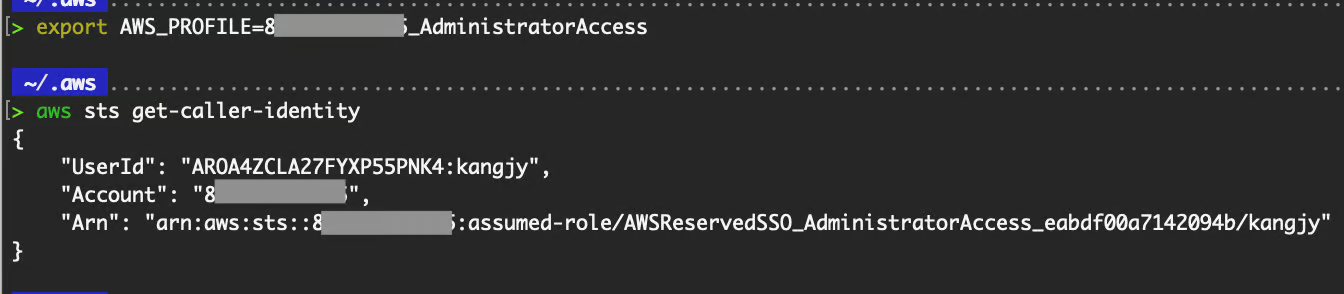
Validate credentials.
The session token will eventually expire, and we must generate a new one.
![]()
Expired token.
Instead of copying it again from the Access Portal as we did above, we can run the aws sso login from our local. Follow the commands below to configure the Single Sign-On (SSO) settings on your local.
# Configure SSO to refresh your session token. The ~/.aws/sso folder will be created.
aws configure sso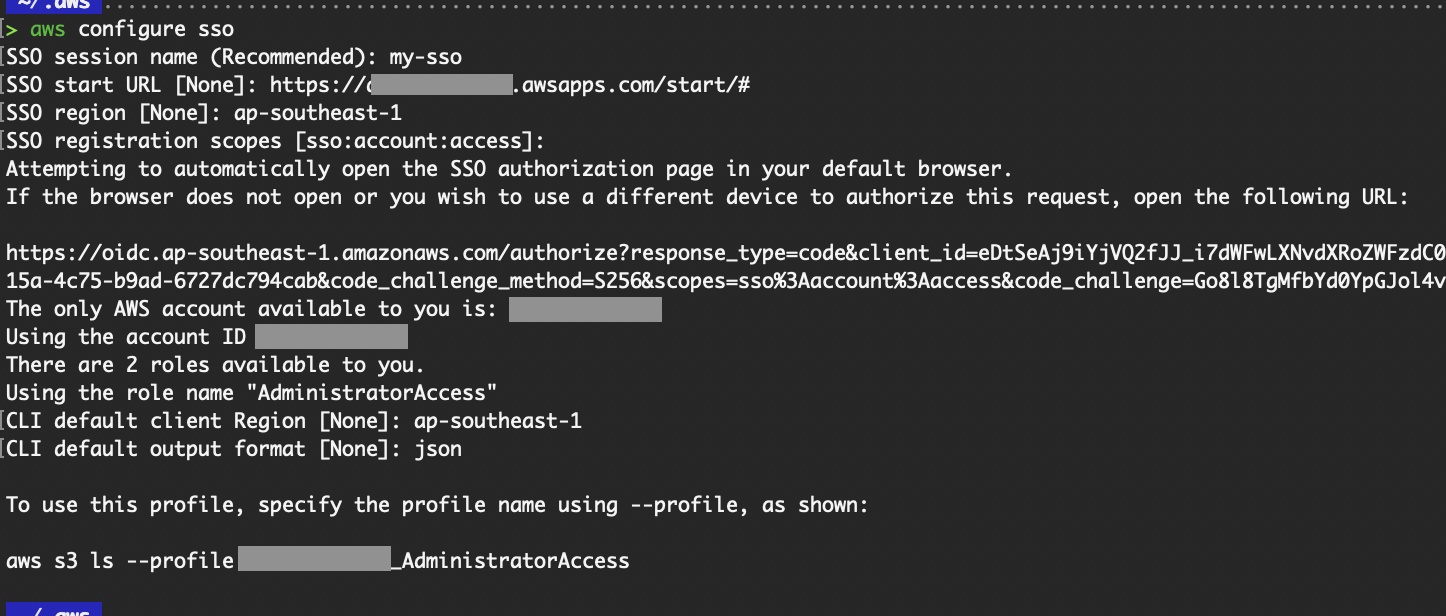
AWS configure SSO command.
You will be prompted to log in.
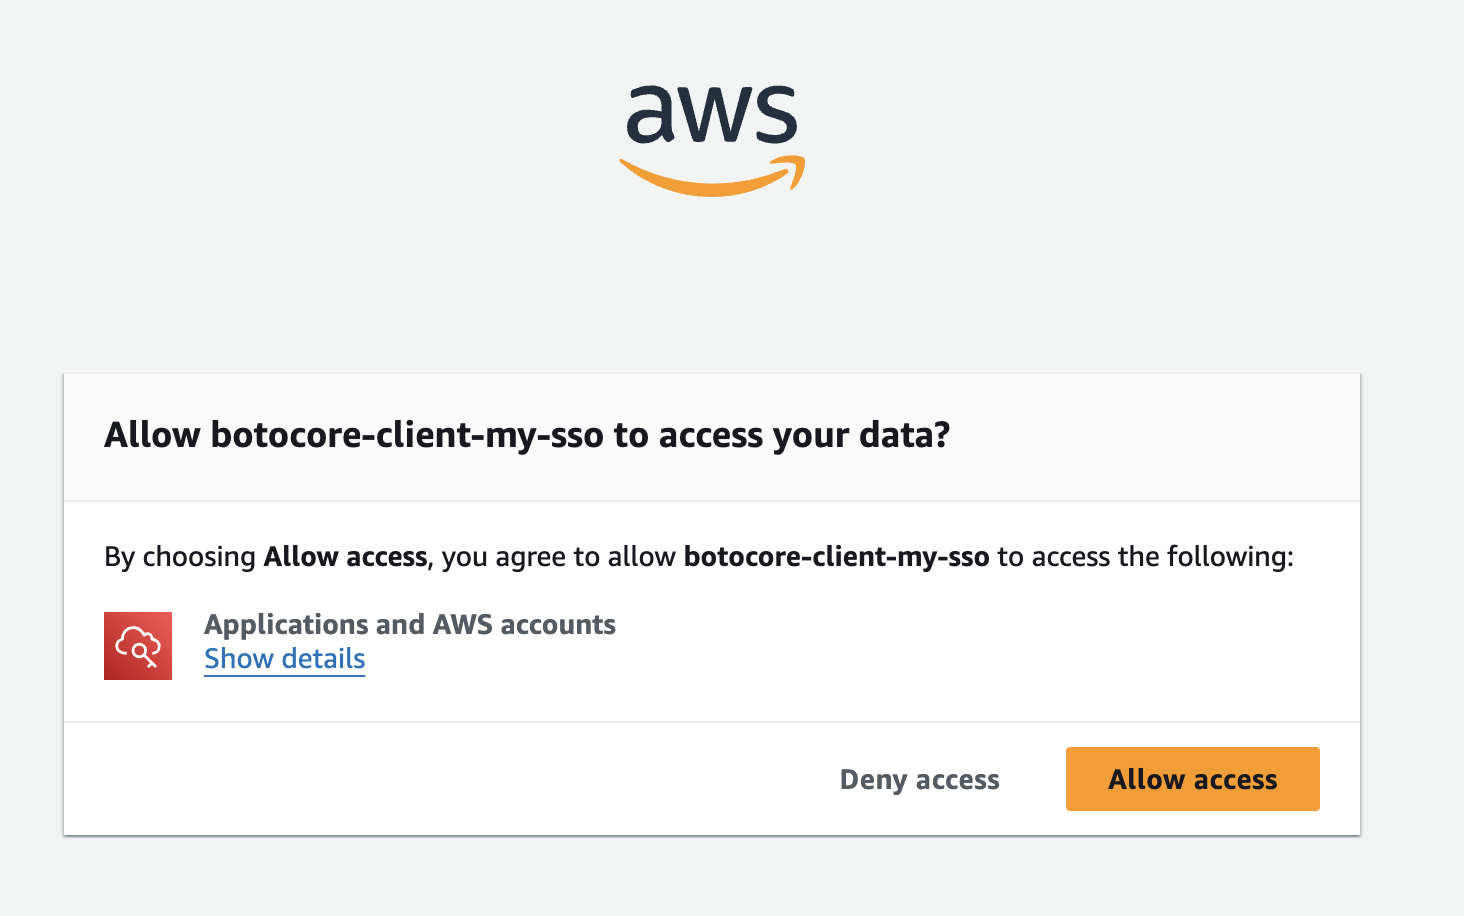
Grant AWS CLI access.
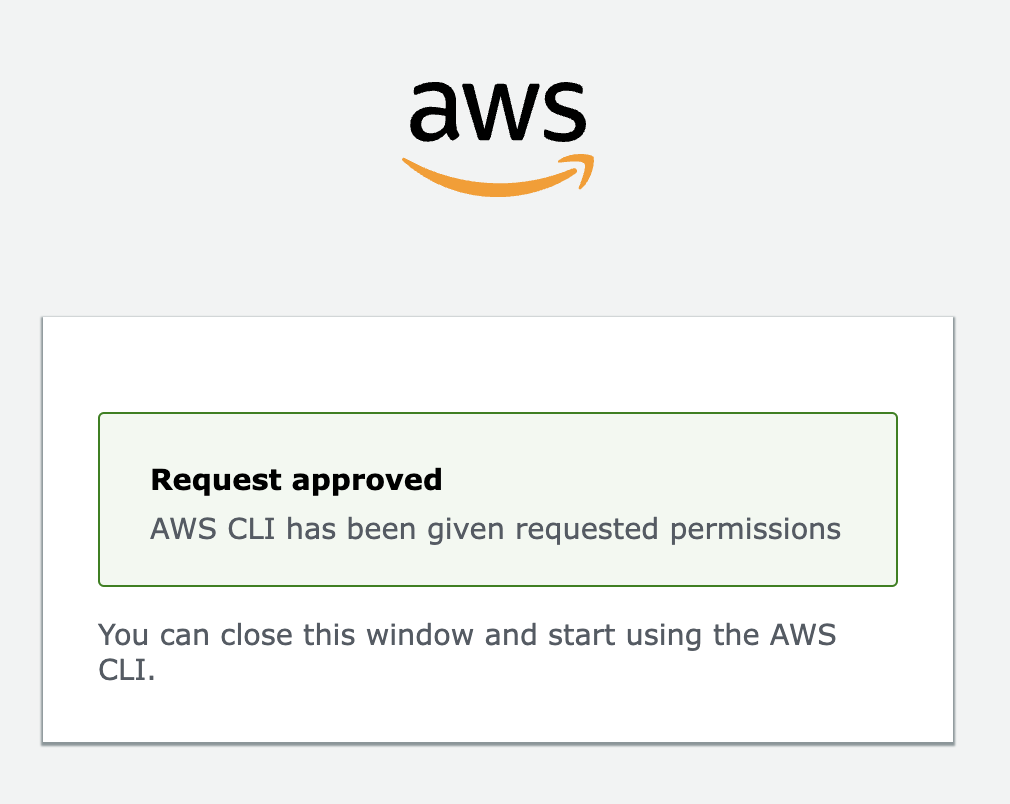
AWS CLI request approved.
When your session token expires again, simply run aws sso login.

AWS SSO login output.
We can customize several configurations as the default options to suit our preferences. If not explicitly specified, these default configurations will apply to the AWS CLI command.
To update or add configuration values in the config file, you can run the command below or modify it manually via vim or nano.
aws configure set <setting> <value>AWS resources that reside in a region will require the region to be specified when executing the AWS CLI commands.
If the “--region <region name>” flag isn’t specified in the command, the default region stated in the config file will be used. If no default region is defined, you’ll encounter the following error.

Error when no region is specified.
The output setting configures the output format returned by the AWS CLI command.
For example, the default output format we configured above is “JSON”, and the aws sts get-caller-identity command returned the output in JSON format. Other valid options are “table” and “text”.
This is how the table output looks. I added the --output table flag to overwrite the default “JSON” output value.

aws sts get-caller-identity --output table.
If you do not want to use your IAM user directly and want it to assume a role instead, specify the role_arn and source_profile configuration.
aws configure set role_arn arn:aws:iam::<Account ID>:role/<Role name>

# Put “default” as the profile name if you do not know what to put
aws configure set source_profile <profile name>
After specifying them, verify that the IAM role is indeed assumed.
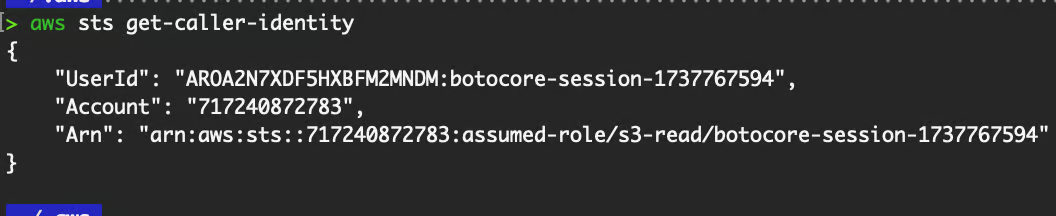
Validate credentials.
By default, the AWS CLI pipes its output through a pager like less, which requires pressing q to exit. We can change this behavior by disabling the pager to configure the output to display directly in the terminal by running:
aws configure set cli_pager ""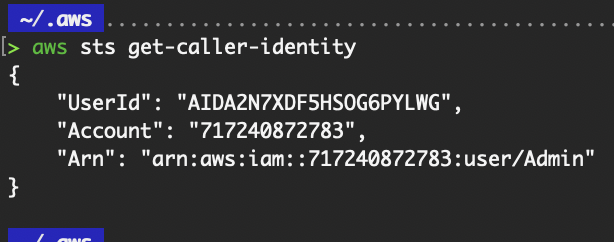
Output with cli_pager disabled.
To keep a record of the AWS CLI commands that were executed, enable the cli_history by running:
aws configure set cli_history enabledThe history will be kept in a SQLite database located in ~/.aws/cli/history.
# View your AWS CLI history
aws history list

# Show details of a specific command
aws history show <command-id>Summary of the standard configuration options:
|
Configuration Key |
Description |
|
region |
Default AWS region (e.g., us-east-1, ap-southeast-1). |
|
output |
Output format: json, text, or table. |
|
role_arn |
ARN of the IAM role to assume. |
|
source_profile |
Profile to use as the source when assuming a role. |
|
cli_pager |
Command output pager (e.g., less, or set to "" to disable). |
|
cli_history |
Enable or disable CLI history file (enabled or disabled). |
|
cli_timestamp_format |
Customize timestamp format (none, iso8601, iso8601_ms). |
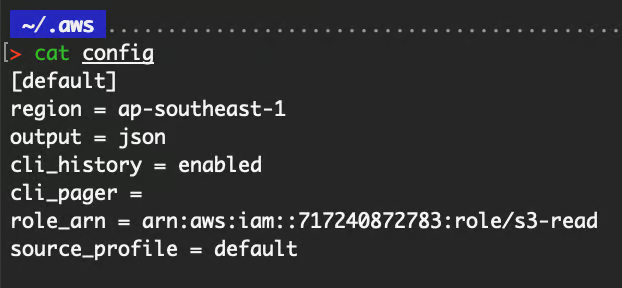
If you followed through with the examples above, this is how your ~/.aws/config file should look like.
Contents in config file.
All AWS CLI commands have a standard format:
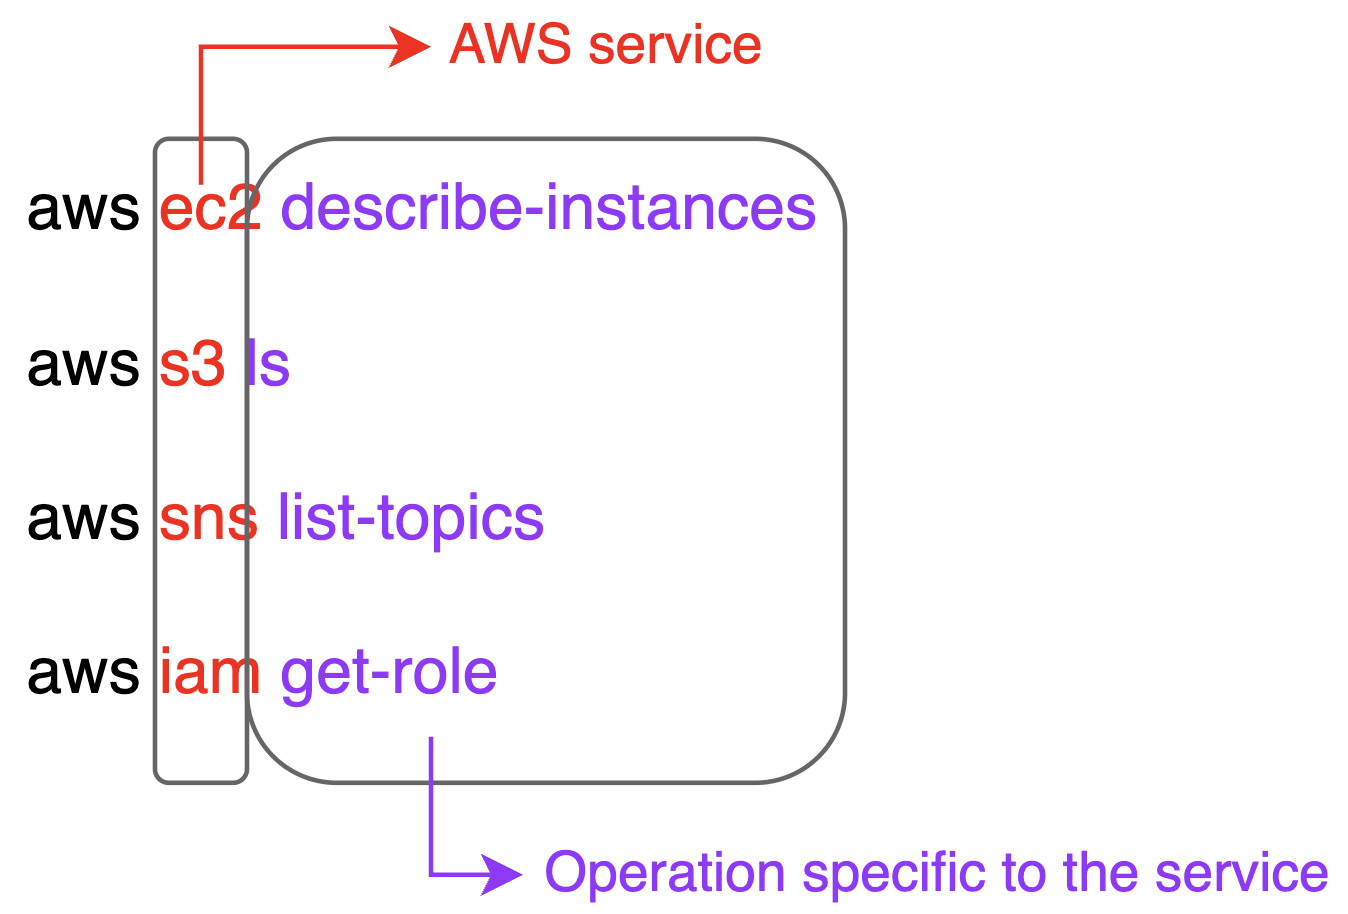
Format of AWS CLI commands—image by Author.
The operation specific to each service will have optional or mandatory options/flags to be added.
Our AWS CLI can now programmatically access our AWS account to interact with the services. Let’s try out some basic commands on some commonly used AWS services!
|
Description |
Command |
|
Describes the specified instances or all instances. |
aws ec2 describe-instances [--instance-ids <value>] |
|
Describe the specified security groups or all of your security groups |
aws ec2 describe-security-groups [--group-ids <value>] |
|
Creates a snapshot of an EBS volume and stores it in Amazon S3 |
aws ec2 create-snapshot --volume-id <value> |
|
Create a VPC |
aws ec2 create-vpc [--cidr-block <value>] |
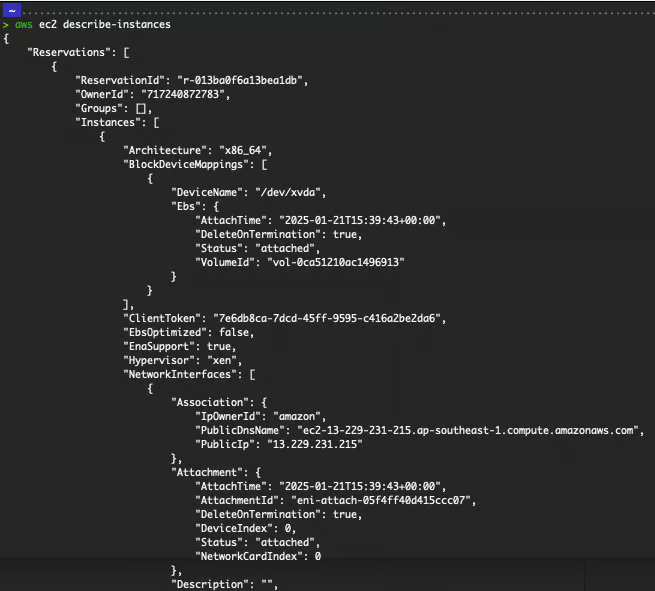
Output of describing all instances.
Refer to the official documentation for EC2 for more information.
|
Description |
Command |
|
List all S3 buckets |
aws s3 ls |
|
List objects in an S3 bucket |
aws s3 ls s3://<bucket-name> --recursive |
|
Moves a local file or S3 object to another location locally or in S3 |
aws s3 mv <LocalPath> <S3Uri> or <S3Uri> <LocalPath> or <S3Uri> <S3Uri> |
|
Deletes an object in an S3 bucket |
aws s3 rm <S3Uri> |
S3 commands.
Refer to the official documentation for S3 for more information.
Note that for the AWS S3 service, in addition to the aws s3 CLI command discussed above, there is also the aws s3api CLI command. The aws s3 commands are pretty generic, whereas the aws s3api commands are more granular and lower-level.
Refer to the official documentation for s3api for more information.
|
Description |
Command |
|
To list all Lambda functions |
aws lambda list-functions |
|
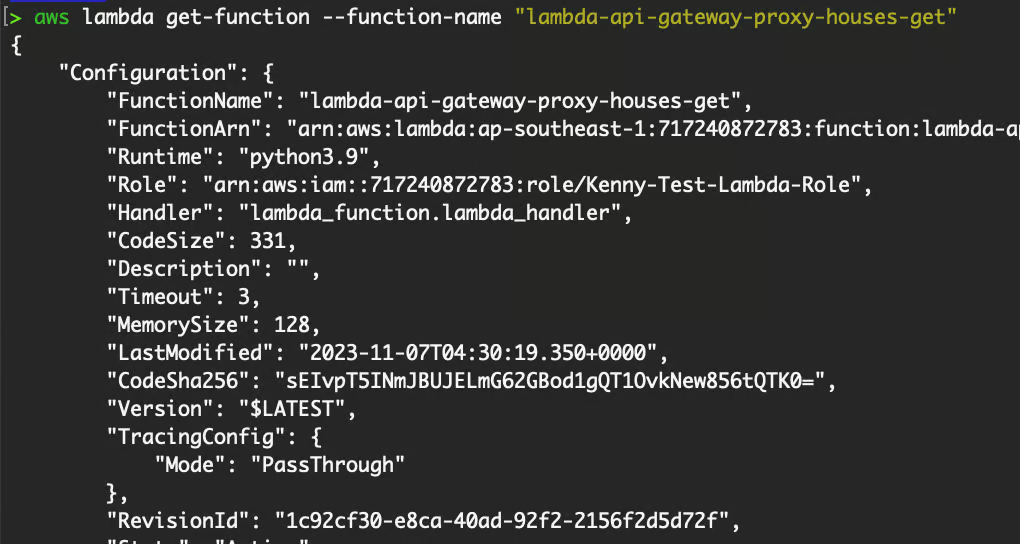
To obtain information on a Lambda function |
aws lambda get-function --function-name <function name> |
|
Invokes a Lambda function |
aws lambda invoke --function-name <function name> |
Returns information about the function.
Refer to the official documentation for Lambda for more information.
Do check out the AWS EC2 Tutorial For Beginners blog to refresh on the basics of EC2! It will help you better understand the following commands.
# To create an EC2 instance
aws ec2 run-instances \
    --image-id ami-0bd55ebedabddc3c0 \
    --count 1 \
    --instance-type t2.micro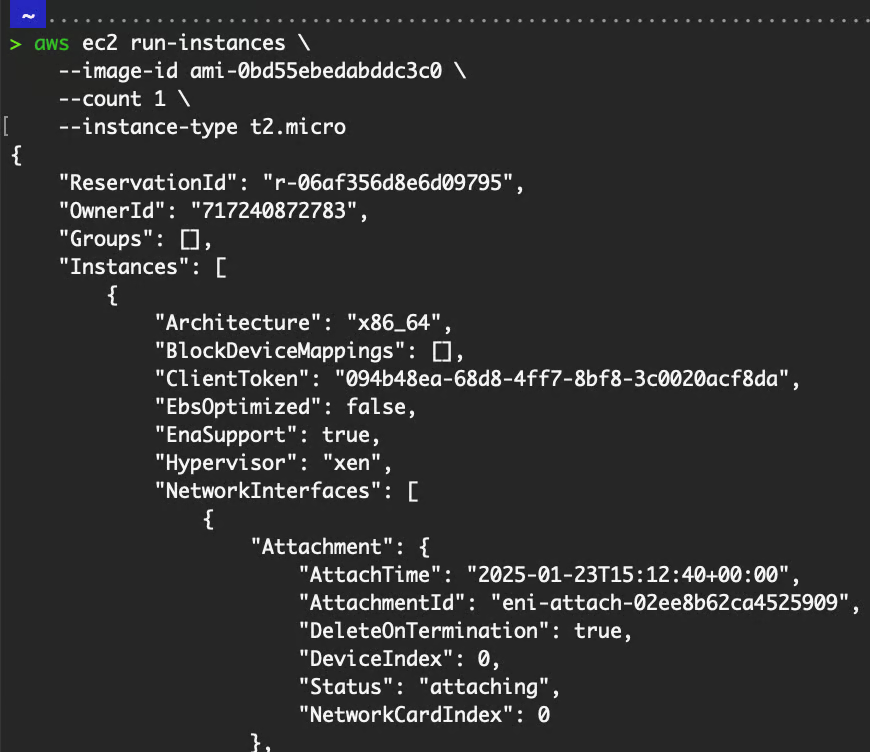
Output of creating an instance.
Run aws ec2 describe-instances to view the details of all EC2 instances, as covered in the basic commands.
If you want to run the command to query a specific instance or instances, add the --instance-ids flag with the instance ID. E.g., aws ec2 describe-instances --instance-ids i-00836ea7575852f10.
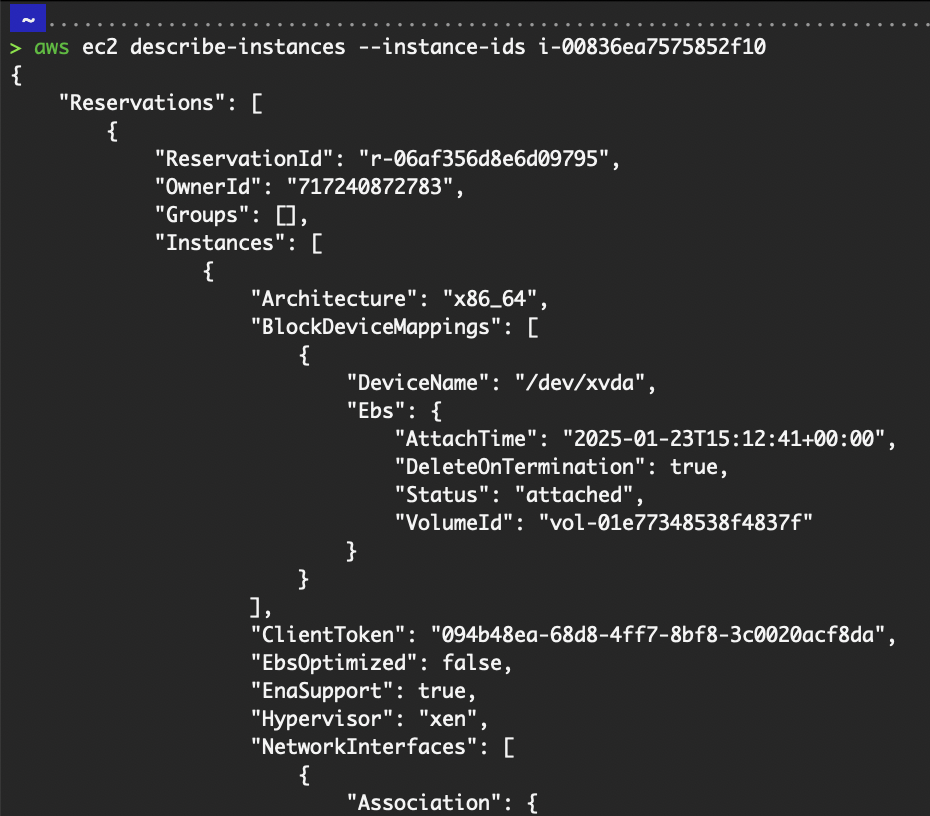
Output of describing an instance.
# To stop the instance
aws ec2 stop-instances --instance-ids i-00836ea7575852f10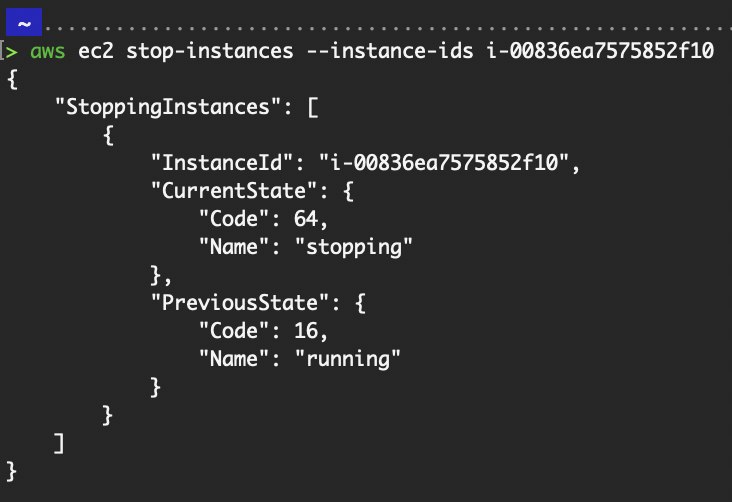
Output of stopping an instance.
# To start the instance
aws ec2 start-instances --instance-ids i-00836ea7575852f10
Output of starting an instance.
# To terminate the instance
aws ec2 terminate-instances --instance-ids i-00836ea7575852f10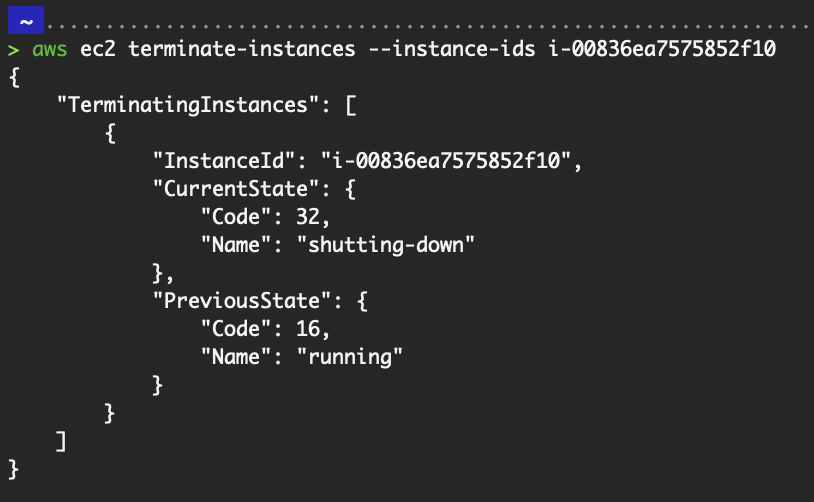
Output of terminating an instance.
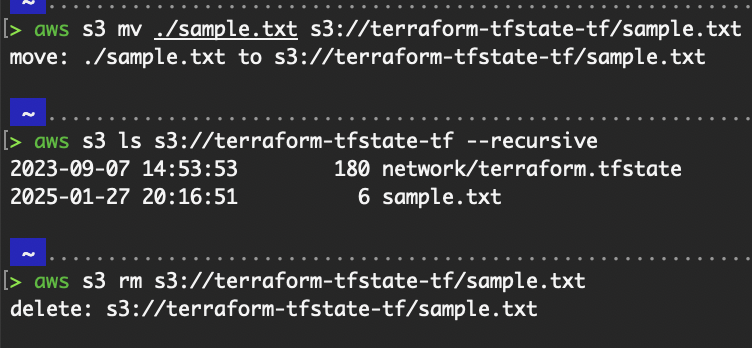
Here are some useful commands to execute common operations with S3 buckets, a basic in AWS!
# To create an S3 bucket. “mb” is short for “make bucket”
aws s3 mb s3://<bucket name> --region <region name>

# To list out all buckets
aws s3 ls

# To copy an object from your local or S3 object to another location locally or in S3. In the screenshot below, I used aws s3 cp <LocalPath> <S3Uri>
aws s3 cp <LocalPath> <S3Uri> or <S3Uri> <LocalPath> or <S3Uri> <S3Uri>

# To delete an object from the S3 bucket
aws s3 rm <S3Uri>

# To sync the source directory to the destination. In the screenshot below, I used aws s3 sync <LocalPath> <S3Uri>
aws s3 sync <LocalPath> <S3Uri> or <S3Uri> <LocalPath> or <S3Uri> <S3Uri>

# To list the objects in the bucket
aws s3 ls <S3Uri>

# To delete an S3 bucket, it has to be empty of objects and versioned objects before it can be deleted. “rb” is short for “remove bucket”
aws s3 rb s3://my-unique-bucket-name-gfht68

# The “aws s3 rb” command comes with the --force parameter to first remove all of the objects in the bucket and then remove the bucket itself.
aws s3 rb s3://mybucket --force
AWS S3 commands output.
Now that we have practiced some basic CLI commands, we can review a few more advanced interface features and use cases.
The AWS CLI examples we have covered thus far involve a single command to get information or perform an action on the service. Let's look at examples of assembling several CLI commands in a script to automate tasks.
Create a launch_ec2.sh file with the following content.
#!/bin/bash

# Set variables
INSTANCE_NAME="My_Demo_Instance"
AMI_ID="ami-0bd55ebedabddc3c0" # Replace with your preferred AMI ID
INSTANCE_TYPE="t2.micro"       # Replace with the desired instance type
REGION="ap-southeast-1"

# Launch the EC2 instance
INSTANCE_ID=$(aws ec2 run-instances \
  --image-id "$AMI_ID" \
  --instance-type "$INSTANCE_TYPE" \
  --region "$REGION" \
  --query "Instances[0].InstanceId" \
  --output text)

echo "Instance launched with ID: $INSTANCE_ID"

# Add a Name tag to the instance
aws ec2 create-tags \
  --resources "$INSTANCE_ID" \
  --tags Key=Name,Value="$INSTANCE_NAME" \
  --region "$REGION"

echo "Tag added: Name=$INSTANCE_NAME"

# Wait for the instance to reach a running state
aws ec2 wait instance-running --instance-ids "$INSTANCE_ID" --region "$REGION"
echo "Instance is now running."
You can customize the script to include more parameters such as the key name (--key-name), security group ID (--security-group-ids), subnet ID (--subnet-id), etc.
# Grant the user permission to execute the shell script
chmod u+x ./launch_ec2.sh

# Run the script
./launch_ec2.sh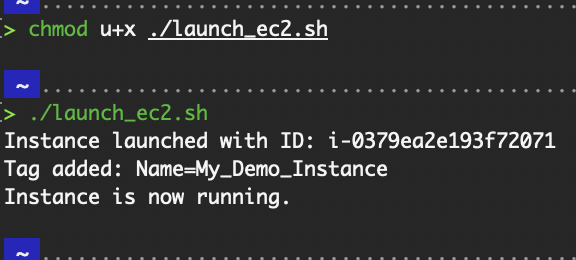
Launch EC2 script.
Create a stop_ec2.sh file with the following content:
#!/bin/bash

# Check if a region is provided as an argument
if [ -n "$1" ]; then
  REGION="$1"
else
  # Get the default region from AWS CLI configuration
  REGION=$(aws configure get region)

  if [ -z "$REGION" ]; then
    echo "No region provided, and no default region found in AWS CLI configuration."
    echo "Please provide a region as an argument: ./stop-all-ec2.sh <region>"
    exit 1
  fi
fi

echo "Using region: $REGION"

# Get a list of all running EC2 instance IDs
RUNNING_INSTANCES=$(aws ec2 describe-instances \
  --filters Name=instance-state-name,Values=running \
  --query "Reservations[*].Instances[*].InstanceId" \
  --output text \
  --region "$REGION")

if [ -z "$RUNNING_INSTANCES" ]; then
  echo "No running EC2 instances found in region $REGION."
else
  echo "Stopping the following EC2 instances in region $REGION:"
  echo "$RUNNING_INSTANCES"
  echo "Give it around 1 minute for the instances to be stopped."

  # Stop the instances
  aws ec2 stop-instances --instance-ids $RUNNING_INSTANCES --region "$REGION"

  # Wait for the instances to stop
  aws ec2 wait instance-stopped --instance-ids $RUNNING_INSTANCES --region "$REGION"

  echo "All instances have been stopped successfully."
fi
# Grant the user permission to execute the shell script
chmod u+x ./stop_all_ec2.sh
# Run the script with the default region
./stop_all_ec2.sh
# Run the script overwriting the default region
./stop_all_ec2.sh us-west-1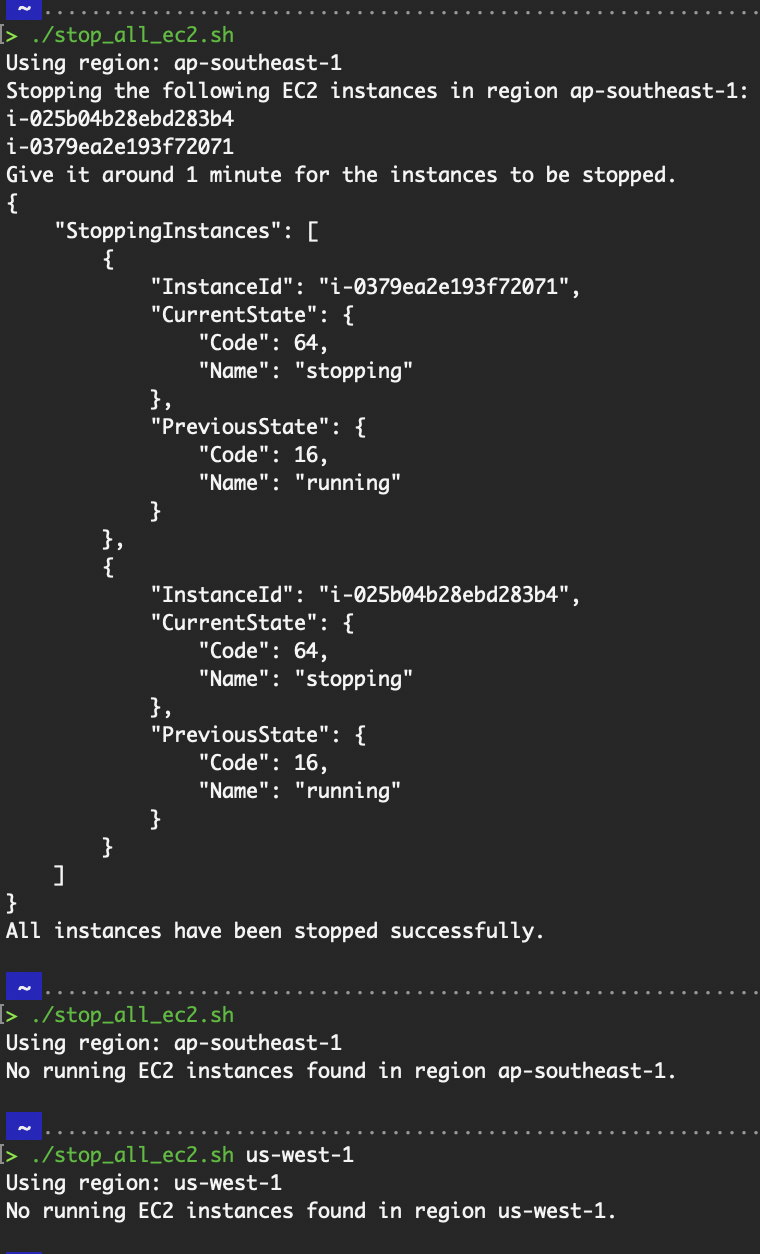
Stop EC2 script.
The AWS CLI command outputs contain quite some information. In some cases, we might not need all the information returned and only want a subset of the output.
For example, in the “EC2” section under “Basic commands” above, we saw that the aws ec2 describe-instances command returned a long JSON output. To parse through this output and obtain only what is needed, we can use the --query flag or the jq command.
Refer to the automation scripts in the “Automating tasks with AWS CLI” section above for examples of the --query flag.
Note that the jq command only works on a JSON output. Thus, configure the default output as “JSON” or pass the --output json flag for every command.
Verify that jq is installed:
Check the version of jq.
# Get a list of all EC2 instances and filter only the instance ID and state
aws ec2 describe-instances | jq '.Reservations[].Instances[] | {InstanceId: .InstanceId, State: .State.Name}'

# Count the number of EC2 instances in the "running" state.
aws ec2 describe-instances --output json | jq '[.Reservations[].Instances[] | select(.State.Name == "running")] | length'

# Extract Lambda Function Names and their runtimes
aws lambda list-functions --output json | jq '.Functions[] | {FunctionName: .FunctionName, Runtime: .Runtime}'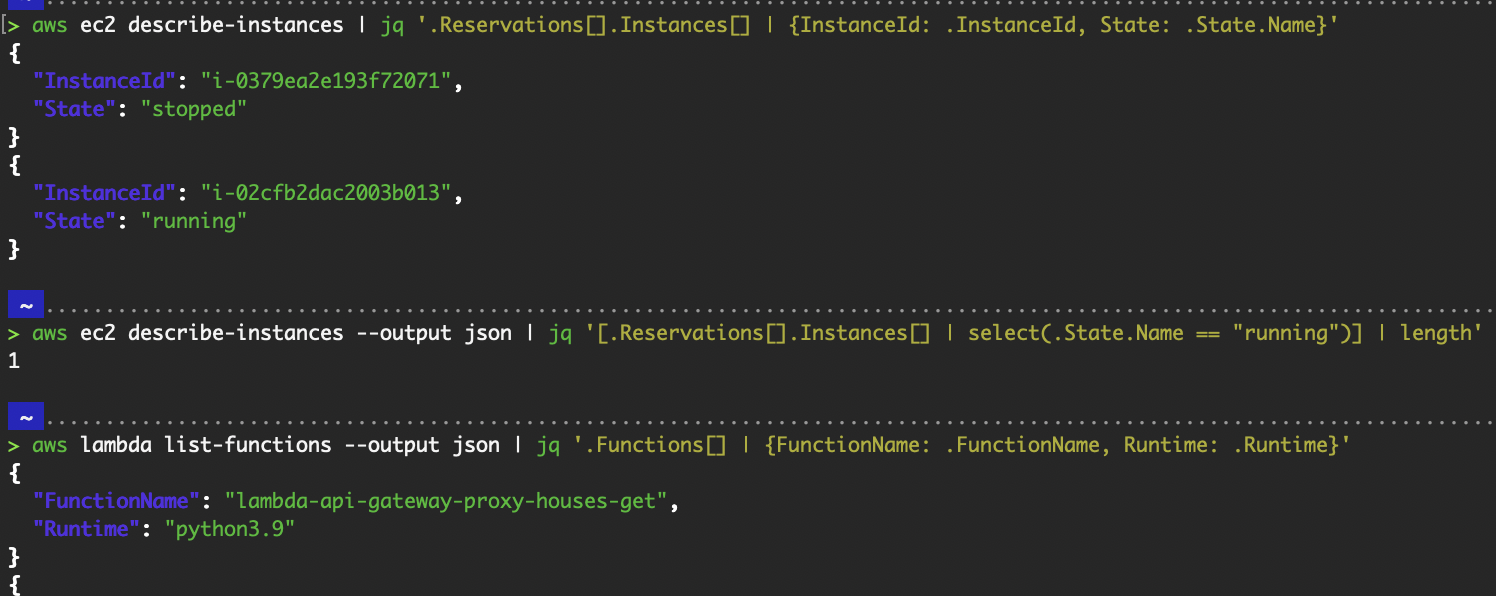
AWS CLI commands with jq.
We can utilize the AWS CLI in our pipeline configuration to automate interactions with AWS services, such as deploying and updating our AWS resources whenever our CI/CD pipeline runs.
For the example below, I’ll use the GitLab pipeline to demonstrate deploying a Lambda function.
# .gitlab-ci.yml file configuration
stages:
  - demo-cicd

datacamp_job:
  image: registry.gitlab.com/gitlab-org/cloud-deploy/aws-base:latest
  stage: demo-cicd
  id_tokens:
    GITLAB_OIDC_TOKEN:
      aud: https://gitlab.com
  variables:
    ROLE_ARN: "arn:aws:iam::<AWS Account ID>:role/<Name of IAM Role that pipeline will use>"
    AWS_DEFAULT_REGION: "ap-southeast-1"
  script:
    - aws --version
    - >
      export $(printf "AWS_ACCESS_KEY_ID=%s AWS_SECRET_ACCESS_KEY=%s AWS_SESSION_TOKEN=%s"
      $(aws sts assume-role-with-web-identity
      --role-arn ${ROLE_ARN}
      --role-session-name "GitLabRunner-${CI_PROJECT_ID}-${CI_PIPELINE_ID}"
      --web-identity-token ${GITLAB_OIDC_TOKEN}
      --duration-seconds 3600
      --query 'Credentials.[AccessKeyId,SecretAccessKey,SessionToken]'
      --output text))

    - aws sts get-caller-identity
    - ls -l
    - aws lambda create-function --function-name <function name> --runtime python3.13 --role <ARN of IAM role that Lambda function will use> --handler index.lambda_handler --zip-file fileb://lambda.zip

    - unset AWS_ACCESS_KEY_ID AWS_SECRET_ACCESS_KEY AWS_SESSION_TOKEN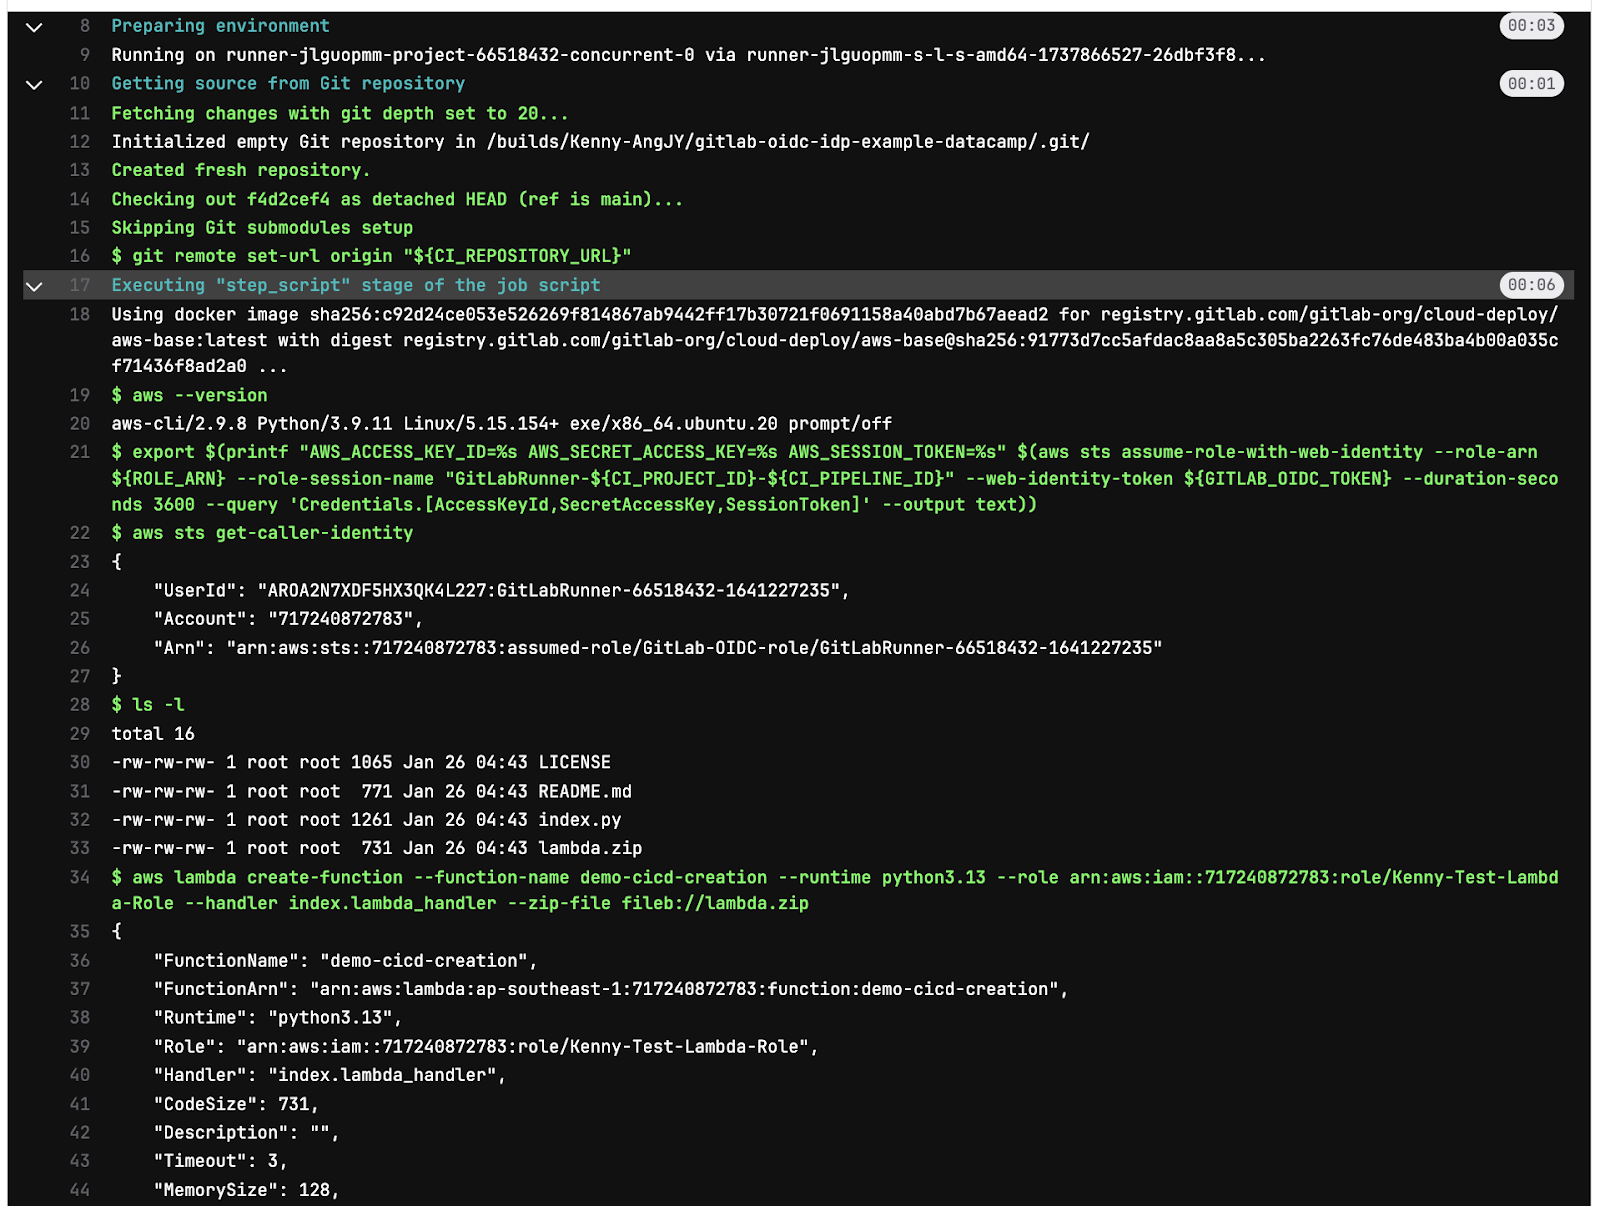
GitLab pipeline job logs.
You can modify the pipeline config to pass the parameters along with the AWS CLI command as variables in the pipeline job instead of hard-coding them, as I did in the above screenshot.
This way, whenever you want to create a Lambda function, you can input and commit the variables along with your pipeline config to the Git repository.
As with all best practices, grant the minimal permissions required to perform the task regardless of whether you use a user or role.
Let's examine other best practices specific to the AWS CLI!
AWS IAM roles provide temporary security credentials for accessing AWS resources. These credentials are automatically rotated and are scoped to a specific role's permissions, reducing the risks associated with long-term access keys.
The recommended way to use a role is via the role created from the IAM Identity Center, as shown in the “IAM Identity Center” section under the “Setting up AWS credentials” above. This is also the AWS recommended approach.
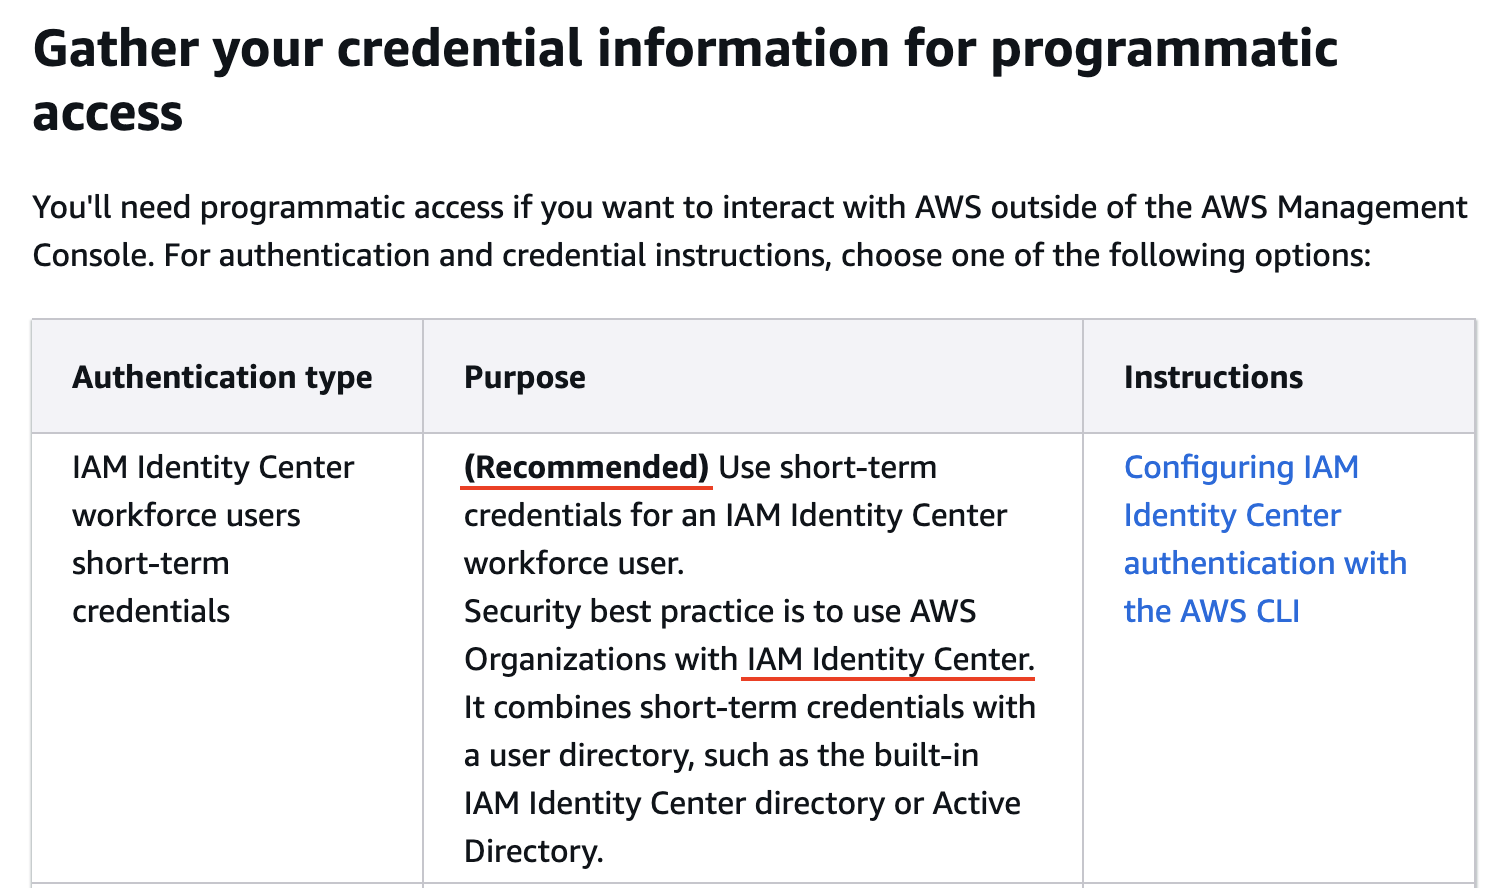
Recommended approach by AWS. Image source: AWS.
When the Cloud administrator creates your user via the IAM Identity Center, they must assign a permission set.
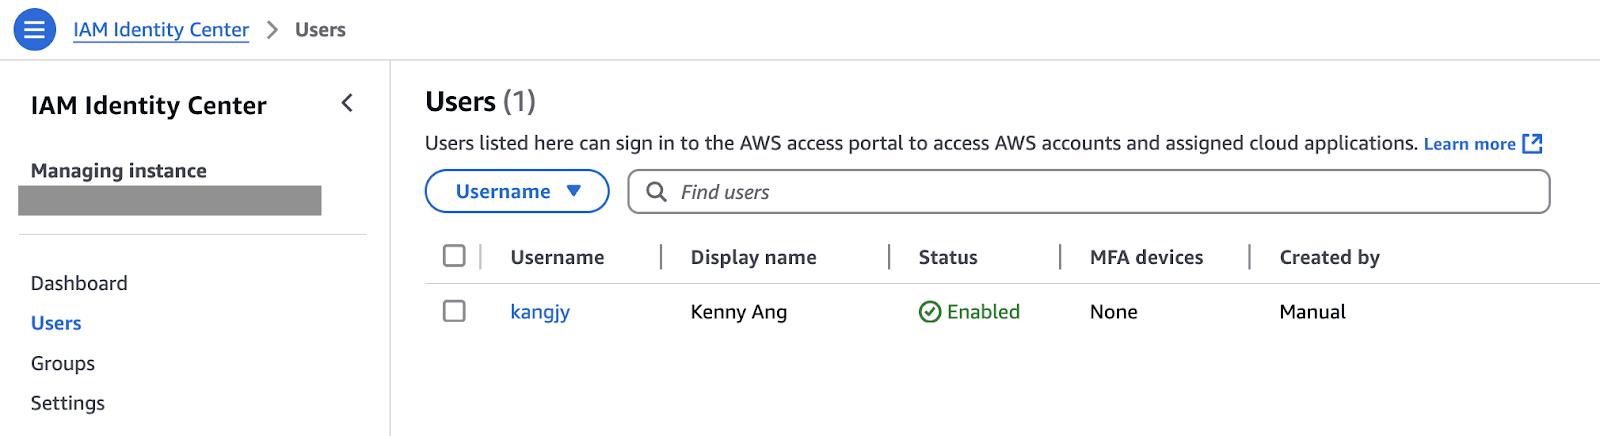
Users in IAM Identity Center.
For each permission set, AWS will create an IAM role.
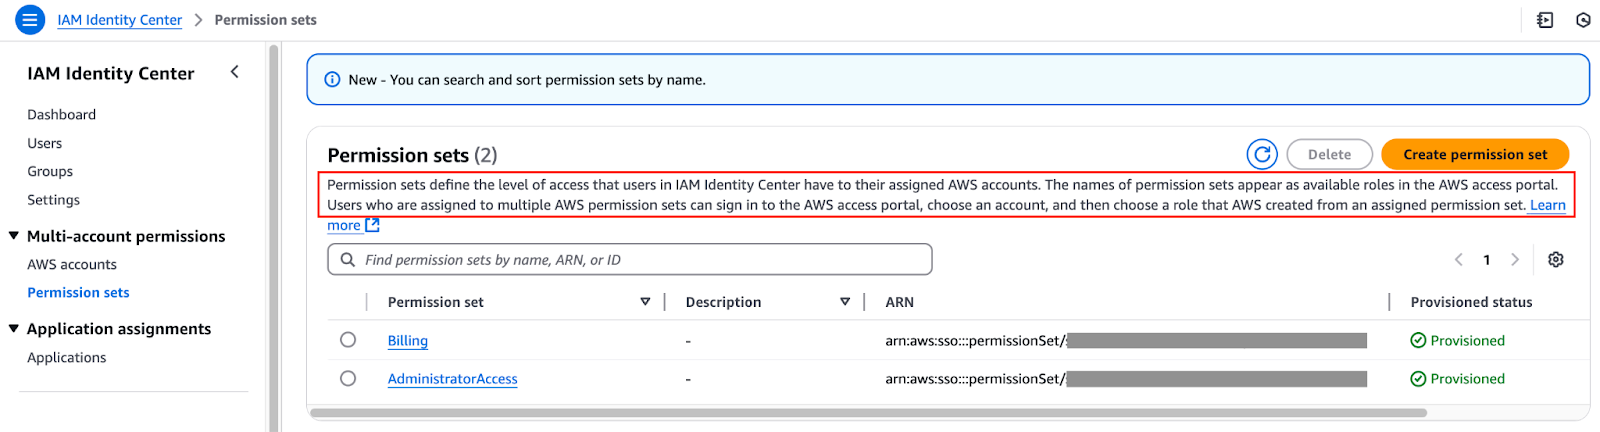
Permission sets in IAM Identity Center.
You will probably handle more than one AWS account in your work environment. We use profiles to configure multiple sets of credentials in the ~/.aws/credentials and ~/.aws/config file.
In the “Setting Up AWS credentials” section above, we ran the aws configure command without specifying the profile via the --profile flag or AWS_PROFILE environment variable. Thus, the credentials and config information are added to the default profile. To add a new profile, you can run the aws configure --profile <profile name> to have a separate set of credentials under the new profile.
# Create a new profile called “dev”
aws configure --profile dev

# To run AWS CLI commands using the dev profile instead of the default profile, set the AWS_PROFILE environment variable to “dev”. Alternatively, add the “--profile dev” for every AWS CLI command.
export AWS_PROFILE=dev

# Validate that the IAM identity under the new profile is returned
aws sts get-caller-identity
New credentials under a new profile.
It is important to update our AWS CLI to ensure effective interaction with our AWS services and take advantage of the latest features and improvements.
If you installed AWS CLI using the installer package for Windows and Mac, you had to download a file to your local computer and run it. Updating it will be the same steps: Download and run the latest installer package.
If you installed AWS CLI via brew on Mac, updating is as simple as running brew upgrade awscli. I already have the latest version installed here.
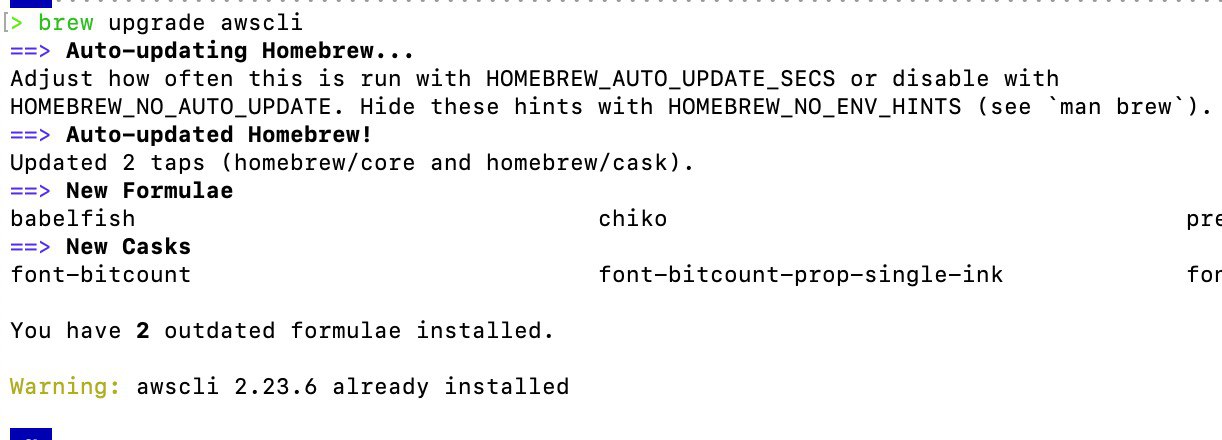
brew upgrade awscli command output.
For Linux, the steps are the same as installing. Refer to the code snippet in “Installing on Linux” section. Follow the commands to download the zip file, unzip, and run the installer.
The AWS CLI is an amazing tool, but we can also face challenges when working with it. Let’s review how to overcome them.
Occasionally, we might forget a command and its parameters that we ran previously or want to view the output of a command that was run. Enabling the cli_history can address these concerns. For more information, refer to the “Configuration options” section above.
When you encounter AWS CLI configuration errors, running the aws configure command will help you determine whether the CLI is correctly reading the information from your credentials and config file.

“Unable to parse config file” error.
# View configuration for the existing profile
aws configure list

# Verify credentials
aws sts get-caller-identity

# Verify configuration values
aws configure get region
aws configure get role_arn

# Review Environment Variables. Variables like AWS_PROFILE, AWS_ACCESS_KEY_ID, and AWS_REGION can override configuration
env | grep AWSOn rare occasions, we might encounter an unknown error when executing AWS CLI commands. To debug the issue with the API call or gather more information to understand the error, it might help to add the --debug flag to the command.
# Add the “--debug” flag
aws ec2 describe-instances --debug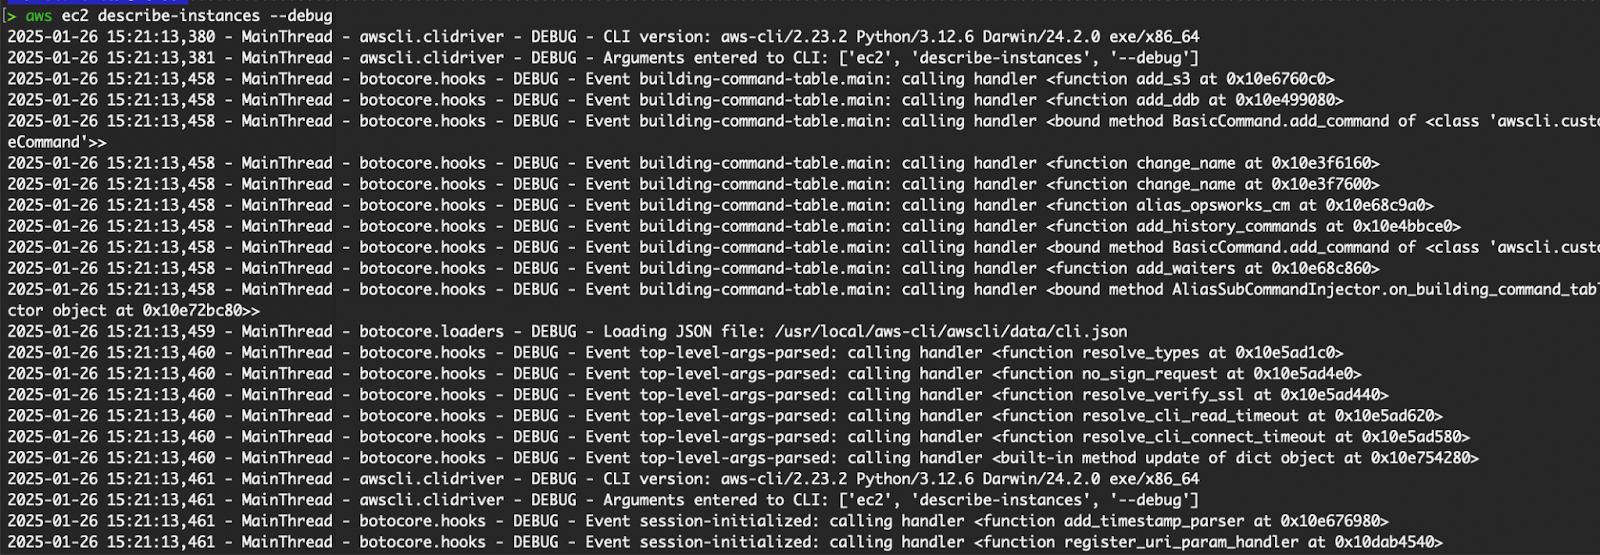
AWS CLI command with the debug flag.
The extra information should help you understand and troubleshoot the issue.
The AWS CLI is a powerful tool that empowers you to interact with AWS services efficiently, automate routine tasks, and easily manage cloud resources. In this tutorial, I taught you how to install, configure, and use the AWS CLI to perform essential operations across several common AWS services.
Whether you’re a cloud beginner or a seasoned DevOps professional, mastering the AWS CLI can significantly enhance productivity. From creating and managing resources to automating deployments, the possibilities are virtually endless with the AWS CLI in your toolkit.
Take the time to experiment with the commands, explore advanced scripting capabilities in your pipeline, and integrate the AWS CLI into your day-to-day tasks. Happy cloud computing!
I recommend checking out the AWS Cloud Practitioner skill track on DataCamp to become an AWS expert.
Learn more about AWS with these courses!
Course
Course
Course
blog
Thalia Barrera
15 min
Tutorial
Joleen Bothma
Tutorial
DataCamp Team
Tutorial
Don Kaluarachchi
Tutorial
Moez Ali
Tutorial
Florin Angelescu