
AWS DMS Tutorial: Step-by-Step Guide to Migrating Databases

This tutorial walks you through setting up and using AWS DMS to migrate databases to AWS, optimize performance, and troubleshoot issues.
Mar 6, 2025  · 15 min read

As organizations progress toward modernizing their infrastructure through cloud technology, migrating databases to AWS is essential. AWS offers a strong migration tool called AWS Database Migration Service (DMS), which enables low-risk and nearly instant migrations from on-premises databases, self-managed cloud databases, and other AWS services.

In this tutorial, you will discover how to set up and use AWS DMS for your database migration needs. You’ll learn:

  • How AWS DMS works and its key features.
  • The step-by-step process for setting up and executing a migration.
  • Best practices to optimize performance, security, and cost.
  • Troubleshooting techniques to resolve common migration issues.

Let’s get started!

What is AWS DMS?

AWS Database Migration Service (DMS) makes it easy to migrate databases to AWS with no downtime. It offers homogeneous and heterogeneous migrations, like MySQL to MySQL or Oracle to PostgreSQL, making it a crucial tool for organizations moving to the cloud.

With AWS DMS, you can:

  • Use Change Data Capture (CDC) to migrate data continuously and cause little to no disruption to your production environment.
  • Let AWS DMS automate and manage migration tasks and require no expert knowledge of your databases.
  • Replicate data to services like Amazon RDS, Aurora, Redshift, DynamoDB, S3, etc.

AWS DMS is widely used for:

  • Lift-and-shift migrations of databases from on-premises to AWS.
  • Cross-region database replication for disaster recovery.
  • Data consolidation by migrating multiple databases into a data warehouse.

Features of AWS DMS

AWS DMS provides several important features to support database migration: 

1. Homogeneous and heterogeneous migrations

  • Homogeneous migration: Transferring from one type of database to another (e.g., MySQL to MySQL). 
  • Heterogeneous migration: Converting schema and data between different engines (e.g., Oracle to PostgreSQL).

2. Minimal downtime with Change Data Capture (CDC)

  • Change Data Capture (CDC) monitors changes in the source database in real time and transfers those changes to the target database, thus reducing system downtime.
  • Suitable for businesses that operate critical applications that require data to be accessible without interruption. 

3. Fully managed and scalable

  • AWS DMS creates and manages resources, tracks performance, and manages failover cases.
  • Multi-AZ support for high availability.

4. Broad database compatibility

  • Source databases: Oracle, SQL Server, MySQL, PostgreSQL, MongoDB, Amazon Aurora, and more.
  • Target databases: Amazon RDS, Aurora, Redshift, DynamoDB, S3, and OpenSearch.

5. Schema conversion with AWS SCT

  • AWS Schema Conversion Tool (SCT) helps convert database schemas when performing heterogeneous migrations.
  • Automatically transforms stored procedures, views, and triggers to fit the target database.

6. Continuous monitoring and logging

  • AWS CloudWatch integration allows you to monitor migration progress and identify bottlenecks.
  • Logs detailed migration statistics, including error rates, latency, and replication lag.

7. Security and compliance

  • Supports TLS encryption for secure data transfer.
  • Integrates with AWS IAM for fine-grained access control.
  • Compliance with major security standards, including HIPAA, PCI DSS, and SOC.

AWS Cloud Practitioner

Learn to optimize AWS services for cost efficiency and performance.
Learn AWS

Setting Up AWS DMS

Let’s get hands-on and start by setting up AWS DMS. In this tutorial, you'll learn how to migrate an Oracle database to Amazon Aurora (MySQL), including schema conversion, data replication, and best practices to ensure a smooth transition.

Step 1:  Prerequisites for using AWS DMS

Before migrating databases, you need to set up essential AWS resources. Using AWS CloudFormation, you can automate provisioning to focus on migration tasks. The template we will use deploys:

  • An AWS VPC with Public Subnets for networking.
  • An AWS DMS Replication Instance to perform the data migration.
  • An Amazon RDS Instance as the target database.
  • An Amazon EC2 Instance to hold migration tools such as AWS Schema Conversion Tool (SCT) or a source database simulation.

Login to the AWS Console

  1. Log in to the AWS Management Console using your credentials.
  2. Click on the drop-down menu in the top right corner of the screen and select your region. I’ll select N. Virginia region for this tutorial.

The AWS Management Console with the region selection dropdown open, showing various available regions

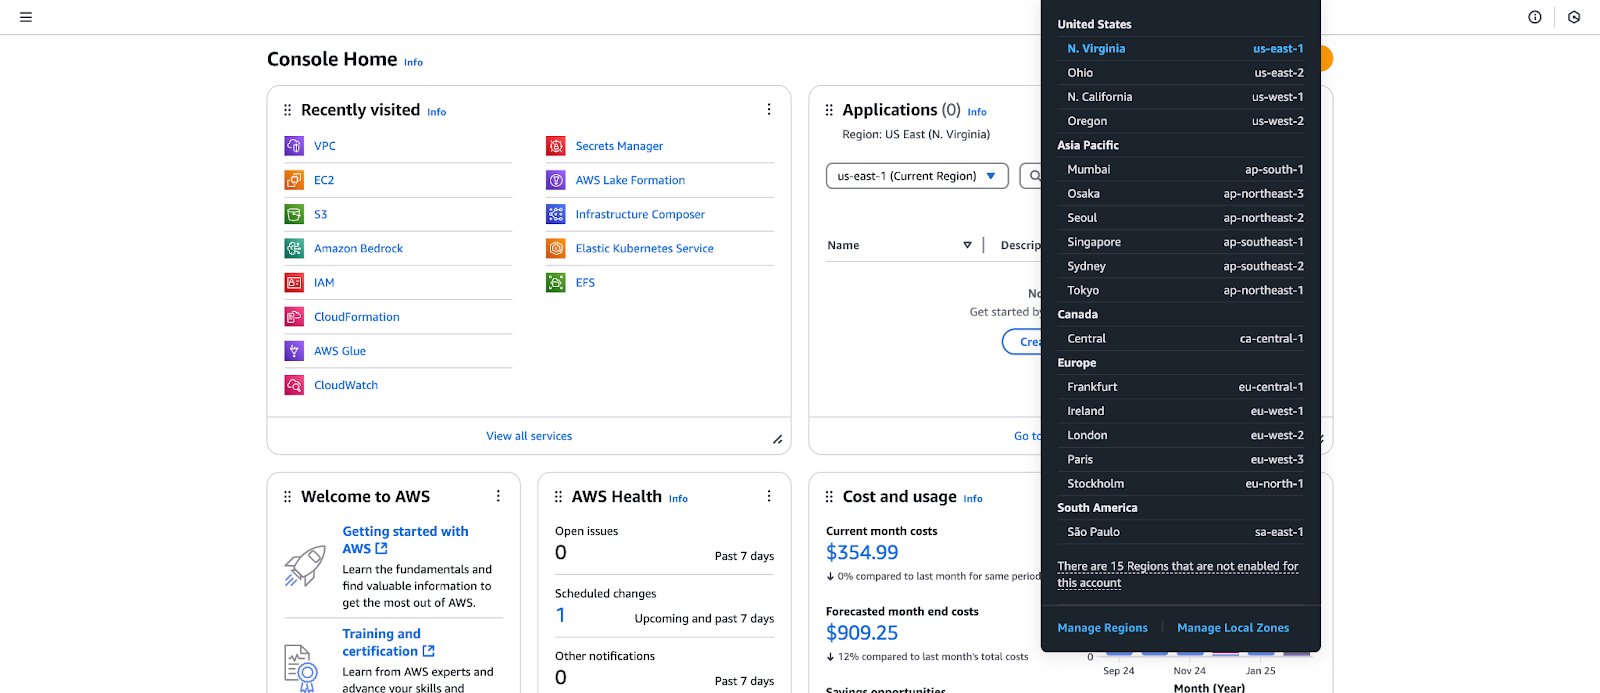
Figure 1 Selecting AWS Region in the AWS Management Console.

  1. Go to the EC2 Console and navigate to the Key Pair section. Ensure you’re in the same AWS region as the previous step.
  2. Click Create Key Pair and name it “DMS”.

AWS EC2 interface displaying the key pair creation page with RSA and ED25519 options.                                        

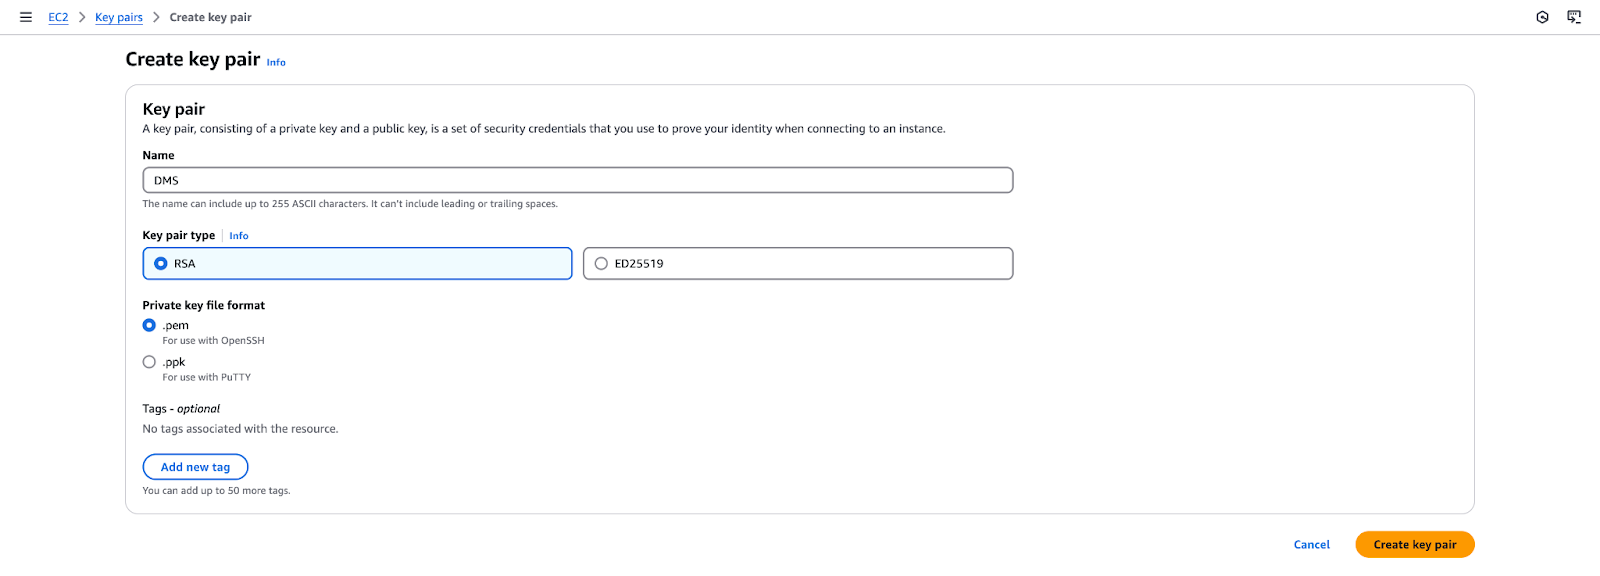
Figure 2 Creating a key pair for secure access in AWS EC2.

  1. Click Create, and your browser will download DMS.pem.
  2. Save this file securely—you’ll need it later in the tutorial.

Configure the environment

In this step, you'll use a CloudFormation (CFN) template to set up the necessary AWS infrastructure for database migration. This automates provisioning, allowing you to focus on migration tasks.

  1. Open the AWS CloudFormation console and click Create Stack.
  2. Select Choose an existing template, then choose Upload a template file.

AWS CloudFormation interface with an option to upload a template file for stack creation.

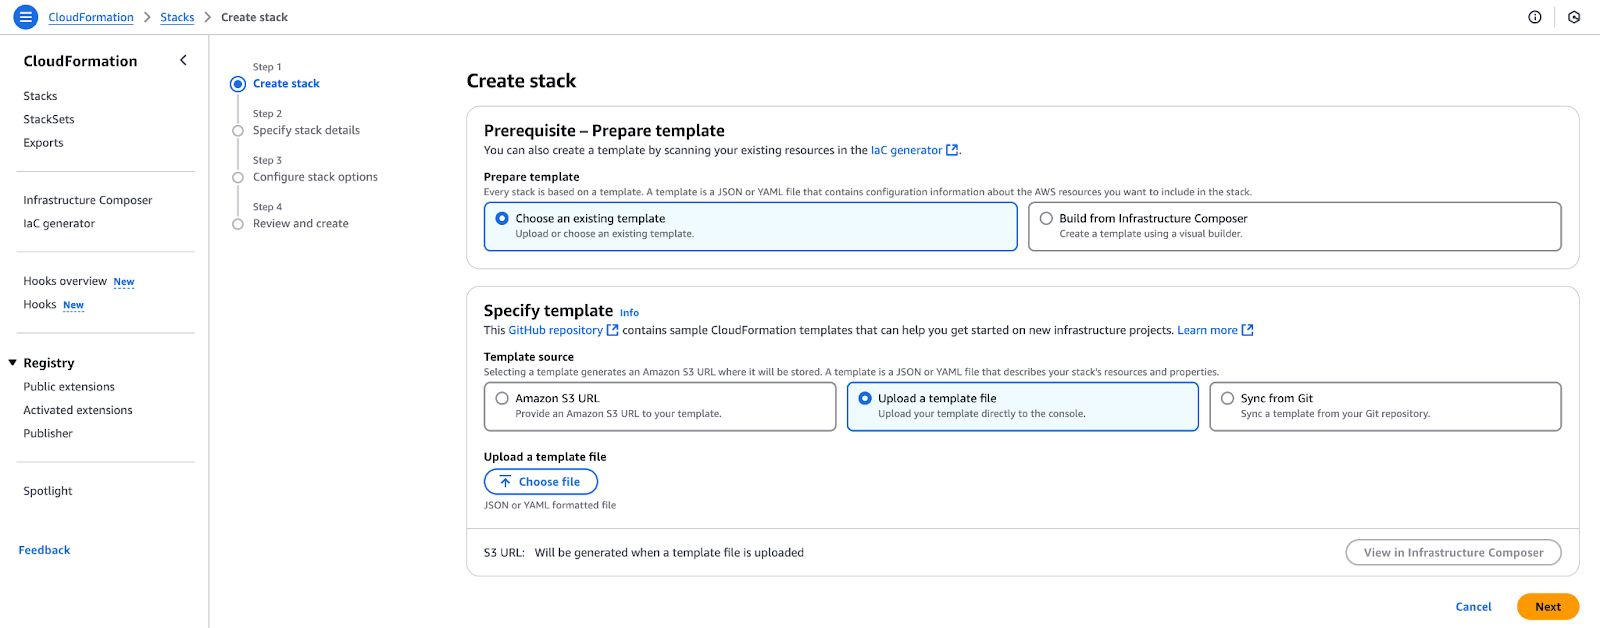
Figure 3 Uploading a CloudFormation template to create a new stack.

  1. Download the file from Github Gist and click Choose file.
  2. Upload the DMS.yaml file and click Next.
  3. Fill in the required parameters as specified, then click Next.

CloudFormation stack setup page showing database migration parameters, EC2 configuration, and network settings

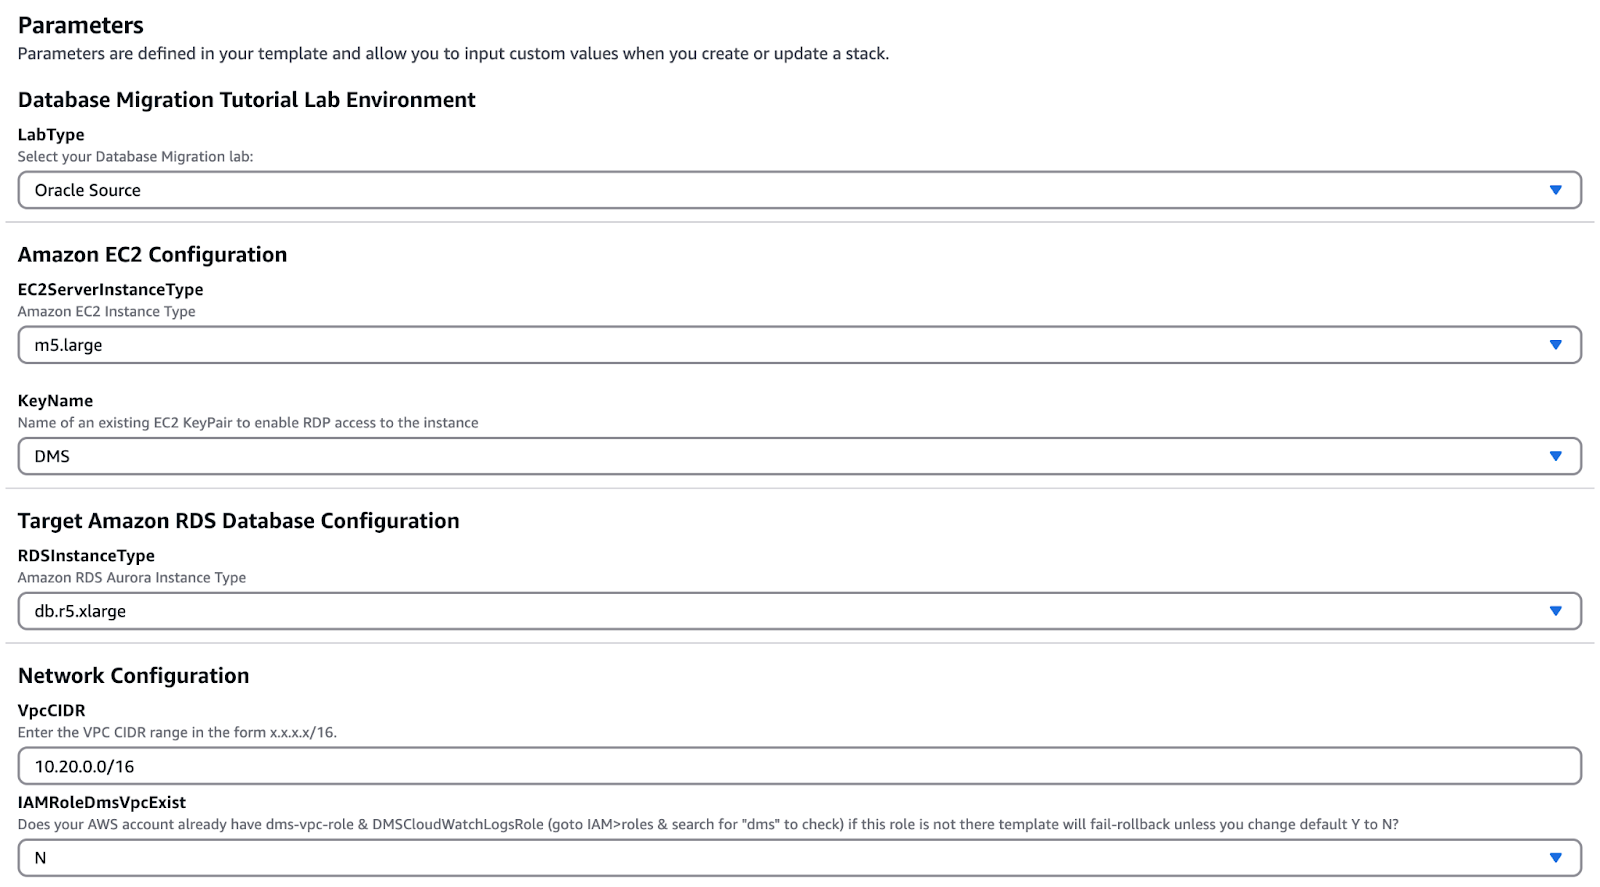
Figure 4 Configuring parameters for an AWS DMS CloudFormation stack

Note: You can adjust the instance type per your requirement or keep it as is.

  1. On the Stack Options page, keep the default settings and click Next.
  2. Review the configuration and click Create stack.
  3. You'll be redirected to the CloudFormation console, where the status will show “CREATE_IN_PROGRESS”. Wait until it changes to “CREATE_COMPLETE”.

CloudFormation resources list displaying logical and physical IDs with their status marked as "CREATE_COMPLETE.

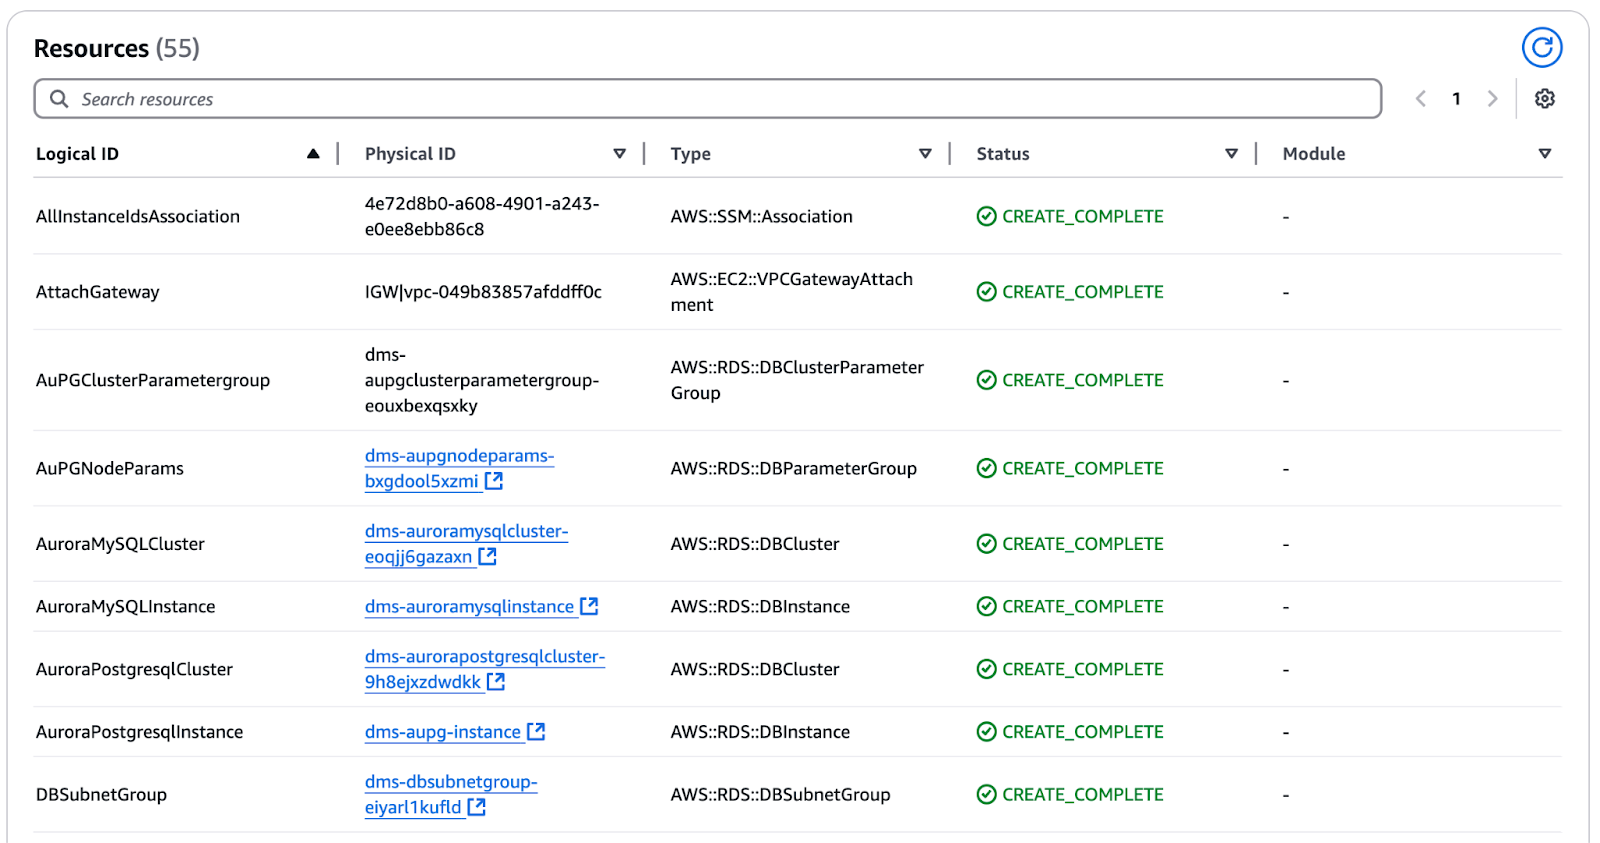
Figure 5  Reviewing resource creation status in AWS CloudFormation

  1. Once complete, navigate to the Outputs section and note the values—you'll need them for the rest of the tutorial.

Prepare source and target database for migration

We will start with the source database configuration. Follow these steps to access the EC2 instance using Remote Desktop Protocol (RDP).

Step 1: Set up RDP access
  • For Mac users: Download Microsoft Remote Desktop from the App Store.
  • For PC users: Use Remote Desktop to connect to the PC you set up.
Step 2: Modify Security Group rules for RDP access
  • Open the AWS EC2 Console.
  • In the left-hand menu, click Security Groups (you may need to scroll down).
  • Select the security group ending in “InstanceSecurityGroup” by checking the box.
  • Click Actions > Edit Inbound Rules.
  • Locate the RDP rule (port 3389), click Source, and select My IP for better security.
    • If on a corporate VPN or a complex network, you may need to change it to “Anywhere (0.0.0.0/0)” later.

AWS security group configuration page showing inbound rules for database and RDP access.

Figure 6 Editing inbound security rules in AWS.

  • Click Save rules.
Step 3: Retrieve RDP credentials
  • In the AWS EC2 Console, click Instances in the left-hand menu.
  • Select the instance named “<StackName>-EC2Instance”.
  • Click Actions > Connect.
  • Navigate to the RDP Client section and click Get password.
  • Click Browse and upload the Key Pair file downloaded earlier.
  • Click Decrypt password.

AWS EC2 interface displaying a private key upload field to decrypt the administrator password.

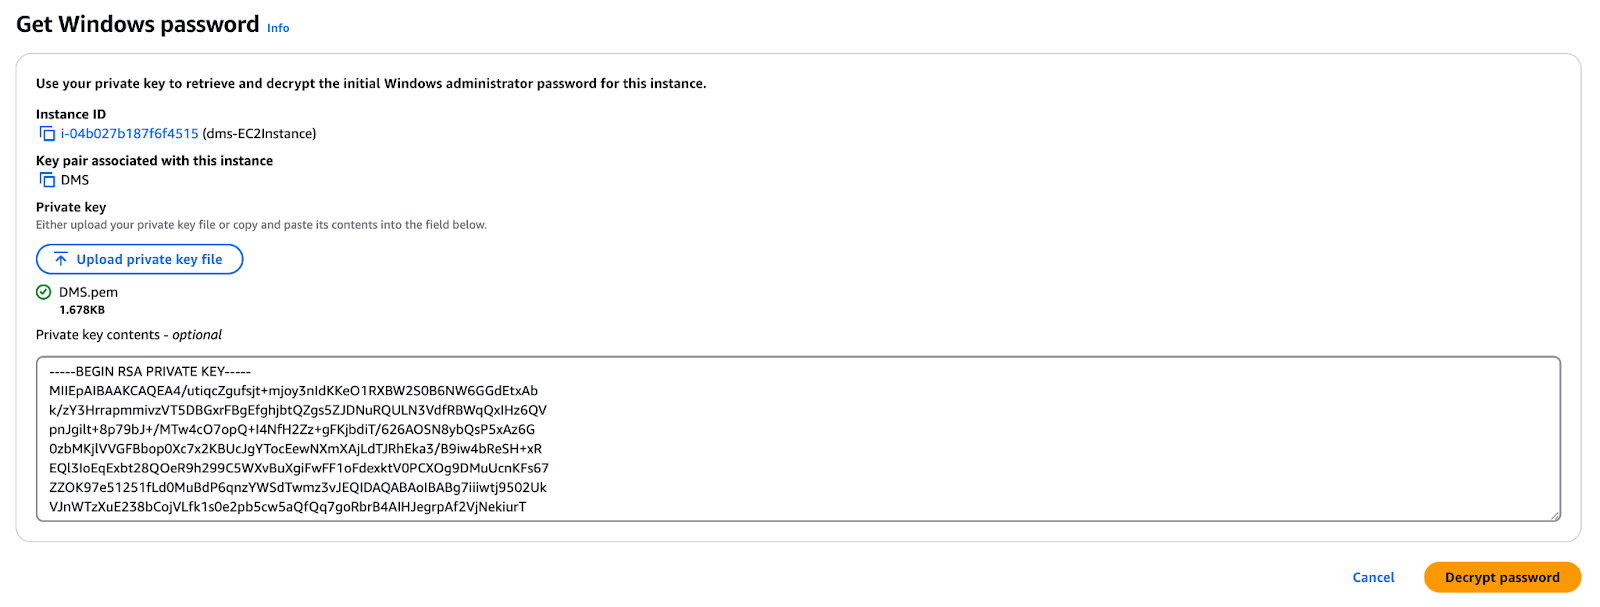
Figure 7 Retrieving the Windows password for an AWS EC2 instance.


  • Copy the generated password to your notes for later use.
Step 4: Connect to the EC2 instance
  • Click Download Remote Desktop File to save the RDP file.
  • Open the RDP client (Microsoft Remote Desktop on Mac).
  • Use the decrypted password to log in.
  • If prompted, click Done to complete the setup.
Step 5: Connect to Oracle SQL Developer

Once connected to the EC2 instance, follow these steps to establish a connection to the Oracle database using Oracle SQL Developer.

Step 1: Open Oracle SQL Developer
  • Locate Oracle SQL Developer in the Taskbar and open it.
    • Note: Your icons may appear in a different order than shown in reference images.

Oracle SQL Developer interface showing a connection setup window with database type, hostname, port, and credentials fields.

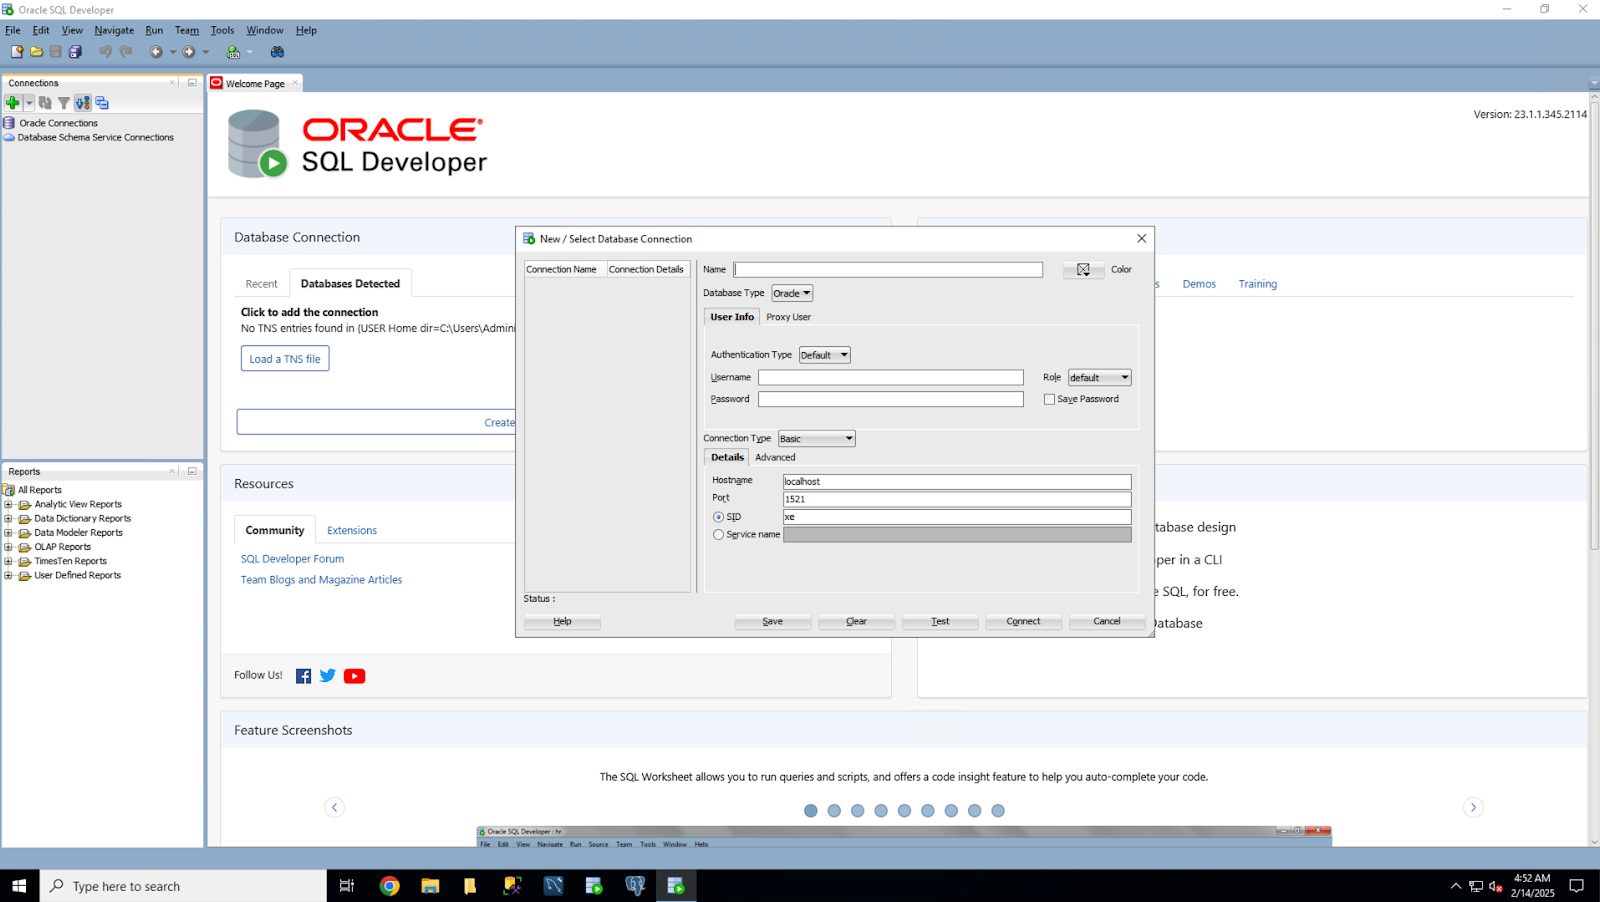
Figure 8 Configuring a new database connection in Oracle SQL Developer.

Step 2: Create a new database connection
  • Click the plus (+) sign in the left-hand menu to create a New Database Connection.
  • Enter the following details:
    • Connection Name: Source Oracle
    • Username: dbadmin
    • Password: Check the CloudFormation Stack’s Outputs tab under DMSDBSecretP
    • Save Password: Check this box.
    • Hostname: Find the Source Oracle Endpoint from the CloudFormation Output tab. Alternatively, navigate to the RDS console, select your Oracle source instance, and use the provided endpoint.
    • Port: 1521
    • SID: ORACLEDB
Step 3: Test and connect
  • Click Test to verify the connection.
  • Once the test status shows “Successful”, click Connect.
Step 4: Configuring Oracle for AWS DMS migration

Before using Oracle as a source for AWS DMS, ensure the following configurations are in place:

1. Create a DMS user with the required privileges

AWS DMS requires a user account (DMS user) with read and write privileges on the Oracle database.

2. Enable ARCHIVELOG MODE
  • ARCHIVELOG MODE must be enabled to provide transaction log information to LogMiner.
  • AWS DMS relies on LogMiner to capture change data from archive logs.
  • Ensure archive logs are retained for at least 24 hours to prevent data loss during migration.
3. Enable supplemental logging
  • Database-level supplemental logging:
    • This ensures LogMiner captures all required details for various table structures (e.g., clustered and index-organized tables).
  • Table-level supplemental logging:
    • It must be enabled for each table that you plan to migrate.
4. Granting required privileges to AWS DMS user
  • In Oracle SQL Developer, click on the SQL Worksheet icon. 
  • Connect to the Source Oracle database. 
  • Copy, paste, and execute the statements from the Github Gist to grant the AWS DMS user the necessary privileges.

SQL scripts are running in Oracle SQL Developer, performing supplemental logging and altering tables

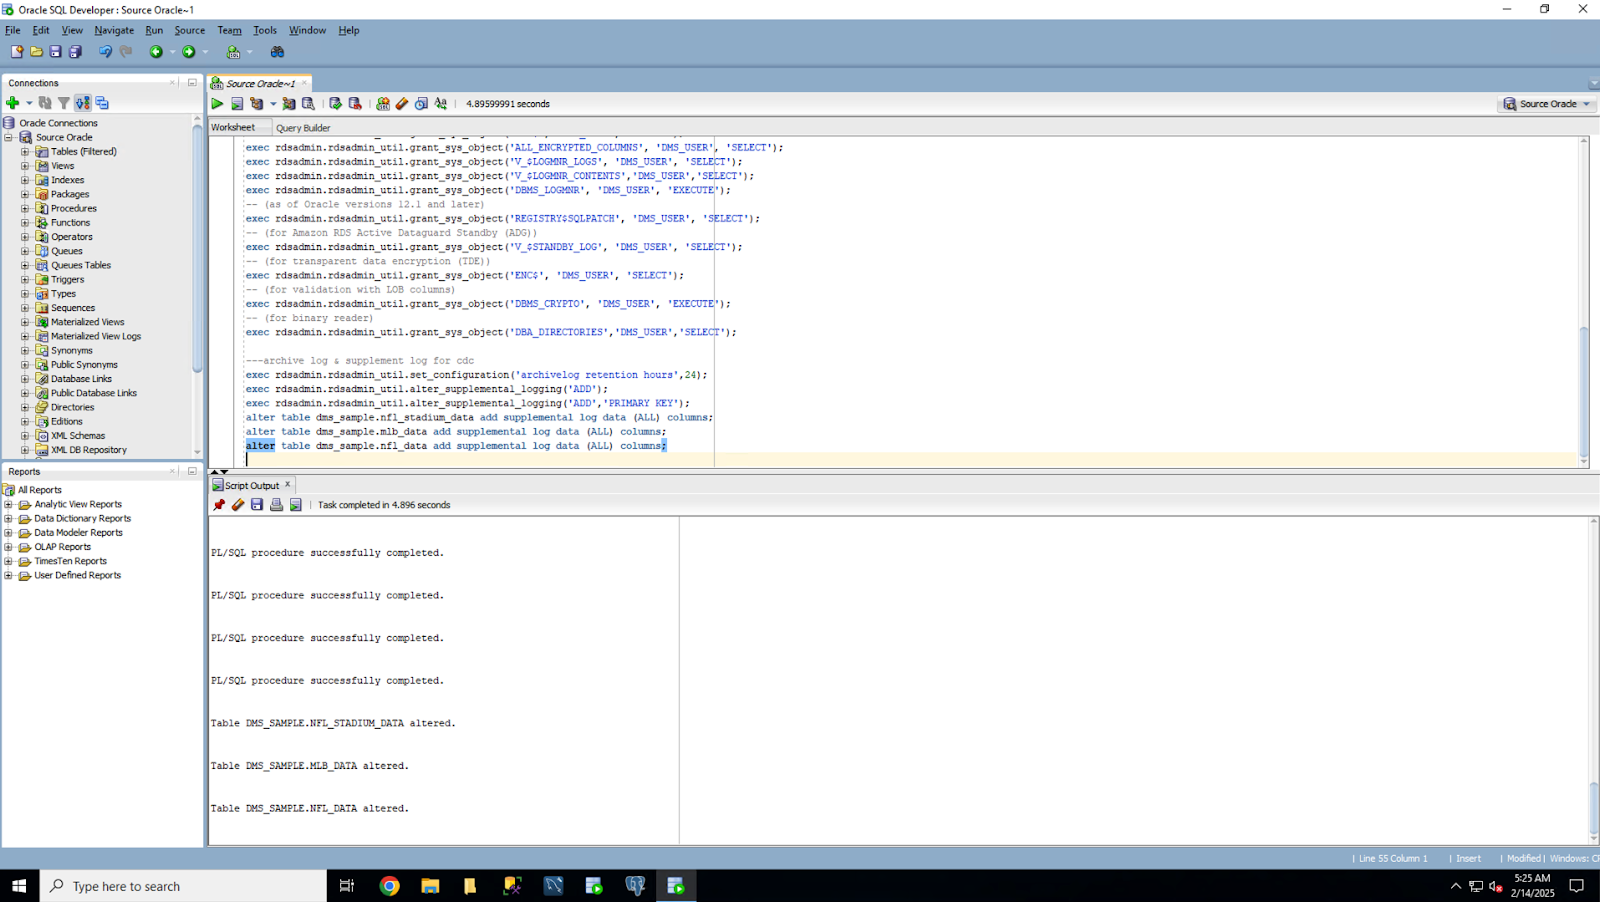
Figure 9 Executing SQL scripts in Oracle SQL Developer.

Step 6: Configure Amazon Aurora (MySQL) target

After selecting the initial setup and the source database, you can migrate a sample database. This guide will describe how to use the AWS Schema Conversion Tool (AWS SCT) and AWS  Database Migration Service (AWS DMS) to transform the database structure and move data to Amazon Aurora (MySQL). 

Furthermore, AWS DMS will act as a tool to enable continuous replication, which means that all the changes made in the source database will be replicated in the target database in real time.

  • Reconnect to the EC2 instance via RDP.
  • Open the DMS Workshop folder on the Desktop and double-click AWS Schema Conversion Tool Download to install the latest version.
  • Unzip and install AWS SCT by following the install wizard (take defaults and click Finish).
  • Launch AWS SCT from the Start Menu or the SCT orange icon on the Desktop and accept the terms.
  • Open MySQL Workbench 8.0 CE and create a new database connection for the target Aurora MySQL using:
    • Connection Name: Target Aurora RDS (MySQL)
    • Host Name: <TargetAuroraMySQLEndpoint> (Find in CloudFormation Outputs or RDS console)
    • Port: 3306
    • Username: dbadmin
    • Password: Retrieve from CloudFormation Output tab
    • Default Schema: Leave blank

MySQL Workbench interface displaying a new connection setup with hostname, port, username, and password fields.

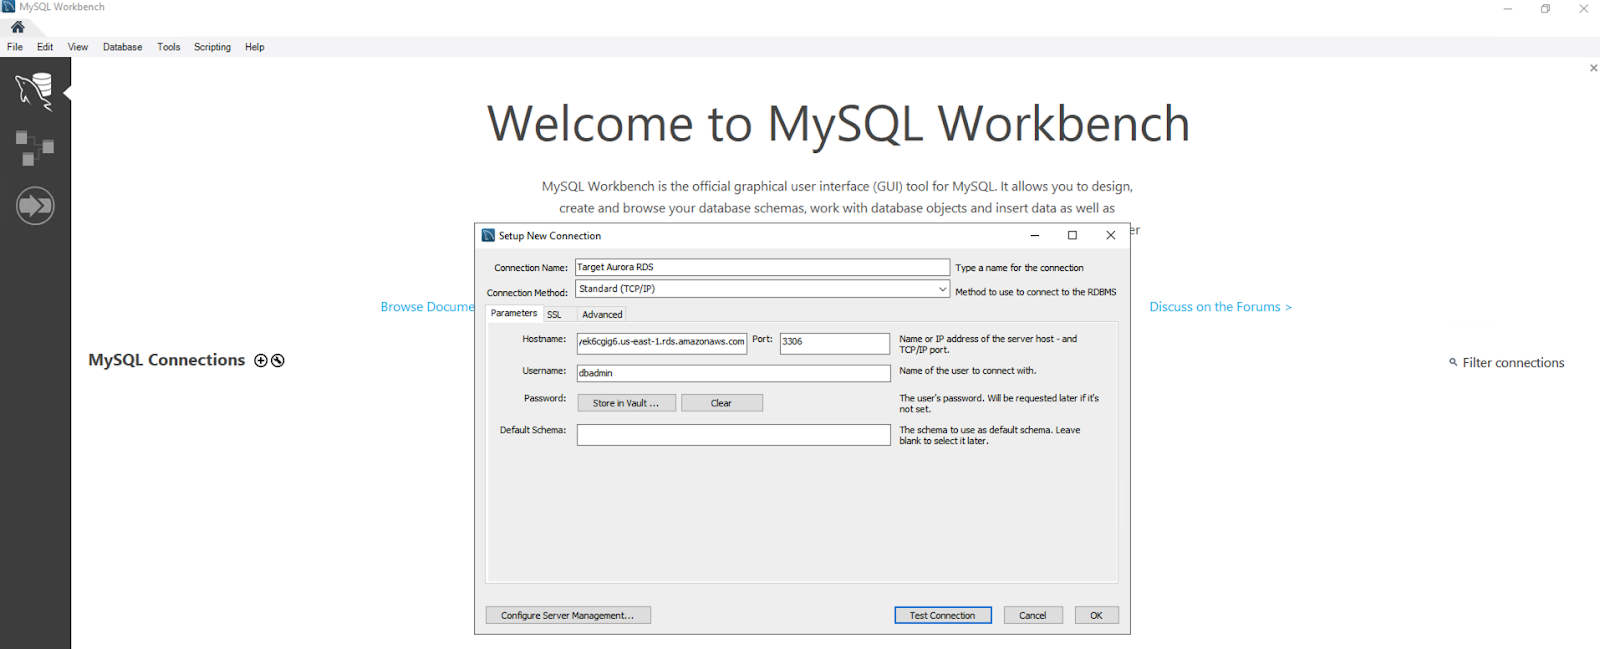
Figure 10 Setting up a MySQL Workbench connection to Amazon Aurora.

  • Click Test Connection, confirm success, then connect to Aurora MySQL.
  • Execute the permission provided by GitHub Gist SQL statements in MySQL Workbench (click the lightning icon to run).

Now that you have installed the AWS Schema Conversion Tool, the next step is to create a Database Migration Project using the tool.

Step 1: Start a new project
  • Open AWS Schema Conversion Tool (SCT).
  • If the New Project Wizard doesn’t start automatically, go to File > New Project Wizard.
  • Enter the following details:
    • Project Name: AWS Schema Conversion Tool Source DB to Aurora MySQL
    • Location: C:\Users\Administrator\AWS Schema Conversion Tool
    • Database Type: Select SQL Database
    • Source Engine: Oracle
    • Migration Type: Select I want to switch engines and optimize for the cloud
  • Click Next.
Step 2: Connect to the source database
  • Fill in the Source Database Configuration:
    • Connection Name: Oracle Source
    • Type: SID
    • Server Name: <SourceOracleEndpoint> (Find in CloudFormation Outputs or RDS Console)
    • Server Port: 1521
    • Oracle SID: ORACLEDB
    • User Name: dbadmin
    • Password: Retrieve from CloudFormation Output tab
    • Use SSL: Unchecked
    • Store Password: Checked
    • Oracle Driver Path: C:\Users\Administrator\Desktop\DMS Workshop\JDBC\ojdbc11.jar
  • Click Test Connection. If successful, click Next.

AWS Schema Conversion Tool showing a successful connection alert after testing Oracle database connectivity.

Figure 11 Testing database connectivity in AWS Schema Conversion Tool.

Step 3: Select the database and review the assessment report
  • Select the dms_sample database, then click Next.
  • Ignore metadata loading warnings if they appear.
  • Review the Database Migration Assessment Report:

AWS Schema Conversion Tool assessment report summarizing conversion actions and storage object compatibility.

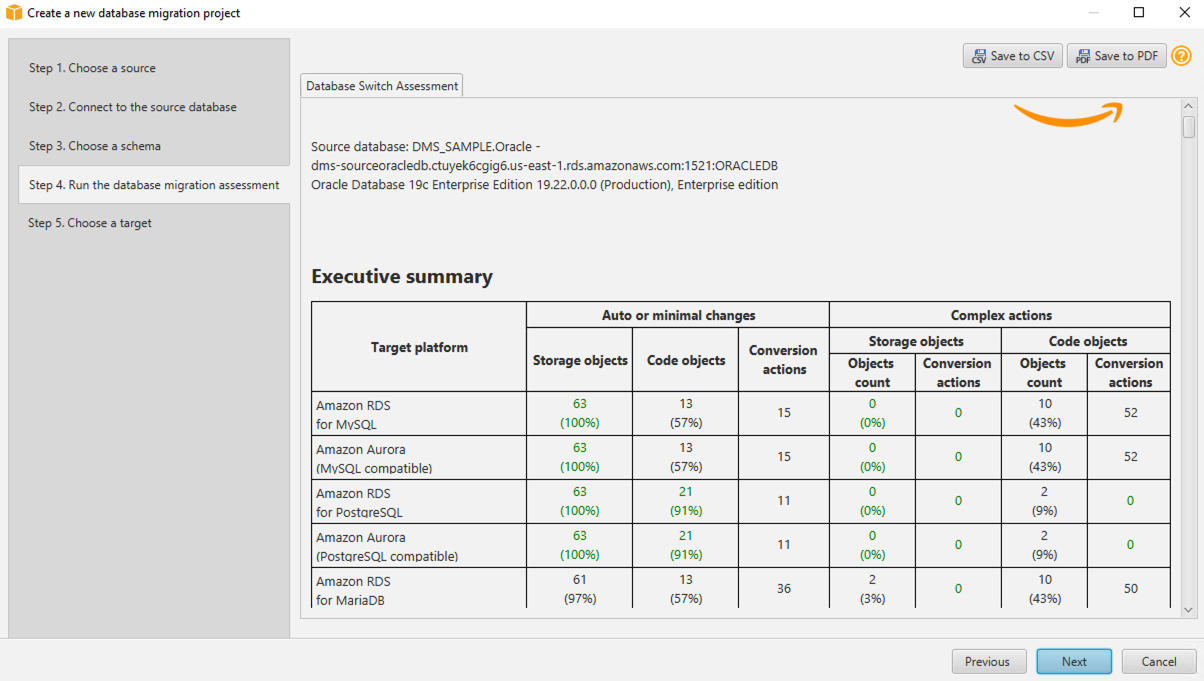
Figure 12 Reviewing database migration assessment results.

  • After reviewing, click Next.

Note: SCT automatically converts most objects and highlights any requiring manual intervention. And pay close attention to procedures, packages, and functions, which may need modifications.

Step 4: Connect to the target database
  • Fill in the Target Database Configuration:
    • Target Engine: Amazon Aurora (MySQL compatible) (change from the default)
    • Connection Name: Aurora MySQL Target
    • Server Name: <TargetAuroraMySQLEndpoint> (Find in CloudFormation Outputs or RDS Console)
    • Server Port: 3306
    • User Name: dbadmin
    • Password: Retrieve from CloudFormation Output tab
    • Use SSL: Unchecked
    • Store Password: Checked
    • MySQL Driver Path: C:\Users\Administrator\Desktop\DMS Workshop\JDBC\mysql-connector-j-8.3.0.jar
  • Click Test Connection. If successful, click Finish.

Now that you’ve created a Database Migration Project, the next step is to convert the source database schema to Amazon Aurora MySQL.

Step 5: Converting the source database schema to Amazon Aurora MySQL
  • Click View in the top menu and select Assessment Report View.
  • Select DMS_SAMPLE on the left panel to display the database hierarchy.
  • Navigate to the Action Items tab to see schema elements that could not be automatically converted.
  • AWS SCT categorizes items as:
    • Green  – Converted successfully.
    • Blue  – Requires manual modification before migration.
  • You have two options for schema elements that cannot be converted automatically:
    • Modify the source schema.
    • Edit the generated SQL scripts before applying them to the target database. We will manually adjust one stored procedure in AWS SCT to make it compatible with Aurora MySQL.
Step 6: Modify SQL code
  • Right-click on the DMS_SAMPLE database in the left panel.
  • Select Convert Schema to generate the target database's Data Definition Language (DDL) statements.
  • When prompted about existing objects, click Yes.

AWS Schema Conversion Tool displaying Oracle and MySQL database structures with a replace objects prompt

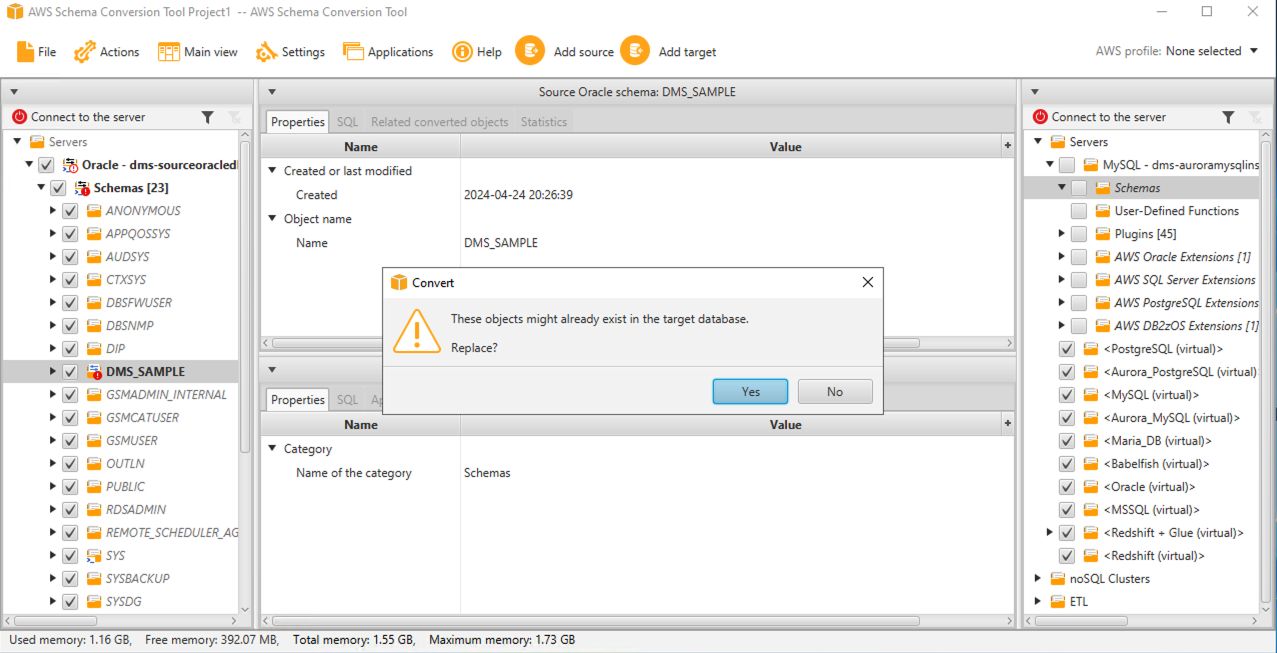
Figure 13 Converting an Oracle schema using AWS Schema Conversion Tool.

  • Right-click on the dms_sample_dbo (SQL Server source) or dms_sample (other sources) schema in the right panel.
  • Select Apply to database.
  • When prompted, click Yes to confirm.
  • Expand the dms_sample_dbo or dms_sample schema in the right panel.
  • You should now see tables, views, stored procedures, and other objects successfully created in Aurora MySQL.

You have successfully converted the database schema and objects to a format compatible with Amazon Aurora MySQL!

Step 2: Creating a replication instance

Follow these steps to create a DMS Replication Instance:

  • Open the AWS Database Migration Service (DMS) console or search for DMS in the AWS search bar.
  • In the left-hand menu, click Replication Instances to access the replication instance management screen.
  • There is a pre-configured replication instance is available, you can skip this step. However, if you want hands-on experience, proceed with creating a new instance:
  • Click Create replication instance in the top-right corner. Then, fill the following details:
    • Name: DMSReplication-dms
    • Descriptive Amazon Resource Name (ARN): Leave blank
    • Description: (Optional) Enter "Replication server for Database Migration"
    • Instance Class: dms.c5.xlarge
    • Engine Version: Leave the default value.
    • High Availability / Multi-AZ: Select Dev or Test workload (Single-AZ)
    • Allocated Storage (GB): 50
    • VPC: Select the VPC ID that includes DMSVpc in the name (adjust the drop-down if necessary)
    • Publicly Accessible: Set to No (unchecked)
    • Advanced -> VPC Security Group(s): Select the default security group

Creating a replication instance

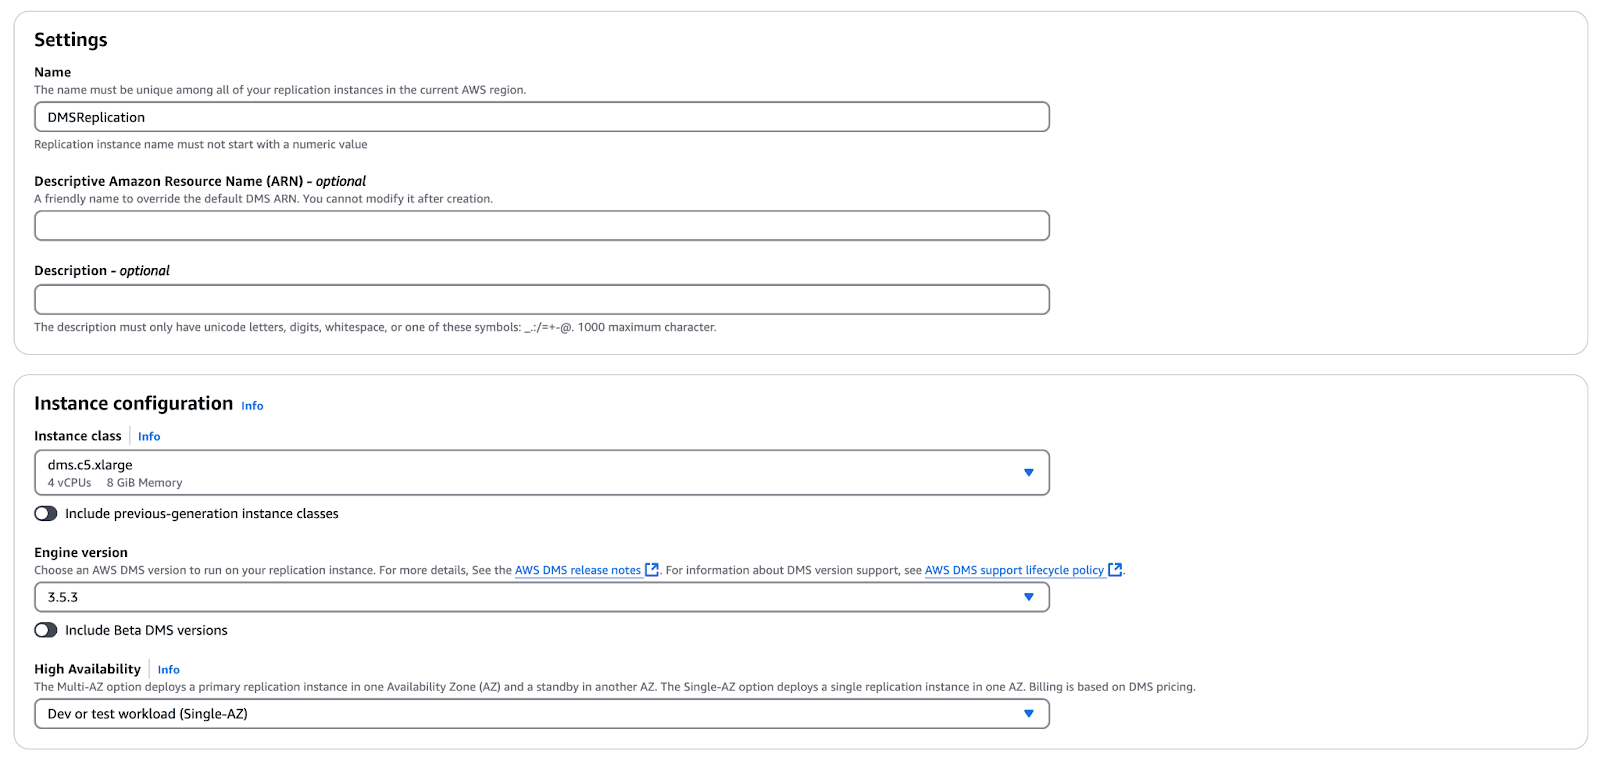
Figure 14 Creating a replication instance.

  • Enter the required details for the replication instance, then click Create.

Step 3: Configuring source and target endpoints

Now that we have the replication instance, the next step is to create source and target endpoints for database migration. Follow these steps to configure both endpoints.

Create the source endpoint

  • Open the AWS DMS Console.
  • In the left-hand menu, click Endpoints.
  • Click Create endpoint (top-right corner).
  • Enter the required details for the source database endpoint:
    • Endpoint Type: Source endpoint
    • Select RDS DB Instance: Check only for Oracle (leave blank for others)
    • RDS Instance: Select <StackName>-SourceOracleDB
    • Endpoint Identifier: oracle-source (or take the pre-populated value)
    • Descriptive ARN: Leave blank
    • Source Engine: Oracle
    • Access to Endpoint Database: Select “Provide access information manually”
    • Server Name: <SourceOracleEndpoint> (it should auto-populate).
    • Port: 1521
    • SSL Mode: None
    • User Name: dbadmin
    • Password: Check the CloudFormation Stack's Outputs tab under 2DMSDBSecretP
    • SID/Service Name: ORACLEDB
    • VPC: Select the VPC ID with DMSVpc from the environment setup
    • Replication Instance: Choose cfn-DMSReplication, DMSReplication, or the replication instance you created (if it is ready)
  • Click Run Test to verify connectivity.

verify connectivity

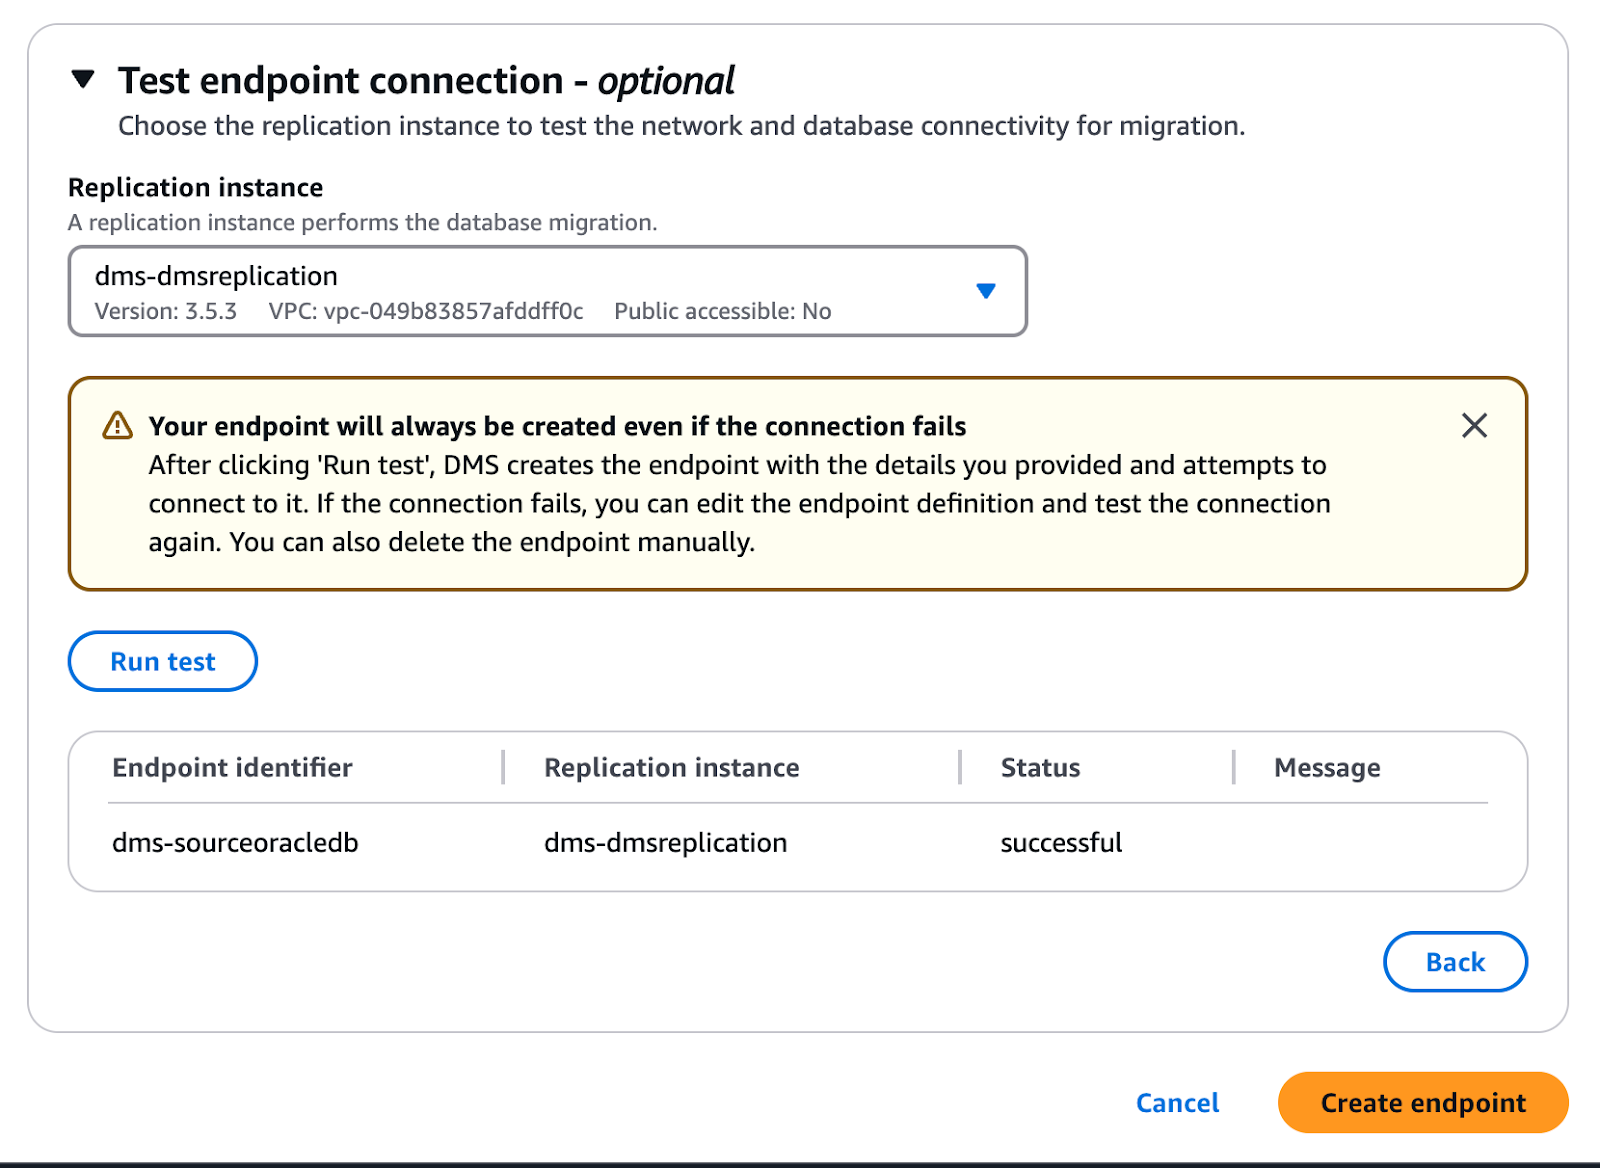
Figure 15 verifying connectivity.

  • Once the test status changes to “Successful”, click Create endpoint.

Create the target endpoint

Follow the same process to create the Target Endpoint for the Aurora RDS Database:

  • Click Create endpoint again.
  • Enter the following details:
    • Endpoint Type: Target endpoint
    • Select RDS DB Instance: Check the box for all RDS database targets
    • RDS Instance: Choose <StackName>-AuroraMySQLInstance
    • Endpoint Identifier: aurora-mysql-target
    • Descriptive ARN: Leave blank
    • Target Engine: Amazon Aurora MySQL
    • Access to Endpoint Database: Select “Provide access information manually”
    • Server Name: TargetAuroraMySQLEndpoint (or it should auto-populate).
    • Port: 3306
    • SSL Mode: None
    • User Name: dbadmin
    • Password: check the CloudFormation Stack's Outputs tab under 2DMSDBSecretP
    • VPC: Select the VPC ID with DMSVpc from the environment setup
    • Replication Instance: Choose cfn-DMSReplication, DMSReplication, or the replication instance you created (if it is ready)
  • Click Run Test to verify connectivity.
  • Once the test status changes to “Successful”, click Create endpoint.

Step 4: Setting up the migration task

Handling foreign key constraints in AWS DMS migration

AWS DMS does not put an order on the tables to be loaded during the full load, which may lead to foreign key violations if constraints are enabled. Also, triggers on the target database can lead to unexpected changes in the data. We also dropped foreign key constraints from the target  Aurora MySQL database.

  • Launch MySQL Workbench 8.0 CE (used earlier for permissions setup).
  • Open a new query window.
  • Drop foreign key constraints: AWS SCT does not automatically create constraints when migrating from Oracle; it only creates indexes. Run the following SQL script to drop the indexes:
DROP INDEX set_seat_idx ON dms_sample.sporting_event_ticket;
DROP INDEX set_ticketholder_idx ON dms_sample.sporting_event_ticket;
DROP INDEX set_sporting_event_idx ON dms_sample.sporting_event_ticket;
  • Click the Execute (lightning) icon to run the script.

MySQL Workbench interface showing SQL queries

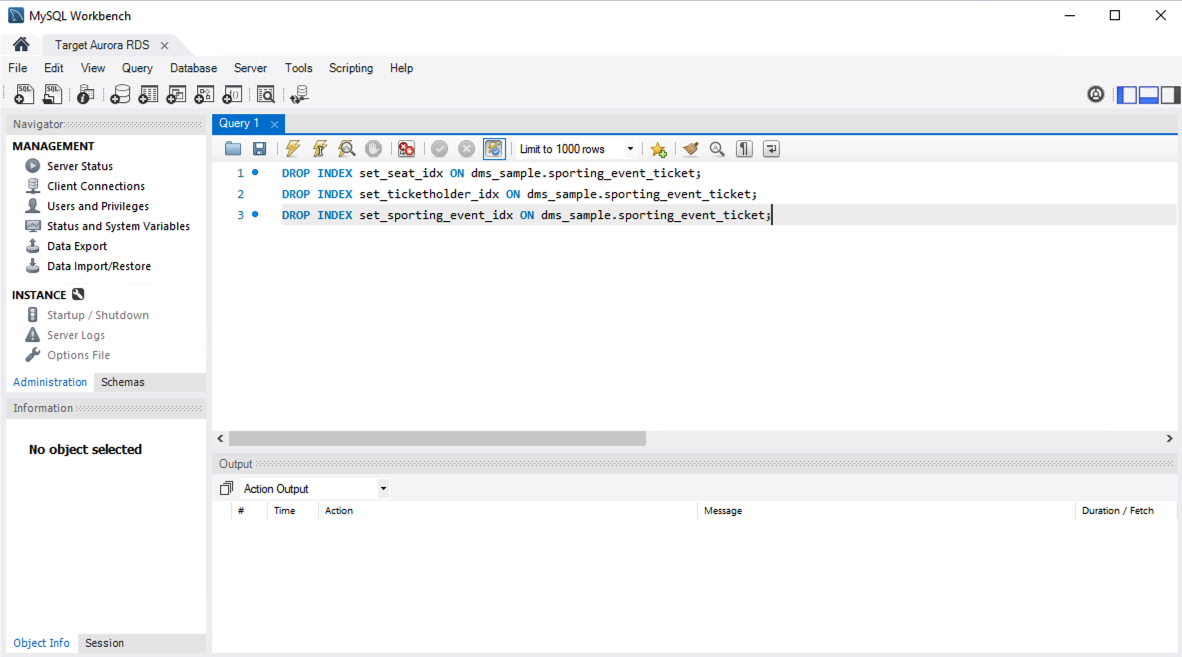
Figure 16 MySQL Workbench interface showing SQL queries.

With the constraints dropped, the target Aurora MySQL database is now ready for data migration using AWS DMS!

Create a DMS migration task

AWS DMS uses Database Migration Tasks to move data from the source to the target database. Follow these steps to create and monitor the migration task.

Step 1: Create a migration task
  • Open the AWS DMS Console.
  • Click Database migration tasks in the left-hand menu.
  • Click Create task (top-right corner).
Step 2: Configure task settings
  • Task Identifier: source-to-AuroraMySQL-target
  • Replication Instance: cfn-dmsreplication
  • Source Database Endpoint: Select your source database
  • Target Database Endpoint: cfn-auroramysqlinstance
  • Migration Type: Migrate existing data and replicate ongoing changes
  • CDC Stop Mode: Don’t use custom CDC stop mode
  • Create Recovery Table on Target DB: Unchecked
  • Target Table Preparation Mode: Do nothing (not the default)
  • Stop Task After Full Load Completes: Don’t stop
  • LOB Column Settings / Include LOB Columns in Replication: Limited LOB mode
  • Max LOB Size (KB): 32
  • Data Validation: Unchecked
  • Enable CloudWatch Logs: Checked
  • Log Context: Default levels
  • Batch-Optimized Apply: Unchecked
Step 3: Configure table mappings
  • Expand the Table mappings section.
  • Select Wizard as the editing mode.
  • Click Add new selection rule, then enter the following:
    • Schema: DMS_SAMPLE%
    • Table Name: %
    • Action: Include

Configure table mapping section shows various rules which can be applied

Figure 17 Configure Table Mapping.

Step 4: Configure transformation rules
  • Expand the Transformation rules section.
  • Click Add new transformation rule and enter the following rules:
    • Rule 1:
      • Target: Schema
      • Schema Name: DMS_SAMPLE
      • Action: Make lowercase
    • Rule 2:
      • Target: Table
      • Schema Name: DMS_SAMPLE
      • Table Name: %
      • Action: Make lowercase
    • Rule 3:
      • Target: Column
      • Schema Name: DMS_SAMPLE
      • Table Name: %
      • Action: Make lowercase
Step 5: Finalize and start migration task
  • Uncheck Turn on premigration assessment (not required for this tutorial).
  • Ensure the Migration task startup configuration is set to Start automatically on create.
  • Click Create task.

Performing the Migration

It’s finally time to perform our migration!

Step 1: Initiating the migration

The task will go through the following statuses:

  • Creating → Ready → Starting → Running.
  • Click the circular refresh button to update the status.

Image showing data migration status

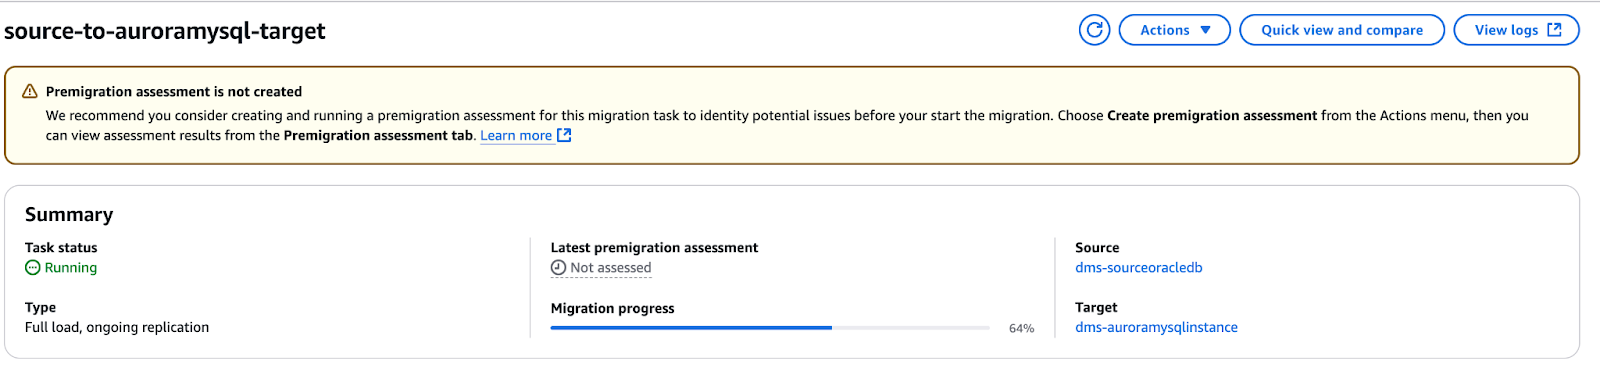
Figure 18 AWS DMS migration task interface showing ongoing replication.

Step 2: Monitoring the migration

AWS DMS provides CloudWatch metrics to monitor the performance of your replication instance and migration tasks.

Viewing CloudWatch metrics for replication instances:

  • Open the AWS DMS Console.
  • Click Replication Instances in the left-hand menu.
  • Select your replication instance.
  • Navigate to the CloudWatch Metrics tab to view performance data.

AWS CloudWatch monitoring graphs showing CPU, memory, and available memory trends.

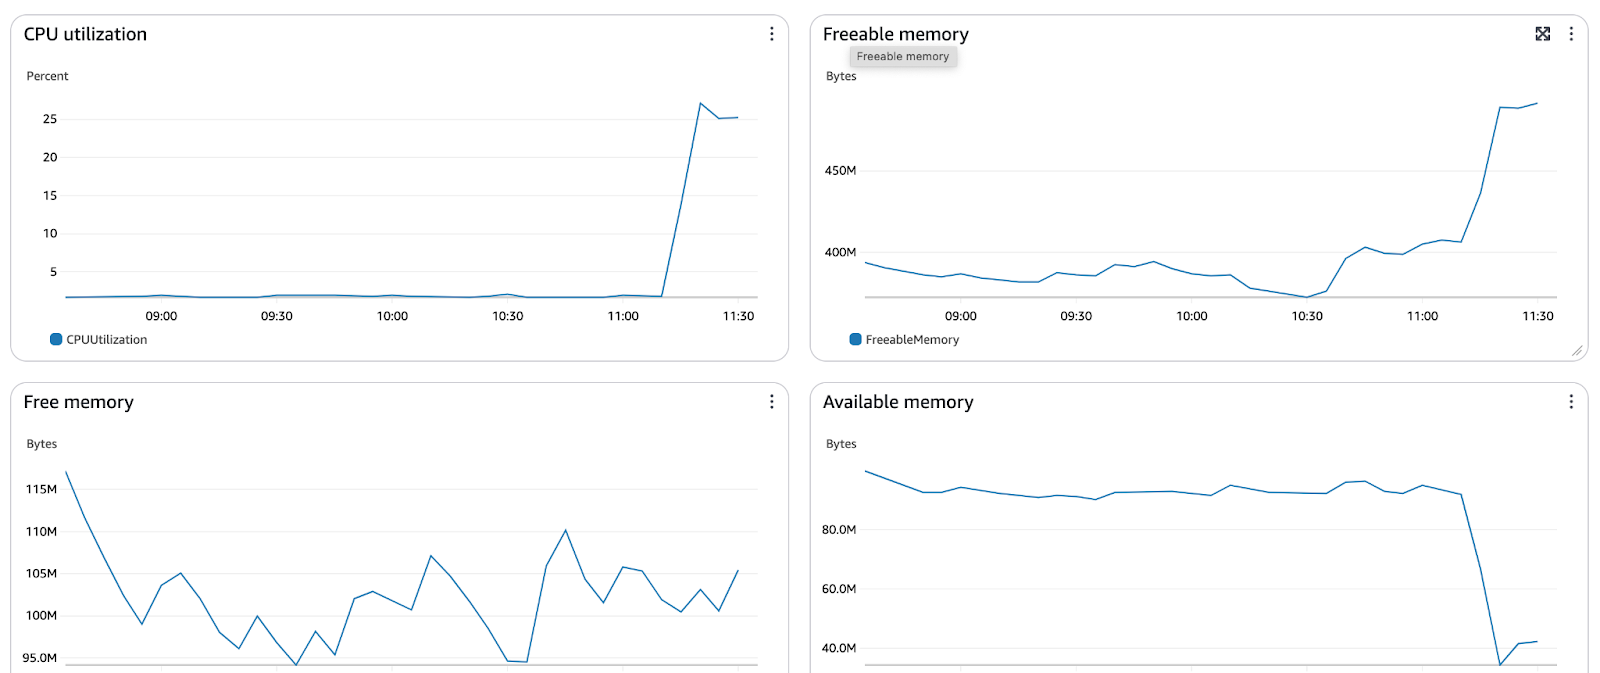
Figure 19 AWS DMS Instance Resource Utilization Graphs.

Viewing CloudWatch metrics for migration tasks:

  • Open the AWS DMS Console.
  • Click Database Migration Tasks in the left-hand menu.
  • Select your DMS task from the list.
  • Navigate to the Monitor tab to analyze task performance.

AWS CloudWatch displaying full load throughput bandwidth and row transfer metrics.

Figure 20 AWS DMS Full Load Throughput Metrics.

With CloudWatch, you can track key metrics such as latency, replication lag, and task status.

Step 3: Handling migration errors and warnings

During AWS DMS migration, errors and warnings can arise due to connection failures, data integrity issues, or misconfigurations. Below are common issues and troubleshooting steps to resolve them.

1. Connection failures

  • Issue: DMS cannot connect to the source or target database.
  • Resolution:
    • Verify VPC settings, Security Groups, and Subnet availability.
    • Ensure the correct database hostname, port, and credentials are used.
    • Test connectivity by clicking Test Endpoint Connection in the DMS Console.

2. Data integrity issues

  • Issue: Missing or inconsistent data between source and target.
  • Resolution:
    • Enable CDC validation to check for missing transactions.
    • Compare row counts using CloudWatch metrics.
    • Run checksum validation queries on both databases to ensure data consistency.

3. Performance bottlenecks

  • Issue: Migration is slow or lagging.
  • Resolution:
    • Enable Parallel Load to speed up bulk transfers.
    • Adjust LOB mode (use Full LOB mode if handling large objects).
    • Monitor CloudWatch metrics for CPU, memory, and replication lag.

4. Target database constraints and triggers

  • Issue: Foreign key violations or unexpected data modifications.
  • Resolution:
    • Disable foreign key constraints before migration.
    • Drop triggers temporarily on the target database to avoid conflicts.

5. CDC replication stopped unexpectedly

  • Issue: The task stops before applying ongoing changes.
  • Resolution:
    • Check the CDC start position in the logs.
    • Ensure the retention period for logs is sufficient (e.g., 24 hours for Oracle LogMiner).
    • Restart the CDC task from the last applied transaction.

6. Schema mismatch between source and target

  • Issue: Certain objects fail to migrate due to schema differences.
  • Resolution:
    • Use AWS SCT (Schema Conversion Tool) to assess incompatibilities.
    • Apply manual schema modifications if required.

7. Checking logs and debugging errors

  • Use AWS CloudWatch logs:
    • Navigate to the AWS DMS Console > Migration Tasks > View Logs.
    • Filter logs by error keywords like failure, timeout, or constraint violation.
  • Enable Verbose Logging if deeper insights are needed.

Post-Migration Steps

Now, let’s take a look at some steps you can take after a migration with DMS.

Step 1: Validating data integrity

Once AWS DMS completes the migration, it is crucial to validate data integrity and ensure the target database accurately reflects the source. Below are key validation techniques:

Using AWS DMS data validation feature

  • If data validation was enabled in AWS DMS, navigate to:
    • AWS DMS Console > Migration Tasks > Table Statistics
    • Check for any validation failures and re-run migration for affected tables.

AWS DMS validation summary showing no pending, failed, or suspended validations.

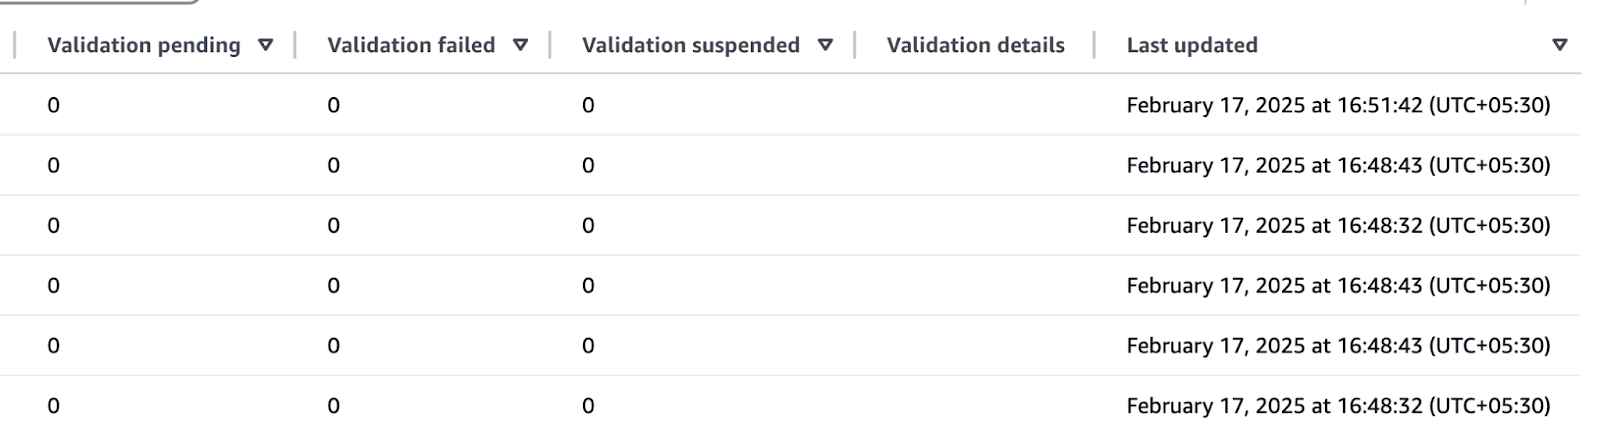
Figure 21 AWS DMS Validation Summary.

Step 2: Performing cutover to the target database

Once AWS DMS has successfully migrated all data and completed ongoing replication (CDC), the final step is to cut over to the target database as the primary system. Follow these steps to ensure a smooth transition:

Step 1: Verify data consistency

Before switching over, confirm that all data has been fully replicated:

  • Check row counts between source and target.
  • Run checksum validation on key tables.
  • Review CloudWatch metrics for replication lag (should be zero before cutover).

Step 2: Stop any new changes on the source database

To prevent data inconsistencies:

  • Disable writes on the source database by setting it to read-only mode.
  • Ensure all applications that write to the database point to the new target instead.

Step 3: Stop AWS DMS replication

  • In the AWS DMS Console, navigate to Database Migration Tasks.
  • Select your active migration task.
  • Click Stop Task to halt ongoing replication.

AWS DMS Migration Task Stop

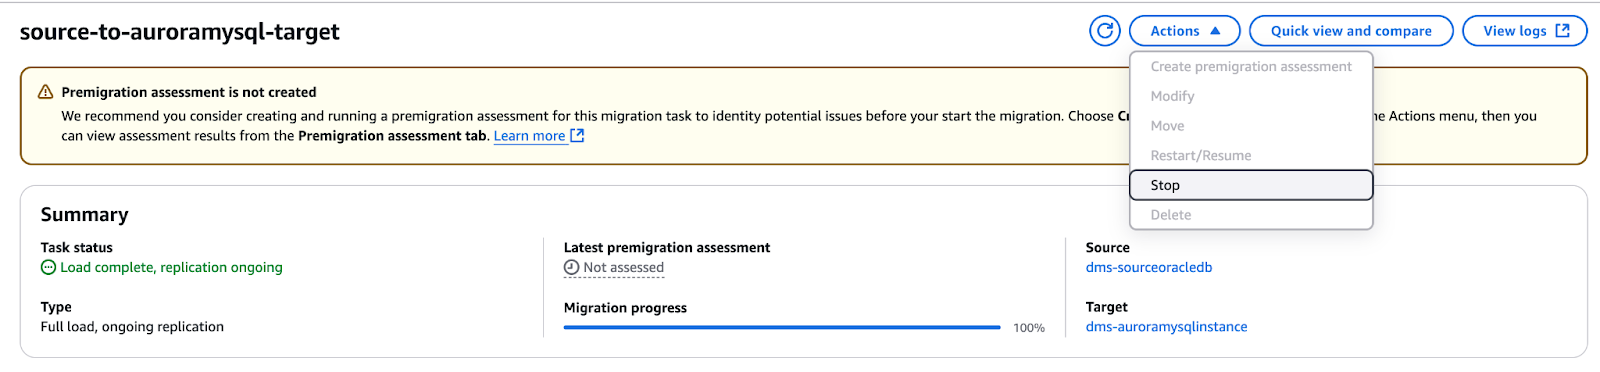
Figure 22 AWS DMS Migration Task Stop.

Step 4: Promote the target database to primary

  • Remove read-only restrictions on the target database
  • Update application connection strings to point to the new database.

Step 5: Perform final validation and testing

  • Test critical application queries to confirm functionality.
  • Validate that new transactions are being processed correctly in the target system.
  • Run end-to-end testing to ensure business processes remain intact.

Step 6: Decommission the old source database (if needed)

  • The source database can be archived or decommissioned if it is no longer required.
  • Keep backups before fully removing the source system.

Step 3: Cleanup and finalization

Step 1: Stop and delete the migration task

  • Open the AWS DMS Console.
  • In the left-hand menu, click Database Migration Tasks.
  • Select the migration task(s) you created.
  • Click Actions > Stop and confirm.
  • Once the task status changes to “Stopped”, click Actions > Delete and confirm.

Step 2: Delete DMS endpoints

  • In the AWS DMS Console, click Endpoints in the left-hand menu.
  • Select the endpoints created during the tutorial.
  • Click Actions > Delete and confirm.

AWS DMS Endpoints Deletion

Figure 23 AWS DMS Endpoints Deletion.

Step 3: Delete the CloudFormation stack

AWS interface prompting confirmation to delete a CloudFormation stack.

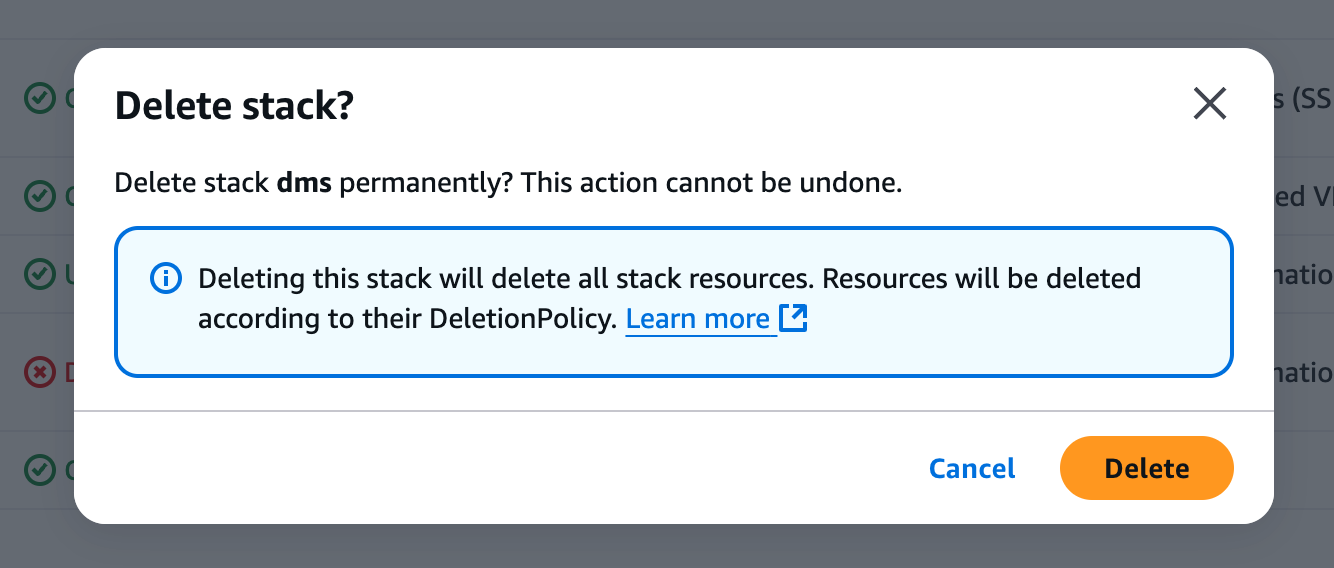
Figure 24 Confirming Stack Deletion in AWS.

  • Confirm the deletion—CloudFormation will automatically remove all associated resources (this may take up to 15 minutes).
  • Monitor the CloudFormation console to ensure the stack is fully deleted.

Advanced Features of AWS DMS

Now, let’s take a look at some of the more complex scenarios that you can solve with AWS DMS.

Data transformation during migration

AWS DMS enables data transformation during migration by allowing modifications such as changing column data types, renaming tables and columns, and filtering data. These transformations help align the source schema with the target database structure. Using transformation rules in the Table Mappings section, you can apply these changes dynamically without altering the source database. 

For detailed steps, refer to this blog post on transforming column content.

Using AWS DMS with S3 as a target

AWS DMS can migrate data to Amazon S3, enabling cost-effective storage for analytics, machine learning, or further processing using services like AWS Glue, Athena, or Redshift.

Follow these steps to configure Amazon S3 as the target destination for AWS DMS migration.

Step 1: Create an S3 bucket

  • Open the Amazon S3 Console.
  • Click Create bucket.
  • Set the Bucket Name as: dmstargetbucket-<random 4-digit number>
  • Ensure the region matches the AWS DMS resources.
  • Leave all other settings as default and click Create bucket.

Step 2: Create a folder in the S3 bucket

  • Open the newly created bucket.
  • Click Create folder.
  • Name the folder dmstargetfolder.
  • Leave all defaults and click Create folder.

Step 3: Create an AWS IAM policy for S3 access

  • Open the IAM Console and go to Policies.
  • Click Create policy, then choose the JSON tab.
  • Copy and paste the following policy, replacing "REPLACE-WITH-YOUR-BUCKET-NAME" with your actual bucket name:
{
  "Version": "2012-10-17",
  "Statement": [
    {
      "Effect": "Allow",
      "Action": [
        "s3:PutObject",
        "s3:DeleteObject"
      ],
      "Resource": [
        "arn:aws:s3:::REPLACE-WITH-YOUR-BUCKET-NAME*"
      ]
    },
    {
      "Effect": "Allow",
      "Action": [
        "s3:ListBucket"
      ],
      "Resource": [
        "arn:aws:s3:::REPLACE-WITH-YOUR-BUCKET-NAME*"
      ]
    }
  ]
}
  • Click Review policy.
  • Set the Policy Name as DMS-tutorial-S3-Access-Policy, then click Create policy.

Step 4: Attach policy to IAM role

  • In the IAM Console, go to Roles.
  • Search for “dms-vpc” and select dms-vpc-role.
  • Click Add permissions > Attach policies.

AWS IAM permissions management interface showing attached policies

Figure 25 AWS IAM Policy Management.

  • Select DMS-LAB-S3-Access-Policy and click Add permissions.

Step 5: Save the IAM Role ARN

  • On the dms-vpc-role summary page, copy the Role ARN.
  • Save it for later use in AWS DMS configuration.

Creating S3 target endpoints

Now that the S3 bucket is configured with the appropriate policies and roles, the next step is to create target endpoints in AWS DMS.

  • Open the AWS DMS Console.
  • Click Endpoints in the left-hand menu.
  • Click Create endpoint (top-right corner).
  • Configure the destination endpoint S3.
  • Enter the following values:
    • Endpoint Type: Target endpoint
    • Endpoint Identifier: S3-target
    • Descriptive ARN: Leave blank
    • Target Engine: Amazon S3
    • Server Name: <ARN of the dms-vpc-role>
    • Bucket Name: <Your S3 Bucket Name>
    • Bucket Folder: dmstargetfolder
  • Click Run Test to verify the connection.
  • Once the test is “Successful”, click Create endpoint.

Creating a DMS migration task

Step 1: Create a migration task
  • Open the AWS DMS Console.
  • Click Database migration tasks in the left-hand menu.
  • Click Create task (top-right corner).
Step 2: Configure task settings
  • Task Identifier: source-to-AuroraMySQL-target
  • Replication Instance: cfn-dmsreplication
  • Source Database Endpoint: Select your source database
  • Target Database Endpoint: cfn-auroramysqlinstance
  • Migration Type: Migrate existing data and replicate ongoing changes
  • CDC Stop Mode: Don’t use custom CDC stop mode
  • Create Recovery Table on Target DB: Unchecked
  • Target Table Preparation Mode: Do nothing (not the default)
  • Stop Task After Full Load Completes: Don’t stop
  • LOB Column Settings / Include LOB Columns in Replication: Limited LOB mode
  • Max LOB Size (KB): 32
  • Data Validation: Unchecked
  • Enable CloudWatch Logs: Checked
  • Log Context: Default levels
  • Batch-Optimized Apply: Unchecked
Step 3: Configure table mappings
  • Expand the Table mappings section.
  • Select Wizard as the editing mode.
  • Click Add new selection rule, then enter the following:
    • Schema: DMS_SAMPLE%
    • Table Name: %
    • Action: Include

Configure Table Mapping

Figure 26 Configure Table Mapping

Step 4: Configure transformation rules
  • Expand the Transformation rules section.
  • Click Add new transformation rule and enter the following rules:
    • Rule 1:
      • Target: Schema
      • Schema Name: DMS_SAMPLE
      • Action: Make lowercase
    • Rule 2:
      • Target: Table
      • Schema Name: DMS_SAMPLE
      • Table Name: %
      • Action: Make lowercase
    • Rule 3:
      • Target: Column
      • Schema Name: DMS_SAMPLE
      • Table Name: %
      • Action: Make lowercase
Step 5: Finalize and start migration task
  • Uncheck Turn on premigration assessment (not required for this workshop).
  • Ensure the Migration task startup configuration is set to Start automatically on create.
  • Click Create task.
Step 6: Monitor migration progress
  • Click on the migration task (source-to-s3-target).
  • Scroll to Table Statistics to view the number of rows moved.
  • If the status turns red (error), click View Logs to troubleshoot using CloudWatch logs.

Best Practices for AWS DMS

Now, let’s look at some of the best practices to apply when migrating data using AWS DMS.

Optimize performance

To ensure efficient and fast database migration using AWS DMS, consider the following optimizations:

  • Choose the right replication instance size
    • Use a larger instance type (e.g., dms.r5.large or higher) for high-throughput migrations.
    • Monitor CPU, memory, and IOPS using CloudWatch and scale the instance if needed.
  • Use multiple migration tasks for parallel processing
    • Split large migrations into multiple tasks by table groups to reduce load time.
    • Migrate large tables separately from small ones to balance performance.
  • Optimize network connections
    • Place the DMS replication instance in the same VPC and Availability Zone as the source and target databases.
    • Use VPC endpoints or Direct Connect for better network stability and reduced latency.
  • Tune LOB settings
    • For large objects (LOBs), use Limited LOB Mode with an appropriate LOB size to minimize performance impact.
  • Enable parallel load and batch apply
    • Turn on Batch Optimized Apply for faster inserts into the target database.
    • Use Parallel Load for large-scale migrations to process multiple tables simultaneously.

Plan for downtime

Minimizing downtime during database migration is crucial for maintaining business continuity. Here are key strategies to ensure a smooth cutover:

  • Migrate during low-traffic periods
    • Schedule the cutover during off-peak hours to minimize the impact on users.
    • Notify stakeholders in advance to prepare for temporary disruptions.
  • Use ongoing replication (CDC)
    • Enable Change Data Capture (CDC) to keep the target database synchronized with the source.
    • This allows applications to switch over with minimal data loss.
  • Perform a test cutover
    • Run a trial migration on a staging environment before the final cutover.
    • Validate performance and resolve any schema or data inconsistencies.
  • Reduce DNS switch impact
    • Prepare a DNS-based database connection so that switching to the new target is seamless.
    • Update application connection strings only when the migration is verified.
  • Keep the source read-only before the final cutover
    • Prevent new transactions on the source by setting it to read-only mode.
    • Ensure all pending changes are replicated before pointing applications to the target.

Secure your data

Data security during migration is critical to protect sensitive information and comply with compliance requirements.

  • Encrypt data in transit with SSL/TLS
    • Enable SSL/TLS for source and target database connections to prevent interception.
    • Use certificate-based authentication for added security.
  • Restrict access with AWS IAM roles and policies
    • Assign the least privilege IAM roles to the DMS replication instance and endpoints.
    • Use IAM policies to restrict access to specific databases, S3 buckets, and CloudWatch logs.
  • Enable at-rest encryption
    • Use AWS Key Management Service (KMS) to encrypt Amazon S3 or RDS data.
    • Ensure the target database supports encryption for secure storage.

Troubleshooting AWS DMS

DMS is a powerful tool, but it doesn’t come without problems. Here’s how to troubleshoot the most common ones.

Common errors and solutions

AWS DMS migrations can encounter errors related to database connectivity, schema mismatches, and replication failures.

1. Database connection errors

  • Error: "Failed to connect to database endpoint."
  • Solution:
    • Verify VPC, security groups, and subnet settings.
    • Check if the database is accessible from the DMS replication instance.
    • Ensure the correct host, port, and credentials in the DMS endpoint settings.
    • Test connectivity using the "Test Endpoint Connection" option in the DMS console.

2. Data type compatibility issues

  • Error: "Unsupported data type conversion between source and target."
  • Solution:
    • Use AWS Schema Conversion Tool (SCT) to identify incompatible data types.
    • Modify column data types manually in the target schema if needed.
    • Enable transformation rules in DMS to automatically convert incompatible types.

3. Foreign key constraint violations

  • Error: "Foreign key constraint violation in target database."
  • Solution:
    • Disable foreign key constraints before migration and re-enable after completion.
    • Use "Truncate before load" if reloading data into an existing table.

4. Slow migration performance

  • Error: "Replication lag increasing significantly."
  • Solution:
    • Use a larger DMS replication instance (dms.r5.large or higher).
    • Enable Parallel Load and Batch Optimized Apply for faster ingestion.
    • Optimize network connections by placing DMS, source, and target in the same VPC.

5. Ongoing replication (CDC) stopping unexpectedly

  • Error: "CDC task stopped due to missing log files."
  • Solution:
    • Ensure sufficient log retention on the source database (e.g., 24 hours for Oracle LogMiner).
    • Restart the CDC task from the last applied transaction.

Using DMS logs for troubleshooting

AWS DMS provides task logs and CloudWatch integration to help identify and resolve migration issues efficiently.

1. Accessing DMS task logs

  • In the AWS DMS Console, go to Database Migration Tasks.
  • Select the migration task experiencing issues.
  • Click Monitoring to access error messages and execution details.

AWS CloudWatch logs displaying errors and warnings related to DMS migration.

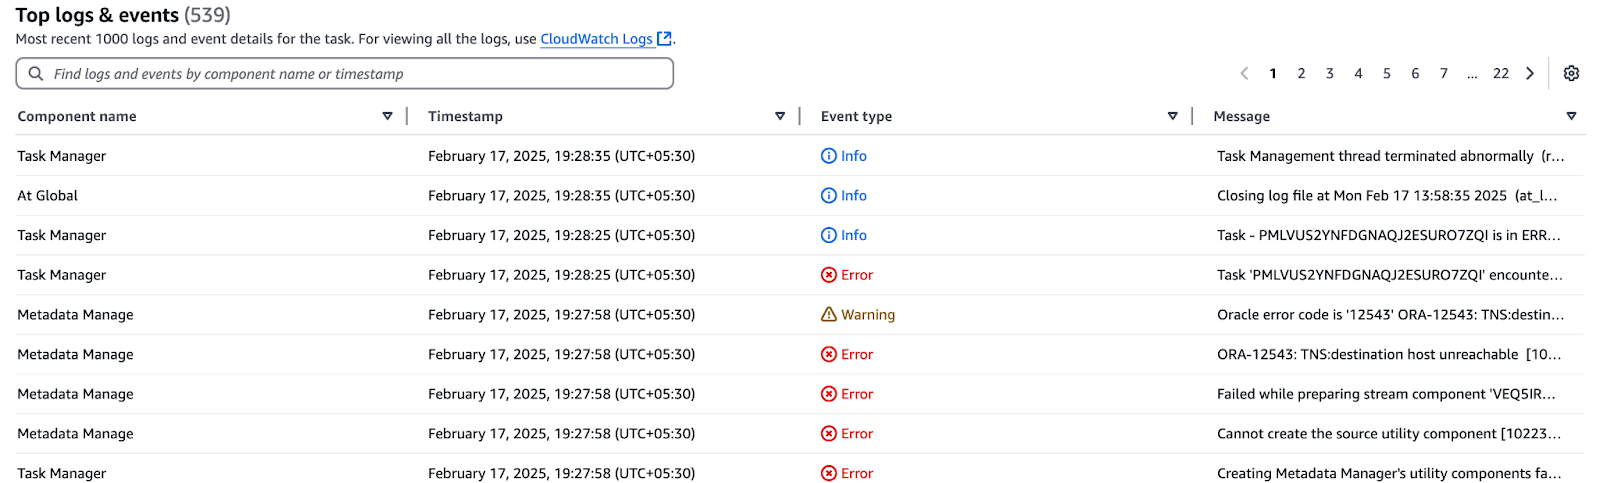
Figure 27 AWS CloudWatch Logs With Migration Errors

2. Using AWS CloudWatch for detailed debugging

  • Navigate to AWS CloudWatch Console > Logs.
  • Look for the DMS replication instance log group (/aws/dms/replication-instance-ID).
  • Enable verbose logging in DMS task settings to capture more details.

AWS CloudWatch displaying detailed log events for a migration task.

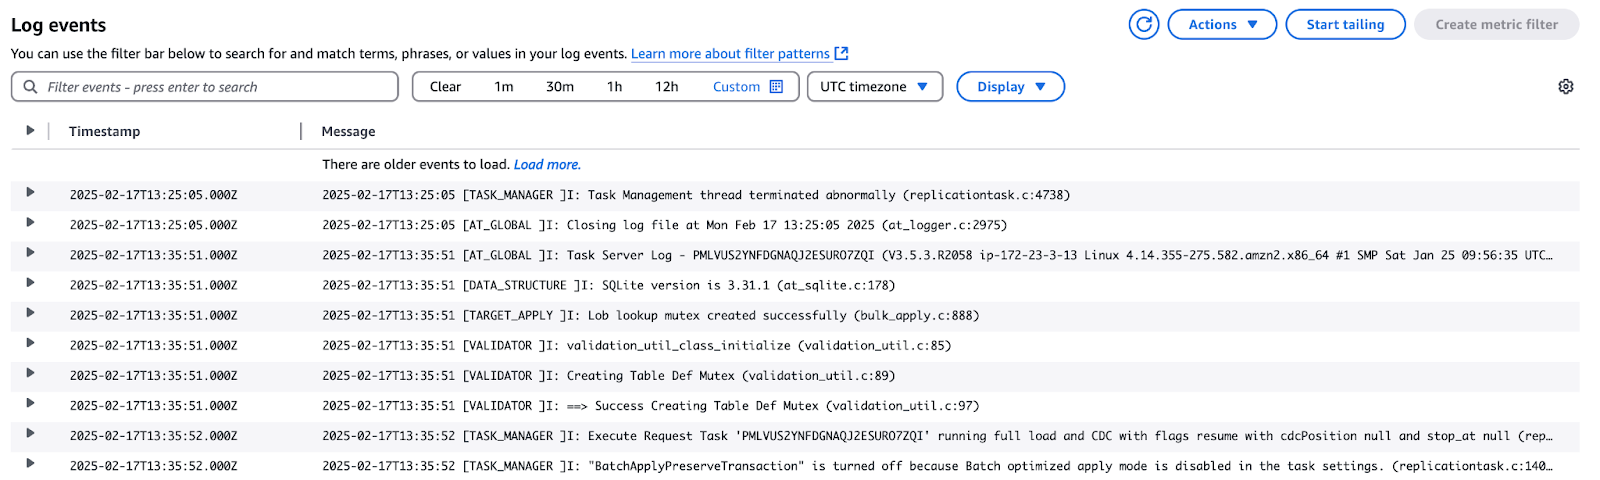
Figure 28 AWS CloudWatch Events Overview

Conclusion

AWS Database Migration Service (DMS) makes it easier to move data across different database engines with minimal downtime. By following best practices—such as optimizing performance, securing data, managing schema changes, and troubleshooting common issues—you can ensure a smooth migration process.

Now that you've completed an end-to-end AWS DMS migration, you’re ready to take full advantage of your new cloud-based database for better scalability, analytics, and cloud-native optimizations. If you want to deepen your AWS knowledge, explore the AWS Cloud Practitioner Certification track or get started with AWS Concepts and AWS Security & Cost Management.

AWS Cloud Practitioner

Learn to optimize AWS services for cost efficiency and performance.

Rahul Sharma's photo
Author
Rahul Sharma
LinkedIn
Twitter

Rahul Sharma is an AWS Ambassador, DevOps Architect, and technical blogger specializing in cloud computing, DevOps practices, and open-source technologies. With expertise in AWS, Kubernetes, and Terraform, he simplifies complex concepts for learners and professionals through engaging articles and tutorials. Rahul is passionate about solving DevOps challenges and sharing insights to empower the tech community.

Topics

Learn more about AWS with these courses!

course

AWS Cloud Technology and Services Concepts

3 hr
8.2K
Master AWS cloud technology with hands-on learning and practical applications in the AWS ecosystem.
See DetailsRight Arrow
Start Course
See MoreRight Arrow
Related

tutorial

Azure SQL Database: Step-by-Step Setup and Management

Learn how to create, connect, manage, query, and secure your Azure SQL Database. This step-by-step guide covers all the essentials for optimal database setup.
Anneleen Rummens's photo

Anneleen Rummens

25 min

tutorial

DynamoDB to Redshift: Three Methods for Migrating Data

Learn three methods to migrate data from Amazon DynamoDB to Redshift, with step-by-step instructions, the pros and cons of each method, and best practices for data integrity and performance optimization.
Aashish Nair's photo

Aashish Nair

29 min

tutorial

How to Set Up and Configure AWS: A Comprehensive Tutorial

Learn how to set up and configure your AWS account for the first time with this comprehensive tutorial. Discover essential settings, best practices for security, and how to leverage AWS services for data analysis and machine learning.
Joleen Bothma's photo

Joleen Bothma

30 min

tutorial

Azure Storage Accounts: Step-by-Step Tutorial for Beginners

This guide teaches you how to set up and manage Azure Storage Accounts, step-by-step. It also explores advanced configuration options for optimal performance and cost optimization.
Anneleen Rummens's photo

Anneleen Rummens

20 min

tutorial

Introduction to DynamoDB: Mastering NoSQL Database with Node.js | A Beginner's Tutorial

Learn to master DynamoDB with Node.js in this beginner's guide. Explore table creation, CRUD operations, and scalability in AWS's NoSQL database.
Gary Alway's photo

Gary Alway

11 min

tutorial

SQL Database Overview Tutorial

In this tutorial, you'll learn about databases in SQL.
DataCamp Team's photo

DataCamp Team

3 min

See MoreSee More