Course
AWS Concepts
2 hr
47.2K
Before you can send your first notification with SNS, you'll need to follow a few setup steps to get everything in place.
If you don't already have an AWS account, you'll need to create one before you can start using SNS.
Head over to the AWS homepage and click on the "Create an AWS Account" button in the top-right corner. You'll need to provide your email address, create a password, and enter some basic account information. AWS will also ask for your credit card details - don't worry, SNS has a pretty generous free tier, and you won't be charged unless you exceed those limits.
Once your account is set up, you're ready to proceed further. However, I strongly recommend creating a dedicated IAM user instead of using your root account. That's out of the scope for today's article, but refer to the official instructions for detailed guidelines.
Now that you have an AWS account, it's time to access the SNS service.
Log into the AWS Management Console with your credentials and find SNS. You can do this in three ways:
Regardless of the way, this is the screen you should see:
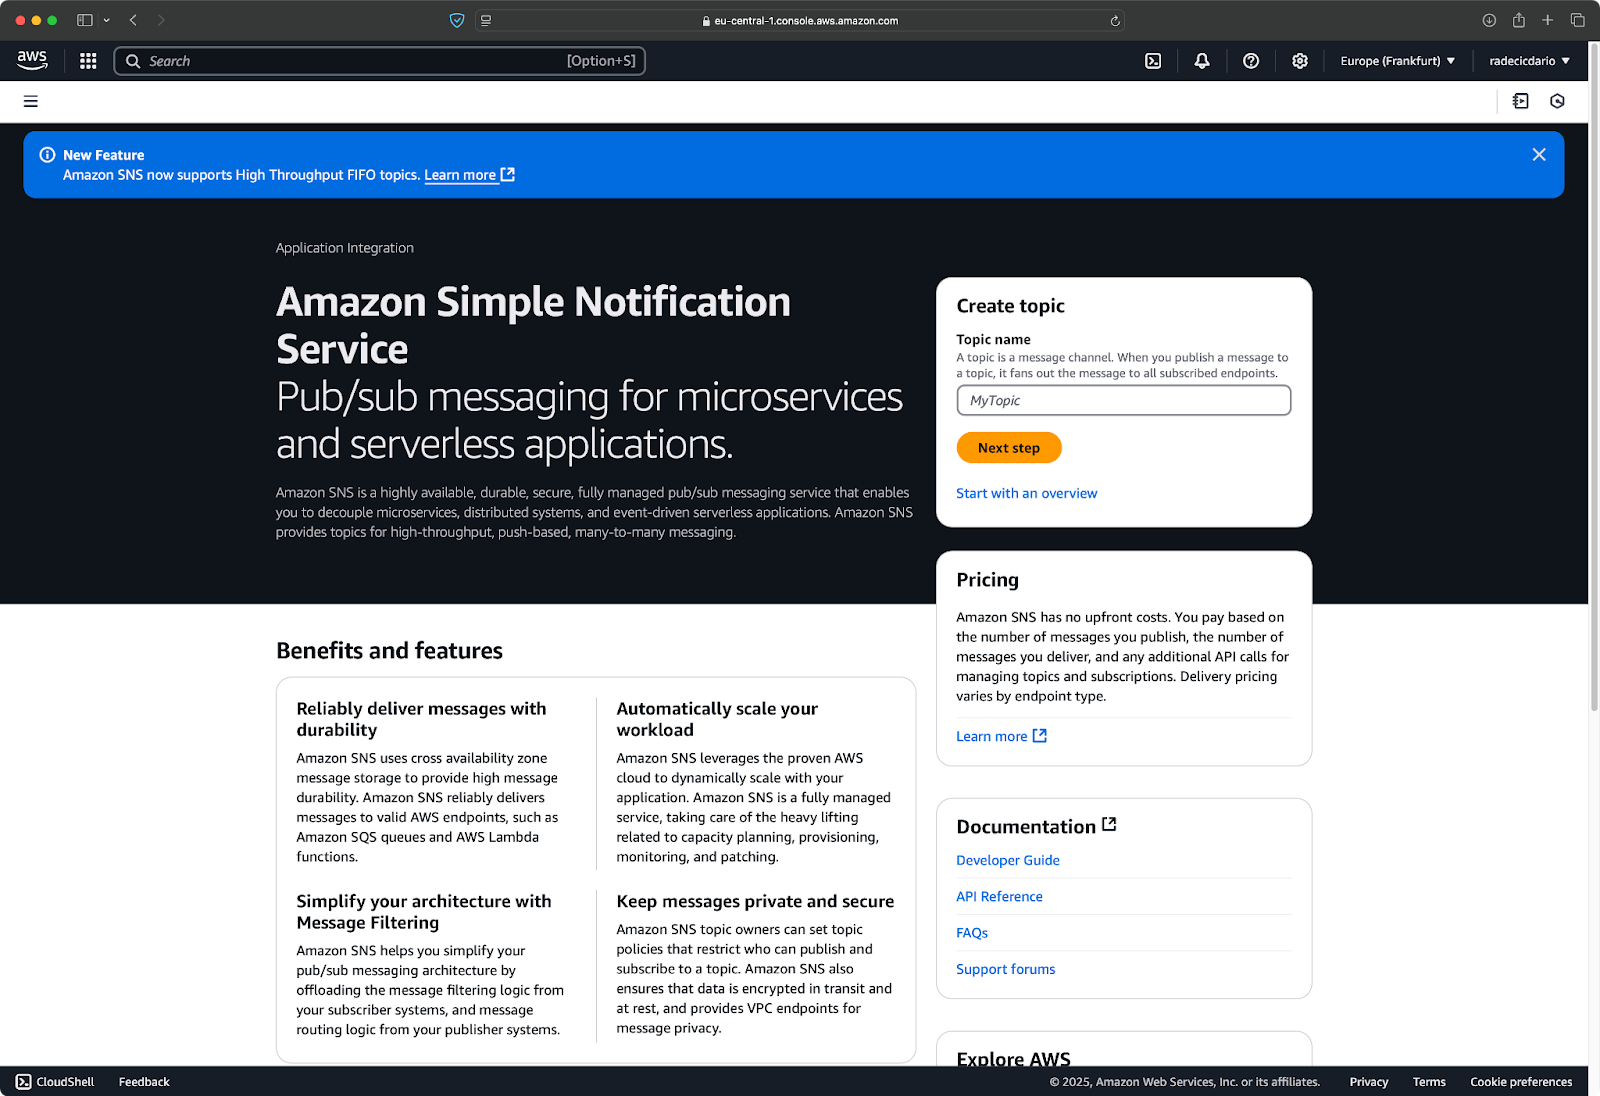
Image 1 - AWS SNS service page
Once you're in the SNS dashboard, you'll see a menu on the left side with options like "Topics," "Subscriptions," and "Mobile." The dashboard gives you an overview of your SNS resources and recent activity.
This will be pretty empty for a new account —that's expected. Now, let's create our first SNS topic.
An SNS topic is basically a communication channel to which publishers send messages and subscribers listen.
Think of it like a radio station - the station broadcasts on a specific frequency (the topic), and anyone tuned to that frequency receives the broadcast. In SNS terms, your application publishes messages to a topic, and all the endpoints subscribed to that topic receive those messages.
Here's how to create your first SNS topic:
If you prefer images over text, this is what your screen should look like:
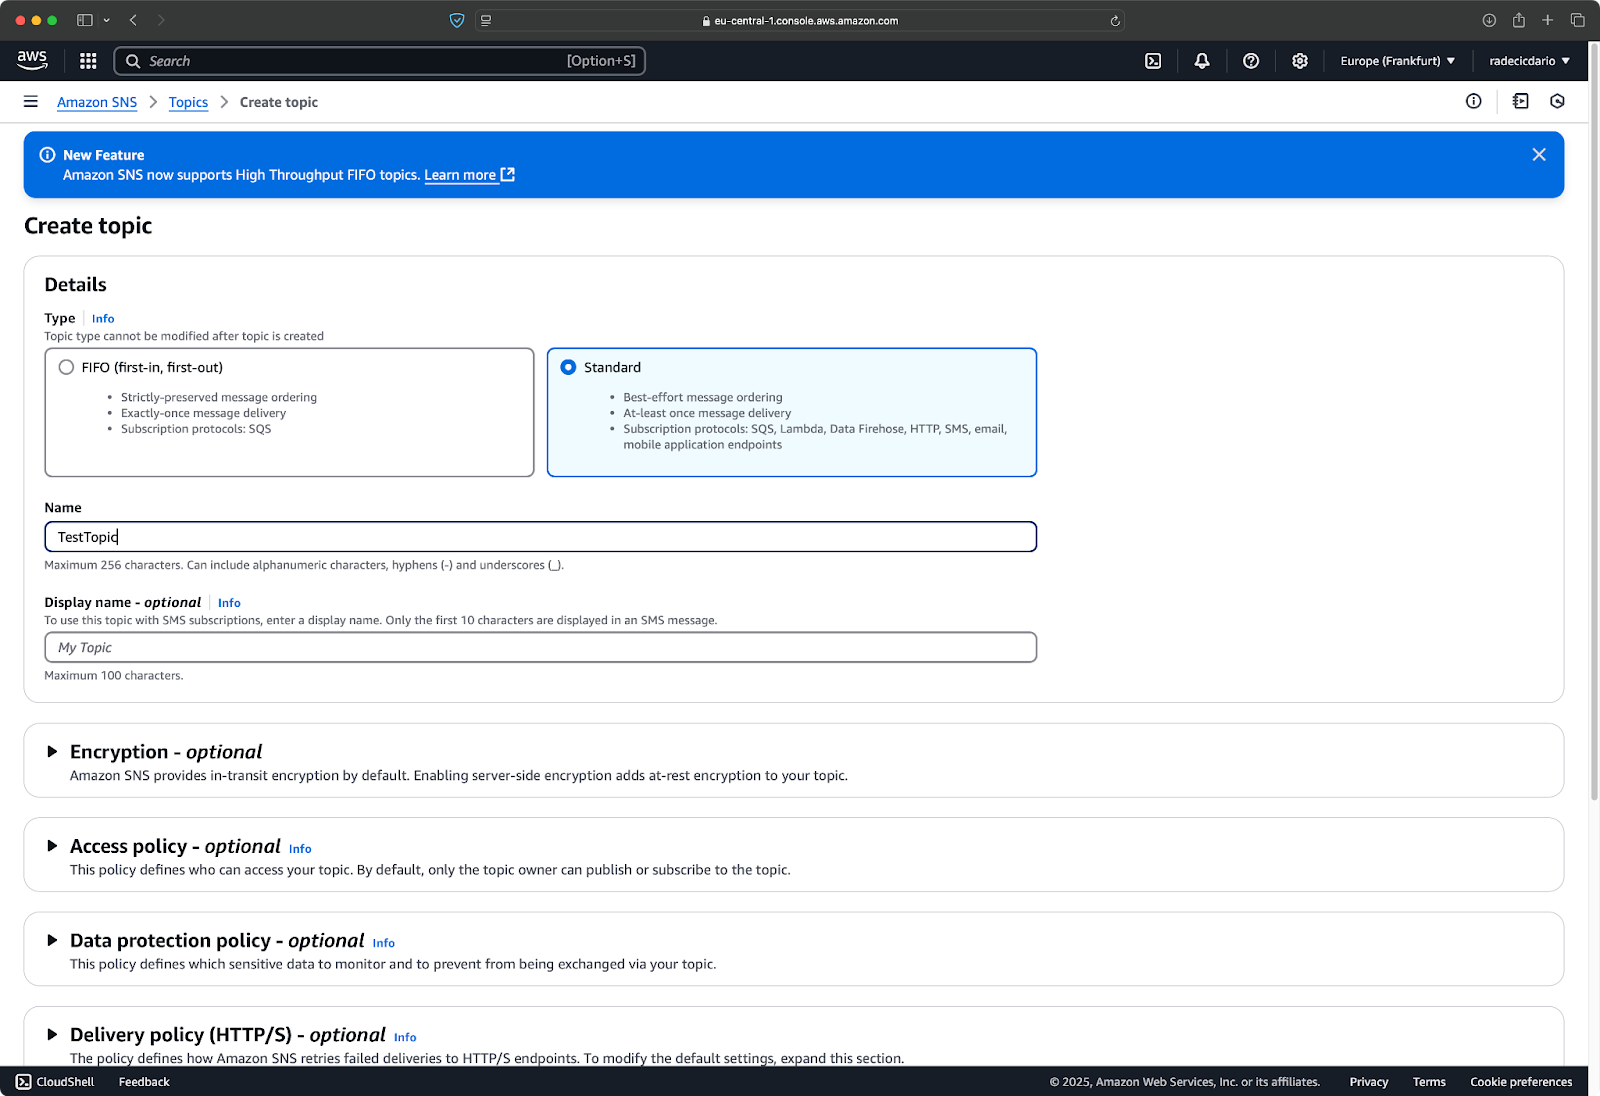
Image 2 - SNS topic creation
Once you're satisfied with the values, scroll down until you see the "Create topic" button:
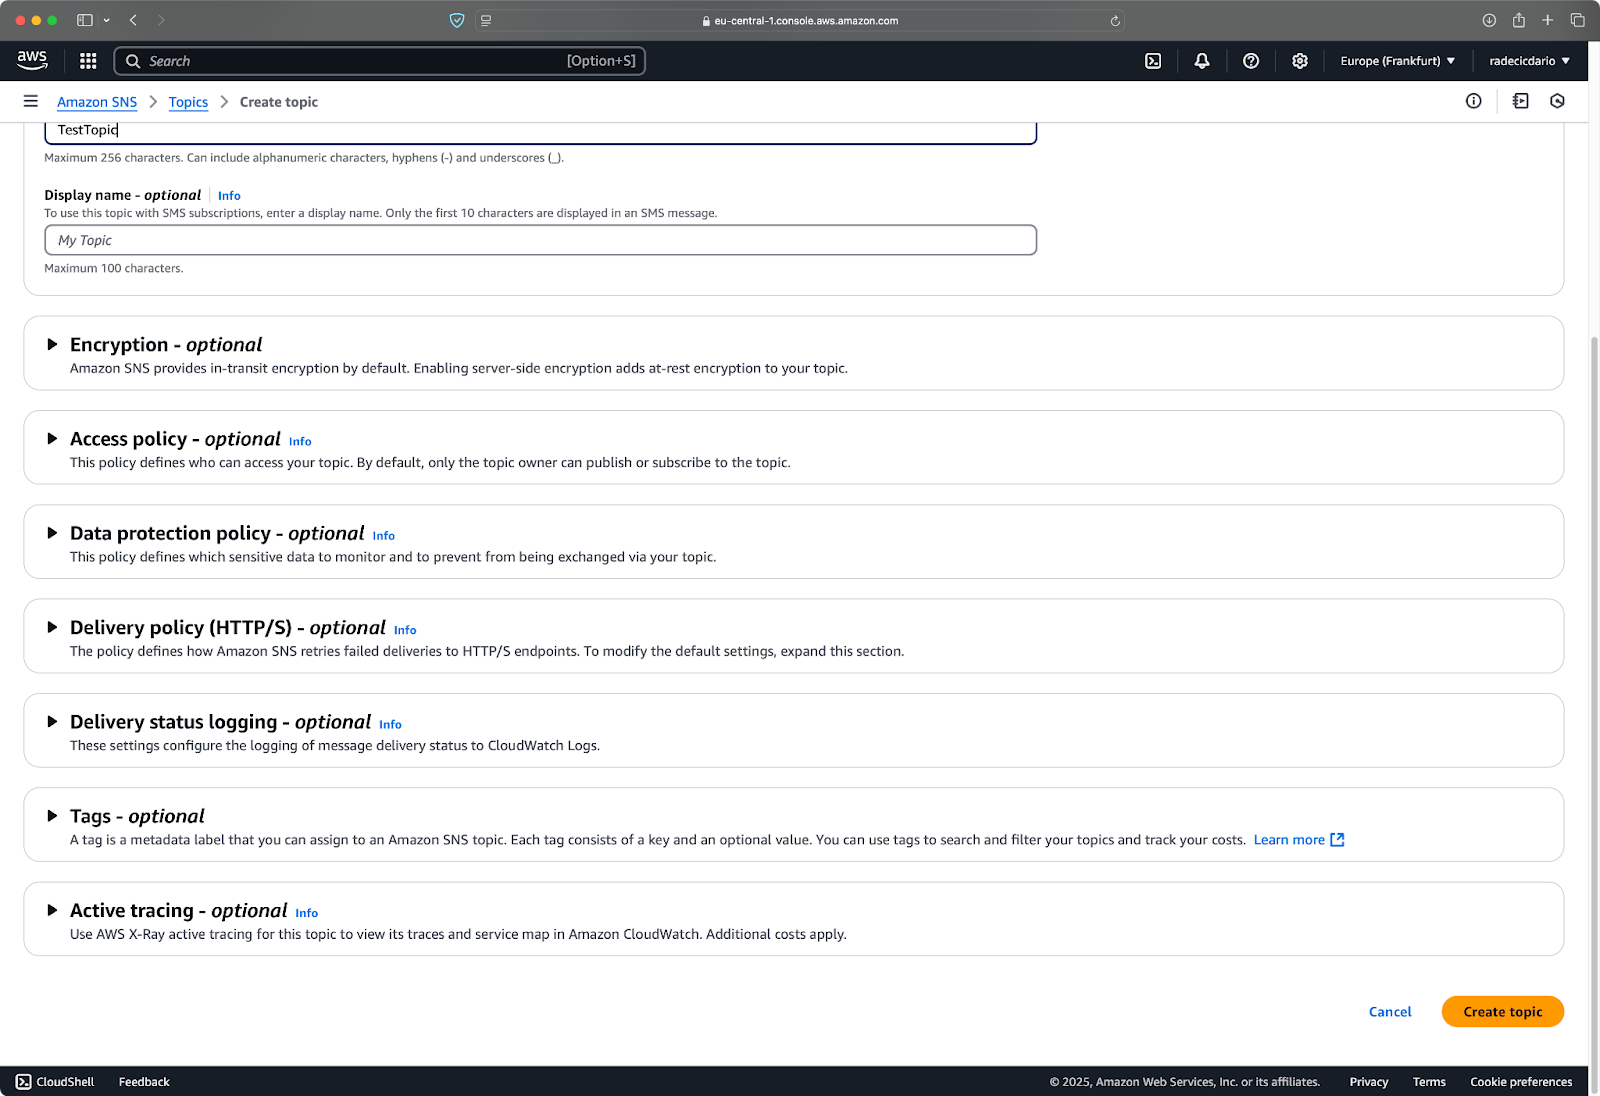
Image 3 - SNS topic creation (2)
And that's it! Your SNS topic is now ready to use. You'll see details like the topic ARN (Amazon Resource Name), which uniquely identifies your topic:
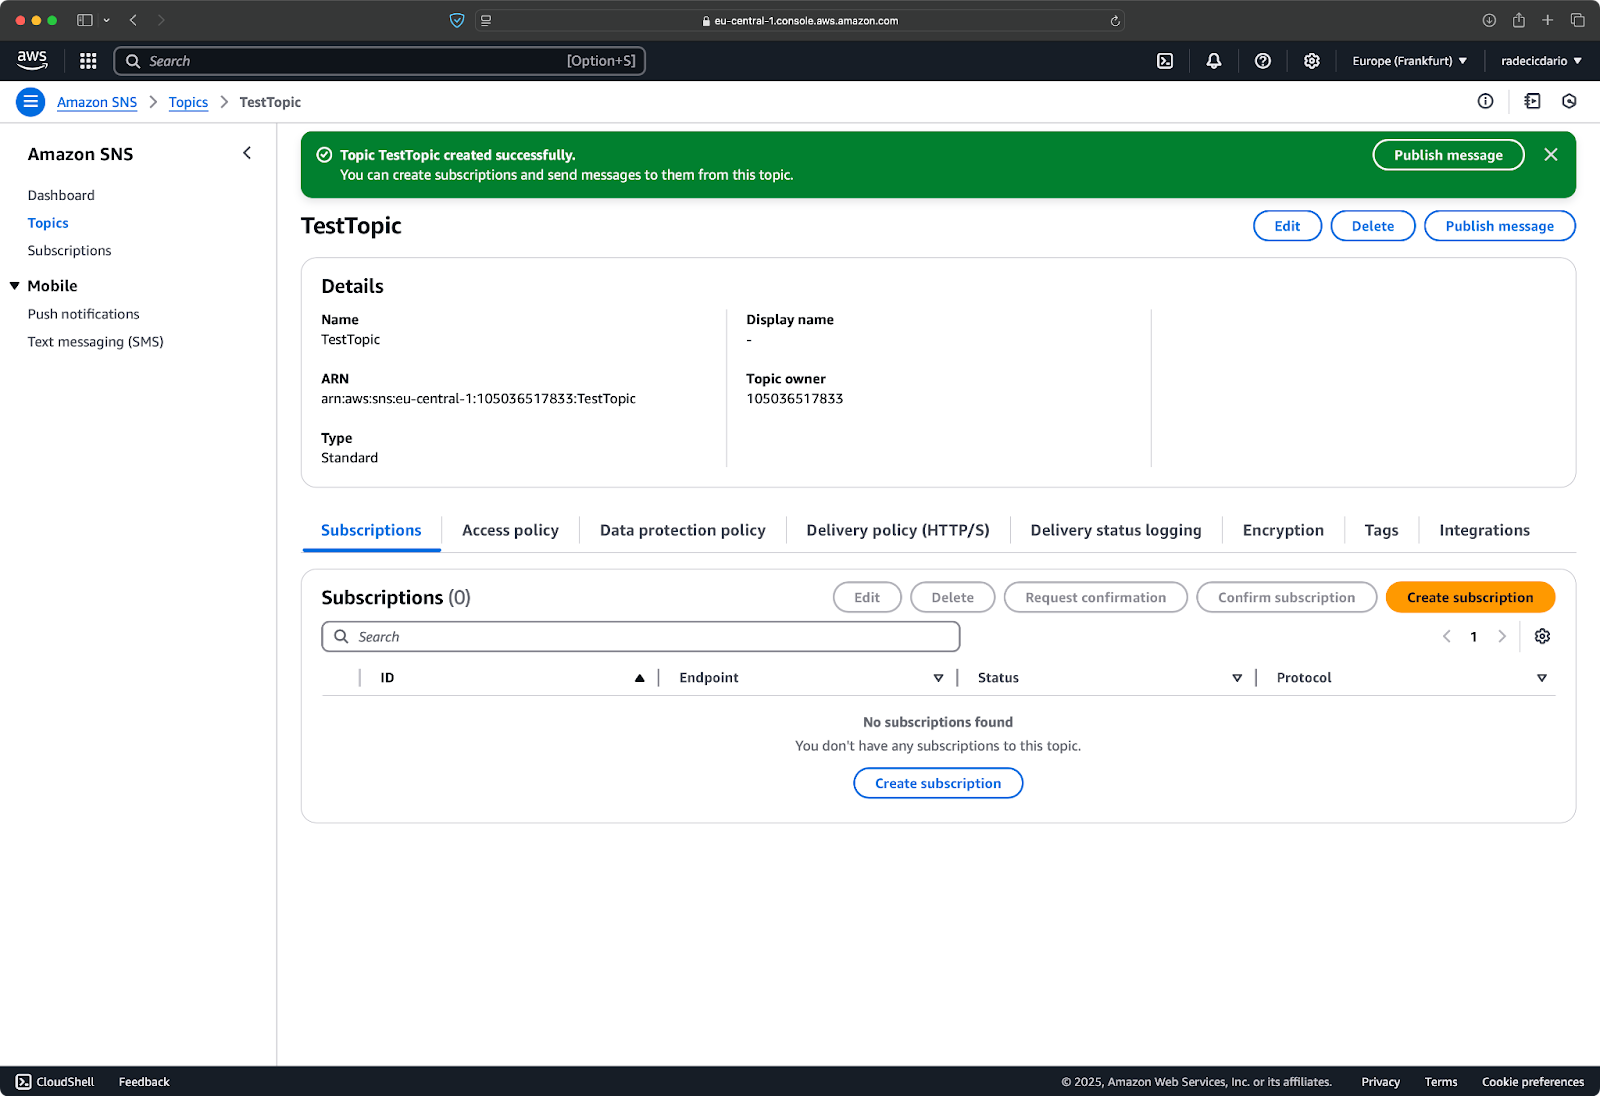
Image 4 - Created topic details
Your new topic is ready for subscriptions, but it doesn't have any yet, meaning any messages you publish won't go anywhere. Don't worry, you'll fix that in the next section when you add subscribers.
As I said earlier, your SNS topic is like a radio station. It currently has no listeners, but that'll change when you add subscribers to receive your messages.
A subscriber is any endpoint that receives notifications from your SNS topic when a message is published.
Consider the analogy of a newsletter. Every time you publish a new edition (message), it gets delivered to everyone on your mailing list. SNS makes this process automatic and scalable, and it handles all the delivery logistics for you.
AWS supports a wide variety of subscriber types, which gives you flexibility in how your messages are processed. I'll list the main types below:
Each subscriber type has its own advantages and use cases. For example, email and SMS are great for human recipients, while SQS queues and Lambda functions are better for system-to-system communication.
Now that you understand what subscribers are, let's add one to your topic. For this tutorial, I'll use email as it's the simplest to set up.
Here's how to add an email subscriber to your SNS topic:
Your screen should look something like this:
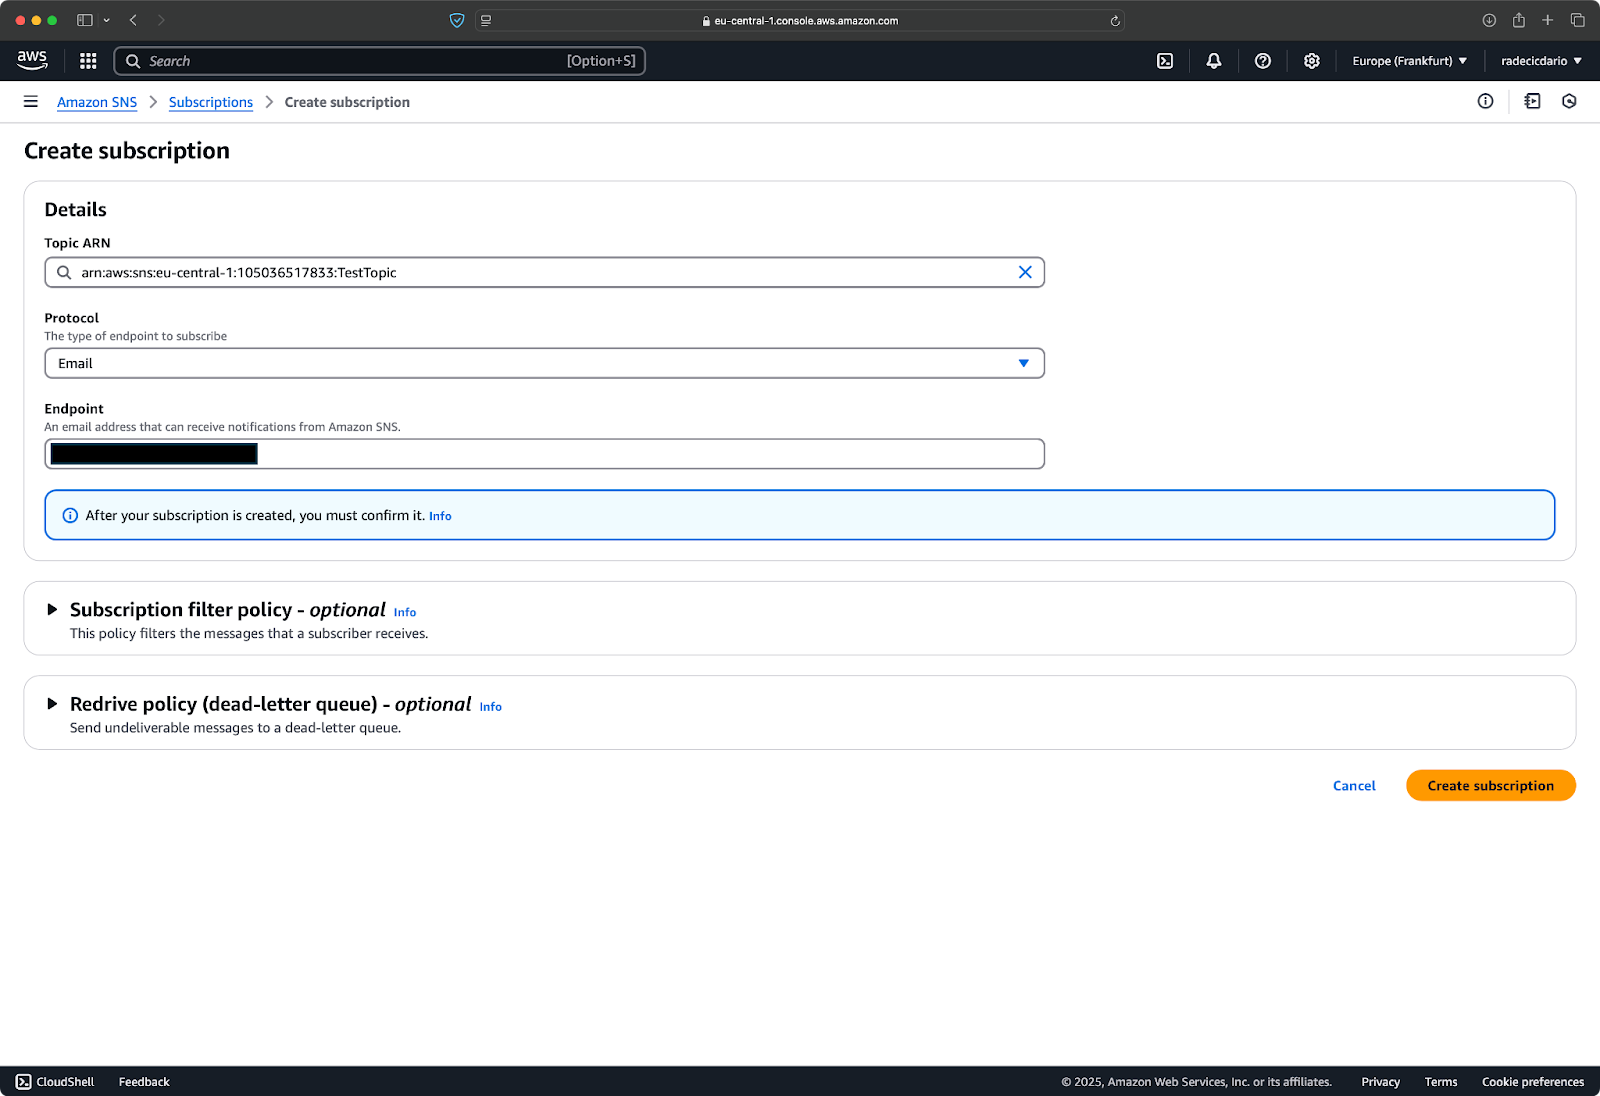
Image 5 - Creating an email subscription
Once you click "Create subscription," AWS will add the subscription to your topic, but it will be in a "pending confirmation" state:
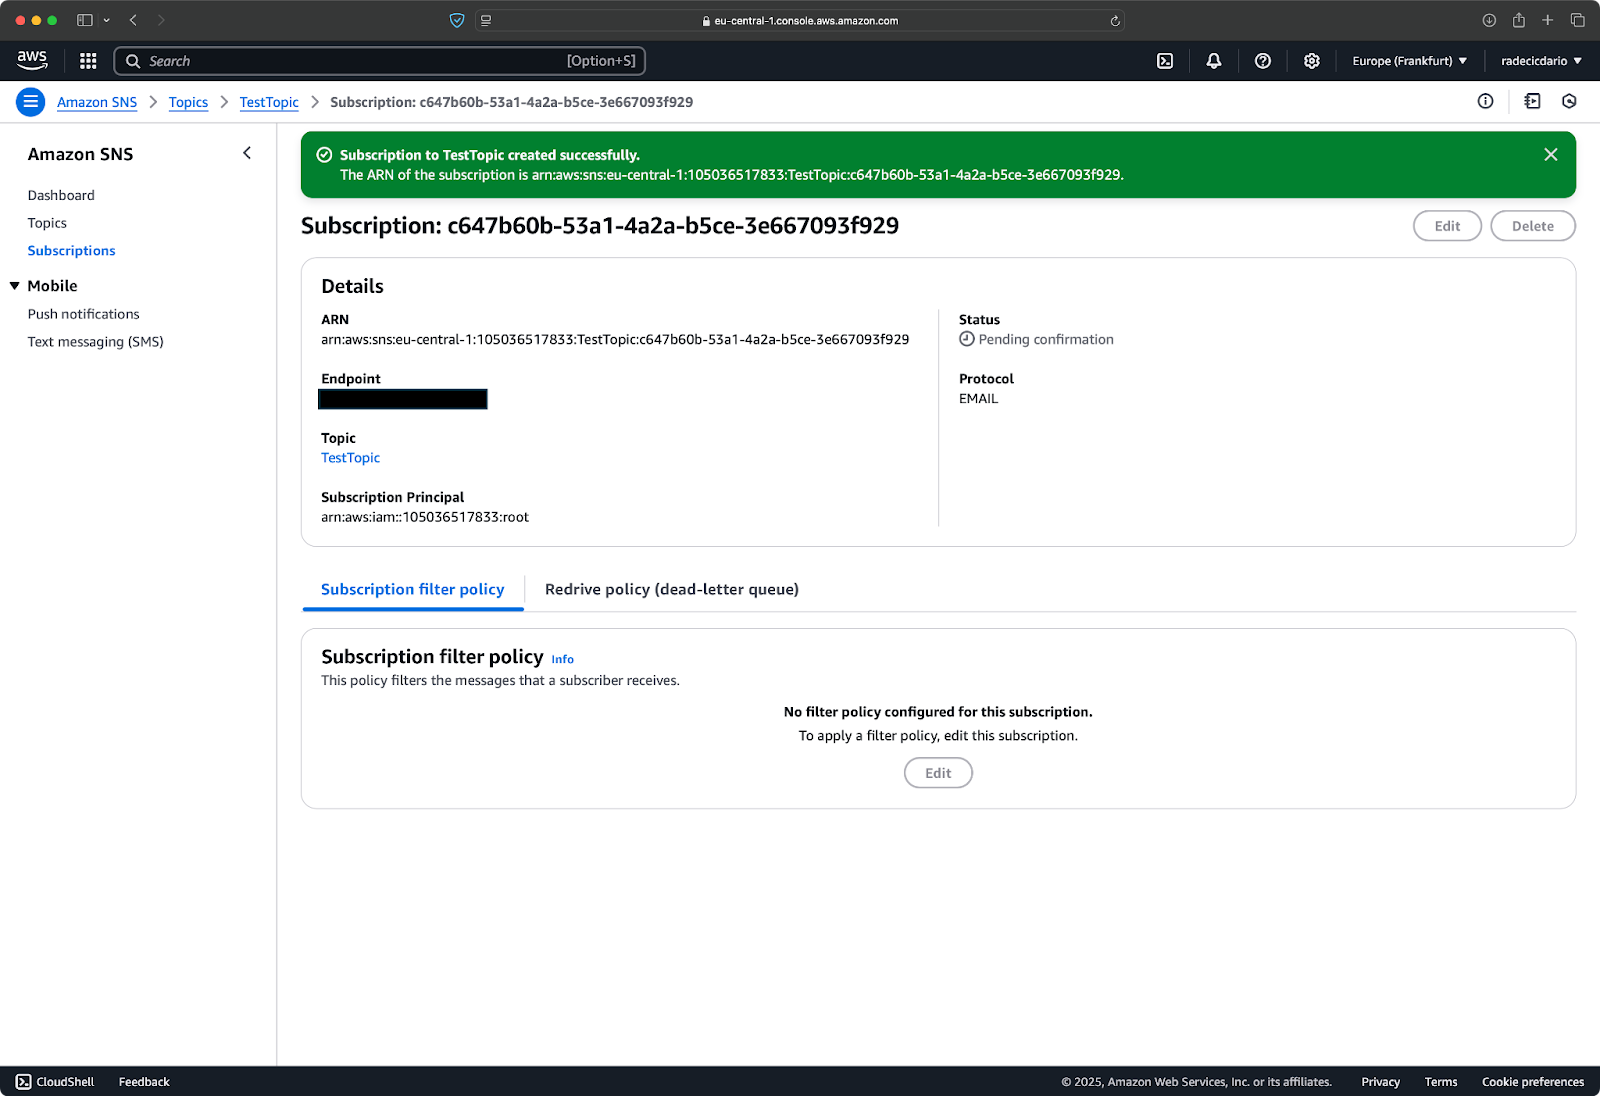
Image 6 - Pending confirmation state
This is an important security feature, as AWS wants to make sure that the owner of the email address actually wants to receive these notifications.
After adding a subscriber, they must confirm that they want to receive notifications from your SNS topic.
For email subscriptions, AWS automatically sends a confirmation email to the address you specified. The email contains a link that the recipient must click to activate the subscription. Until this happens, no messages published to the topic will be delivered to this endpoint.
Here's what a typical confirmation email looks like:
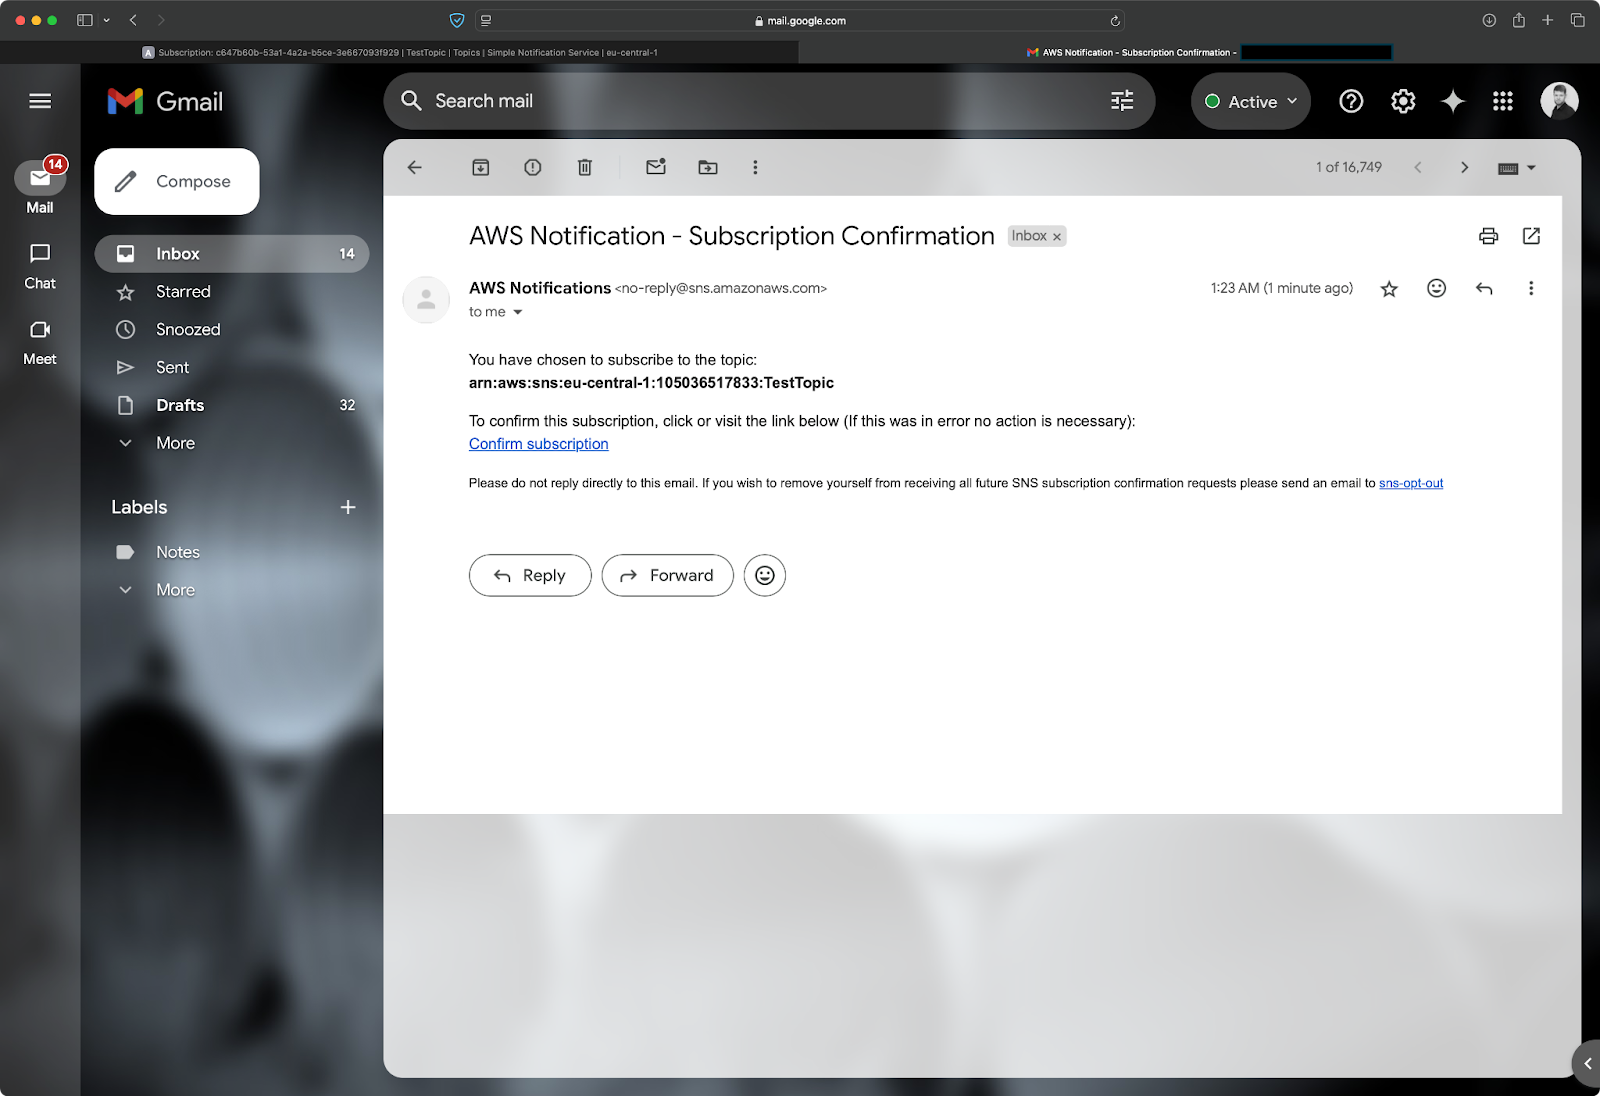
Image 7 - SNS confirmation email
The recipient simply needs to click the "Confirm subscription" link in the email. They'll be taken to a page that confirms their subscription is now active:
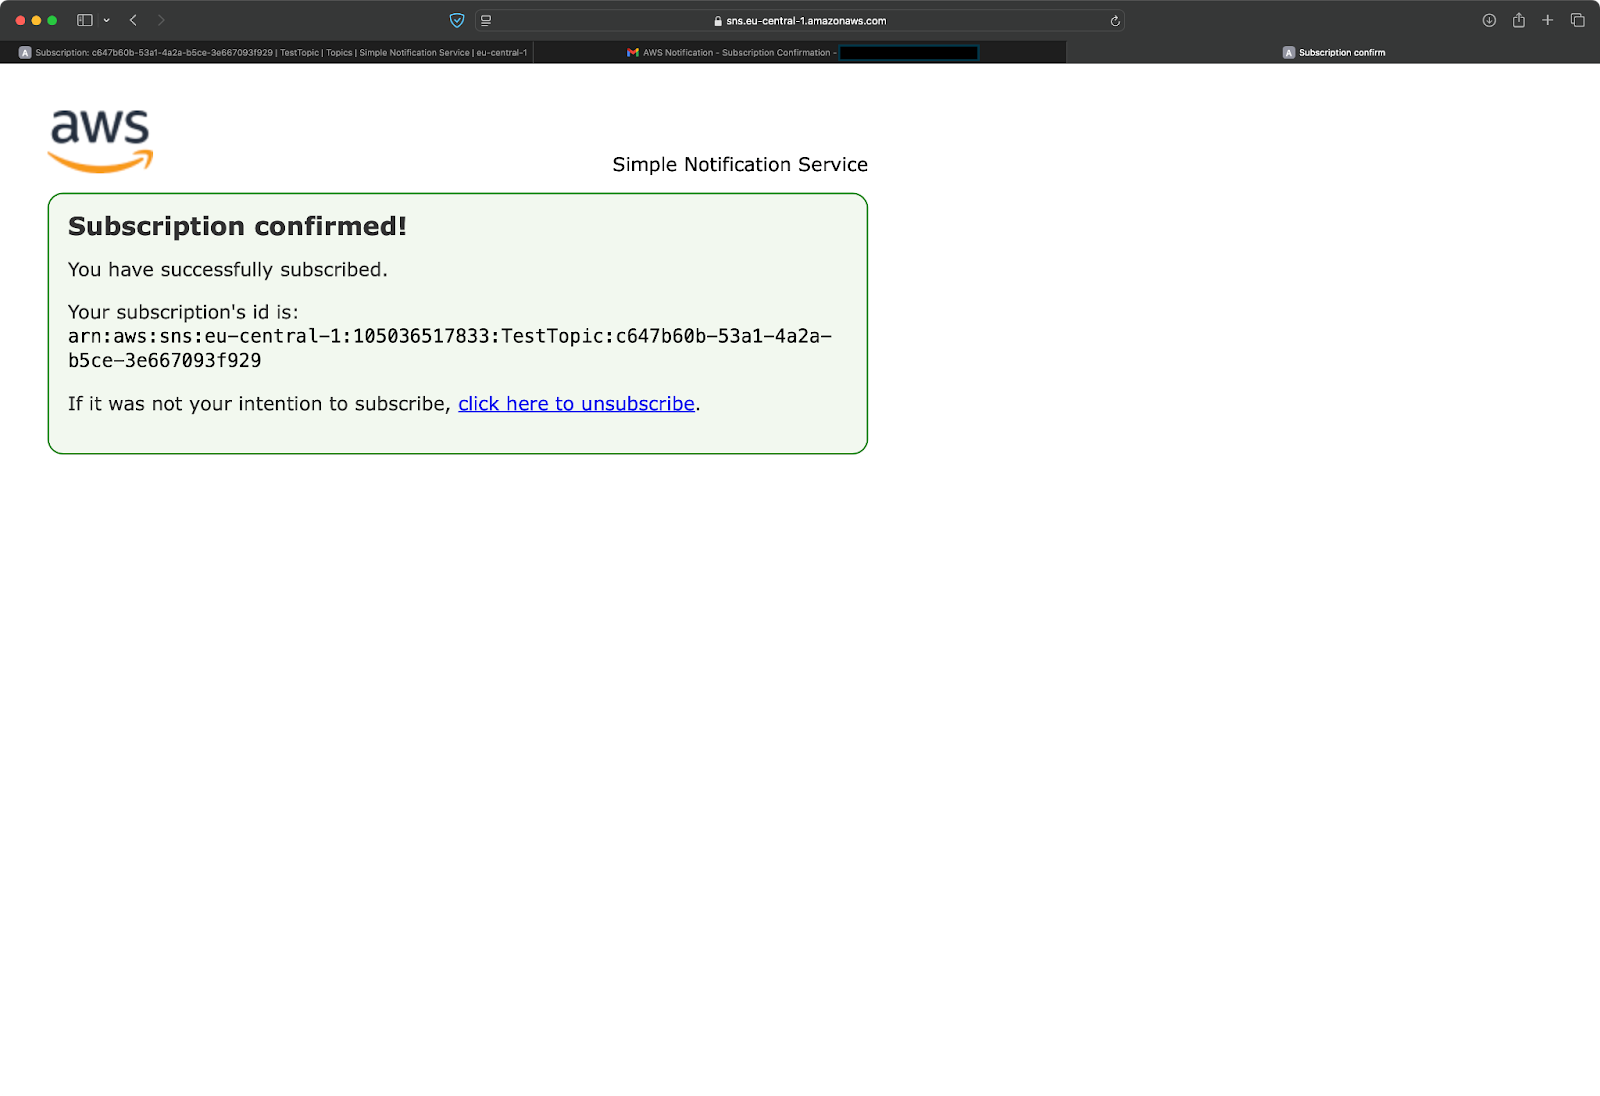
Image 8 - Subscription confirmation message
The process is similar for SMS subscribers - AWS sends a text message with a confirmation link that the recipient must follow. HTTP/HTTPS endpoints need to respond to a confirmation request from AWS, while AWS resources like Lambda functions and SQS queues can be configured for automatic confirmation.
You can check the status of your subscriptions by clicking on the "Subscriptions" section in the left sidebar of the SNS console. Confirmed subscriptions will show a status of "Confirmed," while those waiting for confirmation will show "Pending confirmation."
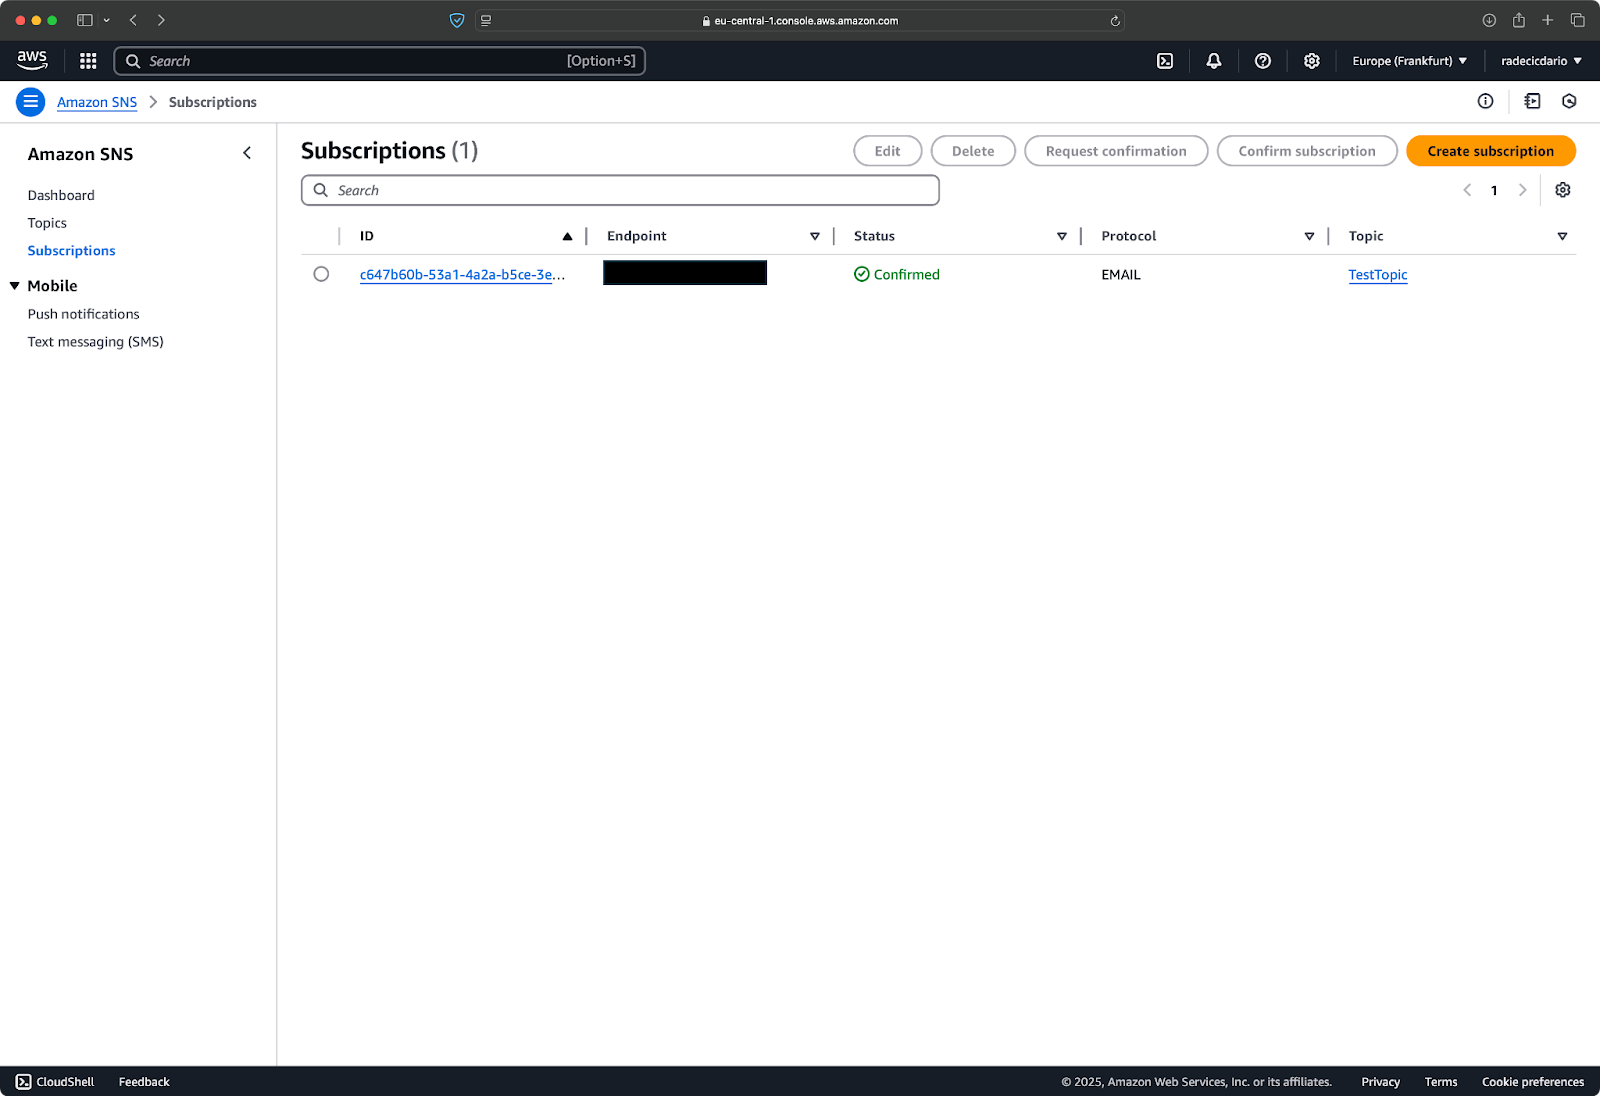
Image 9 - Subscription status
Once your subscription is confirmed, you're ready to start sending messages! Any message published to the topic will be delivered to all confirmed subscribers using their specified protocol.
That's all there is to setting up SNS subscriptions. In the next section, you'll learn how to publish messages to your topic and test that your subscribers are receiving them correctly.
Now that you've set up your SNS topic and added subscribers, it's time to send your first notification.
A good way to get started is by publishing a message through the AWS Console.
To send your first message, navigate to your topic's detail page and click the "Publish message" button at the top right (see Image 4). This will open the message publishing form where you can craft your notification. You'll see fields for the message subject and body. The subject is optional but helpful for email notifications as it becomes the email subject line.
For a simple test message, you might enter something like this:
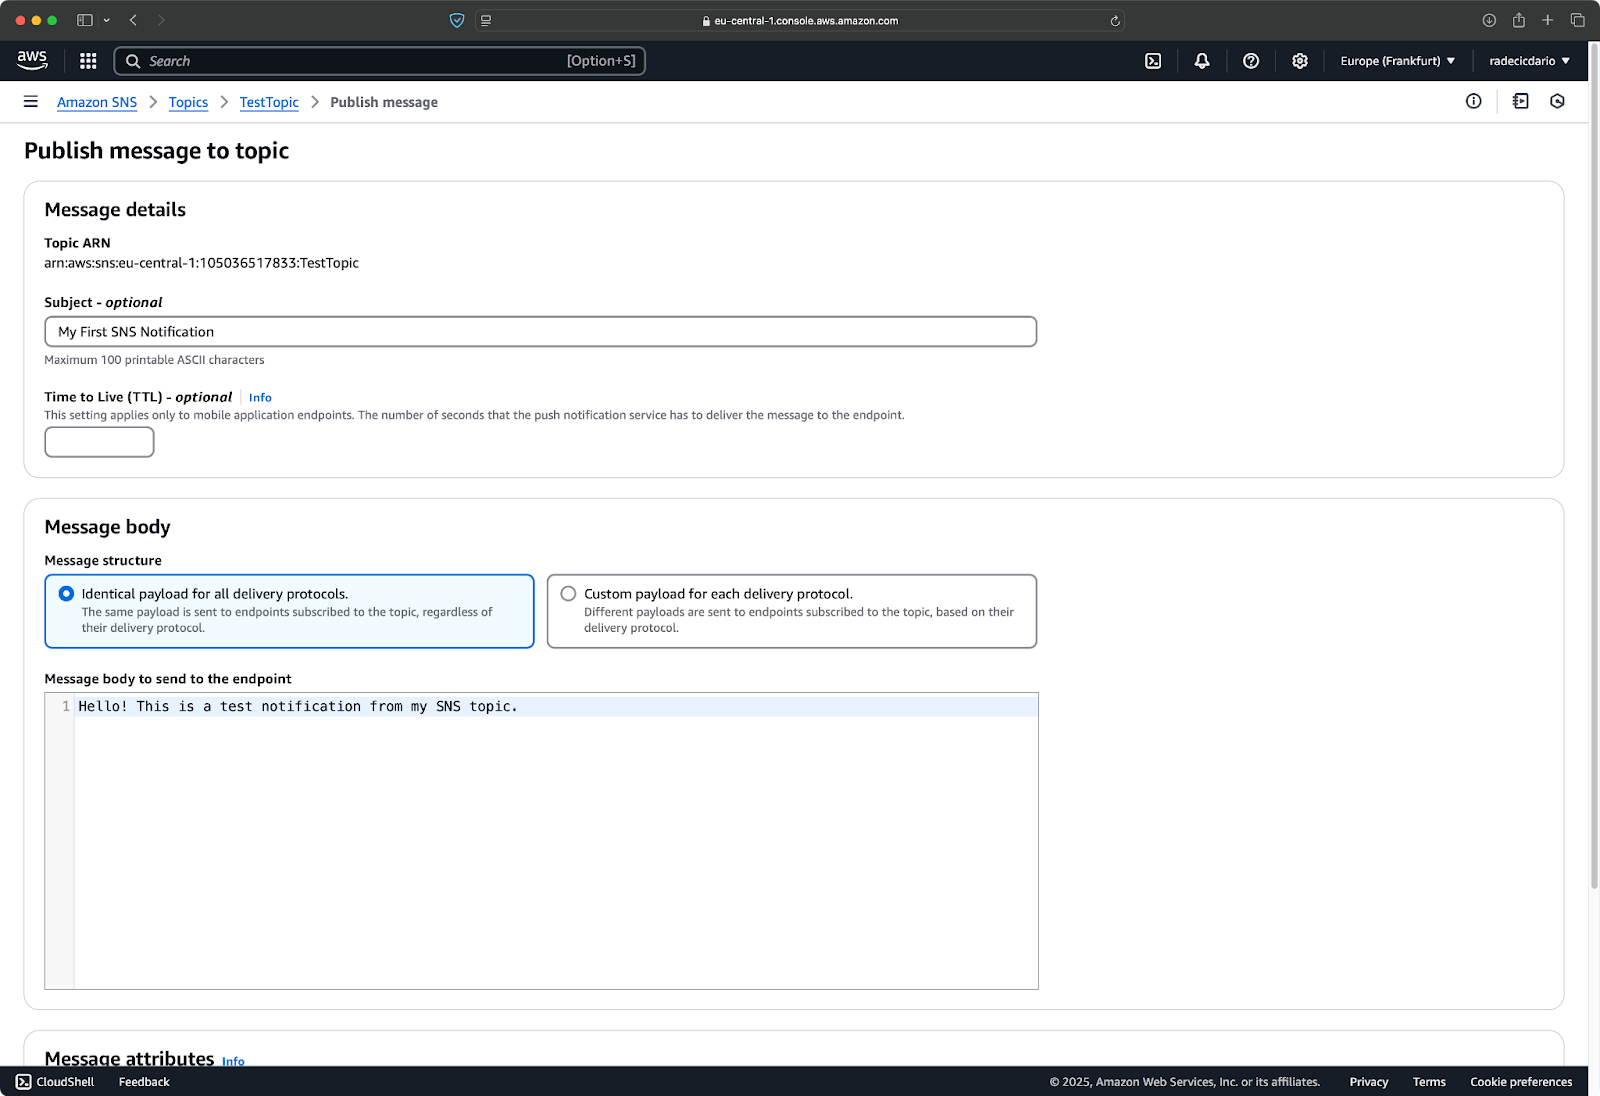
Image 10 - First message contents
When you're satisfied with your message, scroll down and click the "Publish message" button at the bottom of the form:
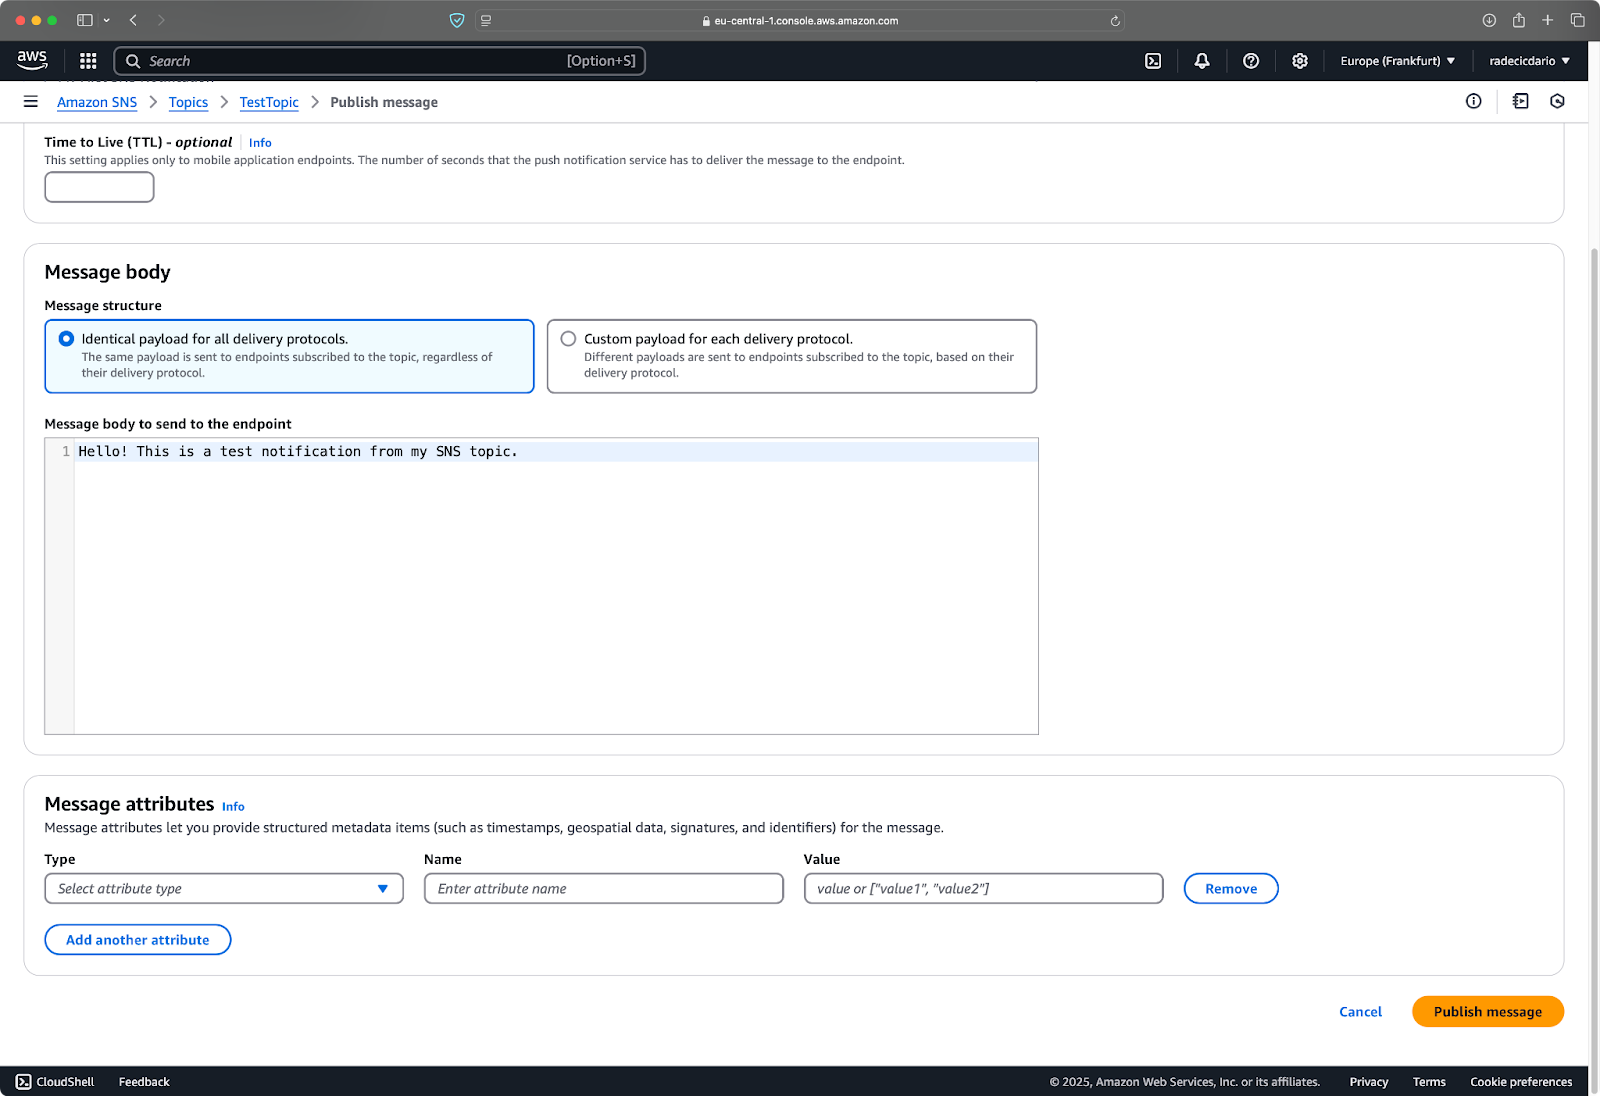
Image 11 - Publishing a message via the console
After clicking, SNS immediately distributes your message to all confirmed subscribers. If you've set up an email subscription, you should receive the test message in your inbox within seconds:

Image 12 - Message received in email
Simple, wasn't it? Let's now see how to customize it further.
SNS lets you customize how your messages appear to different types of subscribers.
When publishing a message, you'll notice the "Message structure" option. By default, it's set to "Identical payload for all delivery protocols," which means all subscribers receive exactly the same message. However, you can also select "Custom payload for each delivery protocol," which lets you tailor the message format for each subscriber type.
For email notifications, you have two format options:
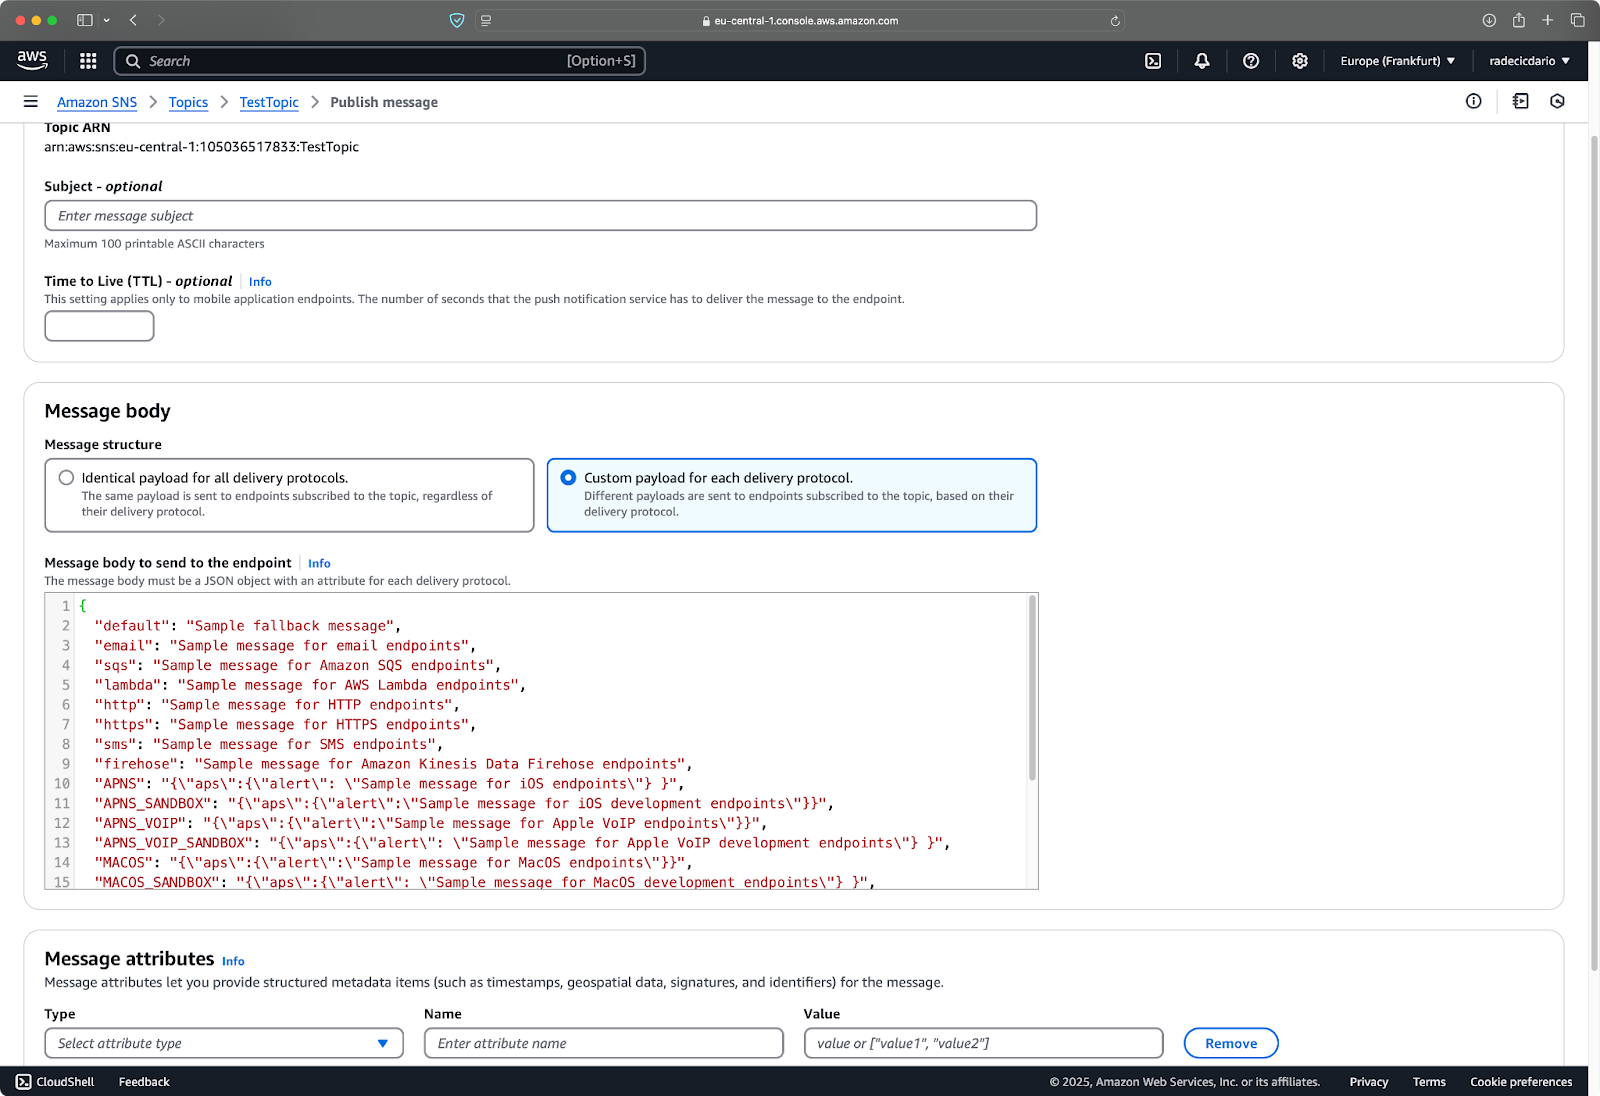
Image 13 - Payload customization
For SMS notifications, keep in mind there's a 160-character limit. SNS will deliver longer messages, but they'll be treated as multiple messages. You can also set the SMS message type to either "Promotional" or "Transactional," which affects delivery optimization:
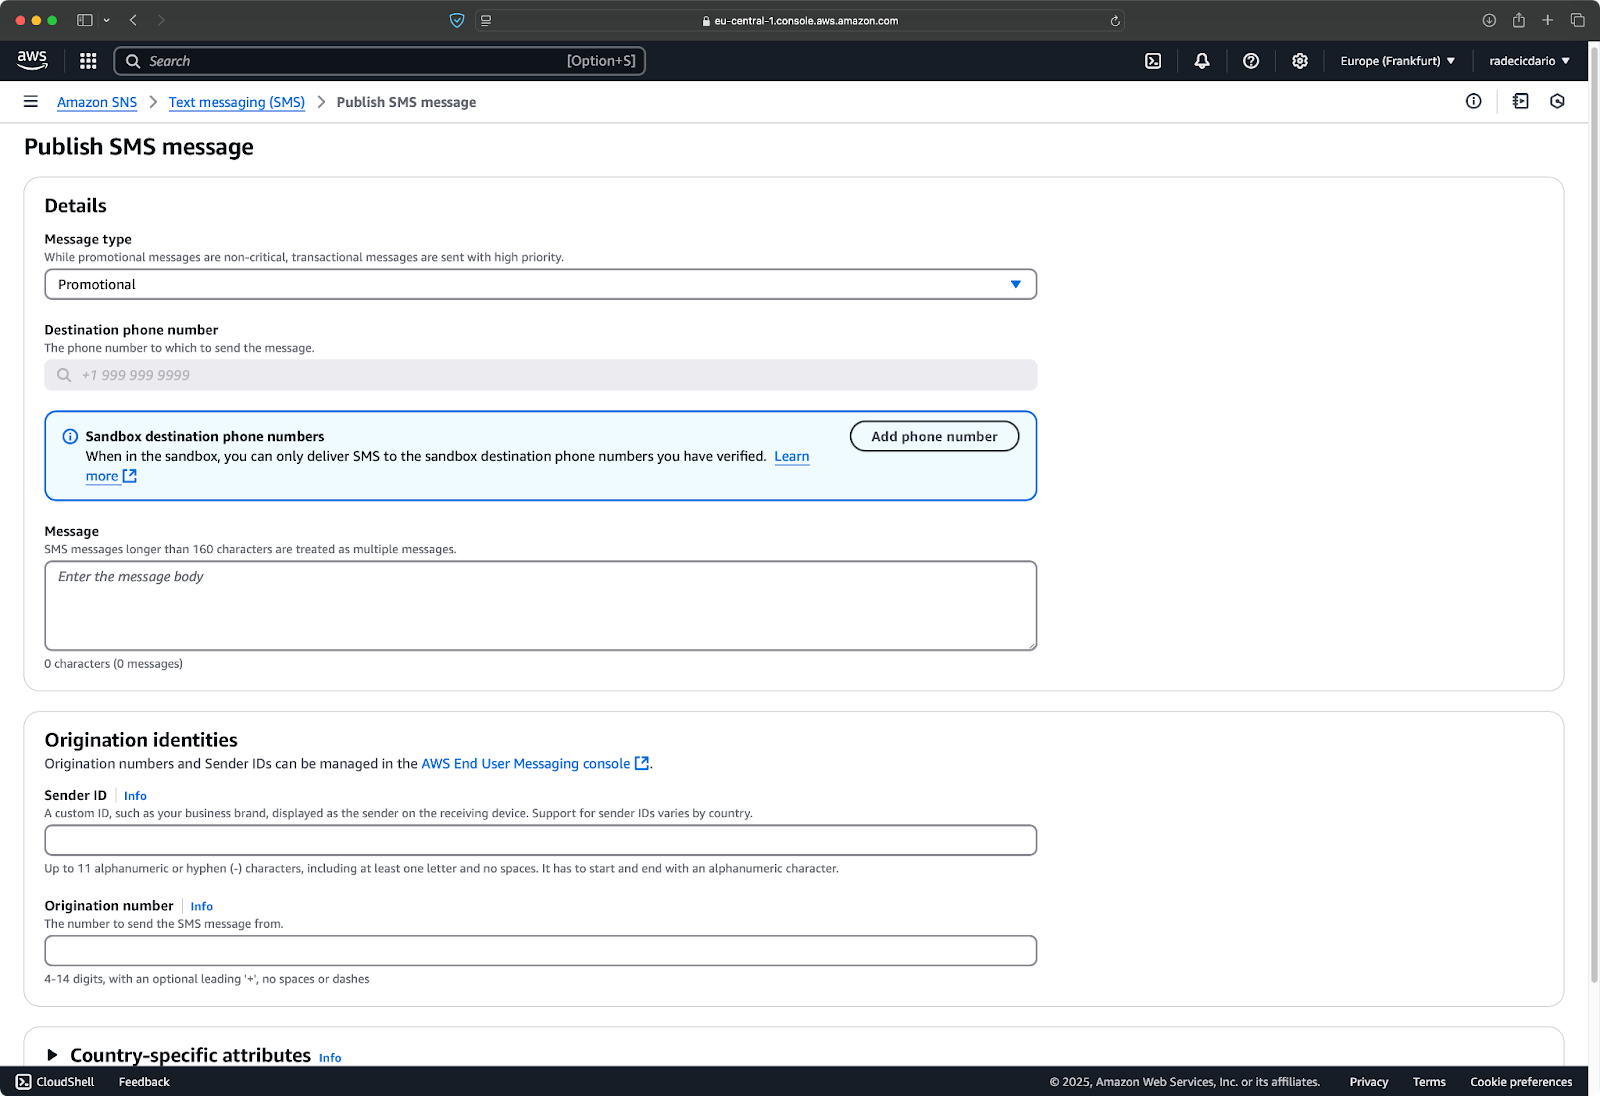
Image 14 - SMS options
You now know how to send and customize email notifications through AWS Console. Up next, you'll learn how to do the same through the CLI and Python.
The console is great for manual testing, but in the real world, you'll want to publish messages programmatically.
The AWS Command Line Interface (CLI) makes it easy to send SNS messages from your terminal or automation scripts.
Assuming you have the AWS CLI installed and configured, run this command to publish a message via the CLI:
aws sns publish --topic-arn "sns-arn" --subject "CLI Notification" --message "Hello from the AWS CLI!"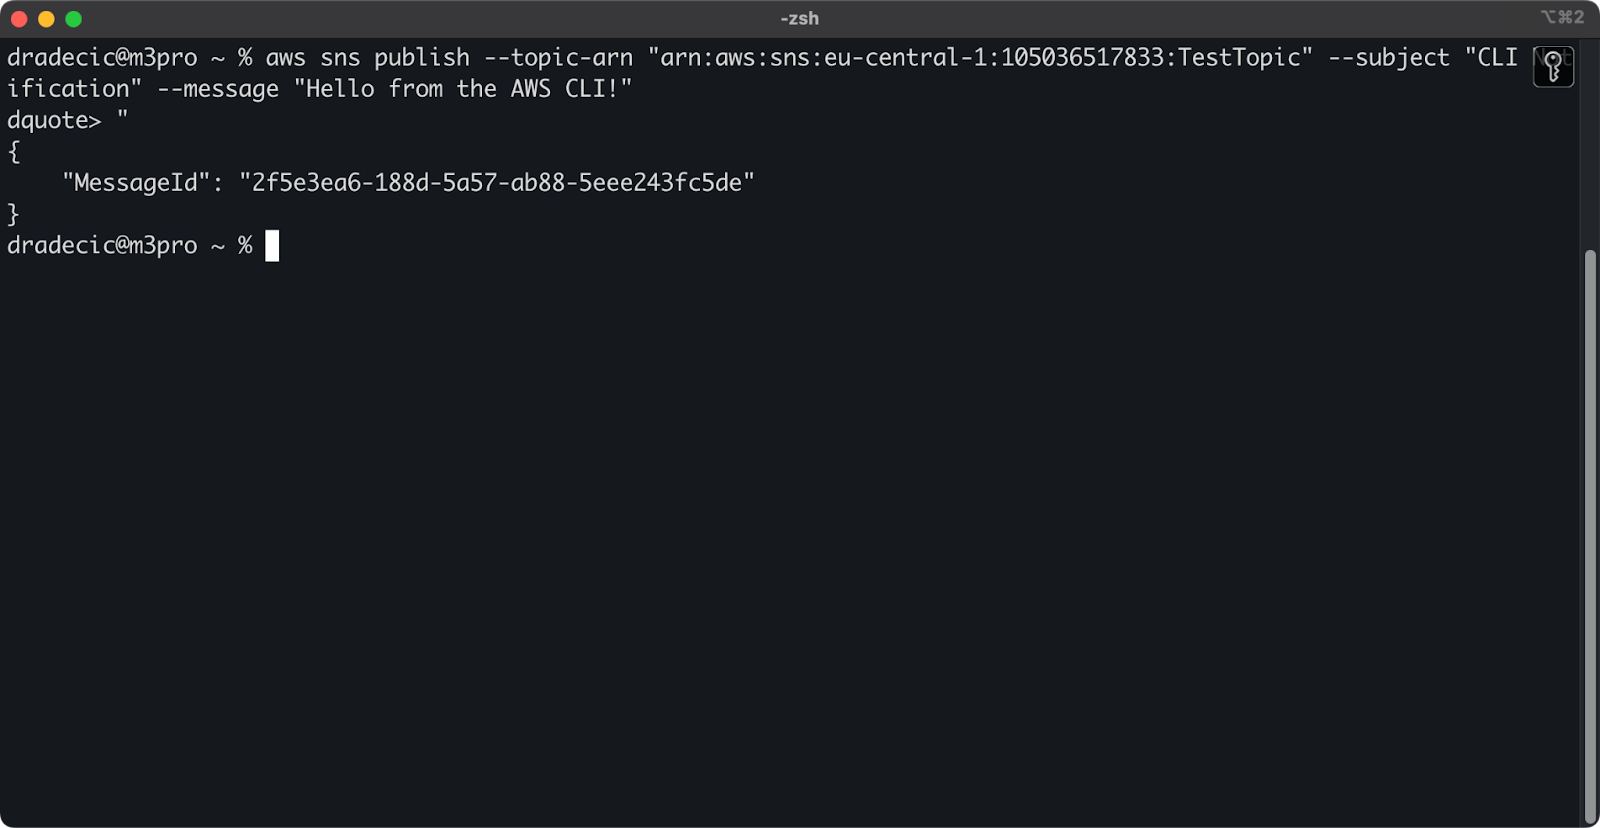
Image 15 - Message publishing through AWS CLI
In an instant, you'll see a similar message in your inbox:
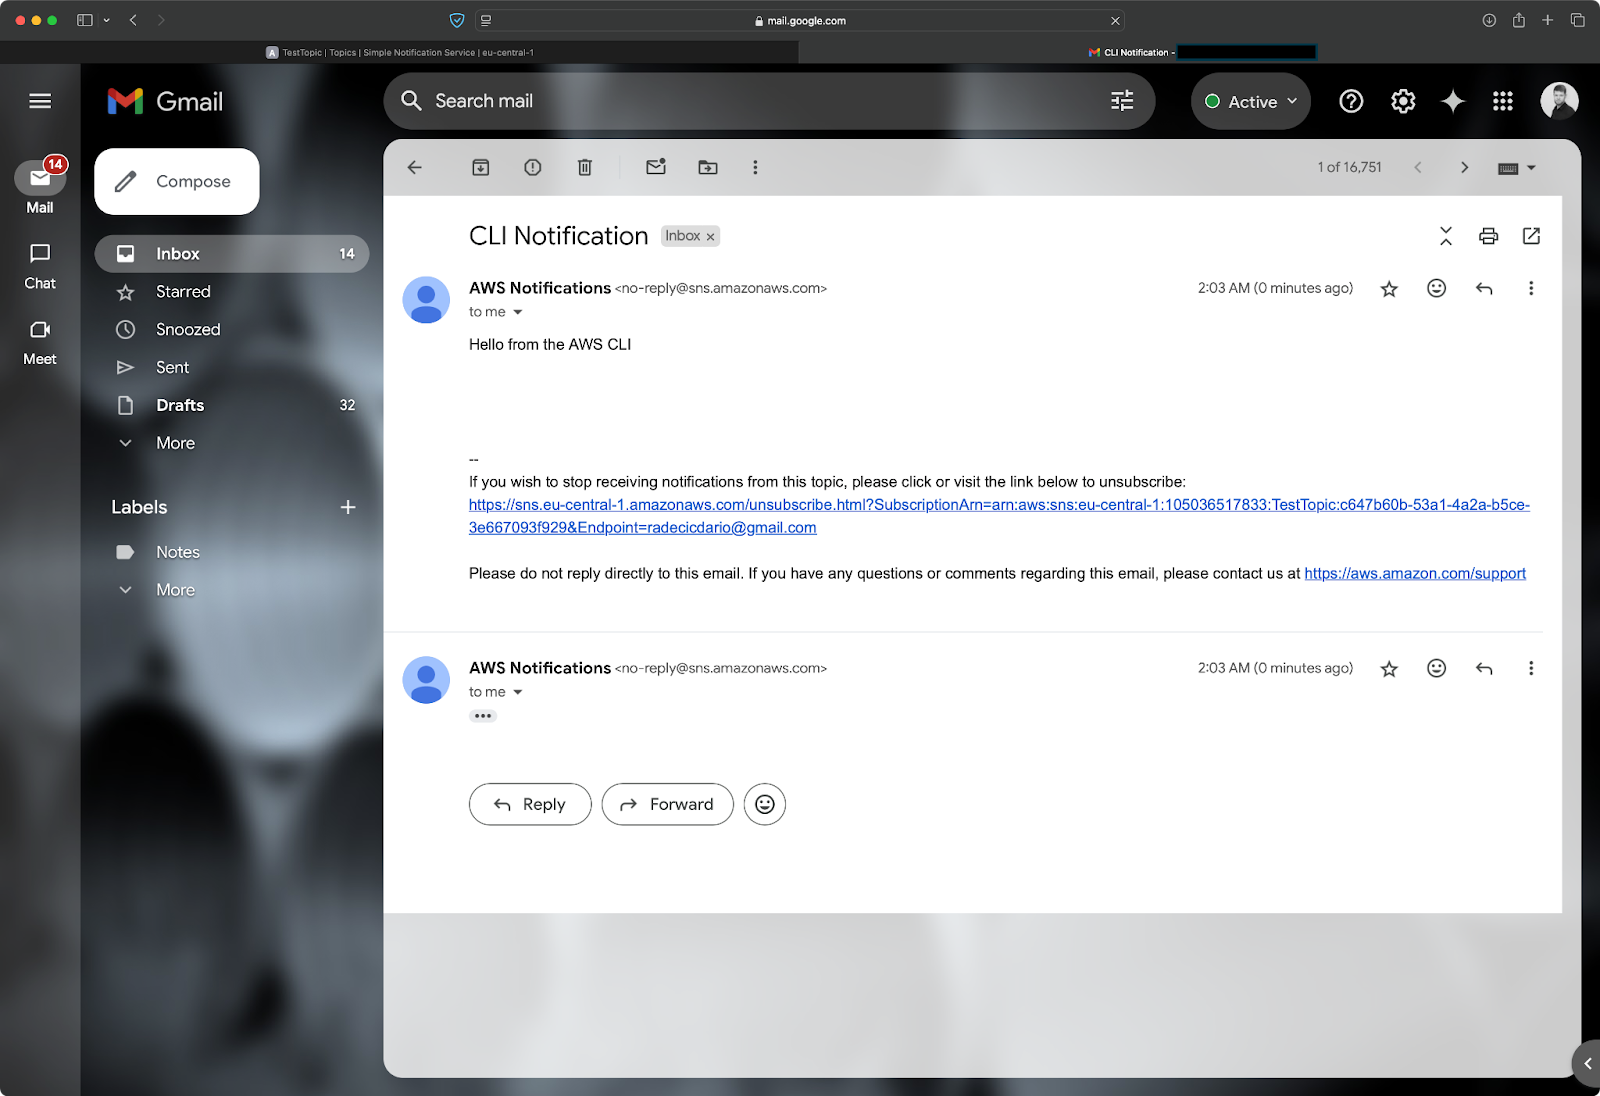
Image 16 - Message publishing through AWS CLI (2)
For more advanced applications, the AWS SDKs provide programmatic access to SNS in many programming languages.
Here's a simple example for publishing a message using Python with the boto3 library:
import boto3

# Initialize the SNS client
sns_client = boto3.client("sns", region_name="eu-central-1")

# Topic ARN (Amazon Resource Name)
topic_arn = "sns-arn"

# Publish a simple message
response = sns_client.publish(
    TopicArn=topic_arn, Message="Hello from Python!", Subject="Python Notification"
)

# Check if the message was sent successfully
if "MessageId" in response:
    print(f"Message published successfully! Message ID: {response['MessageId']}")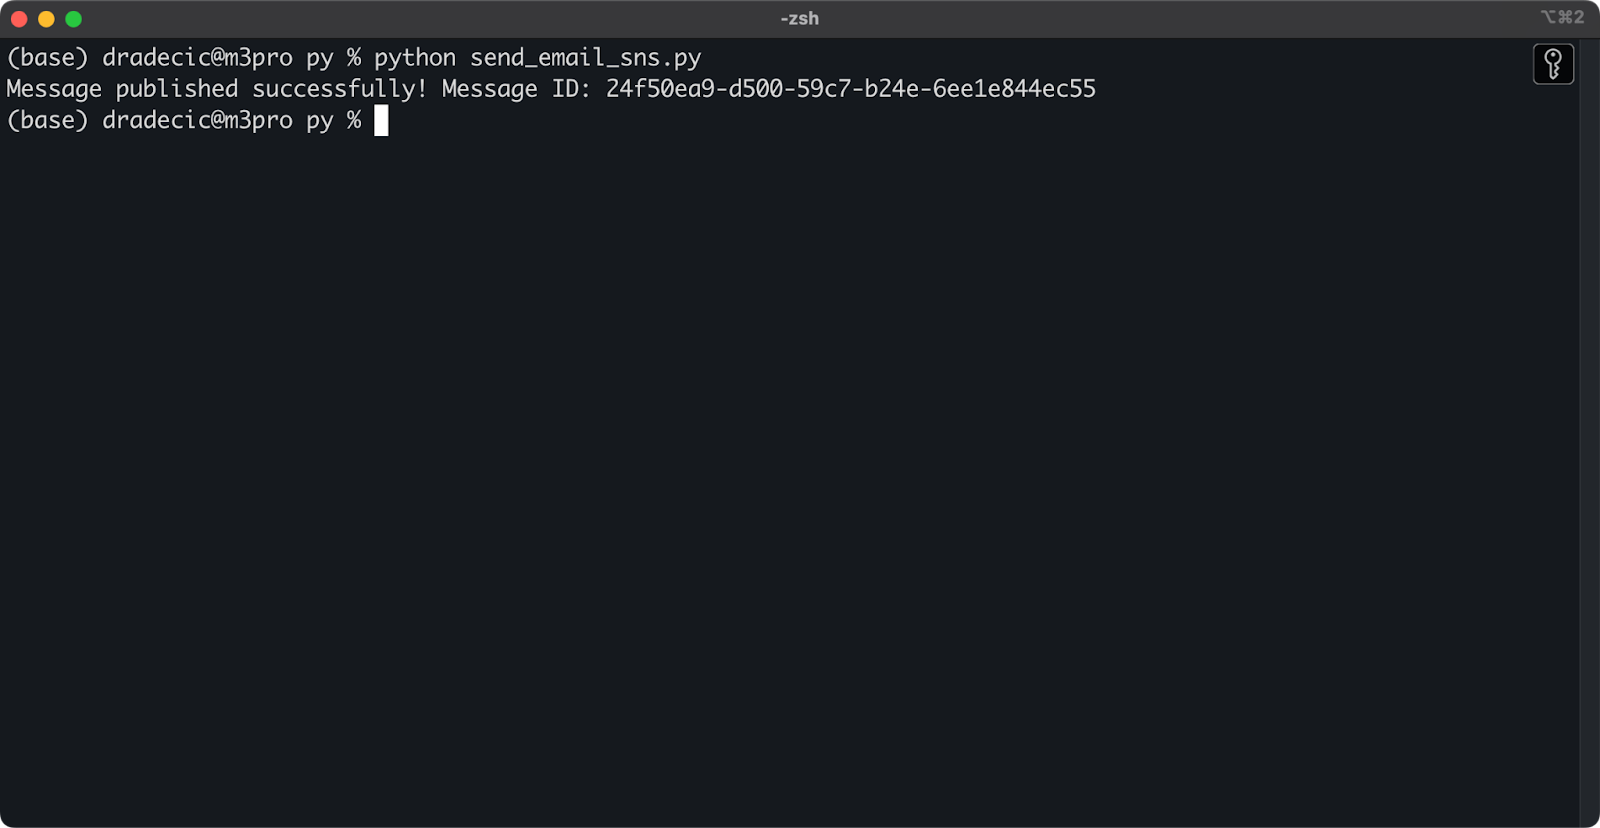
Image 17 - Message publishing through Python SDK
Once again, the message is delivered instantly to my inbox:
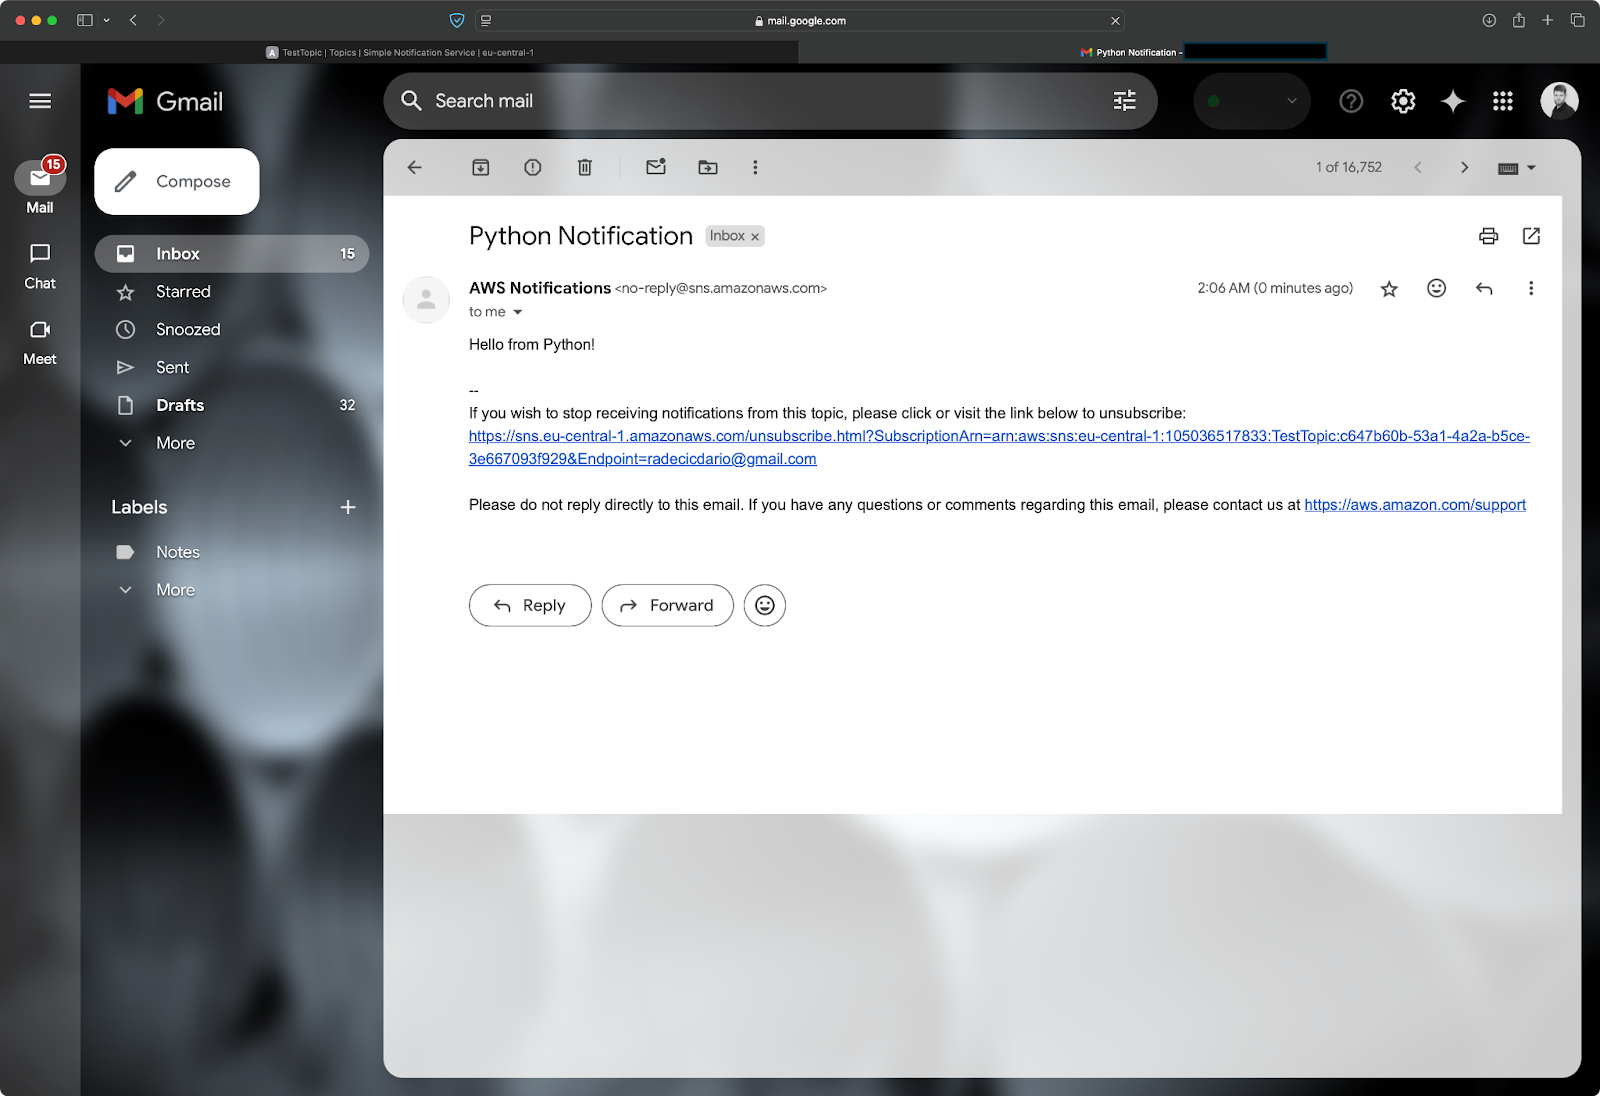
Image 18 - Message publishing through Python SDK (2)
That's all there is to publishing messages with SNS! You now have multiple ways to send notifications, from the simple console interface to programmatic publishing with the AWS CLI or SDK.
> New to AWS Boto in Python? Enroll in our course to become proficient in no time.
In the next section, we'll explore some advanced features of SNS that will take your notifications to the next level.
So far, you've learned the basics of SNS. In this section, you'll see a couple of advanced features that make SNS truly powerful.
Sending the same notification to all subscribers often results in endpoints receiving messages they don't care about.
Message filtering solves this problem by allowing subscribers to filter which messages they receive based on message attributes. Think of it like setting up email filters - you create rules that determine which messages get through. For SNS, these rules are called filter policies.
To start, you can set up filter policies on your subscriptions so they only receive relevant messages:
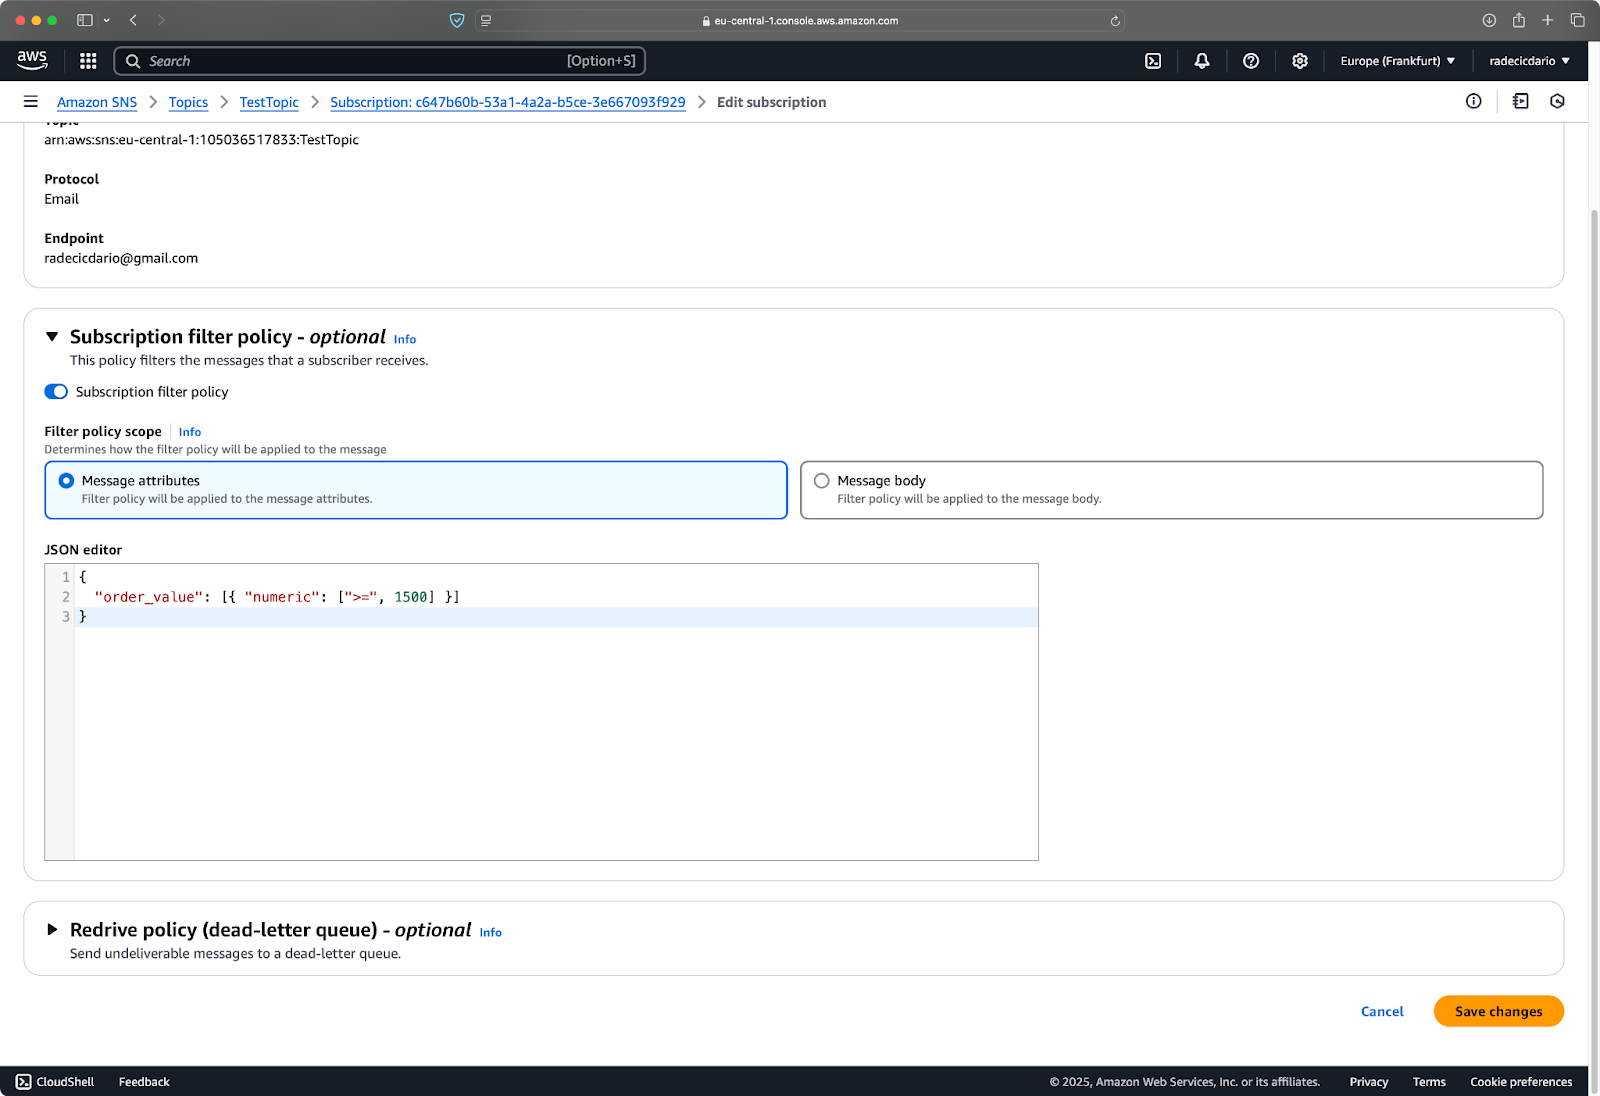
Image 19 - Notification filter policies
In this example, the subscriber will only receive notifications for messages that have an attribute order_value with a numeric value of 1500 and above.
Now, to send such a notification, you can use the following Python code:
import boto3

# Initialize the SNS client
sns_client = boto3.client("sns", region_name="eu-central-1")

# Topic ARN (Amazon Resource Name)
topic_arn = "arn:aws:sns:eu-central-1:105036517833:TestTopic"

response = sns_client.publish(
    TopicArn=topic_arn,
    Message="A new high-value order has been placed",
    Subject="New Order Notification",
    MessageAttributes={
        "order_value": {"DataType": "Number", "StringValue": "2000"},
        "region": {"DataType": "String", "StringValue": "EU"},
        "category": {"DataType": "String", "StringValue": "Electronics"},
    },
)

print(response)
This is what you'll see after running the Python script:
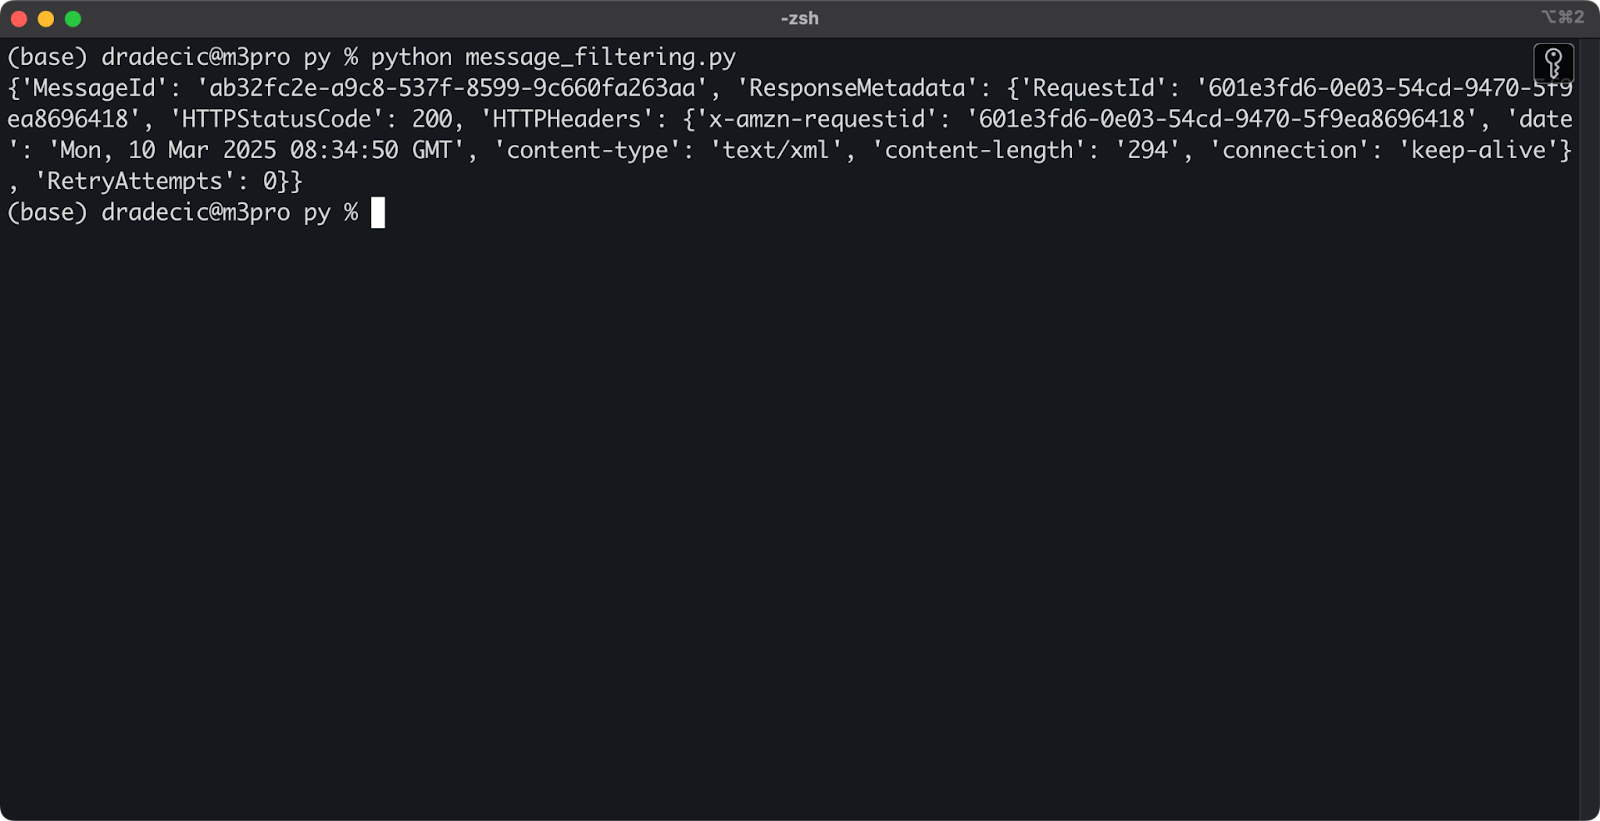
Image 20 - Sending a notification through Python
Only if the value of order_value is 1500 or above, you'll receive the notification:
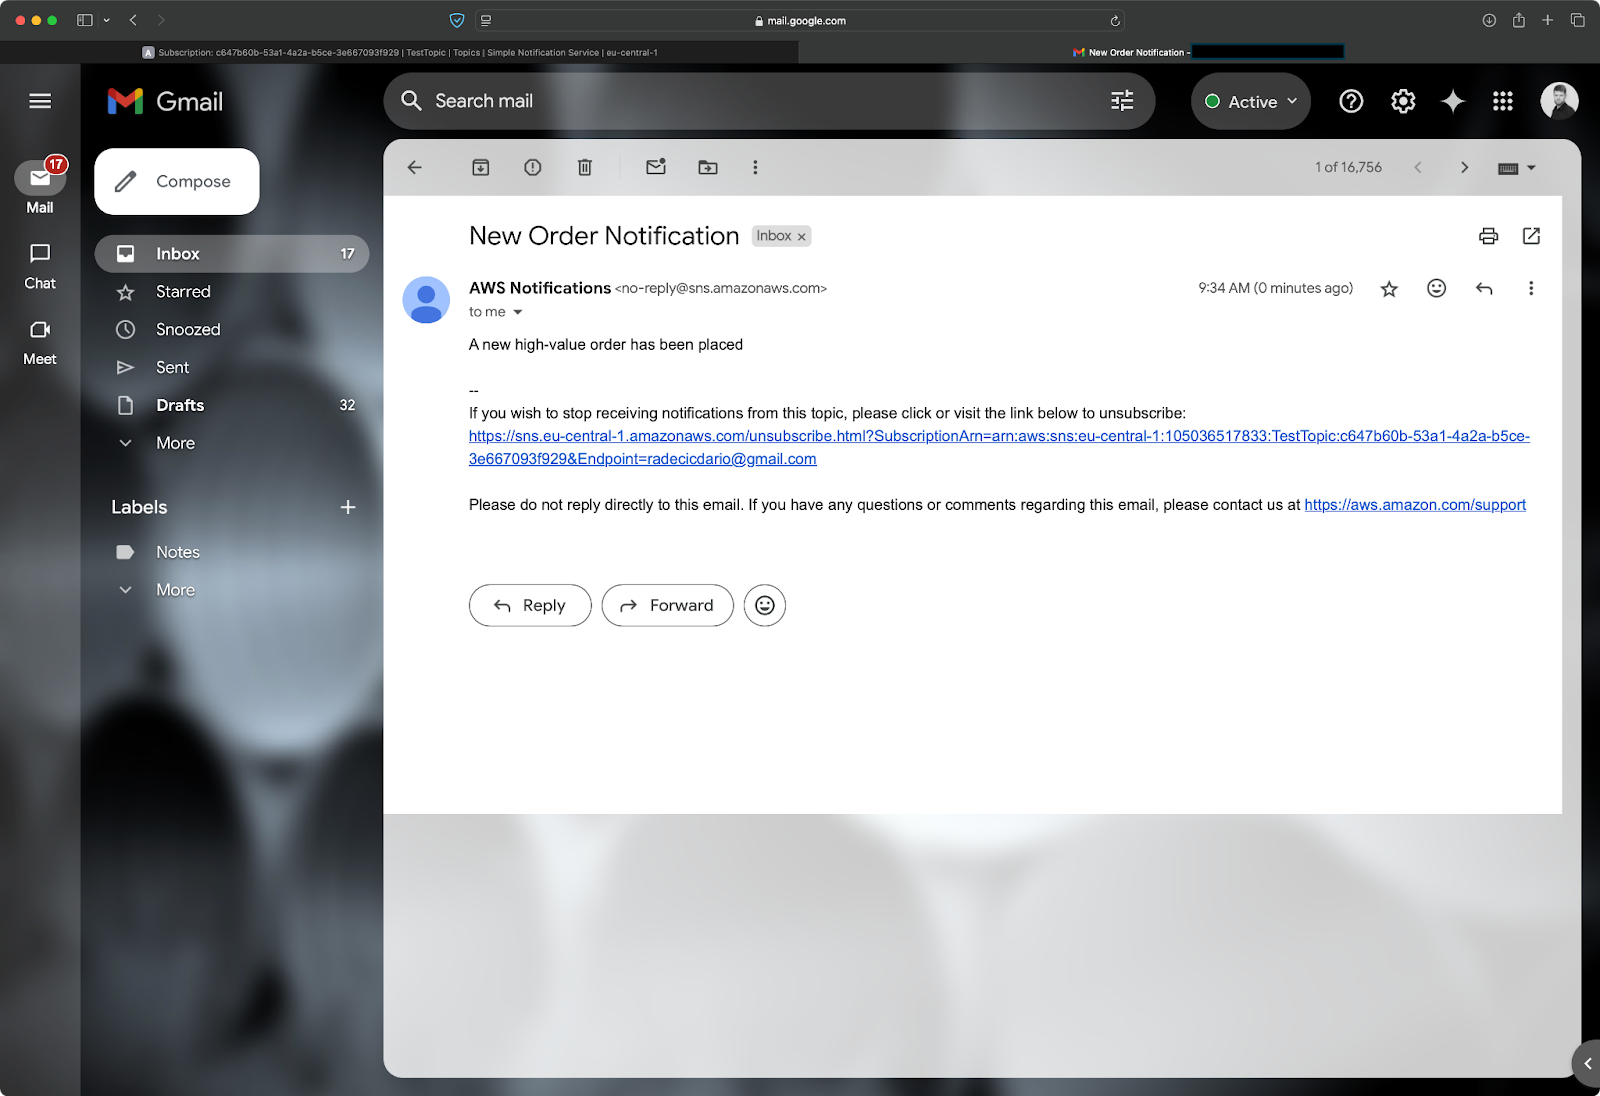
Image 21 - Notification content
In short, filter policies allow you to send targeted notifications without changing your publishing code. The best part is that filtering happens on AWS's side, not in your application, which improves efficiency and reduces unnecessary traffic.
Message delivery can sometimes fail even with the most reliable systems.
A Dead Letter Queue (DLQ) is a special Amazon SQS queue where SNS can send messages that couldn't be delivered to their subscribers. This typically happens when a subscriber is unavailable or returns an error. Instead of losing these failed messages forever, SNS redirects them to the DLQ, where you can analyze them later or retry delivery.
Setting up a DLQ involves two steps. First, create an SQS queue to serve as your DLQ:
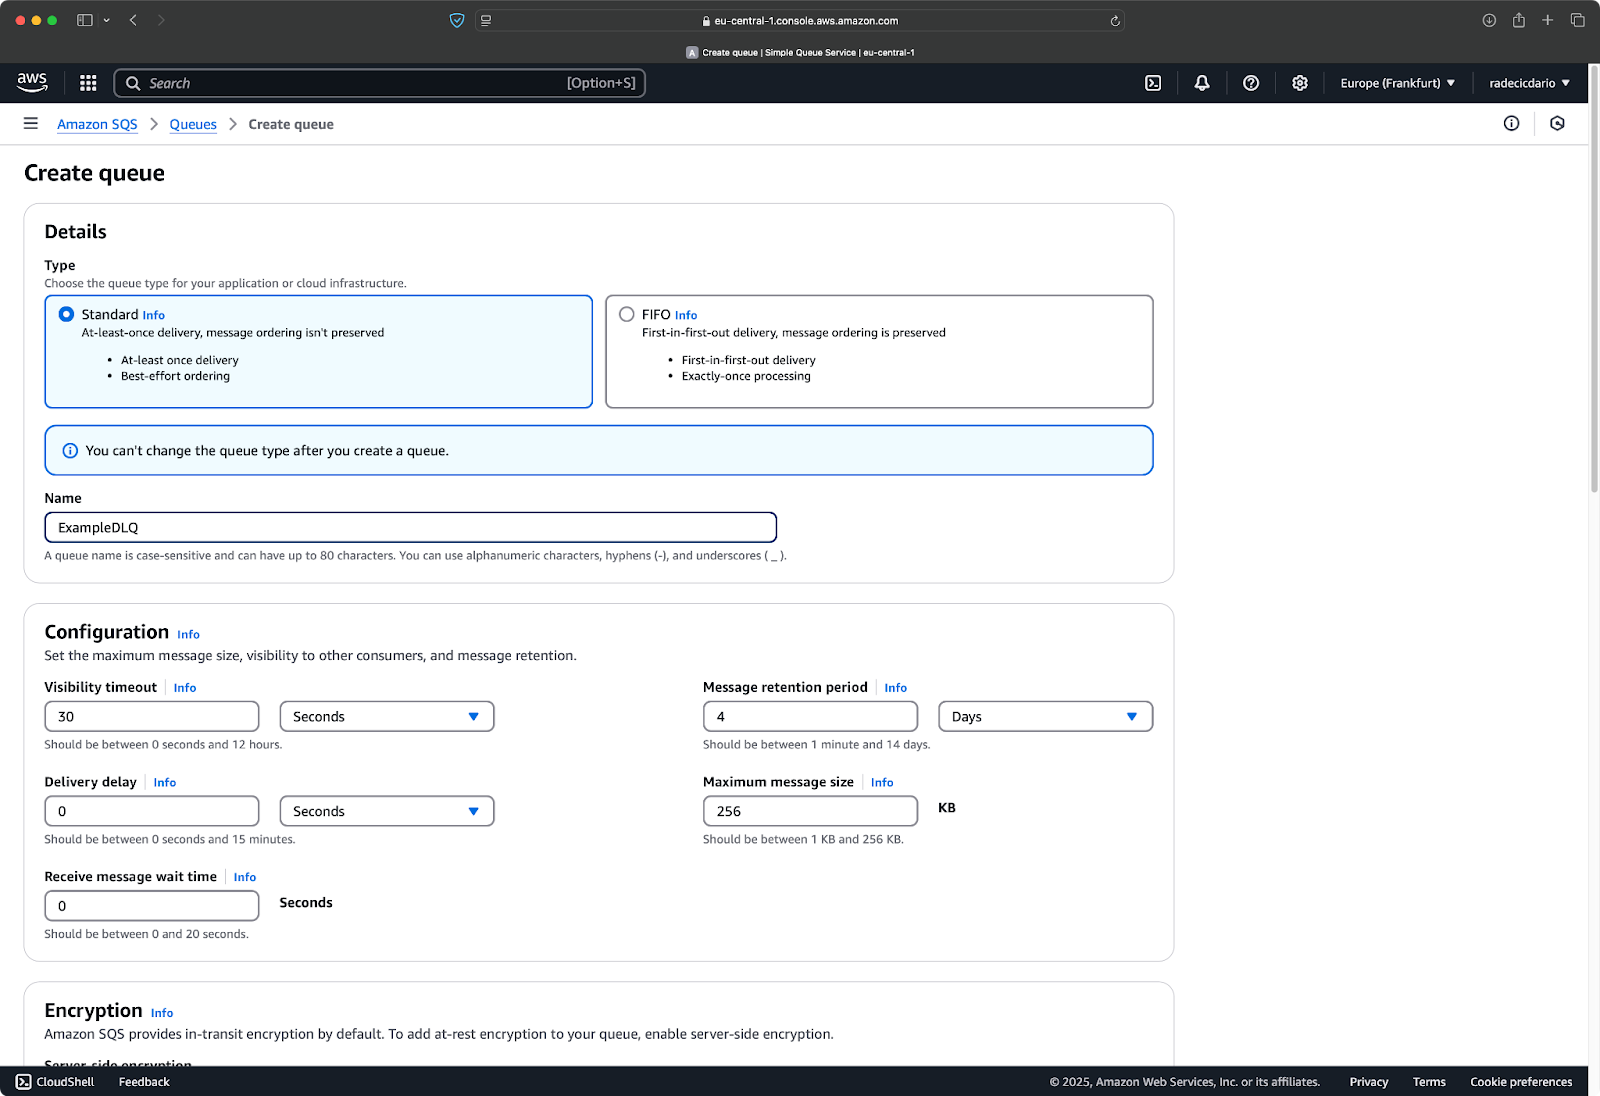
Image 22 - Creating an SQS queue
Then, configure your SNS subscription to use this queue for undeliverable messages:

Image 23 - Adding redrive policy to the SQS queue
This configuration requires the right permissions, as SNS needs to be able to send messages to the SQS queue. In the AWS console, you can set this up through a simple checkbox, but if you're using CloudFormation or other infrastructure-as-code tools, you'll need to add the appropriate IAM permissions.
With a DLQ in place, you can monitor for delivery failures and take action when needed. For example, you might set up an alarm that triggers when messages start appearing in your DLQ, alerting you to potential problems with your subscribers, but that's out of the scope for this section.
Lambda functions open up a world of possibilities for processing SNS messages.
When you subscribe a Lambda function to an SNS topic, the function is triggered automatically whenever a message is published. Lambda's serverless approach means you don't need to manage any infrastructure for message processing, as it scales automatically based on the volume of messages.
To start, first create a Lambda function:
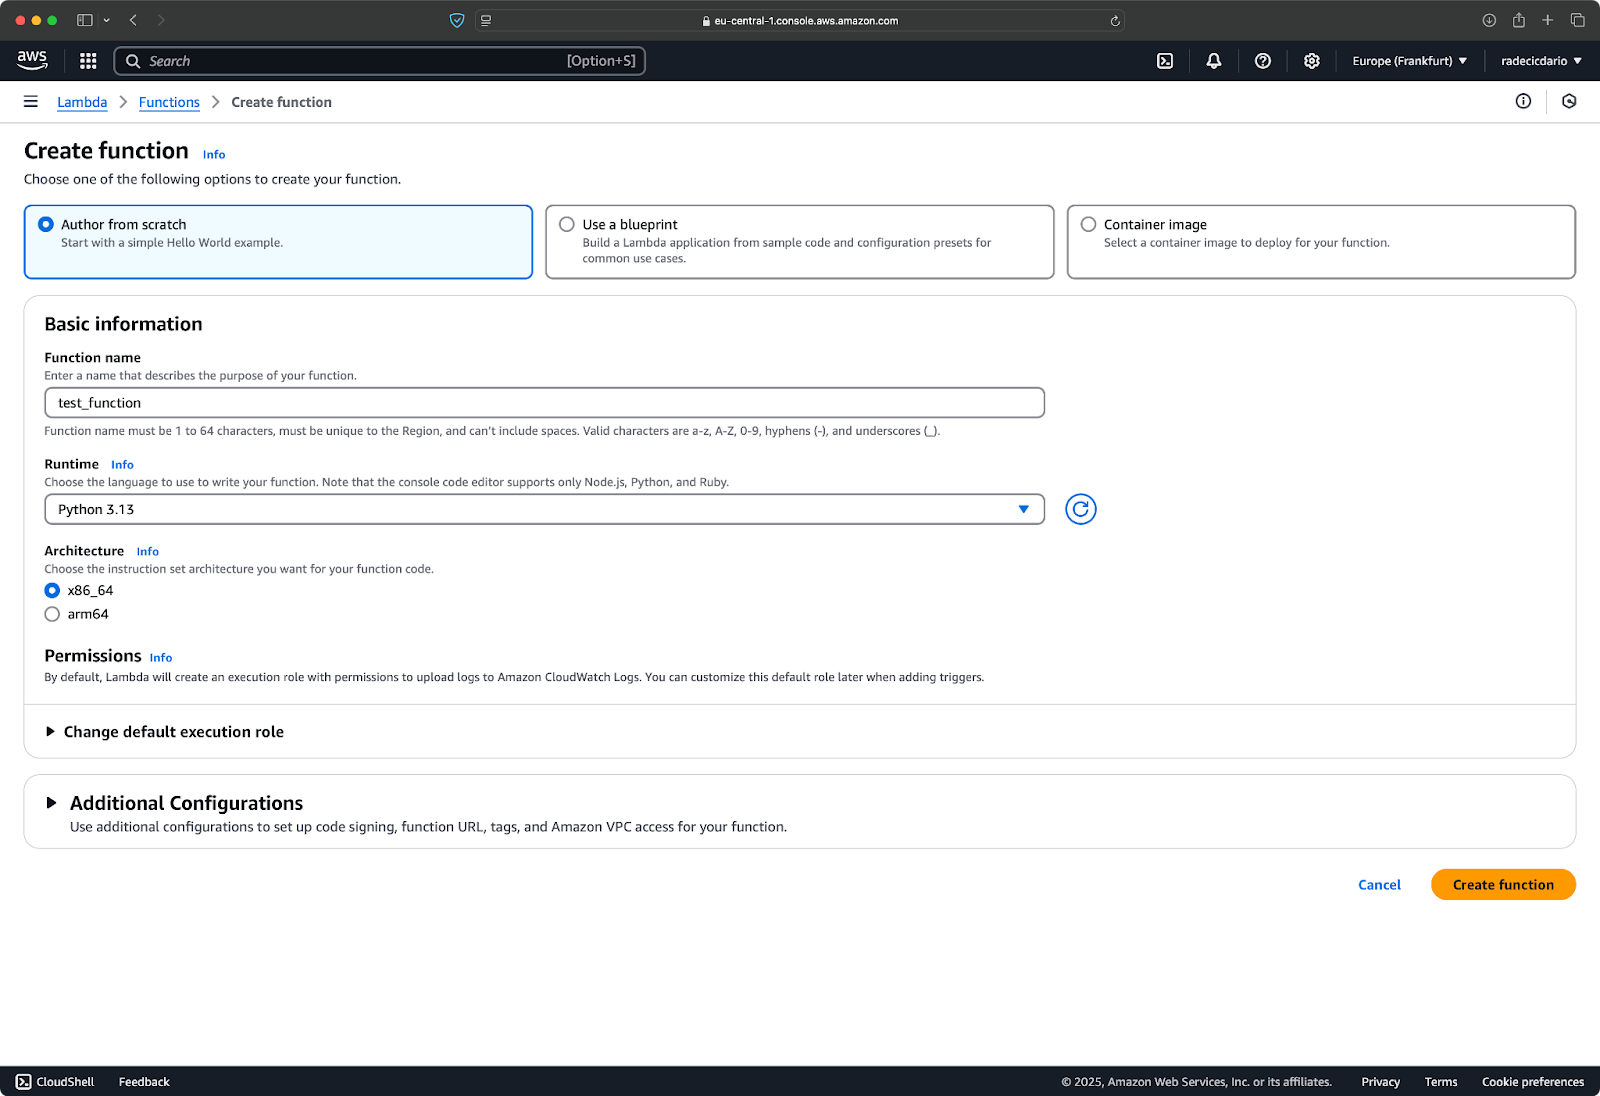
Image 24 - Creating a Lambda function
Then, fill it out with code similar to this:
def lambda_handler(event, context):
    # SNS messages come in the 'Records' array
    for record in event["Records"]:
        # Extract the message
        message = record["Sns"]["Message"]
        subject = record["Sns"]["Subject"]
        timestamp = record["Sns"]["Timestamp"]

        # Process the message
        print(f"Received message: {message}")
        print(f"Subject: {subject}")
        print(f"Timestamp: {timestamp}")

        # Your business logic here
        # For example, store the message in a database
        # or trigger another AWS service
        print("ALL DONE!")

    # Return success
    return {"statusCode": 200, "body": "Message processed successfully"}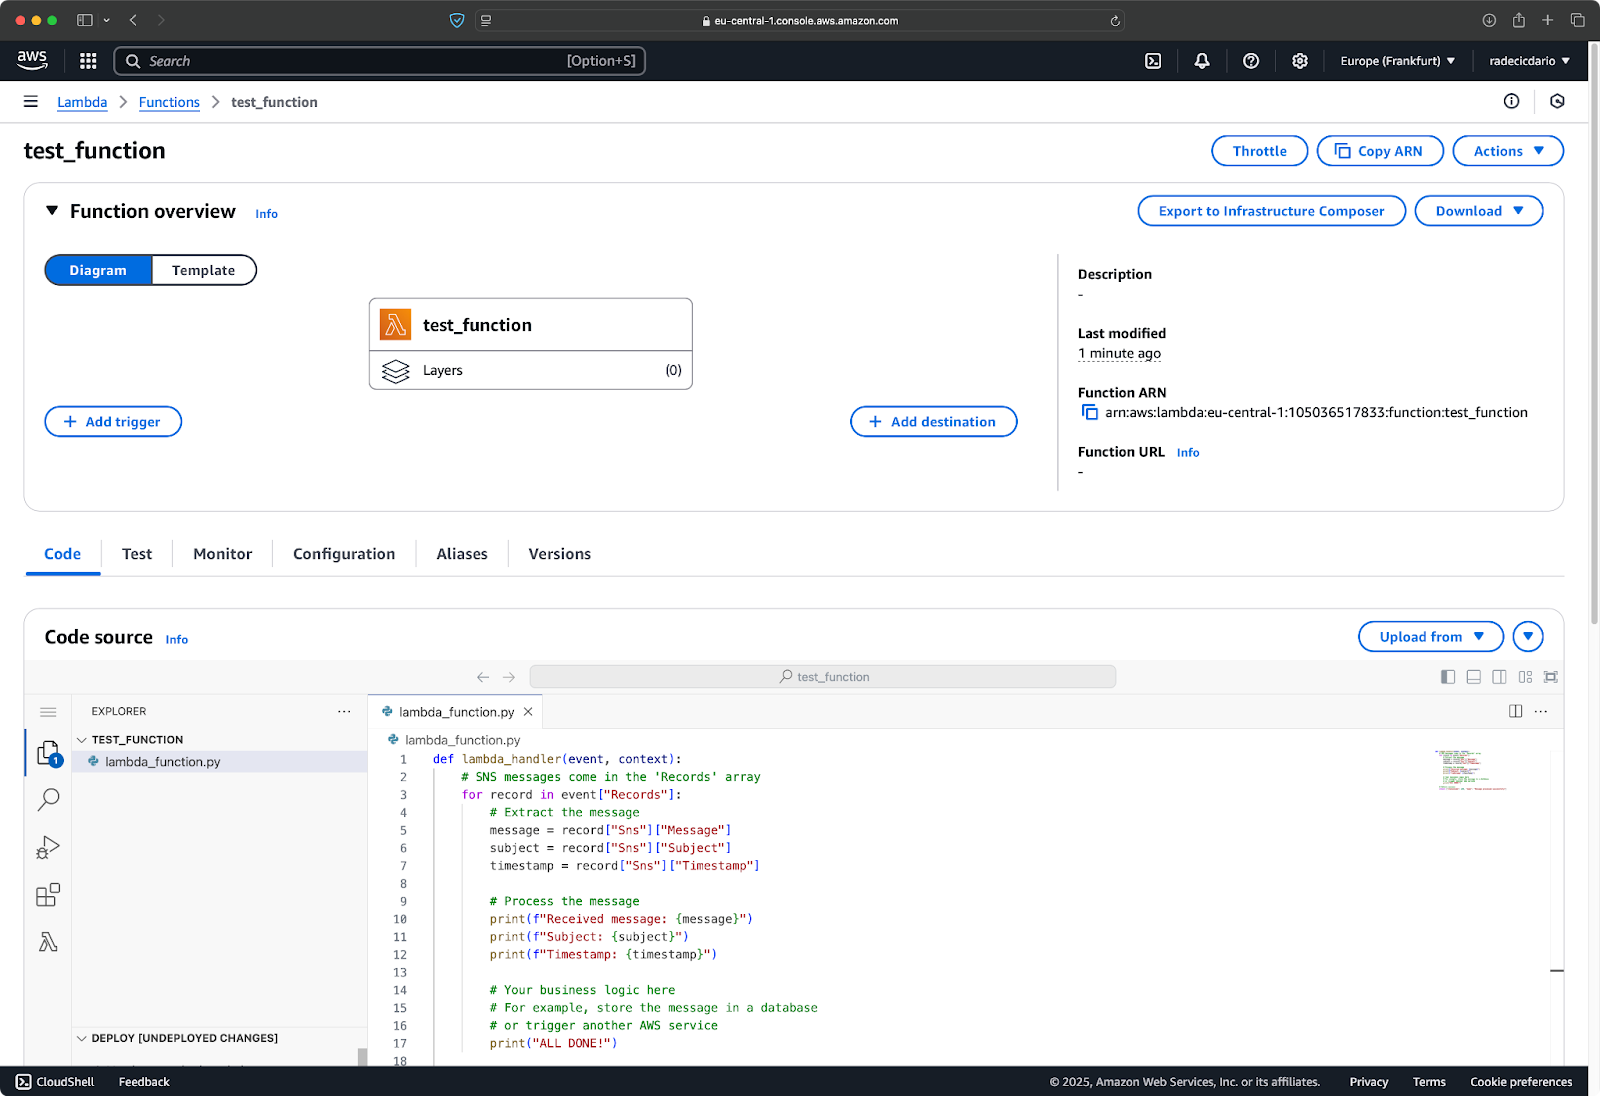
Image 25 - Lambda function code
Once your code is ready, click on the "Add trigger" button to connect Lambda function to SNS:
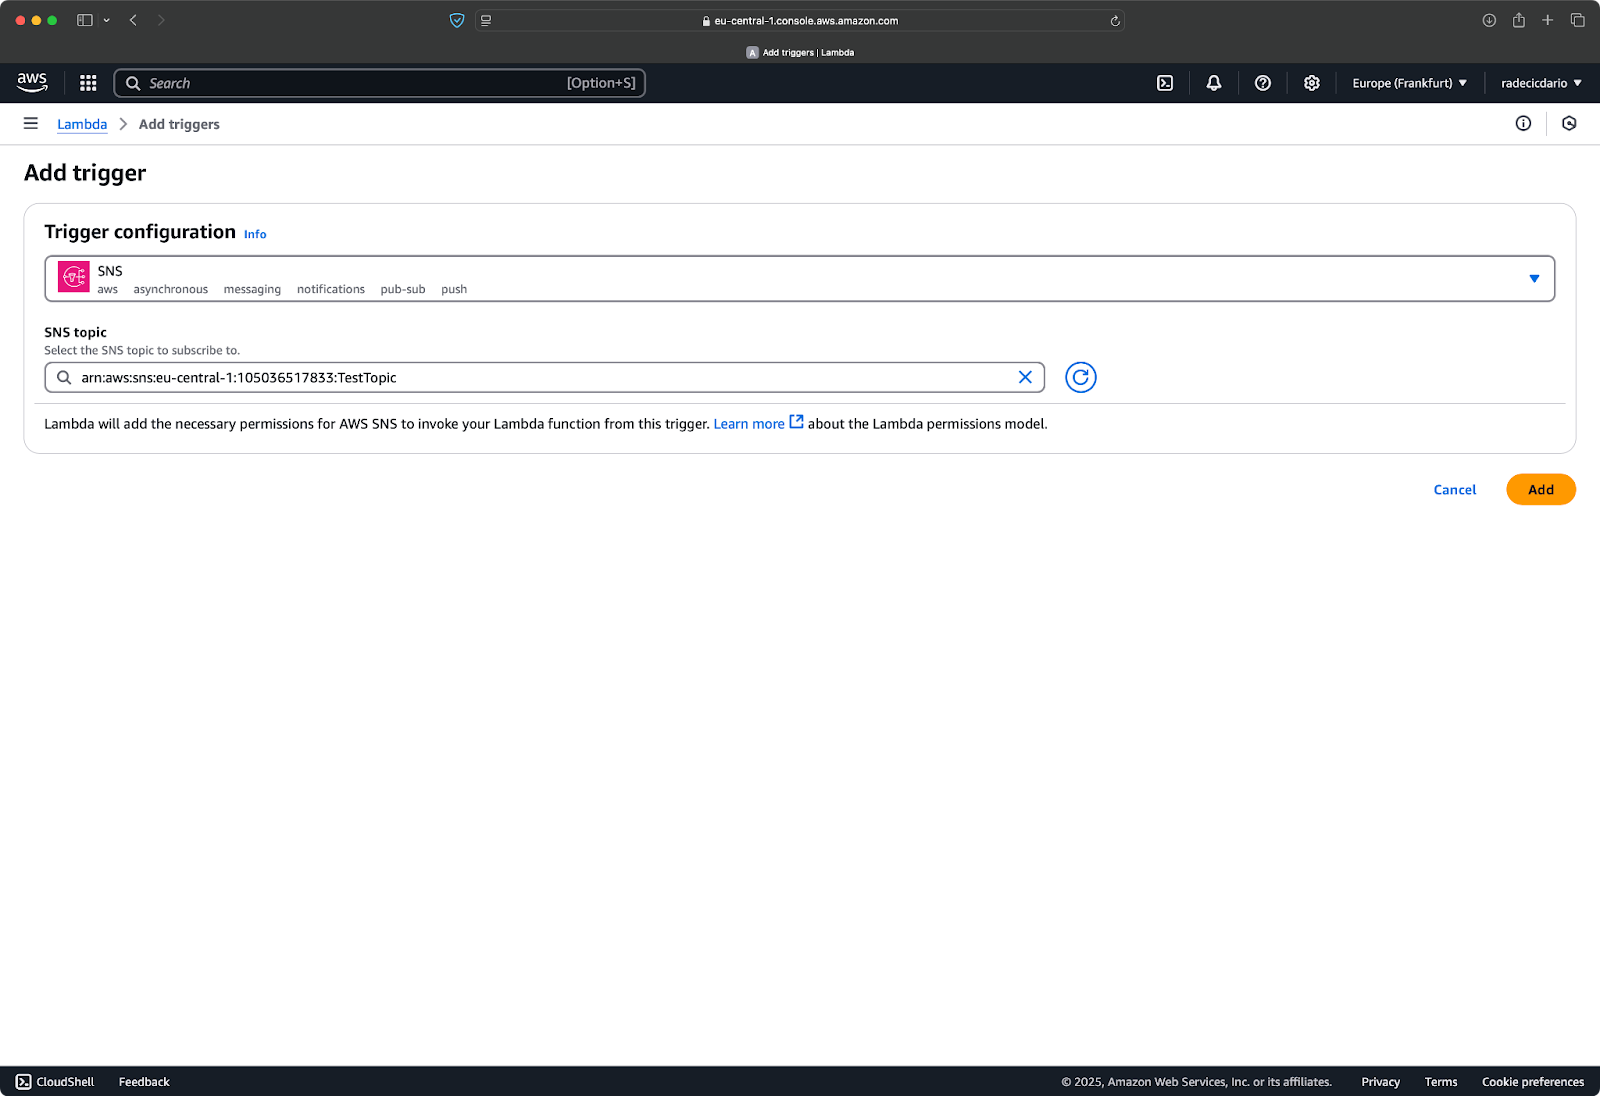
Image 26 - Connecting SNS to Lambda
The function is now connected to the queue, which means you can send a test notification:
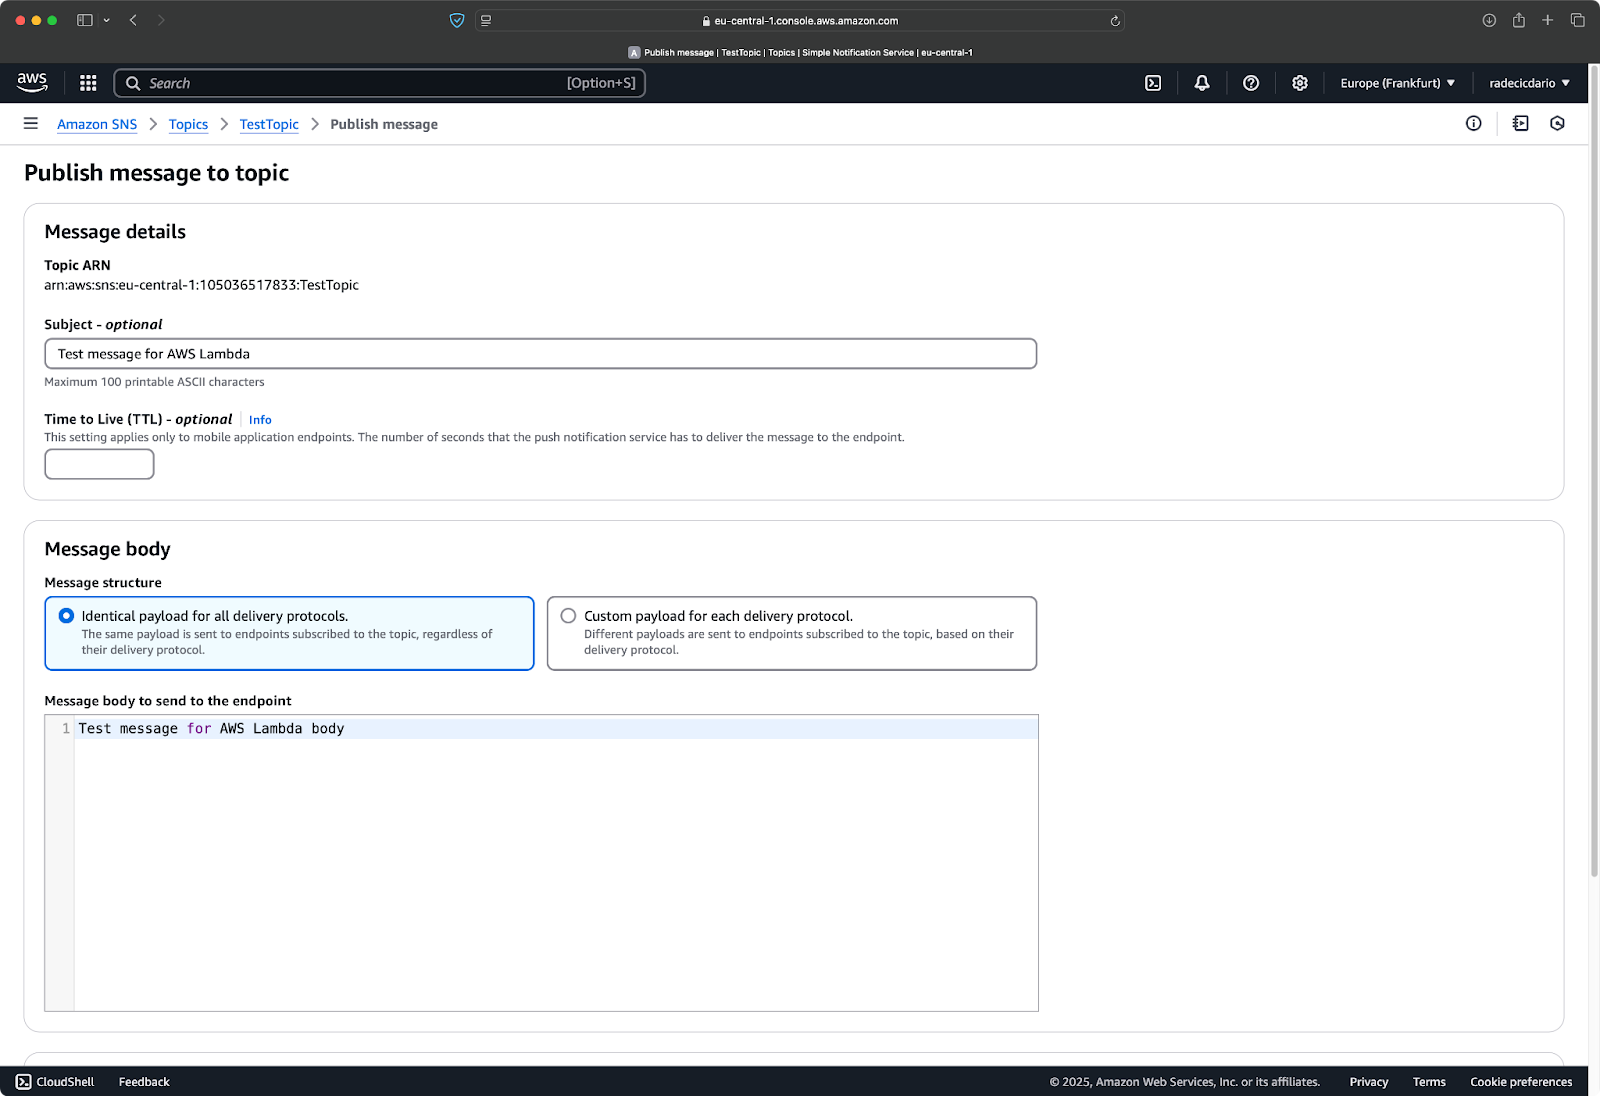
Image 27 - Test notification
Lambda functions allow you to monitor logs, which means you can see recent function invocations - the result of sending a notification:
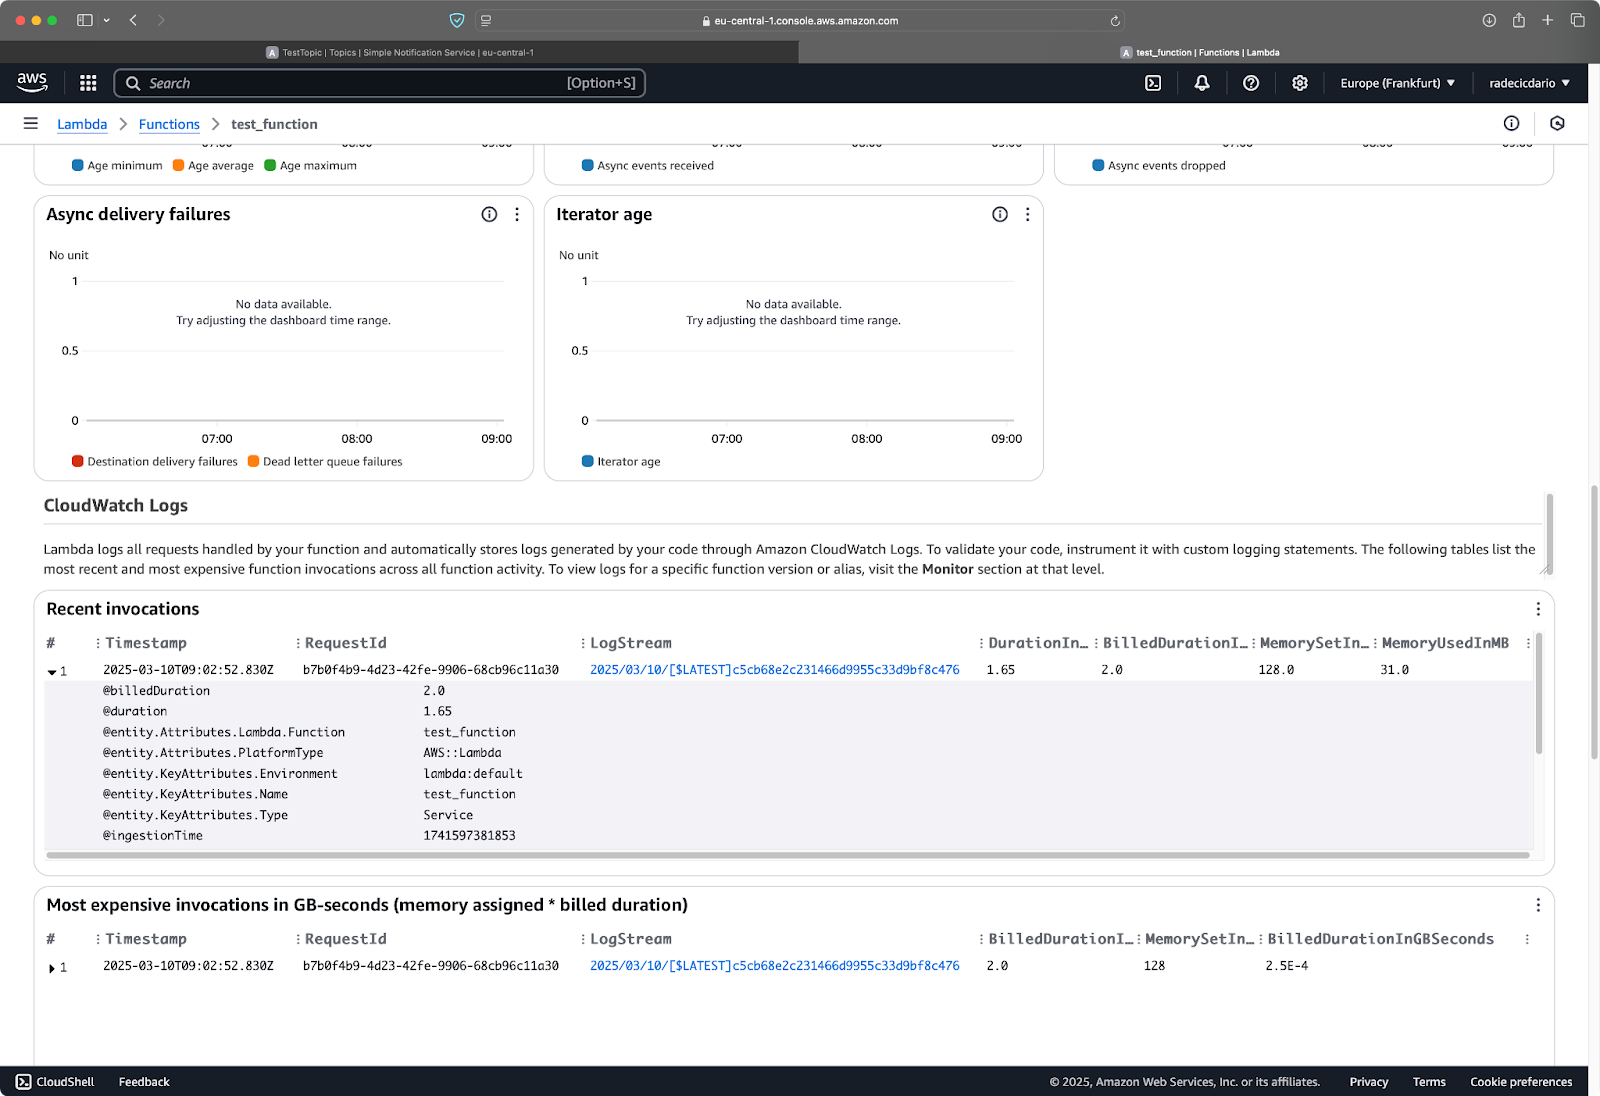
Image 28 - Lambda function logs
Lambda functions can do virtually anything with these messages - store them in a database, trigger other AWS services, send emails, or even call external APIs. This makes SNS and Lambda a powerful combination for building event-driven architectures. You can learn more about Lambda functions in the Getting Started with AWS Lambda tutorial.
Up next, you'll learn the basics of SNS monitoring and logging.
Keeping track of your SNS activity is essential for maintaining a reliable notification system.
Amazon CloudWatch provides comprehensive monitoring for all of your AWS services, SNS included. When you set up CloudWatch with SNS, you gain visibility into important operational metrics like message delivery rates, failures, and API usage patterns.
To get started with CloudWatch monitoring for SNS, navigate to the CloudWatch console in your AWS account. From there, you can access the pre-configured SNS metrics that AWS automatically collects for you.
The most valuable SNS metrics to monitor include:
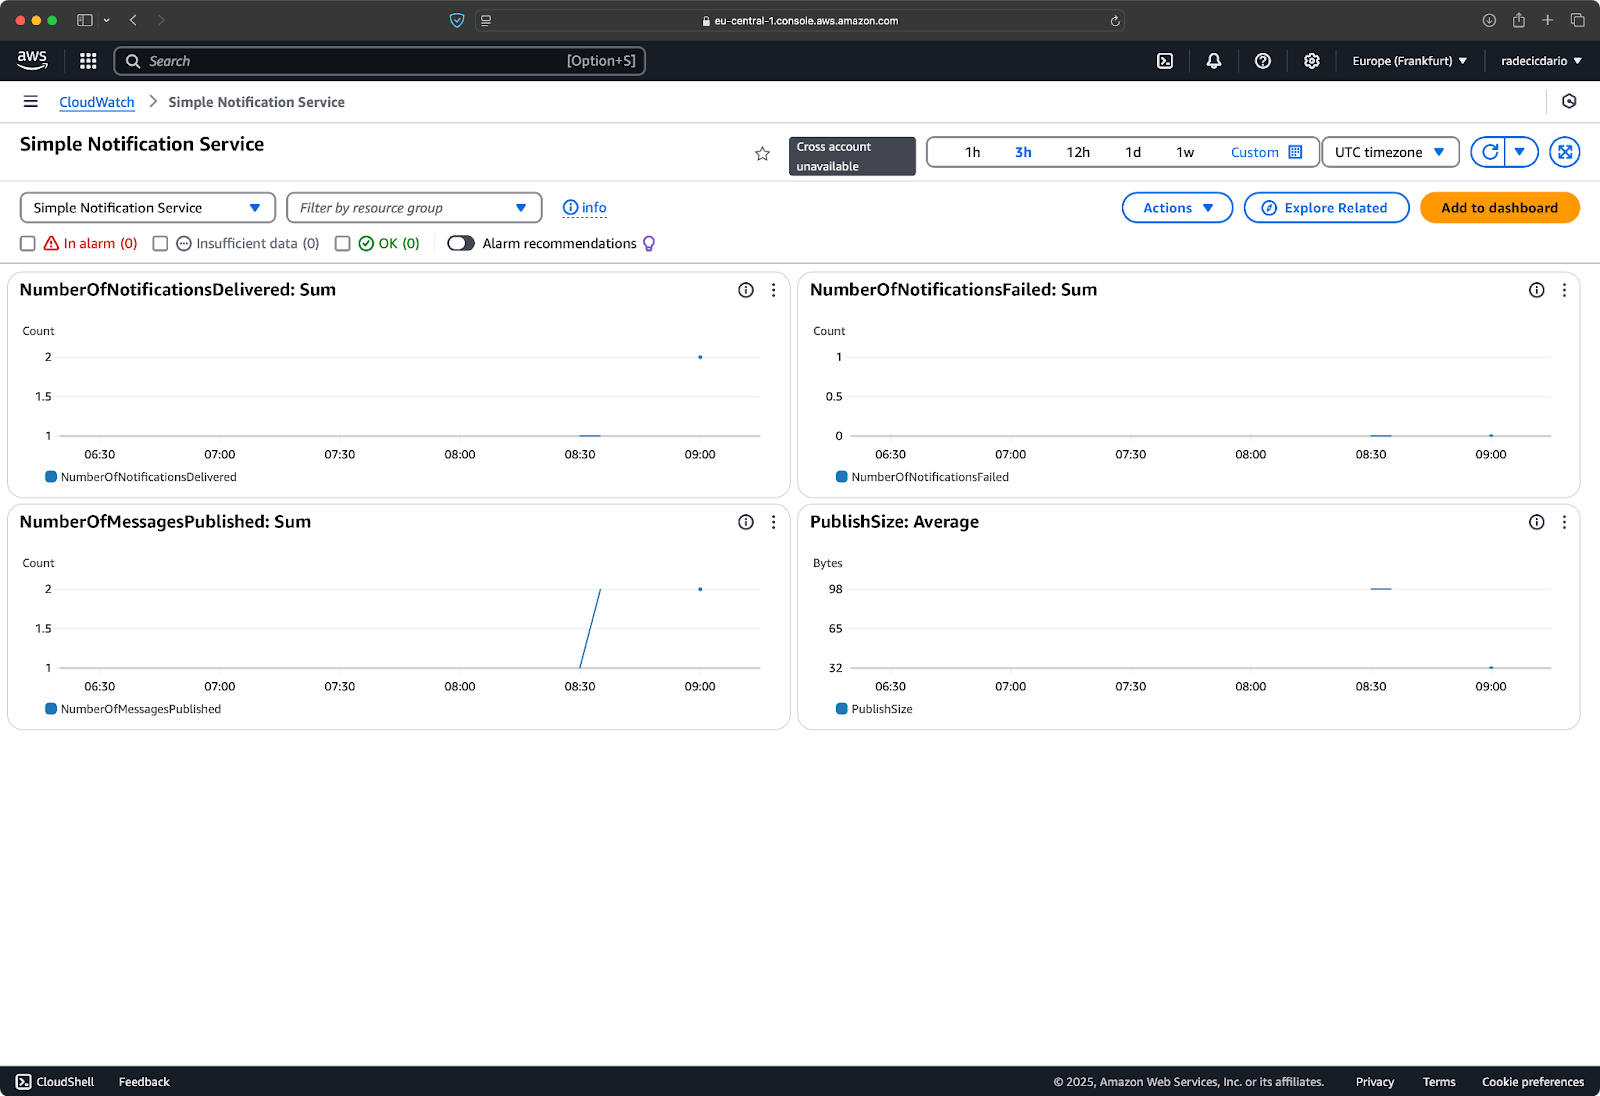
Image 29 - Default Cloudwatch dashboard for SNS
Setting up CloudWatch alarms allows you to quickly respond to potential issues before they impact your users. For example, you might want to create an alarm that triggers when message delivery failures exceed a certain threshold:
If you prefer images over instructions, start by creating an alarm for a metric of interest, such as NumberOfNotificationsFailed. Set up thresholds that will activate the alarm:
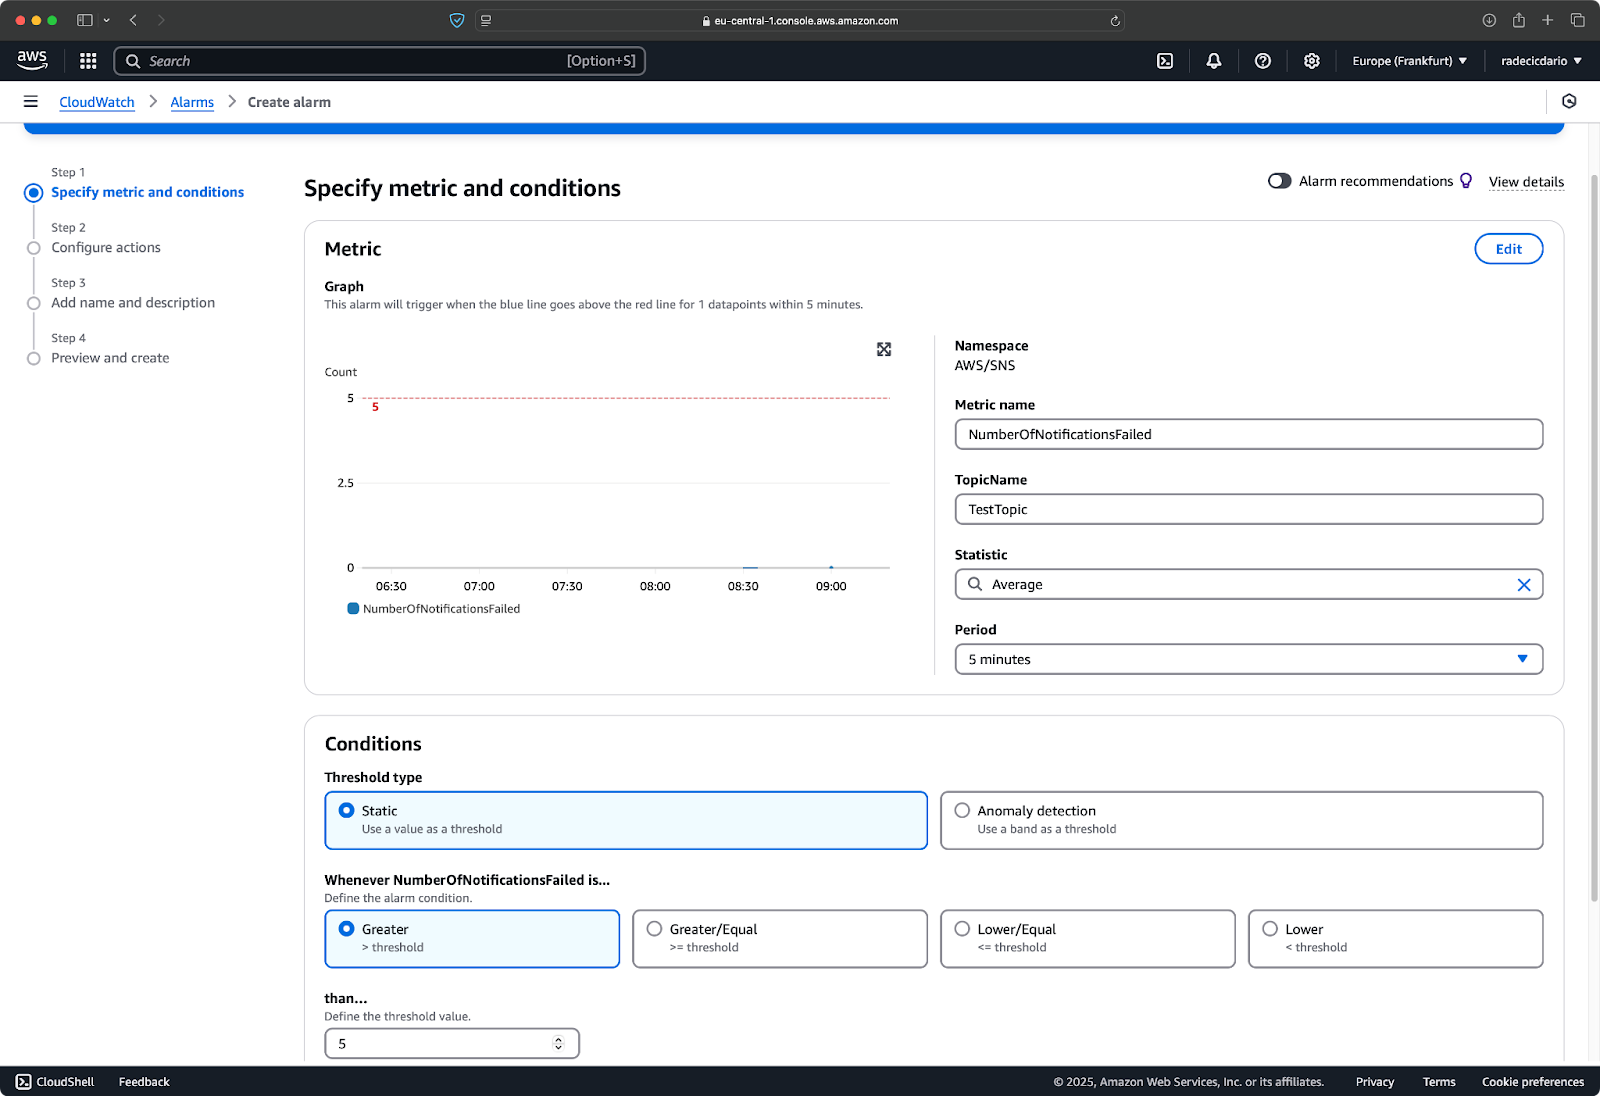
Image 30 - Alarm creation
And that's it - the alarm is now created and active:
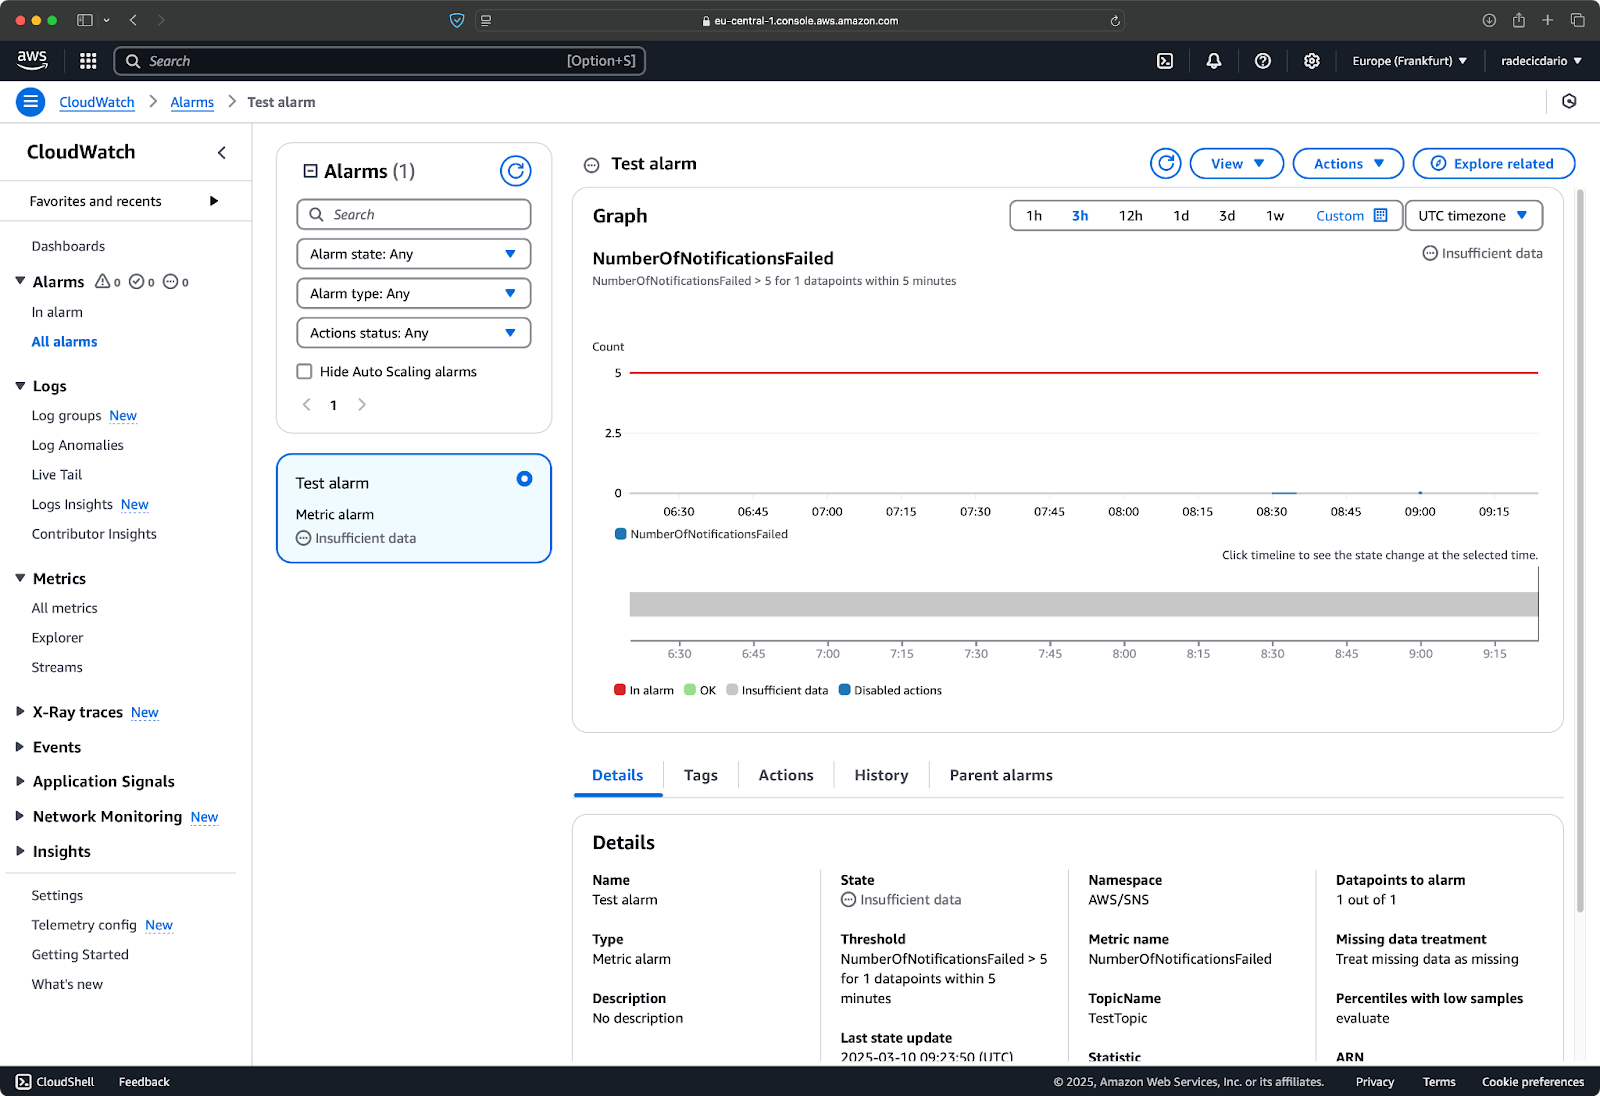
Image 31 - Alarm creation (2)
These alarms can be the difference between proactively addressing an issue and learning about it from unhappy users.
AWS CloudTrail captures all API activity in your AWS account, including actions taken within the SNS service.
Every operation performed on your SNS topics—whether through the console, CLI, or SDK—generates an entry in CloudTrail logs. These logs provide valuable information for security analysis, resource change tracking, and compliance auditing.
To access SNS logs in CloudTrail:
Once again, if text instructions aren't enough, refer to the images below. Start by creating a new trail:
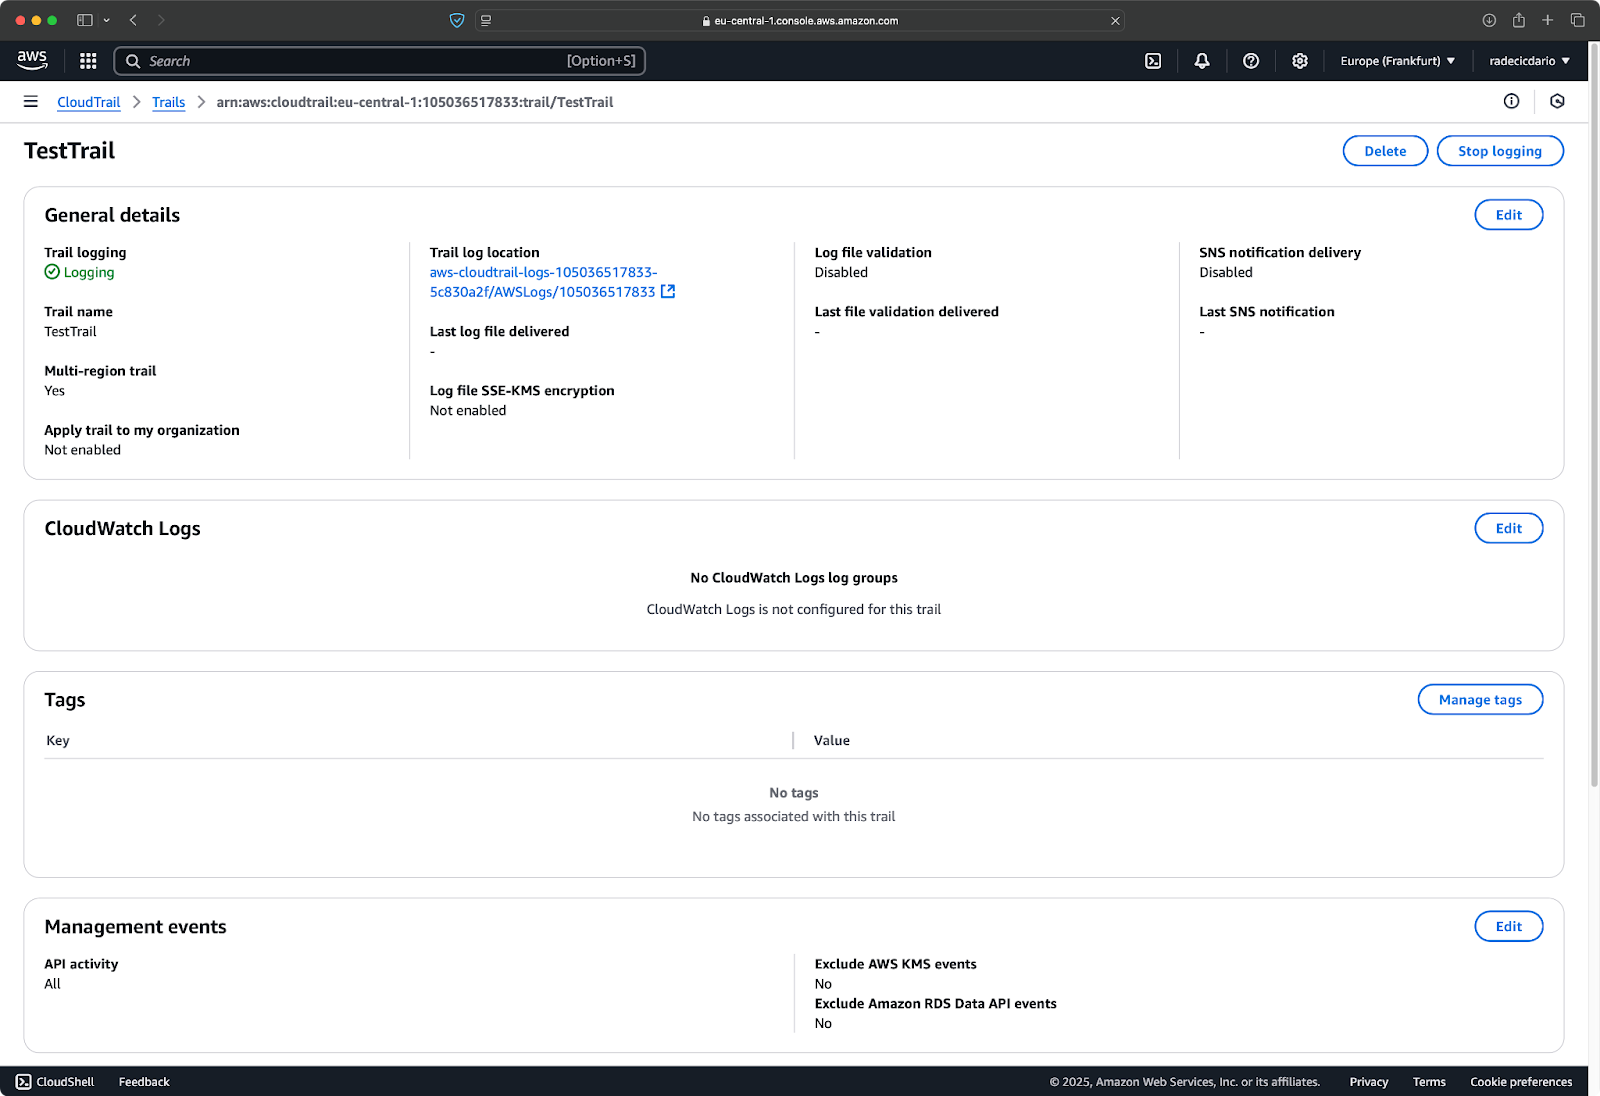
Image 32 - Creating a new trail
Then under "Event history," filter the events to include only those for SNS:

Image 33 - Filtering logs
Logs are automatically stored in an S3 bucket, which means this approach provides permanent storage for your logs and enables more advanced querying capabilities.
> How does storage on AWS work? Read our guide on S3 and EFS.
To conclude, by combining CloudWatch metrics with CloudTrail logs, you create a comprehensive monitoring system that helps ensure your SNS infrastructure operates reliably.
You now know the basic and advanced features of AWS SNS. What's left to discuss are the best practices for creating topics and sending messages.
Security should be a top priority when setting up your SNS infrastructure. Without proper controls, your topics could be vulnerable to unauthorized access, which is a massive security risk.
AWS Identity and Access Management (IAM) provides the tools you need to secure your SNS topics. Start by creating policies that follow the principle of least privilege – only grant the specific permissions needed for each user or service. For example, you might want some applications to only publish messages while others only need to subscribe to topics.
Here's a sample IAM policy that restricts publishing to a specific topic:
{
    "Version": "2012-10-17",
    "Statement": [
        {
            "Effect": "Allow",
            "Action": "sns:Publish",
            "Resource": "sns-arn"
        }
    ]
}
You can also use topic policies to control which AWS accounts can subscribe to your topics. This is particularly important if you're sharing data across organizational boundaries.
Don't forget to regularly audit permissions using AWS CloudTrail and remove access that's no longer needed.
High message volumes can overwhelm subscribers if not handled properly. This is where combining SNS with other AWS services becomes essential.
One popular pattern is the "fanout" architecture, where you publish messages to an SNS topic that has multiple SQS queues subscribed to it. Each queue can then feed into different processing systems at their own pace. This decouples your publishers from your consumers, and provides a buffer during traffic spikes.
For real-time processing needs, consider subscribing Lambda functions to your topics. Lambda scales automatically with your message volume, eliminating the need to provision and manage servers.
While SNS is cost-effective, expenses can accumulate quickly as your message volume grows. A few strategic choices can help keep your costs in check.
First, be selective about your subscription protocols. HTTP/HTTPS endpoints are generally the most cost-effective option. Email notifications, while convenient, should be used judiciously since they incur higher costs per message.
Message filtering is another powerful cost-saving tool. By implementing filter policies on your subscriptions, you make sure the messages are only delivered to interested subscribers. For instance, if you have a topic for all system alerts, you might want your on-call engineers to receive only critical alerts during their shift, not every notification:
# Subscribe with a filter policy
response = sns.subscribe(
    TopicArn="sns-arn",
    Protocol="email",
    Endpoint="oncall@example.com",
    Attributes={"FilterPolicy": '{"severity": ["critical"]}'},
)
Finally, regularly review your SNS usage in the AWS Cost Explorer and look for opportunities to consolidate topics or remove unused subscriptions. Unused or duplicate resources not only add unnecessary costs but also complicate your architecture.
By following these best practices, you'll create an SNS implementation that's secure, scalable, and cost-effective – all you need to have a reliable notification service without unexpected expenses or security concerns.
If you need real-time notification across distributed applications, look no further than AWS SNS. It's easy to use, integrates well with other AWS services, and scales infinitely to match your needs.
The publish-subscribe model in SNS makes it straightforward to implement notification systems that can reach multiple channels simultaneously. From creating topics and managing subscribers to implementing advanced features like message filtering and dead letter queues, you now have the knowledge to build robust notification infrastructure.
You've also learned about the critical aspects of monitoring, security, and cost management that ensure your SNS implementation remains reliable and efficient in production environments.
As applications continue to adopt event-driven architectures, services like SNS become increasingly valuable. Whether you're building a simple alert system or complex microservices, the patterns in this tutorial provide a foundation for effective communication between your system components.
To learn more about AWS, follow these courses by DataCamp:
You can even use DataCamp to prepare for AWS certification exams - AWS Cloud Practitioner (CLF-C02).
Learn more about AWS with these courses!
Course
Course
Course
blog
Aashish Nair
15 min
Tutorial
Zoumana Keita
Tutorial
Zoumana Keita
Tutorial
Moez Ali
Tutorial
Joleen Bothma
Tutorial
Bex Tuychiev