Track
Amazon Simple Queue Service (SQS) is a fully managed message queuing service provided by Amazon Web Services (AWS). It enables the decoupling and scaling distributed systems, microservices, and serverless applications.
This guide provides a clear understanding of AWS SQS, covering its features and the process of setting up and managing queues. It also discusses how to send and receive messages, examines pricing models, explores monitoring and metrics, compares SQS with SNS, and shares best practices for optimal use.
For those without background in AWS, our Introduction to AWS course is a good starting point. It helps you discover the world of Amazon Web Services and understand why it is at the forefront of cloud computing.
What is AWS SQS?
Before we dive into the details, let's first understand what AWS SQS is and why it's so valuable in the AWS ecosystem.
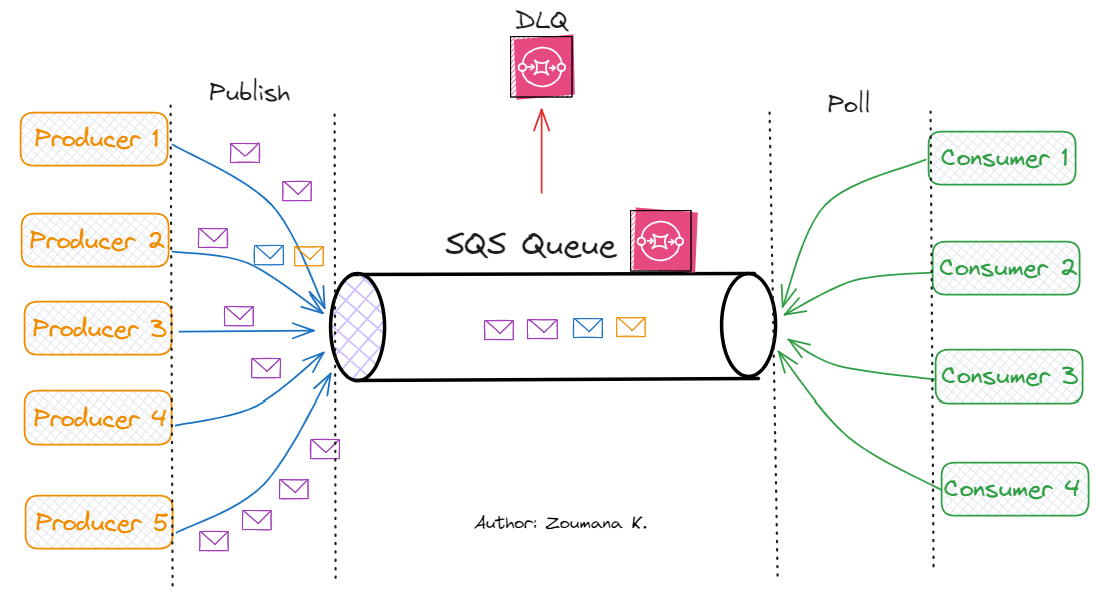
Amazon SQS architecture diagram
AWS SQS is a distributed queuing system that enables web service applications to quickly and reliably queue messages generated by producers to be consumed by consumers.
A queue serves as a temporary repository for messages awaiting processing. Amazon SQS also offers retry capabilities through its redrive policy, which allows for multiple retries and the use of dead letter queues (DLQs) used to manage error-prone messages by notifying developers of issues and optionally storing the messages for future reprocessing.
SQS features and benefits
Using SQS has several benefits including, and not limited to, the following:

AWS SQS key features and benefits
- Scalability: SQS can handle any amount of traffic without requiring you to provision or manage infrastructure.
- Durability: Messages are stored redundantly across multiple availability zones.
- Availability: It offers high availability for producing and consuming messages.
- Security: It provides server-side encryption (SSE) to protect the contents of messages.
- Flexibility: It supports multiple message formats and can be used with various AWS services.
Use cases in decoupling and scaling microservices
Several industry use cases can leverage the benefits of SQS, and some of them are illustrated below:
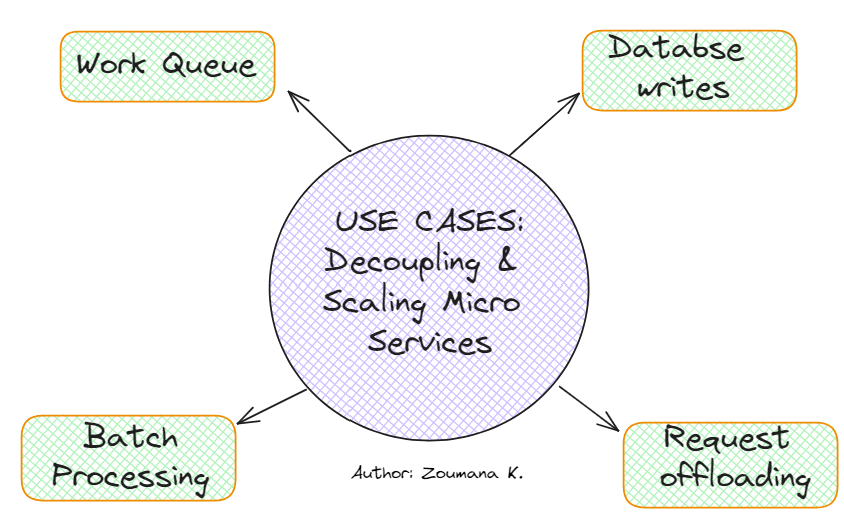
AWS SQS use cases in decoupling and scaling microservices
- Work queue: Distribute tasks among multiple worker processes.
- Buffer for database writes: Protect a database from an excessive write load.
- Request offloading: Move slow operations off of interactive request paths.
- Batch processing: Collect and process a group of messages at once.
Become a Data Engineer
Setting Up AWS SQS
Now that we understand what SQS is let's look at how to set it up. This section will guide you through the prerequisites and how to access the SQS console.
Prerequisites
Before you start using AWS SQS, ensure you have:
- An active AWS account. It can be created from the official page.
- The necessary IAM roles and permissions set up for SQS access.
To set up IAM permissions:
- Go to the IAM console.
- Create a new policy.
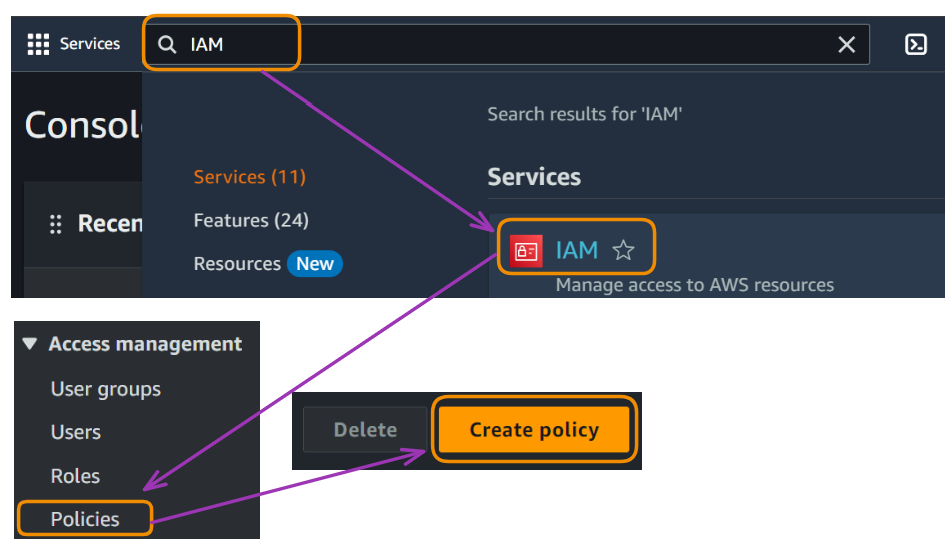
Setting up AWS SQS
- There are two main options for creating a policy: a visual approach or JSON. For our case, we use the visual approach, which is more intuitive.
- Choose “SQS” from the “Service” area and set the Effect to “Allow” the following permissions:
sqs:CreateQueue,sqs:DeleteQueue,sqs:SendMessage,sqs:ReceiveMessage,sqs:DeleteMessage.
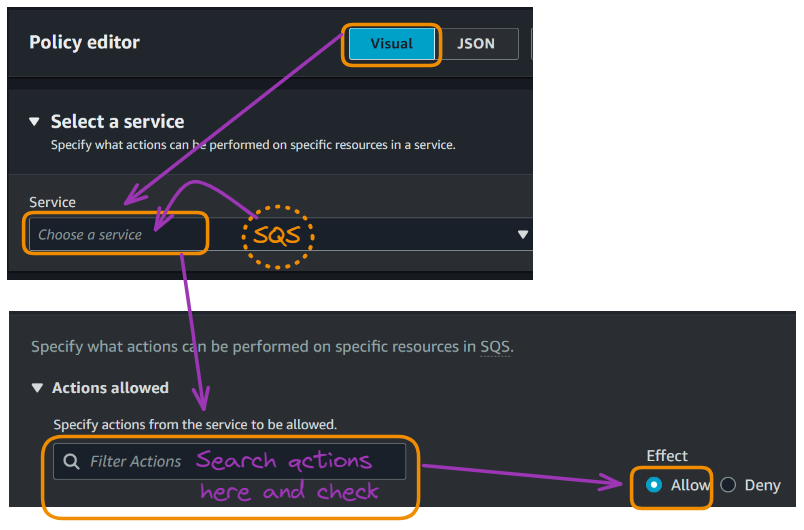
Setting up AWS SQS
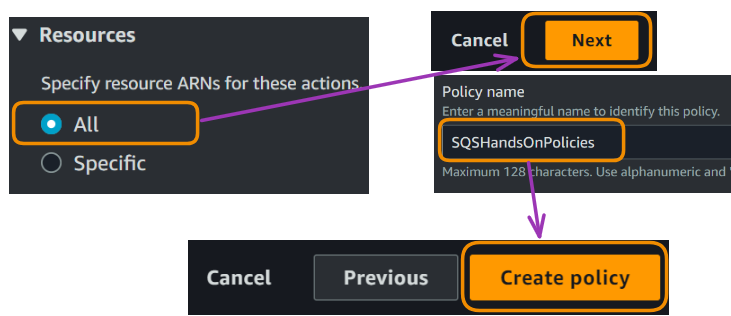
- Allow the actions to access “All” the resources, and choose “Next.”
- Give the policy a name, which corresponds to “SQSHandsOnPolicies” in our case, and finally create the policy.
Setting up AWS SQS
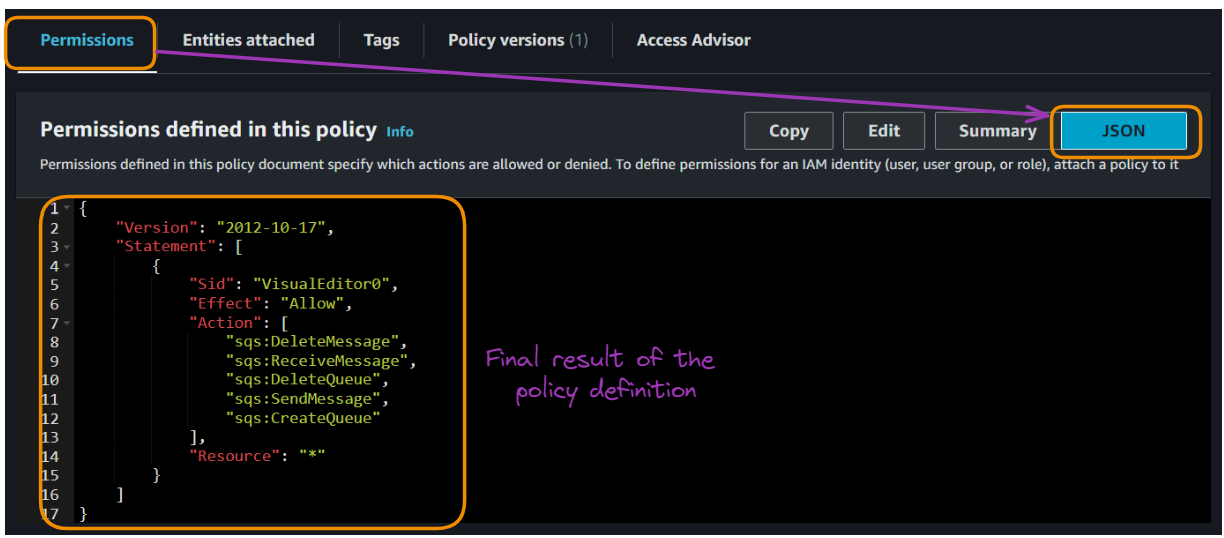
The final policy should look like this in JSON format:
Setting up AWS SQS
Let’s have a brief overview of our policy definition:
“Version”: “2012-10-17”is the current version of the IAM policy language.- The policy contains one
“Statement”, which defines a set of permissions. “Sid”: “VisualEditor0”means that this policy has been created via a visual editor.“Effect”: “Allow”means these actions are being permitted.“Action”: This list specifies the above SQS operations that are allowed:“Resource”: “*”means these actions are allowed on all SQS resources in the account.
This policy gives full access to create, delete, send, and receive messages from any SQS queue in the account. It's pretty permissive, so we might want to restrict it to specific queue ARNs for better security in a production environment.
If you want to learn more about IAM configuration, The Complete Guide to AWS Identity and Access Management (IAM) tutorial teaches how to secure your AWS environment, manage access with users, groups, and roles, and implement best practices for robust security.
To deepen your knowledge of AWS configuration, the How to Setup and Configure AWS: A Comprehensive Tutorial would be helpful to discover essential settings, best practices for security, and how to leverage AWS Services for data analysis and machine learning.
Accessing the Amazon SQS console
Once the prerequisites are in place, the next step is to access the SQS console to start creating and managing queues. Here are the steps to access the console:
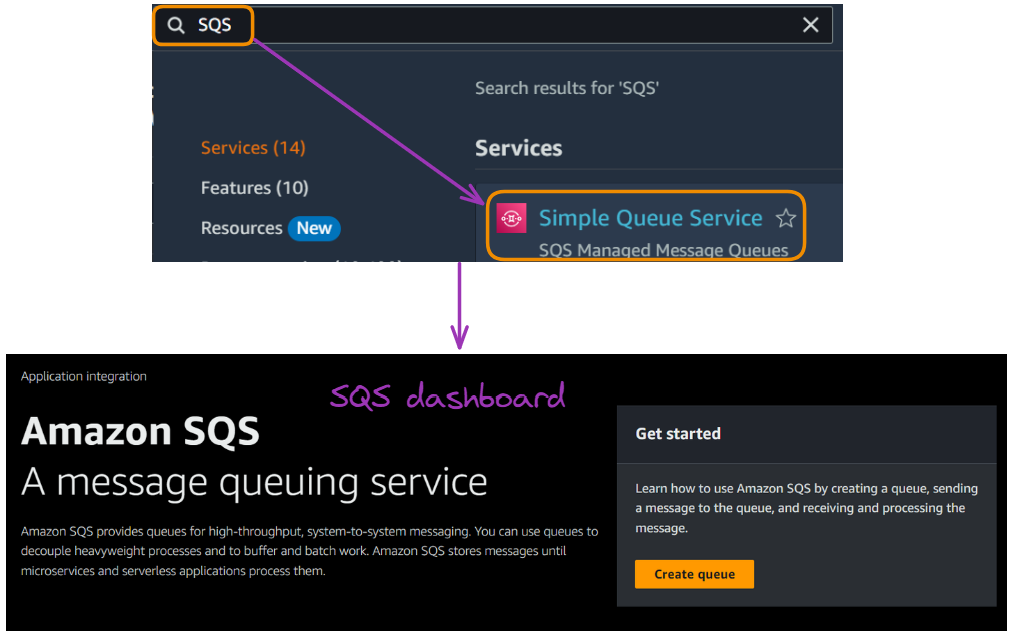
- In the search bar at the top, type "SQS" and select "Simple Queue Service" from the dropdown.
- You'll be directed to the SQS dashboard.
Accessing the Amazon SQS console
Creating and Managing SQS Queues
With access to the SQS console, we can start creating and managing queues. This section will walk through creating both standard and FIFO queues.
But wait, where does our IAM Policy come into play?
The IAM policy we created in the prerequisites section is crucial for queue creation and management. Here's how it factors in:
- User or role association: The policy must be attached to the IAM user or role you're using to access the SQS console or AWS CLI.
- Permission check: When you attempt to create a queue (or perform any other SQS action), AWS checks this policy to ensure you have the necessary permissions.
- Action authorization: The
sqs:CreateQueuepermission in our policy specifically allows queue creation. Without this, you would receive an "Access Denied" error when creating a queue. - Ongoing operations: The other permissions in the policy (
sqs:SendMessage,sqs:ReceiveMessage,sqs:DeleteMessage,sqs:DeleteQueue) allow you to perform various operations on the queue after creation.
With that understanding, let’s continue creating our queues, starting with a standard queue.
Creating a standard queue
Standard queues are the default queue type in SQS. Here's how to create one:
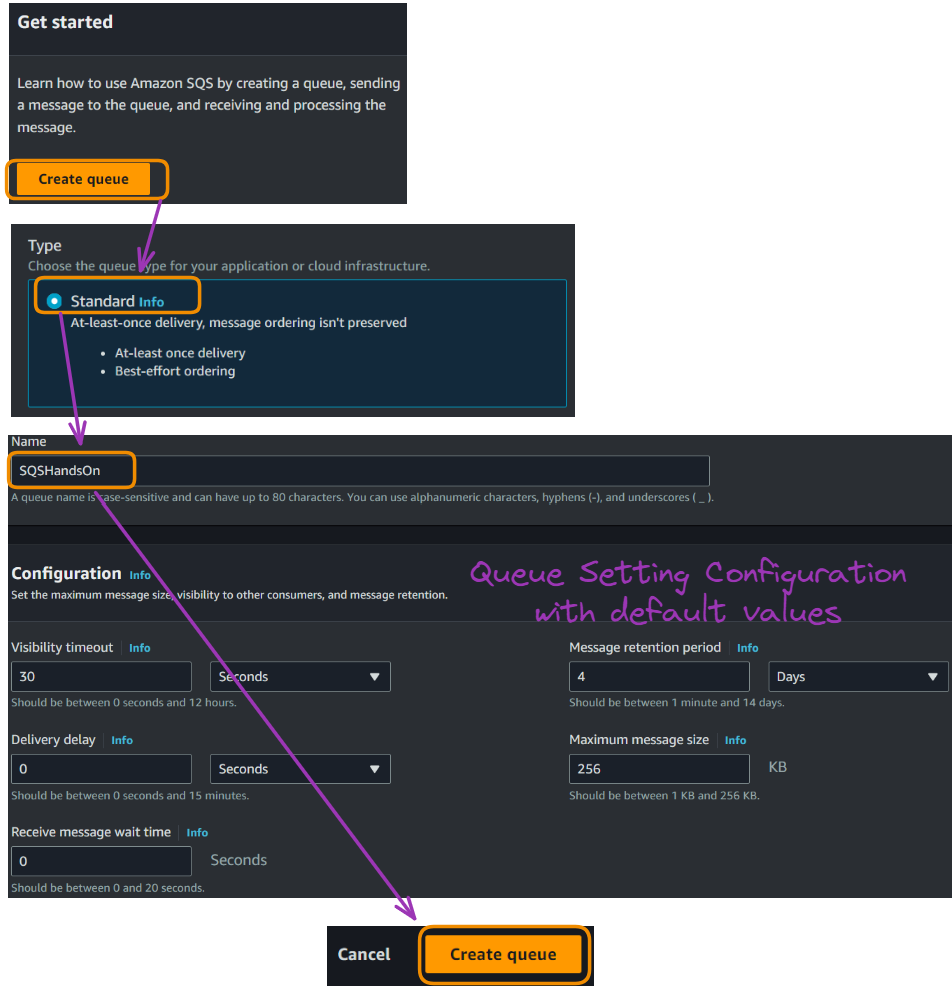
- On the SQS dashboard, click "Create queue."
- Choose "Standard" as the queue type.
- Enter a name for the queue, which is “SQSHandsOn” for our scenario.
- Configure queue settings: Visibility timeout, Message retention period, Maximum message size, and Delivery delay. Let’s leave those default values as they are, then click “Create queue.”
Creating a standard queue
A successful queue creation generates a message confirming its creation, as shown below, along with additional information about the queue.
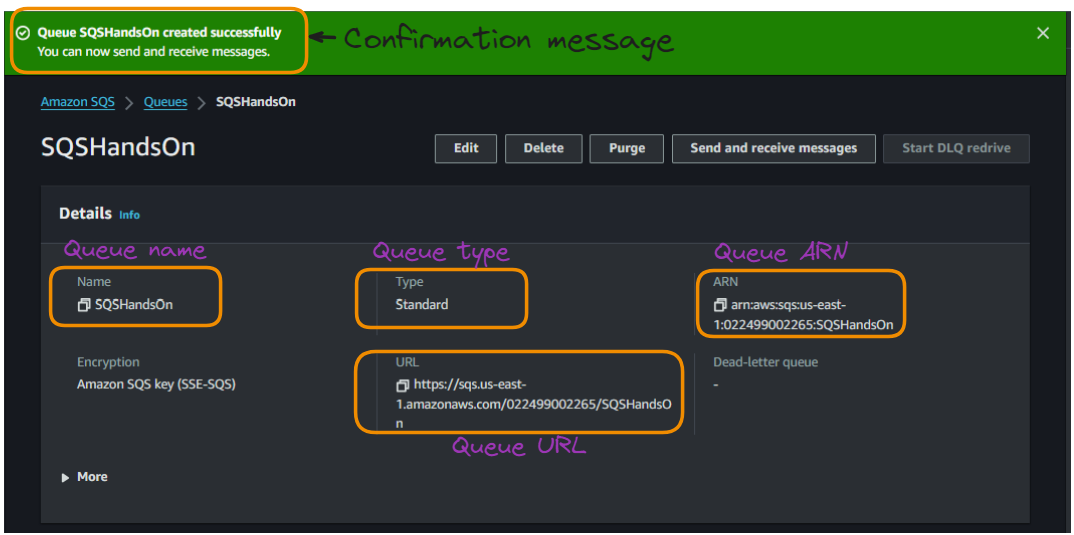
Creating a standard queue
Creating a FIFO queue
FIFO queues are used to guarantee the order of message processing, and below are the steps to create one:
- On the SQS dashboard, click "Create queue."
- Choose "FIFO" as the queue type.
- Enter a name for your queue (must end with “.fifo”). I named mine “SQSHandsOn.fifo”.
- Similarly to the above scenario, leave everything else at their default setting and “Create queue.”
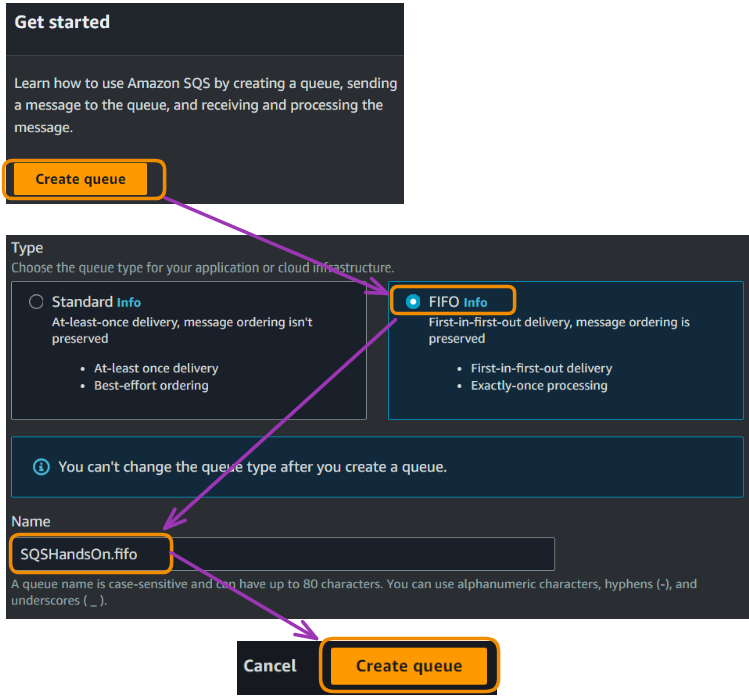
Creating a FIFO queue
Similarly to the standard queue, the successful creation of the FIFO also provides the same details used for sending messages.
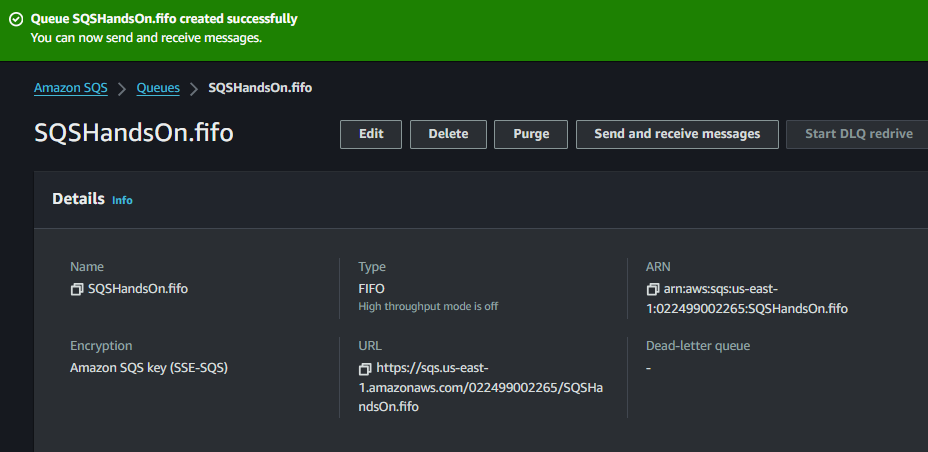
Creating a FIFO queue
Differences between standard and FIFO queues
When choosing between standard and FIFO queues in Amazon SQS, it’s important to understand their distinct features and capabilities.
The following table provides a comparative analysis to help you decide which queue type best suits your application’s needs:
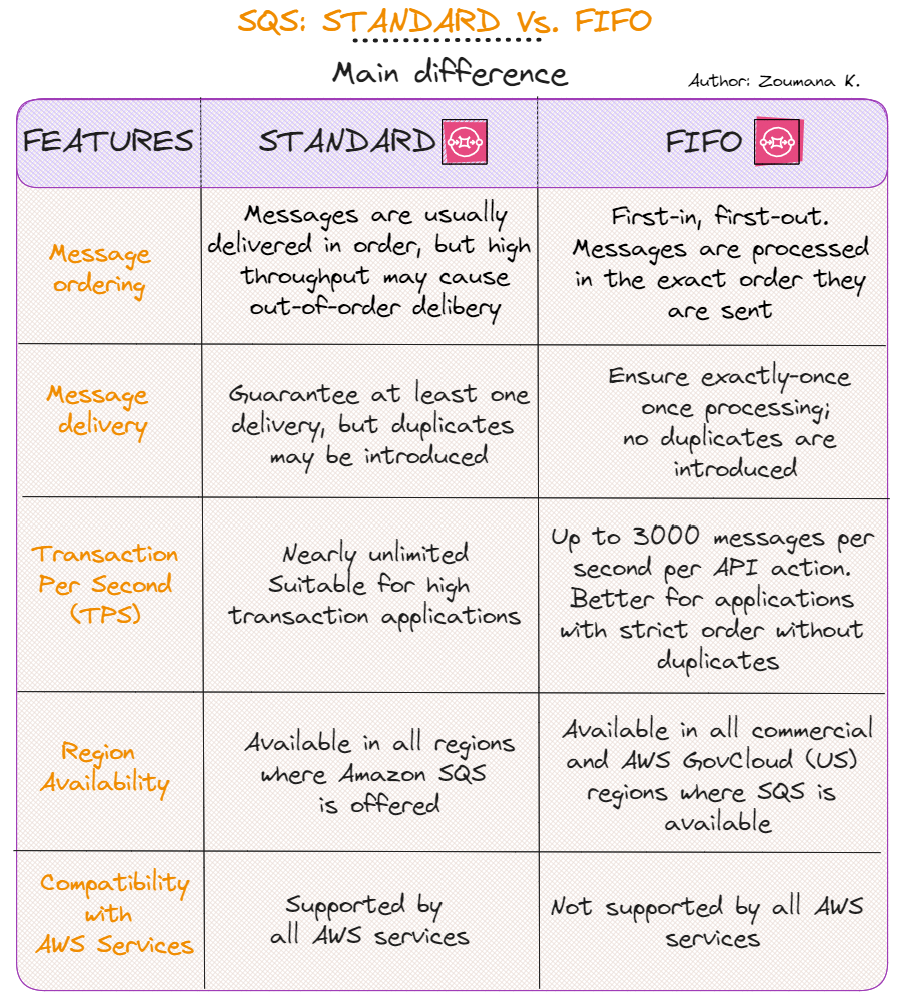
Differences between standard and FIFO queues
Sending and Receiving Messages in SQS
Now that all our queues are set up, let’s start sending and receiving messages. This section covers how to do this through the AWS Management Console and the AWS Command Line Interface (CLI).
Sending messages
The process of sending messages is shown using the standard and FIFO queues.
Standard queue
Using the AWS management console
- Select your queue from the SQS dashboard.
- Click "Send and receive messages."
- In the "Message body" field, we enter a message, for example: “This queue is created using the Comprehensive Guide to Amazon Simple Queue Service (SQS) tutorial.”
- Click "Send message."
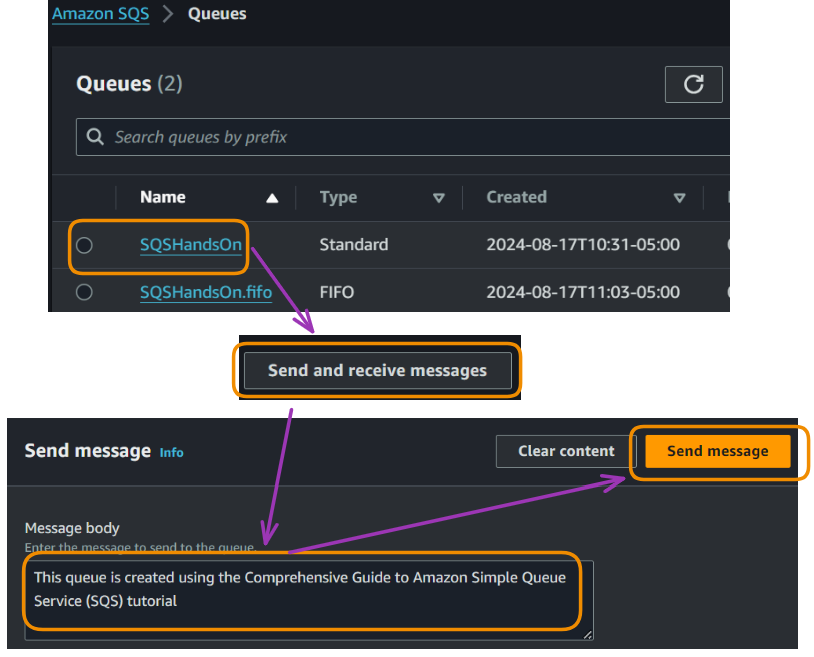
Sending messages using the AWS management console
After sending the message, a pop-up confirms that it was sent. Clicking “View details” provides the details of our message, as shown below.
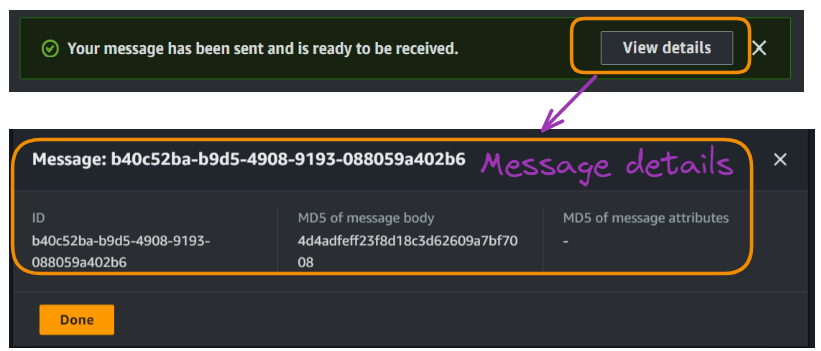
Sending messages using the AWS management console
Finally, in the “Receive messages” section, we can see that one message is available.

Sending messages using the AWS management console
Using the AWS CLI SQS
The main steps to sending a message via the CLI follow the template below.
aws sqs send-message --queue-url [YOUR URL]--message-body "YOUR MESSAGE"For the standard queue method, our URL is given in the corresponding screenshot above. For the CLI, let’s use a different message:
- URL: https://sqs.us-east-1.amazonaws.com/022499002265/SQSHandsOn
- Message: “Message sent via AWS CLI”
The first step to start using the CLI is to configure it so that it can interact with our AWS resources, and this requires the following credentials:
- Access key ID
- Secret access key
aws configureOnce the configuration is complete, run the following command with the correct argument values:
aws sqs send-message --queue-url https://sqs.us-east-1.amazonaws.com/022499002265/SQSHandsOn --message-body "Message sent via AWS CLI"
Sending messages using the CLI
The JSON output from the command execution corresponds to the details of the newly sent message, and we can see that there are now two messages within the SQSHandsOn queue.

Sending messages using the CLI
FIFO queue
The process for sending messages using FIFO slightly differs from the standard queuing approach.
To better illustrate this scenario, imagine you're running an e-commerce platform selling electronic devices.
Your system needs to handle various operations, such as processing orders, updating inventory, and managing payments. In this case, we can use an SQS FIFO queue to ensure these operations are processed in the correct order and without duplicates.
- CLI example 1 (Customer order): This message is sent when a customer places a new order. The order processing system will pick up these messages and fulfill them in the order they were received.
- CLI example 2 (Inventory update): After an order is processed, this message is sent to update the inventory. It ensures that stock levels are accurately maintained as products are sold.
- Console example (Payment processing): This message is generated when a payment needs to be processed for an order. It ensures that payments are handled in the order they were received and prevents double-charging.
Using a FIFO queue for these operations ensures that:
- Orders are processed in the sequence they were placed.
- Inventory updates occur in the correct order, preventing overselling.
- Payments are processed once and in the right order.
When sending messages to an SQS FIFO queue, remember two key elements:
- Message group ID: Required for all messages. Determines which messages are processed in order within a group.
- Message deduplication ID: Ensures each message is processed only once within a 5-minute window.
With that understanding, let’s proceed with the CLI approach.
Using the AWS CLI SQS
We can run the following commands to send the first two messages in the FIFO queue.
- CLI example 1: Sending a customer order:
aws sqs send-message --queue-url https://sqs.us-east-1.amazonaws.com/022499002265/SQSHandsOn.fifo --message-body "Process customer order: #A1001" --message-group-id "CustomerOrders" --message-deduplication-id "Order-A1001-20240817-1"The output for this first execution is given below.

Example 1 - Sending message results using the CLI with FIFO
- CLI example 2: Sending an inventory update:
aws sqs send-message --queue-url https://sqs.us-east-1.amazonaws.com/022499002265/SQSHandsOn.fifo --message-body "Update inventory: ProductX -5 units" --message-group-id "InventoryUpdates" --message-deduplication-id "Inventory-ProductX-20240817-1"The output is given below.

Example 2 - Sending message results using the CLI with FIFO
So far, two messages have been sent to the FIFO queue, and can be seen below.

Sending messages result using the CLI with FIFO queues - Number of messages
Using the AWS management console
Similarly to the standard queue, we can send messages from the management console as follows:
- From the “Queues” pages, choose the “SQSHandsOn.fifo”.
- Select the “Send and receive message” tab to send a message.
- Additional fields such as “Message group ID” and “Message deduplication ID” are required.
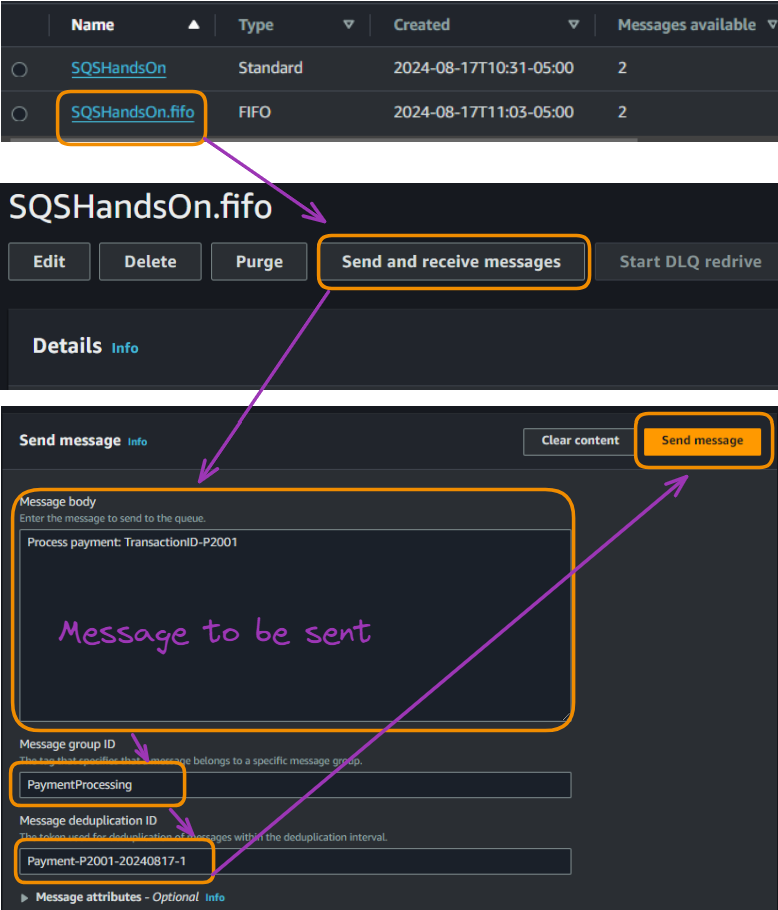
Sending messages result using the management console with FIFO queues
Now, we can see that the total number of messages in the FIFO queue is three.

Sending messages result using the management console with FIFO queues - Total number of messages
Receiving and deleting messages
Receiving and deleting messages is just as important as sending them. Here's how to do both.
Standard queue
Using the AWS management console
- Select your queue from the SQS dashboard.
- Click "Send and receive messages."
- Click "Poll for messages."
- Messages will appear in the "Messages" section.
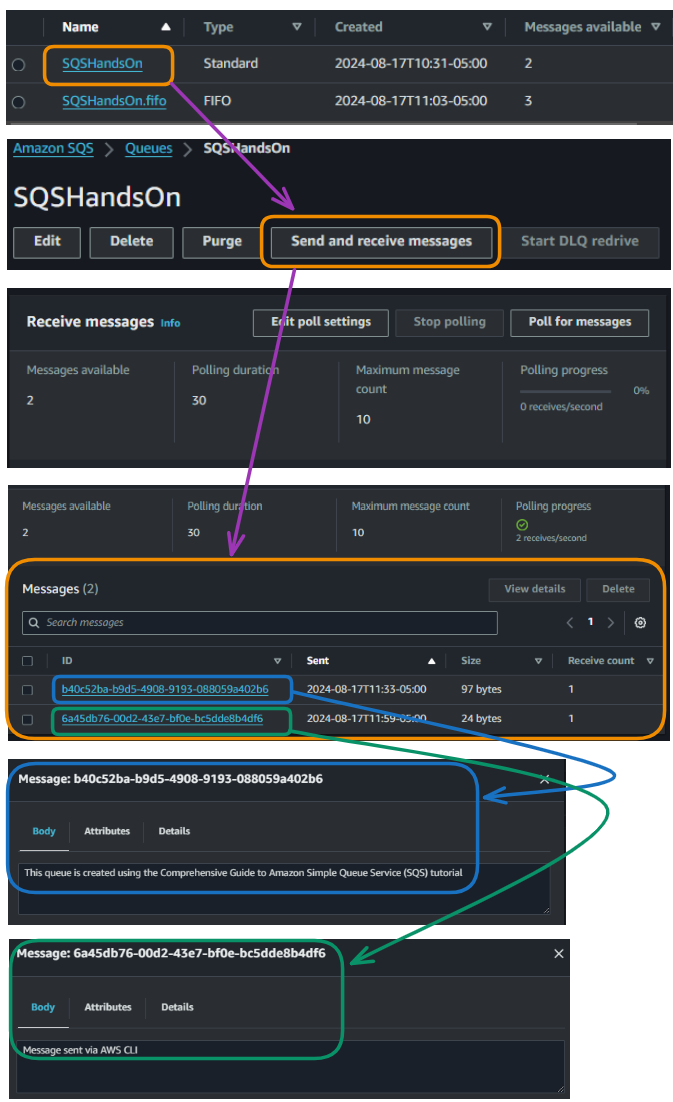
Receiving messages using the AWS management console with standard queue
All the two messages in the standard queue can be seen above.
Using AWS CLI SQS
Below is the general command for receiving messages from a standard queue.
aws sqs receive-message --queue-url [YOUR URL]Using our standard queue, the complete command becomes:
aws sqs receive-message --queue-url https://sqs.us-east-1.amazonaws.com/022499002265/SQSHandsOnFIFO queue
The process for retrieving messages via the management console follows the same process as the standard approach.
To receive messages from a FIFO queue using the AWS CLI, you can use the aws sqs receive-message command. Here's the basic structure:
aws sqs receive-message --queue-url https://sqs.us-east-1.amazonaws.com/022499002265/SQSHandsOn.fifo --attribute-names All --message-attribute-names All --max-number-of-messages 3-attribute-names All: Retrieves all message attributes.-message-attribute-names All: Retrieves all custom message attributes.--max-number-of-messages 3: Specifies the maximum number of messages to
The execution of the above command gives all three messages within the FIFO queue.
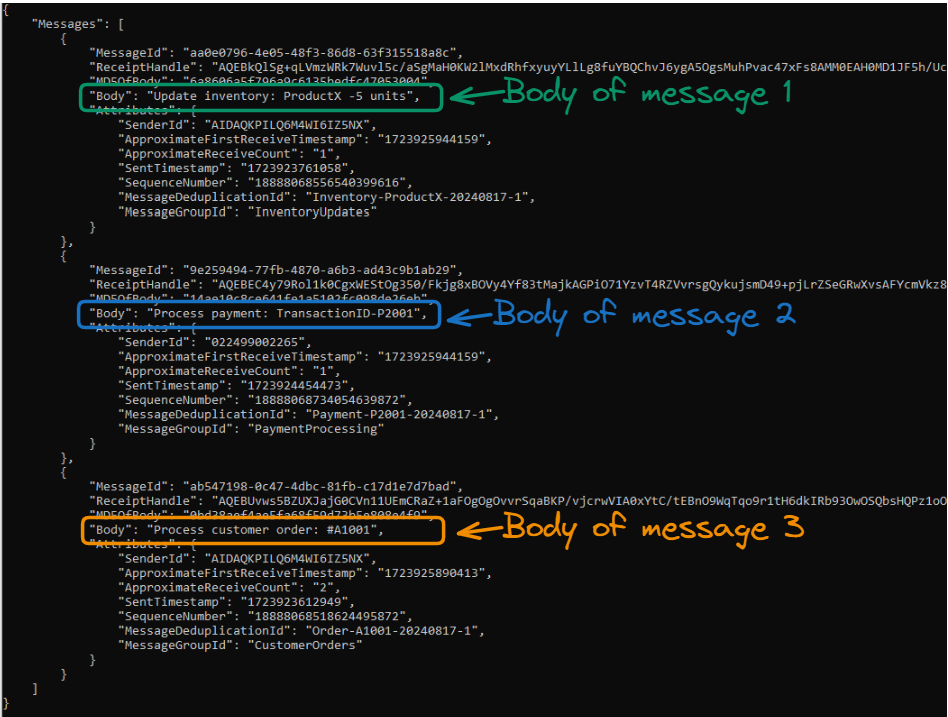
Receiving messages result using the CLI with FIFO queues
AWS SQS Pricing
Understanding the pricing model is crucial for using SQS cost-effectively. This section breaks down the pricing and offers tips for cost management.
In general, the AWS SQS pricing is based on the number of API requests made, data transfer, and optional features used.
Request pricing
The following tables provide an overview of the SQS requests pricing:
|
Standard Queues (per Million requests) |
FIFO Queues (per Million requests) |
|
|
First 1 Million Requests/Month |
Free |
Free |
|
From 1 Million to 100 Billion Requests/Month |
$0.40 |
$0.5 |
|
From 100 Billion to 200 Billion Requests/Month |
$0.30 |
$0.40 |
|
Over 200 Billion Requests/Month |
0.24 |
$0.35 |
Pricing from the AWS SQS Page
Data transfer pricing
To understand data transfer pricing, refer to the following table:
|
Data transfer IN |
Pricing |
|
All data transfer in |
$0.00 per GB |
|
Data transfer OUT |
Pricing |
|
First 10 TB/Month |
$0.09 per GB |
|
Next 40 TB / Month |
$0.085 per GB |
|
Next 100 TB / Month |
$0.07 per GB |
|
Greater than 150 TB / Month |
$0.05 per GB |
Pricing from the AWS SQS Page
Cost management tips
Here are some quick tips to manage your SQS costs:
- Use long polling to reduce the number of empty receives.
- Batch your send and receive operations.
- Monitor your usage with AWS Cost Explorer.
AWS SQS Monitoring and Metrics
Effective monitoring is critical to maintaining a healthy SQS implementation. This section covers important metrics and how to set up alarms.
Key AWS SQS metrics
Here are some of the most important metrics to keep an eye on:
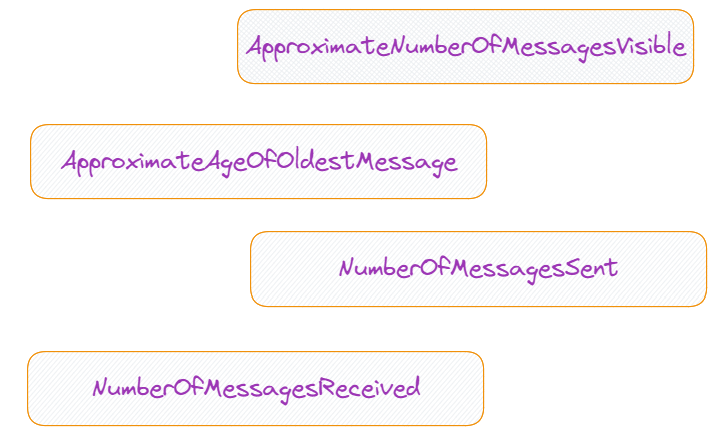
Key AWS SQS metrics
ApproximateNumberOfMessagesVisible
This metric represents the number of messages available for retrieval from the queue. It's an indicator of queue backlog and processing efficiency. A high number may indicate processing bottlenecks.
ApproximateAgeOfOldestMessage
This metric shows how long the oldest non-deleted message has been in the queue. It helps identify potential issues with message processing, such as stuck messages or slow consumers. For FIFO queues, this metric is vital as it can indicate blocked message groups.
NumberOfMessagesSent
It tracks the number of messages added to the queue. It's useful for monitoring queue input rates and identifying unusual spikes in message production. Note that manually sent messages to dead-letter queues are included in this count.
NumberOfMessagesReceived
This metric indicates how many messages have been returned to consumers from the queue. It helps track the queue's output rate and can be compared with NumberOfMessagesSent to gauge processing efficiency. Like NumberOfMessagesSent, it doesn't include messages automatically moved to dead-letter queues due to failed processing
Setting up CloudWatch alarms
A CloudWatch alarm creation is illustrated for the above four metrics. The process is the same for all those metrics. Hence, we are focusing on only one metric and only the Standard SQS (SQSHandsOn) for simplicity’s sake.
The main steps for setting up alarms for the ApproximateNumberOfMessagesVisible are below.
CloudWatch alarms can alert you to potential issues. Here's how to set them up from the management console:
- Search for "CloudWatch" and select it.
- In the left navigation pane, click on "Alarms."
- Click the "Create alarm" button.
- Click "Select metric."
- In the "All metrics" tab, find and click on "SQS."
- Click on "Queue Metrics."
- Find your queue and select the metric ApproximateNumberOfMessagesVisible and the standard metric SQSHandsOn.
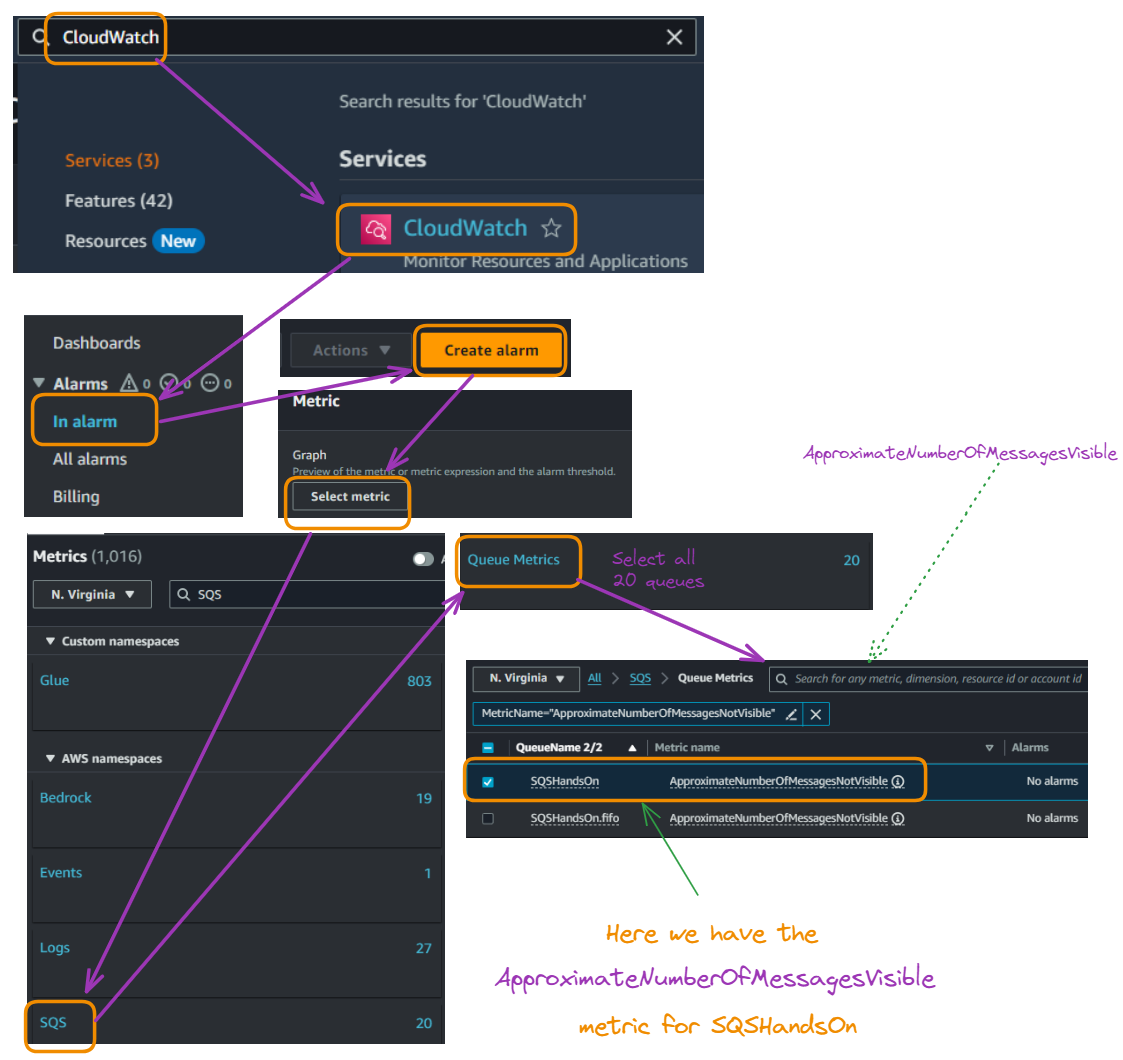
Setting up CloudWatch alarms
- From the above page, select "Graph metrics."
- Choose the statistic and set it to “Average.”
- Set the period, which is 5 minutes in our case, and choose “Select metric.”
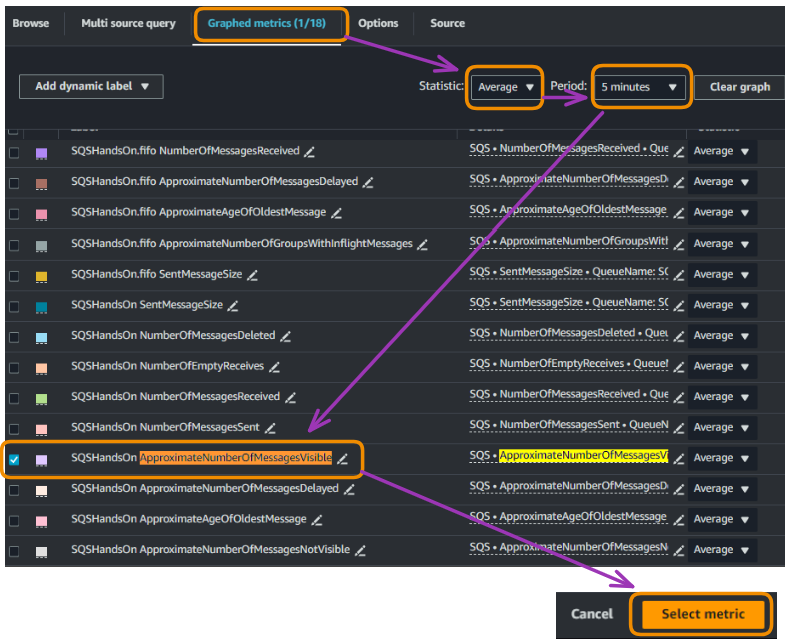
Setting up CloudWatch alarms
- Give the metric a name (for example, “SQS-AvgHighMessageCount-SQSHandsOn”), and set the “Threshold Type” to “Static.”
- Provide a condition to the alarm. This corresponds to “Greater” in our case.
- Let's set the threshold value to “20” and select “Next.”
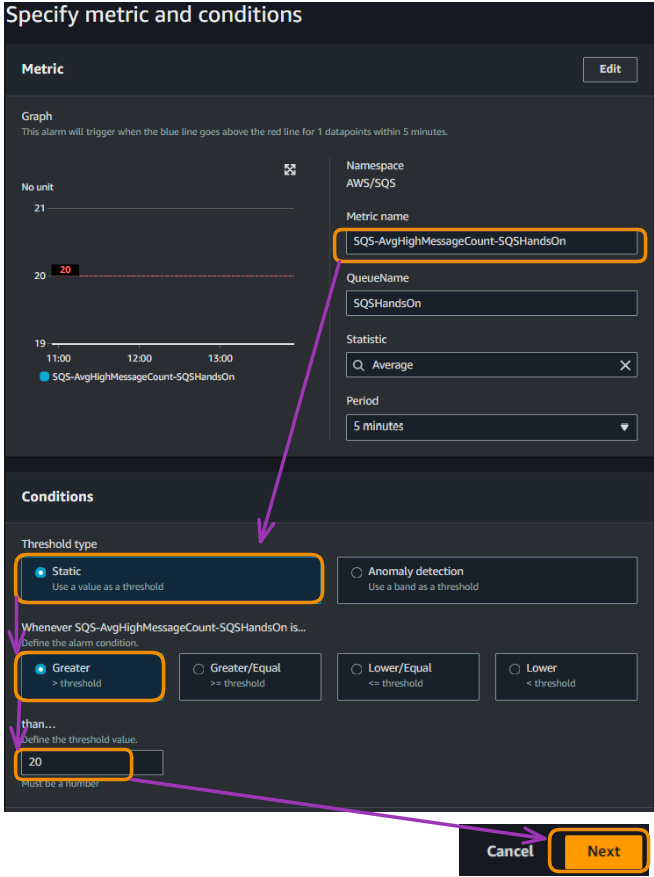
Setting Up CloudWatch Alarms
The above configuration means that this alarm will trigger when the average number of visible messages in your SQSHandsOn queue exceeds 20 for at least one data point within 5 minutes. The graph shows the current message count (blue line) in relation to the threshold (red line at 20).
This setup helps monitor if our queue accumulates too many unprocessed messages, which could indicate processing delays or issues with the consumers.
Consumers refer to all our applications or system components that retrieve and process messages from the queue.
If the average message count goes above 20, you'll receive an alert, allowing you to investigate and take appropriate action to prevent backlogs in your queue.
- The above “Next” action leads to the “Configure actions,” so we do not need to set up anything. We leave that page as it is.
- Choose “Next” and enter a unique name for the alarm, which is "SQSHandsOn-HighMessageCount" in our case
- Optionally, add a description and select “Next.”
- Review your settings, and click "Create alarm."
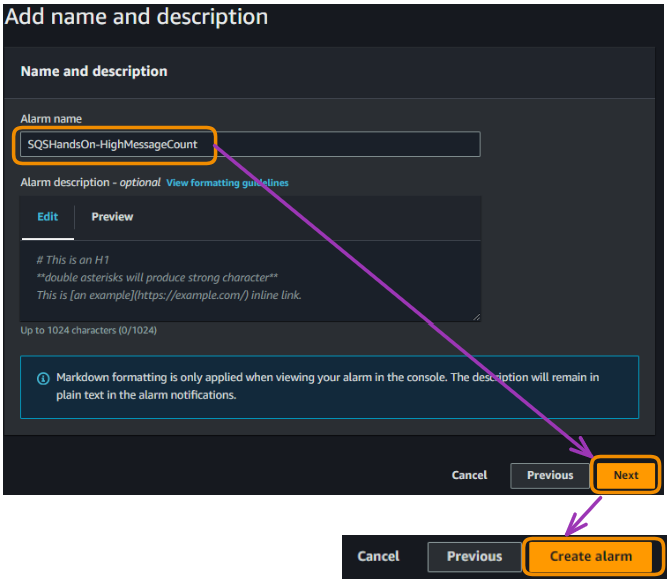
Setting up CloudWatch alarms
- We should see the confirmation green message for our alarm, along with the name of the alarm in the “Name” column.
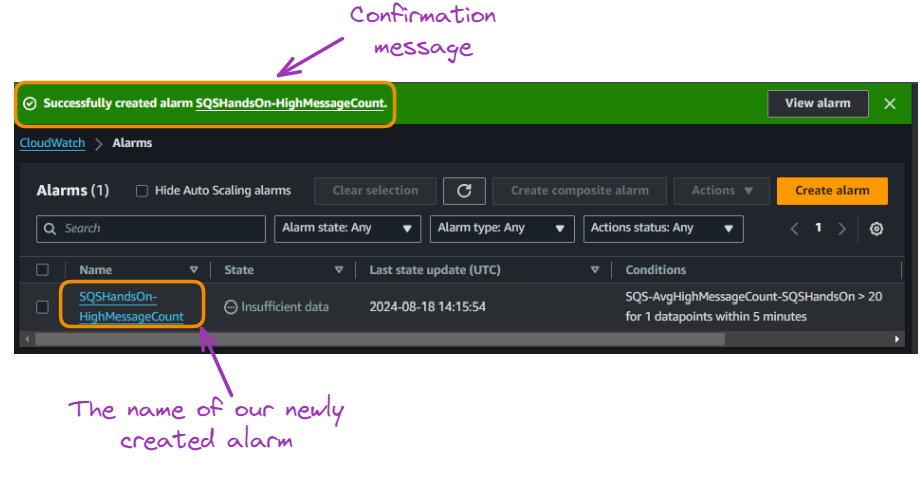
Setting up CloudWatch alarms
- After selecting the alarm name, the full detail is provided as follows:
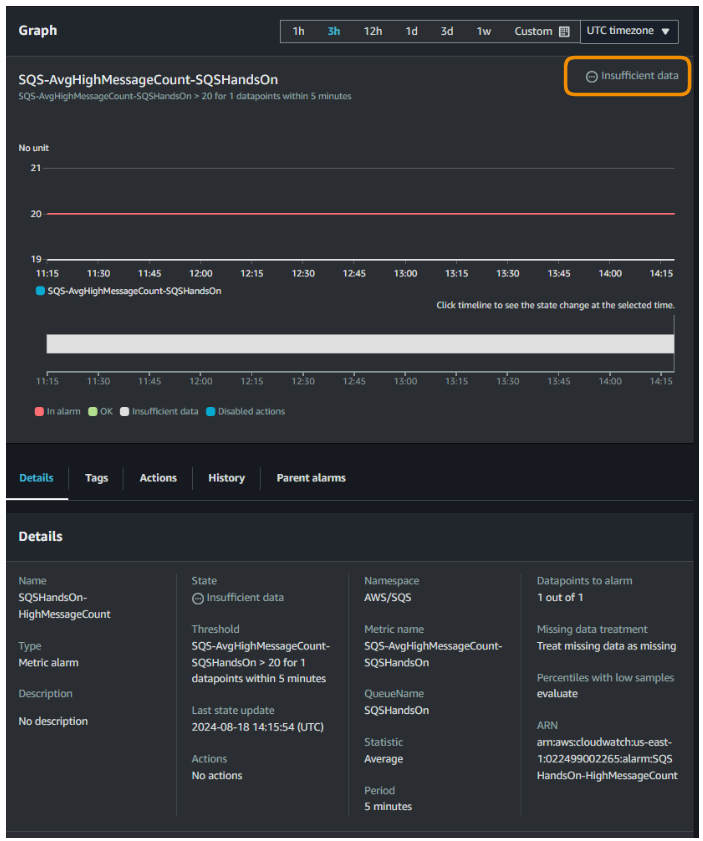
Setting up CloudWatch alarms
The alarm for our SQSHandsOn queue is currently in an "Insufficient data" state. This means CloudWatch lacks enough information to determine if the alarm should trigger.
The graph shows no data points, indicating the queue is new. The alarm is triggered when the average message count exceeds 20 within 5 minutes.
CloudWatch will collect data and update the alarm state as the queue becomes active and messages are processed.
AWS SNS vs SQS
While SQS and SNS are both messaging services, they serve different purposes. This section clarifies the differences and use cases for each.
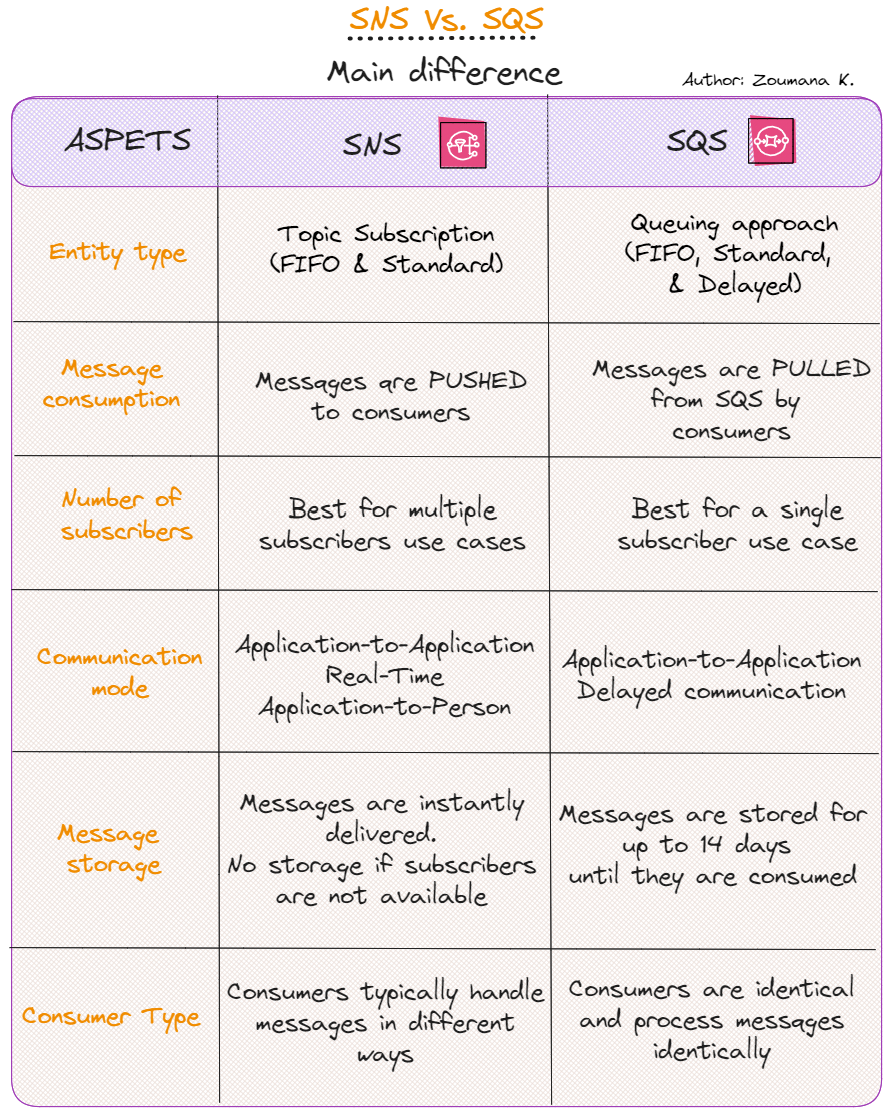
SNS versus SQS comparison table
AWS SQS Best Practices
Following best practices is important to getting the most out of SQS. These are some tips for optimal use:
- Use long polling to reduce costs and latency.
- Implement dead-letter queues for problematic messages.
- Use batch operations when possible.
- Secure your queues with appropriate access policies.
- Monitor queue depth and adjust your processing capacity accordingly.
- Use encryption in transit and at rest for sensitive data.
Conclusion
AWS SQS is a powerful tool for building scalable and resilient cloud applications. By decoupling components of your application, you can achieve greater flexibility, fault tolerance, and scalability. With its ease of use, robust feature set, and integration with other AWS services, SQS is an essential service for modern cloud architectures.
Remember to monitor your usage, optimize your implementation, and follow best practices to get the most out of AWS SQS. As your application grows and evolves, SQS can adapt to your changing needs, making it a valuable asset in your AWS toolkit.
Continue your AWS journey by enrolling in our AWS Cloud Technology and Services course. This initial step will allow you to advance your career and later getting AWS certified.
Get certified in your dream Data Engineer role
Our certification programs help you stand out and prove your skills are job-ready to potential employers.

FAQs
What is the difference between a standard queue and a FIFO queue in SQS?
A standard queue allows for unlimited throughput and at-least-once message delivery, with no guarantee of the order of messages. A FIFO queue, on the other hand, ensures that messages are processed in the exact order they are sent and guarantees that each message is processed only once.
How can I control access to my SQS queues?
You can control access to SQS queues using IAM policies and SQS resource policies. IAM policies allow you to manage permissions for users and roles, while SQS policies manage access at the queue level, restricting access to specific AWS accounts or actions.
What are the costs associated with using AWS SQS?
AWS SQS costs are based on the number of API requests and data transfer. The first million requests each month are free, and pricing increases based on the number of requests and additional features like FIFO queues and long polling.
How can I improve the performance of my SQS queues?
To optimize performance, use long polling to reduce empty receives, implement batch operations to send and receive messages in bulk, and monitor your queue with CloudWatch to adjust your message processing capacity as needed.

A multi-talented data scientist who enjoys sharing his knowledge and giving back to others, Zoumana is a YouTube content creator and a top tech writer on Medium. He finds joy in speaking, coding, and teaching . Zoumana holds two master’s degrees. The first one in computer science with a focus in Machine Learning from Paris, France, and the second one in Data Science from Texas Tech University in the US. His career path started as a Software Developer at Groupe OPEN in France, before moving on to IBM as a Machine Learning Consultant, where he developed end-to-end AI solutions for insurance companies. Zoumana joined Axionable, the first Sustainable AI startup based in Paris and Montreal. There, he served as a Data Scientist and implemented AI products, mostly NLP use cases, for clients from France, Montreal, Singapore, and Switzerland. Additionally, 5% of his time was dedicated to Research and Development. As of now, he is working as a Senior Data Scientist at IFC-the world Bank Group.
