
Track
Hugging Face Fundamentals
12 hr
FLUX.2 Klein is designed for fast, interactive image workflows where you can generate, refine, and iterate with minimal latency. In this tutorial, I will use FLUX.2 Klein 4B to build a lightweight “Generate and Edit application” in Google Colab with Gradio.
In the app, the user starts by entering a generation prompt to create a base image, then provides an edit instruction with optional reference images to guide the modification. Every version is stored in the session history, so the user can reload any prior output and continue experimenting from that point.
The result is an interactive editor that highlights fast iteration, dependable image editing, and a history-driven workflow that is closer to a real product experience than a model call.
I recommend also checking out our FLUX.2 base tutorial and our guide on how to run FLUX.2 locally. If you're interested in other image generation models as well, make sure to read our guide on Google's Nano Banana 2.
FLUX.2 is a family of image models tuned for different tradeoffs. It comprises multiple variants optimized for different levels of quality, speed, and flexibility. The FLUX.2 Klein line focuses on interactive visual intelligence, meaning the model is built to respond quickly, iterate rapidly, and run efficiently on accessible hardware.
The FLUX.2 Klein family supports text-to-image generation, image editing, and multi-reference conditioning.
![FLUX.2 [klein] Elo vs Latency (top) and VRAM (bottom) across Text-to-Image, Image-to-Image Single Reference, and Multi-Reference tasks](https://media.datacamp.com/cms/ed3132d0735b33e6296bb485e0638899.png)
Figure: FLUX.2 [klein] Elo vs Latency (top) and VRAM (bottom) across Text-to-Image, Image-to-Image Single Reference, and Multi-Reference tasks (Flux 2 blog)
The Klein 4B variant is the most developer-friendly option in the Klein family because it is fully open under the Apache 2.0 license and is designed to run on consumer GPUs with roughly 13GB VRAM.
Klein typically comes in two broad types: distilled models optimized for speed and base foundation models optimized for flexibility. The Klein 4B distilled model is the practical choice for building interactive apps, while the base variants are more suitable when you want maximum fine-tuning flexibility and control, even at higher latency.
In this section, we’ll implement a two-stage image workflow using FLUX.2 Klein, wrapped inside a Gradio application. At a high level, the app performs three core tasks:
Behind the scenes, this workflow is powered by two complementary functions:
local_generate() function runs FLUX.2 Klein 4B locally using the Diffusers library for fast text-to-image generation.bfl_edit(edit_prompt, base_img, ref_imgs) function sends an image editing request to Black Forest Labs’ hosted FLUX.2 Klein editing API, then repeatedly polls the returned polling_url until the edited image is ready.The history mechanism stores generated images as a dictionary containing the image and a short label as: {"img": PIL.Image, "label": str}.
In the video below, you can see an abridged version of the workflow. The video is sped up for demonstration purposes:
Before we build our image generation and editing app, we need to set up a clean environment with the latest Diffusers library. For this tutorial, we will run everything on a Google Colab instance with an A100 GPU for faster image generation. That said, the same setup also works on more modest GPUs, such as a T4, with slightly slower performance.
We begin by uninstalling any existing version of Diffusers to avoid version conflicts, then install the latest development version directly from GitHub. We also install the supporting libraries needed for model loading, checkpoint handling, and acceleration.
!pip -q uninstall -y diffusers
!pip -q install -U git+https://github.com/huggingface/diffusers.git
!pip -q install -U accelerate safetensors transformers huggingface_hub
Once the installation is complete, we check the installed Diffusers version, then confirm that the Flux2KleinPipeline class can be imported successfully.
import diffusers
print("diffusers:", diffusers.__version__)
from diffusers import Flux2KleinPipeline
print("Flux2KleinPipeline import OK")
This confirms that our environment is correctly configured. In the next step, we will load the FLUX.2 Klein model onto the GPU and prepare it for both local image generation and API-based editing workflows.
Before loading the model, you need an API key from Black Forest Labs. To get started, log in to your Black Forest Labs account and add credits under the Credits tab. The minimum top-up is around ten dollars, which grants approximately one thousand credits. Once the credits are added, click on Create Key, give it a descriptive name, and store it securely.
With your API key ready, the next step is to load FLUX.2 Klein 4B model and prepare it for two different usage modes: local image generation and API-based image editing.
import os, time, base64, io, requests
import gradio as gr
import torch
import nest_asyncio
from PIL import Image
from diffusers import Flux2KleinPipeline
from google.colab import userdata
nest_asyncio.apply()
# =============================
# LOAD via API
# =============================
MODEL_ID = "black-forest-labs/FLUX.2-klein-4B"
BFL_API_KEY = userdata.get("BFL_API_KEY")
BFL_CREATE_URL = "https://api.bfl.ai/v1/flux-2-klein-4b"
print(f"Loading model to GPU: {torch.cuda.get_device_name(0)}")
# =============================
# LOAD via LOCAL HF PIPELINE
# =============================
dtype = torch.float16
pipe = Flux2KleinPipeline.from_pretrained(MODEL_ID, torch_dtype=dtype).to("cuda")
We start by setting up the API key as a Colab secret, so it never appears in the notebook code. We also define the model ID and the Klein editing endpoint that we will call later.
Next, we apply nest_asyncio before launching the Gradio UI to avoid triggering the event loop conflicts.
Finally, load the local FLUX.2 Klein pipeline for base image generation. We use Flux2KleinPipeline with float16 for broad GPU compatibility (A100 and T4 both work well), then move the pipeline to CUDA for fast inference. This local pipeline is used only for generating the initial image, while edits are handled through the API.
Note: At this point, you might wonder why we load the model locally and also configure API access. The reason is capability separation:
By combining both approaches, we get the best of both worlds: local generation speed and editing support.
Before we wire everything into the Gradio interface, we need a small set of helper functions. Since our app generates images locally but edits them through the API, we need a way to encode images into base64 for API requests, a way to download edited images returned as URLs, and a local generation function that produces the initial base image.
def pil_to_b64_png(img: Image.Image) -> str:
    buf = io.BytesIO()
    img.convert("RGB").save(buf, format="PNG")
    return base64.b64encode(buf.getvalue()).decode()
def url_to_pil(url: str) -> Image.Image:
    r = requests.get(url, timeout=60)
    r.raise_for_status()
    return Image.open(io.BytesIO(r.content)).convert("RGB")
def local_generate(prompt: str):
    if not prompt.strip():
        raise gr.Error("Prompt is empty.")
    out = pipe(
        prompt=prompt.strip(),
        width=1024,
        height=1024,
        num_inference_steps=4,
        guidance_scale=1.0,
        output_type="pil",
    )
    return out.images[0].convert("RGB")
The above code defines three key helper functions:
pil_to_b64_png() function converts a PIL image into a base64-encoded PNG string. This is required because of the FLUX.2 editing API accepts the base image and reference images as either URLs or base64 strings. url_to_pil() function handles the opposite direction. The editing API returns a signed URL for the generated output, so we fetch that URL with requests, validate the response, and convert the downloaded bytes back into a PIL image. This allows the edited result to be displayed directly in our Gradio interface and saved in history.local_generate() function is our local text-to-image entry point. It validates that the prompt is not empty, then calls the local Flux2KleinPipeline with fixed settings such as resolution, step count, and guidance scale. The output is returned as a clean RGB PIL image, which becomes the base image for subsequent edits.Feel free to play around with the FLUX pipeline settings, such as image resolution, diffusion steps, and guidance scale, to explore different quality-speed trade-offs and better understand how each parameter influences the final image.
The Flux 2 image editing documentation is a good place to understand more about these settings.
In the next step, we will use these utilities to implement API-based image editing with FLUX.2 Klein.
This step is the core difference between a purely Hugging Face workflow and the hybrid approach used in this tutorial. Instead of attempting to run image editing locally, we delegate edits to the API, which handles prompt-based edits and optional multi-reference conditioning reliably.
At a high level, the FLUX.2 Klein editing API expects a text prompt describing the edit, a base image to modify, and optional reference images provided as additional inputs. The API runs asynchronously, meaning we submit a request and then poll a returned URL until the edited image is ready.
POLL_INTERVAL_S = 1.0
POLL_TIMEOUT_S = 120
def bfl_edit(edit_prompt, base_img, ref_imgs=None):
    if not BFL_API_KEY:
        raise gr.Error("Missing BFL_API_KEY in Colab Secrets.")
    payload = {
        "prompt": edit_prompt.strip(),
        "input_image": pil_to_b64_png(base_img),
        "output_format": "png",
    }
    if ref_imgs:
        for i, ref in enumerate(ref_imgs[:3], start=2):
            payload[f"input_image_{i}"] = pil_to_b64_png(ref)
    create = requests.post(
        BFL_CREATE_URL,
        headers={"x-key": BFL_API_KEY, "accept": "application/json"},
        json=payload,
        timeout=60,
    )
    create.raise_for_status()
    job = create.json()
    polling_url = job.get("polling_url")
    if not polling_url:
        raise gr.Error(f"API Error: {job}")
    t0 = time.time()
    while True:
        if time.time() - t0 > POLL_TIMEOUT_S:
            raise gr.Error("BFL API polling timed out.")
        time.sleep(POLL_INTERVAL_S)
        res = requests.get(polling_url, headers={"x-key": BFL_API_KEY})
        res.raise_for_status()
        j = res.json()
        if j["status"] == "Ready":
            return url_to_pil(j["result"]["sample"])
        if j["status"] in ("Error", "Failed"):
            raise gr.Error(f"Generation Failed: {j}")
The bfl_edit() function does three important things:
base64 PNG. If reference images are provided, we attach them using the API’s indexed format. This allows us to supply up to three reference images alongside the base image, which is enough for many practical workflows such as color palette transfer, style anchoring, or object grounding.polling_url that we must query repeatedly until the job finishes. We implement this using a simple polling loop with two guardrails, a polling interval that avoids excessive requests, and a timeout that prevents the notebook from waiting indefinitely.Once the status becomes Ready, the API response contains a signed URL to the output image. We download that image using our earlier url_to_pil() helper function and return it as a PIL image.
In the next step, we’ll implement session history so users can revisit any generated or edited output.
At this point, the final piece we need before building the UI is a lightweight session memory layer so users can revisit previous outputs. We implement history using two Gradio state objects:
base_img_state stores the current working image (the image that future edits will apply to).history_state stores every generated or edited version as a list of dictionaries, each containing an image and a short label.def update_history(history):
choices = [f"{i}: {h['label']}" for i, h in enumerate(history or [])]
return gr.update(choices=choices, value=choices[-1] if choices else None)
def on_generate(prompt, history):
img = local_generate(prompt)
new_history = list(history or [])
new_history.append({"img": img, "label": "Generated Base"})
return img, img, new_history, update_history(new_history), "Base image generated."
def on_edit(edit_prompt, ref2, ref3, ref4, base_img, history):
if base_img is None:
raise gr.Error("Please generate a base image first.")
refs = [r.convert("RGB") for r in (ref2, ref3, ref4) if r is not None]
out = bfl_edit(edit_prompt, base_img, refs)
new_history = list(history or [])
new_history.append({"img": out, "label": f"Edit: {edit_prompt[:20]}..."})
return out, out, new_history, update_history(new_history), "Edit successful."
def on_load(choice, history):
if not history or not choice:
return None, None, "No history to load."
idx = int(choice.split(":")[0])
img = history[idx]["img"]
return img, img, f"Loaded entry #{idx}."
def on_clear():
return None, None, [], gr.update(choices=[], value=None), "Cleared everything."The functions above form the core logic for maintaining image history in our demo:
update_history() function formats the session history into a dropdown. Each entry is labeled with its index and a short description, and the dropdown automatically selects the newest item by default. This keeps the UI in sync without requiring manual refresh logic.on_generate() callback runs local_generate() to create the initial base image. It then appends the result to history as {"img": img, "label": "Generated Base"}. The function returns both the image and the updated history state, along with a dropdown update so the new entry becomes visible immediately.on_edit() callback is similar, but it calls bfl_edit() instead. It takes the current working image and some optional reference images, applies the edit via the API, and appends the output to history. It also returns the edited output as the new base_img_state, meaning future edits apply to the most recent image unless the user explicitly loads an older version.on_load() callback parses the selected dropdown entry, retrieves the corresponding image from history_state, and makes that image the active working image again. This allows users to branch their edits from any previous checkpoint.on_clear() function resets everything. It clears the output, clears the base image state, resets the history list, and empties the dropdown choices.Let’s wire these functions into a Gradio interface with two textboxes, optional reference uploads, and a history workflow.
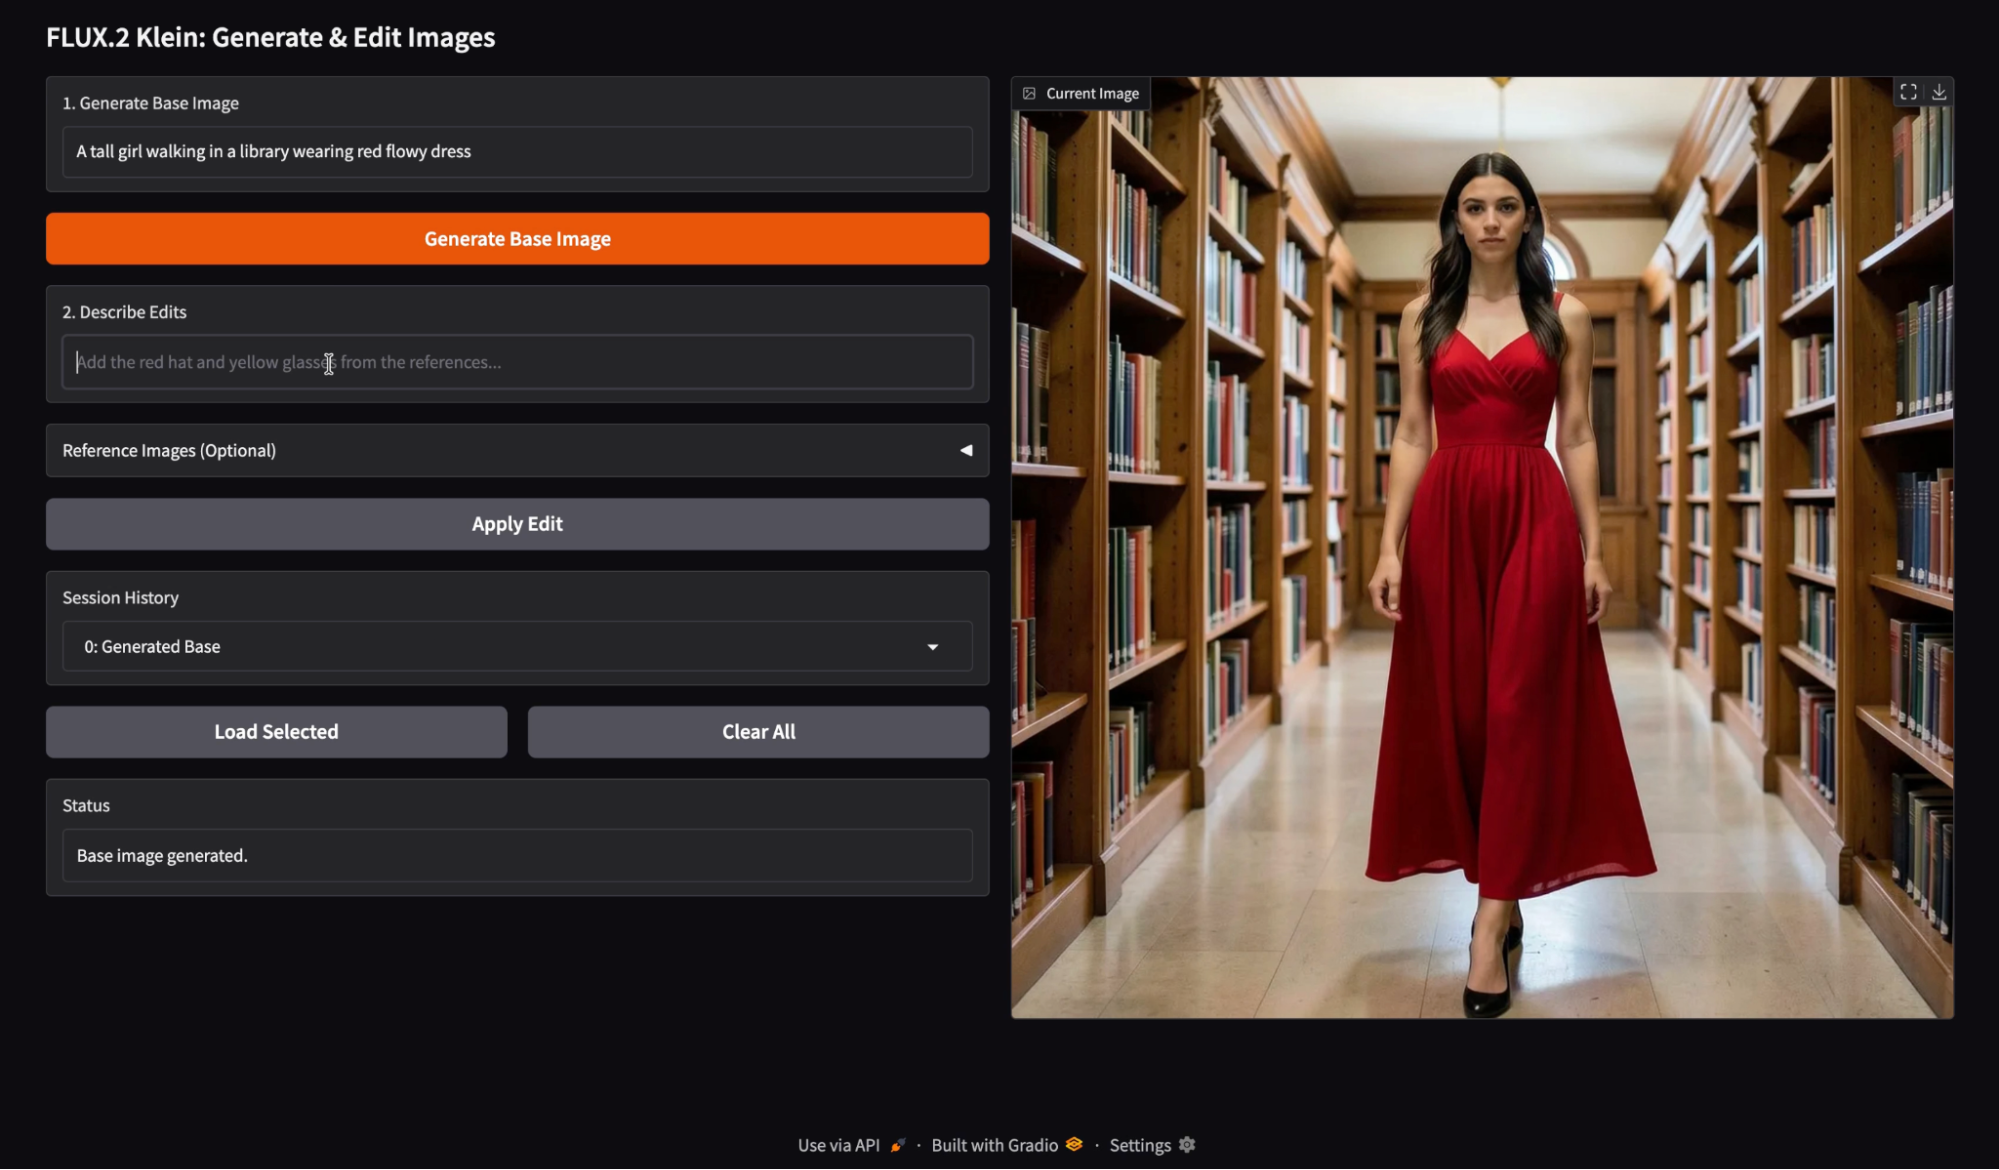
This step connects our generation, editing, and history logic to a simple Gradio interface. The interface is built with gr.Blocks, which gives us fine-grained control over layout.
with gr.Blocks() as demo:
    gr.Markdown("## FLUX.2 Klein: Generate & Edit Images")
    with gr.Row():
        with gr.Column(scale=1):
            gen_prompt = gr.Textbox(label="1. Generate Base Image", placeholder="A young boy riding a scooter...")
            gen_btn = gr.Button("Generate Base Image", variant="primary")
            edit_prompt = gr.Textbox(label="2. Describe Edits", placeholder="Add the red hat and yellow glasses from the references...")
            with gr.Accordion("Reference Images (Optional)", open=False):
                r2 = gr.Image(label="Ref 1", type="pil")
                r3 = gr.Image(label="Ref 2", type="pil")
                r4 = gr.Image(label="Ref 3", type="pil")
            edit_btn = gr.Button("Apply Edit", variant="secondary")
            history_dd = gr.Dropdown(label="Session History", choices=[])
            with gr.Row():
                load_btn = gr.Button("Load Selected")
                clear_btn = gr.Button("Clear All")
            status = gr.Textbox(label="Status", interactive=False)
        with gr.Column(scale=1):
            output_view = gr.Image(label="Current Image", type="pil")
    base_img_state = gr.State(None)
    history_state = gr.State([])
    gen_btn.click(
        on_generate,
        [gen_prompt, history_state],
        [output_view, base_img_state, history_state, history_dd, status]
    )
    edit_btn.click(
        on_edit,
        [edit_prompt, r2, r3, r4, base_img_state, history_state],
        [output_view, base_img_state, history_state, history_dd, status]
    )
    load_btn.click(
        on_load,
        [history_dd, history_state],
        [output_view, base_img_state, status]
    )
    clear_btn.click(
        on_clear,
        None,
        [output_view, base_img_state, history_state, history_dd, status]
    )
demo.launch(share=True, inline=True, debug = True)
We organize the UI into two columns, such that the left column contains inputs and actions, while the right column displays the current image. Here is how we build the Gradio app:
on_generate() function. This callback runs local generation, saves the output into history, and updates both the displayed image and the current working image stored in base_img_state.on_edit() function, which uses the current working image as the base image and returns the edited output. The edited output is also appended to the history and becomes the new working image for the next edits.on_load(), which restores the chosen history image and sets it as the current working image again. on_clear() function, including the output display, the base image state, and the stored history.The following two Gradio State objects keep everything consistent:
base_img_state ensures every edit applies to the correct image.history_state stores the full timeline of outputs for replay and branching.Finally, demo.launch() launches the app in Colab, provides a shareable link, renders it inline, and enables debug logs to help diagnose issues during development.
To understand how FLUX.2 Klein behaves in practice. I ran a set of small experiments using the final Generate and Edit app. I tested three main interaction patterns: base image generation, prompt-only editing, and reference-guided editing using one or more images. I also validated the session history workflow to confirm that I can restore any previous output and continue editing from that point.
I started with a simple generation prompt to create a clean base image. The model produced a coherent subject with consistent lighting, sharp facial details, and a stable scene layout. The output base image looked strong and useful for later modifications rather than a regeneration.
Next, I tested a single reference image as a color source, and used an edit instruction like “Change the color of the dress to the color of the reference image.”. The edit successfully transferred the intended color while preserving most of the original scene structure.
To my observation, the single reference edits work best when the prompt is narrow and constrained. Color transfer and wardrobe recoloring are especially reliable because they do not require major geometry changes. When the edit instruction stays focused on one attribute, the subject identity and background details remain stable.

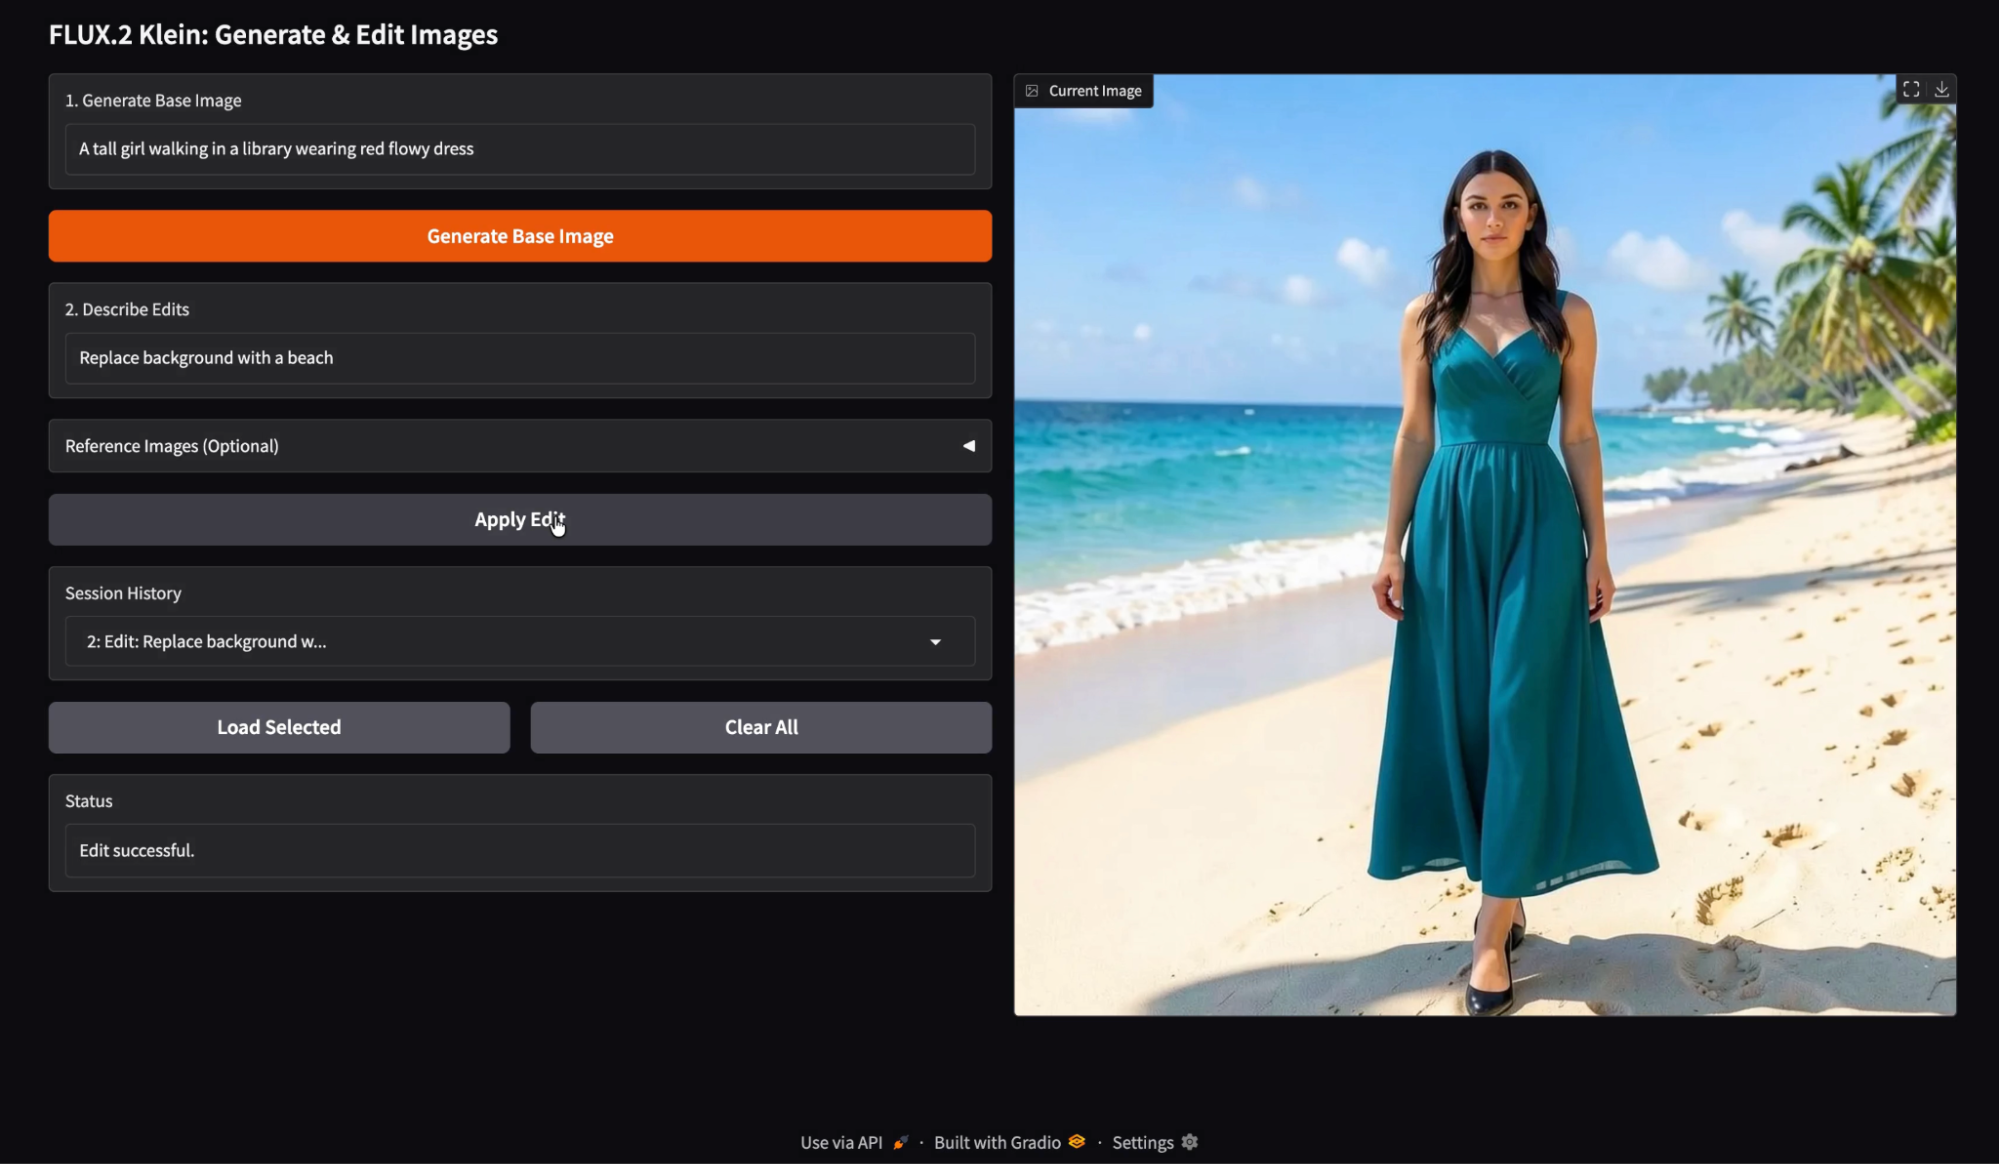
Then I tried prompt-only editing with a semantic change, such as “Replace background with a beach.” The model handled the background substitution cleanly, while keeping the subject roughly consistent.
When the background changes, the model often adjusts color temperature and shadow intensity to keep the result photorealistic. This is usually a feature, but it means the edited image may look like a different photo shoot rather than a simple cut and paste.
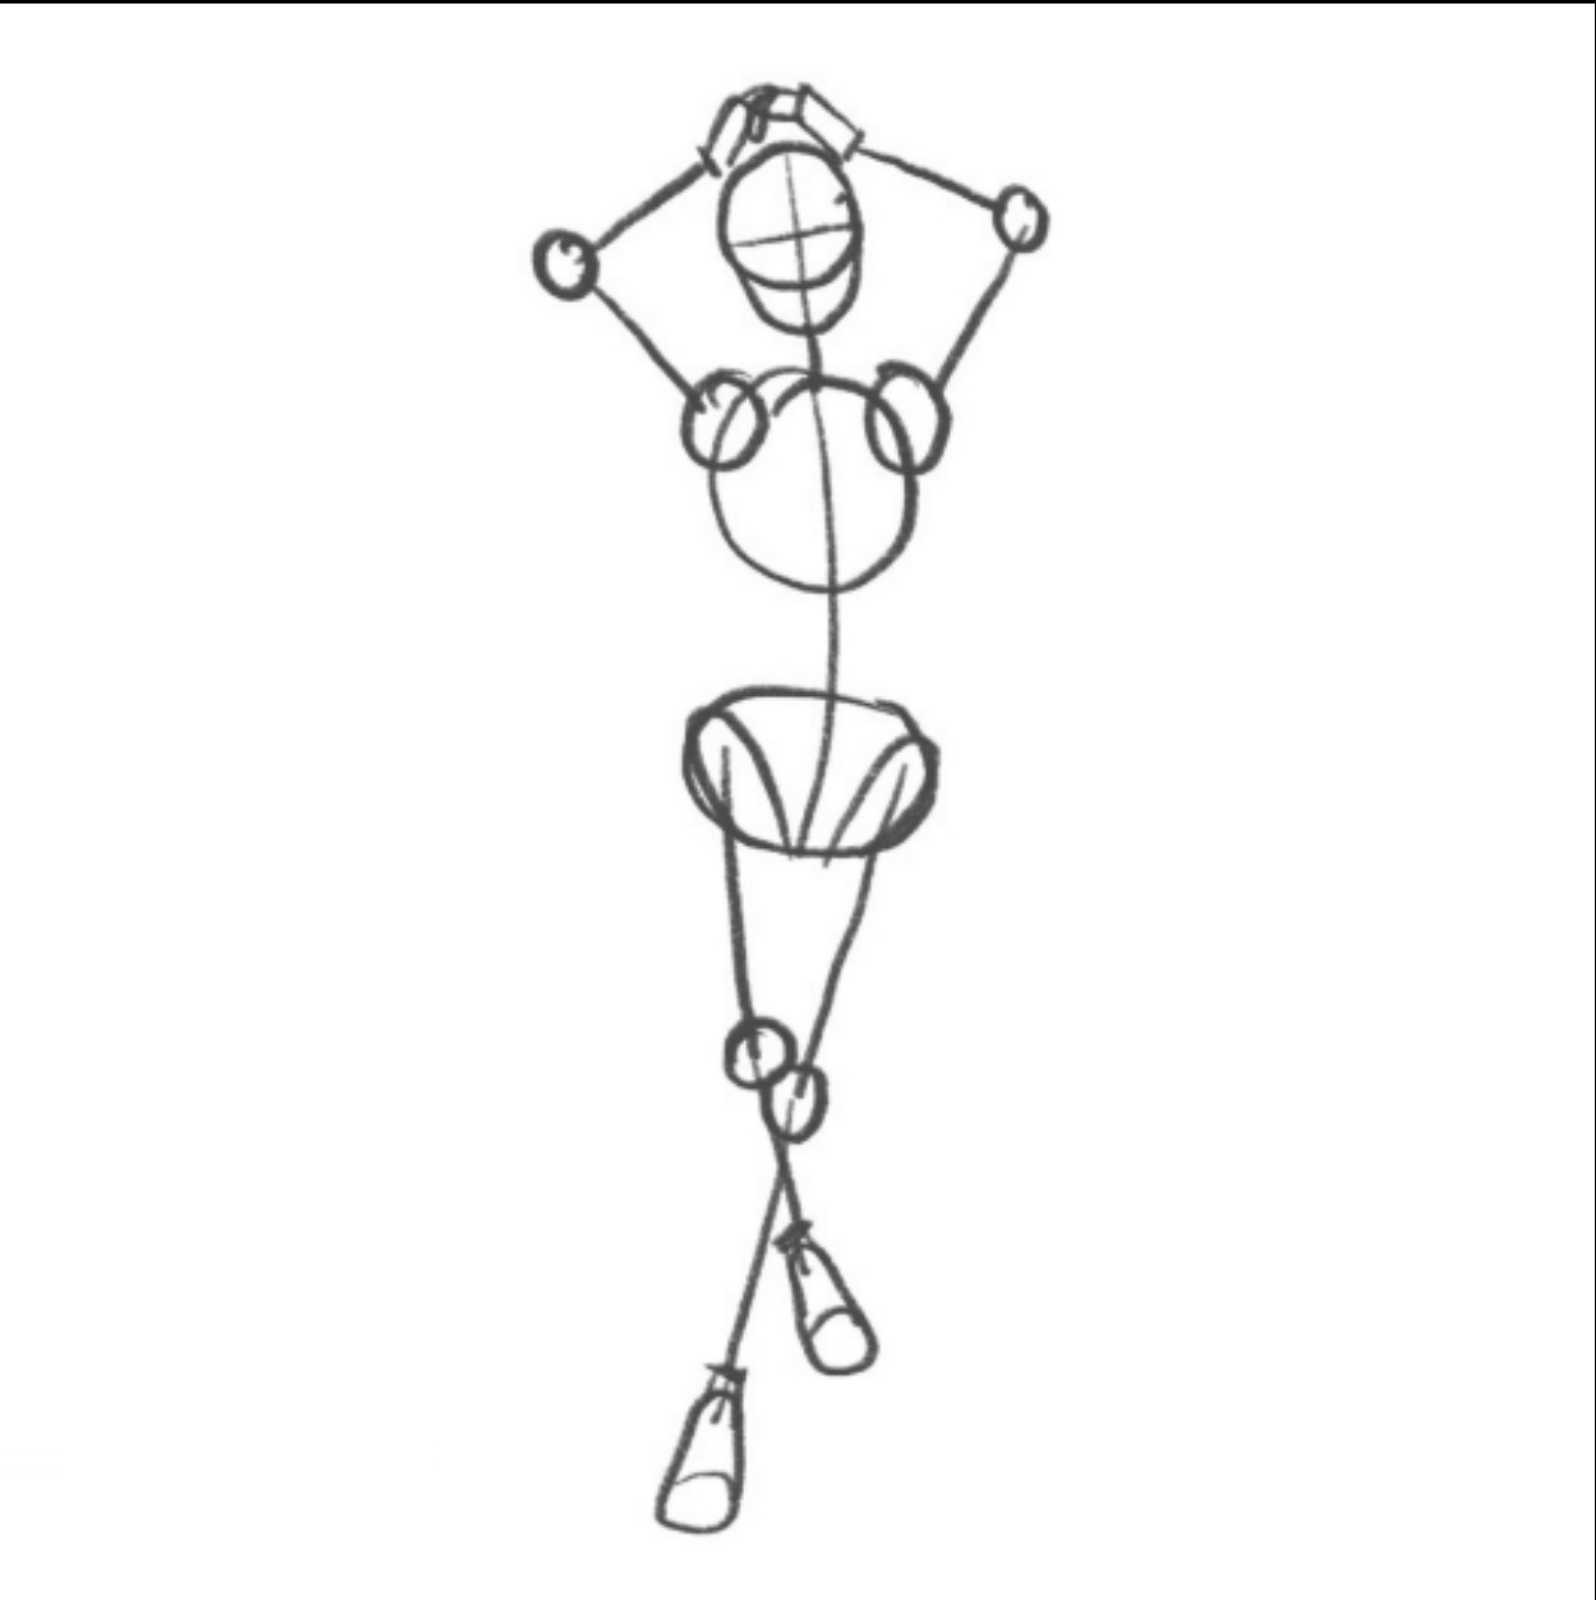
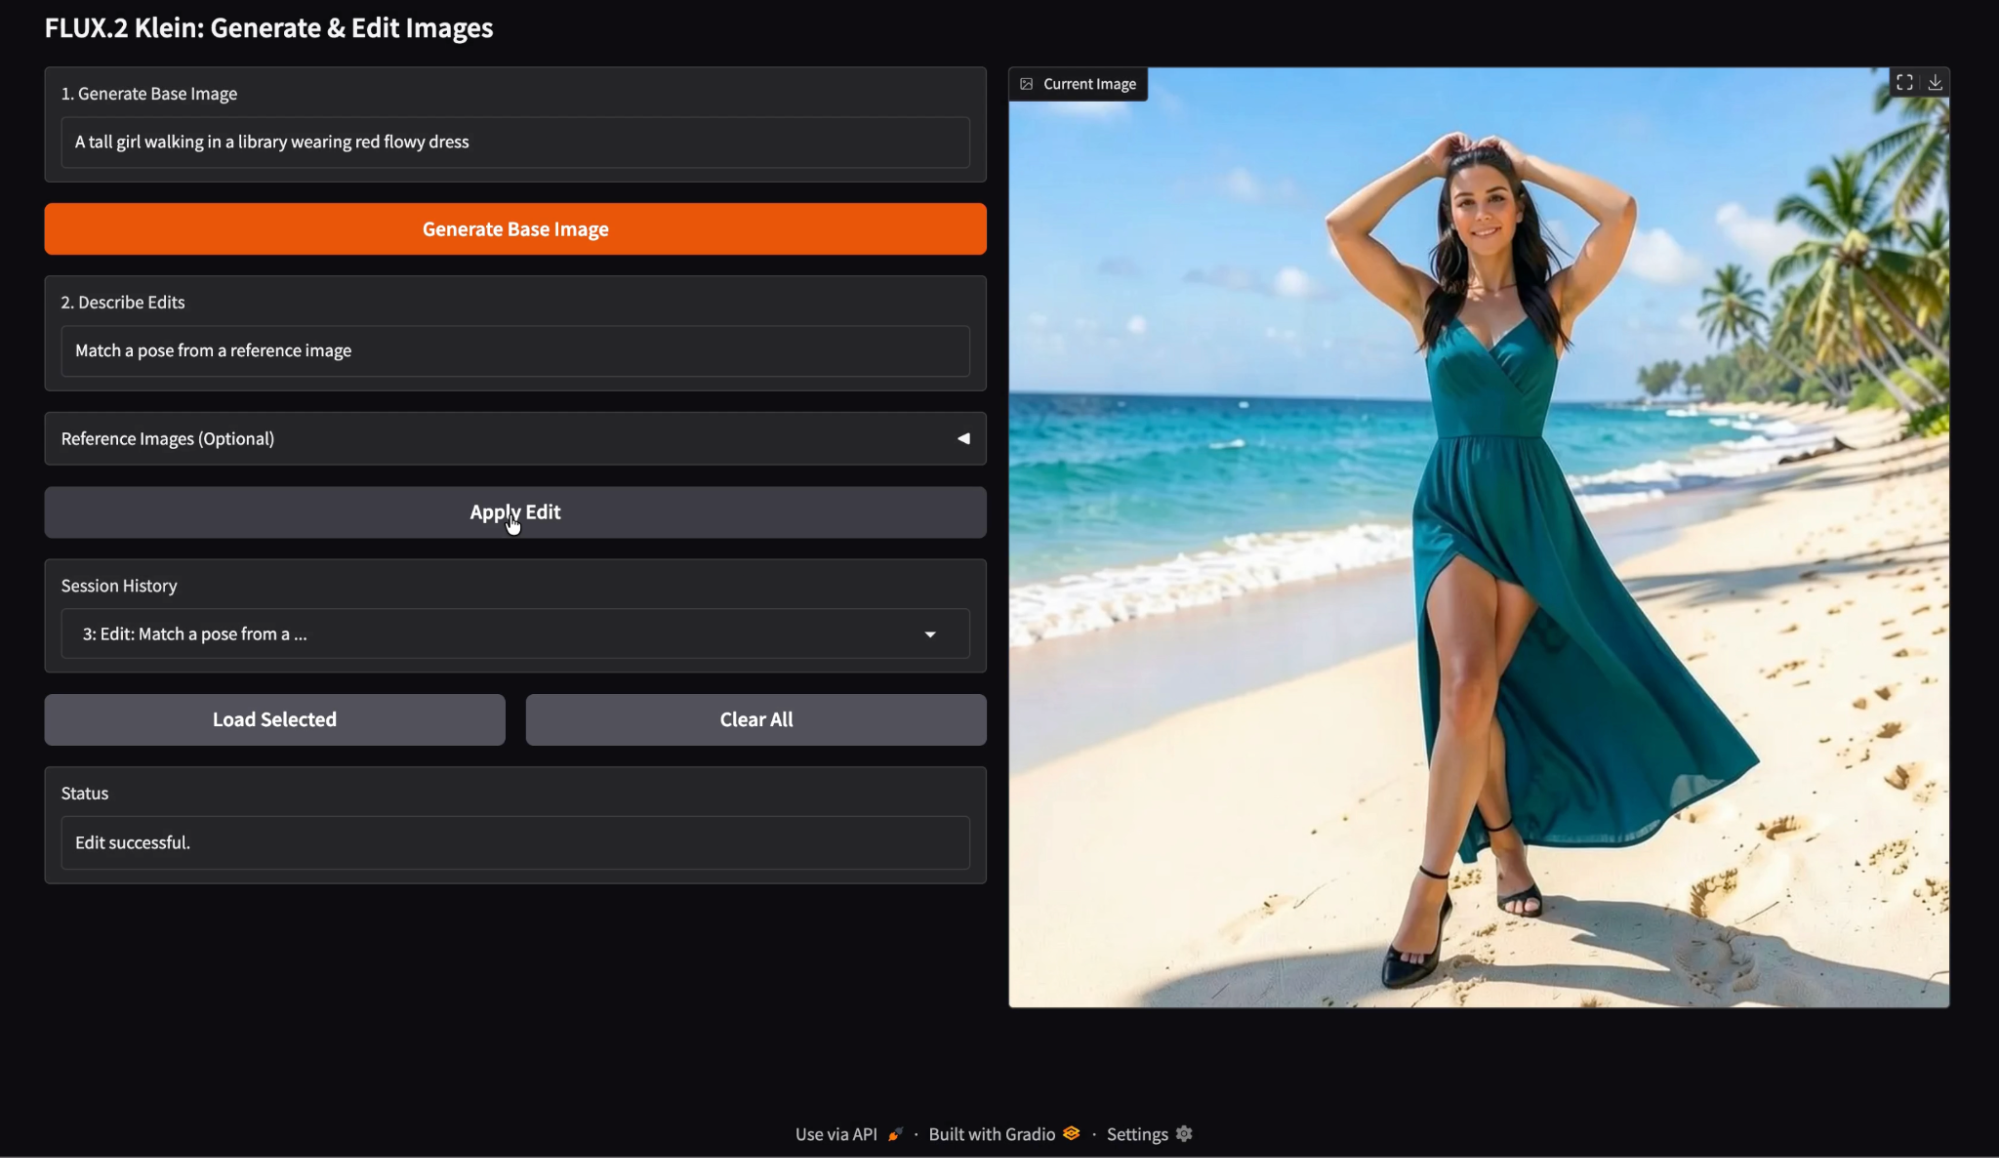
I tested a pose-based edit using a reference image that implies body positioning, combined with a prompt like “Match a pose from a reference image.” The resulting image shifted the subject pose while still maintaining a similar identity and styling.
Here is the reference image I used for pose guidance:
The pose edits are feasible, but they are more sensitive than color edits. Any pose change can trigger secondary changes such as fabric drape, limb placement, and camera framing. It took me a couple of experiments to get this pose right, and it was still struggling with the leg placement.
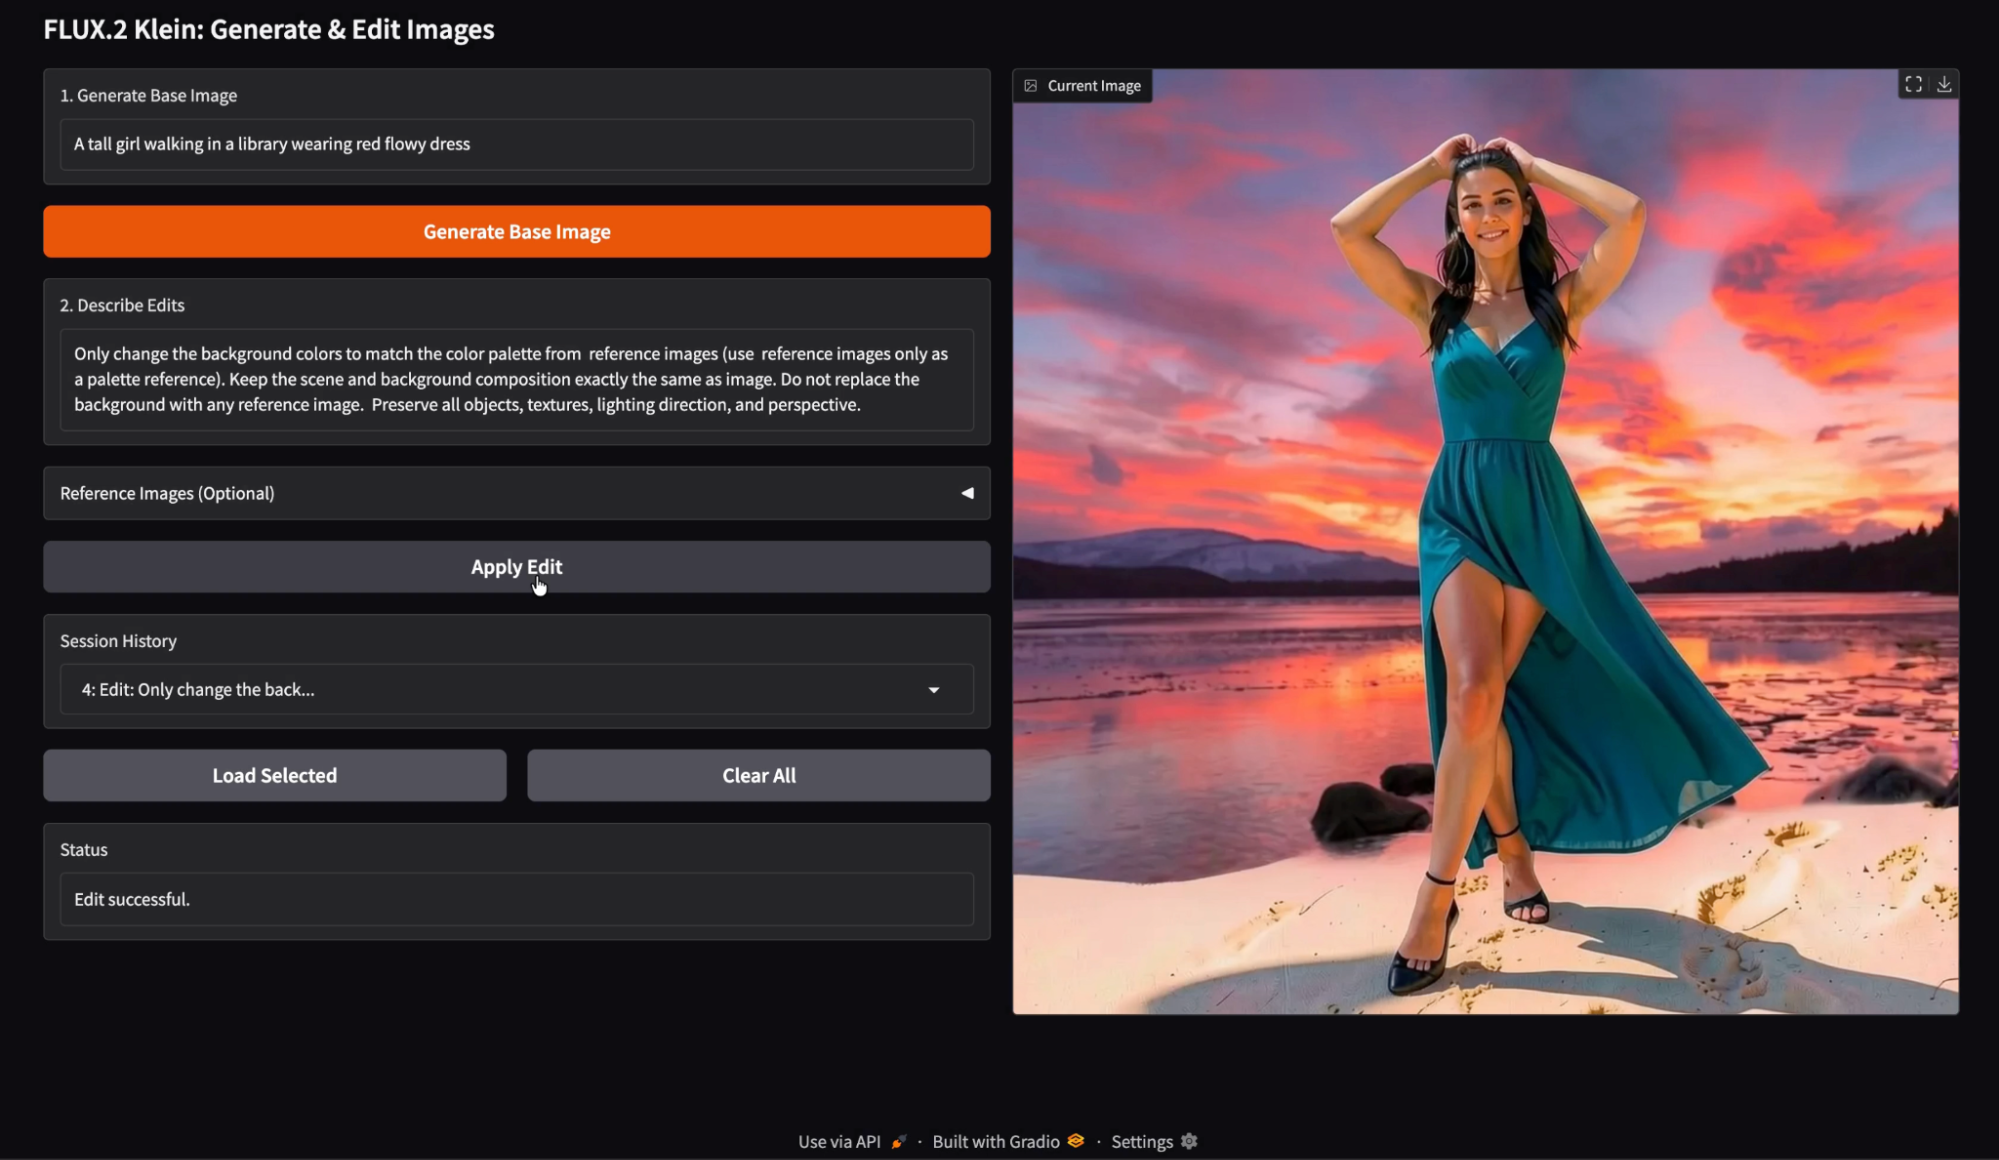
Finally, I tested multi-reference edits using several inputs, such as a color palette reference and an edit prompt that explicitly states “Only change background colors using the palette from the reference images. Do not replace the background with the reference images.”
To my surprise, the multi-reference editin
g is most effective when each reference image has a clear role.
Palette references work well when the prompt explicitly says palette only and avoids instructing the model to use the reference content as a replacement.
When references are ambiguous, the model may borrow texture or layout cues instead of only color. In my run, I noticed a few minor artifacts where elements resembling the reference images subtly leaked into the scene, but the overall result still looked strong and visually consistent.
A practical benefit of this demo is that every generated and edited image is stored in the session history. You can load any previous entry and continue editing from that exact checkpoint. This makes experimentation much faster. You can branch edits from an earlier version, compare multiple edit directions, and avoid losing a good intermediate result.
Top DataCamp Courses
Track
Course
Course
Tutorial
Aashi Dutt
Tutorial
Bhavishya Pandit
Tutorial
Aashi Dutt
Tutorial
Bex Tuychiev
Tutorial
Aashi Dutt
Tutorial
Abid Ali Awan