
Kurs
Agentische Systeme mit LangChain entwerfen
3 Std.
12.1K
The real bottleneck in software development is no longer writing code, because almost every developer on a team of any size now has at least one agent helping them ship. Coding agents are now embedded in everyday workflows, and implementation is no longer the slowest part of the system.
Cursor Automations is built to close that gap. Instead of repeatedly prompting an agent, you define when it should act. A trigger fires, instructions guide what it does, and it runs on its own. A pull request opens, and it gets reviewed. A bug report lands in Slack, and it gets handled. A schedule runs, and a report is generated.
In this tutorial, I’ll show you how to set up Cursor automations end-to-end. You’ll build two automations, a PR review, and a scheduled test coverage monitor. Along the way, I’ll break down how to structure instructions and connect tools and MCP so the automations behave as we expect.
One note before you start. Automations is still under development, and the dashboard at cursor.com/automations is evolving. If a menu label or button has shifted by the time you read this, the underlying logic will still match.
Cursor automations is a system for running Cursor's cloud agents automatically, triggered by events in your development tools or by a schedule you define.
In Cursor's Agent mode, as covered in our Software Development with Cursor course, you start every session by opening a chat and typing a prompt, and the agent runs on your local machine for as long as you keep it company.
In automations, the starting signal comes from somewhere else in your stack, and the agent does its job in a cloud sandbox without needing you to monitor it.
Automations include trigger events that I've summarized in the table below, but you can also set up custom triggers using webhooks. An automation can have more than one trigger and runs whenever any of them fires.
|
Trigger |
What it means |
Typical use |
|
Scheduled |
A recurring timer defined by a preset interval or cron expression |
Weekly reports, nightly audits, recurring maintenance |
|
GitHub |
Events on a connected GitHub repository, including PR lifecycle events, branch pushes, and CI completions |
Automated code review, security scans, CI-based workflows |
|
Slack |
A message posted or a channel created in a connected public Slack workspace |
Bug report triage, support question routing |
|
Webhook |
An HTTP POST to a private endpoint Cursor generates for the automation |
Connecting internal systems, CI pipelines, or monitoring tools |
|
Linear |
Events on a connected Linear workspace, including issue creation, status changes, and cycle completions |
First-pass investigation, sprint-based workflows |
|
Sentry |
Error and issue events in a connected Sentry project |
Automatically investigating errors and proposing fixes |
|
PagerDuty |
Incident events including triggered, acknowledged, and resolved states |
Incident triage, log investigation, on-call response |
Each of those trigger types replaces a moment in your day when you would have otherwise had to notice something, context-switch into Cursor Agent mode, and ask for help.
The pull request trigger is the one you are most likely to build first. Here is what the lifecycle of a single PR would look like before and after you add an automation to watch your repository.
|
Step |
Without Automations |
With Automations |
|
1 |
Teammate opens a PR |
Teammate opens a PR |
|
2 |
You notice the notification eventually |
Agent wakes up immediately in a cloud sandbox |
|
3 |
You open Cursor and ask it to review |
Agent reviews the diff against your instructions |
|
4 |
You read the output, post comments |
Inline comments are already on the PR |
|
5 |
Next PR sits in the queue |
Next PR already being reviewed in parallel |
What changes in that second column is not the speed of any individual step, but the fact that your attention is no longer the rate limiter on the entire process.
Every automation follows the same pipeline under the hood. When the trigger you define fires, Cursor spins up a fresh cloud sandbox, clones your repository into it, and launches an agent that follows your instructions using the configured tools, MCP connections, and model.
The agent verifies its output before finishing, then posts the result wherever you configured it, whether that is a PR comment, a Slack message, a Linear ticket, or by opening a new pull request.
Two properties shape every automation you build:
There is also a memory tool, as shown in the preview below, that lets your automation persist state between runs, which becomes important later when we build the scheduled coverage monitor.
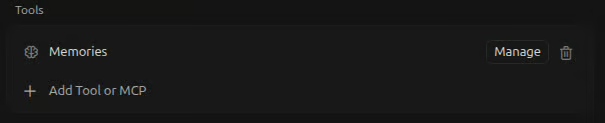
I will come back to it when you build the scheduled coverage monitor.
If you already use Cursor regularly, the key question is when to use automations instead of Agent mode. I would not use Automations for one-off tasks. They are built for work that repeats or depends on external events.
I find a comparison of how they differ useful when the choice is not obvious:
|
Agent mode |
Automations |
|
|
Who initiates |
You, from the IDE |
An event or schedule |
|
Where it runs |
Your local machine |
Isolated cloud sandbox |
|
Parallelism |
One session at a time |
Many running simultaneously |
|
State across runs |
None, every chat is fresh |
Memory tool persists across runs |
|
Best for |
Interactive development, exploration, one-off refactors |
Recurring, predictable tasks you want to happen without you |
I think about it this way. Suppose a task starts with “whenever” or “every time,” it belongs in Automations.
For example: “Every time a PR is opened, or whenever a bug report lands in #support, create a Linear ticket.” The trigger is recurring and predictable.
If it starts with “right now I need to refactor this module,” it belongs in Agent mode. You decide when “right now” is.
If you want to explore Cursor before diving into automations, our Cursor 2.0 complete guide walks you through the Agents interface, Composer, and the multi-agent workflow with a full Python project.
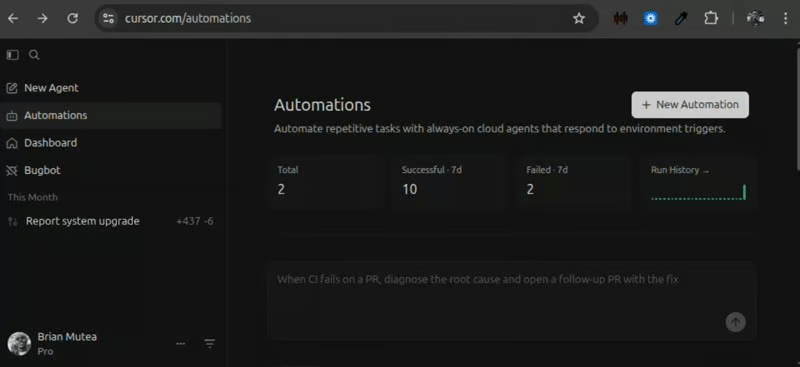
The Cursor automations dashboard lives at cursor.com/automations. Sign in with your Cursor account, and you will land on the main dashboard as shown below:
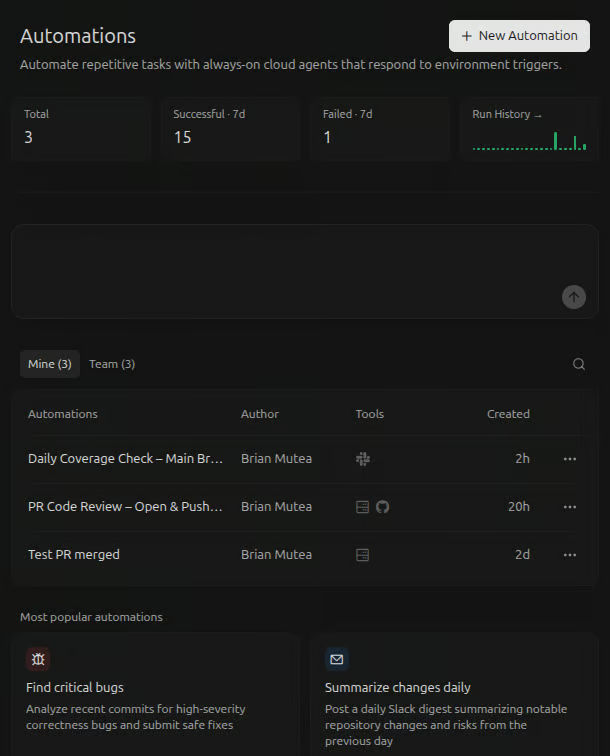
Let’s break down what we see on the dashboard.
The tiles give us a health snapshot of everything you have run. They include:
The input field is the fastest way to create a new automation without opening the full setup form. We describe the task, and Cursor generates the automation structure.
 If you’re just getting started, I would recommend you start here. Figure out what you want to automate, then write a structured set of instructions for the agent to follow every time the trigger fires.
Once you hit the arrow button, Cursor uses those instructions to generate the automation for you, pre-filling the name, triggers, and required tools.
I would not treat these instructions as a normal prompt, but as a spec the agent runs every time. I will come back to this when I show you how to build your first automation later.
The toggle filters between your automations and team automations.

The + New button opens a configuration page to configure a new automation:
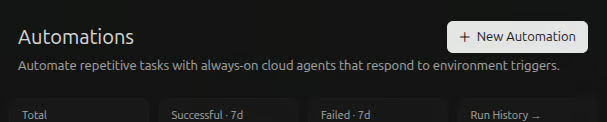
The + New Automation button is the longer-form alternative to the inline prompt box if you want to configure the trigger, instructions, and tool connections manually from scratch.
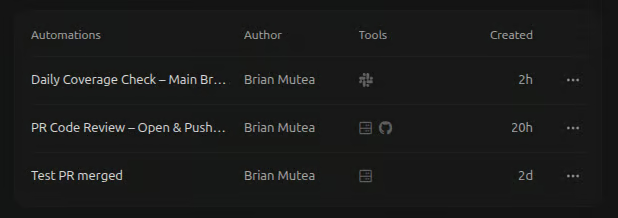
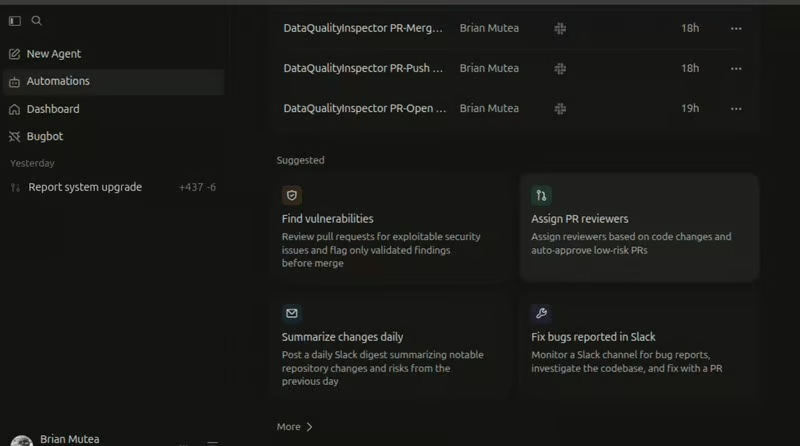
The table shows all the automations we have created, including the tools used and the run history.
Clicking into any one opens its settings page and run history:
Beneath the list of previous automations is a grid of template cards. Templates provide prebuilt automations you can modify instead of starting from scratch.
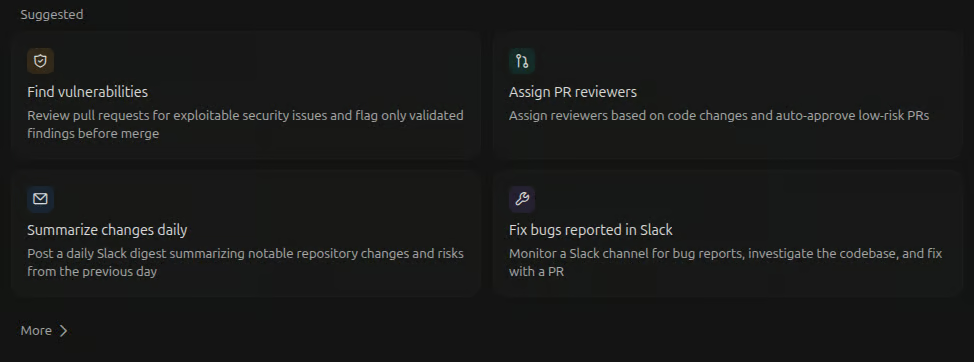
Cursor automation templates are the quickest way to spin up an automation on day one. If you are building your first automation, I suggest checking whether there is a template that matches what you want to automate and starting from there.
The templates can give you opinions about what good instructions look like, which tool or MCP connections you need.
Cursor automations run on Cursor's cloud infrastructure, which requires cloud agent access, which is included in paid plans. Each run consumes credits based on model usage and execution time.
Automations support three visibility tiers as per its permissions model:
Getting the tier right matters because it determines whose credits the automation uses each time it runs. Keep experiments private until you trust the output. Once automation becomes part of your team's workflow, you can move it to a team-owned tier.
The main failure mode is letting an automation run too broadly, too early. If it triggers on every push in a busy repo, it can rack up usage quickly without you noticing. Start narrow, let it run for a few days, review how often it fires, then decide whether to expand or scale it.
PR code review is the right first automation because the feedback loop is short and the consequences of a bad run are low. If the agent posts a useful comment, we see it on the PR immediately. If it posts something off base, we ignore it, and nothing ships.
I'll walk you through building your first automation in five steps:
Before the agent can review a pull request, it needs access to a repository. Cursor accesses your repository through a native GitHub App integration. Without that connection, the automation agent can’t see your code, read PR diffs, or respond with feedback, so nothing really works.
If you have not done this yet:
Once your connection is active, your repositories will be available when you configure the automation trigger.
From the automations dashboard:
PR Code Review – Open & Push – Comment OnlyIf you skipped step 1 or this is your first time connecting GitHub to Cursor automations, you will be prompted to authenticate.
In the preview below, I show how to configure it and select the target repository once authorization is complete:
Note: We can bundle multiple trigger events into a single automation when the instructions don’t change depending on which event fired. But if the depth or purpose of the review changes depending on the event, we go for separate automations.
The automation now knows when to run. The next step is to tell it what to do.
The instructions are the single biggest lever for whether our automation produces useful output. The agent uses them to learn what “good” looks like. Vague instructions lead to inconsistent results.
Before writing the instruction, we must understand what we are defining. We are not giving a one-off prompt. We are setting a behavior that the agent will follow every time the trigger fires. The quality of the automation depends on how clearly we specified that behavior.
Here’s the structure I would recommend:
Write automation instructions the same way you would write a runbook, specific, ordered, with clear acceptance criteria and explicit boundaries.
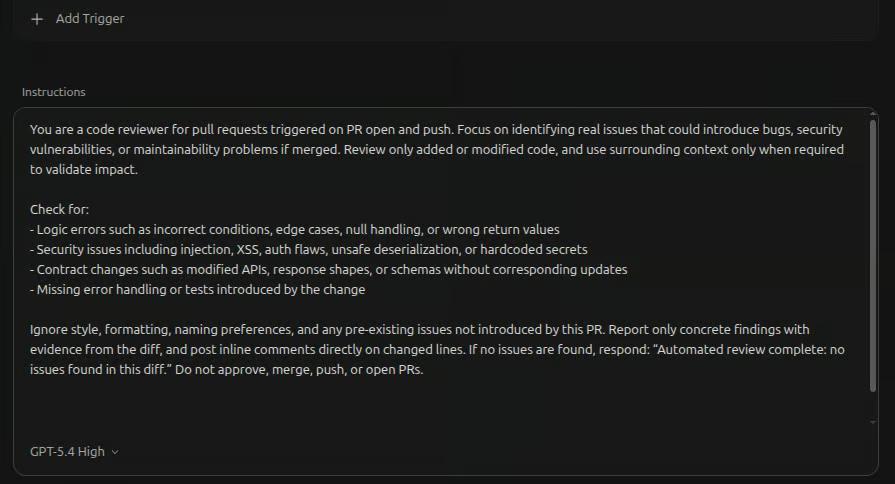
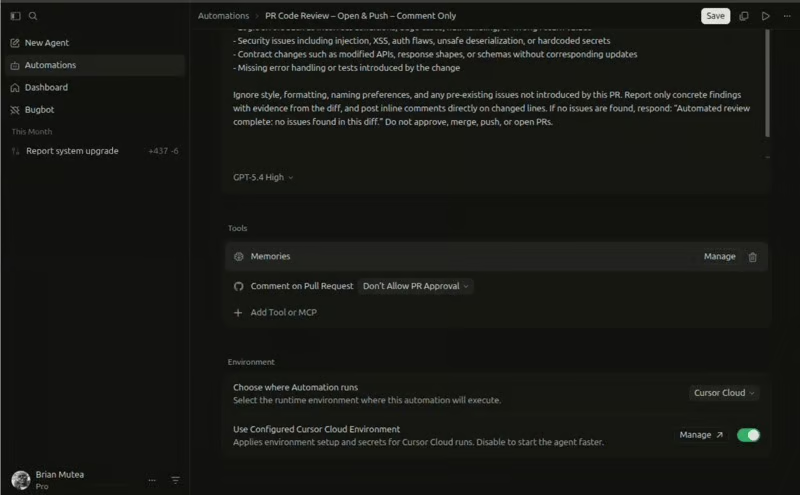
Here is the instruction I used for this PR code review automation. You can copy it into your instructions input box, but modify it to match your use case:
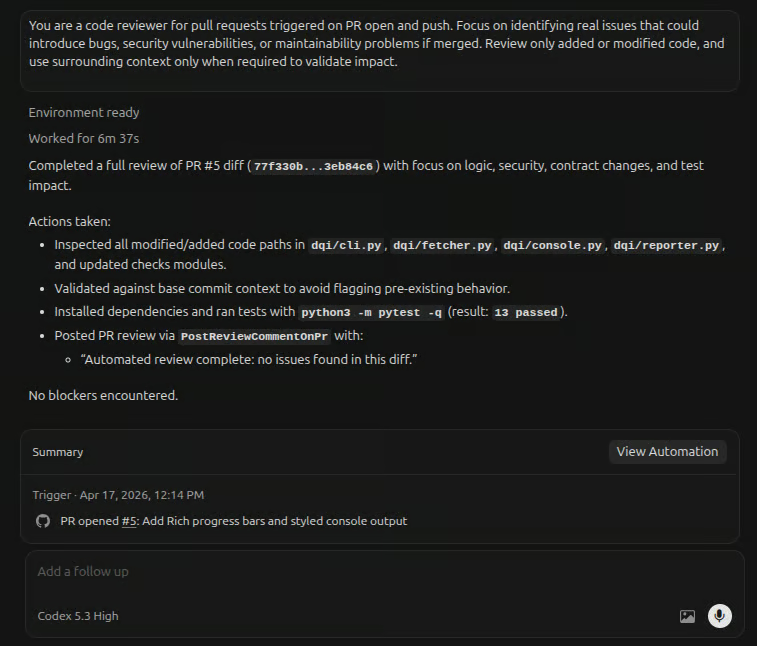
You are a code reviewer for pull requests triggered on PR open and push. Focus on identifying real issues that could introduce bugs, security vulnerabilities, or maintainability problems if merged. Review only added or modified code, and use surrounding context only when required to validate impact.

Check for:
- Logic errors such as incorrect conditions, edge cases, null handling, or wrong return values
- Security issues including injection, XSS, auth flaws, unsafe deserialization, or hardcoded secrets
- Contract changes such as modified APIs, response shapes, or schemas without corresponding updates
- Missing error handling or tests introduced by the change

Ignore style, formatting, naming preferences, and any pre-existing issues not introduced by this PR. Report only concrete findings with evidence from the diff, and post inline comments directly on changed lines. If no issues are found, respond: “Automated review complete: no issues found in this diff.” Do not approve, merge, push, or open PRs.
Here is the instruction in the instructions input box:
This prompt is simplified, but it still follows a clear and specific structure.
Avoid vague instructions like:
Review this PR and give feedback on any issues you notice.Without structure, constraints, and priorities, the agent will be forced to guess what “issues” means, leading to generic, surface-level feedback rather than reliable output.
Open the tools panel inside the automation editor. For this automation, we will go to the GitHub section and select the Comment on Pull Request tool. We ensure PR approval is disabled, as in the preview below, so the automation can only comment, not approve changes.
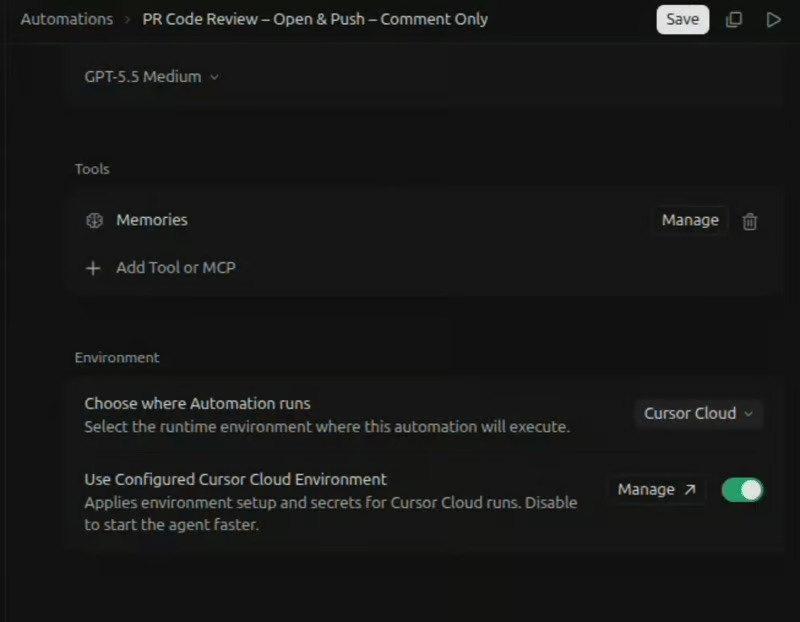
Comment on Pull Request tool lets the agent post findings back to the PR. It does not require a separate connection because it is powered by the same Cursor GitHub App you authorized in Step 1.
If we wanted to send output to other services (like posting to Slack), we would select the corresponding tool or add an MCP connection. For this automation, the comment tool is enough.
Once the triggers, instructions, and tools are set, we click Create to save the automation, which opens the automation’s settings page, as you can see below:

Since we have deployed the automation, we need to trigger a run and observe what the agent produces.
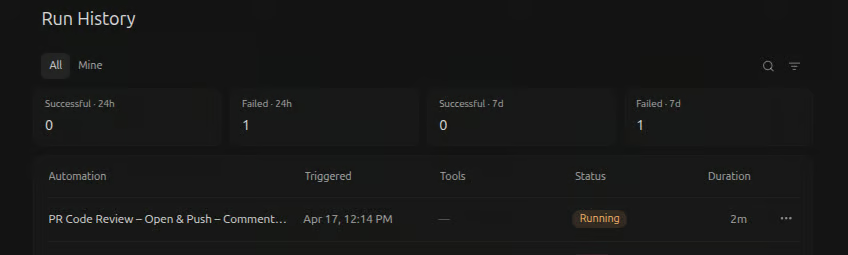
Open a draft pull request in your connected repository. This fires the PR opened trigger, and a new entry should appear in the Run history within seconds, as you can see below:
Open that run and check three things:
Below is an overview of my automation’s run. You can see it ran for six minutes, took some actions, and posted the PR review using the PostReviewCommentOnPr tool:
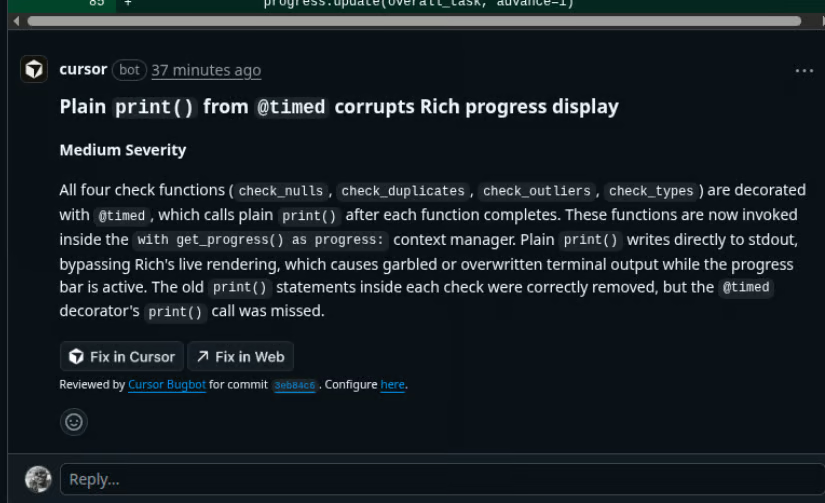
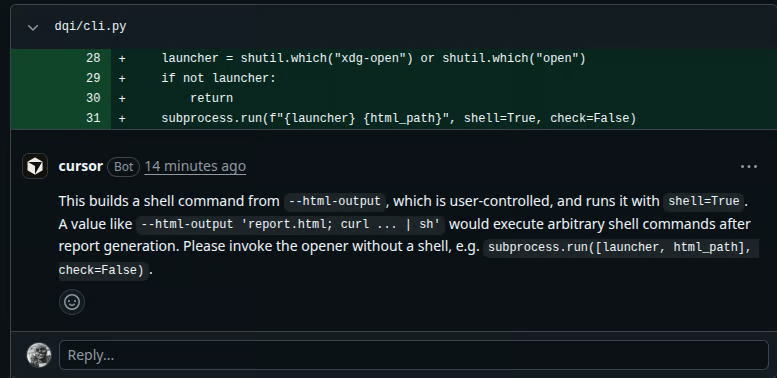
Below, is an example comment the agent posted on my PR:
Sometimes the output can be off, and when that happens, the issue is usually in the instructions. We adjust the instruction that controls the behavior we want to change, push a new commit to trigger another run, and review the result.
For these early runs, we should start simple to keep them low risk. In this case, we limit the automation to comments only, which lets us confirm how it behaves safely. Once the output is consistent, we move it into real use and then connect other tools beyond GitHub to expand what it can do.
The PR review automation we just built runs on GitHub. It reads the diff and posts comments to the pull request using the GitHub Comment on Pull Request tool. But if we want the agent to do more than review code, we need to connect other tools. That is what Model Context Protocol (MCP) is for.
MCP is a standard interface that lets agents use external tools without custom integrations. Without it, each tool would require its own setup and maintenance.
With MCP, once we connect a supported tool in the automation’s tools panel, the agent can use it through the same interface.
MCP lets the same automation do more and take action in other tools. Your PR review automation already comments on GitHub. Add Slack, and it can post updates to a channel. Add Linear, and it can create tickets. Add Datadog, and it can pull logs. Each connection extends what the automation can do without changing its core logic.
Cursor automations include a built-in set of MCP integrations like Slack, Linear, ClickUp, Datadog, Notion, and more. Because MCP is an open standard, we can connect any compatible tool in the same way.
You’ll find MCP under Tools -> MCP server on the automations settings page. Click the + New Connection button to browse, then install and connect the tool you need.
Here’s a preview showing how to add them:

In the next section, I will guide you on how to add a Slack MCP connection to the PR code review automation.
GitHub gets the automation reading and commenting on our code. Slack gets it talking to the team.
From the Tools panel, click Add Tool or MCP, select MCP Server, then choose +New Connection. In the panel that opens, search for Slack and select the Slack MCP server.
Slack comes already installed, but if not, install it and follow the OAuth flow to authorize your workspace. Once connected, it appears in your tools panel, as I show in the overview below:
We don't pick a target channel during the connection setup. The MCP gives the automation agent workspace-level access to all public channels. We control exactly where it posts by naming the channel in the instructions, for example, "Send a Slack message to #pr-alerts if any critical issue is found."
Note: Slack MCP only works with public channels, and the target channel must have the Cursor bot invited before the automation can post. After the OAuth flow, a Cursor bot should appear in your Slack workspace. Go to the channel and run /invite @Cursor to add it.
If you don’t see the @Cursor bot, the authorization may have failed. Go to dashboard -> integrations, click Manage next to Slack, and re-run the OAuth.
If you want to go deeper on MCP itself, our FastMCP 2.0 tutorial walks through building a custom MCP server from scratch and integrating it into Cursor.
With the Slack MCP connected, we can extend the PR code review automation. We will keep the same GitHub PR triggers and the GitHub comment on PR tool. But now the agent can also post critical findings to #pr-alerts through the Slack MCP.
Add this block to the end of the instructions we wrote in step 3 when building the first automation:
Additionally:
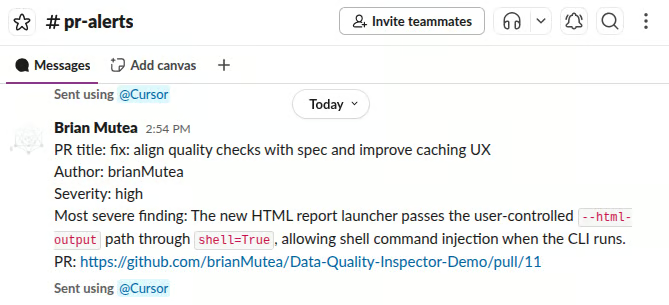
If you find any issue at severity high or critical, send a Slack message to #pr-alerts containing: the PR title, the author, a one-sentence description of the most severe finding, the severity label, and a link to the PR. If no high or critical issues are found, do not post to Slack at all.That final line matters more than it looks. Without it, the #pr-alerts can quickly fill with “all clear” notifications and lose its value. To me, telling the agent when not to act is just as important as telling it when to act.
Below are the outputs from a test PR run on my repository.
A view of a comment the automation agent posted on PR open in my GitHub (via the GitHub PR comment tool):
A view of the Slack notification the automation agent sent in my #pr-alerts Slack channel for the same run via the Slack MCP connection:
At this point, you have a working automation that reviews every PR, posts comments on GitHub, and escalates critical issues to Slack. That’s the core pattern.
In the next section, we’ll build a second automation following the same flow: a trigger, instructions, and the tools the agent needs to produce the output.
The PR code review automation we have built reacts to GitHub events. Scheduled automations work differently. We define when the agent should run, and it executes at that time regardless of what has happened in the repo.
The automation we are building here runs every day at 9 AM, reviews code merged to the main branch in the past 24 hours, identifies areas with inadequate test coverage, and posts a summary to #repo-coverage on Slack.
From the automations dashboard:
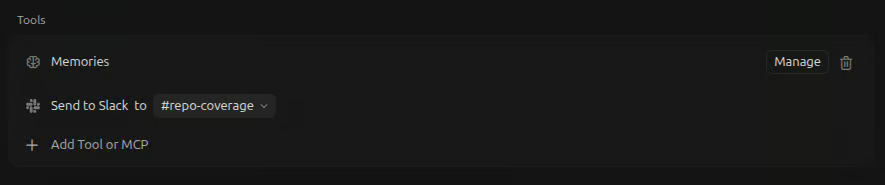
Daily Coverage Check – Main Branch.Here, I will introduce you to the Send to Slack tool available in the automations settings. This differs from the Slack MCP used earlier. We use it to send messages to a specific channel, while the Slack MCP provides workspace-level access and lets the agent post to any channel defined in the instructions.
To add the Send to Slack tool, select it from the tools section and specify the target channel for the automation’s output. Here is how it should look:
In the PR review automation, the agent reacts to a pull request and posts feedback. With scheduled automations, there is no incoming input. The agent starts the task on its own, so we need to be clear about where to start, what to check, and what to post.
The memory tool is important here. The coverage comparison only works if the agent knows yesterday’s numbers. We must tell it which key to read, what to compare, and what to store at the end. If we leave that unclear, results can vary between runs.
Here is the instruction set I used:
You are a daily test coverage monitor for this repository. Run every day at 9 AM on the main branch.
Identify PRs merged to main in the last 24 hours.For modified files, check if changed code paths have test coverage.Run tests with coverage:  pytest --cov=src --cov-report=json.Parse the report and record the overall coverage and per-file coverage for modified files.Read yesterday's coverage from memory (daily_coverage_latest: If none exists, post a green status and skip comparison.Compare coverage: If it drops by >1%, post a warning to #repo-coverage Slack Channel with today's value, yesterday's value, delta, and affected files. Otherwise, post a green status with today’s value and delta.Save today’s coverage to memory (daily_coverage_latest).
Below, I show you the outputs from my scheduled automation at 9 AM.
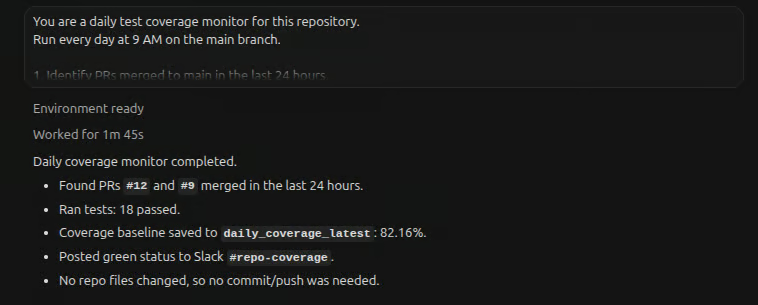
Here is the automation overview. In my case, coverage stayed above the threshold, so it just posted a green status in the Slack channel:
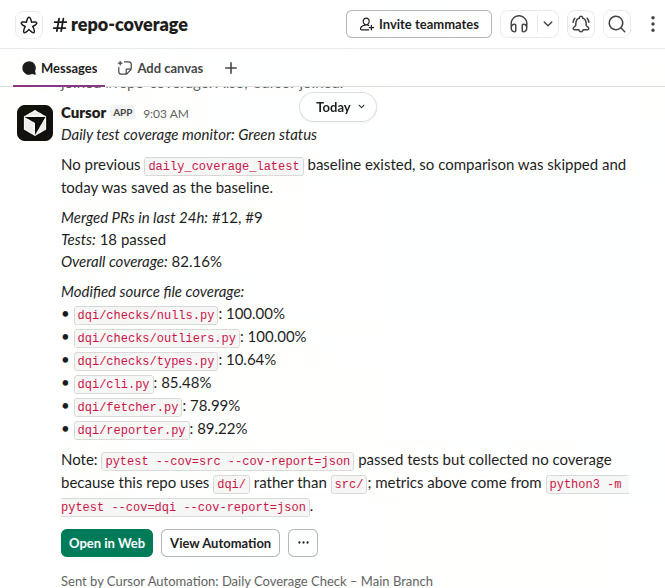
Here is the Slack message. This is the first test coverage run, so I did not expect much. You can also see that the run was saved to memory as the baseline for the next comparison:
Looking at the run above, two parts of the instructions stand out.
First, it defines both the warning path and the green path. The green path is required. If we only define what happens when something is wrong, the automation stays silent when everything is fine. In a monitoring channel, that silence looks like a failure. The green status confirms the run completed.
Second, the memory read and save are explicit. The agent has a memory tool, but it will not reliably use it for comparisons unless instructed. If we leave this implicit, results can vary across runs. We must specify exactly which key to read, what to compare, and what to save.
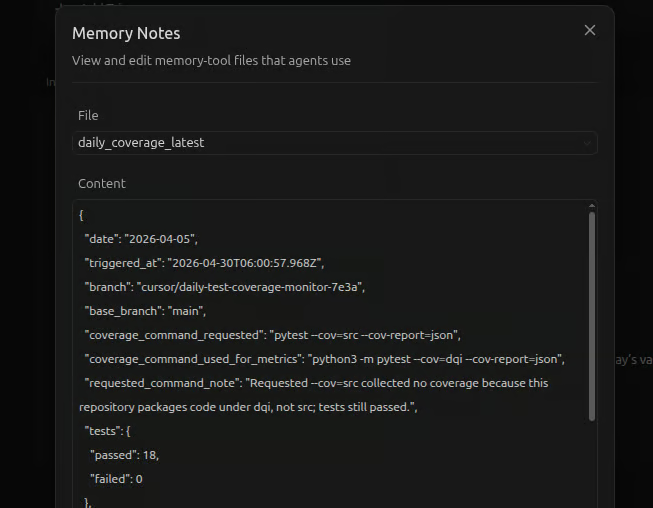
In the image below, you can see that the agent saved my automation:
In the next section, I will cover the common mistakes and best practices to help you get more out of your automations.
Most issues with automations come from a small set of predictable mistakes. They are easy to avoid once you know them, but costly to debug when you don’t.
@Cursor bot is invited in that channel.PR Code Review – Open & Push – Comment Only are more useful than generic labels when you revisit them later.Cursor Automations moves agentic coding from an interactive workflow to an event-driven system. In Cursor Agent mode, we open a chat and prompt the agent to review code, refactor functions, or investigate issues. In automations, we do not start the work directly. Triggers like a pull request, a Slack message, or a schedule start the agent automatically, and it completes the task on its own. The main shift is that routine work moves from a manual queue into a system that runs in the background.
In this piece, I have guided you on how to build two automations: a PR code review and a scheduled coverage monitor. These are intentionally simple, but they give you the right starting point because they show how the system behaves without added complexity. Once you are comfortable, you can implement advanced workflows.
The core idea is to start with one narrow automation, write instructions like a runbook, run it in a low-risk mode, and only expand once it behaves reliably. The value comes less from how many automations you build and more from how consistent each one is.
To keep building on what we covered in this piece, here are our recommended next steps:
Top DataCamp Courses
Kurs
Kurs
Kurs
Blog
Khalid Abdelaty
15 Min.
Blog
Khalid Abdelaty
15 Min.
Blog
Srujana Maddula
11 Min.
Tutorial
Bex Tuychiev
Tutorial
Khalid Abdelaty
Tutorial
François Aubry