Track
I have often copied and pasted code into ChatGPT to ask why it isn’t working, to refactor it, or simply to explain it to me. However, switching between my code editor and ChatGPT can get a bit tedious.
AI editors solve this problem by integrating GPTs directly into code editors. By integrating directly with our code, GPTs gain more context about the overall project, which significantly enhances their output.
In this article, we’ll explore one of the most popular code editors: Cursor AI. Trusted by engineers at OpenAI and Perplexity, Cursor AI offers AI-assisted coding, intelligent code suggestions, and integration with various development tools. You should also check out our guide to the new Cursor 2.0 if you're keen to explore the new features.
We keep our readers updated on the latest in AI by sending out The Median, our free Friday newsletter that breaks down the week’s key stories. Subscribe and stay sharp in just a few minutes a week:
What Is Cursor AI and What Can It Do?
Cursor AI is an AI-powered code editor designed to make software development easier. As a fork of Visual Studio Code (VS Code), it retains the user-friendly interface and extensive ecosystem of VS Code, making it easier for developers already familiar with the platform to transition.
Cursor AI integrates advanced AI capabilities through OpenAI’s ChatGPT and Claude. This integration allows Cursor AI to offer intelligent code suggestions, automated error detection, and dynamic code optimization.
Key autocompletion features
Cursor offers key autocompletion and predictive code features:
- Autocomplete and code prediction: Cursor provides autocomplete functionality that predicts multi-line edits and adjusts based on recent changes.
- Code generation: Familiar with recent changes, Cursor predicts what we want to do next and suggests code accordingly.
- Multi-line edits: It can suggest edits that span multiple lines.
- Smart rewrites: The editor can automatically correct and improve our code, even if we type carelessly.
- Cursor prediction: It predicts the next cursor position, allowing seamless navigation through the code.
Chat features
Cursor also integrates advanced chat features to facilitate better interaction:
- Codebase answers: Query Cursor about the codebase, and it will search through the files to provide relevant answers.
- Code reference: Reference specific blocks of code or files, integrating them into the context of our queries.
- Image support: Drag images into the chat or use buttons to add visual context.
- Web search: Get the latest information from the internet directly into code queries.
- Instant apply: Implement code suggestions from the chat directly into the codebase with a click of a button.
- Documentation integration: Reference popular libraries and add our own documentation for quick access.
For a comprehensive list of features, for example, check Cursor’s feature page.
How to Install Cursor AI
Cursor AI provides an installation file for Linux, Windows, and MacOS that can be downloaded for free on their website.

To install it on Windows and MacOS, we download it from their homepage and install the download file as we’d install any other program.
In Linux, it comes as an AppImage file. Before executing it, we need to make it executable using:
chmod a+x cursor-0.40.3x86_64.AppImageThen, we can execute it with:
./cursor-0.40.3x86_64.AppImageWe may need to replace the version 0.40.3x86_64 in the above commands, depending on which version was downloaded. The current release, as of October 2025, is 1.6, but the naming format may differ between systems (e.g., cursor_1.7.46_arm64.deb on macOS or Linux). For more instructions on how to install AppImage files, check out their website.
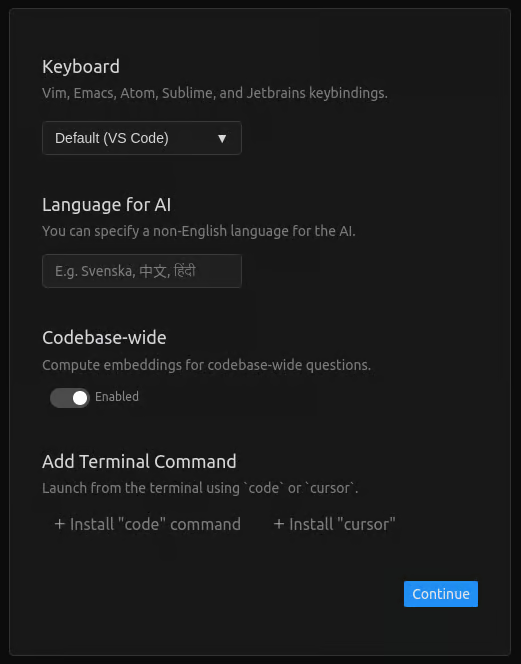
- Keyboard: This option lets us configure the keyboard shortcuts. By default, it uses the VS Code shortcuts, which I recommend unless you are familiar with another code editor on the list.
- Language for AI: Here, we have the option of using a non-English language to interact with the AI.
- Codebase-wide: Enabling this option allows the AI to understand the context of the entire codebase.
- Add terminal command: If installed, these allow the Cursor AI editor to run from the terminal.
How to Use Cursor AI: 10 Use Cases
Throughout this guide, we’ll provide the MacOS shortcuts with the Cmd ⌘ key. The shortcuts are the same if you use Cursor on Windows or Linux, except the Ctrl key is used instead.
Inline code generation
We use the Cmd+K shortcut to open the inline code generator. This opens a small prompt window where we insert a prompt to generate code:

To generate code, we type a prompt and then click the generate button:

This will generate the code, and we add it to our project by clicking the accept button:
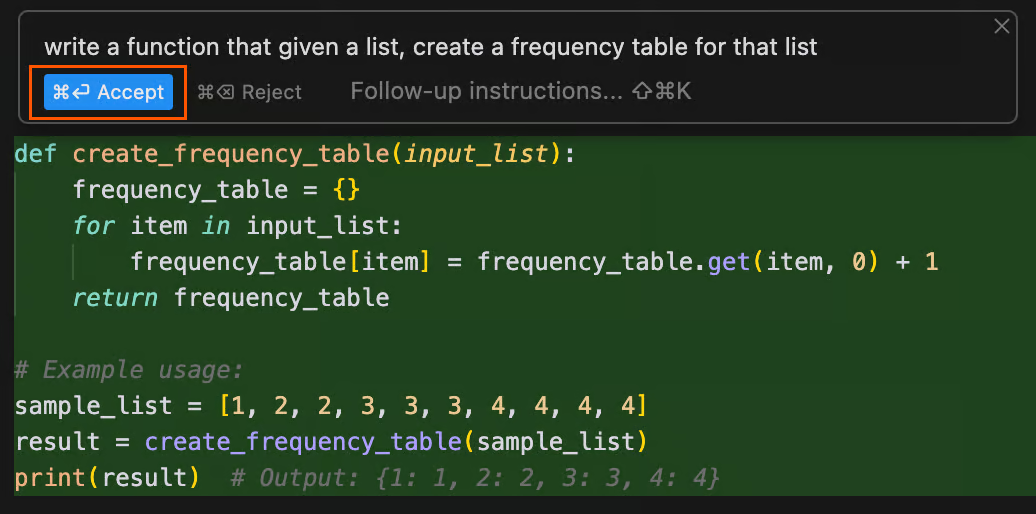
In this case, we used the cloude-3.5-sonnet model. We can select another model using the model dropdown selector:

Interact with existing code
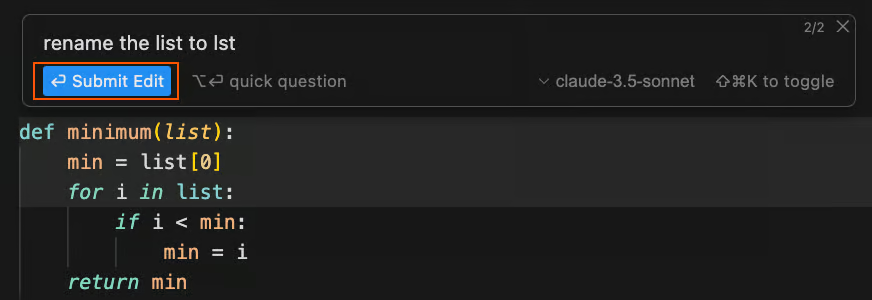
We can also use the inline chat to interact with existing code by selecting the relevant code before using the Cmd+K shortcut. This can be used to make changes to the code, such as refactoring, or to ask questions about the code. After typing the prompt, we click on the Submit Edit button to get the modifications:
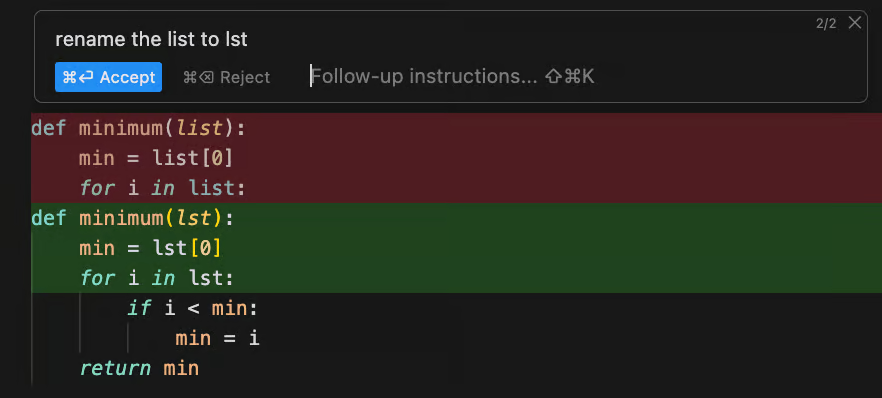
Code changes in the Cursor are presented as a diff. The red lines represent lines that will be deleted by the change, while the green ones represent the new changes that will be added:
Asking questions about existing code
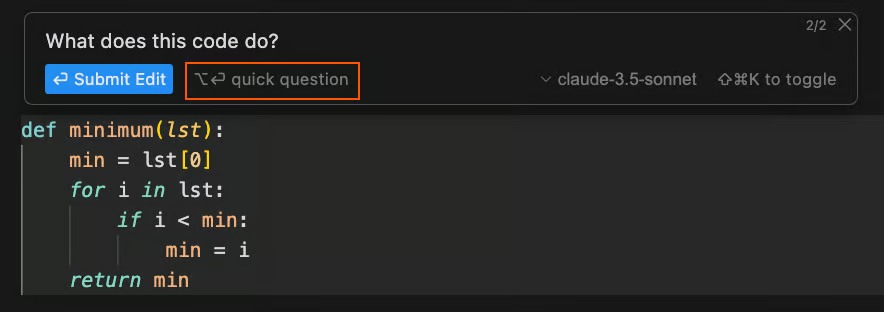
In the same way, we can ask questions about a piece of code by selecting it and using the Cmd+K shortcut. In the case of a question, we click the quick question button to submit the prompt:
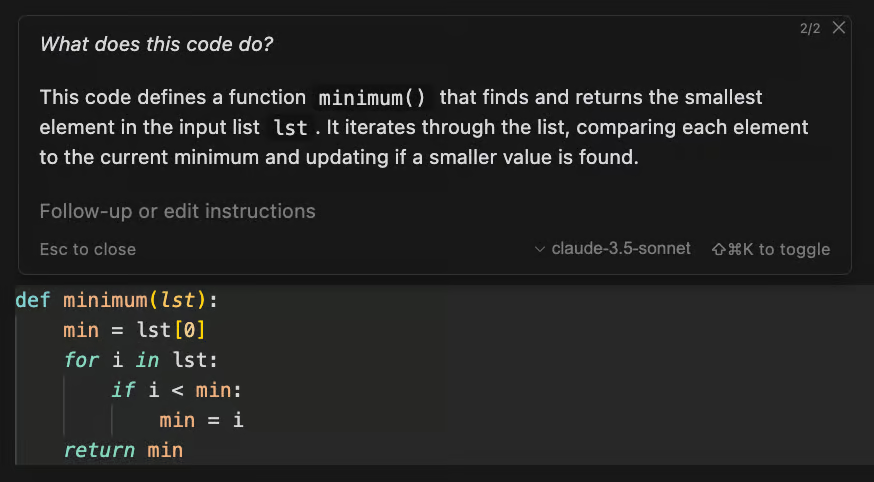
After submitting the question, the system will generate the answer and display it in the following manner:
Autocompletion with tab
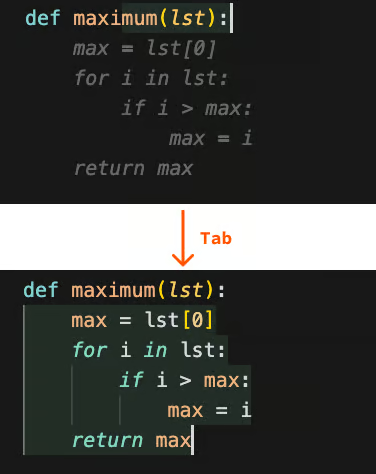
While writing code, Cursor will suggest code completions generated using AI. Similar to traditional code completion, we can use the Tab key to incorporate these suggestions into our code.
For example, let's say we start implementing a function named maximum(). Cursor will recognize our intent and suggest an appropriate implementation. By pressing Tab, we can add the suggested code:
Autocomplete also works with code written in natural language. For example, if we want to create a double for loop to iterate over all pairs in a list, we can simply describe this in plain text. Cursor will then provide the corresponding autocomplete suggestion, which can be integrated by pressing the Tab key:

Chat interface overview
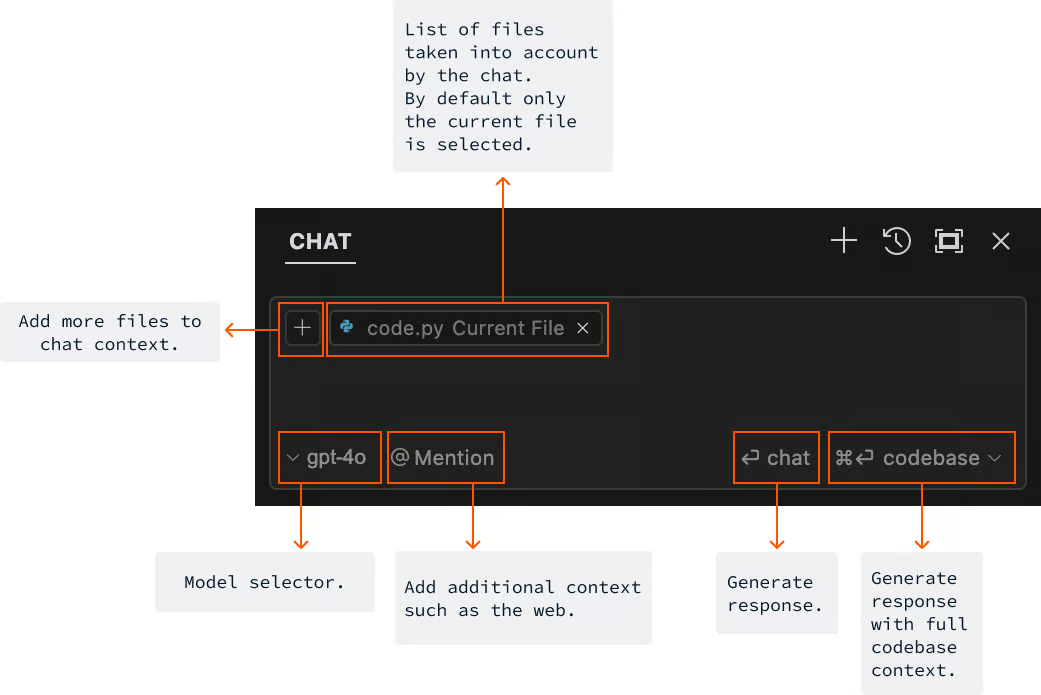
To open the chat window, use the Cmd+L shortcut. The chat window is more versatile than the inline generator, as it allows us to not only generate code but also ask questions. Here’s an overview of the chat interface:
Code generation with chat
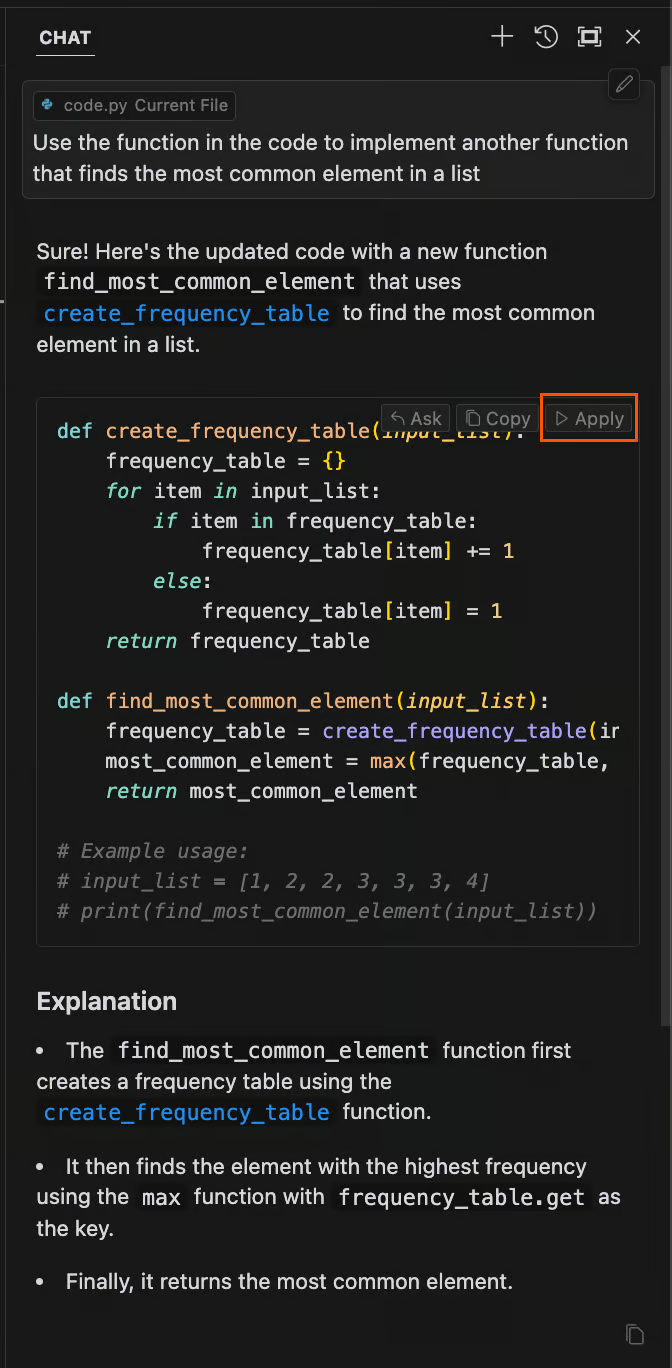
Similarly to generating with the inline chat, we can also generate code using the chat feature. The code generated in the chat can be integrated into the project by clicking the Apply button at the top right corner of the code window.
Enhancing query context with @
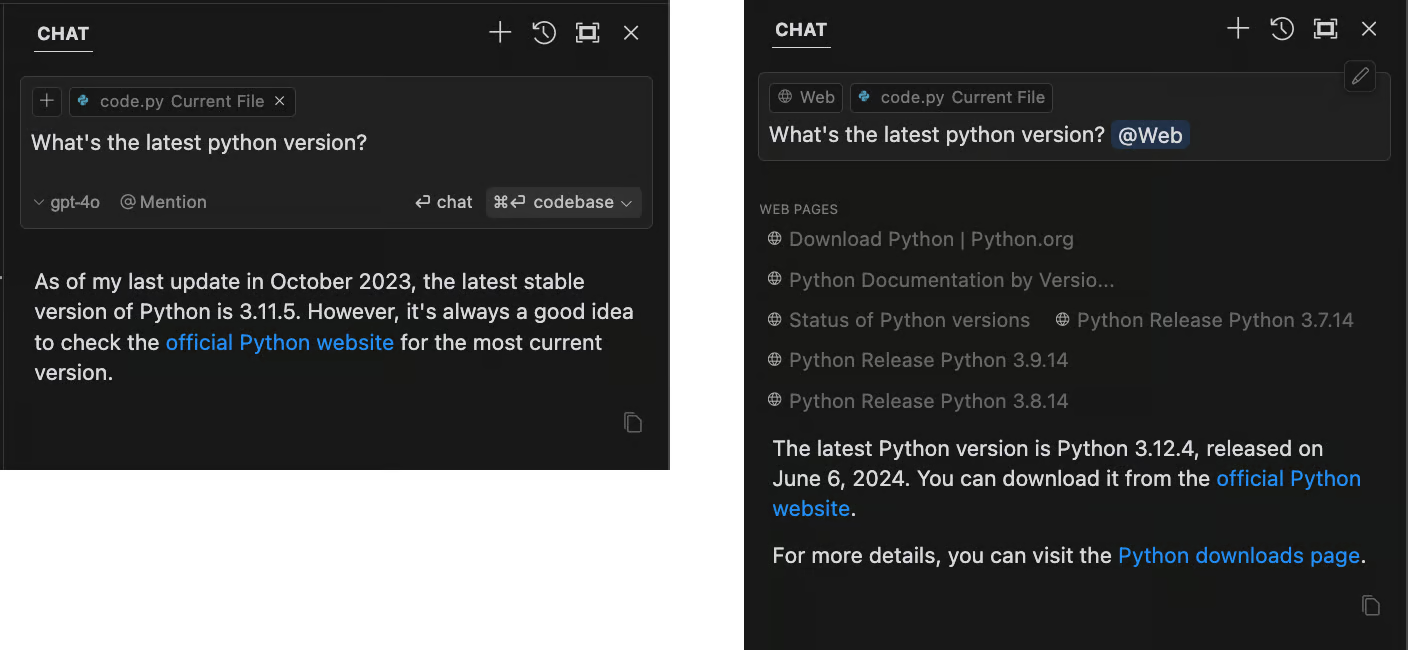
Perhaps the most important feature of the chat window is the @ Mention option. This option enables us to provide more data for the AI to generate the response. This ranges from simple files and folders to web searches or giving the AI access to a GitHub repository.
For example, we can use @Web to allow the AI to search the web for the answer.
Keep in mind that in some cases it might be problematic to share the whole code base or a private GitHub repository with the AI. We should be mindful of what we share with the AI and avoid sharing sensitive or private data.
Global code base questions
One of the features that I find the most useful when working on bigger projects is the ability to quickly find a piece of code by asking a question with the full codebase as scope. Recently, I wanted to locate a function in a project that calculates the navigation direction in an app. With Cursor, I could very simply locate it by describing what the function does:
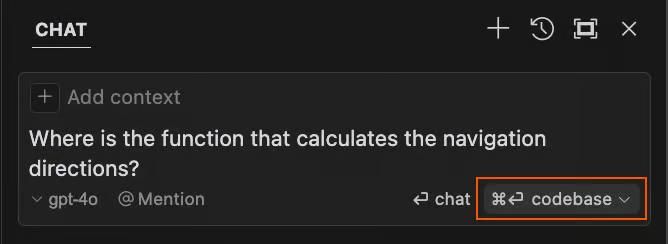
Note that we use the codebase option in this case. Although Cursor didn’t display the actual code for some reason, clicking the code box still opened the correct file and scrolled to the function I was looking for:

Image support
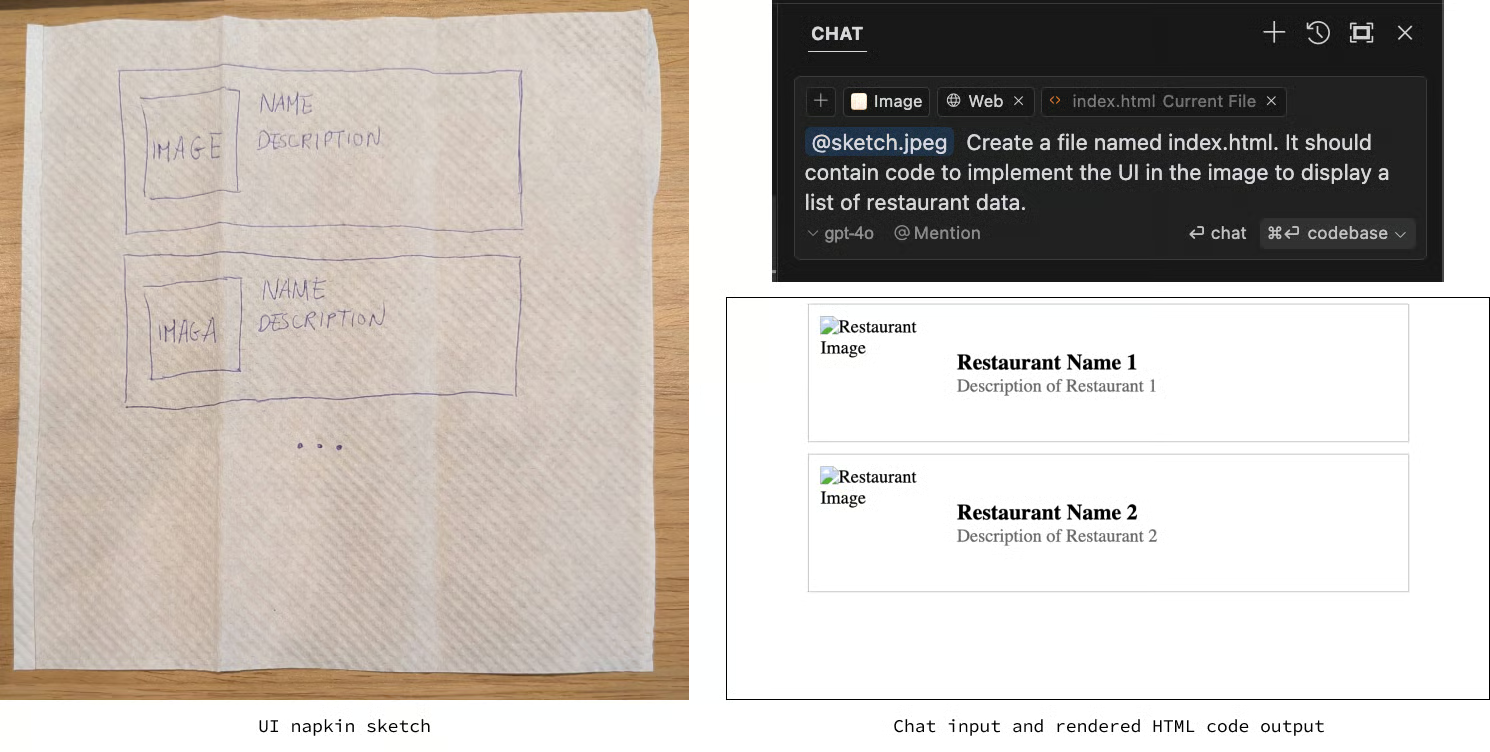
The Cursor chat also supports image inputs. For example, we could sketch a UI design for a website and ask it to generate the HTML and CSS code for it. To add an image, we can drag and drop it into the chat window.
Adding documentation
A very useful feature of Cursor AI is the ability to add documentation references. This is especially useful for lesser-known or private libraries whose documentation might not have been used in the AI training process.
To add a documentation entry, we use the @ symbol and then select Docs from the dropdown menu:
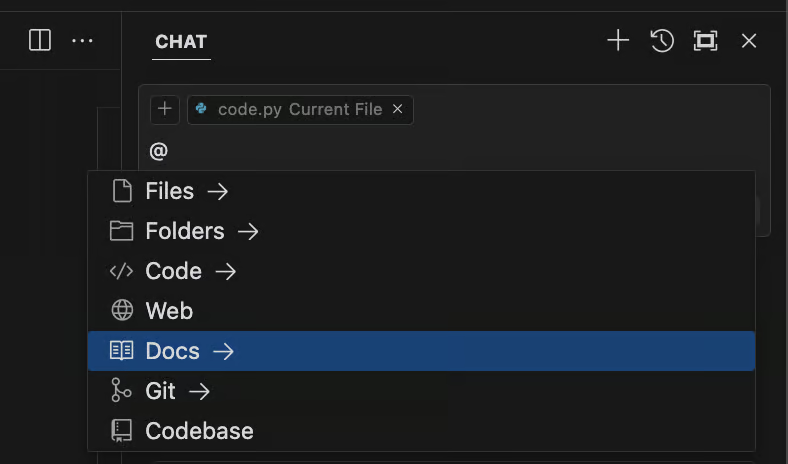
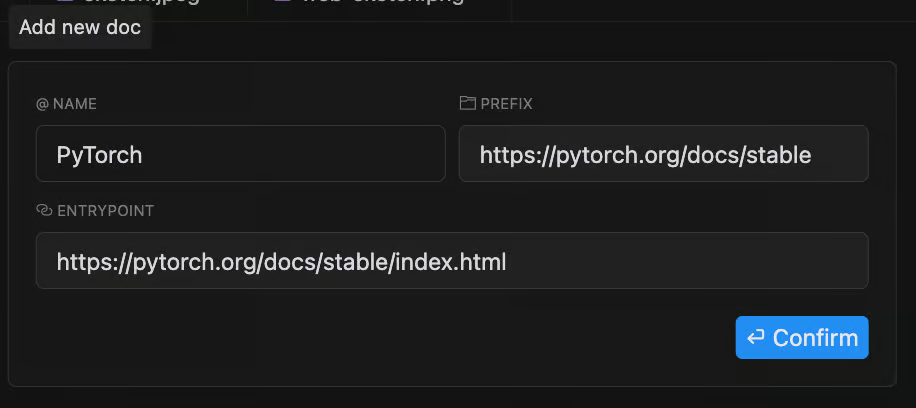
This will open a window requesting a URL for the documentation. Let’s add the PyTorch documentation as an example:

After inserting the URL, we can give the documentation entry a name. In this case, we use PyTorch. We can then use this name to refer to this documentation in the chat prompt using @PyTorch.
Documentation references can also be managed in the Features tab from the Cursor settings:

Cursor AI: Additional Features and Benefits
Language support
The examples we’ve shown in this article were in Python, HTML, and CSS. But Cursor is not built with any specific language support in mind. Because its code generation is based on general-purpose LLMs, Cursor can generate code in any programming language. It will use the file extension to guess what language should be used.
Extensions
Because Cursor is built on top of VS Code, it inherits from its rich extension ecosystem. We can access these in the View menu.
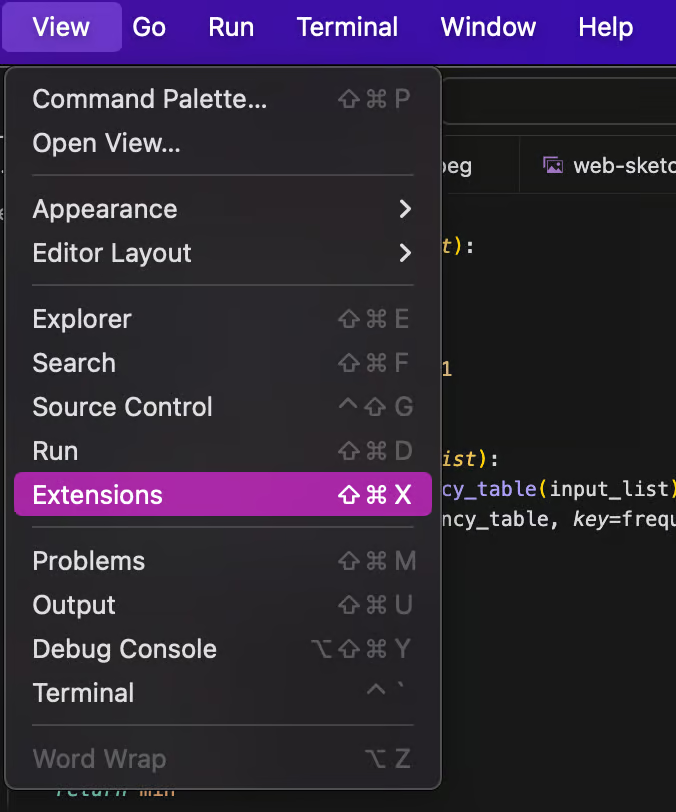
To set up Cursor to work with Python, I recommended the VSCode Python setup tutorial, as the same features should be available on both VSCode and Cursor.
Collaboration with others
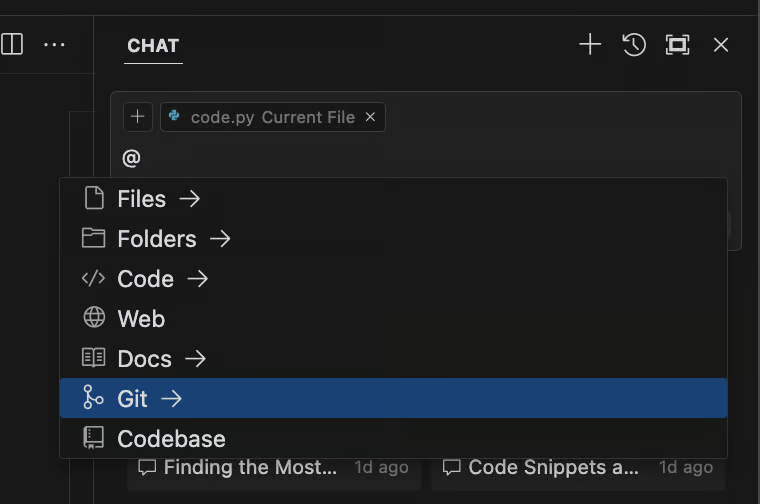
Using collaborative tools such as Git with Cursor is similar to using them with any code editor. These tools are not dependent on how the code was written. There are extensions specifically designed to assist with Git.
Remember that Cursor’s chat allows you to use Git repositories within context using the @ operator. Be mindful that this should be used with caution if the repository contains private data.
Setting custom AI rules
Cursor allows us to guide the AI using specific rules. These are accessible under the general settings menu:
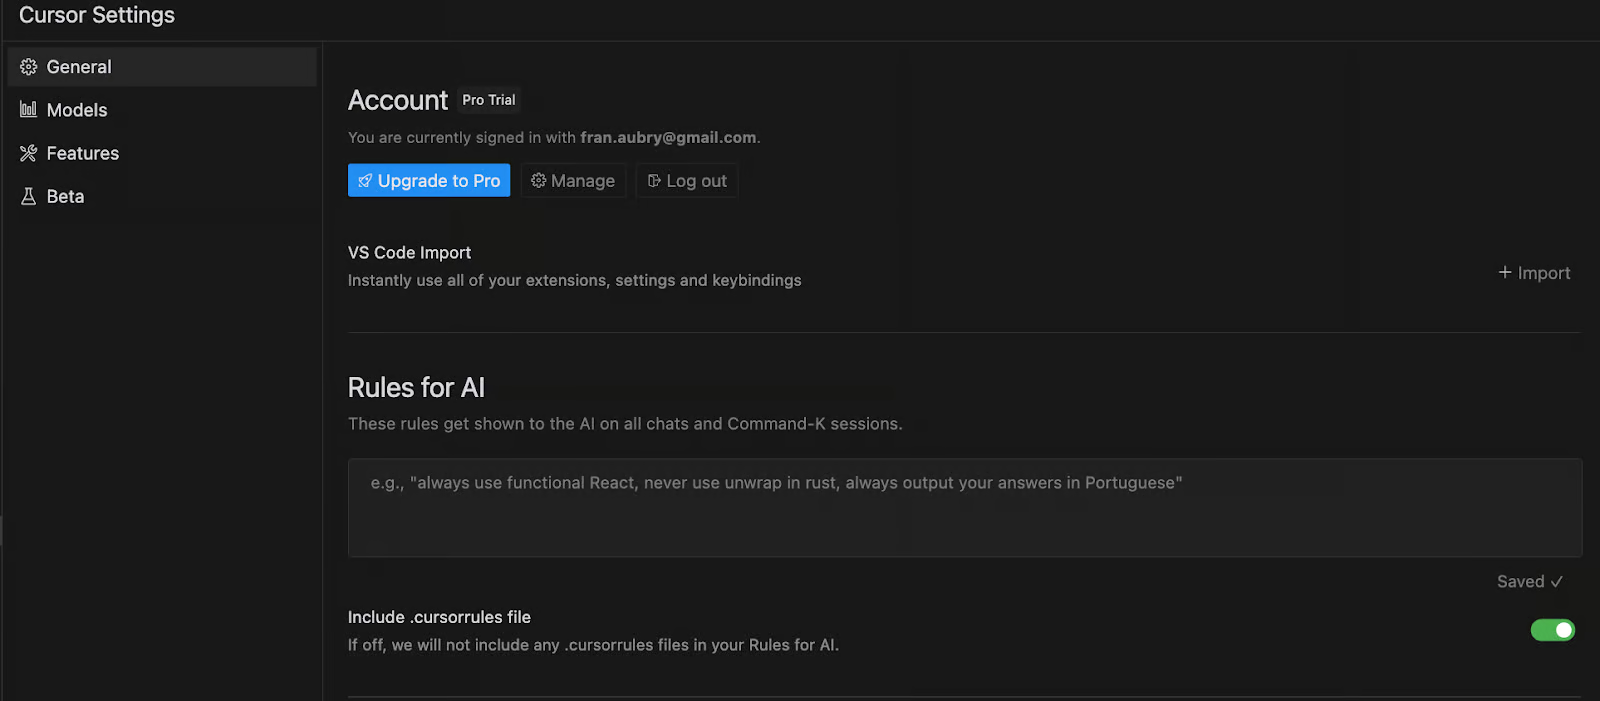
These rules can modify the AI's behavior without needing to prompt it repeatedly. For example, we can ensure the AI always uses type hints in Python by adding a rule such as "Always use type hints in Python function definitions."
Custom AI models
Another interesting feature of Cursor is the ability to add other AI models. This option can be found under the Models settings:
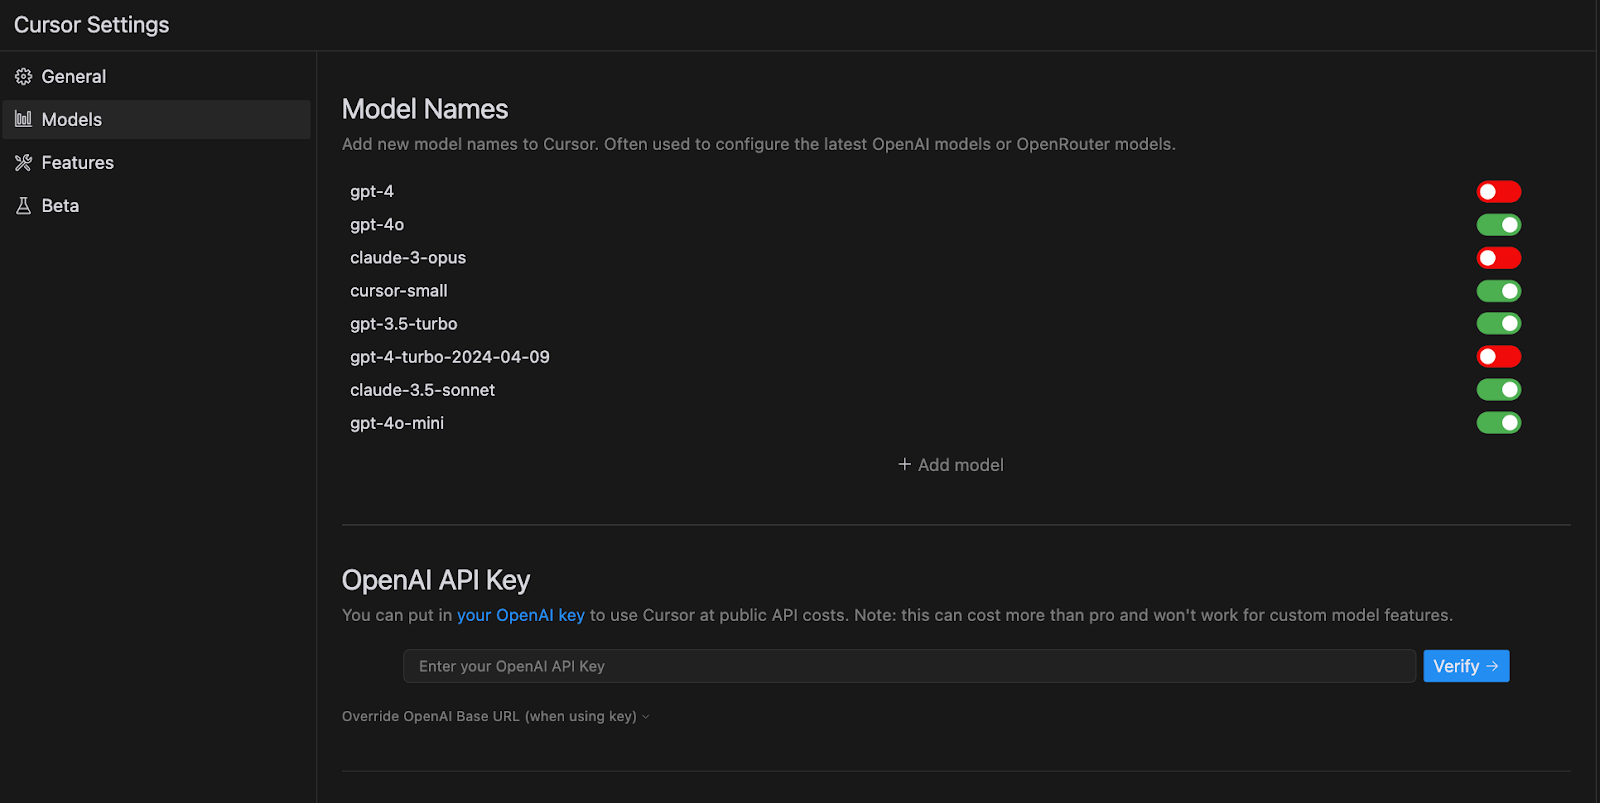
Here we can add new models. These model settings also make it possible to add our API keys if we want.
Cursor AI vs GitHub Copilot
Cursor AI and GitHub Copilot are both AI-powered code assistants, each offering unique features.
Cursor AI is built on VSCode and functions as a standalone editor. It integrates closely with the coding environment to automate tasks and provide intuitive code suggestions, which helps streamline code writing and refactoring. It is particularly suited for developers who prefer a deep integration with a familiar IDE.
GitHub Copilot, developed by GitHub and OpenAI, integrates with various popular code editors like Visual Studio Code. It provides context-aware code suggestions based on the user’s coding style and project context. GitHub Copilot excels at predicting subsequent lines of code and supports a wide range of programming languages and frameworks.
From an integration perspective, Cursor AI offers significant customization within its standalone VSCode-based environment, potentially enhancing workflow for some users. In contrast, GitHub Copilot is noted for its easy setup and integration with widely-used IDEs, which facilitates adoption for many developers.
Both tools provide real-time code suggestions and support for multiple languages and frameworks. Cursor AI may be advantageous for specialized tasks due to its deep integration, while GitHub Copilot’s extensive IDE support and straightforward setup make it accessible to a broader audience.
Ultimately, the choice between Cursor AI and GitHub Copilot may depend on factors like customization needs, integration preferences, and budget. Both tools aim to enhance coding efficiency in different ways.
Conclusion
Tools like ChatGPT have made programming much more accessible by allowing users to write code simply by explaining their goals in natural language. Cursor takes this a step further by directly integrating with the code editor, eliminating the need to switch between the editor and a chat interface.
While Cursor AI offers a comprehensive standalone solution specifically designed for deep integration within the VSCode environment, tools like GitHub Copilot provide versatility across various popular IDEs. The choice between the two ultimately relies on individual needs and preferences for customization and ease of setup.
In summary, Cursor AI is a powerful, AI-driven code editor that promises to change how developers approach coding, refactoring, and debugging.
FAQs
What is Cursor AI?
Cursor AI is an innovative AI-powered code editor designed to streamline and enhance the coding process. It uses artificial intelligence to provide advanced features like intelligent code completion, code generation, and codebase understanding.
How to open the AI in the Cursor editor?
Cursor AI's capabilities are seamlessly integrated into the editor. You can trigger AI actions using keyboard shortcuts like Ctrl+K or by interacting with specific code snippets. For instance, selecting code and pressing Ctrl+K allows you to edit or generate new code based on your prompts.
Is Cursor AI free?
Yes, Cursor offers a free version with robust AI features. They also provide a Pro plan with additional capabilities like access to more powerful AI models and extended context windows for deeper code understanding. As of the date of writing this article, GPT-4, GPT-4o, and Claude 3.5 Sonnet are all considered models.
Does Cursor use Claude?
Yes, Cursor uses Claude 3 Opus and Claude 3.5 Sonnet (premium model).
Is Cursor based on VSCode?
While Cursor shares some visual similarities with VSCode, it's built on its own independent codebase. This allows Cursor to optimize its architecture specifically for AI-powered coding features.
