

Grok 3 क्या है?
Grok 3 xAI का नवीनतम बड़ा भाषा मॉडल है, जिसे चरण-दर-चरण तर्क, तार्किक सुसंगतता, और संरचित आउटपुट के लिए विशेष रूप से बनाया गया है। सामान्य चैट मॉडलों के विपरीत जो बातचीत के प्रवाह को प्राथमिकता देते हैं, Grok 3 उत्तर देने से पहले सोचता है, जिससे यह उन कार्यों के लिए उपयुक्त बनता है जिनमें गहरी लॉजिक की ज़रूरत होती है, जैसे जटिल निर्णय-निर्धारण, गणितीय तर्क, और परिमाणात्मक विश्लेषण।
Grok 3 दो संस्करणों में आता है: रेगुलर मॉडल और एक मिनी मॉडल। जहाँ मिनी मॉडल पूरी तरह तर्क पर केंद्रित है और अपनी reasoning traces तक पहुँच की सुविधा देता है, वहीं रेगुलर मॉडल के बारे में कहा जाता है कि उसके पास वित्त, हेल्थकेयर, क़ानून और विज्ञान जैसे क्षेत्रों में महत्वपूर्ण डोमेन ज्ञान है।
दोनों मॉडल संस्करण नैटिव फंक्शन कॉलिंग और संरचित प्रतिक्रिया जनरेशन जैसी उन्नत क्षमताओं का समर्थन करते हैं, जिससे डेवलपर्स विश्वसनीय और पूर्वानुमेय AI वर्कफ़्लो आसानी से बना सकते हैं।
यदि आप Grok 3 की आर्किटेक्चर और प्रदर्शन के बारे में और जानना चाहते हैं, तो इस Grok 3 के इस ओवरव्यू पर नज़र डालें।
तैयारी: Grok 3 API की एक्सेस प्राप्त करना
इस खंड में, मैं बताऊंगा कि API कुंजी कैसे बनाएं, Grok API से कनेक्ट करने के लिए Python एनवायरनमेंट कैसे सेटअप करें, और अपनी पहली उपयोगकर्ता रिक्वेस्ट कैसे भेजें।
API कुंजी बनाना
Python क्लाइंट को API के साथ प्रमाणित करने के लिए, हमें एक API कुंजी बनानी होगी। प्रक्रिया इस प्रकार है:
- इस xAI डॉक्युमेंटेशन पेज पर जाएँ।
- अपने X, xAI, या Google खाते से साइन इन करें—या एक xAI खाता बनाएँ।
- “Create an API key” पर क्लिक करें, उसे एक नाम दें, और “save” पर क्लिक करें।
- जब कुंजी दिखाई दे, तो उसे कॉपी कर लें। आप इसे बाद में फिर नहीं देख पाएँगे, लेकिन खो जाने पर आप हमेशा नई बना सकते हैं।
- अपने प्रोजेक्ट डायरेक्टरी में
.envनाम की फ़ाइल बनाएँ और कुंजी को निम्न प्रारूप में पेस्ट करें:
XAI_API_KEY=<your_api_key>Grok 3 API की कीमत
हालाँकि API का उपयोग अक्सर प्रीमियम सब्सक्रिप्शन की तुलना में कम लागत से जुड़ा होता है, यह मुफ़्त नहीं है। स्थिर मासिक खाते के बजाय, जो SuperGrok सब्सक्रिप्शन के लिए $30 से शुरू होता है, लागत पूरी तरह उपयोग की मात्रा पर निर्भर करती है। संभावित लागतों का ओवरव्यू पाने के लिए xAI के प्राइसिंग पेज पर जाएँ।
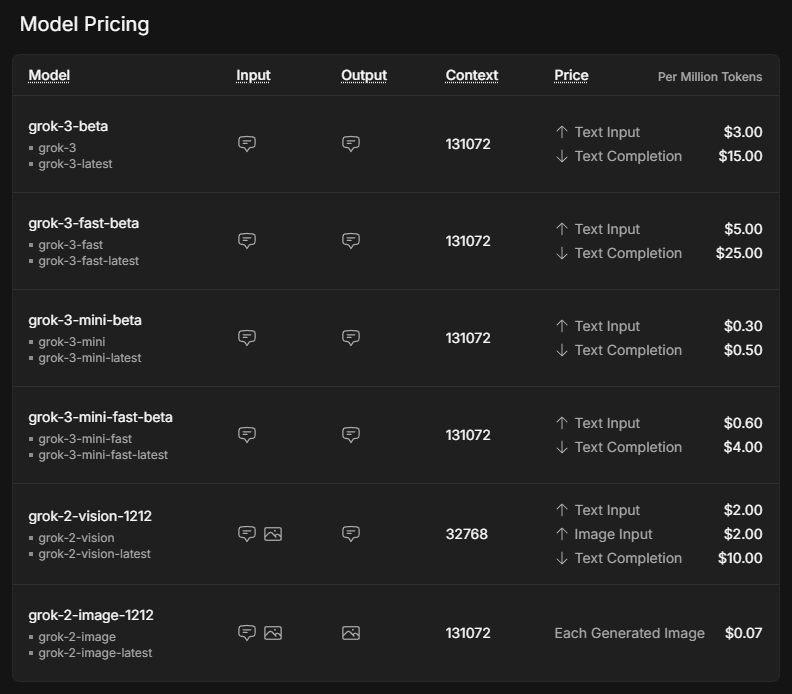
सूचीबद्ध कीमतें प्रति मिलियन टोकन हैं, जो एक अनुमानित नियम के अनुसार अंग्रेज़ी में लगभग 750,000 शब्दों के इनपुट या आउटपुट के बराबर है।
मिनी मॉडल रेगुलर मॉडल की तुलना में काफी सस्ता है। Grok 3 और Grok 3 mini दोनों के फास्ट संस्करण समान अंतर्निहित मॉडलों का उपयोग करते हैं, लेकिन इन्हें तेज़ इन्फ्रास्ट्रक्चर पर सर्व किया जाता है, जिससे प्रतिक्रिया समय बेहतर होता है।
API का उपयोग करने के लिए, हमें क्रेडिट खरीदने होंगे। शुरुआत में ऑटोमैटिक इनवॉइस बिलिंग के बजाय प्रीपेड क्रेडिट का उपयोग करने की सिफारिश की जाती है, क्योंकि यह अप्रत्याशित लागतों के खिलाफ एक अच्छा सुरक्षा उपाय है। आप xAI कंसोल में Invoices > Credits के अंतर्गत टोकन खरीद सकते हैं और अपने उपयोग का ओवरव्यू देख सकते हैं।
Python एनवायरनमेंट सेटअप करना
अब जब हमने API कुंजी प्राप्त कर ली है और क्रेडिट खरीद लिए हैं, तो Python क्लाइंट सेटअप करने का समय है। हमें अपनी API रिक्वेस्ट को सफलतापूर्वक चलाने के लिए दो निर्भरताएँ इंस्टॉल करनी होंगी:
python-dotenvताकि.envफ़ाइल से API कुंजी को एनवायरनमेंट वेरिएबल के रूप में लोड किया जा सके, औरopenaiक्लाइंट, जो Grok 3 को रिक्वेस्ट भेजने के लिए इंटरफ़ेस का काम करता है।
अपने प्रोजेक्ट के लिए एनवायरनमेंट सेटअप करने हेतु, मैं संभावित पैकेज संघर्षों से बचने के लिए Anaconda उपयोग करने की सलाह देता/देती हूँ। Anaconda इंस्टॉल करने के बाद, हम Python 3.10 का उपयोग करते हुए grok3 नाम का एनवायरनमेंट बनाते हैं और टर्मिनल में निम्न कमांड्स से उसे सक्रिय करते हैं:
conda create -n grok3 python=3.10
conda activate grok3अंत में, निर्भरताएँ इंस्टॉल की जाती हैं:
pip install python-dotenv openaiपहली उपयोगकर्ता रिक्वेस्ट भेजना
अब हमारे पहले स्क्रिप्ट से शुरुआत करने का समय है! सबसे पहले, हमें पहले से इंस्टॉल किए गए पैकेजों से उपयोग होने वाले फ़ंक्शन इम्पोर्ट करने हैं, साथ ही API कुंजी पढ़ने के लिए os भी।
import os
from dotenv import load_dotenv
from openai import OpenAIAPI कुंजी से संबंधित एनवायरनमेंट वेरिएबल को dotenv पैकेज से इम्पोर्ट किए गए load_dotenv() फ़ंक्शन को चलाकर उपलब्ध कराया जाता है।
# Load environment variables
load_dotenv()अगला कदम क्लाइंट को इनिशियलाइज़ करना है। हम .env फ़ाइल से अपनी API कुंजी और Grok सर्वर का URL देकर OpenAI फ़ंक्शन कॉल करते हैं, और इसे client वेरिएबल में असाइन करते हैं।
client = OpenAI(
api_key=os.getenv("XAI_API_KEY"),
base_url="https://api.x.ai/v1",
)मान लीजिए हम Grok से पूछते हैं कि अगर सैन फ्रांसिस्को में बारिश हो रही हो तो क्या किया जाए। हमें model और अपनी messages निर्दिष्ट करनी हैं, और उन्हें client.chat.completions.create फ़ंक्शन को आर्ग्युमेंट्स के रूप में पास करना है। वैकल्पिक रूप से, हम max_tokens जैसे पैरामीटर समायोजित कर सकते हैं ताकि प्रतिक्रिया की लंबाई नियंत्रित हो, या temperature से रैंडमनेस को प्रभावित कर सकते हैं।
# Send a basic reasoning query
response = client.chat.completions.create(
model="grok-3",
messages=[
{"role": "user", "content": "What kind of activity would you suggest, if it rains in San Francisco? Answer in one sentence."}
],
max_tokens=1000,
temperature=0.2, # lower temperature for more deterministic answers
)Grok का उत्तर प्रिंट करने के लिए, हमें उसे प्राप्त ऑब्जेक्ट से निकालना होगा। चूँकि हमने परिणाम स्टोर करने वाले वेरिएबल को response कहा है, तो उत्तर response.choices[0].message.content में मिलेगा।
print(response.choices[0].message.content) # Print the responseIf it rains in San Francisco, I suggest visiting indoor attractions like the San Francisco Museum of Modern Art or the California Academy of Sciences for an enriching and dry experience.Grok 3 Mini के साथ तर्क करना
Grok की तर्क शैली देखने के लिए, चलिए एक बुनियादी प्रश्न पूछते हैं जिसमें कुछ लॉजिकल रीजनिंग की ज़रूरत है। हम इस पहली रिक्वेस्ट के लिए Grok 3 Mini का उपयोग करेंगे क्योंकि यह हर API प्रतिक्रिया में पूर्ण reasoning trace प्रदान करता है, जिससे मॉडल की सोच की प्रक्रिया को विशेष प्रॉम्प्ट इंजीनियरिंग पर निर्भर हुए बिना चरण-दर-चरण फॉलो करना आसान हो जाता है।
वह पैरामीटर जो निर्धारित करता है कि मॉडल कितनी गहराई से सोचेगा, उसे reasoning_effort कहते हैं। यह केवल Grok 3 Mini में होता है और डिफ़ॉल्ट रूप से तेज़ विकल्प ”low” पर सेट होता है। reasoning_effort="high" सेट करने से मॉडल अंतिम उत्तर देने से पहले समस्या को सावधानीपूर्वक चरण-दर-चरण सुलझाता है—योजना-निर्माण, निर्णय-निर्धारण या गणितीय तर्क जैसे कार्यों के लिए उपयुक्त।
कल्पना कीजिए कि हम Grok का उपयोग यह तय करने के लिए करना चाहते हैं कि छुट्टी के दिन मौसम के अनुसार क्या किया जाए। हम Grok को धूप और बारिश वाले दिनों के लिए गतिविधि तय करने वाले प्रीमाइसेस दे सकते हैं, और वास्तविक मौसम पर आधारित एक प्रीमाइस भी।
response = client.chat.completions.create(
model="grok-3-mini-beta",
reasoning_effort="high",
messages=[
{"role": "user", "content": (
"Premises:\n"
"- If it is raining, the weather is suitable for indoor activities.\n"
"- Visiting a museum is an indoor activity.\n"
"- Today, it is raining.\n"
"Question: What should we do today?"
)}
],
max_tokens=1000,
temperature=0.2,
)reasoning trace के साथ काम करने के लिए, हमें पहले API प्रतिक्रिया को पार्स करना होगा और message ऑब्जेक्ट से reasoning_content एट्रिब्यूट निकालना होगा। नीचे दिया कोड दिखाता है कि कैसे वेब इंटरफेस की तरह ही विस्तृत तर्क स्टेप्स और अंतिम उत्तर प्रिंट करें।
# Print the reasoning trace if available
reasoning = getattr(response.choices[0].message, "reasoning_content", None)
if reasoning:
print("Reasoning steps:\n")
print(reasoning)
else:
print("No detailed reasoning trace found.")
# Print the final answer
print("\nFinal Answer:\n")
print(response.choices[0].message.content)परिणाम कुछ इस तरह दिखता है:
Reasoning steps:
First, the premises are:
1. If it is raining, the weather is suitable for indoor activities.
2. Visiting a museum is an indoor activity.
3. Today, it is raining.
The question is: What should we do today?
I need to reason step by step based on the given premises.
From premise 3, today it is raining.
From premise 1, if it is raining, then the weather is suitable for indoor activities. Since it's raining today, the weather is suitable for indoor activities today.
From premise 2, visiting a museum is an indoor activity. So, if the weather is suitable for indoor activities, and visiting a museum is an indoor activity, it makes sense that visiting a museum would be a good choice today.
The conclusion should be that we should visit a museum or engage in some indoor activity. But the question is "What should we do today?" and the premises point towards indoor activities, with a specific example given.
Let me chain the logic:
- It is raining (premise 3).
- Therefore, weather is suitable for indoor activities (from premise 1).
- Visiting a museum is an indoor activity (premise 2).
- So, since the weather is suitable for indoor activities, and museum visiting is an indoor activity, it should be suitable to visit a museum.
The premises don't explicitly say that we should do the most suitable activity or anything like that. They just provide conditions and facts.
However, the question implies a recommendation based on the premises. Given that it's raining and indoor activities are suitable, and a museum is mentioned, it's logical to suggest visiting a museum.
I should stick to what's given. The premises don't suggest any other activities or constraints, so based on the information, visiting a museum is a reasonable suggestion.
Final answer should be something like: "We should visit a museum today."
To make it clear, I can phrase it as: "Since it is raining and the weather is suitable for indoor activities, and visiting a museum is an indoor activity, we should visit a museum today."
But since the instruction is to put the final answer in a box, probably a concise statement.
Looking back at the user's message, it's a reasoning exercise, so the answer should be direct.
Final Answer:
Based on the given premises:
- It is raining today (premise 3).
- If it is raining, the weather is suitable for indoor activities (premise 1).
- Therefore, the weather is suitable for indoor activities today.
- Visiting a museum is an indoor activity (premise 2).
A suitable activity for today would be an indoor one, such as visiting a museum.
**Recommendation:** We should visit a museum today.भले ही यह एक काफी सरल उदाहरण है, हम देख सकते हैं कि grok-3-mini प्रत्येक प्रीमाइस से सावधानीपूर्वक गुज़रता है, लॉजिक को चरण-दर-चरण जोड़ता है और फिर सिफारिश पर पहुँचता है। इसका तर्क पद्धतिगत और पारदर्शी है, जिससे यह ट्रेस करना आसान हो जाता है कि मॉडल तथ्यों से अंतिम सुझाव तक कैसे पहुँचा।
Grok 3 के साथ फंक्शन कॉलिंग
Grok 3 की दिलचस्प विशेषताओं में से एक फंक्शन कॉलिंग है, जो इसे बाहरी टूल्स और सिस्टम्स से जोड़ने में सक्षम बनाती है। इससे मॉडल केवल टेक्स्ट जनरेट करने तक सीमित नहीं रहता, बल्कि मौसम का पूर्वानुमान प्राप्त करना, इवेंट शेड्यूल देखना, डेटाबेस एंट्रीज़ का विश्लेषण करना, या स्मार्ट डिवाइस कंट्रोल करना जैसी कार्रवाइयाँ भी ट्रिगर कर सकता है।
जब हम कोई उपयोगकर्ता रिक्वेस्ट भेजते हैं, तो Grok 3 पहचान सकता है कि उसे अतिरिक्त जानकारी की ज़रूरत है और विशेष आर्ग्युमेंट्स के साथ फंक्शन कॉल का अनुरोध कर सकता है। Python क्लाइंट तब लोकली उस फंक्शन को चलाता है, परिणाम वापस Grok 3 को भेजता है, और अंतिम, पूर्ण रूप से तर्कसंगत प्रतिक्रिया प्राप्त करता है।
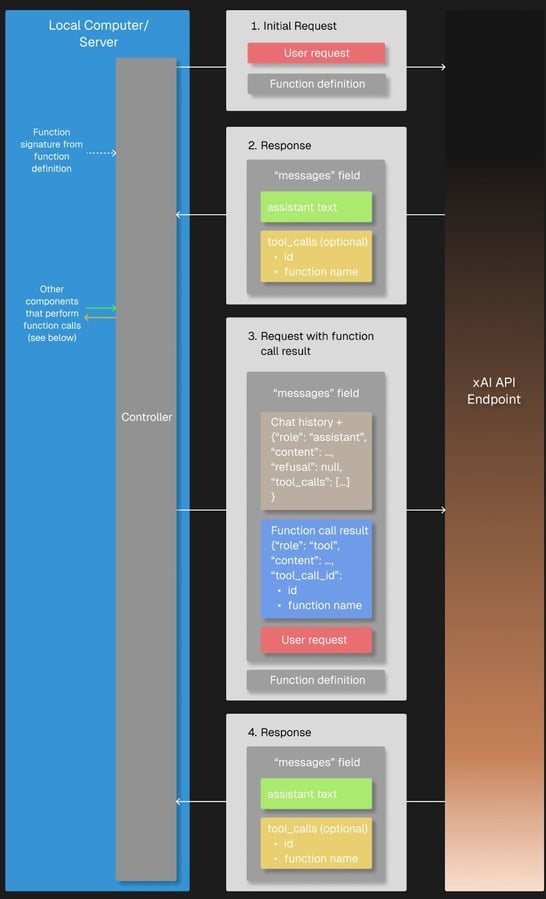
स्रोत: xAI
तैयारी
हमें Grok द्वारा कॉल किए गए फंक्शन के आर्ग्युमेंट स्ट्रक्चर तक पहुँचने के लिए json पैकेज की ज़रूरत पड़ेगी, इसलिए हमें इसे इम्पोर्ट करना होगा।
import jsonफंक्शन कॉलिंग आज़माने के लिए, हमें एक कॉलबैक फंक्शन परिभाषित करना होगा जिसे Grok अपनी प्रतिक्रिया में अनुरोध करने पर कॉल करेगा। हमारे मामले में, get_weather_forecast एक साधारण Python फ़ंक्शन है जो हार्ड-कोडेड मौसम पूर्वानुमान लौटाता है। डेमो को सरल रखने और बाहरी सेवाओं पर निर्भर न रहने के लिए मैंने इसे हार्ड-कोड किया है।
# Define the dummy function
def get_weather_forecast(location: str, date: str) -> dict:
"""Simulated function to always return rainy weather."""
return {
"location": location,
"date": “this weekend”, # hardcoded for demo purposes
"forecast": "rainy" # hardcoded for demo purposes
}हमें उपलब्ध टूल को भी परिभाषित करना होगा—उसका नाम, उद्देश्य, और आवश्यक पैरामीटर्स JSON स्कीमा में निर्दिष्ट कर—जिसे बाद में हमारी रिक्वेस्ट के साथ Grok को भेजा जाएगा। यह सेटअप Grok 3 को बताता है कि जब भी उसे अपने तर्क के लिए मौसम की जानकारी चाहिए, वह इस टूल को कॉल कर सकता है।
tools = [
{
"type": "function",
"function": {
"name": "get_weather_forecast",
"description": "Get a simulated weather forecast for a given location and date.",
"parameters": {
"type": "object",
"properties": {
"location": {
"type": "string",
"description": "The city where the activity will take place."
},
"date": {
"type": "string",
"description": "The date for which the weather is needed, in YYYY-MM-DD format."
}
},
"required": ["location", "date"]
}
}
}
]अंत में, tools_map dictionary Grok 3 द्वारा उपयोग किए गए फंक्शन नामों को वास्तविक लोकल Python फंक्शंस से लिंक करता है, जिससे क्लाइंट अनुरोधित टूल कॉल्स को सही ढंग से निष्पादित कर सके।
# Link the function names to the functions
tools_map = {
"get_weather_forecast": get_weather_forecast
}हालाँकि सरल प्रोजेक्ट्स के लिए टूल स्कीमा को मैन्युअल रूप से परिभाषित करना बिलकुल ठीक है, लेकिन जैसे-जैसे प्रोजेक्ट्स आकार और जटिलता में बढ़ते हैं, Pydantic जैसे डेटा वैलिडेशन मॉड्यूल का उपयोग अत्यधिक मूल्यवान हो जाता है। यह फंक्शन इनपुट्स के स्वत: वैलिडेशन, बेहतर एरर हैंडलिंग, और अधिक स्वच्छ, मेंटेन करने योग्य कोड की अनुमति देता है।
निष्पादन
देखते हैं कि जब हम इस वीकेंड सैन फ्रांसिस्को में सुझाई जाने वाली गतिविधि पूछते हैं तो क्या Grok हमारे मौसम पूर्वानुमान फंक्शन का उपयोग करता है। हम फंक्शन कॉलिंग वर्कफ़्लो की संरचना का पालन करते हैं:
- सबसे पहले, हम अपना प्रारंभिक उपयोगकर्ता प्रश्न Grok को उपलब्ध
toolsके साथ भेजते हैं। - हम Grok के उत्तर में किसी टूल कॉल अनुरोध की जाँच करते हैं, और यदि लागू हो, तो
tools_mapका उपयोग करके मिलते-जुलते लोकल फंक्शन को कॉल करते हैं। यदि Grok टूल कॉल का अनुरोध नहीं करता, तो हम मॉडल का प्रारंभिक उत्तर ही लौटा सकते हैं। - इसके बाद, हम परिणाम को मैसेज हिस्ट्री में जोड़ते हैं; और
- इसे वापस Grok को भेजते हैं ताकि तर्क पूरा हो और अंतिम उत्तर जेनरेट हो।
# Step 1: Send the initial user request
messages = [
{"role": "user", "content": "What should I do this weekend in San Francisco?"}
]
response = client.chat.completions.create(
model="grok-3",
messages=messages,
tools=tools,
tool_choice="auto",
)
# Step 2: Check if a tool call was requested
tool_calls = getattr(response.choices[0].message, "tool_calls", [])
if tool_calls:
for tool_call in tool_calls:
function_name = tool_call.function.name
function_args = json.loads(tool_call.function.arguments)
# Find and call the matching local function
if function_name in tools_map:
function_result = tools_map[function_name](**function_args)
# Step 3: Add the function result back to the message history
messages.append(response.choices[0].message) # Grok's tool call message
messages.append({
"role": "tool",
"tool_call_id": tool_call.id,
"content": json.dumps(function_result)
})
# Step 4: Send a new request including the tool response
final_response = client.chat.completions.create(
model="grok-3",
messages=messages,
tools=tools,
tool_choice="auto"
)
# Print the final answer
print("\nFinal Answer:")
print(final_response.choices[0].message.content)
else:
# No tool call: respond directly
print("\nNo tool call was requested. Final Answer:")
print(response.choices[0].message.content)जैसा कि Grok के उत्तर से पता चलता है, फंक्शन को सफलतापूर्वक अनुरोध किया गया और निष्पादित किया गया:
Thanks for the weather update. Since it's going to be rainy this weekend in San Francisco, I’ll suggest some indoor activities to keep you entertained and dry. Here are a few ideas for your weekend: (...)आपने प्रारंभिक उपयोगकर्ता रिक्वेस्ट में tool_choice आर्ग्युमेंट पर ध्यान दिया होगा, जो फंक्शन कॉलिंग मोड से संबंधित है। डिफ़ॉल्ट रूप से, "auto" मोड Grok 3 को बातचीत के आधार पर यह तय करने देता है कि किस फंक्शन को कॉल करना है और करना भी है या नहीं। वैकल्पिक रूप से, हम ”required” के साथ फंक्शन कॉल को बाध्य कर सकते हैं, कॉल किए जाने वाले सटीक फंक्शन को निर्दिष्ट कर सकते हैं, या ”none” के साथ फंक्शन कॉलिंग को पूरी तरह अक्षम कर सकते हैं।
Grok 3 के साथ संरचित आउटपुट
स्ट्रक्चर्ड आउटपुट Grok 3 को फ्री-फॉर्म टेक्स्ट के बजाय JSON जैसे सख्त, पूर्व-परिभाषित फ़ॉर्मेट में उत्तर लौटाने की अनुमति देता है। इससे मॉडल प्रतिक्रियाओं को स्वचालित रूप से पार्स, वैलिडेट और एप्लिकेशनों या वर्कफ़्लोज़ में एकीकृत करना काफ़ी आसान हो जाता है।
पहले से स्कीमा परिभाषित करके, हम सुनिश्चित कर सकते हैं कि Grok के आउटपुट सुसंगत, मशीन-पठनीय हों और डाउनस्ट्रीम प्रोसेसिंग के लिए तैयार हों। इसलिए, यह ऐसे उपयोग मामलों के लिए बहुत उपयोगी फ़ीचर है जैसे दस्तावेज़ों से संरचित डेटा निकालना या AI-जनित इनसाइट्स को डेटाबेस, डैशबोर्ड, या ऑटोमेशन पाइपलाइन्स जैसे डाउनस्ट्रीम सिस्टम्स में फीड करना—वह भी नाज़ुक टेक्स्ट पार्सिंग पर निर्भर हुए बिना।
हम आउटपुट स्कीमा परिभाषित करने के लिए Pydantic का उपयोग करते हैं क्योंकि यह जटिल डेटा को संरचित करने का एक साफ़ और अधिक पठनीय तरीका प्रदान करता है। इस स्कीमा डेफ़िनिशन को सही ढंग से काम कराने के लिए pydantic से BaseModel और Field दोनों को इम्पोर्ट करना पड़ता है। चूँकि हमारे आउटपुट में reasoning steps की एक सूची शामिल है, हम तत्व प्रकार को और सटीक रूप से निर्दिष्ट करने के लिए Python के typing मॉड्यूल से List भी इम्पोर्ट करते हैं।
हालाँकि साधारण JSON से भी स्कीमा परिभाषित करना संभव है, परीक्षण में मैंने पाया कि Grok 3 कभी-कभी ऐसा आउटपुट लौटाता था जो अपेक्षित संरचना से पूरी तरह मेल नहीं खाता था। लौटाया गया JSON आशय में समान था, लेकिन एक अलग स्कीमा का पालन करता था, जो उस स्थिति में एप्लिकेशनों को तोड़ सकता है जहाँ एक विशेष संरचना की अपेक्षा होती है। इस असंगति के कारण—खासकर सूचियों जैसे nested तत्वों के साथ—मैं संरचित आउटपुट के विश्वसनीय वैलिडेशन और पार्सिंग के लिए Pydantic उपयोग करने की कड़ी सिफारिश करता/करती हूँ।
from pydantic import BaseModel, Field
from typing import Listहमारा स्कीमा, DecisionPlan, हमारे प्रारंभिक situation और DecisionSteps की एक सूची से बना है, जिन्हें उनके step नंबर, उनके पीछे का reasoning, और सुझाए गए action द्वारा परिभाषित किया जाता है।
# Define the schema for the structured output
class DecisionStep(BaseModel):
step: int = Field(description="Step number in the decision process")
reasoning: str = Field(description="Reasoning behind this step")
action: str = Field(description="Suggested action at this step")
class DecisionPlan(BaseModel):
situation: str = Field(description="The initial situation to consider")
steps: List[DecisionStep] = Field(description="List of reasoning steps leading to the final action")रिक्वेस्ट के संदर्भ में कुछ बातों पर विचार करना ज़रूरी है। सबसे पहले, हमें create() के बजाय client.beta.chat.completions.parse() का उपयोग करना होगा, ताकि Grok समझे कि हम आउटपुट को एक विशिष्ट फ़ॉर्मेट में चाहते हैं। यह वही स्कीमा है जिसे हमने अभी परिभाषित किया है, और तदनुसार हम अपने DecisionPlan को response_format आर्ग्युमेंट के रूप में पास करते हैं।
किसी विशिष्ट कार्य के लिए सभी महत्वपूर्ण निर्देशों को सिस्टम प्रॉम्प्ट में शामिल करना उपयोगी हो सकता है, क्योंकि यह पूरी बातचीत के दौरान Grok 3 को कार्य पर केंद्रित रहने में मदद करता है। अलग से परिभाषित स्कीमा के संयोजन में, उपयोगकर्ता प्रॉम्प्ट को आउटपुट JSON में आवश्यक फ़ील्ड निर्दिष्ट नहीं करने पड़ते और वह केवल कार्य पर ध्यान केंद्रित कर सकता है।
उदाहरण के लिए, हम गतिविधि योजना प्रक्रिया को आसानी से तीन स्पष्ट रूप से परिभाषित स्टेप्स में बाँट सकते हैं:
# Send a prompt and request structured output
completion = client.beta.chat.completions.parse(
model="grok-3",
messages=[
{"role": "system", "content": (
"You are an expert travel planner."
"When asked about activities, always break down the decision process into exactly 3 logical reasoning steps."
"Return the output in structured JSON format following the provided schema, without any extra text."
)},
{"role": "user", "content": (
"It's raining today in San Francisco. What indoor activity would you recommend?"
)}
],
response_format=DecisionPlan,
)Grok 3 के संरचित आउटपुट को पार्स करने के बाद, हम प्रमुख सिफारिशों का सारांश बनाकर, स्वचालित वर्कफ़्लो ट्रिगर करके, या प्रोग्रामेटिक रूप से आगे के निर्णय लेकर, परिणामों पर कार्रवाई कर सकते हैं।
पहले उदाहरण के साथ आगे बढ़ते हैं और अपने ट्रैवल एक्सपर्ट Grok की हमारी स्थिति और अंतिम सिफारिश ही प्रदर्शित करते हैं। चूँकि हमारा आउटपुट पूर्व-परिभाषित JSON फ़ॉर्मेट में है, हम अंतिम स्टेप की सिफारिश को आसानी से एक्सेस कर सकते हैं:
# Access the parsed result
plan = completion.choices[0].message.parsed
# Use the final action to create a summary message
final_step = plan.steps[-1]
print(f"\nSummary:")
print(f"Situation: {plan.situation}")
print(f"Recommended Action: {final_step.action}")Summary:
Situation: It's raining today in San Francisco, and an indoor activity is needed to make the most of the day.
Recommended Action: Visiting the California Academy of Sciences in Golden Gate Park for an educational and entertaining indoor experience.सब कुछ एक साथ: Grok 3 के साथ एक सरल तर्क-आधारित ऐप बनाना
हम फंक्शन कॉलिंग और संरचित आउटपुट को मिलाकर एक सरल ऐप बना सकते हैं जो Grok के तर्क का उपयोग करता है। हम निम्न का कोड कॉपी-पेस्ट कर सकते हैं:
- पहले बताए गए सभी पैकेज और फ़ंक्शंस इम्पोर्ट करना;
- क्लाइंट इनिशियलाइज़ करना;
- फंक्शन स्कीमा, डमी फंक्शन और
tools_mapपरिभाषित करना; और - आउटपुट स्कीमा परिभाषित करना।
हम create() फ़ंक्शन का उपयोग करके API कॉल से शुरुआत करते हैं ताकि टूल कॉल ट्रिगर हो। उपयोगकर्ता को टर्मिनल में प्रश्न दर्ज करने देने के लिए, हम सैन फ्रांसिस्को की गतिविधि वाले अपने प्रश्न को input("> ") से बदल देते हैं।
function_result को messages सूची में जोड़ने के बाद ट्विस्ट आता है: create() का उपयोग करने वाली एक और API कॉल बनाने के बजाय, हम parse() करते हैं और अपने DecisionPlan को response_format के रूप में पास करते हैं।
यह रहा हमारे छोटे ऐप का पूरा कोड:
import os
import json
from dotenv import load_dotenv
from openai import OpenAI
from pydantic import BaseModel, Field
from typing import List
# Load environment variables
load_dotenv()
# Initialize the client
client = OpenAI(
api_key=os.getenv("XAI_API_KEY"),
base_url="https://api.x.ai/v1",
)
# 1. Define the function schema (tool definition)
tools = [
{
"type": "function",
"function": {
"name": "get_weather_forecast",
"description": "Get a simulated weather forecast for a given location and date.",
"parameters": {
"type": "object",
"properties": {
"location": {
"type": "string",
"description": "The city where the activity will take place."
},
"date": {
"type": "string",
"description": "The date for which the weather is needed, in YYYY-MM-DD format."
}
},
"required": ["location", "date"]
}
}
}
]
# 2. Dummy weather function (hardcoded)
def get_weather_forecast(location: str, date: str) -> dict:
return {
"location": location,
"date": "this weekend",
"forecast": "rainy"
}
# 3. Tool mapping
tools_map = {
"get_weather_forecast": get_weather_forecast
}
# 4. Define structured output schema using Pydantic
class DecisionStep(BaseModel):
step: int = Field(description="Step number in the decision process")
reasoning: str = Field(description="Reasoning behind this step")
action: str = Field(description="Suggested action at this step")
class DecisionPlan(BaseModel):
situation: str = Field(description="The initial situation to consider")
steps: List[DecisionStep] = Field(description="List of reasoning steps leading to the final action")
# 5. Defining messages: system prompt and input
messages = [
{"role": "system", "content": (
"You are an expert travel planner. When asked about weekend plans, "
"first get the weather forecast via the tool provided. Then, based on the result, "
"break down your reasoning into exactly 3 steps and return structured JSON only."
)},
{"role": "user", "content": input("> ")} # enter the question in the terminal
]
# 6. First API call to trigger the tool call
response = client.chat.completions.create(
model="grok-3",
messages=messages,
tools=tools,
tool_choice="auto",
)
tool_calls = getattr(response.choices[0].message, "tool_calls", [])
if tool_calls:
for tool_call in tool_calls:
function_name = tool_call.function.name
function_args = json.loads(tool_call.function.arguments)
if function_name in tools_map:
function_result = tools_map[function_name](**function_args)
# Add the assistant's tool call message and the tool result to the message history
messages.append(response.choices[0].message)
messages.append({
"role": "tool",
"tool_call_id": tool_call.id,
"content": json.dumps(function_result)
})
# 7. Second API call with parse() to get structured output
final_response = client.beta.chat.completions.parse(
model="grok-3",
messages=messages,
response_format=DecisionPlan
)
plan = final_response.choices[0].message.parsed
# 8. Use the output
final_action = plan.steps[-1].action
print(f"\nSummary:")
print(f"Situation: {plan.situation}")
print(f"Recommended Action: {final_action}")
else:
print("No tool call was requested.")निष्पादन उदाहरण
ऐप आज़माने के लिए, हम अपनी प्रोजेक्ट डायरेक्टरी में जाते हैं, अपना एनवायरनमेंट लोड करते हैं और स्क्रिप्ट चलाते हैं:
cd <your/working/directory>
conda activate grok3
python app.pyयदि हम हेलसिंकी के लिए कुछ सलाह पूछें, तो हमारा Grok ऐप यह उत्तर देता है:

अनुभव से कह सकता/सकती हूँ—यह एक बढ़िया सुझाव है!
निष्कर्ष
हमने बहुत कुछ कवर किया—अब समेटते हैं। हमने देखा कि कैसे Grok 3 API के साथ सरल क्वेरीज़ चलाई जाएँ, reasoning traces को हैंडल किया जाए, और फंक्शन कॉलिंग व स्ट्रक्चर्ड आउटपुट जैसी उन्नत सुविधाएँ उपयोग की जाएँ।
हमने इन क्षमताओं को एक छोटे प्रोजेक्ट में समाहित किया, जिसमें दिखाया गया कि Grok बाहरी टूल्स का उपयोग कैसे कर सकता है और संरचित, क्रियान्वयन योग्य उत्तर कैसे दे सकता है। APIs—हमारे मामले में, एक वेदर API—के साथ मिलकर, ऐसे शक्तिशाली एप्लिकेशन बनाए जा सकते हैं जो Grok 3 की ताकतों का पूरा लाभ उठाते हैं।
यदि आप यहाँ तक पहुँच गए हैं, तो संभवतः आप LLMs के बारे में और सीखने में रुचि रखते हैं। इन संसाधनों पर भी नज़र डालें:
Grok 3 xAI द्वारा विकसित एक तर्क-केंद्रित बड़ा भाषा मॉडल (LLM) है, जिसे जटिल तार्किक कार्यों को संभालने और समस्याओं को सुनियोजित तरीके से हल करने के लिए डिज़ाइन किया गया है।
इस ट्यूटोरियल में, मैं आपको API के ज़रिए Grok 3 का उपयोग कैसे करें यह दिखाऊंगा, और सरल क्वेरीज़ से लेकर फंक्शन कॉलिंग और स्ट्रक्चर्ड आउटपुट जैसी उन्नत सुविधाओं तक हर चीज़ पर साथ-साथ काम करेंगे।