Track
Developing AI Applications
21 hr
Grok 3 is xAI’s latest large language model, purpose-built for step-by-step reasoning, logical consistency, and structured outputs. Unlike typical chat models that prioritize conversation flow, Grok 3 thinks before answering, making it ideal for tasks that require deep logic, such as complex decision-making, math reasoning, and quantitative analysis.
Grok 3 comes in two different flavors: the regular model and a mini model. While the mini model completely focuses on the reasoning aspect and enables accessing its reasoning traces, the regular model is advertised to possess significant domain knowledge in fields like finance, healthcare, law, and science.
Both model versions support advanced capabilities like native function calling and structured response generation, helping developers easily build reliable and predictable AI workflows.
If you want to know more about Grok 3’s architecture and performance, make sure to take a look at this overview of Grok 3.
In this section, I will explain how to create an API key, set up a Python environment to connect to the Grok API, and make your first user request.
To authenticate the Python client with the API, we need to create an API key. The process looks like this:
.env in your project directory and paste the key in the following format:XAI_API_KEY=<your_api_key>Although using the API is often associated with lower costs than using a premium subscription, it is not free. Instead of a fixed account per month, which starts at $30 for the SuperGrok subscription, the cost is completely dependent on the usage amount. To get an overview of potential costs, visit xAI's pricing page.

The prices listed are per million tokens, which, according to a rule of thumb corresponds to around 750,000 words of input or output in English.
The mini model is significantly cheaper than the regular model. The fast versions of both Grok 3 and Grok 3 mini use the exact same underlying models, but are served on faster infrastructure, leading to improved response times.
To use the API, we need to buy credits. Using prepaid credits rather than automatic invoice billing is recommended in the beginning, as it is a good safeguard against unexpected costs. You can buy tokens and get an overview of your usage in the xAI console under Invoices > Credits.
Now that we have acquired an API key and bought credits, it is time to set up the Python client. We need to install two dependencies to make our API requests run successfully:
python-dotenv to load the API key as an environment variable from the .env file, andopenai client as the interface to send requests to Grok 3.To set up the environment for our project, I recommend using Anaconda to avoid potential conflicts between different Python packages. After installing Anaconda, we create an environment named grok3 using Python 3.10 and activate it using the following commands in the terminal:
conda create -n grok3 python=3.10
conda activate grok3
Finally, the dependencies are installed:
pip install python-dotenv openaiTime to get started with our first script! First, we need to import the functions we will be using from the packages we installed earlier, as well as os to read the API key.
import os
from dotenv import load_dotenv
from openai import OpenAI
The environment variable referring to the API key is made available by executing the load_dotenv() function imported from the dotenv package.
# Load environment variables
load_dotenv()
The next step is to initialize the client. We call the OpenAI function with our API key from the .env file and the URL of the Grok server, and assign it to the variable client.
client = OpenAI(
    api_key=os.getenv("XAI_API_KEY"),
    base_url="https://api.x.ai/v1",
)
Let’s ask Grok for advice on what to do in San Francisco if it is raining. What we have to do is specify the model and our messages, pass them as arguments to the client.chat.completions.create function. Optionally, we can also adjust parameters like max_tokens to control the response length or temperature to influence randomness.
# Send a basic reasoning query
response = client.chat.completions.create(
    model="grok-3",
    messages=[
        {"role": "user", "content": "What kind of activity would you suggest, if it rains in San Francisco? Answer in one sentence."}
    ],
    max_tokens=1000,
    temperature=0.2,  # lower temperature for more deterministic answers
)
To print Grok’s answer, we have to extract it from the resulting object. Since we called the variable storing the result response, the answer can be found in response.choices[0].message.content.
print(response.choices[0].message.content) # Print the responseIf it rains in San Francisco, I suggest visiting indoor attractions like the San Francisco Museum of Modern Art or the California Academy of Sciences for an enriching and dry experience.To see Grok’s reasoning style, let’s ask a basic question that requires some logical reasoning. We will use Grok 3 Mini for this first request because it guarantees a full reasoning trace in every API response, making it easier to follow the model’s thought process step-by-step without relying on special prompt engineering.
The parameter that determines how deeply the model thinks is called reasoning_effort. It is exclusive to Grok 3 Mini and is set to the faster option ”low” by default. Setting reasoning_effort="high" helps the model carefully walk through the problem step-by-step before giving the final answer, perfect for tasks like planning, decision-making, or math reasoning.
Imagine we wanted to use Grok to figure out what to do on a day off, depending on the weather. We could pass Grok premises defining an activity for sunny and rainy days, and a premise based on the actual weather.
response = client.chat.completions.create(
    model="grok-3-mini-beta",
    reasoning_effort="high",
    messages=[
        {"role": "user", "content": (
            "Premises:\n"
            "- If it is raining, the weather is suitable for indoor activities.\n"
        	"- Visiting a museum is an indoor activity.\n"
        	"- Today, it is raining.\n"
            "Question: What should we do today?"
        )}
    ],
    max_tokens=1000,
    temperature=0.2,
)
To work with the reasoning trace, we first need to parse the API response and extract the reasoning_content attribute from the message object. The following code shows how to print both the detailed reasoning steps and the final answer, similar to how they would appear in a web interface.
# Print the reasoning trace if available
reasoning = getattr(response.choices[0].message, "reasoning_content", None)

if reasoning:
    print("Reasoning steps:\n")
    print(reasoning)
else:
    print("No detailed reasoning trace found.")

# Print the final answer
print("\nFinal Answer:\n")
print(response.choices[0].message.content)
The result looks like this:
Reasoning steps:
First, the premises are:
1. If it is raining, the weather is suitable for indoor activities.
2. Visiting a museum is an indoor activity.
3. Today, it is raining.
The question is: What should we do today?
I need to reason step by step based on the given premises.
From premise 3, today it is raining.
From premise 1, if it is raining, then the weather is suitable for indoor activities. Since it's raining today, the weather is suitable for indoor activities today.
From premise 2, visiting a museum is an indoor activity. So, if the weather is suitable for indoor activities, and visiting a museum is an indoor activity, it makes sense that visiting a museum would be a good choice today.
The conclusion should be that we should visit a museum or engage in some indoor activity. But the question is "What should we do today?" and the premises point towards indoor activities, with a specific example given.
Let me chain the logic:
- It is raining (premise 3).
- Therefore, weather is suitable for indoor activities (from premise 1).
- Visiting a museum is an indoor activity (premise 2).
- So, since the weather is suitable for indoor activities, and museum visiting is an indoor activity, it should be suitable to visit a museum.
The premises don't explicitly say that we should do the most suitable activity or anything like that. They just provide conditions and facts.
However, the question implies a recommendation based on the premises. Given that it's raining and indoor activities are suitable, and a museum is mentioned, it's logical to suggest visiting a museum.
I should stick to what's given. The premises don't suggest any other activities or constraints, so based on the information, visiting a museum is a reasonable suggestion.
Final answer should be something like: "We should visit a museum today."
To make it clear, I can phrase it as: "Since it is raining and the weather is suitable for indoor activities, and visiting a museum is an indoor activity, we should visit a museum today."
But since the instruction is to put the final answer in a box, probably a concise statement.
Looking back at the user's message, it's a reasoning exercise, so the answer should be direct.
Final Answer:
Based on the given premises:
- It is raining today (premise 3).
- If it is raining, the weather is suitable for indoor activities (premise 1).
- Therefore, the weather is suitable for indoor activities today.
- Visiting a museum is an indoor activity (premise 2).
A suitable activity for today would be an indoor one, such as visiting a museum.
**Recommendation:** We should visit a museum today.
Even though this is a fairly simple example, we can see how Grok-3-mini carefully walks through each premise, chaining the logic step-by-step before arriving at a recommendation. Its reasoning is methodical and transparent, making it easy to trace how the model moves from facts to the final suggestion.
One of the features that makes Grok 3 interesting is function calling, which enables it to connect itself to external tools and systems. This allows the model to not only generate text, but also trigger actions such as retrieving weather forecasts, looking up event schedules, analyzing database entries, or even controlling smart devices.
When we send a user request, Grok 3 can recognize that it needs additional information and request a function call with specific arguments. The Python client then executes the function locally, sends the result back to Grok 3, and receives the final, fully reasoned response.
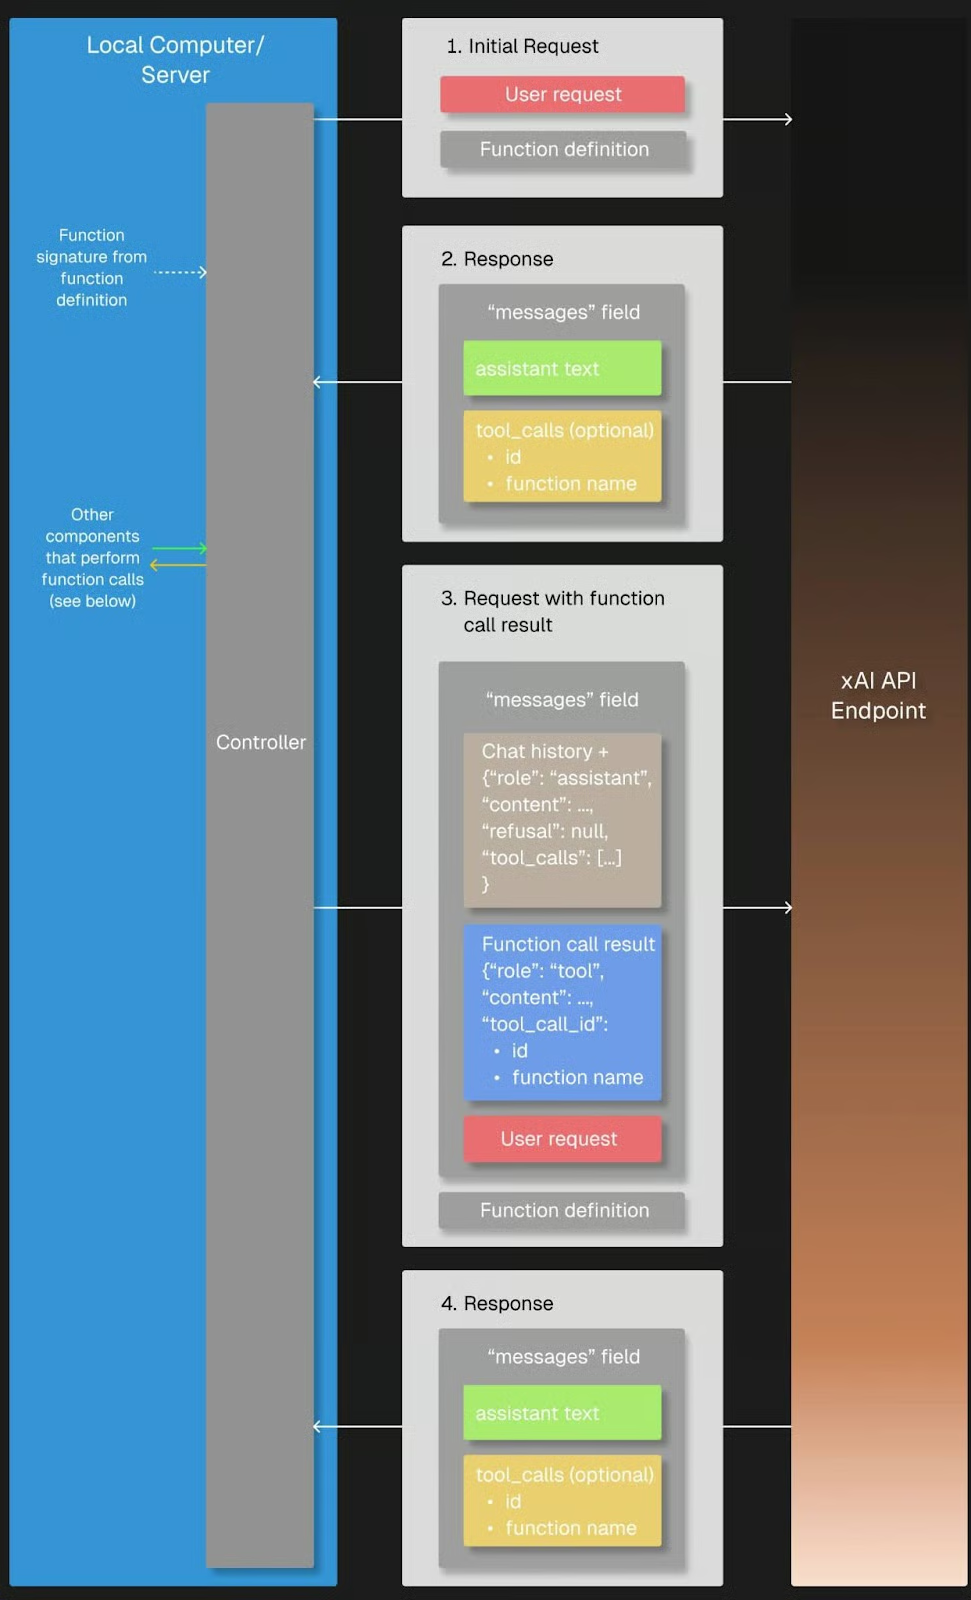
Source: xAI
We will need the json package to access the argument structure of a function that was called by Grok, so we have to import it.
import jsonTo try out function calling, we need to define a callback function that gets called when Grok requests it in its response. In our case, the get_weather_forecast function is a simple Python function that returns a hard-coded weather forecast. I’ve hard-coded it for demonstration purposes to keep the explanation straightforward and avoid relying on external services.
# Define the dummy function
def get_weather_forecast(location: str, date: str) -> dict:
    """Simulated function to always return rainy weather."""
    return {
        "location": location,
        "date": “this weekend”, # hardcoded for demo purposes
        "forecast": "rainy"  # hardcoded for demo purposes
    }
We must also define the available tool by specifying its name, purpose, and required parameters in a JSON schema, which will be sent to Grok with our request later. This setup lets Grok 3 know that it can call this tool whenever it needs weather information for its reasoning.
tools = [
    {
        "type": "function",
        "function": {
            "name": "get_weather_forecast",
            "description": "Get a simulated weather forecast for a given location and date.",
            "parameters": {
                "type": "object",
                "properties": {
                    "location": {
                        "type": "string",
                        "description": "The city where the activity will take place."
                    },
                    "date": {
                        "type": "string",
                        "description": "The date for which the weather is needed, in YYYY-MM-DD format."
                    }
            	    },
            	    "required": ["location", "date"]
            }
        }
    }
]
Finally, the tools_map dictionary links the function names used by Grok 3 to the actual local Python functions, allowing the client to correctly execute the requested tool calls.
# Link the function names to the functions
tools_map = {
    "get_weather_forecast": get_weather_forecast
}
While defining tool schemas manually is perfectly fine for simple projects, using a data validation module like Pydantic becomes increasingly valuable as projects grow in size and complexity. It allows for automatic validation of function inputs, better error handling, and cleaner, more maintainable code.
Let’s see if Grok uses our weather forecasting function when asked about a suggested activity in San Francisco this weekend. We follow the structure of the function calling workflow:
tools.tools_map. If Grok does not request a tool call, we can handle it by returning the model’s initial answer.# Step 1: Send the initial user request
messages = [
{"role": "user", "content": "What should I do this weekend in San Francisco?"}
]
response = client.chat.completions.create(
model="grok-3",
messages=messages,
tools=tools,
tool_choice="auto",
)
# Step 2: Check if a tool call was requested
tool_calls = getattr(response.choices[0].message, "tool_calls", [])
if tool_calls:
for tool_call in tool_calls:
function_name = tool_call.function.name
function_args = json.loads(tool_call.function.arguments)
# Find and call the matching local function
if function_name in tools_map:
function_result = tools_map[function_name](**function_args)
# Step 3: Add the function result back to the message history
messages.append(response.choices[0].message) # Grok's tool call message
messages.append({
"role": "tool",
"tool_call_id": tool_call.id,
"content": json.dumps(function_result)
})
# Step 4: Send a new request including the tool response
final_response = client.chat.completions.create(
model="grok-3",
messages=messages,
tools=tools,
tool_choice="auto"
)
# Print the final answer
print("\nFinal Answer:")
print(final_response.choices[0].message.content)
else:
# No tool call: respond directly
print("\nNo tool call was requested. Final Answer:")
print(response.choices[0].message.content)The function was requested and executed successfully, as Grok’s answer indicates:
Thanks for the weather update. Since it's going to be rainy this weekend in San Francisco, I’ll suggest some indoor activities to keep you entertained and dry. Here are a few ideas for your weekend: (...)You might have noticed the tool_choice argument in the initial user request, which refers to the function calling mode. By default, the "auto" mode lets Grok 3 decide whether and which function to call based on the conversation. Alternatively, we can control the behavior by forcing a function call with ”required”, specifying an exact function to call, or disabling function calling completely with ”none”.
Structured outputs allow Grok 3 to return answers in a strict, predefined format like JSON instead of free-form text. This makes it much easier to automatically parse, validate, and integrate model responses into applications or workflows.
By defining a schema up front, we can ensure that Grok's outputs are consistent, machine-readable, and ready for downstream processing. Therefore, it is a very useful feature for use cases such as structured data from documents or feeding AI-generated insights into downstream systems like databases, dashboards, or automation pipelines without needing fragile text parsing.
We use Pydantic to define the output schema because it offers a cleaner and more readable way to structure complex data. Both BaseModel and Field from pydantic need to be imported to make this schema definition work correctly. Since our output includes a list of reasoning steps, we also import List from Python’s typing module to specify the element type more precisely.
While it’s also possible to define the schema using plain JSON, I’ve found in testing that Grok 3 sometimes returned output that didn’t exactly match the expected structure. The returned JSON was similar in meaning but followed a different schema, which could break applications expecting a specific structure. Because of this inconsistency, especially with nested elements like lists, I strongly recommend using Pydantic to ensure the structured output is validated and parsed reliably.
from pydantic import BaseModel, Field
from typing import List
Our schema, called DecisionPlan, consists of our initial situation and a list of DecisionSteps, which are defined by their step number, the reasoning behind them, and a suggested action.
# Define the schema for the structured output
class DecisionStep(BaseModel):
    step: int = Field(description="Step number in the decision process")
    reasoning: str = Field(description="Reasoning behind this step")
    action: str = Field(description="Suggested action at this step")

class DecisionPlan(BaseModel):
    situation: str = Field(description="The initial situation to consider")
    steps: List[DecisionStep] = Field(description="List of reasoning steps leading to the final action")
There are a few things to consider regarding the request itself. First of all, we need to use client.beta.chat.completions.parse() instead of create(), so Grok knows that we want the output to have a specific format. This is the schema we just defined, and accordingly, we pass our DecisionPlan as the response_format argument.
It can be useful to include all important instructions for a specific task in the system prompt, as it helps Grok 3 stay focused on the task throughout the entire conversation. In combination with the separately defined schema, the user prompt does not have to specify required fields in the output JSON but can focus on the task itself.
We could, for instance, easily break down the activity planning process into three well-defined steps:
# Send a prompt and request structured output
completion = client.beta.chat.completions.parse(
    model="grok-3",
    messages=[
        {"role": "system", "content": (
        "You are an expert travel planner."
        "When asked about activities, always break down the decision process into exactly 3 logical reasoning steps."
        "Return the output in structured JSON format following the provided schema, without any extra text."
        )},
        {"role": "user", "content": (
        "It's raining today in San Francisco. What indoor activity would you recommend?"
        )}
    ],
    response_format=DecisionPlan,
)
After parsing Grok 3’s structured output, we can act on the results by summarizing the key recommendations, triggering automated workflows, or even making further decisions programmatically.
Let’s go with the first example and only display our situation and the final recommendation of our travel expert, Grok. Since our output is in our predefined JSON format, we can access the recommendation of the final step easily:
# Access the parsed result
plan = completion.choices[0].message.parsed

# Use the final action to create a summary message
final_step = plan.steps[-1]

print(f"\nSummary:")
print(f"Situation: {plan.situation}")
print(f"Recommended Action: {final_step.action}")
Summary:
Situation: It's raining today in San Francisco, and an indoor activity is needed to make the most of the day.
Recommended Action: Visiting the California Academy of Sciences in Golden Gate Park for an educational and entertaining indoor experience.We can combine the function calling and structured outputs to create a simple app that uses Grok’s reasoning. We can copy and paste the code for:
tools_map; andWe start with an API call using the create() function to trigger the tool call. To let the user enter the question in the terminal, we just replace our question about the activity in San Francisco with input("> ").
After appending the function_result to the messages list comes the twist: instead of creating another API call that uses create(), we parse() and pass our DecisionPlan as the response_format`.
Here is the full code of our small app:
import os
import json
from dotenv import load_dotenv
from openai import OpenAI
from pydantic import BaseModel, Field
from typing import List

# Load environment variables
load_dotenv()

# Initialize the client
client = OpenAI(
    api_key=os.getenv("XAI_API_KEY"),
    base_url="https://api.x.ai/v1",
)

# 1. Define the function schema (tool definition)
tools = [
    {
        "type": "function",
        "function": {
            "name": "get_weather_forecast",
            "description": "Get a simulated weather forecast for a given location and date.",
            "parameters": {
                "type": "object",
                "properties": {
                    "location": {
                        "type": "string",
                        "description": "The city where the activity will take place."
                	},
                    "date": {
                        "type": "string",
                        "description": "The date for which the weather is needed, in YYYY-MM-DD format."
                    }
            	    },
                "required": ["location", "date"]
        	}
        }
    }
]

# 2. Dummy weather function (hardcoded)
def get_weather_forecast(location: str, date: str) -> dict:
    return {
        "location": location,
        "date": "this weekend",
        "forecast": "rainy"
    }

# 3. Tool mapping
tools_map = {
    "get_weather_forecast": get_weather_forecast
}

# 4. Define structured output schema using Pydantic
class DecisionStep(BaseModel):
	step: int = Field(description="Step number in the decision process")
	reasoning: str = Field(description="Reasoning behind this step")
	action: str = Field(description="Suggested action at this step")

class DecisionPlan(BaseModel):
	situation: str = Field(description="The initial situation to consider")
	steps: List[DecisionStep] = Field(description="List of reasoning steps leading to the final action")

# 5. Defining messages: system prompt and input
messages = [
    {"role": "system", "content": (
        "You are an expert travel planner. When asked about weekend plans, "
        "first get the weather forecast via the tool provided. Then, based on the result, "
        "break down your reasoning into exactly 3 steps and return structured JSON only."
    )},
    {"role": "user", "content": input("> ")} # enter the question in the terminal
]

# 6. First API call to trigger the tool call
response = client.chat.completions.create(
    model="grok-3",
    messages=messages,
    tools=tools,
    tool_choice="auto",
)

tool_calls = getattr(response.choices[0].message, "tool_calls", [])

if tool_calls:
    for tool_call in tool_calls:
        function_name = tool_call.function.name
        function_args = json.loads(tool_call.function.arguments)
        if function_name in tools_map:
            function_result = tools_map[function_name](**function_args)

        	# Add the assistant's tool call message and the tool result to the message history
            messages.append(response.choices[0].message)
            messages.append({
                "role": "tool",
                "tool_call_id": tool_call.id,
                "content": json.dumps(function_result)
        	})

        	# 7. Second API call with parse() to get structured output
            final_response = client.beta.chat.completions.parse(
                model="grok-3",
                messages=messages,
                response_format=DecisionPlan
        	)

        	plan = final_response.choices[0].message.parsed

        	# 8. Use the output
            final_action = plan.steps[-1].action

            print(f"\nSummary:")
            print(f"Situation: {plan.situation}")
            print(f"Recommended Action: {final_action}")

else:
print("No tool call was requested.")To try the app, we navigate to our project directory, load our environment, and run the script:
cd <your/working/directory>
conda activate grok3
python app.py
If we ask for some advice for Helsinki, our Grok app answers:

This is a decent suggestion, I can tell from experience!
We covered a lot—let’s wrap up. We explored how to work with the Grok 3 API to run simple queries, handle reasoning traces, and utilize advanced features like function calling and structured outputs.
We combined these capabilities into a small project that showed how Grok can use external tools and return structured, actionable answers. In combination with APIs—in our case, a weather API—powerful applications can be built that fully utilize Grok 3’s strengths.
If you made it this far, you’re probably interested in learning more about LLMs. Feel free to check out these resources, too:
Learn AI with these courses!
Track
Course
Course
blog
Alex Olteanu
8 min
blog
Alex Olteanu
8 min
blog
Matt Crabtree
7 min
Tutorial
Tom Farnschläder
Tutorial
Aashi Dutt
Tutorial
Abid Ali Awan