Programma
Ingegnere AI associato per scienziati dei dati
40 h
MiniMax M3 is MiniMax’s latest open-weight model for coding, tool use, and long-horizon agent workflows. What makes it stand out from earlier MiniMax models is its combination of a 1M-token context window, native multimodal support for text, images, and video, and MiniMax Sparse Attention, which is designed to make very long-context inference more practical.
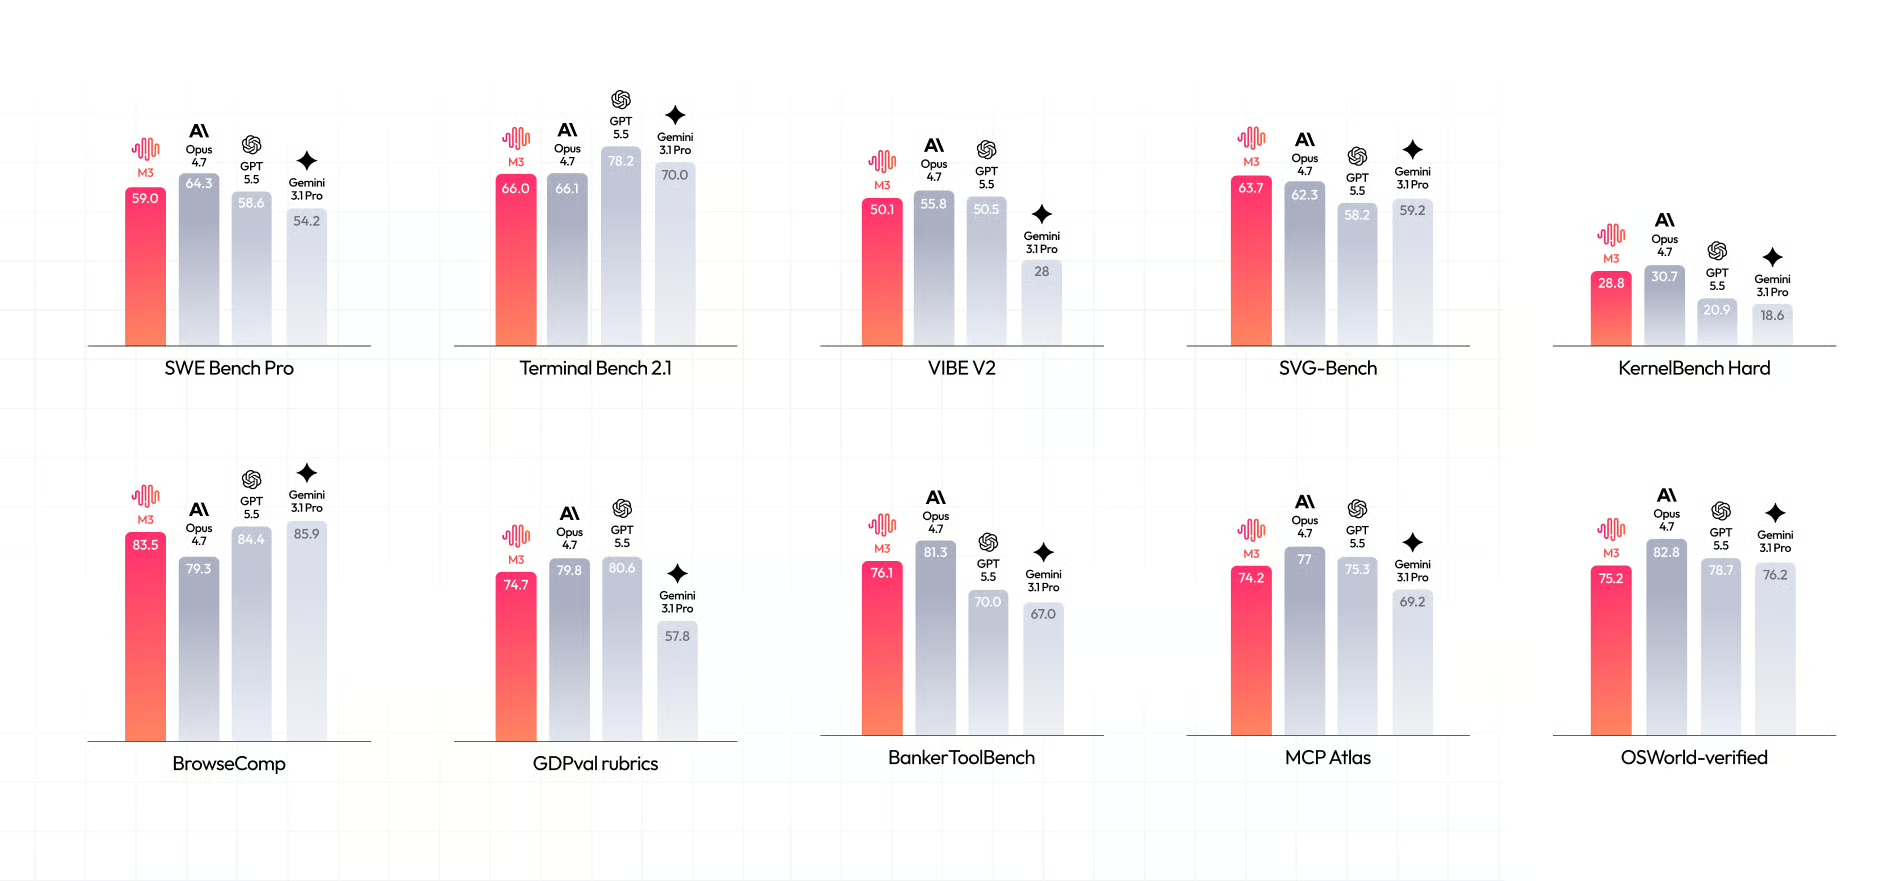
Source: MiniMax
In this guide, I will show you how to run MiniMax M3 locally across two NVIDIA RTX PRO 6000 GPUs, test the model through its built-in web interface, and connect the local OpenAI-compatible endpoint to the Pi coding agent.
The setup uses JupyterLab terminals on a RunPod PyTorch pod instead of SSH, with llama.cpp compiled for CUDA, serving the model on port 8910.
Before running MiniMax M3 locally, make sure your system has enough GPU memory and storage to load the model.
UD-IQ3_XXS GGUF quantization from unsloth/MiniMax-M3-GGUF. It is approximately 159 GB and is the most practical option for this hardware.llama.cpp with multi-GPU support.MiniMax M3 is a large mixture-of-experts model, so its weights must be split across both GPUs during inference. Even though the system provides 192 GB of combined VRAM, not all of that memory can be used for the model itself.
Some VRAM is required for runtime overhead, prompt processing, and the KV cache.
For this reason, start with the UD-IQ3_XXS quantization. At around 159 GB, it leaves enough memory for the model to load and run.
Avoid 4-bit MiniMax M3 quantizations on this setup, as the smallest available 4-bit file is around 208 GB and exceeds the available VRAM before runtime overhead is considered.
Create a new RunPod Pod and select 2× NVIDIA RTX PRO 6000 GPUs with the latest RunPod PyTorch template. This template includes JupyterLab, which we will use instead of SSH throughout this guide.
Configure the Pod with the following settings:
50 GB300 GB8910HF_TOKEN: Your Hugging Face access token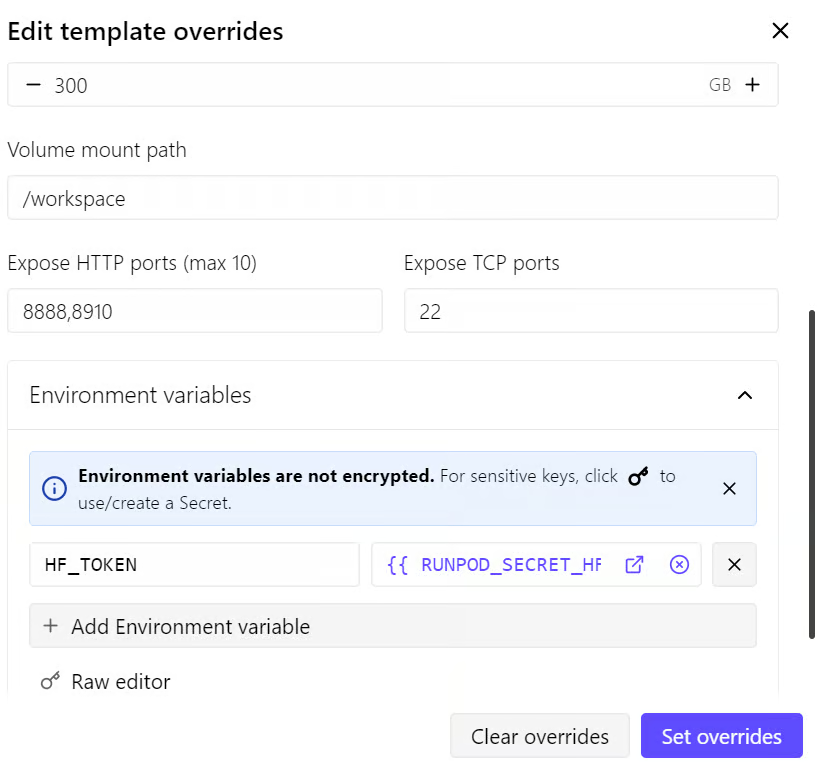
The 50 GB container disk is only for the operating system, packages, and temporary files. The 300 GB volume disk is where the MiniMax M3 model and Hugging Face cache should live.
Setting HF_HOME ensures that Hugging Face downloads are stored in /workspace, so they remain available after you stop and restart the Pod.
Expose HTTP port 8910, as llama.cpp will later run its web interface and OpenAI-compatible API on this port. Once the server is running, you can access it through a URL in this format:
https://<POD_ID>-8910.proxy.runpod.net
This URL is publicly accessible, so do not share it widely. We will add an API key when launching llama.cpp later in the guide.
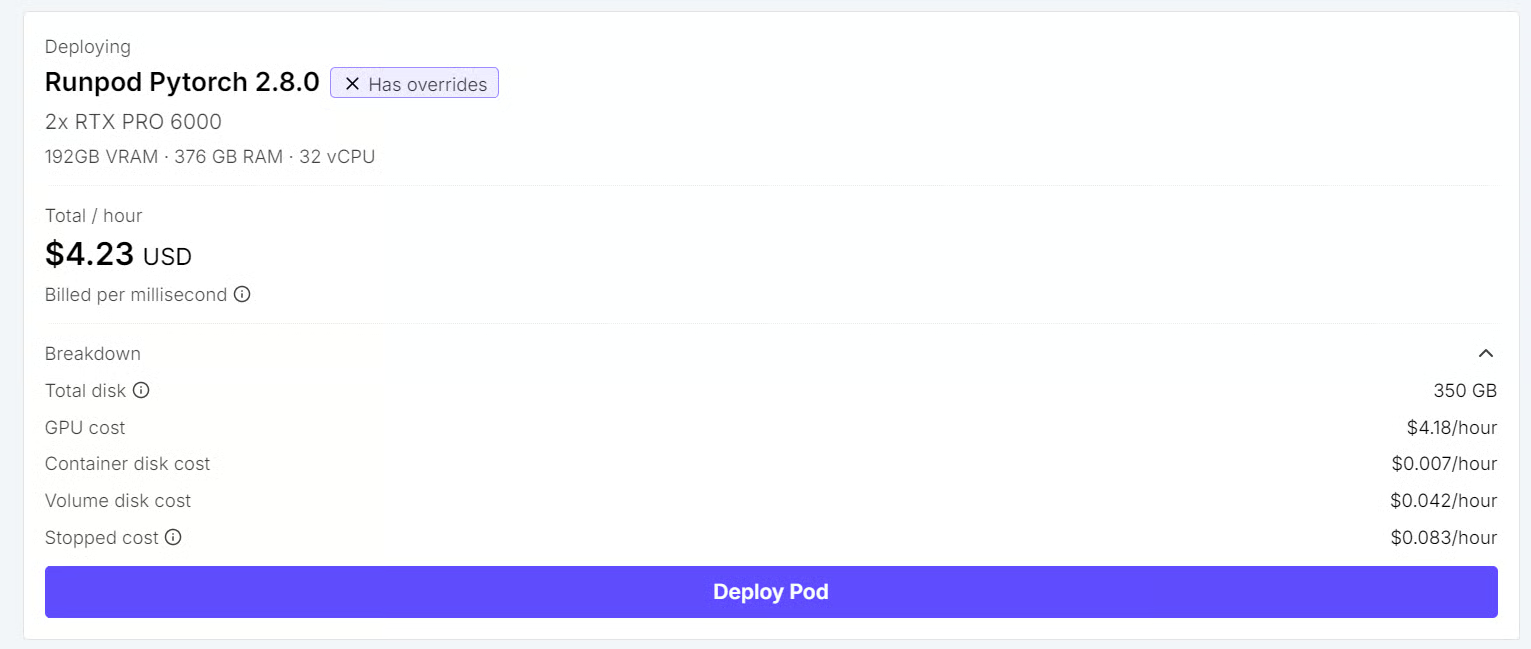
The Pod configuration used for this guide costs approximately $4.23 per hour, although the price can vary depending on availability and location.
I recommend you keep at least $10 in RunPod credits, but $15–$20 is safer for the initial build, model download, and testing.
After the Pod is running, open it from the RunPod dashboard:
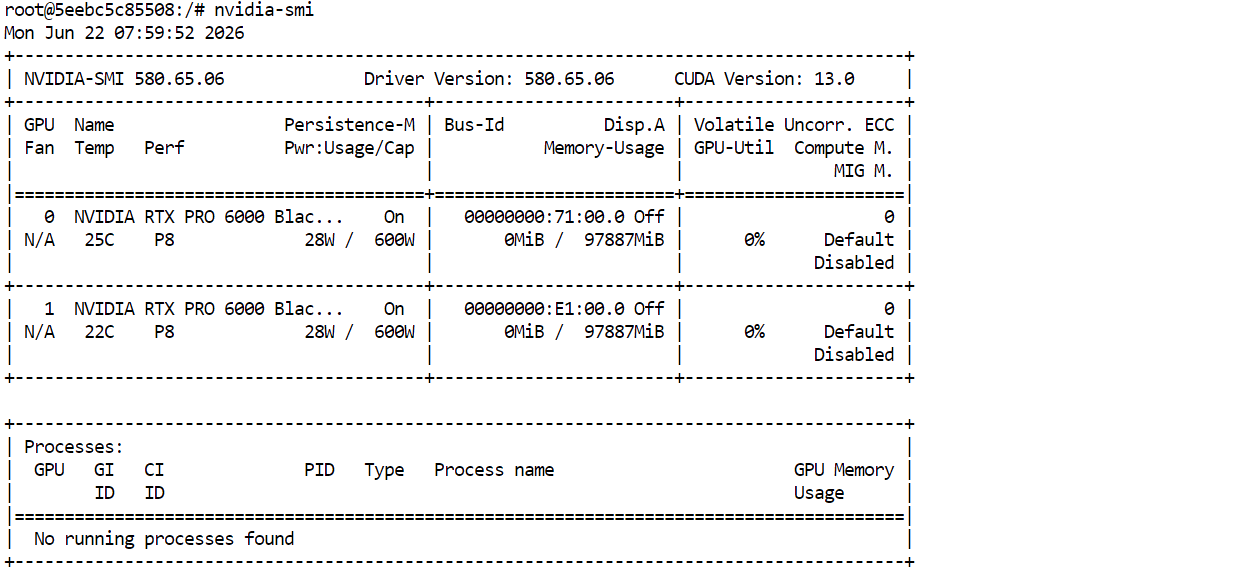
First, confirm that both GPUs are available:
nvidia-smiYou should see two NVIDIA RTX PRO 6000 GPUs, each with approximately 96 GB of VRAM.
Next, install the required build tools:
apt-get update && apt-get install -y \
  git \
  cmake \
  build-essential \
  curl
Finally, verify that CUDA is available:
nvcc --versionYou should see CUDA 12.8 or a compatible CUDA version. You are now ready to build llama.cpp with CUDA support.
llama.cpp is an open-source inference engine for running GGUF models locally. I suggest reading our full llama.cpp guide if you’re unfamiliar.
It supports CUDA acceleration, multi-GPU offloading, a built-in web interface, and an OpenAI-compatible API server.
MiniMax M3 support is still experimental, so you need to build llama.cpp from the dedicated minimax-m3 branch instead of using the standard release.
Run the following commands from your JupyterLab terminal:
cd /workspace

git clone https://github.com/ggml-org/llama.cpp.git
cd llama.cpp

git fetch origin pull/24523/head:minimax-m3
git checkout minimax-m3
Next, configure llama.cpp with CUDA support and compile the server and command-line binaries:
cmake -B build \
  -DGGML_CUDA=ON \
  -DCMAKE_BUILD_TYPE=Release

cmake --build build \
  -j"$(nproc)" \
  --target llama-server llama-cli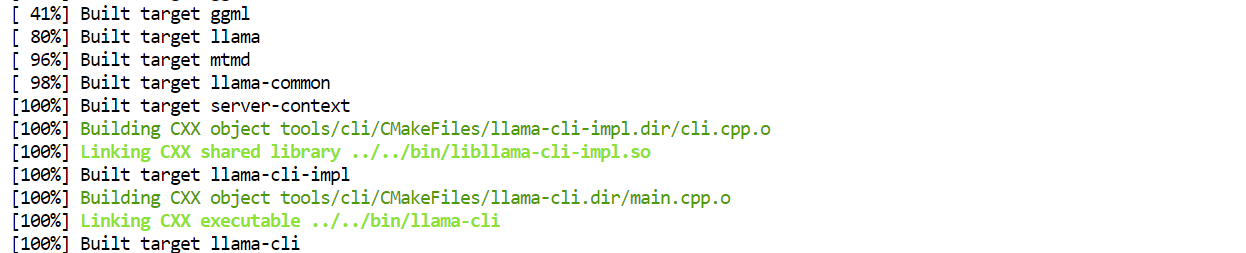
This creates two binaries in build/bin/:
llama-server, which provides the browser-based chat interface and OpenAI-compatible API endpoint.llama-cli, which lets you test the model directly from the terminal.Note: This is an experimental MiniMax M3 implementation. It supports text inference, but MiniMax Sparse Attention is not included in this branch, so llama.cpp uses dense attention instead. Vision support and MTP/speculative decoding are also not part of this build.
MiniMax M3 is distributed as multiple GGUF files. Download the complete UD-IQ3_XXS folder to the persistent workspace volume before starting the server.
First, install the latest Hugging Face Hub CLI:
pip install -U huggingface_hubCreate a directory for the model and enable faster Hugging Face downloads:
mkdir -p /workspace/unsloth

export HF_XET_HIGH_PERFORMANCE=1
Then download the UD-IQ3_XXS quantization:
hf download unsloth/MiniMax-M3-GGUF \
  --include "UD-IQ3_XXS/*" \
  --local-dir /workspace/unsloth
The download is around 159 GB and includes five GGUF shards. Because the model is saved in /workspace, it remains available when you stop and restart the Pod.
Move to the llama.cpp directory and make both GPUs available to the server:
cd /workspace/llama.cpp

export CUDA_VISIBLE_DEVICES=0,1
Then start MiniMax M3:
MODEL_FILE="/workspace/unsloth/UD-IQ3_XXS/MiniMax-M3-UD-IQ3_XXS-00001-of-00005.gguf"

./build/bin/llama-server \
  -m "$MODEL_FILE" \
  --host 0.0.0.0 \
  --port 8910 \
  --api-key "$LLAMA_API_KEY" \
  --ctx-size 8192 \
  --parallel 1 \
  --split-mode layer \
  --tensor-split 1,1 \
  --n-gpu-layers 99 \
  --flash-attn on \
  --jinja \
  --temp 1.0 \
  --top-p 0.95 \
  --top-k 40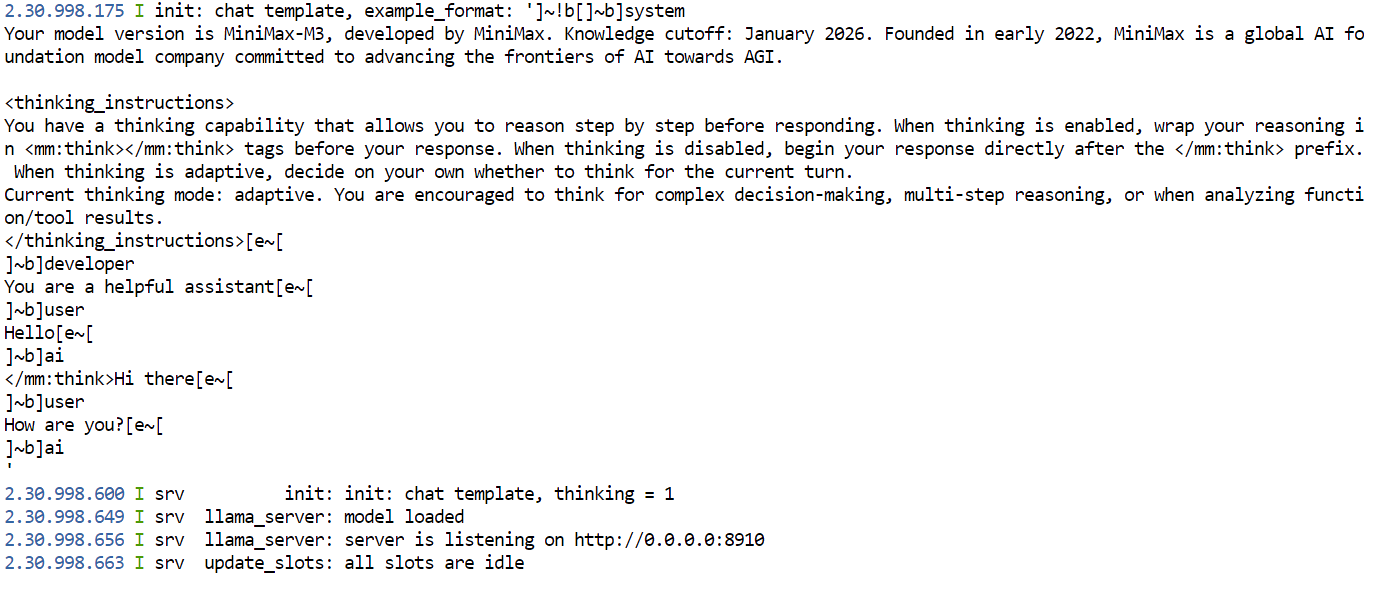
This command loads MiniMax M3 across both RTX PRO 6000 GPUs. The --tensor-split 1,1’ setting divides the model evenly between the GPUs, while --n-gpu-layers 99 keeps as much of the model as possible in GPU memory.
The server runs on port 8910 and provides both the llama.cpp web interface and an OpenAI-compatible API. Keep this terminal open while the model is running.
Start with an 8K context window. The experimental llama.cpp branch uses dense attention rather than MiniMax Sparse Attention, so using a much larger context window may cause memory issues. Once the server is working, you can test --ctx-size 16384.
Open another JupyterLab terminal and run the following command to confirm that both GPUs are being used:
nvidia-smiAfter the model loads, both GPUs should show substantial VRAM usage.
Open a new JupyterLab terminal and first confirm that the server is running and has loaded MiniMax M3:
curl -s http://127.0.0.1:8910/v1/models \
  | python3 -c "import sys, json; print(json.load(sys.stdin)['data'][0]['id'])"
You should see a model ID similar to:
MiniMax-M3-UD-IQ3_XXS-00001-of-00005.ggufNext, send a test request to the OpenAI-compatible chat completions endpoint:
curl http://127.0.0.1:8910/v1/chat/completions \
  -H "Content-Type: application/json" \
  -d '{
    "model": "MiniMax-M3-UD-IQ3_XXS-00001-of-00005.gguf",
    "messages": [
      {
        "role": "user",
        "content": "Write a Python function that checks whether a number is prime."
      }
    ],
    "temperature": 1.0,
    "top_p": 0.95,
    "max_tokens": 512
  }'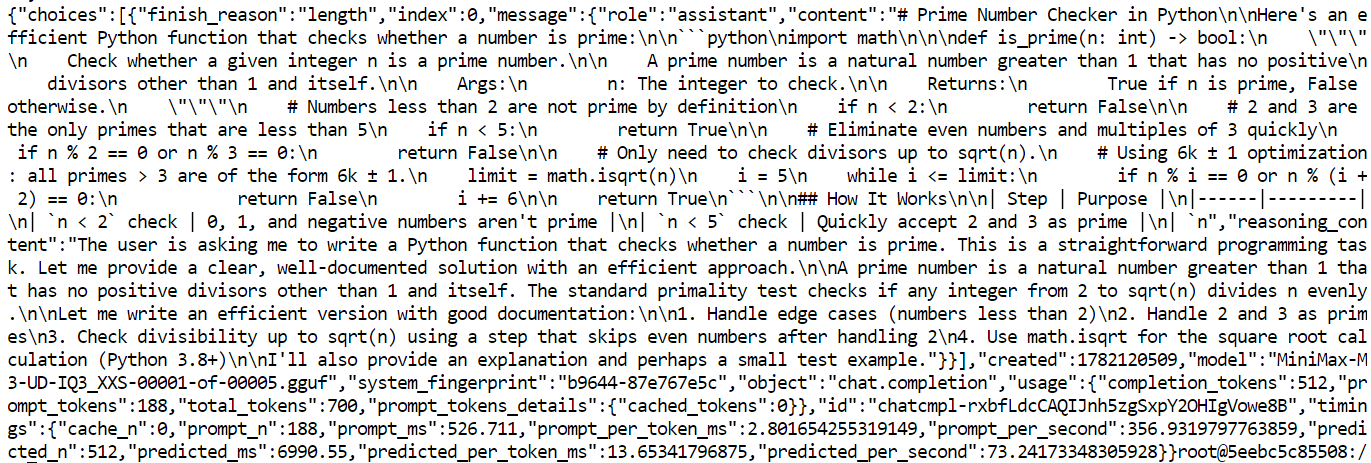
Your local MiniMax M3 server is working correctly.
It generated an efficient Python is_prime() function using math.isqrt() and the 6k ± 1 optimization.
The response was cut off because it reached your max_tokens limit of 512, shown by: "finish_reason": "length"
In this test, the server processed the prompt at around 357 tokens per second and generated text at around 73 tokens per second.
Your speed may vary depending on context length, GPU load, and prompt size.
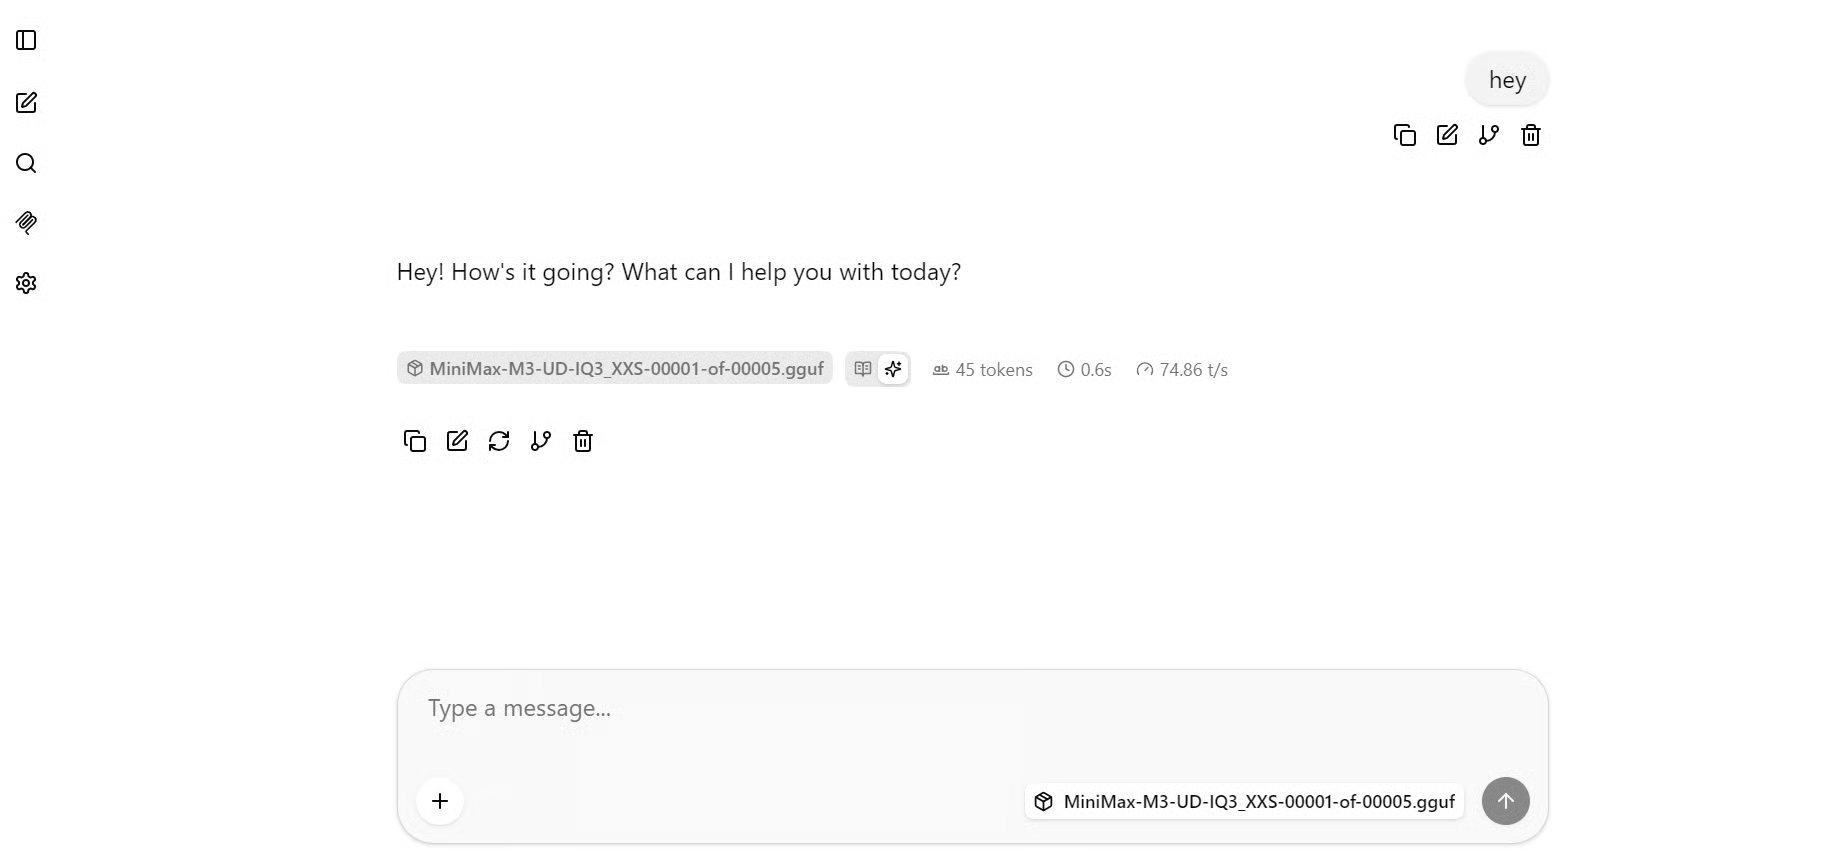
Because port 8910 is exposed through RunPod, you can also test MiniMax M3 through the built-in llama.cpp web interface.
In the RunPod dashboard, open your Pod and click the Connect button. Under the exposed HTTP ports, select the link for port 8910.

This opens the llama.cpp web interface in your browser. It works like a lightweight ChatGPT-style chat application, with the locally running MiniMax M3 model already selected. You can now send prompts and test the model without using the terminal or API.
For a practical test, I asked MiniMax M3 to generate a Python web interface for serving machine learning models. It produced a detailed FastAPI-based dashboard design with model switching, JSON prediction requests, CSV batch uploads, live WebSocket streaming, a model registry, health endpoints, structured logging, tests, and a Docker setup.
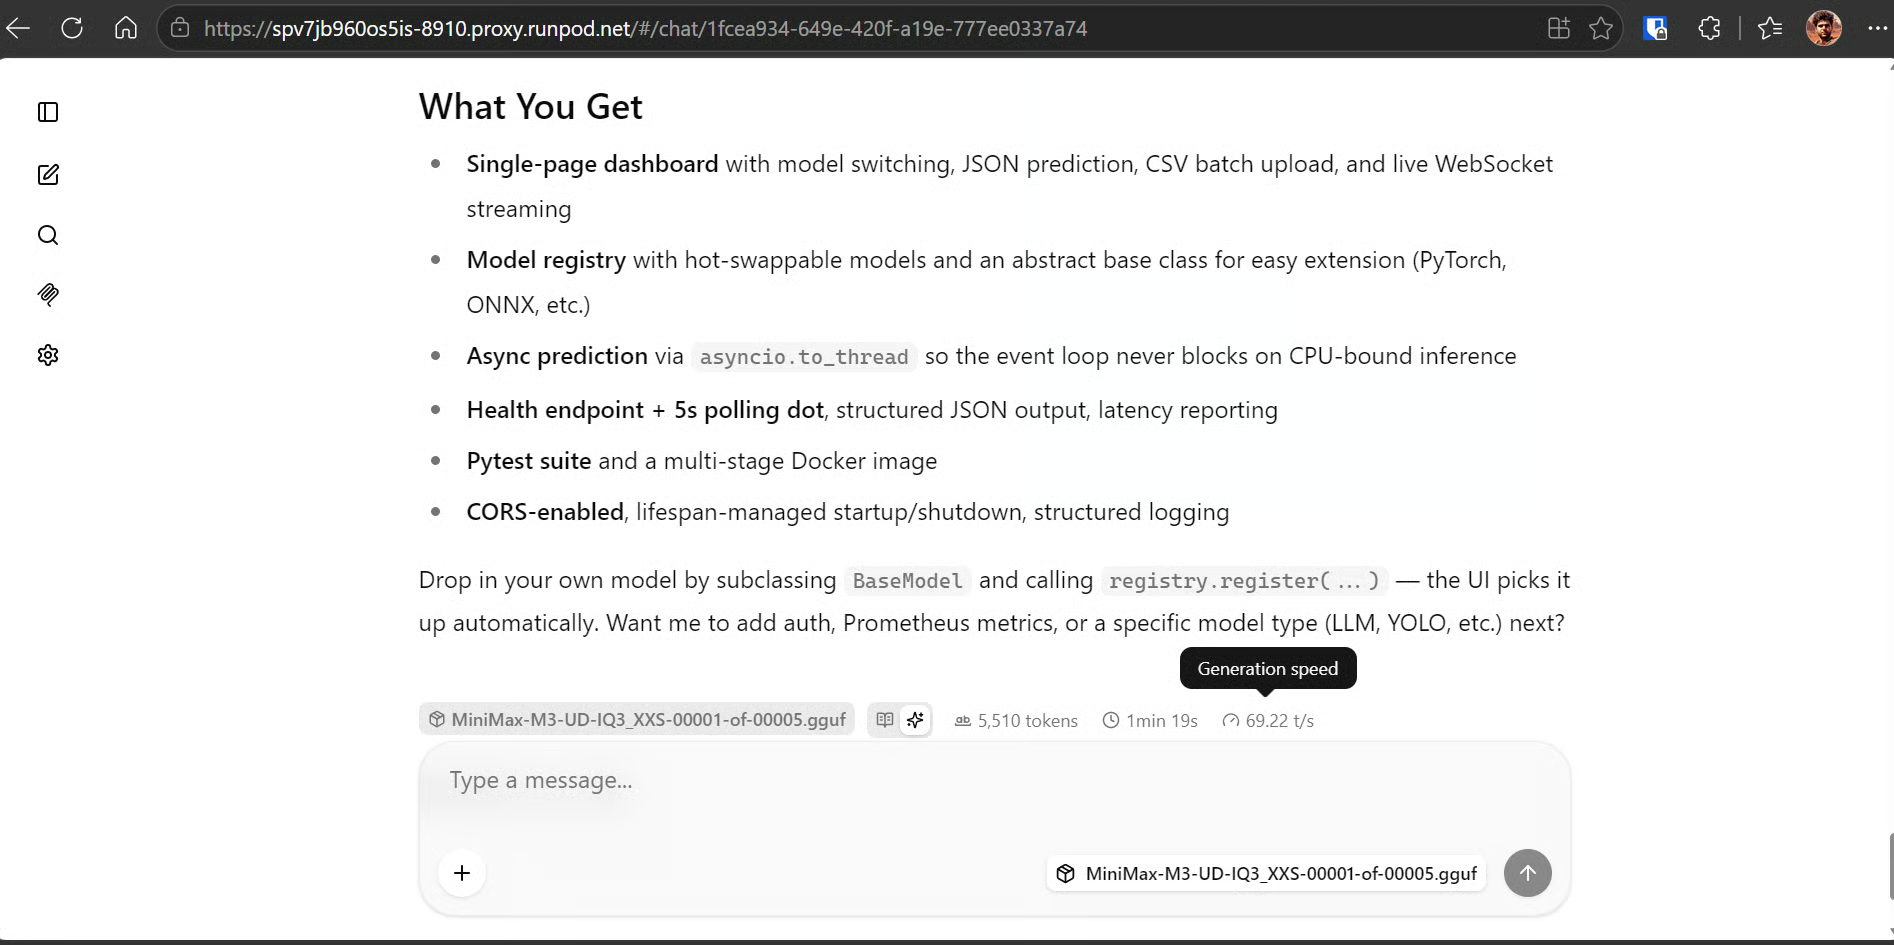
The response generated 5,510 tokens in 1 minute and 19 seconds, reaching approximately 69 tokens per second.
For a 3-bit local quantization running across two RTX PRO 6000 GPUs, this is a strong result and shows that MiniMax M3 can handle longer coding requests at an interactive speed.
Pi is a terminal-based coding agent that can work directly with your local project files, run commands, inspect code, and use your locally hosted MiniMax M3 model.
Open a third JupyterLab terminal. Keep the first terminal running llama-server, then use this terminal to install and configure Pi.
Install Pi with the official installation script:
curl -fsSL https://pi.dev/install.sh | sh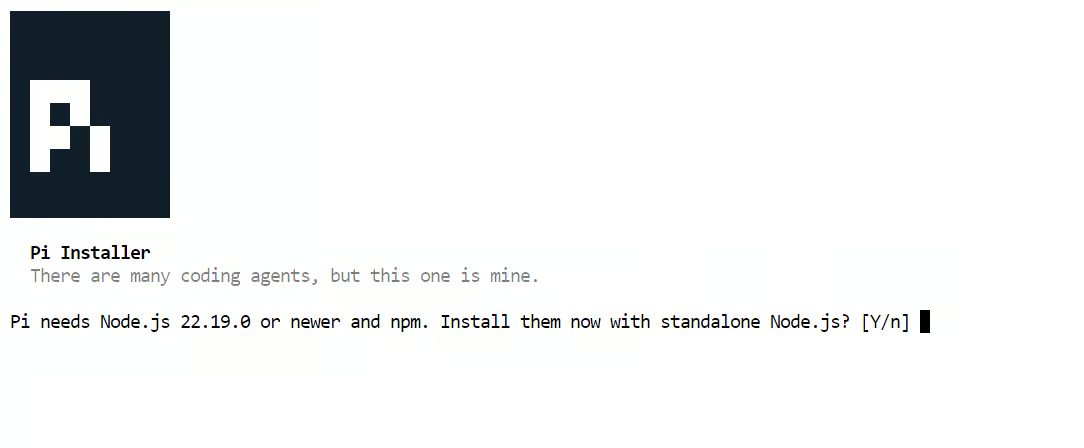 If the installer asks whether it should install Node.js, type Y
 and press Enter. Pi will then install its required Node.js runtime and the pi command-line tool.
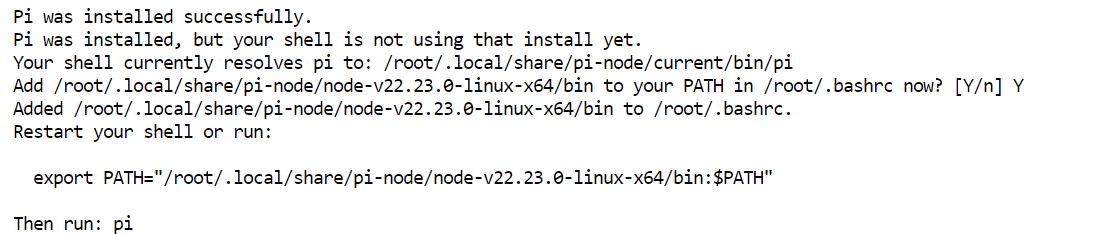
When the installation finishes, the installer may show a command for updating your shell environment. Run the command it provides, then restart the shell:
exec bash -lConfirm that Pi is available:
pi --versionYou should see the installed Pi version number.
0.79.10Pi supports custom OpenAI-compatible providers through a models.json file. Create Pi’s configuration directory:
mkdir -p ~/.pi/agentThen create the provider configuration:
cat > ~/.pi/agent/models.json <<'EOF'
{
  "providers": {
    "local-minimax": {
      "baseUrl": "http://127.0.0.1:8910/v1",
      "api": "openai-completions",
      "apiKey": "none",
      "compat": {
        "supportsDeveloperRole": false,
        "supportsReasoningEffort": false,
        "supportsUsageInStreaming": false,
        "maxTokensField": "max_tokens"
      },
      "models": [
        {
          "id": "MiniMax-M3-UD-IQ3_XXS-00001-of-00005.gguf",
          "name": "MiniMax M3 Local 3-bit",
          "reasoning": false,
          "input": ["text"],
          "contextWindow": 8192,
          "maxTokens": 2048,
          "cost": {
            "input": 0,
            "output": 0,
            "cacheRead": 0,
            "cacheWrite": 0
          }
        }
      ]
    }
  }
}
EOF
This configuration tells Pi to use the local llama.cpp server running on port 8910. The openai-completions API setting matches llama.cpp’s OpenAI-compatible chat completions endpoint.
The compatibility settings prevent Pi from sending unsupported fields or message roles that can cause issues with some local OpenAI-compatible servers. In particular, Pi will use the standard system role instead of the newer developer role and will send max_tokens, which llama.cpp expects.
The model is listed as text-only with an 8K context window, matching the server configuration you started earlier. The cost values are set to zero because MiniMax M3 is running locally on your RunPod instance rather than through a paid API.
Open a new JupyterLab terminal for Pi. For a more comfortable coding-agent experience, switch JupyterLab to dark mode by selecting Settings → Theme → JupyterLab Dark.
Next, clone the project you want MiniMax M3 to work on:
cd /workspace

git clone https://github.com/kingabzpro/semantic-web-cache
cd semantic-web-cache
Launch Pi:
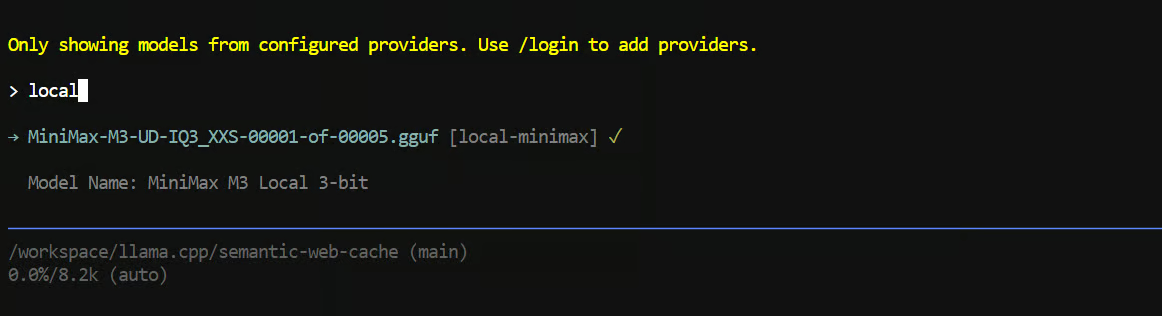
piInside Pi, type:
/modelSearch for local, then select MiniMax M3 Local 3-bit. Pi should show the local provider and confirm that the MiniMax M3 GGUF model is selected.
Start with a read-only task so that Pi can inspect the repository without changing any files. For example:
"Read the README.md file and explain how this project is structured."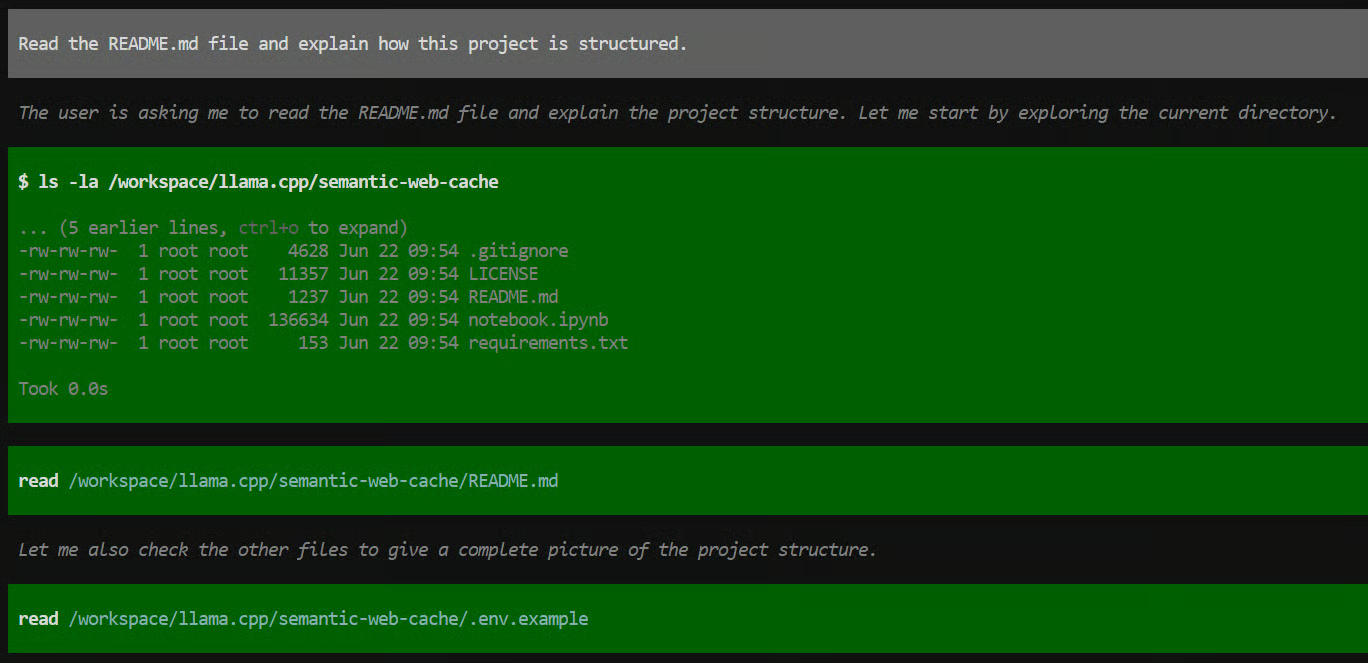
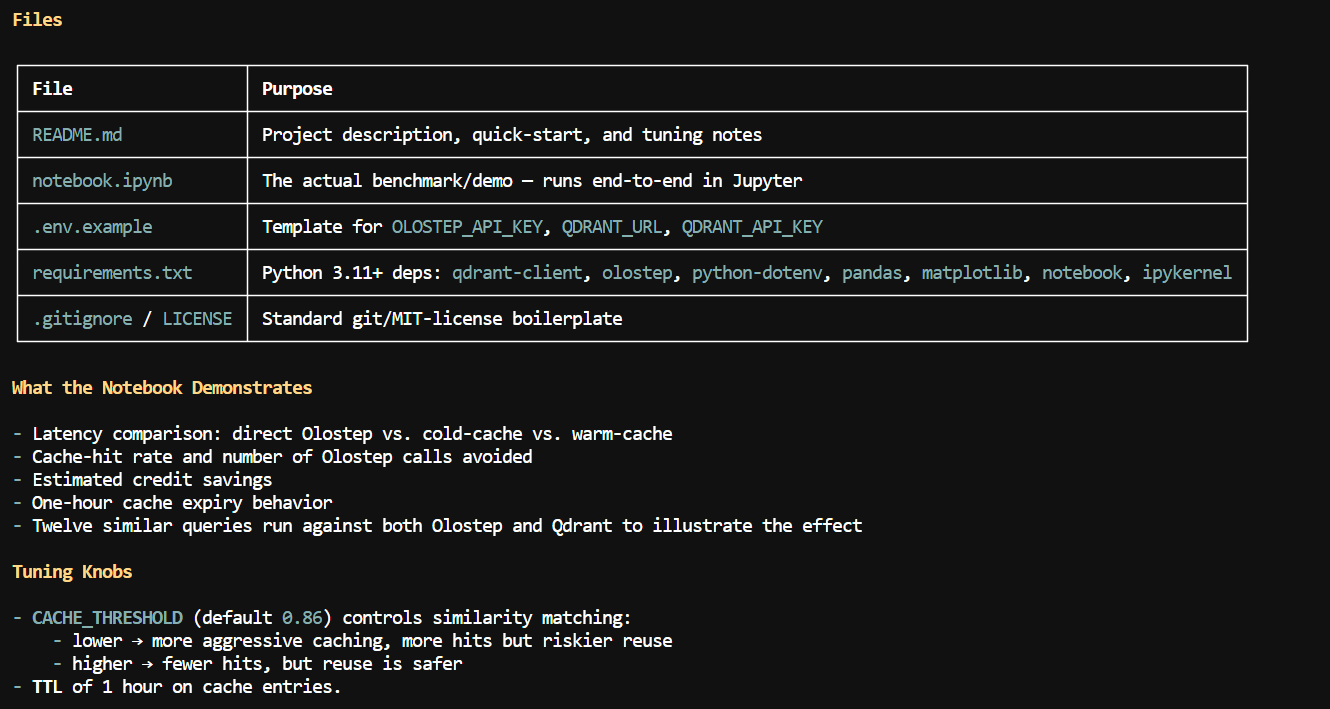
Pi will use terminal tools such as ls and read to explore the repository, inspect the README, and review supporting files such as .env.example, requirements.txt, and the Jupyter notebook.
In this example, MiniMax M3 correctly identified the main project files and explained that the repository is a semantic caching demo built with Olostep and Qdrant.
It highlighted the notebook-based workflow, the environment variables required for the APIs, the cache threshold and TTL settings, and the latency, cache-hit, and credit-saving evaluations included in the project.
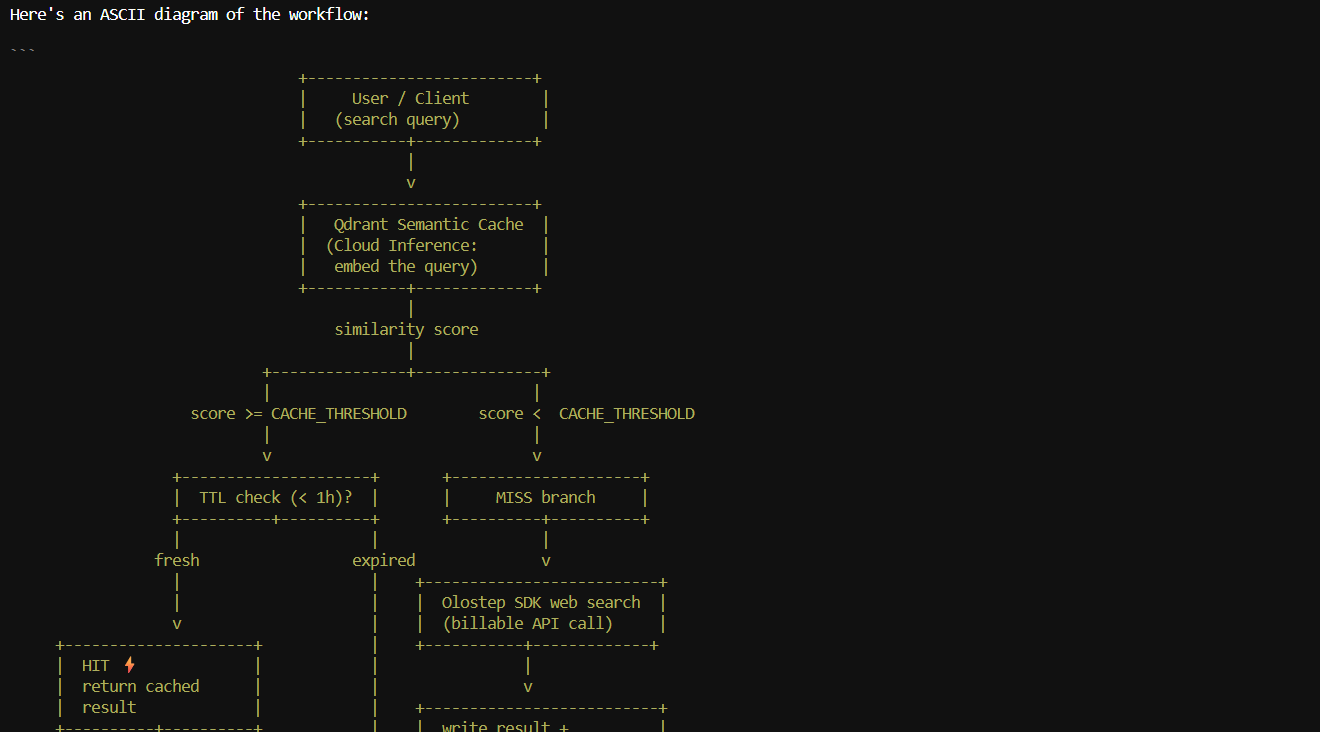
I also asked it to create an ASCII workflow diagram of the semantic cache pipeline. It generated a clear flow showing how a user query is embedded, checked against the Qdrant cache, evaluated against the similarity threshold, and either returned from cache or sent to Olostep before the result is stored.
For larger repositories or deeper multi-step tasks, you may need a larger context window. Update the --ctx-size value in the llama-server command and restart the server. Start by increasing it from 8192 to 16384, then test 32768` if GPU memory remains available.
Avoid jumping directly to a 100K context window. This experimental MiniMax M3 llama.cpp branch uses dense attention instead of MiniMax Sparse Attention, so very large contexts can significantly increase memory usage and may cause out-of-memory errors.
After running MiniMax M3 locally, I think it offers a much better balance than trying to run extremely large coding models such as GLM 5.2 or Kimi K2.7 Code.
Those models may be more powerful in some cases, but they also require far more GPU memory and can become very expensive to rent and serve locally.
With MiniMax M3, I was able to run a capable coding and agentic model across two RTX PRO 6000 GPUs, use it through a browser interface, expose it through an OpenAI-compatible API, and connect it to Pi as a local coding agent.
In my tests, it generated at roughly 70 tokens per second and handled repository exploration, README analysis, command execution, project explanations, and workflow diagrams well.
It is not a perfect setup yet. The llama.cpp support is still experimental, Sparse Attention is not available, and the context window needs to stay relatively small unless you have more available VRAM. Still, for a 3-bit quantized model running locally, the results were impressive.
Top DataCamp Courses
Programma
Programma
Corso
Tutorial
Abid Ali Awan
Tutorial
Abid Ali Awan
Tutorial
Abid Ali Awan
Tutorial
Abid Ali Awan
Tutorial
Abid Ali Awan
Tutorial
Abid Ali Awan