
Curso
Sistemas Multiagentes com LangGraph
2 h 45 min
7K
GLM-5-Turbo is designed to support real-world agent workflows. It provides multiple thinking modes, allowing users to balance between faster responses and deeper reasoning depending on the task.
For interactive applications, it also supports streaming output, enabling responses to be delivered token-by-token for a more responsive user experience.
One of its core strengths is function calling, which allows the model to invoke external tools reliably. The model also supports structured outputs such as JSON, making it easier to integrate with downstream systems and UI layers.
For longer workflows, GLM-5-Turbo includes context caching, which helps maintain performance across extended interactions without repeatedly processing the same information. It also supports integration with external systems through MCP (Model Context Protocol), allowing the model to connect with additional tools and data sources.
GLM-5-Turbo is deeply optimized for agent-style environments, particularly scenarios like OpenClaw, where tasks involve multiple steps, tools, and long execution chains.
This optimization improves several critical areas:
In practice, GLM-5-Turbo is fast enough for interactive systems while still being reliable in multi-step, tool-calling scenarios, which is exactly what we need for building browser agents.
In this tutorial, we will create a Streamlit application that behaves like a lightweight travel assistant. The user provides a query such as “Find the cheapest flights from SFO to JFK next Friday to Monday.” The system will then:
At a high level, the system consists of four components working together.
llm_client.py), which sends chat-completion requests to either Z.AI or OpenRouter. browser_tools.py), which exposes actions such as searching, opening pages, and extracting content. agent.py), which connects the model and tools into a multi-step workflow. app.py) provides an interface for interaction and visualization.Full source code: https://github.com/AashiDutt/GLM5_TURBO
Before building the application, make sure you have the following:
Install the required libraries:
pip install streamlit pandas python-dotenv requests playwright
playwright install chromium
The app.py file uses Streamlit, pandas, dotenv, and custom modules. While the browser_tools.pyfile uses requests and Playwright. API calls are made within llm_client.py using requests.
Now, run the following command to create a .env file where our API key(s) will reside:
cp .env.example .envSelect your preferred API endpoint and pass in the API key:
.env
PROVIDER=zai
# Direct Z.AI API
ZAI_API_KEY=Your Z.AI API key
ZAI_BASE_URL=https://api.z.ai/api/paas/v4/chat/completions
ZAI_MODEL=glm-5-turbo
# OpenRouter
OPENROUTER_API_KEY=Your OpenRouter API key
OPENROUTER_BASE_URL=https://openrouter.ai/api/v1/chat/completions
OPENROUTER_MODEL=z-ai/glm-5-turbo
# Browser
HEADLESS=true
MAX_STEPS=10
Similarly, the Playwright browser is launched from this constructor in browser_tools.py:
class BrowserTools:
    def __init__(self, headless: bool = True) -> None:
        self.playwright = sync_playwright().start()
        self.browser = self.playwright.chromium.launch(headless=headless)
        self.context = self.browser.new_context(viewport={"width": 1440, "height": 1100})
        self.page = self.context.new_page()
This block initializes a fully controlled browser environment using Playwright, which the agent uses to interact with the web.
It starts the Playwright engine, launches a Chromium browser, creates an isolated browser session, and opens a new page where all actions take place.
This setup allows the agent to browse real websites, observe live content, and make decisions based on what it sees.
Next, we’ll set up our LLMClient which supports both direct Z.AI usage and OpenRouter with the same interface. The provider-specific endpoint is selected in the constructor. Since the pricing is comparable, you can use either API for this demo based on your preference.
Here is the key setup:
class LLMClient:
    def __init__(
        self,
        provider: str,
        api_key: str,
        model: str,
        app_name: str = "GLM-5 Browser Agent Demo",
        app_url: str = "http://localhost:8501",
    ) -> None:
        self.provider = provider.lower().strip()
        self.api_key = api_key
        self.model = model
        if self.provider == "zai":
            self.url = os.getenv("ZAI_BASE_URL", "https://api.z.ai/api/paas/v4/chat/completions")
        elif self.provider == "openrouter":
            self.url = os.getenv("OPENROUTER_BASE_URL", "https://openrouter.ai/api/v1/chat/completions")
This initializer configures the LLM client by selecting the appropriate API endpoint (Z.AI or OpenRouter) while keeping the interface consistent.
It stores the API key, model, and endpoint URL, allowing the rest of the system to call the model without worrying about provider-specific differences.
Then create_chat_completion() builds the payload, attaches tools when needed, and parses any returned tool calls.
payload: Dict[str, Any] = {
    "model": self.model,
    "messages": messages,
    "temperature": temperature,
    "max_tokens": max_tokens,
    "stream": False,
}
if tools:
    payload["tools"] = tools
    payload["tool_choice"] = "auto"
The above payload defines the request sent to the model, including the conversation context and generation parameters. By attaching the tools and enabling tool_choice="auto", it allows the model to decide when to invoke external functions.
In agent.py, we define a tool schema that the model can call. These include search_web, open_url, open_search_result, extract_page, extract_flight_cards, click, type_text, and wait_for_text.
Here is one example tool definition:
{
    "type": "function",
    "function": {
        "name": "search_web",
        "description": "Search the public web for flight result pages or travel aggregators.",
        "parameters": {
            "type": "object",
            "properties": {
                "query": {"type": "string"},
                "max_results": {"type": "integer", "default": 8},
            },
            "required": ["query"],
        },
    },
}
This schema tells the model what the tool does, what inputs it expects, and how to call it. By defining tools this way, we allow the model to dynamically decide when to search the web instead of hardcoding the flow.
On the execution side, those tools are implemented in browser_tools.py. For this demo, we used DuckDuckGo’s HTML endpoint to store the current result links for follow-up navigation.
def search_web(self, query: str, max_results: int = 8) -> Dict[str, Any]:
    url = f"https://html.duckduckgo.com/html/?q={quote_plus(query)}"
    headers = {"User-Agent": "Mozilla/5.0"}
    resp = requests.get(url, headers=headers, timeout=30)
    resp.raise_for_status()
    html = resp.text
The search_web() function above performs a lightweight web search by fetching raw HTML results and parsing them, avoiding the need for a paid search API. It also stores the results internally so the agent can navigate them in subsequent steps.
Now that we have defined how the agent can interact with the web, the next step is to see how it actually uses these tools to extract flight information via web search.
Once the model finds a promising source, it needs to inspect it. We can use the browser tools(from step 3) to extract raw page snapshots.
We’ll use the open_url() tool to load web page and return a snapshot with title, URL, and visible text.
def open_url(self, url: str) -> Dict[str, Any]:
    self.page.goto(url, wait_until="domcontentloaded", timeout=45000)
    self.page.wait_for_timeout(1200)
    return self._page_snapshot()
For broader extraction, we’ll use the following extract_page() tool which returns the page snapshot and a collected set of links from the current page.
def extract_page(self, max_chars: int = 7000, link_limit: int = 20) -> Dict[str, Any]:
    snapshot = self._page_snapshot(max_chars=max_chars)
    snapshot["links"] = self._collect_links(limit=link_limit)
    self.current_links = snapshot["links"]
    return snapshot
This is useful because the model does not always need to click blindly. Sometimes it can inspect the current page text and available links first, then decide the next move.
A key part of the demo is extract_flight_cards() function which takes the visible page text and uses regex patterns to detect prices, times, durations, and stops.
Here is the core of that logic:
money_pattern = re.compile(r"(?:\$|USD\s?)(\d{2,5})")
time_pattern = re.compile(r"\b\d{1,2}:\d{2}\s?(?:AM|PM|am|pm)?\b")
duration_pattern = re.compile(r"\b\d{1,2}\s?h\s?\d{0,2}\s?m?\b|\b\d{1,2}\s?hr\s?\d{0,2}\s?min?\b", re.I)
stop_pattern = re.compile(r"nonstop|1 stop|2 stops|3 stops", re.I)
These regex patterns act like detectors for common flight-related signals. The money_pattern captures prices in formats like $299 or USD 299, while the time_pattern identifies departure and arrival times.
Similarly, the duration_pattern extracts travel duration, and the stop_pattern detects whether a flight is nonstop or has layovers. You can build similar patterns for any use case.
Once these signals are defined, the function scans small chunks of text and looks for meaningful combinations. When a match is found, it constructs a structured flight card:
card = {
    "snippet": joined[:350],
    "price_usd": int(price_match.group(1)),
    "times": times[:2],
    "duration": duration.group(0) if duration else None,
    "stops": stops.group(0) if stops else None,
}
The above code block converts raw text into a structured representation of a flight option. It extracts the price, limits time entries to the most relevant ones, and handles missing fields. This preserves the original context, which is useful for debugging.
With extraction in place, the agent now has a way to convert unstructured page content into usable data. Next, we’ll see how this data flows through the agent loop to drive multi-step decision making.
The actual agent behavior lives in BrowserAgent class(inside agent.py). This class sends the prompt and tool schema to the model, checks whether the model wants to call a tool, executes that tool, appends the tool result back into the conversation, and continues until a final answer is produced.
Here is the main loop:
for step in range(1, self.max_steps + 1):
    assistant = self.llm.create_chat_completion(
        messages=messages,
        tools=TOOLS,
        temperature=0.2,
        max_tokens=2200,
        enable_thinking=False,
    )
    if assistant.tool_calls:
        ...
        result = self.tool_runner(tc.name, tc.arguments)
        ...
        continue
    final_content = assistant.content.strip()
    if final_content:
        yield {"type": "final", "step": step, "content": final_content}
        return
This loop is the heart of the demo.
At each step, the model receives the current conversation state and decides what to do next. If it returns tool calls, those are executed using tool_runner, and the results are fed back into the loop for the next iteration.
This process continues until the model produces a final response instead of calling a tool.
The loop also enforces a maximum step limit to prevent infinite execution and keeps the process controlled and efficient.
In app.py, we map the tool names requested by the model to the actual browser methods. That mapping is implemented with make_tool_runner() function:
def make_tool_runner(browser: BrowserTools):
    def run(name: str, args: Dict[str, Any]):
        if name == "search_web":
            return browser.search_web(**args)
        if name == "open_url":
            return browser.open_url(**args)
        if name == "open_search_result":
            return browser.open_search_result(**args)
        if name == "extract_page":
            return browser.extract_page(**args)
        if name == "extract_flight_cards":
            return browser.extract_flight_cards(**args)
This function acts as a dispatcher between the model and the browser. The model only returns the tool name and arguments, and run() translates that into a function call on the BrowserTools instance.
Now that the agent can successfully call and execute tools, the next step is to build the user interface that ties everything together.
The Streamlit UI turns the browser agent into an interactive application. It collects the trip details from the user, launches the agent, streams intermediate steps, and finally renders a summary along with a structured table of top flight options. This full UI flow is implemented in app.py.
st.set_page_config(page_title="GLM-5 Browser Agent", page_icon="", layout="wide")
st.title("GLM-5-Turbo Real-Time Browser Agent")
st.subheader("Trip Request")
origin = st.text_input("Origin", value="SFO")
destination = st.text_input("Destination", value="JFK")
depart_date = st.date_input("Depart date")
return_date = st.date_input("Return date")
adults = st.number_input("Adults", min_value=1, max_value=9, value=1)
natural_request = st.text_area(
    "Optional natural language request",
    value="Find the cheapest reasonable flight options and summarize the best ones.",
    height=120,
)
user_query = (
    f"Find flight options from {origin} to {destination} for {adults} adult(s). "
    f"Departure date: {depart_date}. Return date: {return_date}. "
    f"User preference: {natural_request}"
)
run = st.button("Run browser agent", type="primary", use_container_width=True)
if run:
    if not api_key:
        st.error("Please enter an API key in the sidebar.")
        st.stop()
    llm = LLMClient(provider=provider, api_key=api_key, model=model)
    event_box = st.container(border=True)
    result_box = st.container(border=True)
    all_events = []
    with managed_browser(headless=headless) as browser:
        agent = BrowserAgent(llm=llm, tool_runner=make_tool_runner(browser), max_steps=max_steps)
for event in agent.stream(user_query):
    all_events.append(event)
    with event_box:
        if event["type"] == "status":
            st.write(f"**Step {event['step']}** — {event['content']}")
        elif event["type"] == "tool_call":
            with st.expander(f"Step {event['step']} • Tool call: {event['tool']}", expanded=False):
                st.json(event["arguments"])
        elif event["type"] == "tool_result":
            with st.expander(f"Step {event['step']} • Tool result: {event['tool']}", expanded=False):
                st.json(event["result"])
        elif event["type"] == "final":
            st.success("Agent finished.")
final_event = next((e for e in reversed(all_events) if e["type"] == "final"), None)
final_text = final_event["content"] if final_event else ""
with result_box:
    st.subheader("Final Answer")
    parsed = parse_final_json(final_text)
    if parsed:
        st.markdown(render_final_markdown(parsed))
        options_df = build_options_dataframe(parsed)
        if not options_df.empty:
            st.subheader("Top options table")
            st.dataframe(
                options_df,
                use_container_width=True,
                column_config={
                    "Link": st.column_config.LinkColumn("Link", display_text="Open source"),
                },
            )
    else:
        st.markdown(final_text)
Here is how the Streamlit UI brings all components together:
st.set_page_config() and st.title() calls define the overall layout and heading of the app, while the input widgets such as st.text_input(), st.date_input(), st.number_input(), and st.text_area() collect the trip details. Run browser agent button, the app first checks whether an API key is available, then initializes the LLMClient. It then creates separate containers for intermediate agent logs and final results, and opens a managed Playwright browser session. Inside that session, the BrowserAgent starts streaming events, and the UI displays each status update, tool call, and tool result.render_final_markdown(), while build_options_dataframe() converts the structured flight options into a table with clickable source links.With this step complete, you can save everything as app.py and launch the app with:
streamlit run app.py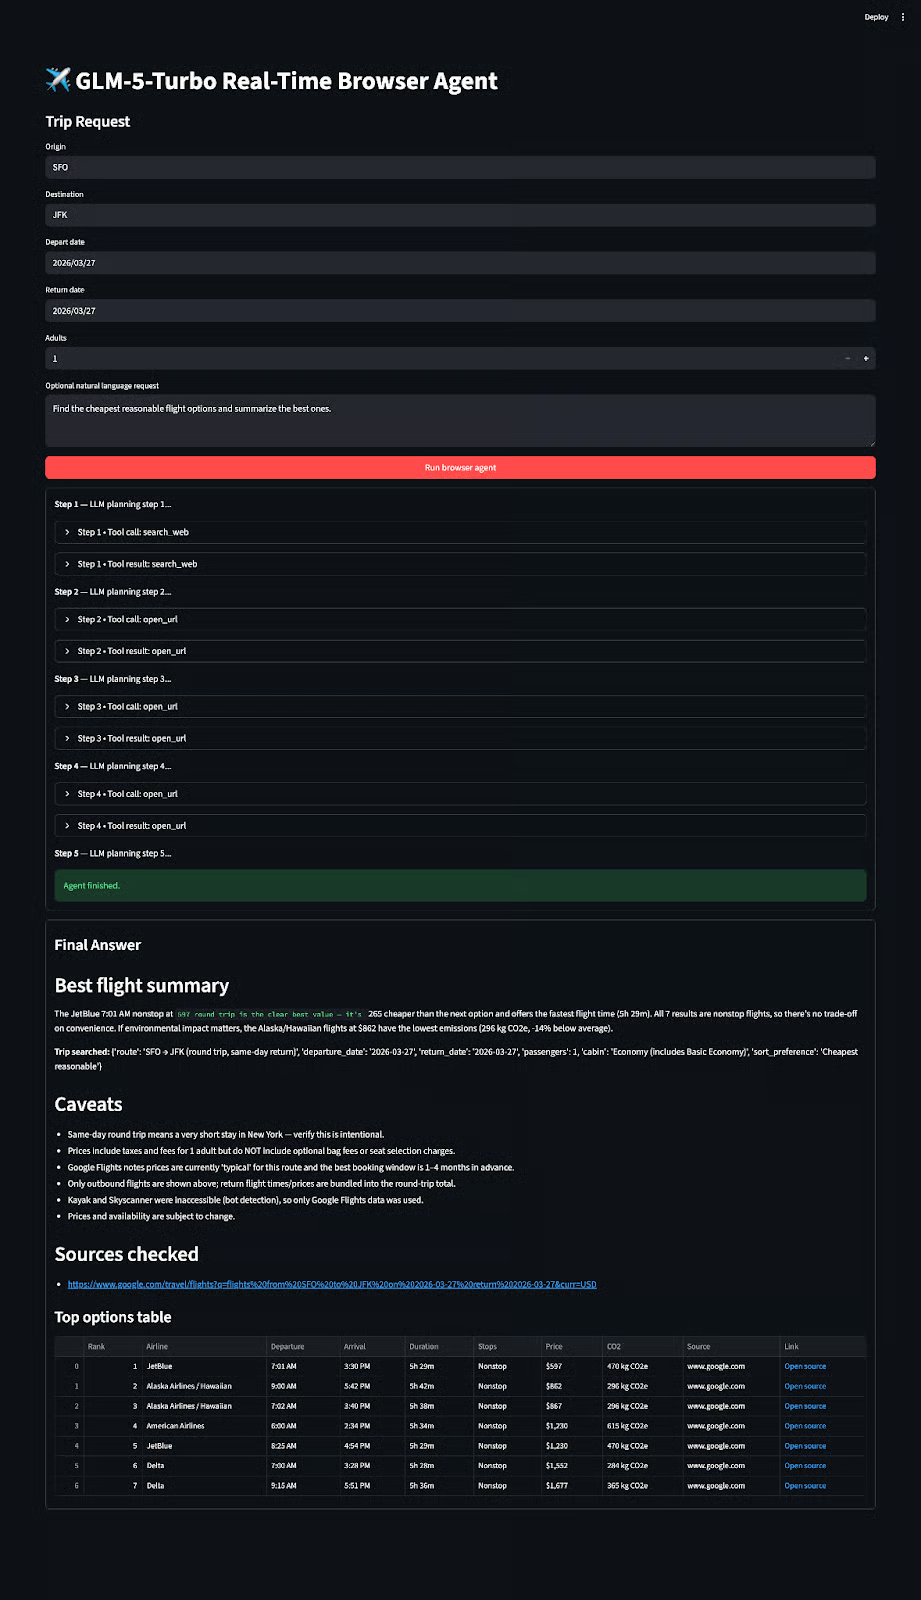
This project works well as a real demo because it uses actual browser search results and tool-calling. At the same time, it is still a prototype. Flight websites are dynamic, pages can be noisy, and some platforms use anti-bot protections.
The current extraction logic is intentionally heuristic, which keeps the system simple and easy to understand.
More importantly, this setup is not limited to flights. With a few tweaks, mainly updating the prompts and extraction logic, you can reuse the same architecture to build agents for shopping, research, news aggregation, or any task that requires browsing and summarizing live information.
In this tutorial, we built a real-time browser agent with GLM-5-Turbo, Playwright, and Streamlit. The model acts as a planner, the browser tools act as the execution layer, and the UI turns structured results into a user-friendly format.
The most important takeaway is that the value does not come from the model alone. It comes from combining the model with a controlled tool layer and an agent loop.
However, there are several extensions to this project. You can improve extraction by adding site-specific parsers, extending the system to hotels or itineraries, or integrating user preferences such as nonstop flights or preferred airlines. These can help you turn this demo into a full-fledged browser extension.
Top DataCamp Courses
Curso
Curso
Curso
Tutorial
Aashi Dutt
Tutorial
Khalid Abdelaty
Tutorial
Abid Ali Awan
Tutorial
Aashi Dutt
Tutorial
Aashi Dutt
Tutorial
Abid Ali Awan