Track
AWS Cloud Practitioner (CLF-C02)
10 hr
Imagine you are managing terabytes of customer transaction data, and your existing system is buckling under the pressure.
You need a solution that scales on demand, optimizes costs, and integrates with your existing AWS setup. Amazon Elastic MapReduce (EMR) can help with this. When I first started working with big data, I faced the same challenge—until I discovered EMR.
In this guide, we will go through everything from setting up an EMR cluster to executing workloads, optimizing performance, ensuring security, troubleshooting issues, and managing costs.
Amazon EMR is a fully managed cluster-based service that simplifies big data processing by providing automated provisioning, scaling, and configuration of open-source frameworks.
It allows you to analyze vast amounts of structured and unstructured data without the hassle of manually managing on-premises clusters.
The image below shows how Amazon EMR on EKS works with other AWS services, providing a visual representation of its integration and workflow.
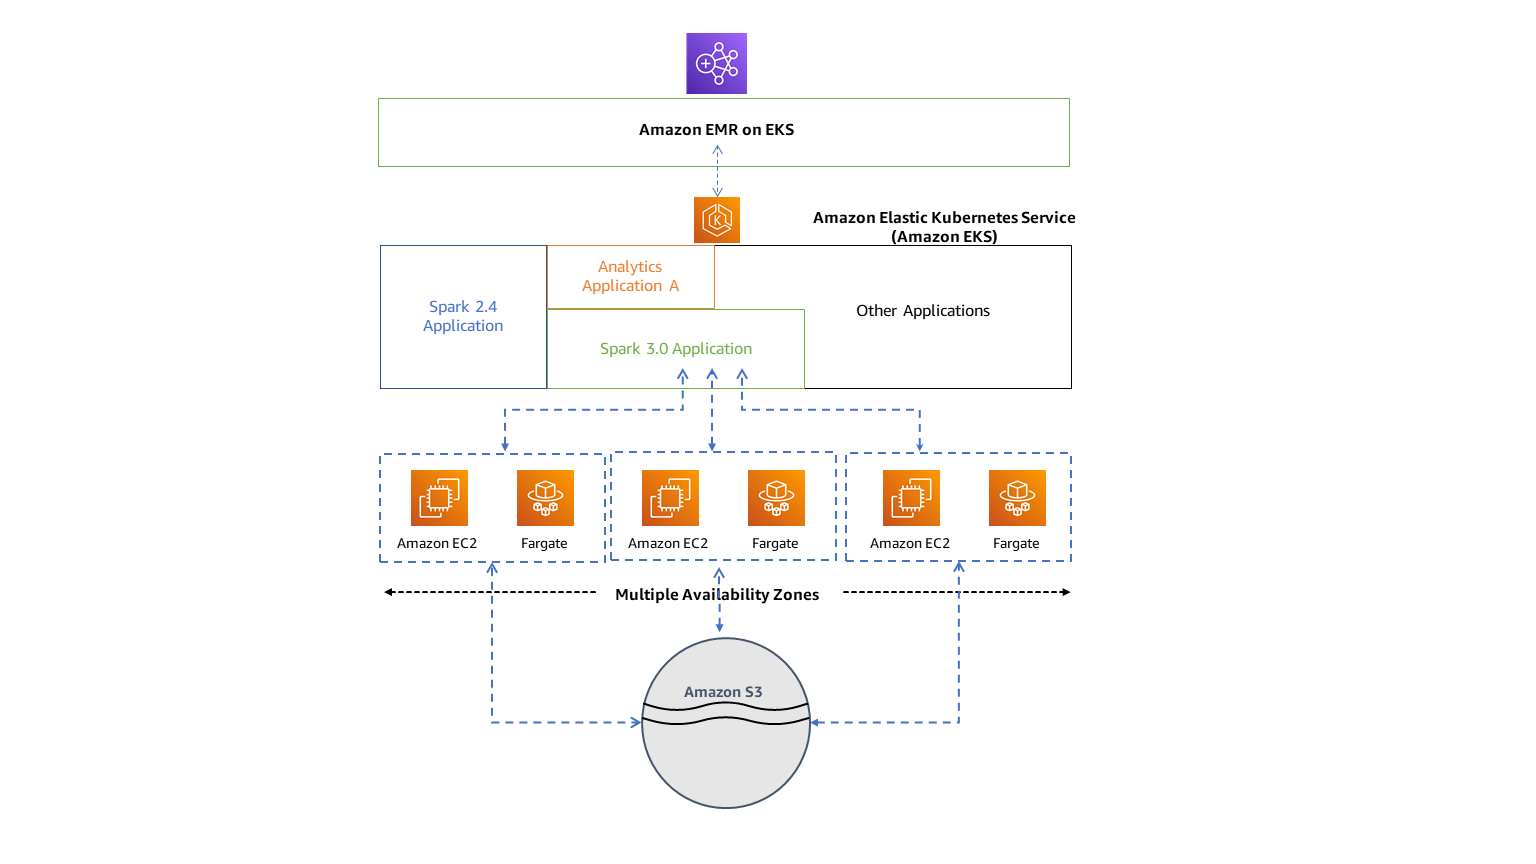
A diagram illustrating how Amazon EMR integrates with Amazon EKS and other AWS services for big data processing. Source: AWS Docs
If you are new to AWS, I recommend checking out this Introduction to AWS course to build foundational knowledge.
Some of the key features of Amazon EMR include:
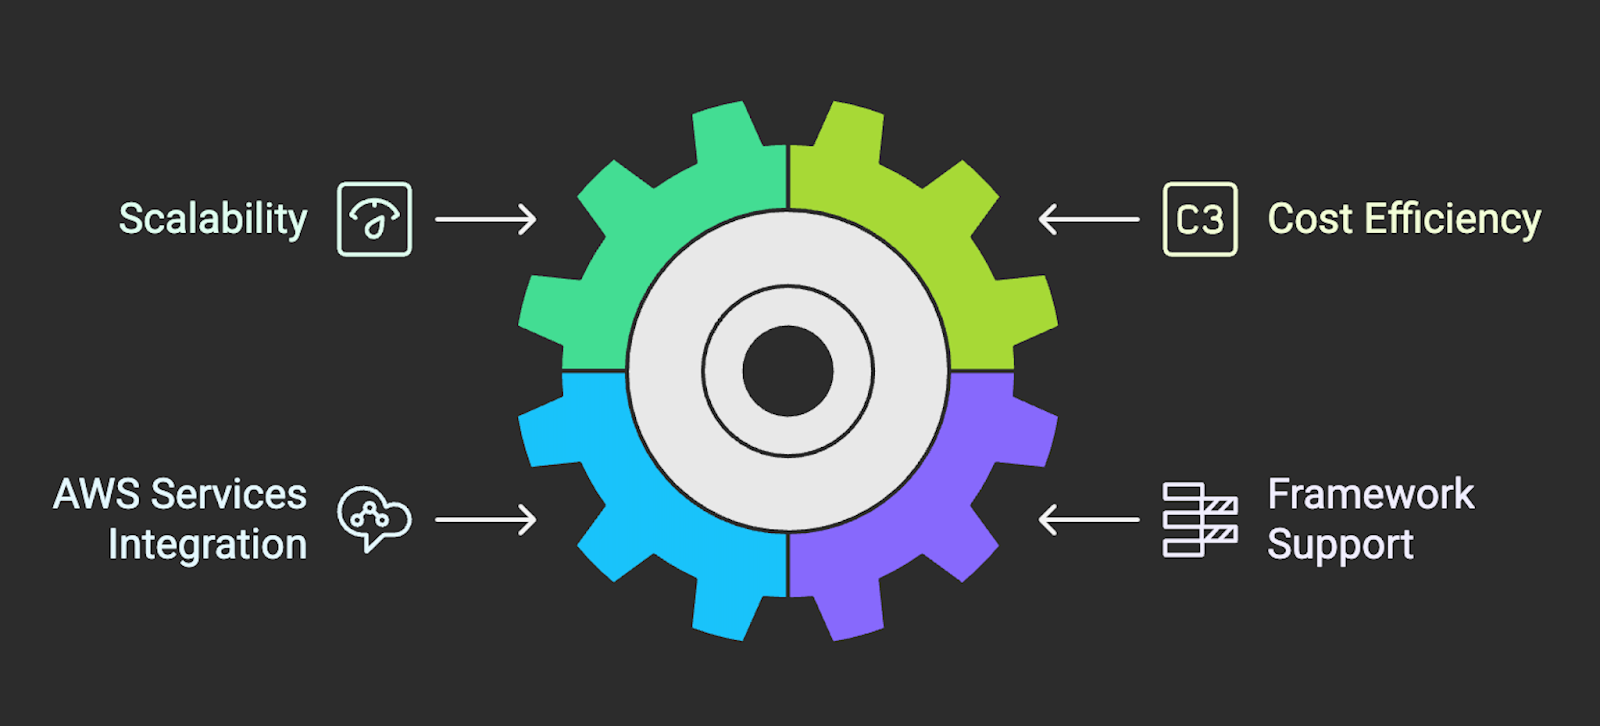 Diagram listing the key features of Amazon EMR. Image created using Napkin AI
Automating cluster management and scaling allows you to reduce operational complexity and focus on data processing and analytics.
If you want to better understand AWS storage services like Amazon S3 before proceeding with Amazon EMR, check out this AWS Storage Tutorial.
To set up an Amazon EMR cluster, you will need to access the EMR service, create the cluster, and configure it to suit your workload.
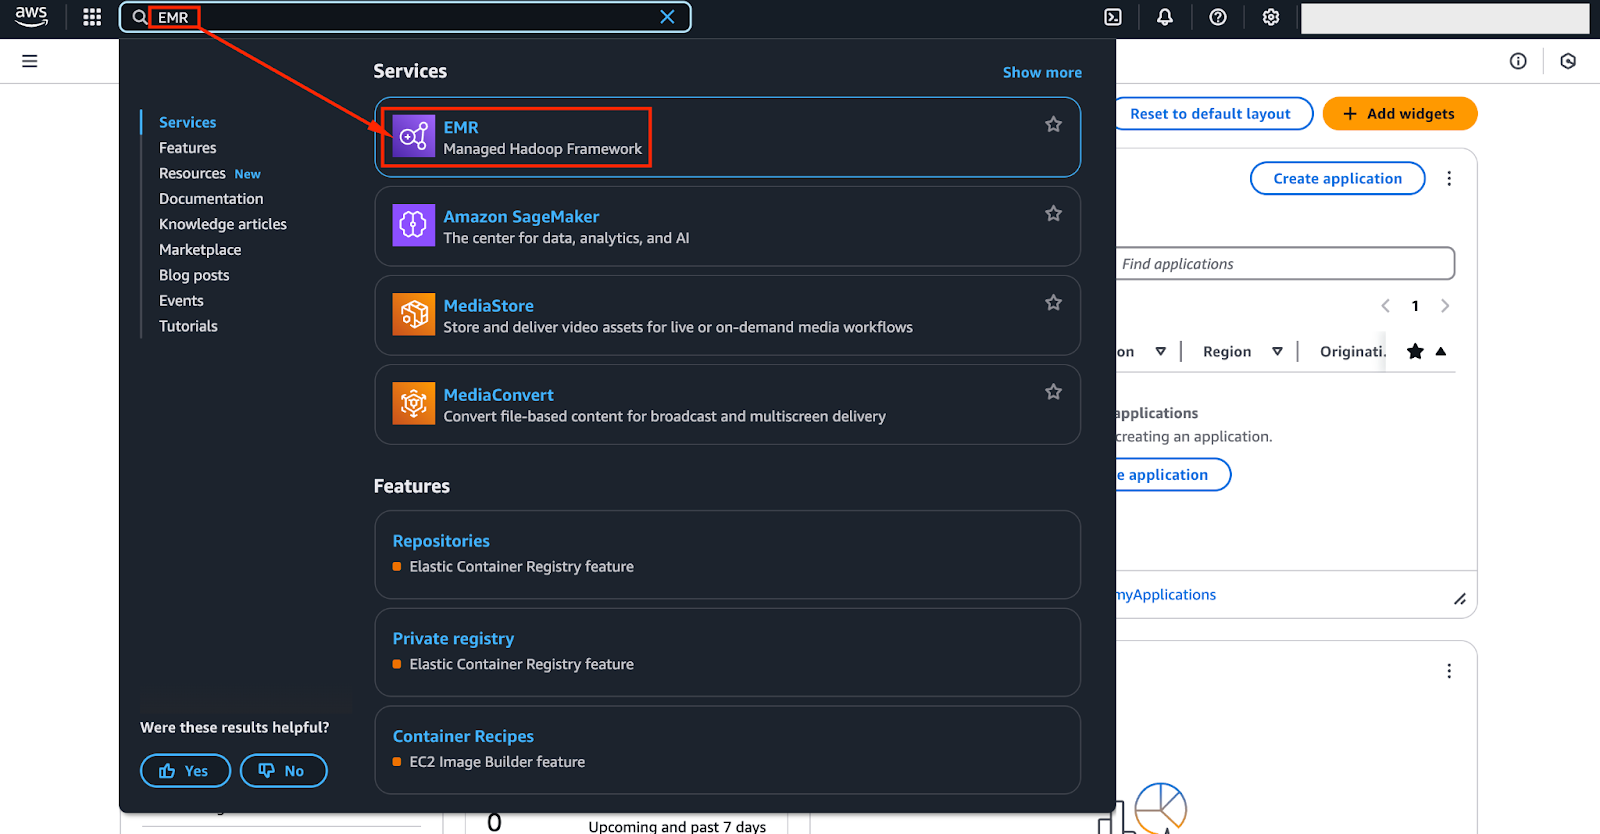
To get started, log in to the AWS Management Console and navigate to the EMR service.
You can do this by searching for "EMR" in the AWS Management Console’s search panel - as shown in the image below.
Once you are there, click on “Create Cluster” - as shown in the image below.
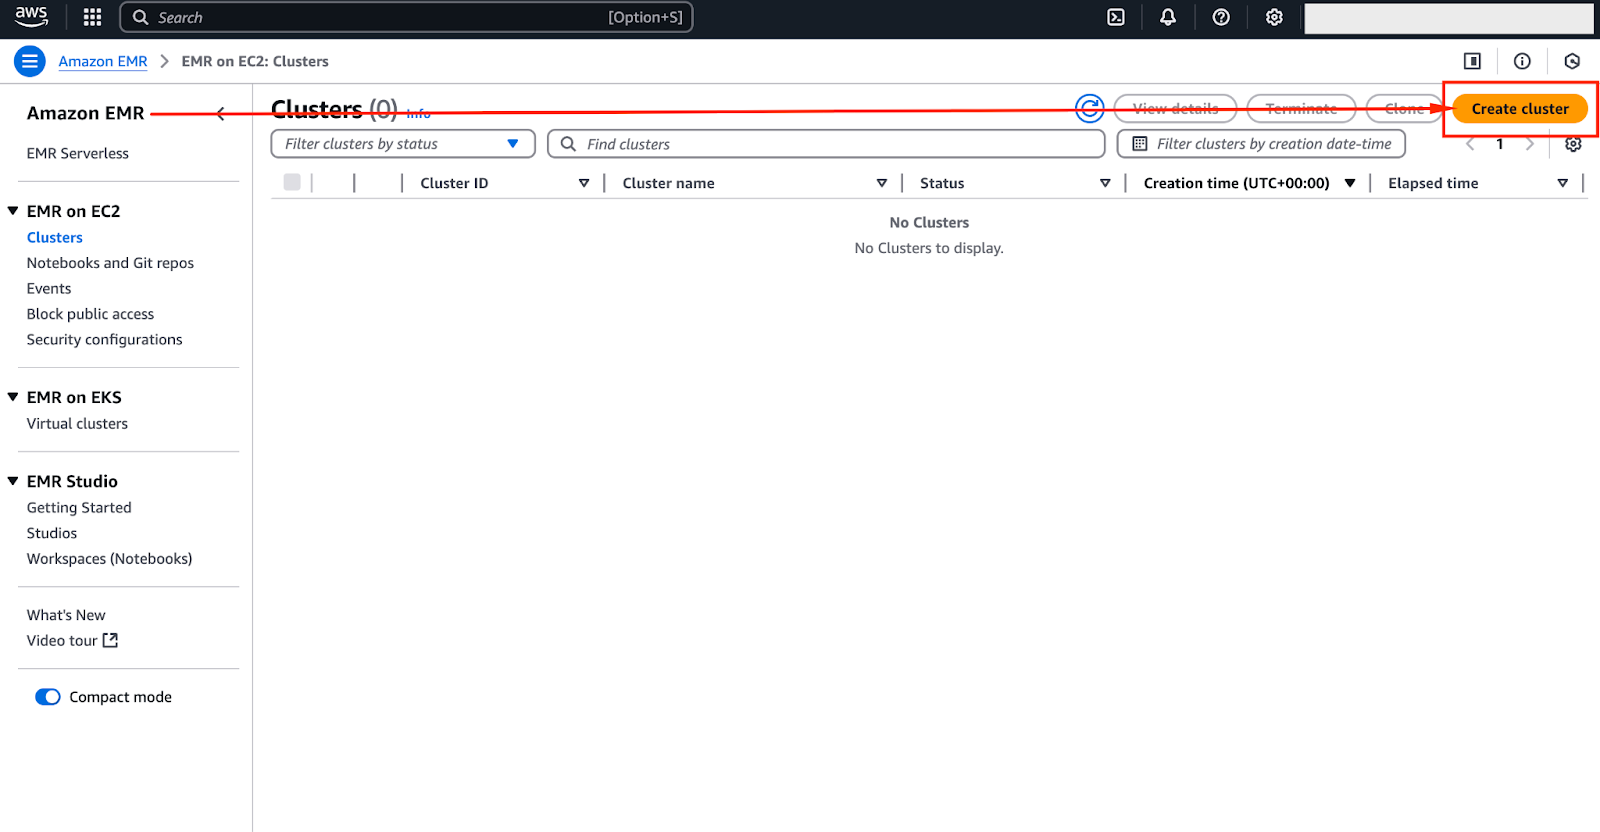
The image below provides a screenshot of the current EMR interface—while it may evolve over time, the core settings will remain similar.
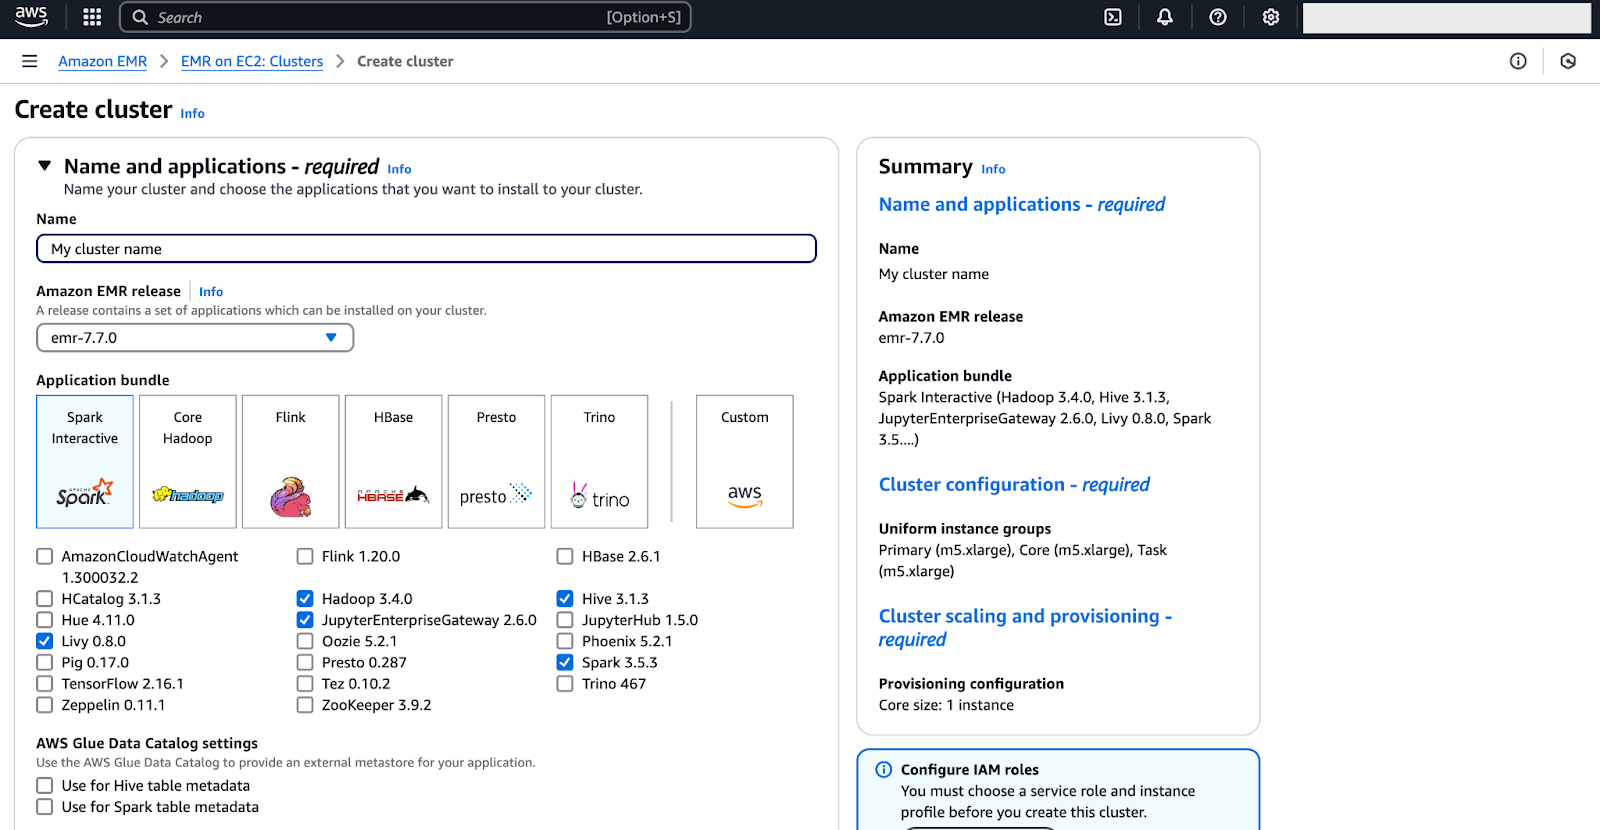
To configure your Amazon EMR cluster, you will need to adjust several settings to align with your specific workload requirements. Follow the instructions below:
EMR provides multiple frameworks, such as Apache Spark for in-memory processing, Hadoop for distributed storage and processing, and Presto for interactive SQL queries.
Choose the framework that best suits your use case.
The instance type impacts performance and cost. A common choice is m5.xlarge, as it offers a balance between computing power and affordability.
For memory-intensive workloads, use r5.xlarge, while c5.xlarge is better suited for compute-intensive tasks.
EMR clusters consist of three types of nodes:
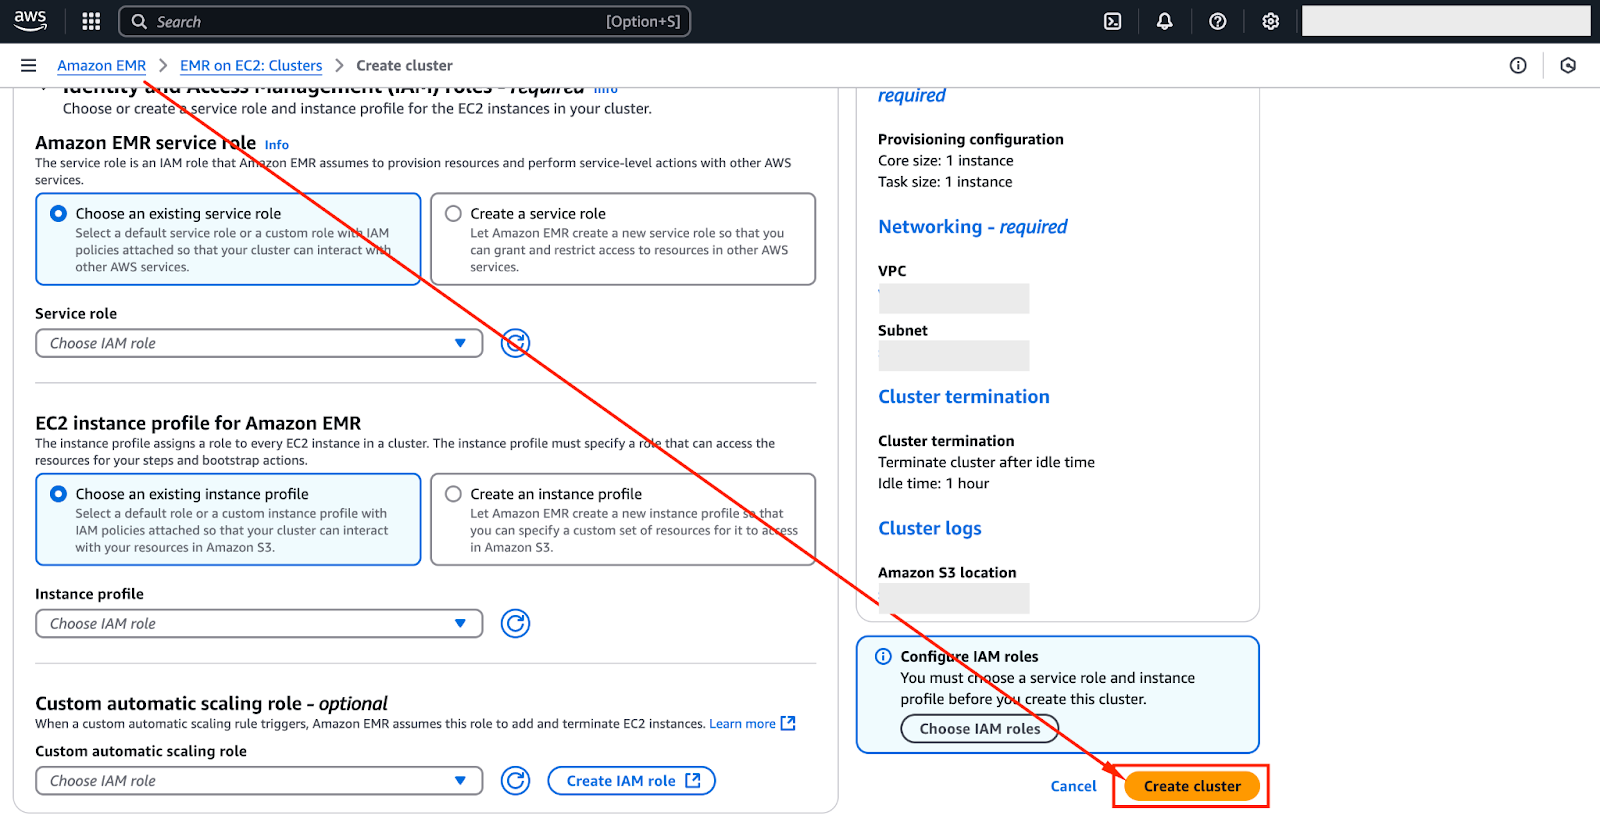
Set up EC2 key pairs for SSH access and configure IAM roles to control permissions.
It would be a good idea for you to enable Kerberos authentication or AWS Lake Formation for enhanced security.
Define VPC settings, enable auto-scaling to dynamically adjust cluster size, and specify Amazon S3 as the primary storage location (s3://your-bucket-name/).
After reviewing the configuration, click "Create Cluster" to launch it.
The cluster will take a few minutes to initialize before becoming available.
The image below highlights the interface where you can create the cluster.
Once the cluster is up and running, you can fine-tune it by selecting pre-installed applications and configuring bootstrap actions:
pip install pandas numpy)Proper configuration ensures that your EMR cluster is fully optimized for its workload, reducing processing time and operational costs.
Once your EMR cluster is set up and configured, the next step is to start working with your data.
Amazon EMR primarily relies on Amazon S3 to store input datasets and save output results.
Unlike HDFS, which stores data within the cluster, S3 offers durability, scalability, and cost-efficiency, which makes it the preferred choice for managing data in EMR.
To upload data to Amazon S3, follow these steps:
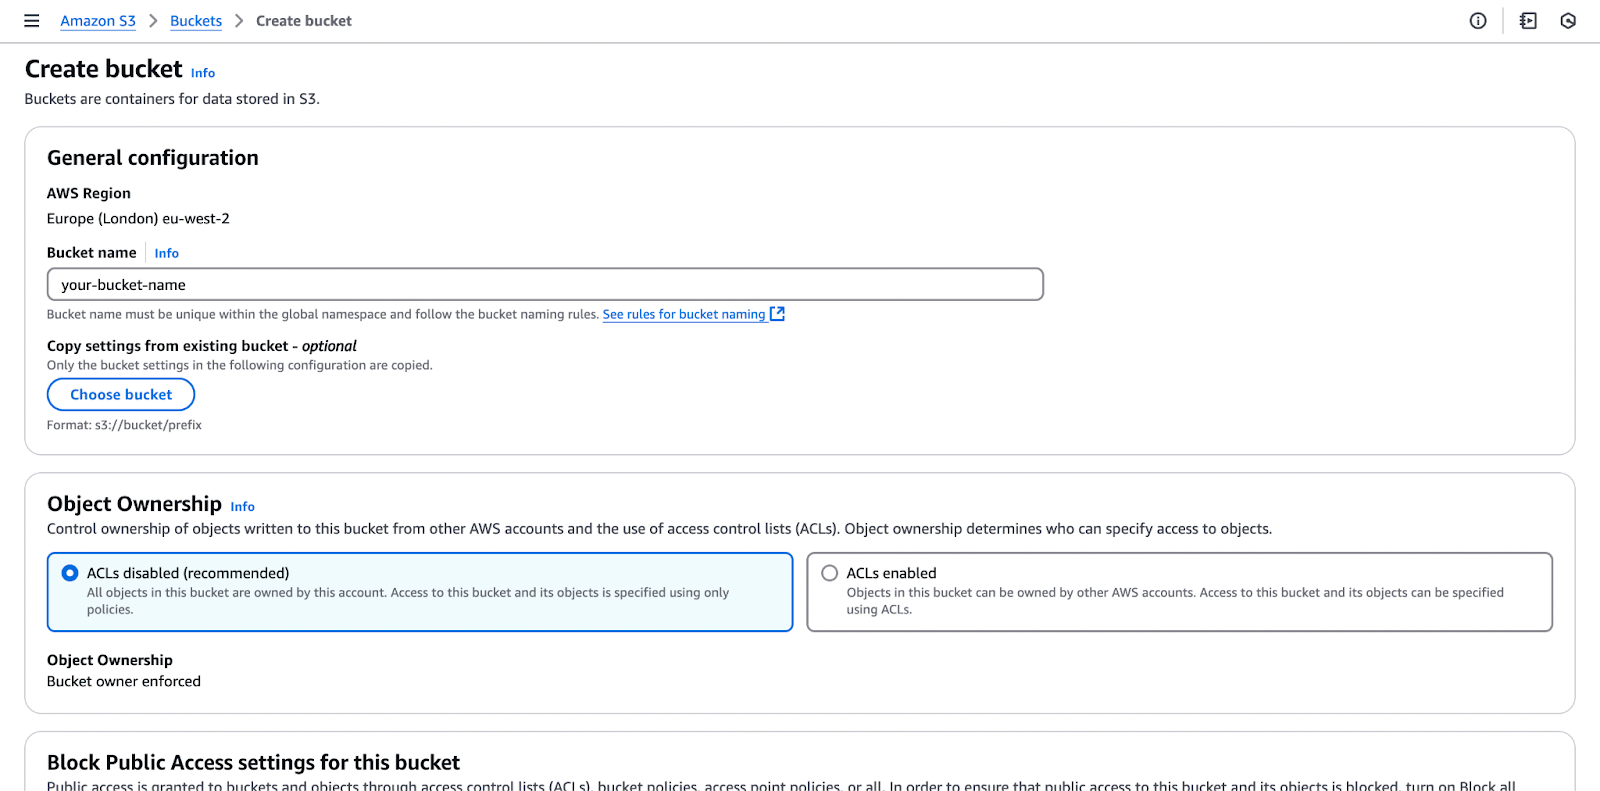
Log in to the AWS Management Console and open the Amazon S3 service.
Choose an existing bucket or create a new one. Make sure the bucket is in the same region as your EMR cluster to minimize latency.
The image below shows the process of creating an Amazon S3 bucket.
When creating a bucket, remember that the bucket name must be globally unique and comply with AWS naming conventions. Make sure that you choose a name that reflects your use case while adhering to these requirements.
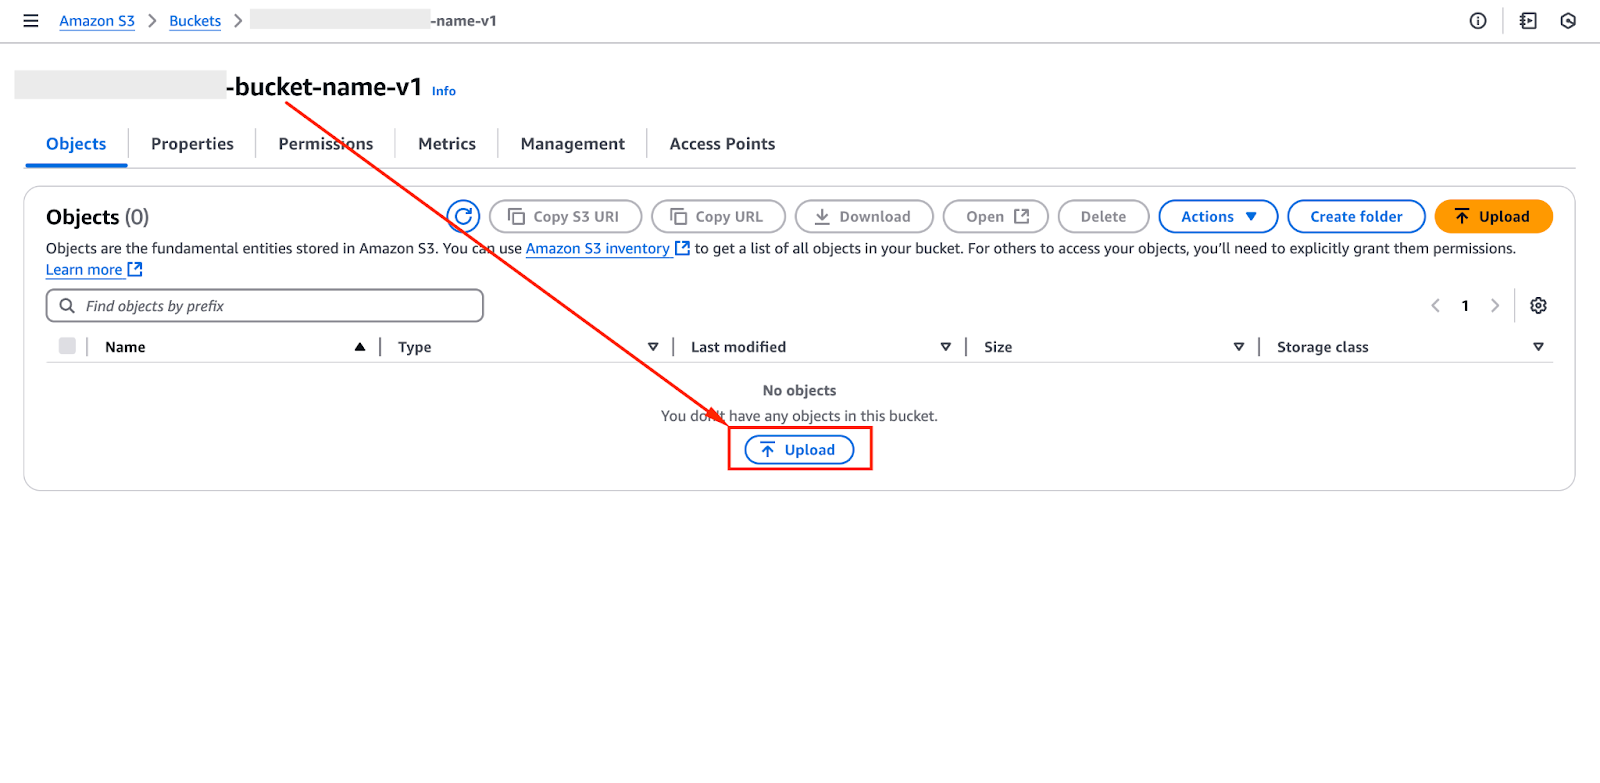
Click "Upload", select the required files, and define access permissions.
The image below highlights the interface where you can upload files to an Amazon S3 bucket.
Alternatively, you can use the AWS CLI to upload files programmatically.
Before doing so, you will need to ensure that the AWS CLI is installed and configured with the appropriate credentials by running:
aws configureThis will prompt you to enter your AWS Access Key ID, Secret Access Key, region, and output format to authenticate your session. You can skip the above step if the AWS CLI is already configured.
Once configured, you can upload files using the following command:
aws s3 cp local_file.csv s3://your-bucket-name/data/Once uploaded, data can be accessed from EMR using an S3 path: s3://your-bucket-name/data/
Applications like Spark, Hadoop, and Hive can then process the data directly from S3.
After uploading data, you can process it using Apache Spark, Hadoop, or other big data frameworks.
EMR allows job execution through the AWS CLI, EMR console, or direct SSH access.
To submit a Spark job, SSH into the cluster and use the spark-submit command:
spark-submit --deploy-mode cluster s3://your-bucket-name/scripts/sample_job.pyAlternatively, you can submit jobs through the AWS EMR "Steps" feature - which allows job automation without manually accessing the cluster.
To explore foundational concepts before running Spark jobs on EMR, the Big Data Fundamentals with PySpark course offers a great starting point. If your workflow includes preparing messy datasets, you might find the Cleaning Data with PySpark course particularly useful.
For Hadoop jobs, use the command-line interface:
hadoop jar s3://your-bucket-name/jars/sample_job.jar input_dir output_dirHadoop jobs can also be managed using AWS Step Functions to automate workflows.
Effective security and access control are crucial when running big data jobs.
As Spark and Hadoop jobs interact with sensitive data, Amazon EMR integrates with Apache Ranger to enforce fine-grained access control and permissions.
The image below illustrates an example architecture of this integration, highlighting how security policies are applied across EMR clusters.
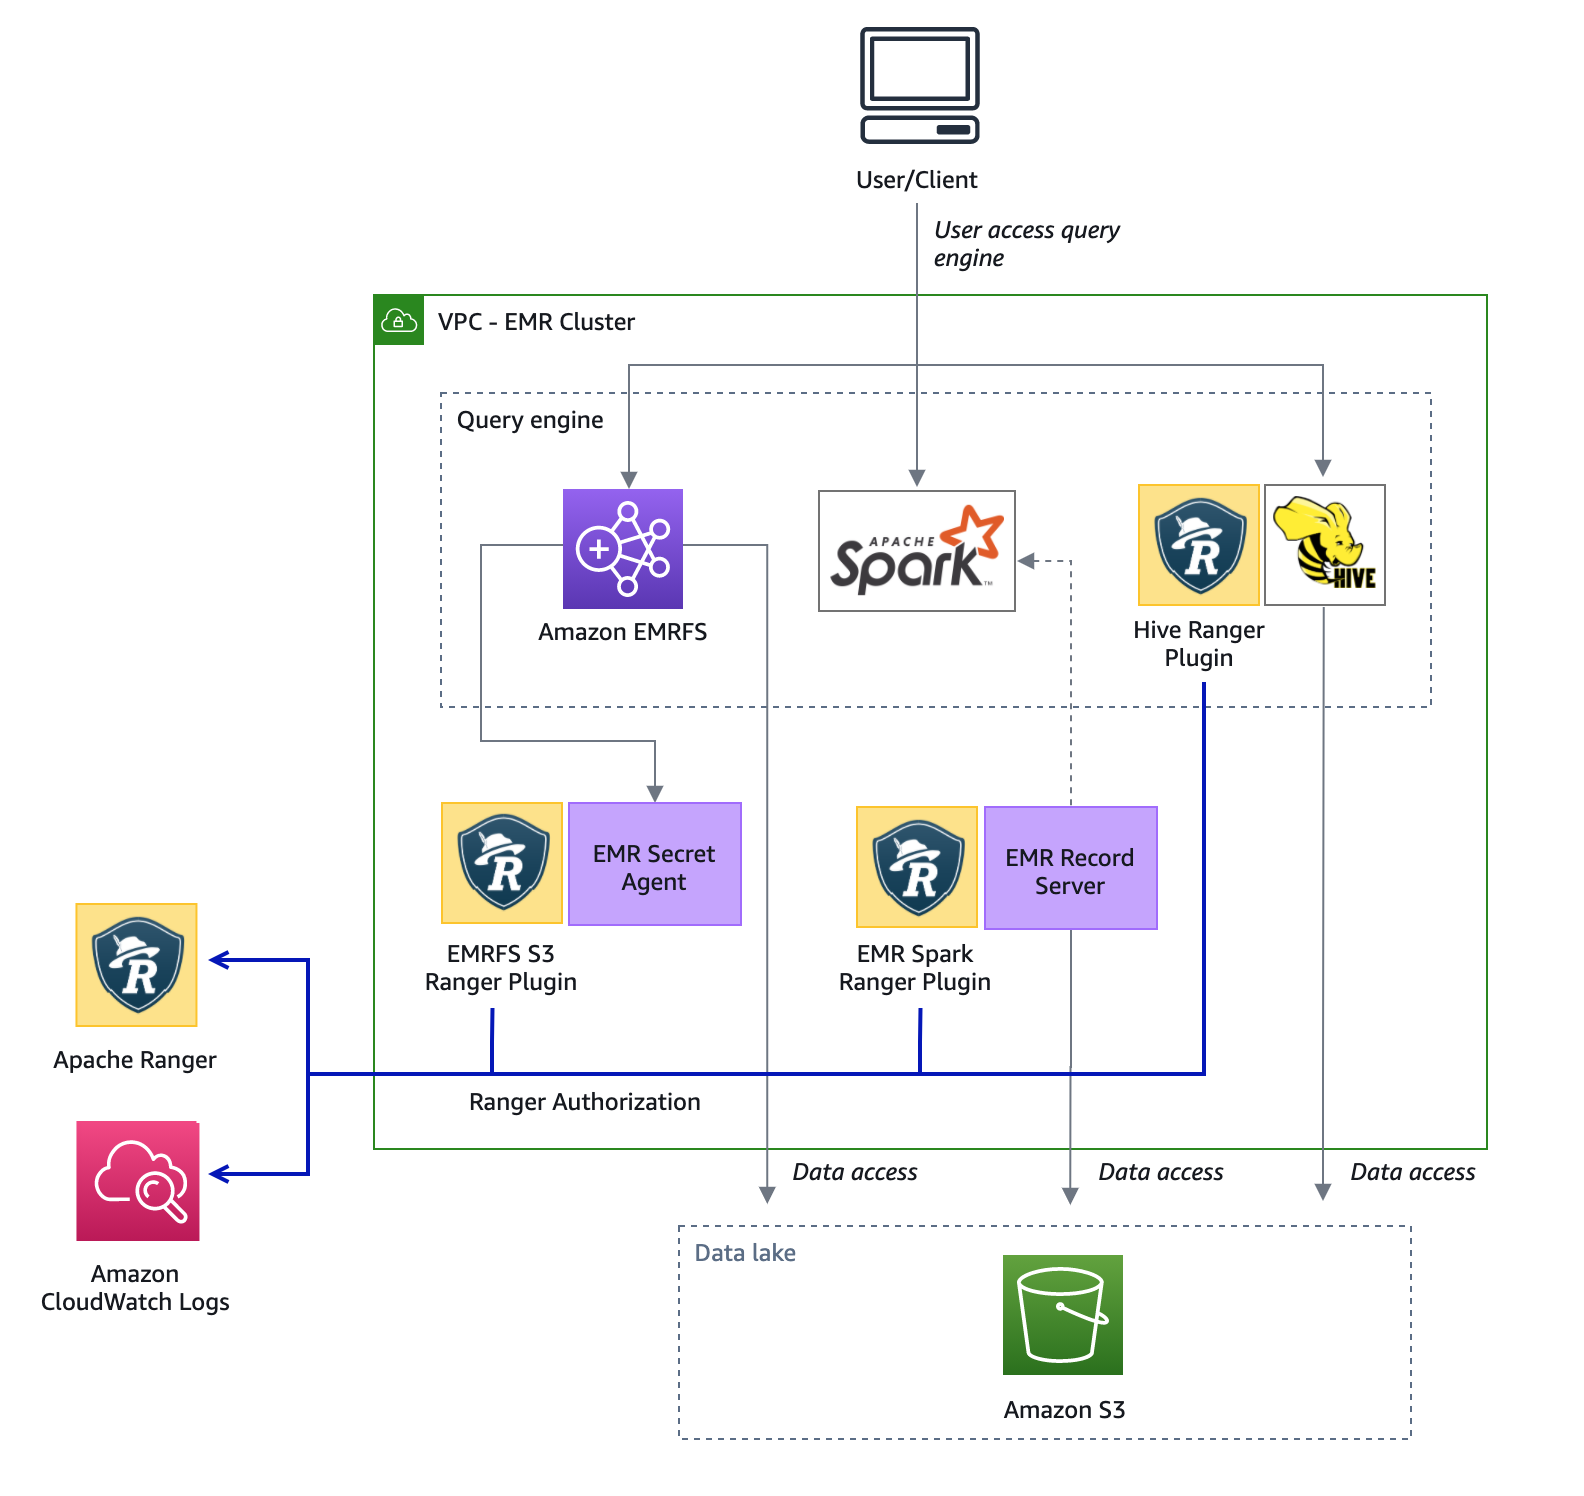 Diagram illustrating how Apache Ranger enforces security policies across Amazon EMR clusters. Source: AWS Docs
To ensure efficient processing, monitor your EMR cluster using Amazon CloudWatch, Ganglia, and the Spark UI.
These tools provide real-time insights into resource utilization, job progress, and potential bottlenecks.
spark.executor.memory), parallelism (spark.default.parallelism), and Hadoop block size for optimal performance.You can efficiently process large datasets while keeping your EMR cluster cost-effective and high-performing by following these steps.
As your data processing needs evolve, you may need to adjust your EMR cluster's resources to maintain performance and cost efficiency.
EMR offers manual and automated scaling options, allowing you to modify instance counts based on workload demands.
To add to this, leveraging Spot Instances can help optimize costs while ensuring scalability.
Manual scaling allows you to increase or decrease the number of instances in your cluster based on real-time workload demands.
This adjustment can be made through the EMR console, the AWS CLI, or the EMR API.
aws emr modify-instance-groups --cluster-id <your-cluster-id> --instance-groups InstanceGroupId=<your-instance-group-id>,InstanceCount=<new-instance-count>ModifyInstanceGroups API to dynamically adjust the number of instances.Manual scaling is best suited for predictable workloads where you can anticipate the resource needs in advance.
For example, I used manual scaling when I knew my data processing job would have steady demand, which allowed me to adjust the instance count based on expected workload and ensured optimal resource utilization.
Auto-scaling in EMR dynamically adjusts the number of instances in response to workload changes, ensuring efficient resource utilization while keeping costs under control.
Auto-scaling policies define when to add or remove instances based on specific metrics such as CPU utilization, YARN memory usage, or task queue length.
Key auto-scaling configurations:
To enable auto-scaling, configure an Auto-Scaling Policy via the AWS Management Console, CLI, or API.
An example of an AWS CLI command to set an auto-scaling policy is:
aws emr put-auto-scaling-policy --cluster-id <your-cluster-id> --instance-group-id <your-instance-group-id> --auto-scaling-policy file://policy.jsonAuto-scaling is particularly beneficial for variable workloads, such as streaming analytics, batch processing, and machine learning tasks that experience fluctuating resource requirements.
For instance, I used auto-scaling when running a machine learning model that experienced unpredictable spikes in traffic. The system automatically scaled up during peak times and scaled down when demand dropped, which optimized both costs and performance.
Amazon EC2 Spot Instances provide a cost-effective way to run EMR clusters by utilizing spare EC2 capacity at significantly reduced rates.
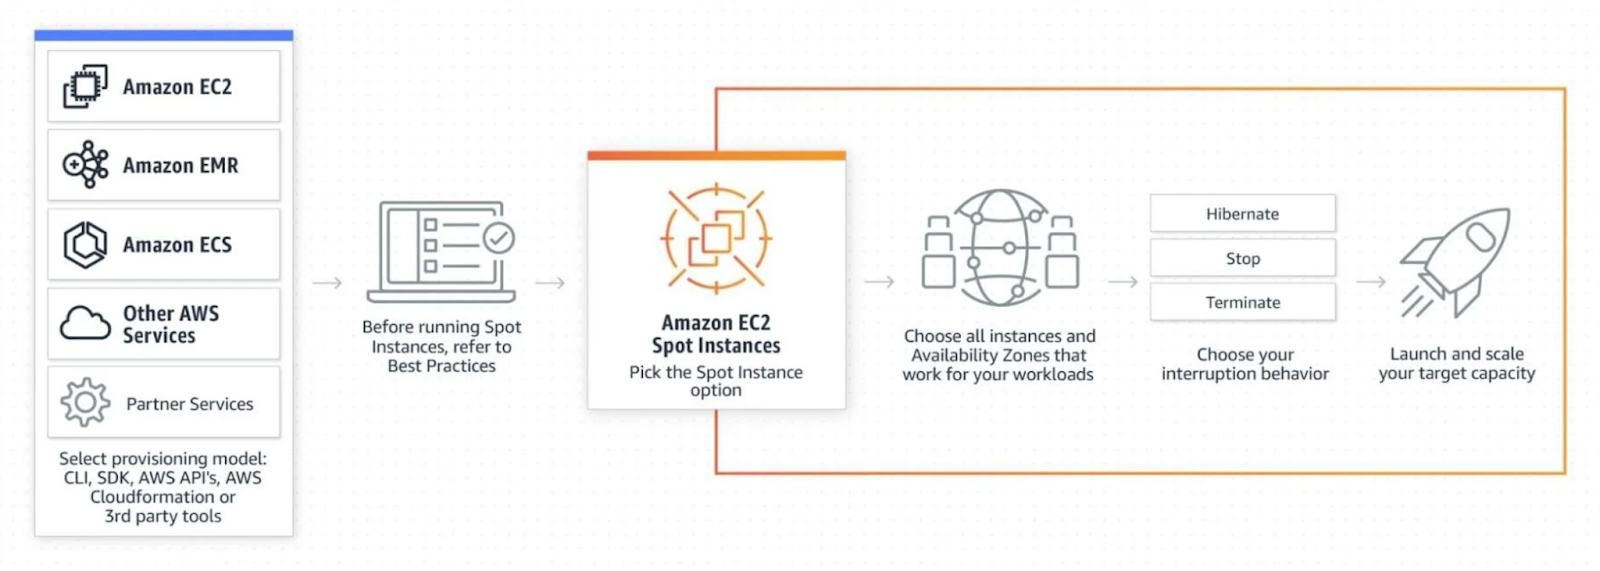
These instances are ideal if you have fault-tolerant workloads, such as big data processing and machine learning.
Benefits of using Spot Instances in EMR:
However, Spot Instances may be interrupted if AWS reclaims capacity. To mitigate this:
To configure Spot Instances in EMR, use the following AWS CLI command:
aws emr create-cluster --instance-fleets file://instance-fleet-config.jsonCombining manual scaling, auto-scaling, and Spot Instances can help you optimize your EMR clusters for performance, cost-efficiency, and reliability.
Misconfigured IAM roles in EMR can expose sensitive data to unintended users. Therefore, you should always use the principle of least privilege and restrict SSH access to only trusted IPs.
AWS provides robust security features, including IAM roles for access control, encryption for data protection, and best practices to safeguard your environment.
AWS Identity and Access Management (IAM) controls access to EMR clusters and related resources.
When creating a cluster, you must assign IAM roles that grant permissions to interact with S3, DynamoDB, and other AWS services.
Defining least-privilege policies ensures security by limiting access to only necessary resources.
The image below shows managed policies and how they could be used with EMR.
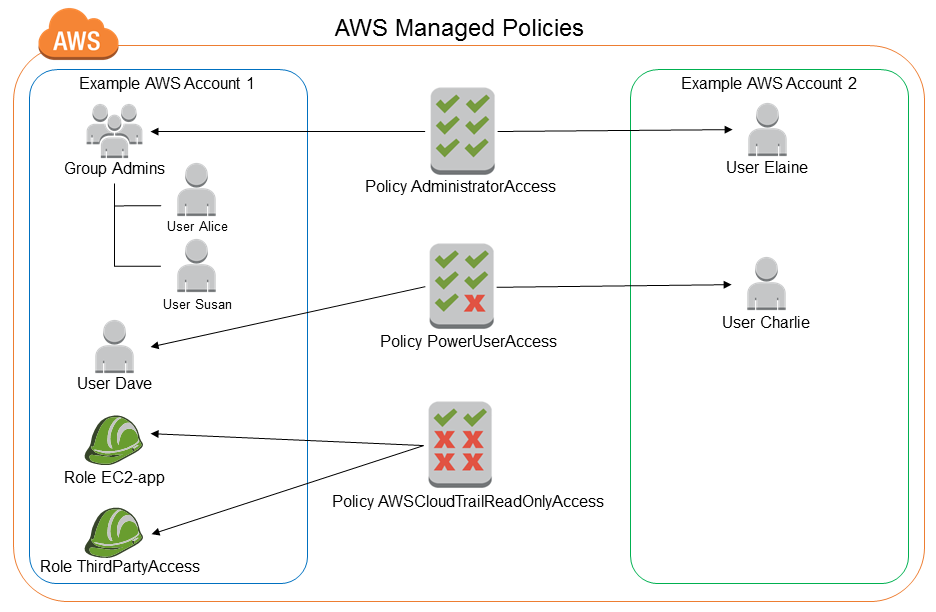
Screenshot of AWS IAM policy settings showing how permissions are assigned. Source: AWS Docs
Amazon EMR supports encryption for data at rest using Amazon S3 server-side encryption (SSE) or AWS Key Management Service (KMS). Data in transit can be secured using SSL/TLS protocols.
Best security practices include using multi-factor authentication (MFA) for accessing the AWS console, restricting SSH access, and managing API keys securely.
If you want to learn more about AWS security, have a look at the AWS Security and Cost Management course.
While Amazon EMR is designed for scalability and reliability, issues can still arise during cluster operation and job execution.
Common challenges include performance bottlenecks, job failures, and resource constraints. Understanding how to diagnose and resolve these problems can help you maintain an efficient workflow.
Users often encounter problems such as slow job execution, insufficient memory allocation, instance failures, and inefficient data shuffling.
Performance issues may stem from incorrect instance types, under-provisioned clusters, or excessive disk I/O. To address these problems:
When Spark or Hadoop jobs fail, understanding the root cause is crucial for remediation.
Logs stored in Amazon S3 or accessible through the EMR console provide valuable insights into execution failures, memory issues, and task slowdowns.
The image below shows how Dr. Elephant and Sparklens can be used to tune performance in Hadoop and Spark on Amazon EMR.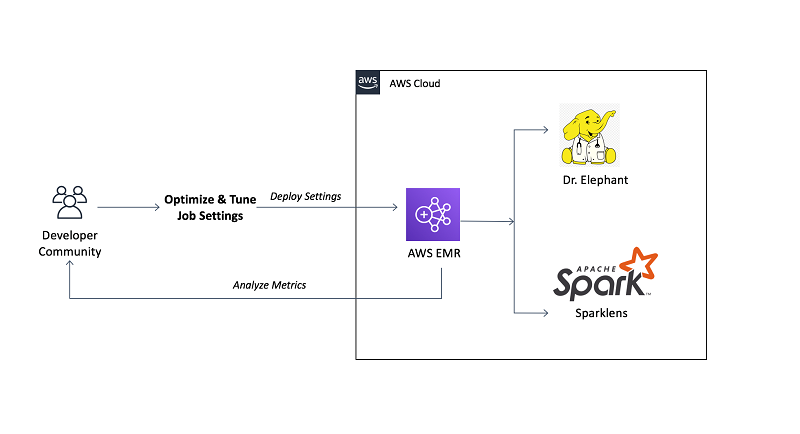
Dr. Elephant and Sparklens interface displaying performance tuning insights for Hadoop and Spark jobs on Amazon EMR. Source: AWS Blogs
If a cluster experiences failures, diagnosing the problem quickly can minimize downtime and prevent data loss.
Amazon CloudWatch and AWS CloudTrail offer monitoring and alerting capabilities that can help identify underlying issues.
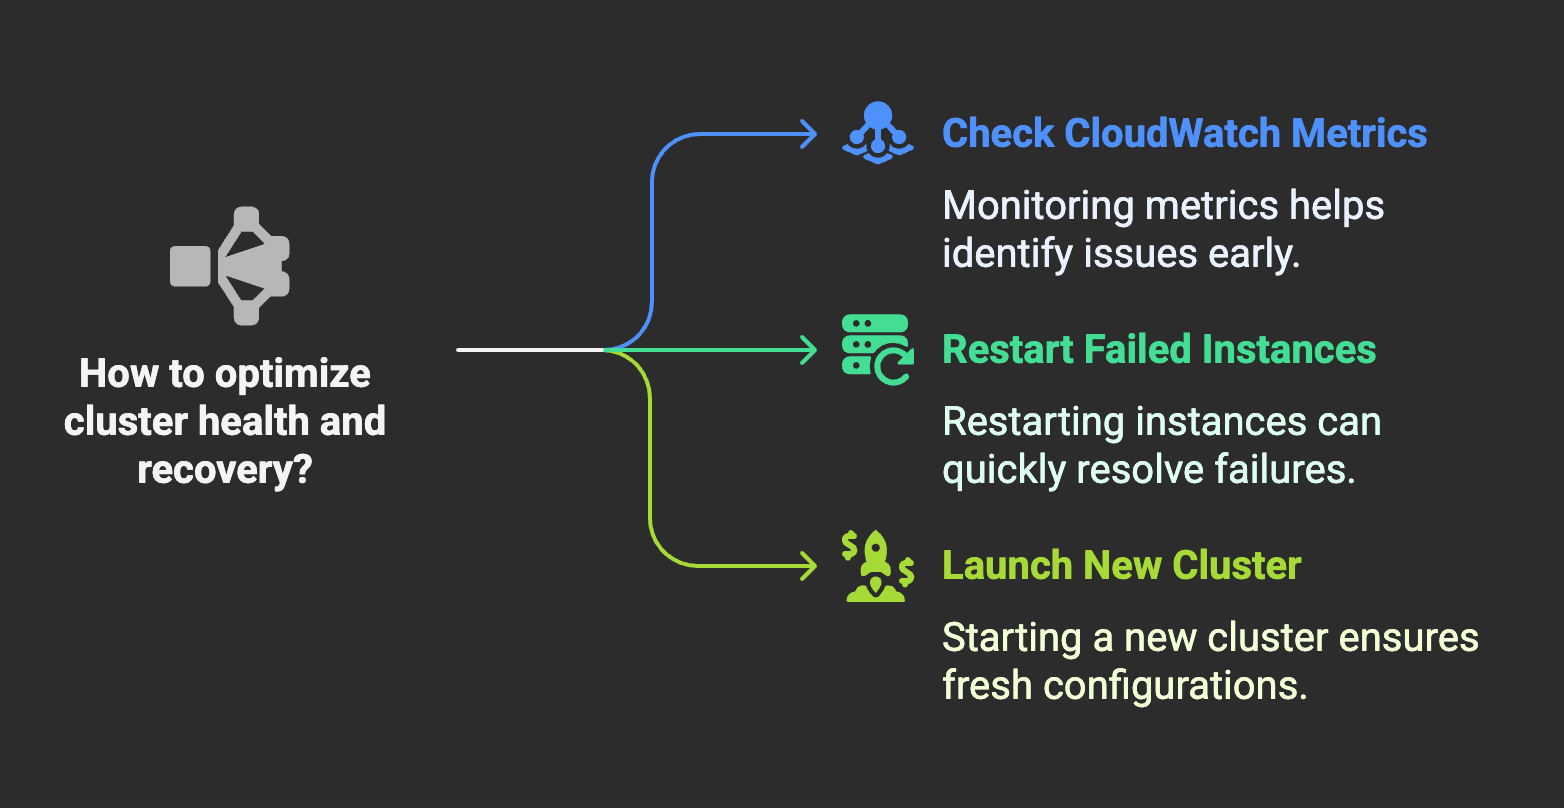 Diagram illustrating ways to optimize cluster health and recovery in Amazon EMR. Image created using Napkin AI
Effectively managing costs is crucial when running workloads on Amazon EMR. Pricing depends on factors such as instance types, storage, and data transfer, but there are strategies to optimize spending.
Amazon EMR pricing is primarily based on several key factors: compute instances, storage, and data transfer.
To estimate costs accurately, you can use the AWS Pricing Calculator, which takes into account cluster configurations, instance types, and workload demands.
You need to understand these pricing structures to enable better forecasting and budgeting, which ensures efficient resource allocation.
In addition, leveraging AWS Savings Plans or Reserved Instances for predictable workloads can lock in lower rates and reduce overall costs.
To optimize costs, you should implement several best practices when running Amazon EMR workloads:
Implementing these cost optimization strategies will help you balance performance and cost efficiency.
For a broader understanding of AWS cloud cost management, check out AWS Cloud Technology and Services.
After working with Amazon EMR, I have come to appreciate how it simplifies big data processing by automating cluster management, scaling, and AWS service integration. It is essential for anyone dealing with large-scale data workloads, regardless of whether you are just starting out or optimizing an existing pipeline.
If you are exploring cloud-based big data solutions, EMR is a powerful, scalable option worth considering!
Learn more about AWS with these courses!
Track
Course
Course
Tutorial
DataCamp Team
Tutorial
Joleen Bothma
Tutorial
Tim Lu
Tutorial
Zoumana Keita
Tutorial
Zoumana Keita
Tutorial
Zoumana Keita