Security isn’t just a technical buzzword, it’s non-negotiable in modern software development, and security can’t be compromised because of the consequences at stake. That’s something I learned quickly as an engineer. Imagine waking up to an incident call regarding your company’s production database password being accidentally exposed in a version control commit, and your app is down. That’s a nightmare and a wake-up call about the importance of secret management.
From my experience, hardcoding credentials in code or configuration files is a recipe for disaster. Azure Key Vault eliminates these risks by providing a secure, cloud-hosted service for storing API keys, passwords, certificates, and cryptographic keys, without requiring you to write a single line of custom security code.
In this tutorial, you’ll learn:
- How Azure Key Vault works
- Step-by-step setup and configuration
- Managing secrets, keys, and certificates
- Integrating and automating with Azure services
- Best practices and compliance guidelines
What Is Azure Key Vault?
When building or managing cloud applications, you know secrets are everywhere, from API keys, database passwords, and cryptographic keys to certificates. Azure Key Vault is Microsoft’s answer to storing and managing these secrets securely in the cloud.
Azure Key Vault is a cloud-hosted service that provides secure storage and management for secrets, keys, and certificates. It acts as a centralized safe for your most sensitive information, ensuring only authorized users and services can access what they need when they need it.
Azure Key Vault manages three main digital asset types:
- Secrets: These include passwords, connection strings, tokens, API keys, and any other sensitive text-based information your applications need. Secrets represent about 80% of what most organizations store in Key Vault, making them the most commonly used feature.
- Keys: Cryptographic keys used for encryption, decryption, signing, and verification operations. Azure Key Vault supports software-protected keys and hardware security module (HSM) protected keys for the highest security requirements.
- Certificates: SSL/TLS certificates for your applications, including automatic renewal capabilities, have saved me countless hours of manual certificate management.
One aspect that consistently impresses organizations I've worked with is the centralized secret management capability. Instead of scattered configuration files across different environments, you get a single source of truth for all your secrets. This centralization eliminates the common problem of "secret sprawl," where teams lose track of where sensitive information is stored.
The automated key rotation feature deserves special mention. A previous organization I worked for reduced its security incident response time by approximately 75% in its SLA simply because it no longer had to manually coordinate key rotations across multiple services. Azure Key Vault can automatically regenerate new keys and notify your applications when a key needs rotation or expires.
From a regulatory compliance perspective, Azure Key Vault helps organizations meet requirements for standards like HIPAA, SOC 2, and PCI DSS. The service provides the audit logs, access controls, and encryption standards that IT compliance officers need to sleep soundly at night.
For a deeper dive into the Azure ecosystem, check out the Understanding Microsoft Azure course.
How Azure Key Vault Works
Before you jump into any new concept, understanding the underlying structure and architecture helps you make smarter decisions. Let’s break down how Azure Key Vault works and why it matters.
Key Vault architecture
Azure Key Vault operates on a multi-tenant architecture with strict isolation between vaults and tenants. Your organization's secrets, keys, and certificates are contained within a secure barrier represented by each Azure Key Vault instance.
The architecture centers around three primary component types, each serving distinct security purposes:
- Secrets
Secrets represent the most flexible storage type in the Key Vault. You can store any text-based sensitive information up to 25KB in size. Common examples include:
- Database connection strings
- Service principal passwords
- API keys and tokens
- Configuration settings containing sensitive data
- Third-party service credentials
In my years of practice, organizing secrets with a consistent naming convention saves tremendous time. For example, using patterns like {environment}-{service}-{secret-type}, such as dev-webapp-dbconnection, makes secrets much easier to manage at scale.
- Keys
Keys provide cryptographic capabilities directly within the vault. Azure Key Vault supports several key types:
|
Vault Type |
Key Type |
Use Case |
Protection / Security Level |
|
Vaults (Standard & Premium) |
RSA |
Encryption, decryption, signing, and verification |
Software-protected (Standard; FIPS 140‑2 Level 1), or HSM-protected (Premium; FIPS 140‑2 L2 or L3) |
|
EC |
Digital signatures and key agreement |
Software-protected (Standard; FIPS 140‑2 Level 1), or HSM-protected (Premium; FIPS 140‑2 L2 or L3) |
|
|
Managed HSM |
RSA-HSM |
Encryption, decryption, signing, and verification |
HSM‑protected (FIPS 140‑3 Level 3); supported (2048-bit, 3072-bit, 4096-bit) |
|
EC-HSM |
Digital signatures and key agreement |
HSM‑protected (FIPS 140‑3 Level 3); supported (P-256, secp256k1/P-256K, P-384, P-521) |
|
|
Symmetric (oct‑HSM) |
Bulk encryption, key wrapping, and HMAC operations |
HSM‑protected only; supported only in Managed HSM (128-bit, 192-bit, 256-bit) |
One feature that sets Azure Key Vault apart is its support for Hardware Security Modules (HSMs). When you create HSM-protected keys, the cryptographic operations occur within FIPS 140-2 Level 2 validated HSMs, ensuring that key material never exists in plain text outside the secure hardware boundary.
- Certificates
Certificates in Key Vault provide integrated certificate lifecycle management. You can import existing certificates or have Key Vault generate them using integrated Certificate Authorities. The automatic renewal feature has been a game-changer in my experience—no more 3 AM calls about expired SSL certificates bringing down production services.
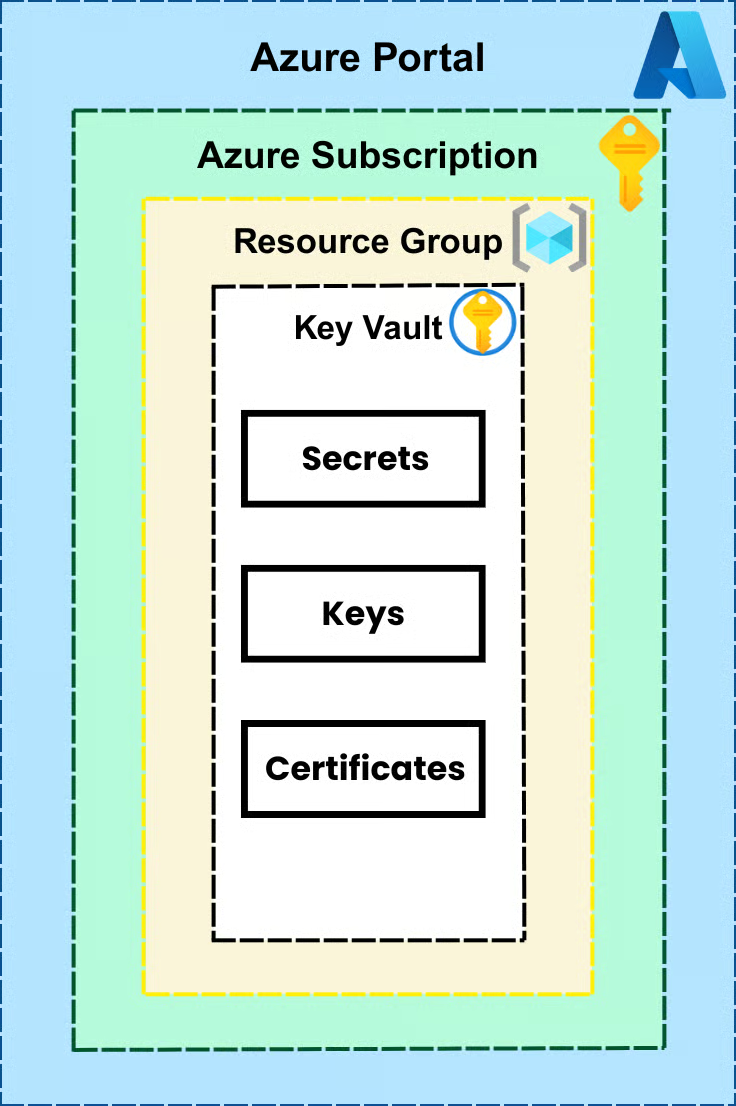
Azure Key Vault Resource Structure
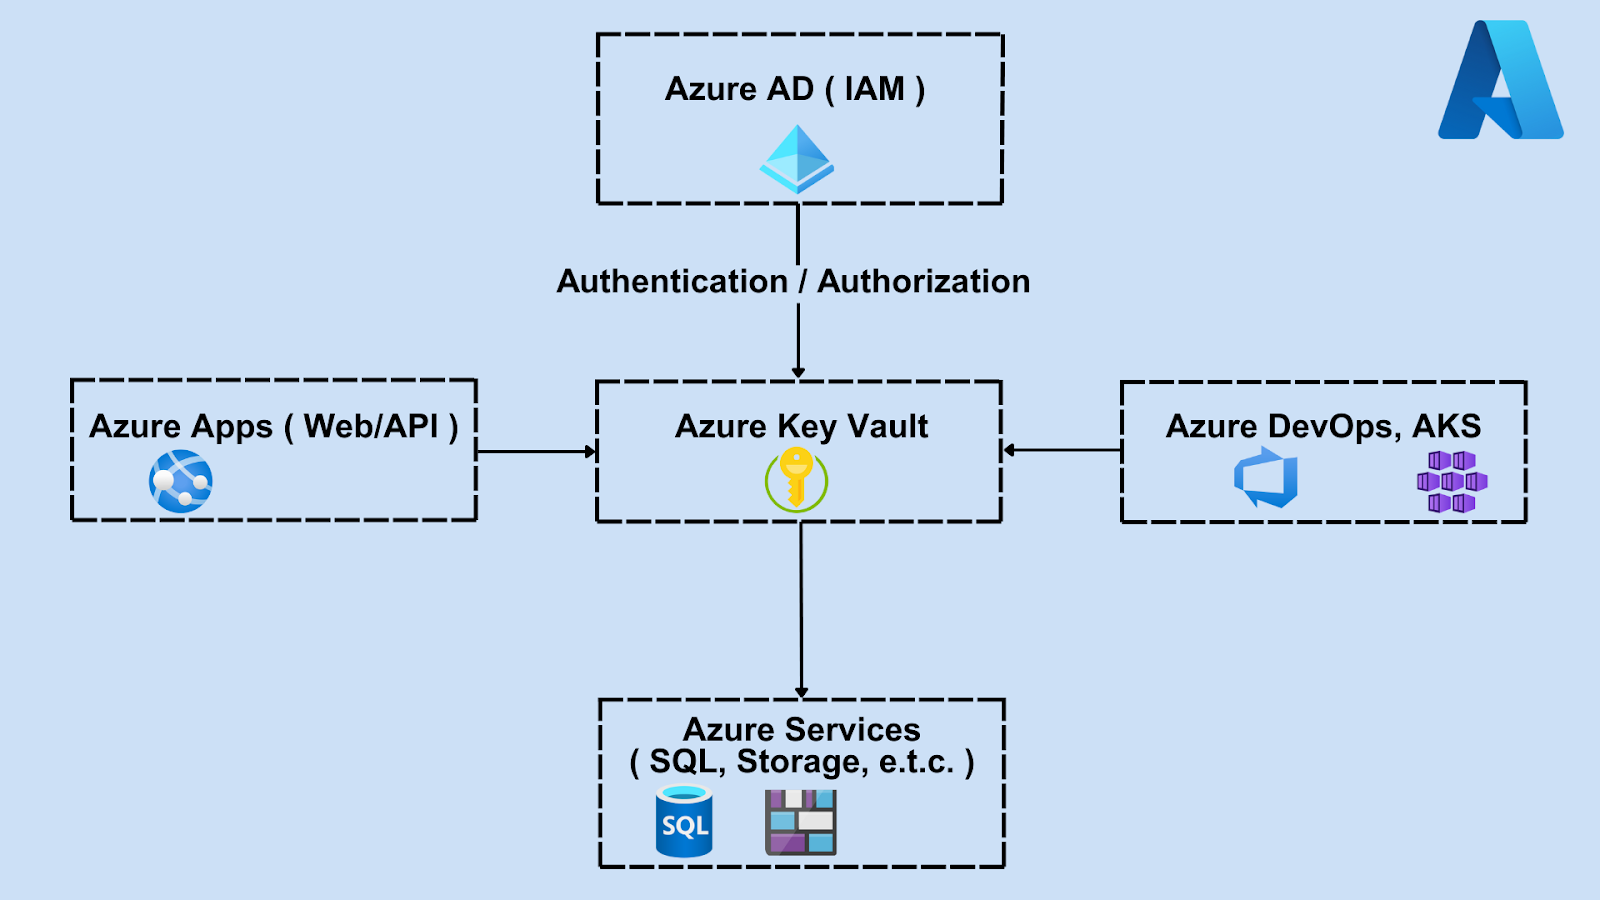
- Integration Points
Azure Key Vault integrates with many Azure and external services. Here are some of the main integration categories below:
- Azure Services: Key Vault integrates natively with Azure services such as Azure App Service, Azure Functions, Azure Kubernetes Service (AKS), Azure DevOps, Logic Apps, etc.
- Identity & Access Management (IAM): Key Vault works closely with Microsoft Entra ID (formerly Azure AD) to authenticate users, apps, and services.
- Application Integration: You can securely fetch secrets in your custom apps (hosted anywhere) via SDKs, CLI, or REST API.
- Certificate Management: Azure Key Vault can automatically manage and renew SSL/TLS certificates.
- Security Monitoring & Compliance: Key Vault integrates with security and monitoring tools such as Azure Monitor / Log Analytics, Azure Policy, Microsoft Defender for Cloud, etc.
Azure Key Vault in the Azure Ecosystem
Azure Key Vault offers two service tiers that provide different security and performance requirements:
- Standard Tier
This uses software-based encryption, providing excellent security for almost any application. The keys are protected using industry-standard encryption algorithms, and all operations occur within Microsoft's secure data centers.
- Premium Tier
The Premium Tier adds Hardware Security Module (HSM) security for keys and certificates. This tier is crucial for organizations with strict compliance requirements, especially those handling highly sensitive data. Azure also offers Managed HSM, a separate, single-tenant service with dedicated HSM pools for even higher isolation and control.
Note: Managed HSM is not part of Premium Key Vault; it’s a separate service.
|
Feature |
Standard Tier |
Premium Tier |
|
Protected key type |
The standard tier is made up of only software-protected keys. |
The premium tier consists of both software-protected keys and HSM-protected keys. |
|
Pricing |
The standard tier costs less than the Premium tier. |
The premium tier costs more than the Standard tier, especially for HSM support. |
|
Advanced key features |
The standard tier doesn’t include advanced key features. |
The premium tier includes advanced key features. |
|
Use case |
The standard tier is used for general purposes. |
The premium tier is used for high-security compliance purposes. |
In my experience, the Standard tier works for almost any application, but the Premium is worth the investment if you need advanced compliance or high-assurance keys.
Access policies and RBAC
One area where many teams initially stumble is understanding Azure Key Vault's dual access control model. Key Vault supports two access management approaches: Vault Access Policies and Azure Role-Based Access Control (RBAC).
- Vault Access Policies: Represents the traditional Key Vault access control method. Access policies allow you to specify permissions for each principal (user, service principal, or managed identity) on the Key Vault resource. This is ideal when you want to strictly limit access to specific secrets or keys.
If you are using the legacy “Vault access policy” model, here’s an example of setting access policies using Azure CLI:
# bash
# This grants a service principal read access to secrets
az keyvault set-policy \
    --name "MyKeyVault" \
    --spn "your-service-principal-id" \
    --secret-permissions get list

# This grants a user comprehensive access to keys
az keyvault set-policy \
    --name "MyKeyVault" \
    --upn "user@company.com" \
    --key-permissions get list create delete encrypt decrypt
Access policies work well for smaller teams or simpler scenarios, but they can become unwieldy as your organization grows. I've worked with a company with dozens of access policies per vault, making it difficult to understand who had access to what.
- Azure Role-Based Access Control (RBAC): Provides a more scalable and integrated Key Vault access management approach. With RBAC, you assign standard Azure roles or custom roles to principals, and these roles determine their Key Vault permissions. This is ideal for organizations managing access at scale or integrating with enterprise-wide identity and access management.
The decision between access policies and RBAC often comes down to your organization's identity management strategy. RBAC offers better consistency and integration if you have already extensively used Microsoft Entra ID (formerly Azure AD) groups and roles in your organization. For specific situations, access policies provide more granular control.
Here's a practical example of setting up RBAC on Key Vault using Azure CLI:
# bash
# This is to enable RBAC on a Key Vault
az keyvault update \
    --name "MyKeyVault" \
    --enable-rbac-authorization true

# This is to assign a role to a user
az role assignment create \
    --role "Key Vault Secrets User" \
    --assignee "user@company.com" \
--scope "/subscriptions/{subscription-id}/resourceGroups/{rg}/providers/Microsoft.KeyVault/vaults/MyKeyVault"If you want to dive deeper to gain a broader understanding of Azure CLI, check out the Azure CLI Cheat Sheet. It’s your pathway to interact with Azure services via your terminal.
Integration with other Azure services
Azure Key Vault's real power lies in its native seamless integration with other Azure services. Rather than building custom applications or going through the stress of integrating with a third-party application, you can natively integrate within the Azure ecosystem with various Azure services. Here’s how we can connect Azure Key Vault to other Azure services:
Azure Functions
This integration represents one of the most elegant implementations I've encountered. It lets you use managed identities to allow your code to fetch secrets at runtime without hardcoding credentials.
# json
{
  "ConnectionStrings": {
    "DatabaseConnection": "@Microsoft.KeyVault(VaultName=MyKeyVault;SecretName=DbConnectionString)"
  }
}Web Apps
Web Applications benefit from similar integration patterns to Azure Functions. For ASP.NET Core applications, you can configure Key Vault as a configuration provider like this:
# csharp
public class Program
{
    public static void Main(string[] args)
    {
        CreateHostBuilder(args).Build().Run();
    }

    public static IHostBuilder CreateHostBuilder(string[] args) =>
        Host.CreateDefaultBuilder(args)
            .ConfigureAppConfiguration((context, config) =>
            {
                var keyVaultEndpoint = Environment.GetEnvironmentVariable("KEYVAULT_ENDPOINT");
                if (!string.IsNullOrEmpty(keyVaultEndpoint))
                {
                    config.AddAzureKeyVault(new Uri(keyVaultEndpoint), new DefaultAzureCredential());
                }
            })
            .ConfigureWebHostDefaults(webBuilder =>
            {
                webBuilder.UseStartup<Startup>();
            });
}
Virtual Machines (VMs)
Virtual Machines can access Key Vault secrets through managed identities, eliminating the need to store credentials on the VM itself, grant it access to Key Vault, and retrieve secrets securely from within your app. This integration is compelling for legacy applications that you're migrating to Azure:
# bash
# Retrieve a secret from within a VM using managed identity
SECRET=$(curl -H "Metadata: true" \
  "http://169.254.169.254/metadata/identity/oauth2/token?api-version=2018-02-01&resource=https://vault.azure.net" \
  | jq -r '.access_token')

curl -H "Authorization: Bearer $SECRET" \
  "https://MyKeyVault.vault.azure.net/secrets/DatabasePassword?api-version=7.4"
Azure Logic Apps
Logic Apps integration enables secure workflow automation without exposing secrets in workflow definitions. You can reference Key Vault secrets directly in Logic App actions, making it possible to build secure integration workflows. Just like the example below:
# json
# Setting up a Key Vault action to access a Key Vault secret in a Logic App and how to use it in an HTTP request

{
  "Get_Secret": { "type": "AzureKeyVault", "inputs": { "secretName": "My-Api-Key" } },
  "HTTP_Request": {
    "type": "Http",
    "inputs": {
      "uri": "https://api.example.com/data",
      "headers": { "Authorization": "Bearer @{actions('Get_Secret').outputs.secretValue}" }
    }
  }
}
CI/CD pipelines
CI/CD Pipeline Integration deserves special attention because it addresses one of modern development's most common security challenges. Azure DevOps and GitHub Actions both provide native Key Vault integration. This securely injects secrets into your build and deployment processes, keeping them out of code and config files.
# yaml
# Azure DevOps Pipeline
steps:
- task: AzureKeyVault@2
  inputs:
    azureSubscription: 'MyServiceConnection'
    KeyVaultName: 'MyKeyVault'
    SecretsFilter: 'DatabasePassword,ApiKey'
    RunAsPreJob: true

- script: |
    echo "Database password retrieved: $(DatabasePassword)"
  displayName: 'Use secret from Key Vault'
Success with Azure Key Vault comes from understanding what it offers and how to architect its use in your overall Azure solution.
Step-by-Step Setup in Azure
We’ve learned about how Azure Key Vault works and why it matters. Now, it’s time to roll up your sleeves to implement Azure Key Vault. I'll walk you through each step using the same approach I use when setting up Key Vaults for enterprise clients.
Creating and configuring a Key Vault
Let's start by creating your Key Vault using the Azure portal, though I prefer using the CLI approach, especially for production deployments:
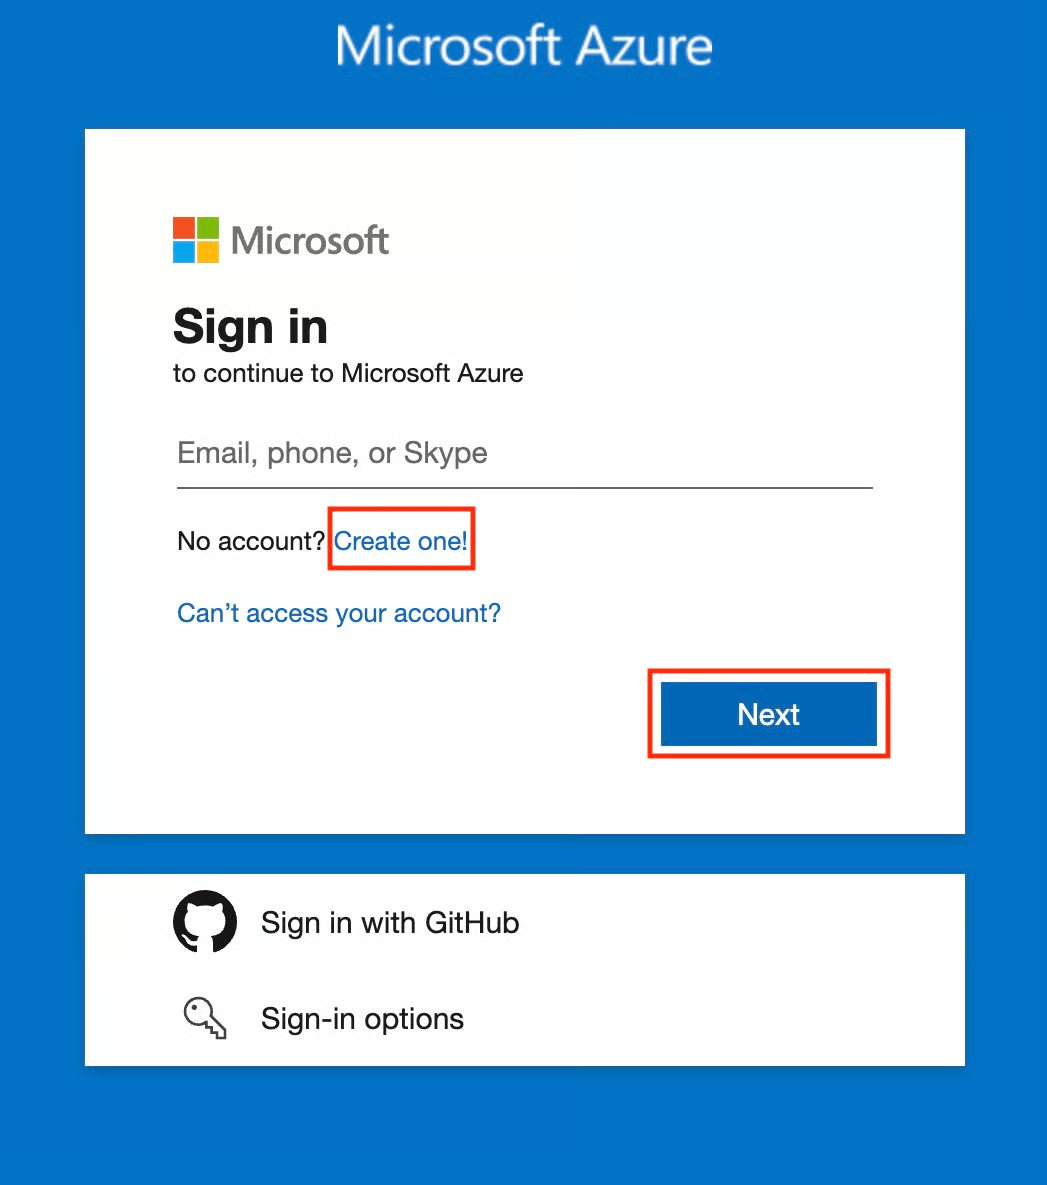
- First, you have to sign in to the Azure Portal.
If you already have a Microsoft account (e.g., Outlook, Xbox, Office 365), you can use it to sign in. If not, you’ll need to create a free Microsoft account.
- Click Sign in or Create one (Sign up).
- Use your Microsoft credentials or other sign-in options to log in.
- Click Next.
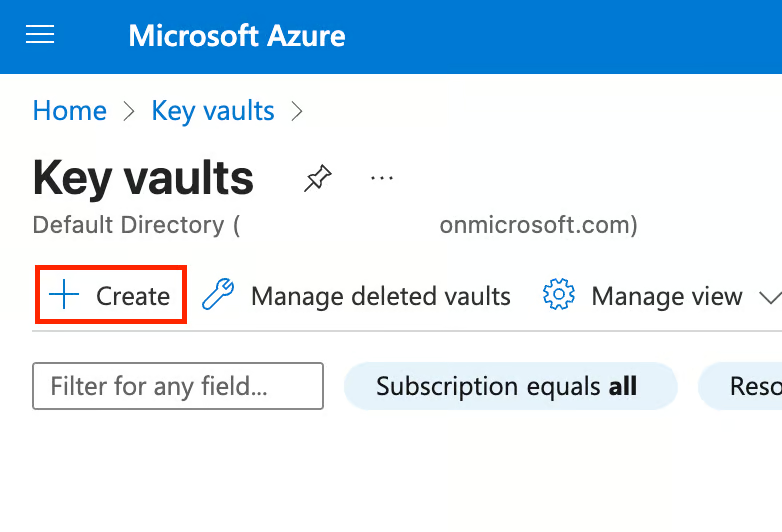
- In the Azure portal, navigate and click on Create a resource.
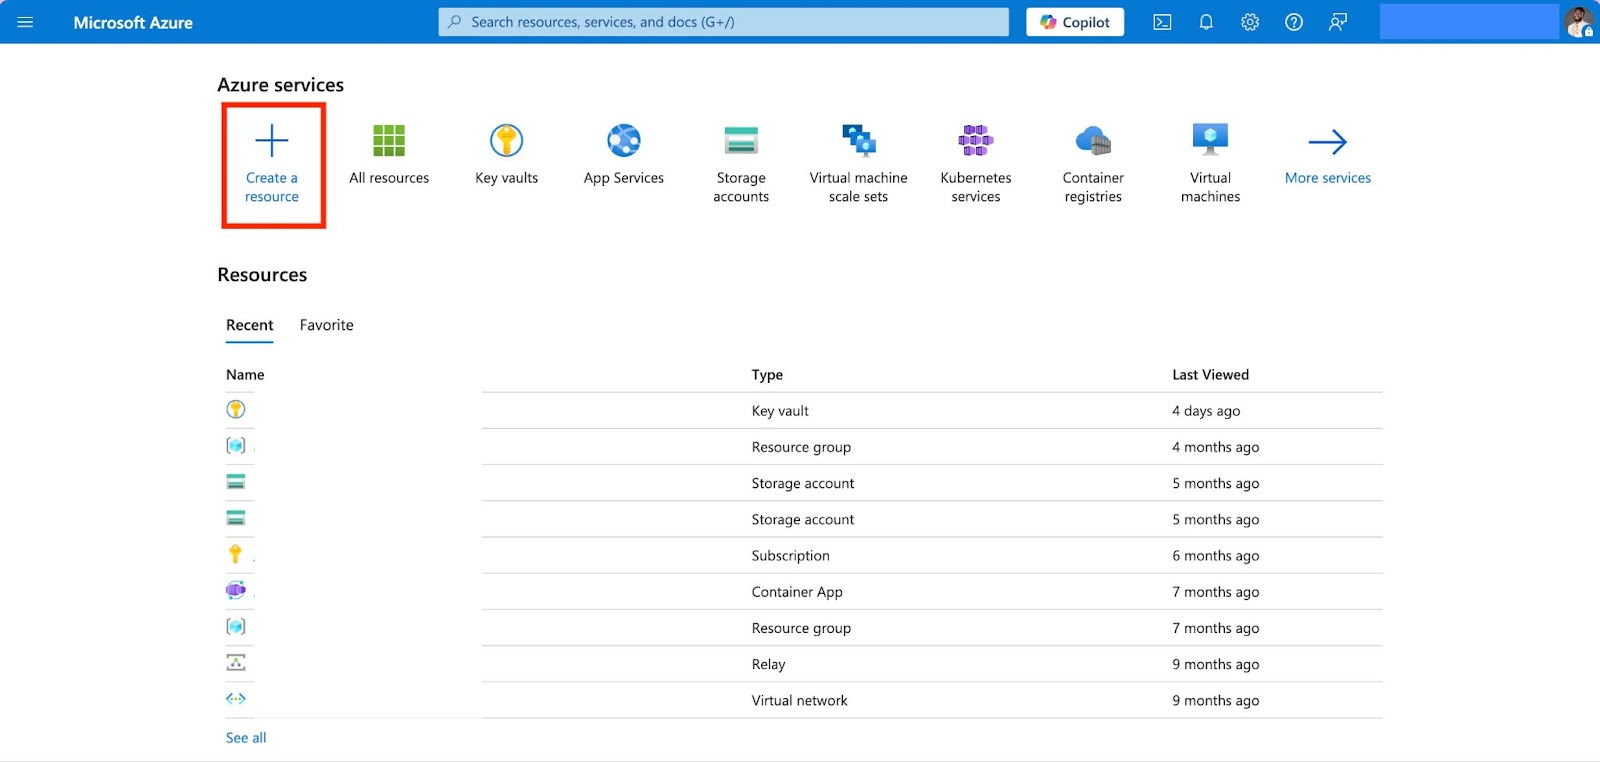
- Search for Key Vault and select it. Click Create to begin the setup process.
- Select and fill in the details:
- Subscription & Resource group (Use an existing one or create a new one).
- Key vault name (Globally unique, e.g., prod-dcamp-kv).
- Region (Choose the closest to your workload for lower latency).
- Pricing tier (Standard for most use cases; Premium for HSM-backed keys).
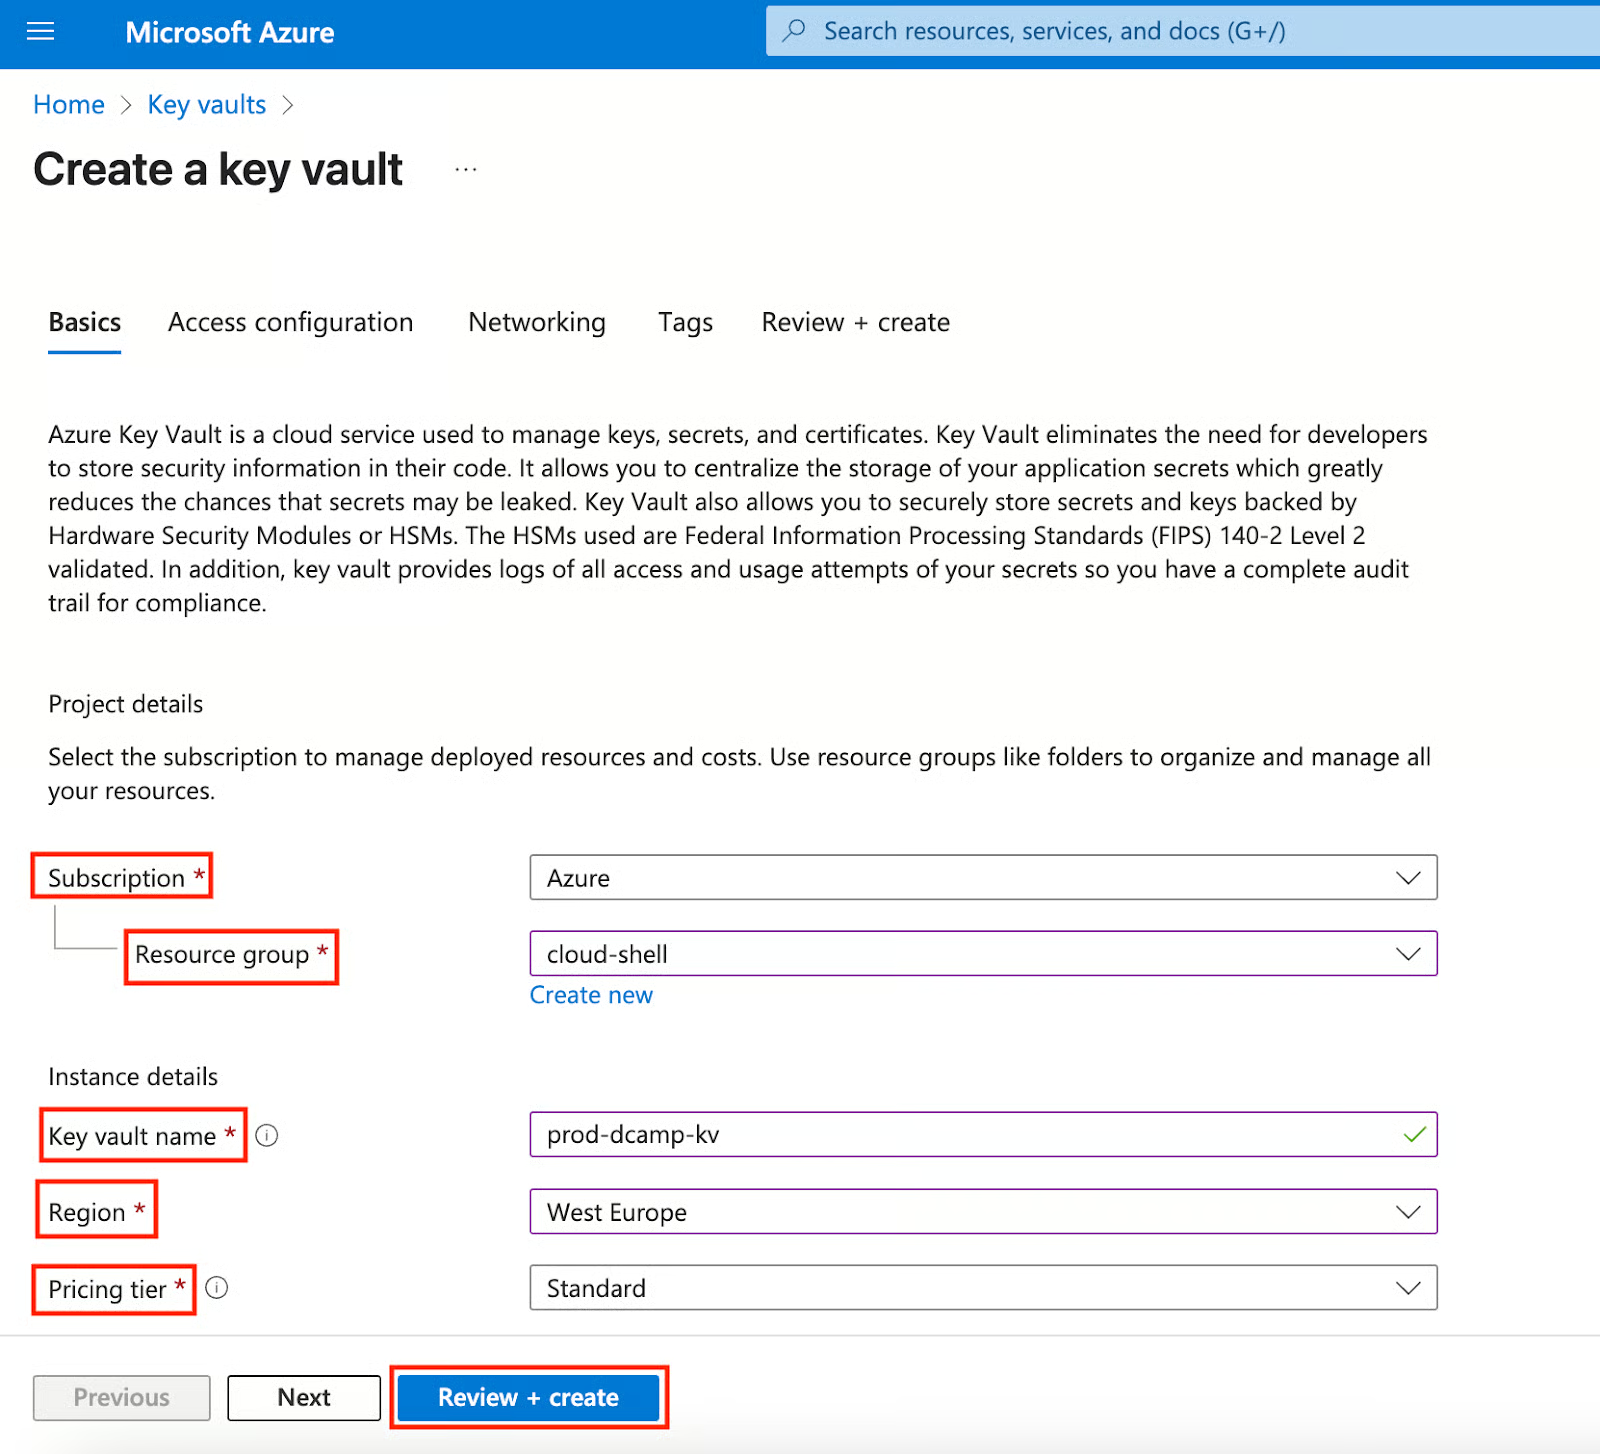
From Basics through Access configuration, Networking, and Tags to Review + create, leave them at defaults unless you have specific needs.
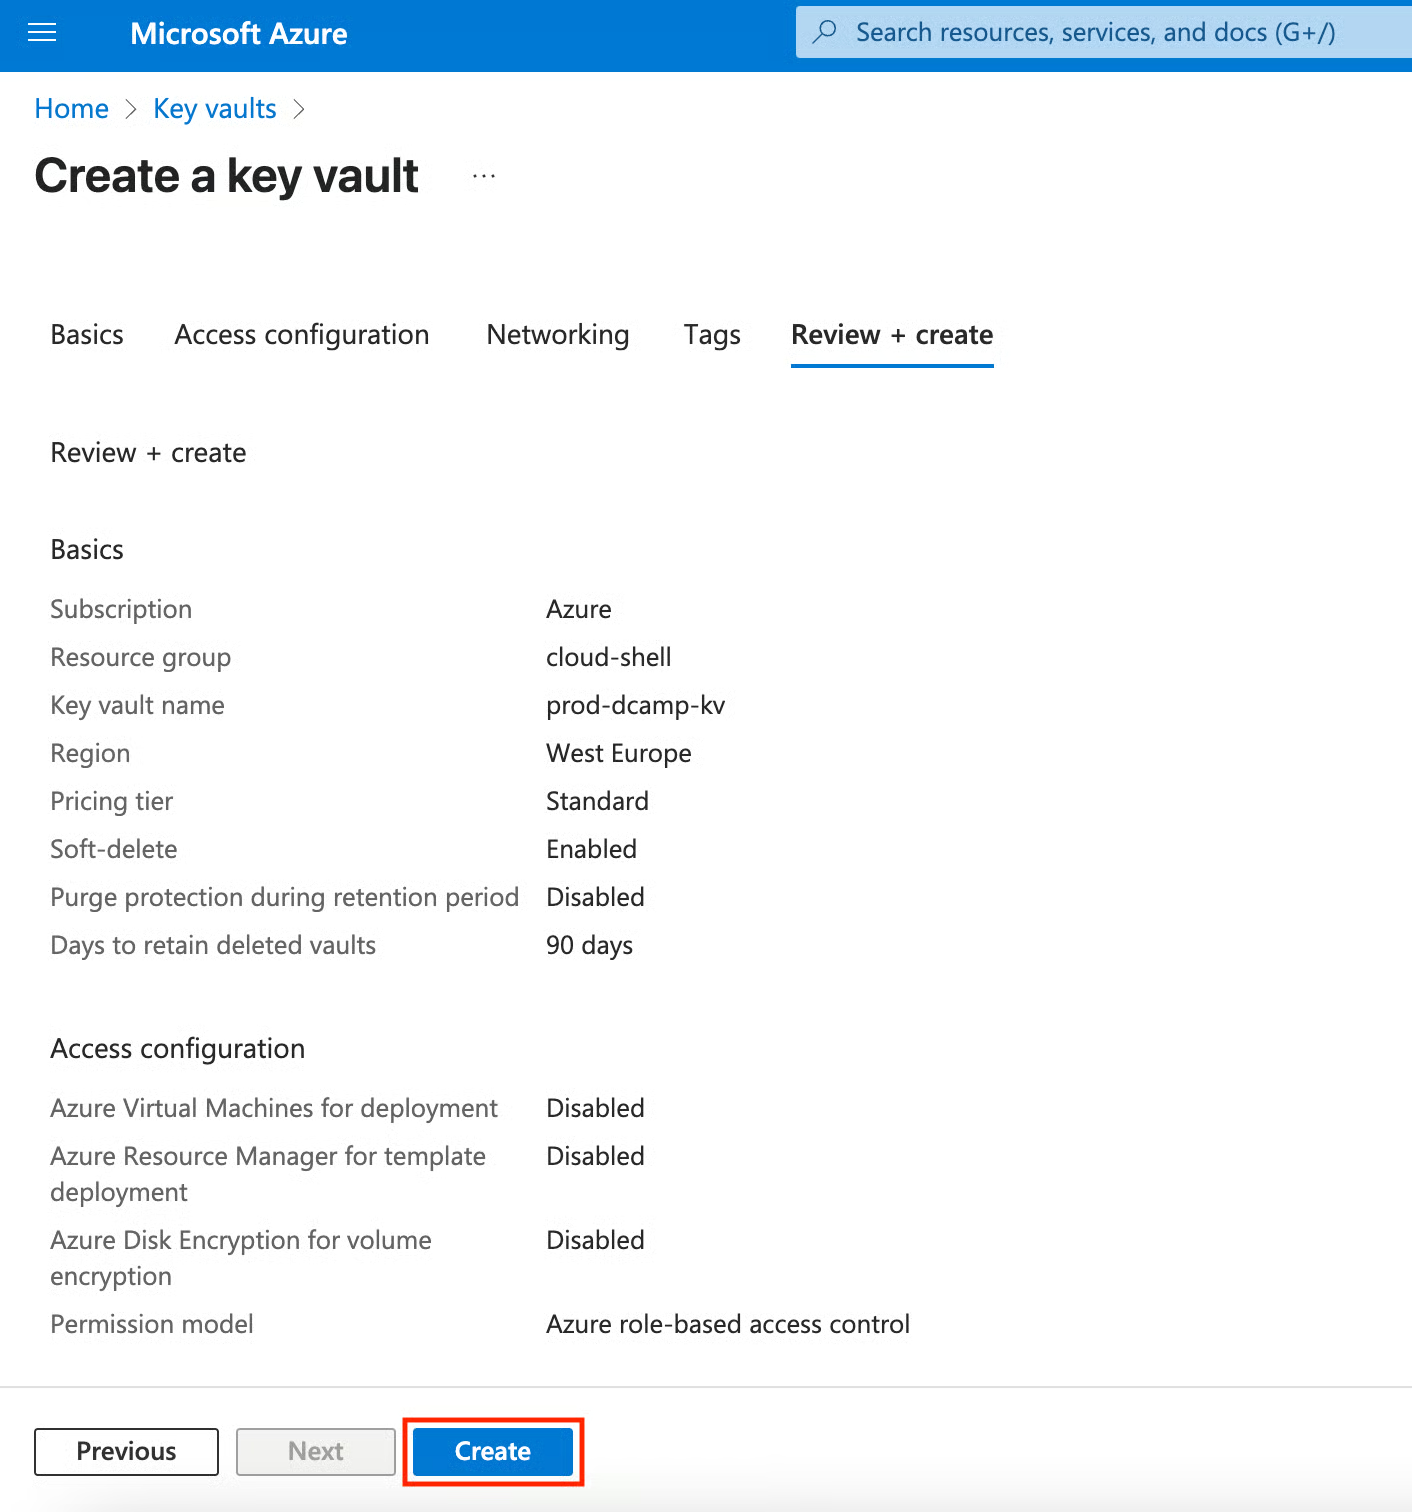
After configuring all settings, Azure performs validation checks. The most common validation failures I encounter are:
- Name conflicts: Key Vault names must be globally unique.
- Permission issues: Ensure you have Contributor access to the resource group.
- Network restrictions: Some organizations have policies that limit resource creation.
Take note of your Vault Name and Vault URI, you’ll need these for API calls and integrations.
- Click Review + Create
- After passing all validation checks, click Create.
Setting access controls
Access control configuration represents your Key Vault implementation's most critical security decision. Now that we’ve created and configured our Key Vault, let me show you how to set access control for our Key Vault by defining access with Azure Role-Based Access Control (RBAC) and Vault Access Policies.
Defining Azure Role-Based Access Control
- After you click Go to resource. On the left plane of your Key Vault, go to the Access Control (IAM) tab.
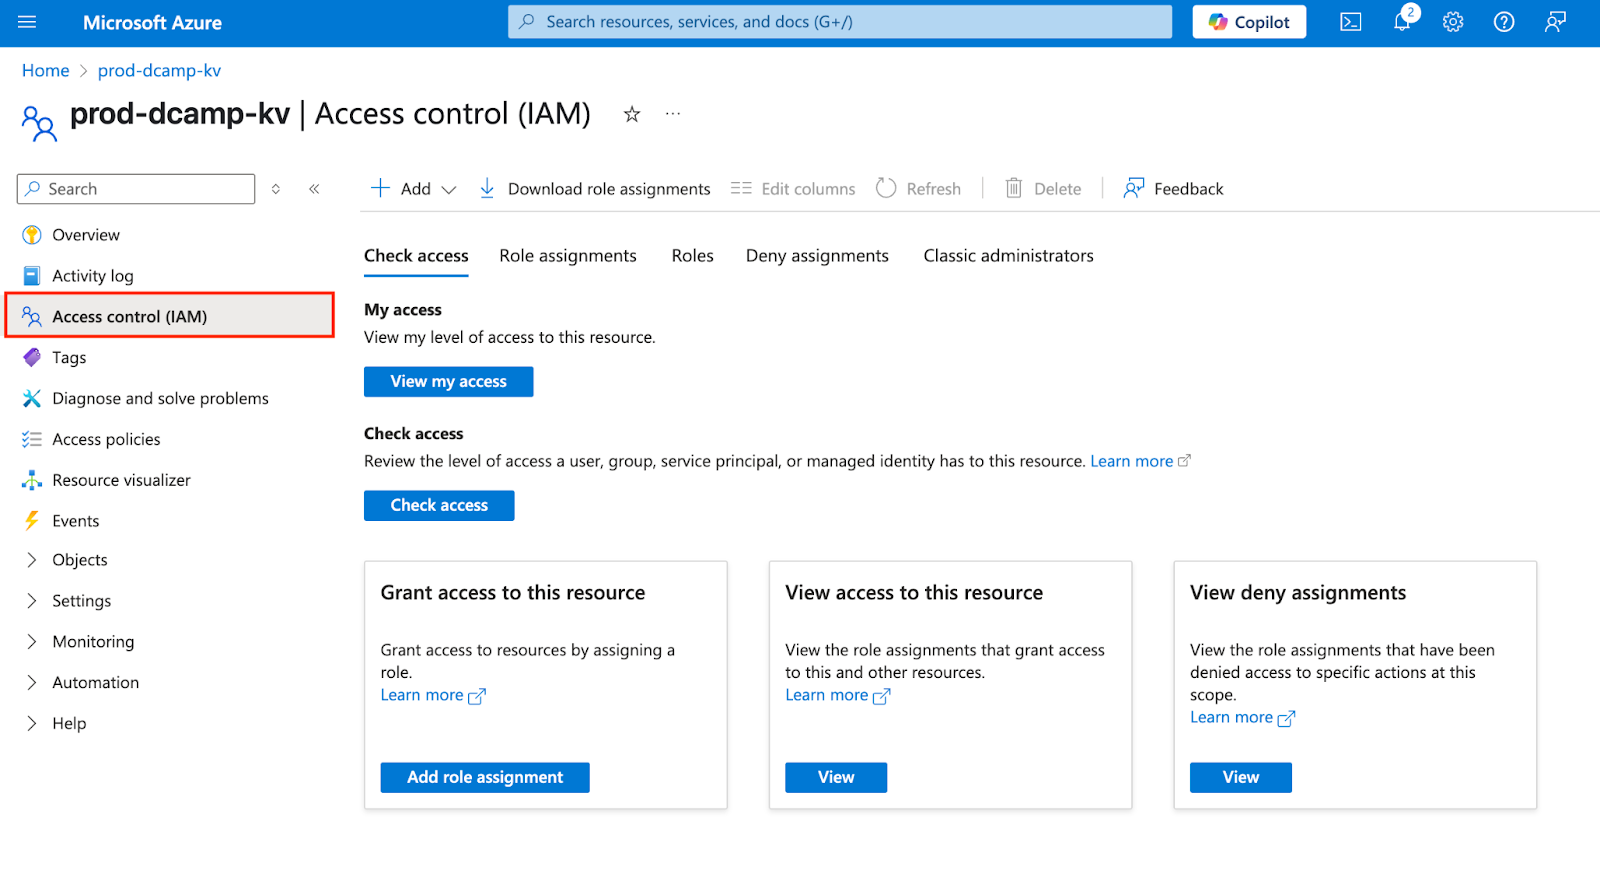
- Click + Add and select Add Role Assignment from the drop-down.

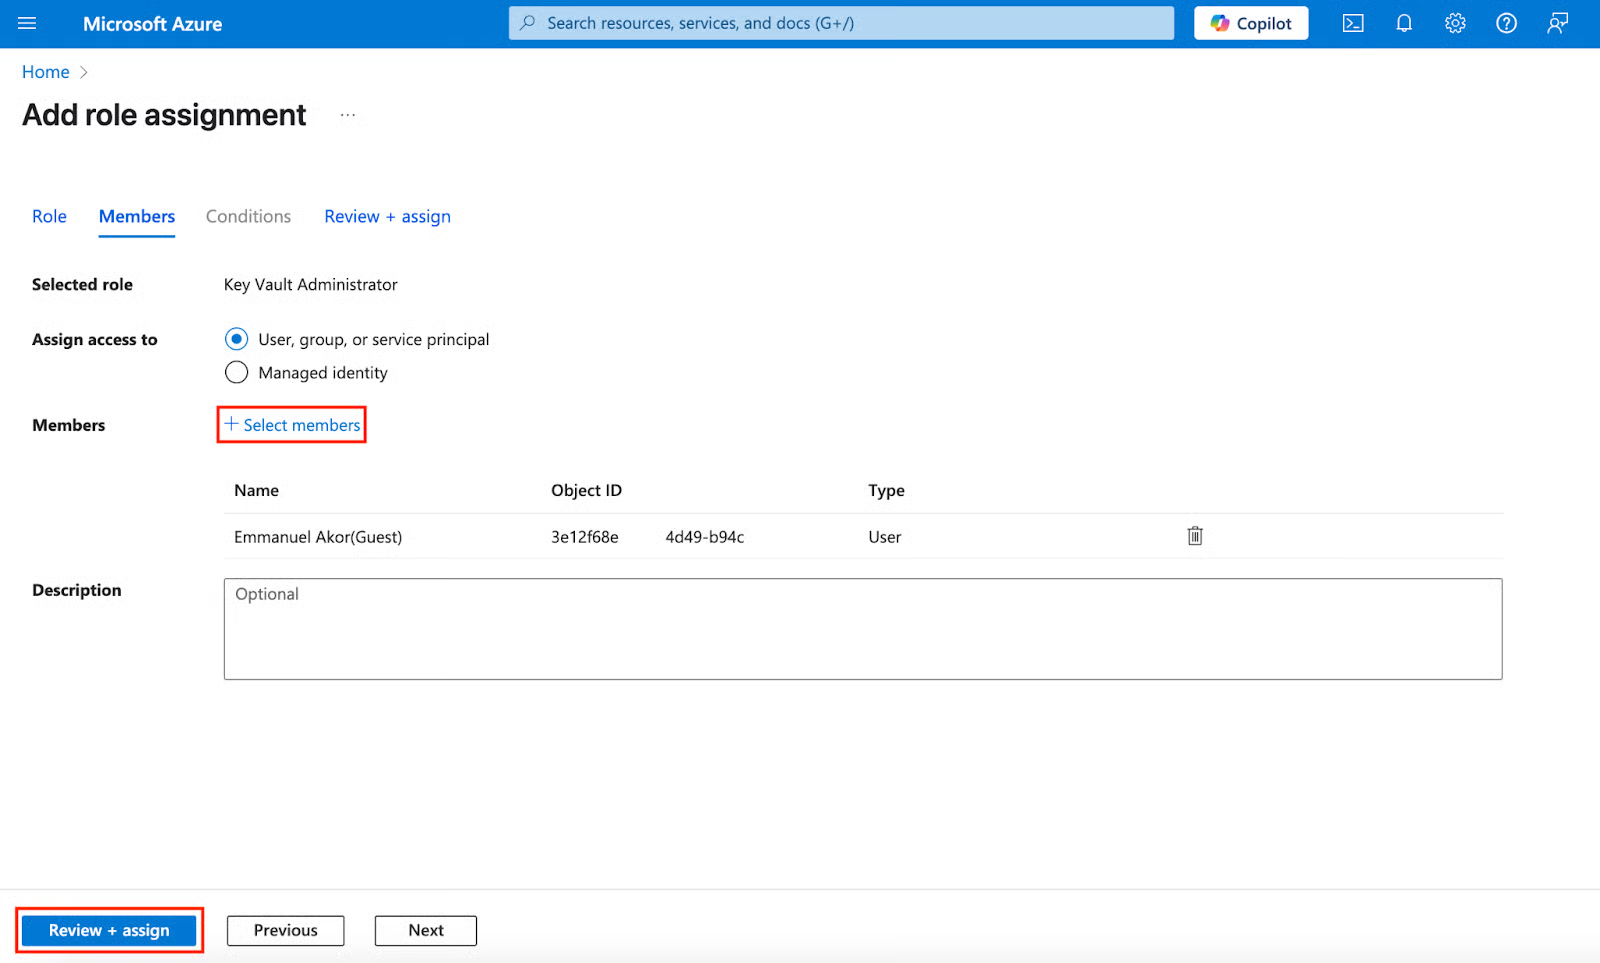
- In the Add role assignment, we can assign roles like:
- Key Vault Administrator (Full control).
- Key Vault Secrets Officer (Manage secrets only).
- Key Vault Reader (View-only access).
- And many more, depending on your scope and the policies you want to meet.
I will assign the Key Vault Administrator role for this. Click the Key Vault Administrator role and select Next.

- Click + Select members to pick members, and right after that, click Review + assign.
Defining Vault Access Policies
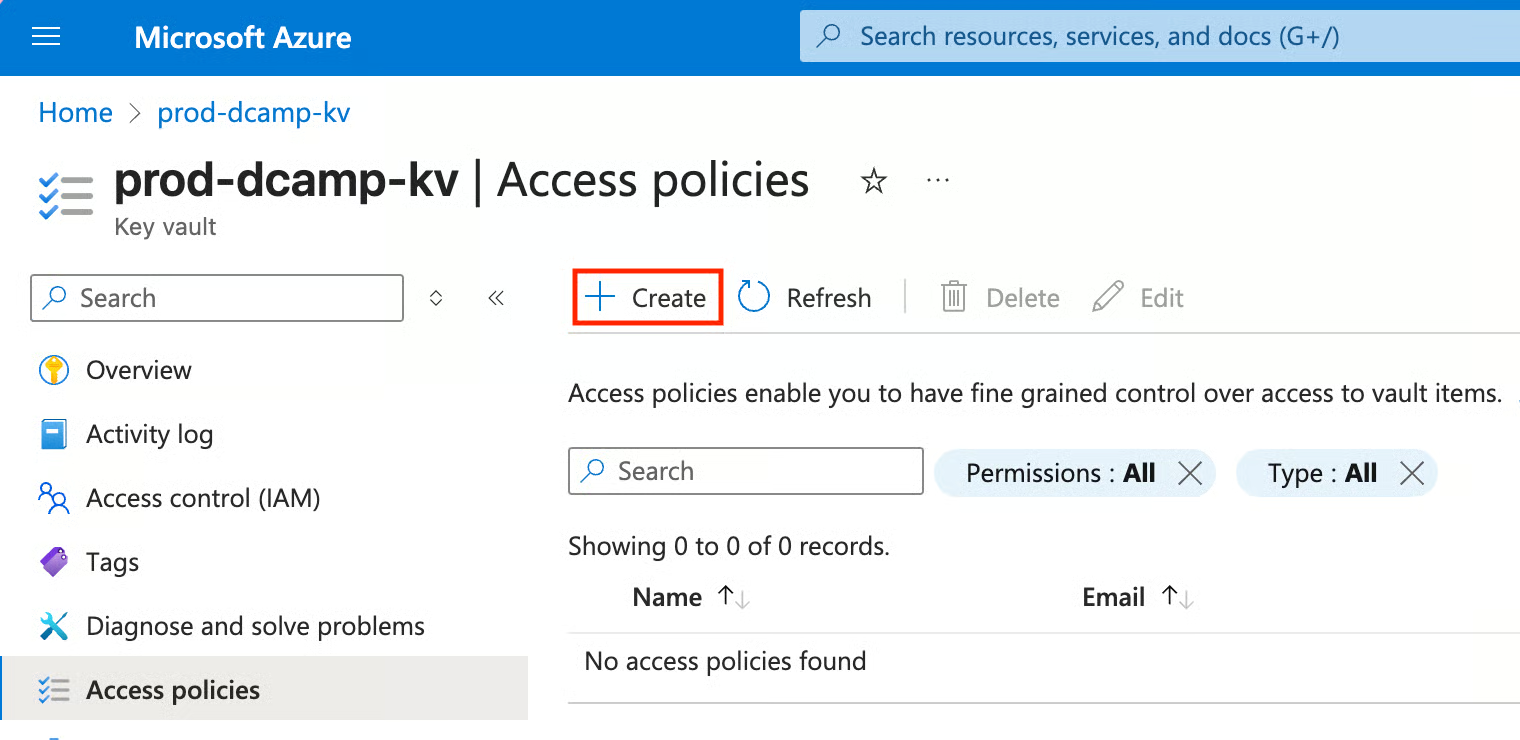
- On the left plane of your Key Vault, go to the Access policies tab.
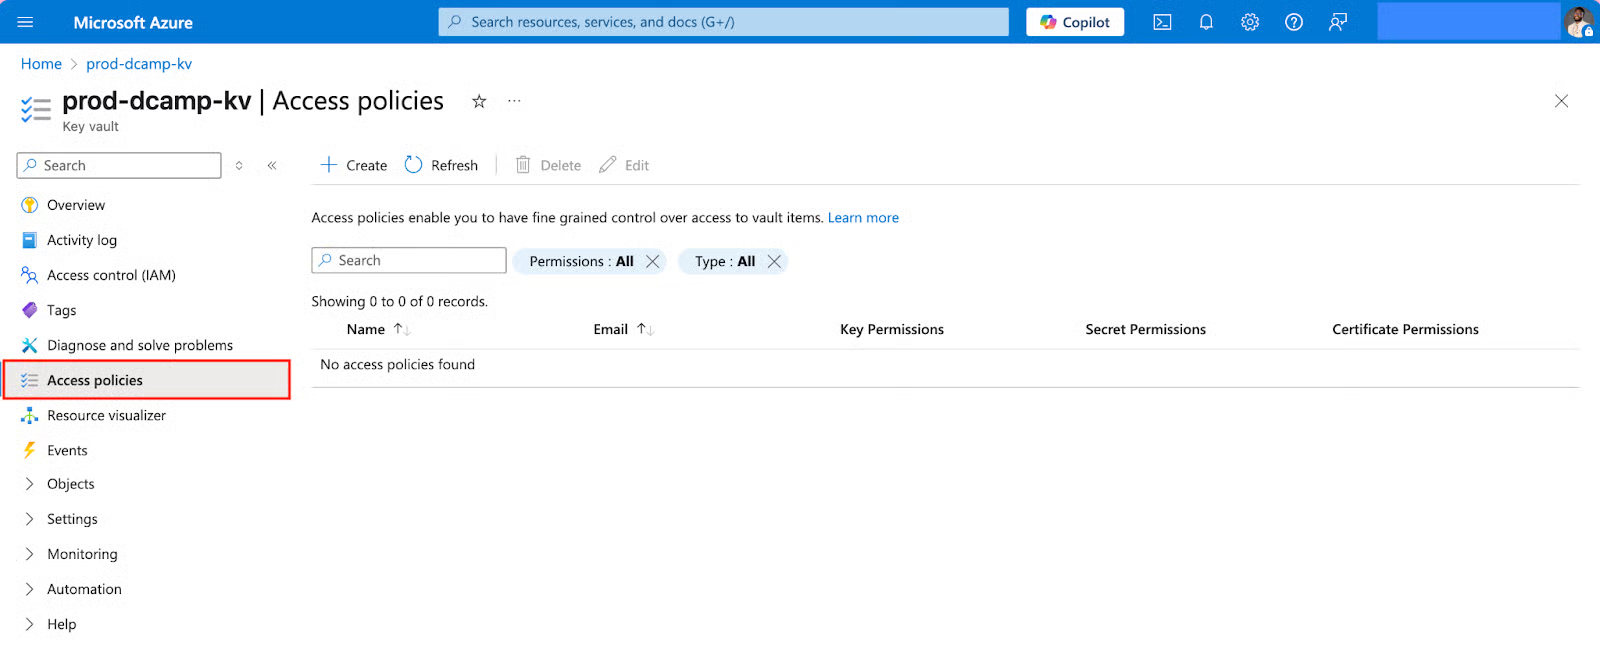
- Click + Create.
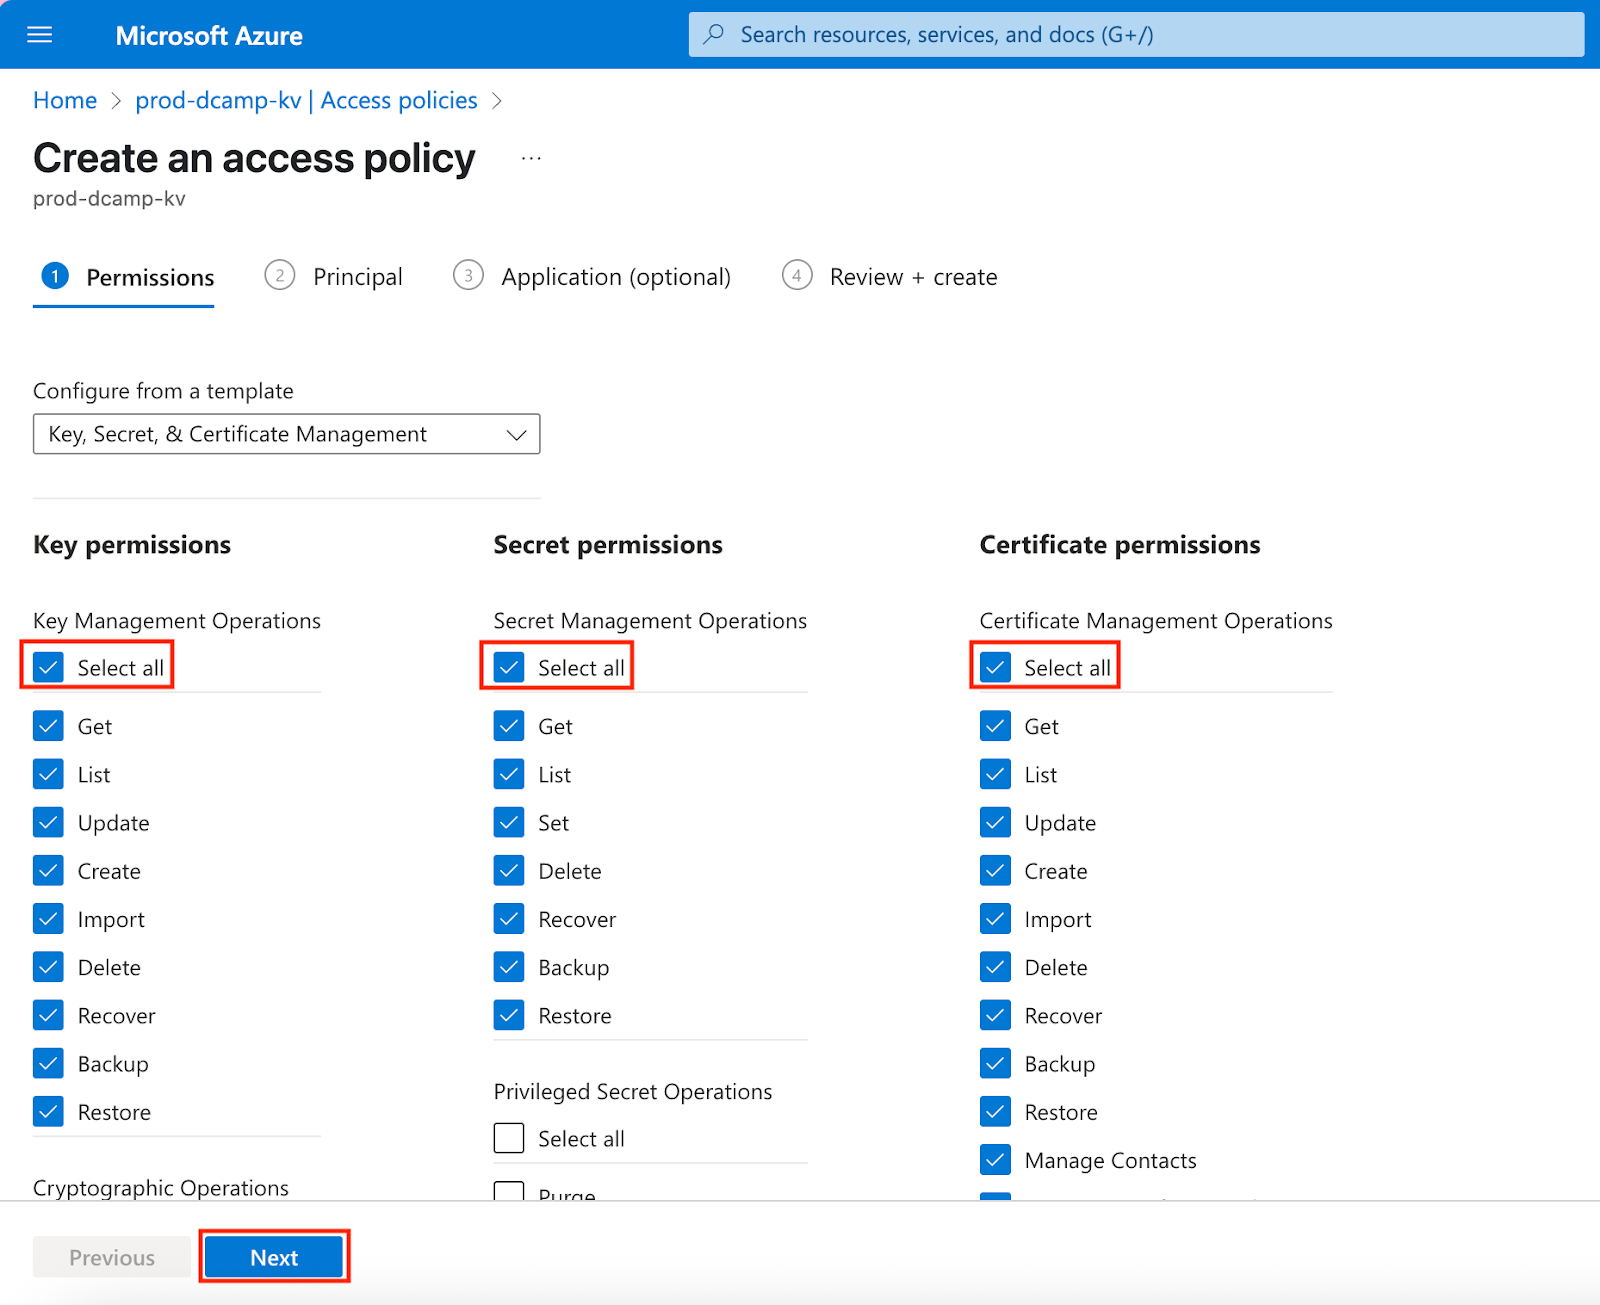
- First, configure from a template by clicking the Select a template drop-down. Then click Key, Secret, & Certificate Management.
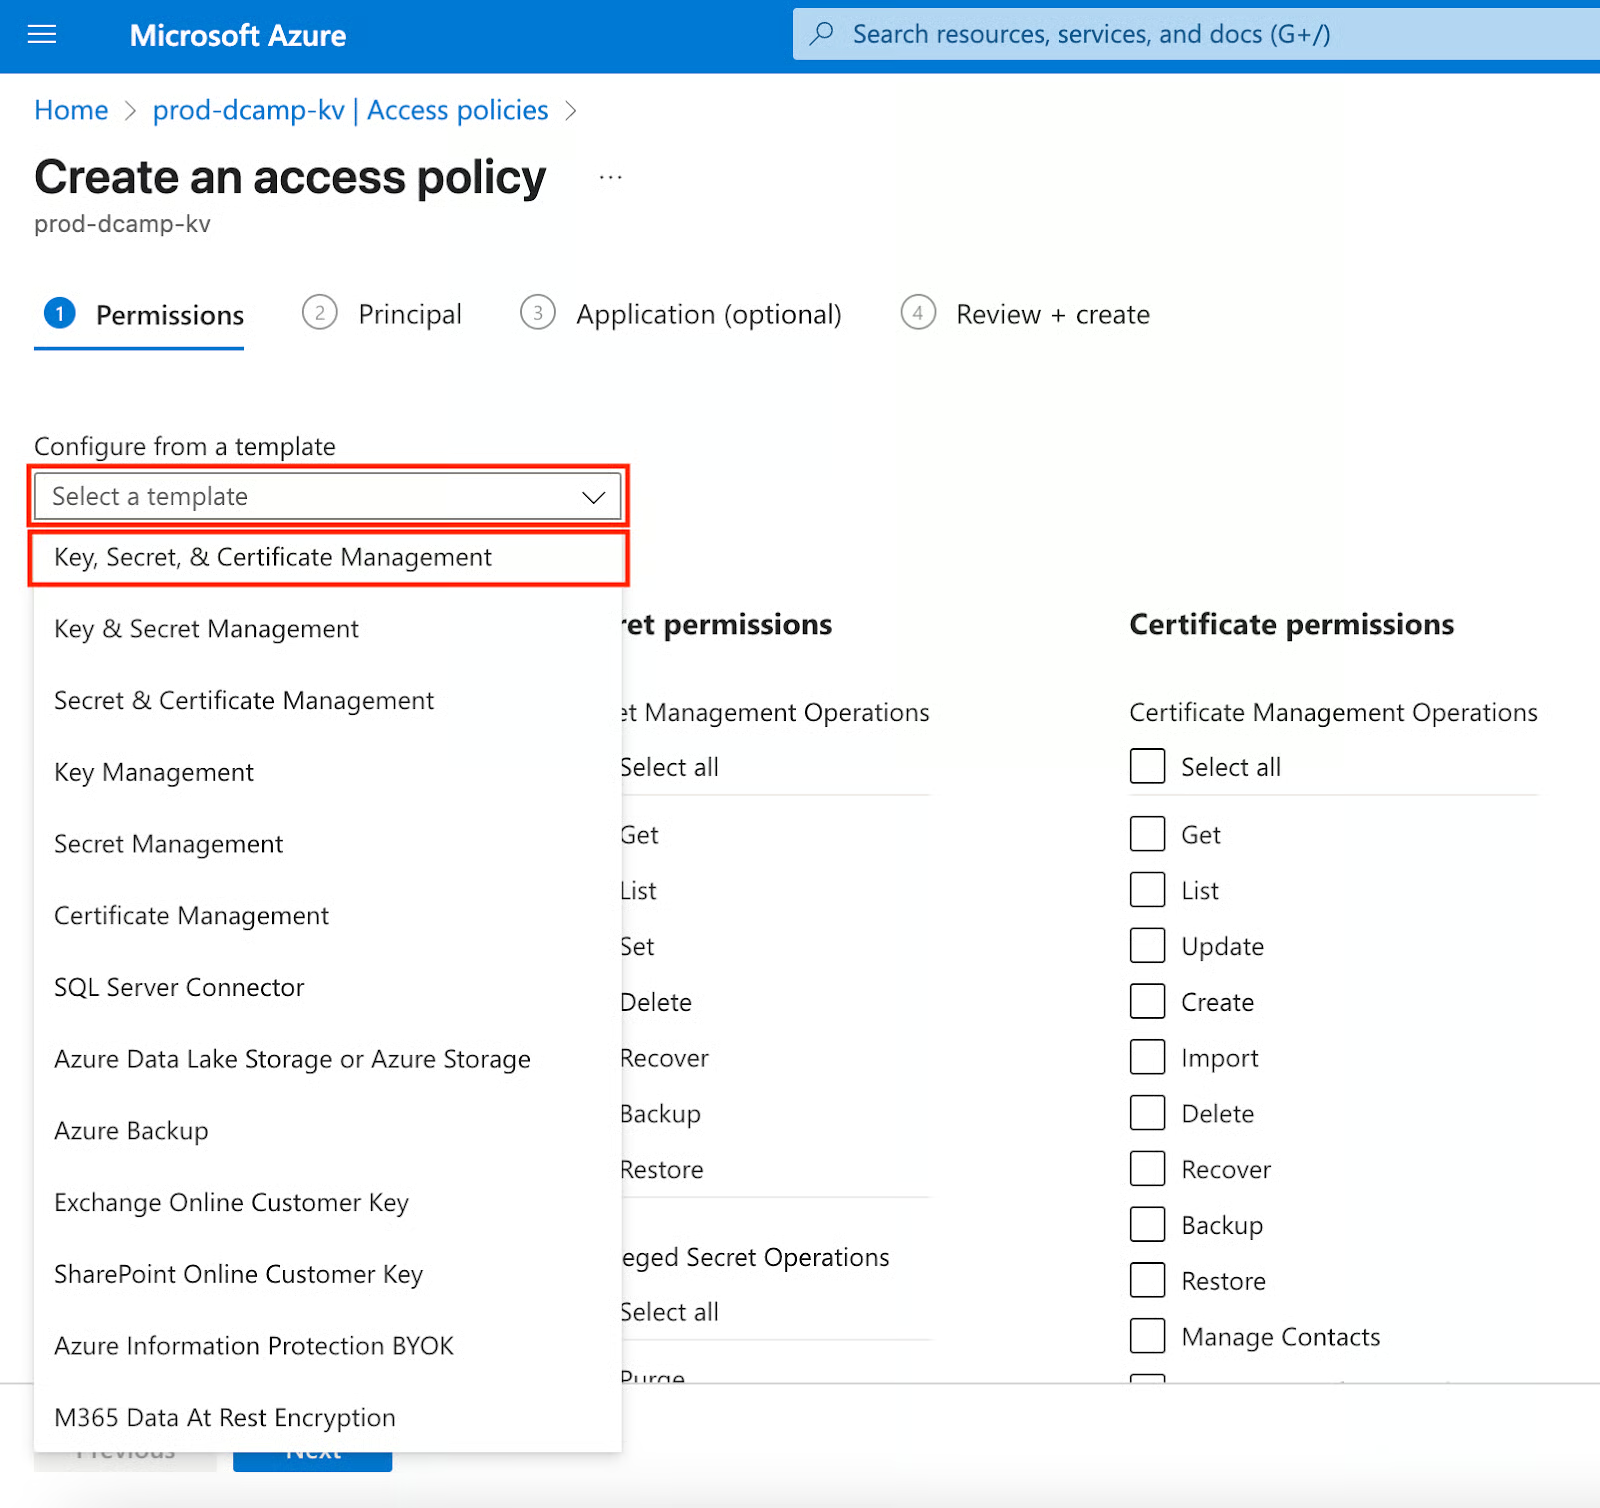
- Selecting Key, Secret, & Certificate Management in the drop-down automatically checks the Select all box for Key, Secret, and Certificate permissions. Click Next.
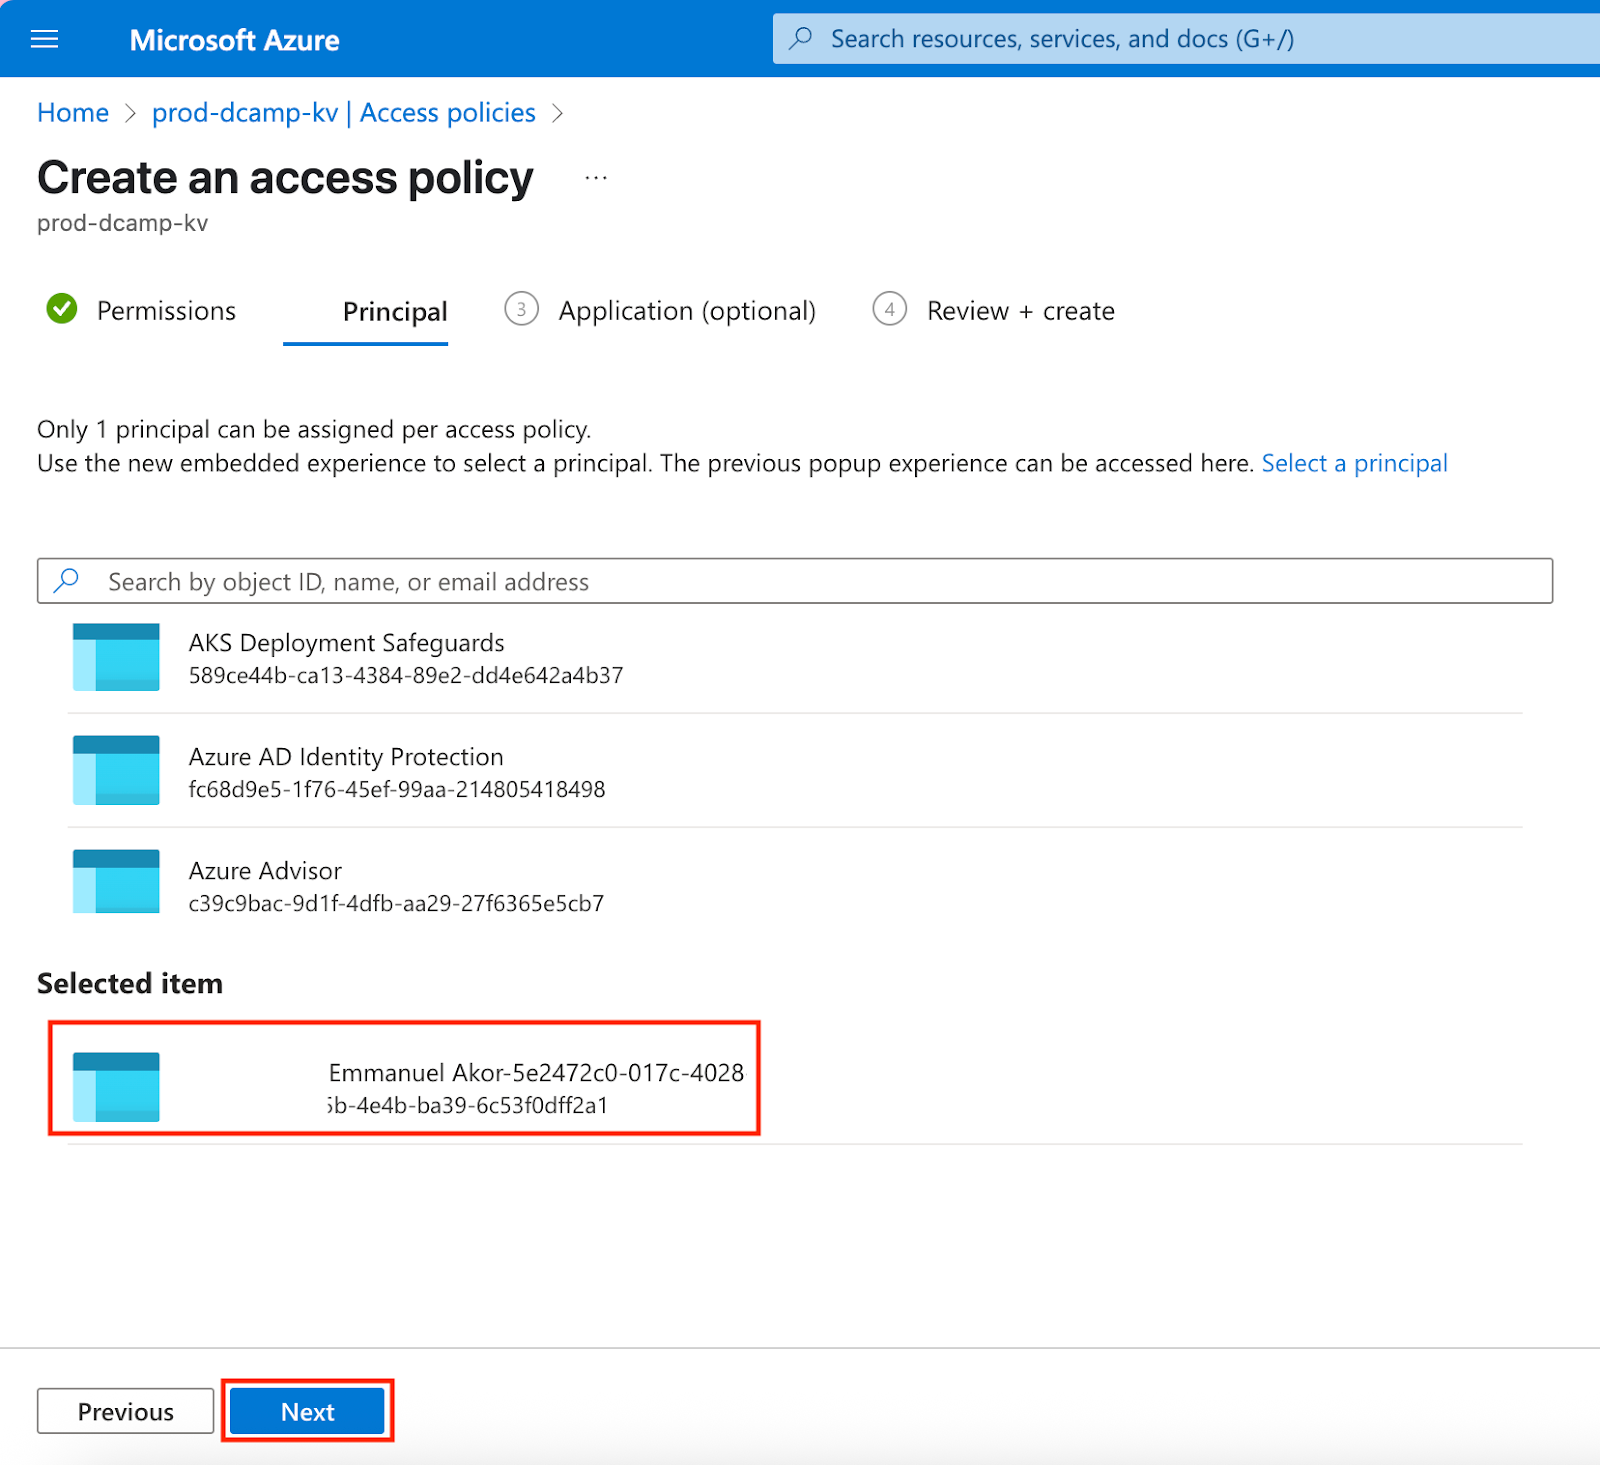
- Select the principal you want to assign to your access policy in the Principal section. Right after, click Next.
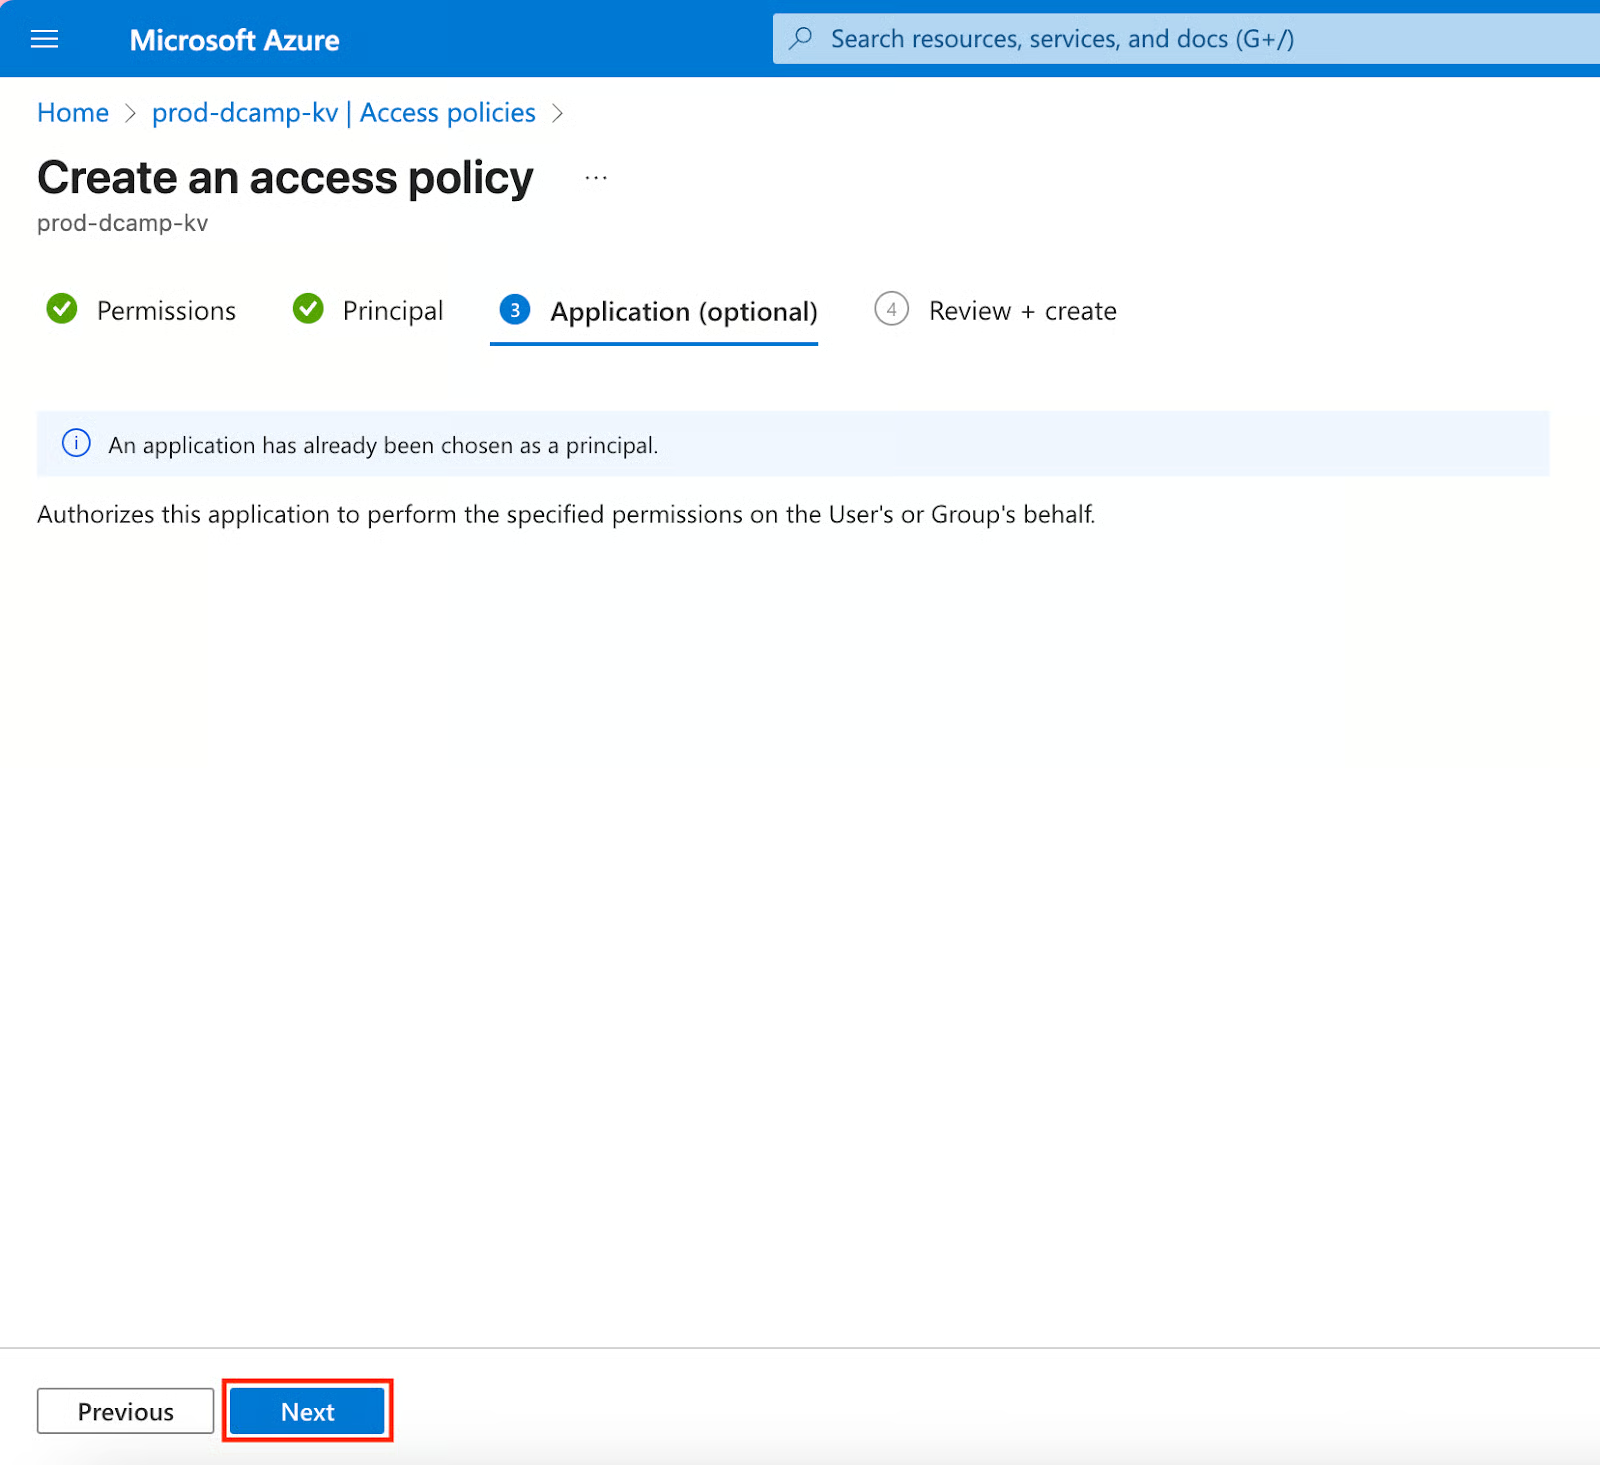
- In the Application (optional) section, you’ll get a message, “An application has already been chosen as a principal.” Click Next.
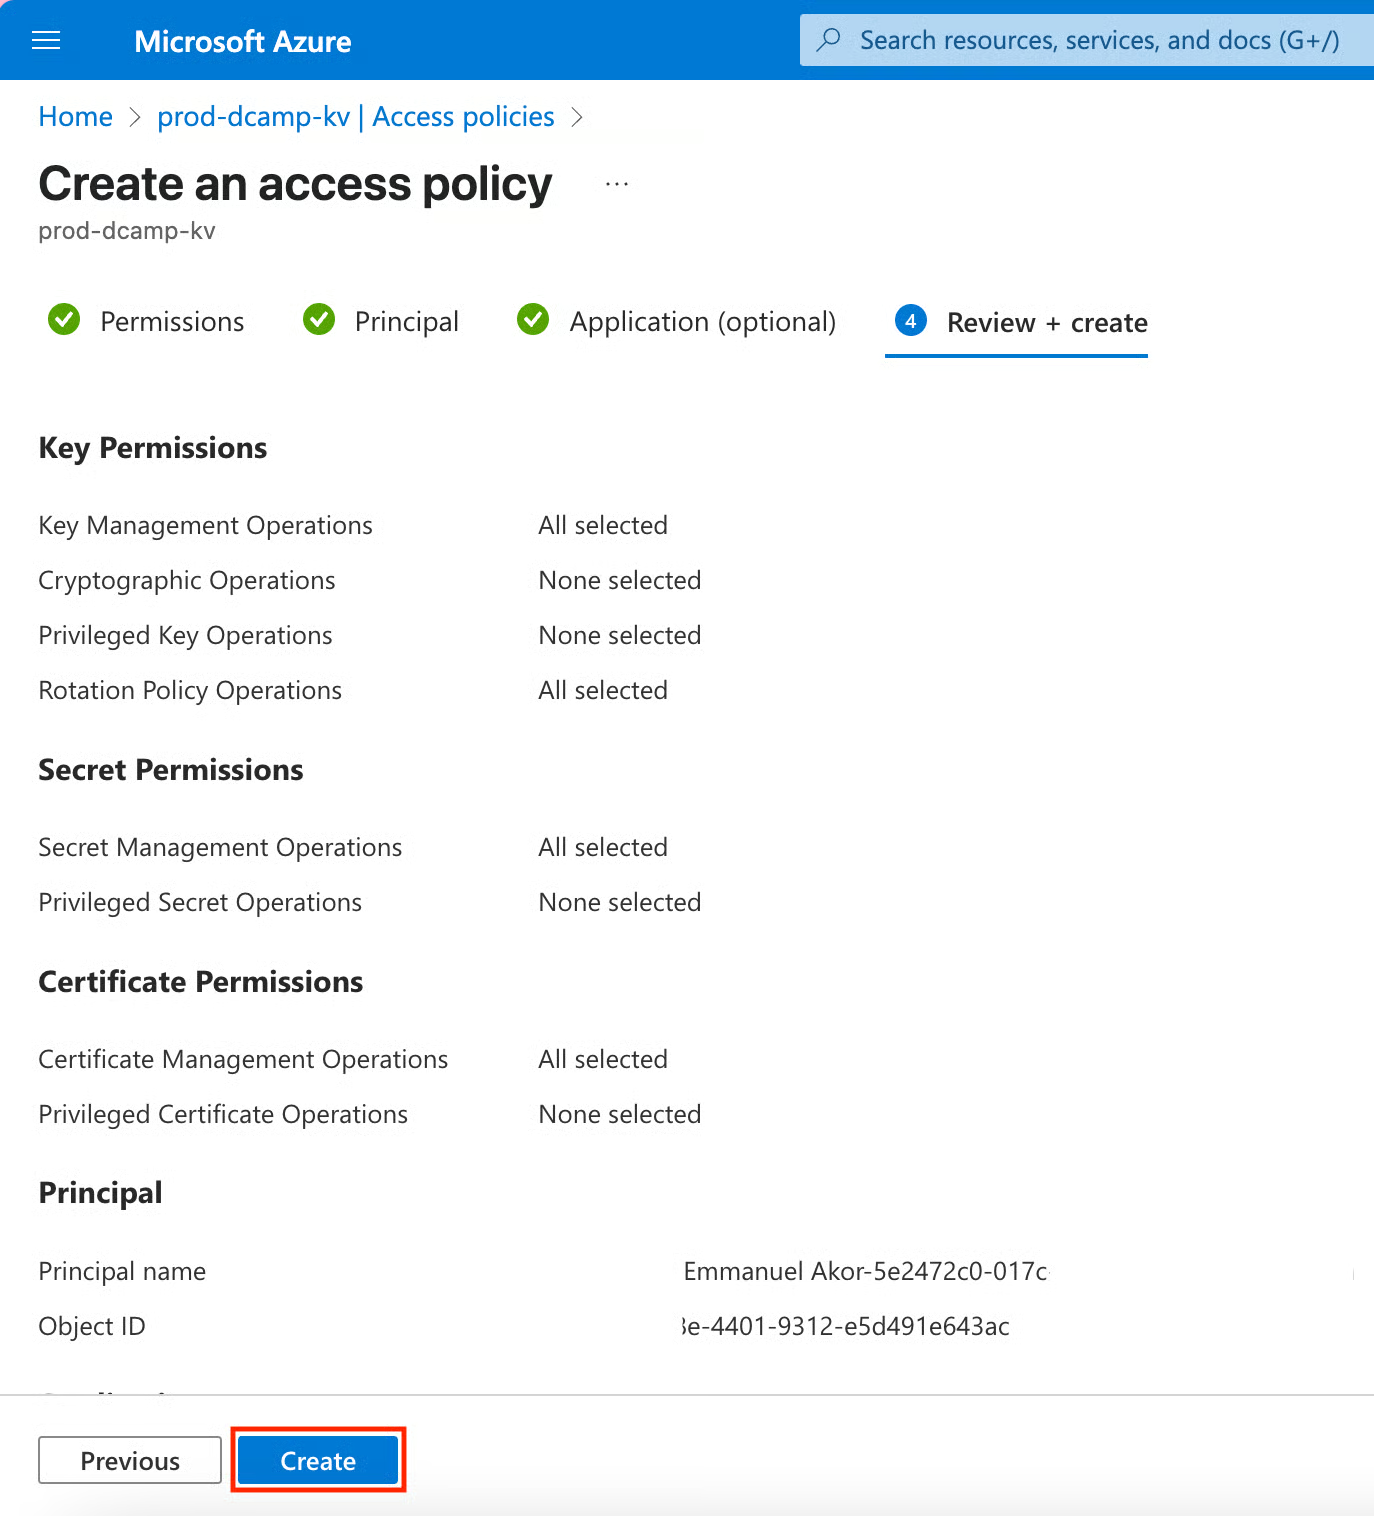
- In the Review + create section, click Create after our access policy passes all validation checks.
Permission Scoping Best Practices
Through years of integrating security into my workflows, I've developed these permission principles:
- Principle of Least Privilege: Start with minimal permissions and add as needed.
- Environment Separation: Production service principals should never have access to development Key Vaults.
- Human vs. Service Access: Humans need broader permissions for troubleshooting; services need narrow, specific access.
In a recent project I worked on, we granted Reader roles to auditors and Secrets Officer to DevOps to prevent accidental deletions. Organizations beginning with Key Vault have simple control over access through access policies. However, for larger organizations, RBAC offers better scalability and integration.
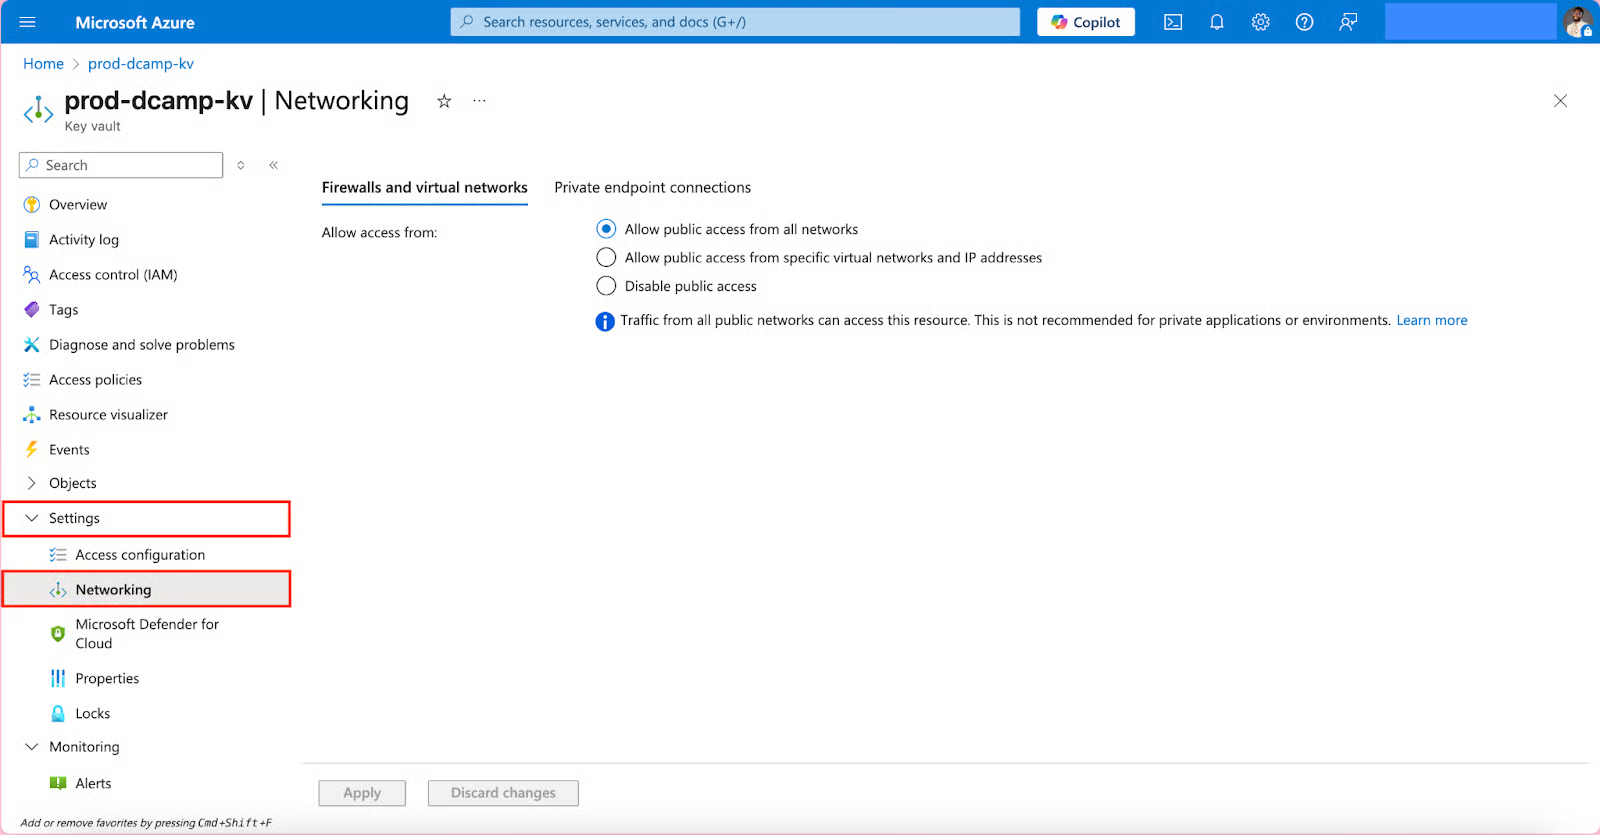
Securing network access
Network security for Key Vault often gets overlooked. It provides your first line of defense against unauthorized access. By default, Key Vault is open to the internet, don’t leave it that way. Let’s learn how to use private endpoints, firewall rules, and virtual networks for access restriction.
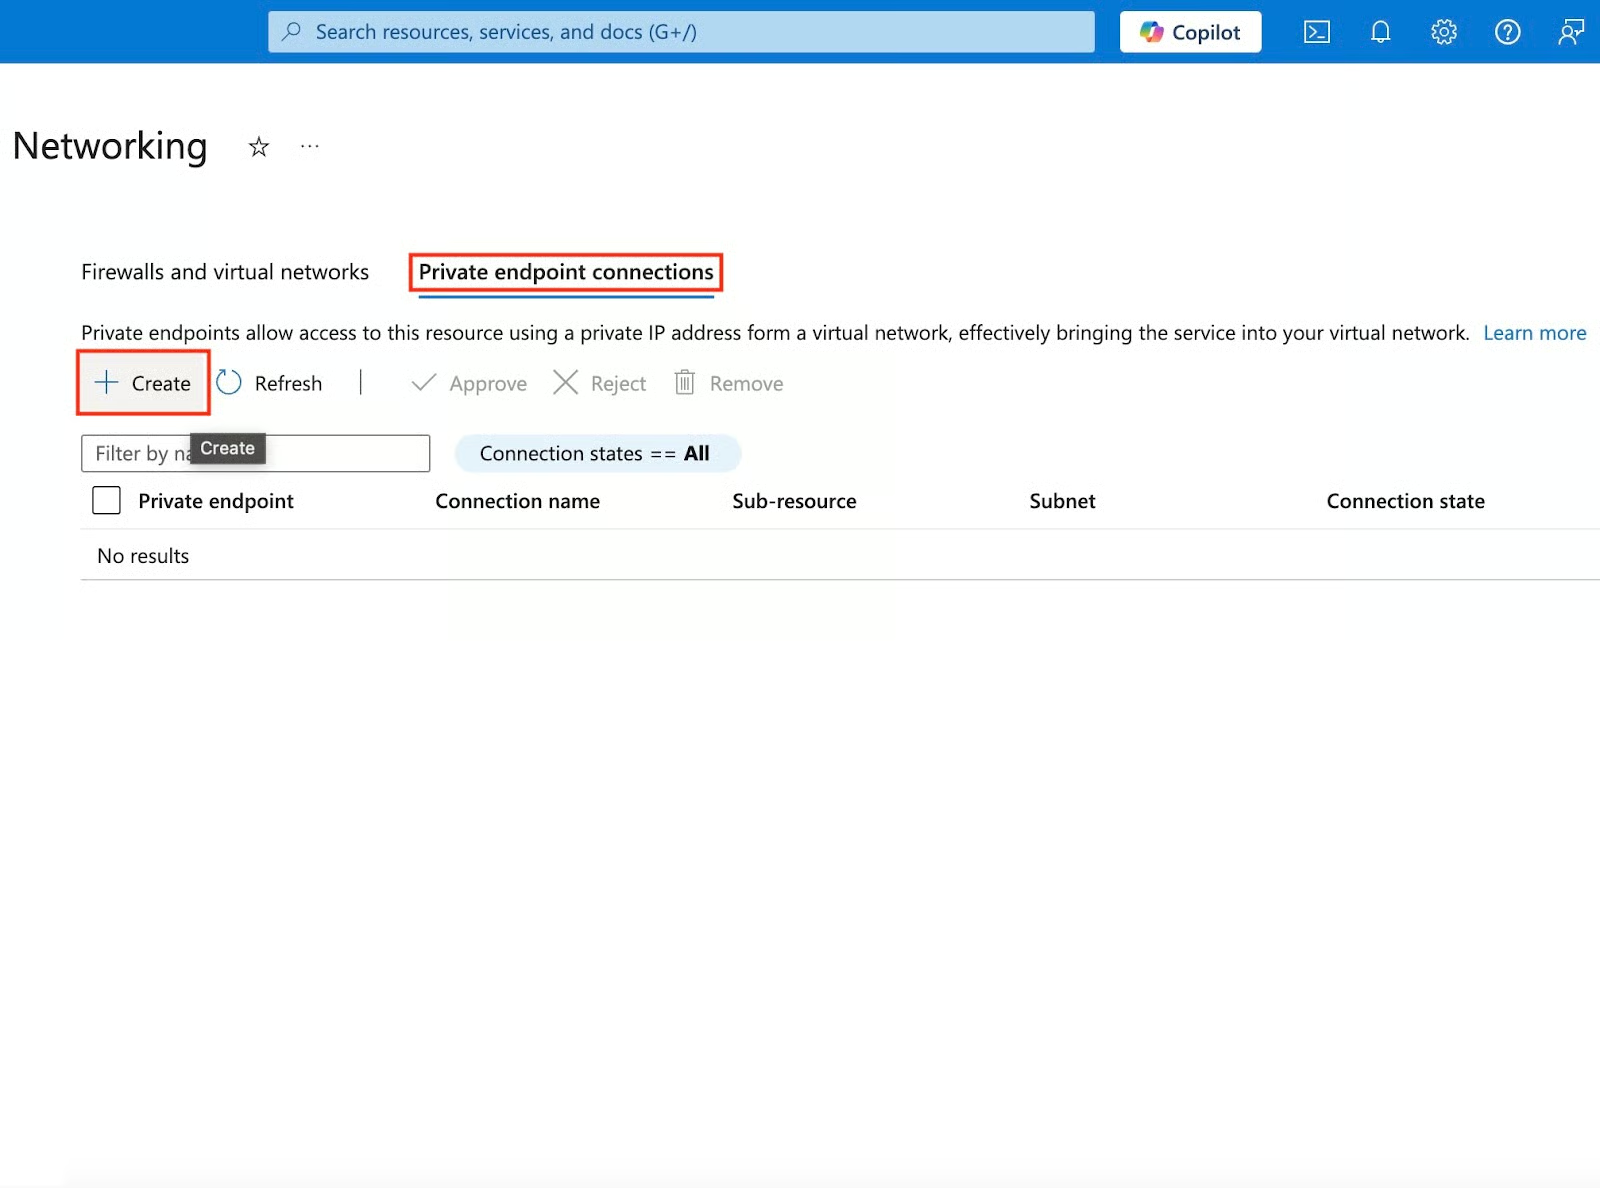
Private Endpoints
Private endpoints provide the highest security by bringing Key Vault into your virtual network. This practice is best for internal applications. Let’s learn how to set up private endpoints for our Key Vault:
- On the left plane of your Key Vault, navigate to Settings, click the drop-down, and select Networking.
- Navigate to Private endpoint connections and click Create to begin the setup process.
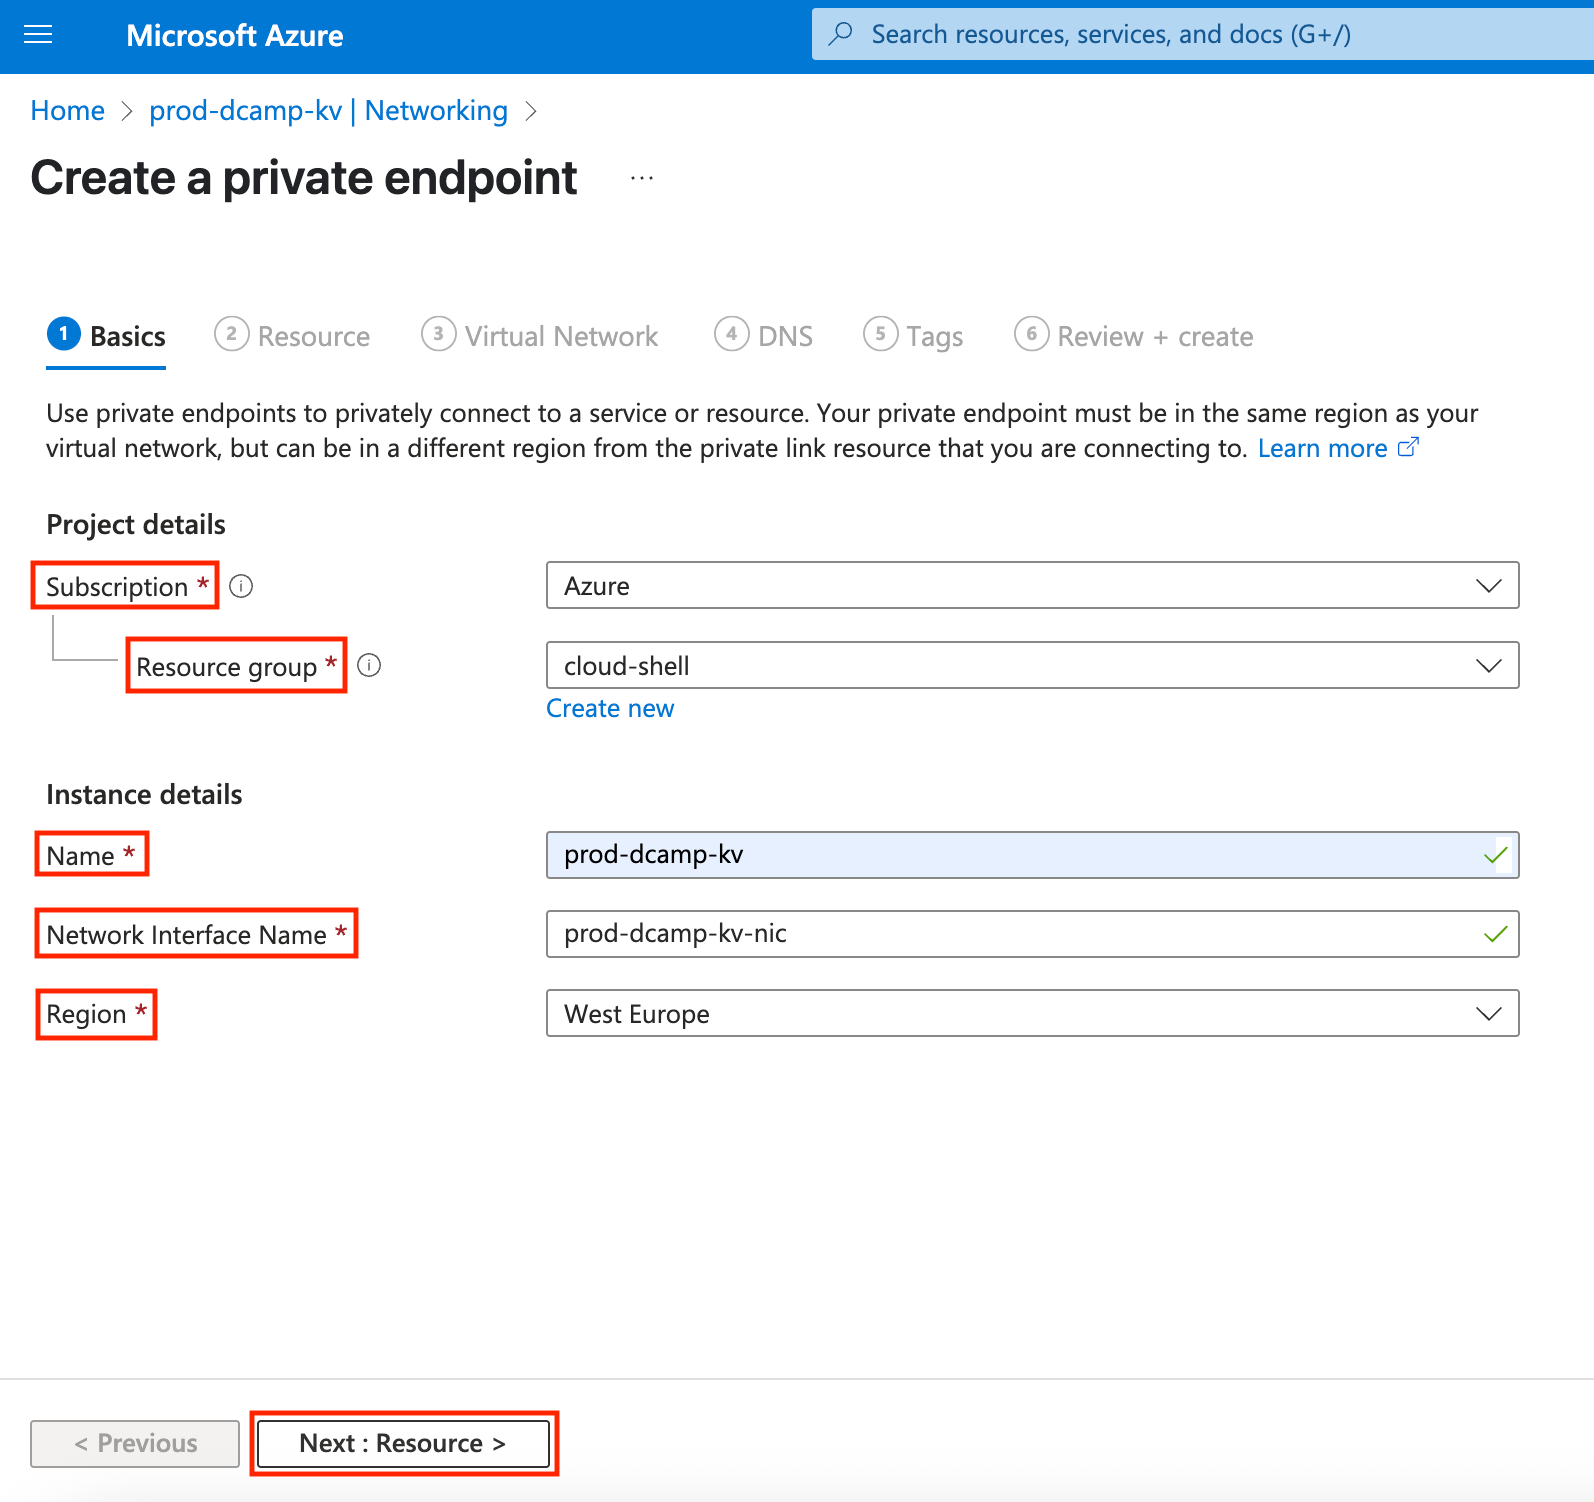
- Select and fill in details in the basics section:
- Subscription & Resource group (Use an existing one or create a new one).
- Name (Globally unique, e.g., prod-dcamp-kv).
- Network Interface Name (Azure automatically generates one using your chosen Name, e.g., prod-dcamp-kv-nic).
- Region (Choose the closest to your workload for lower latency).
- Click Next: Resource > to go to the next step.
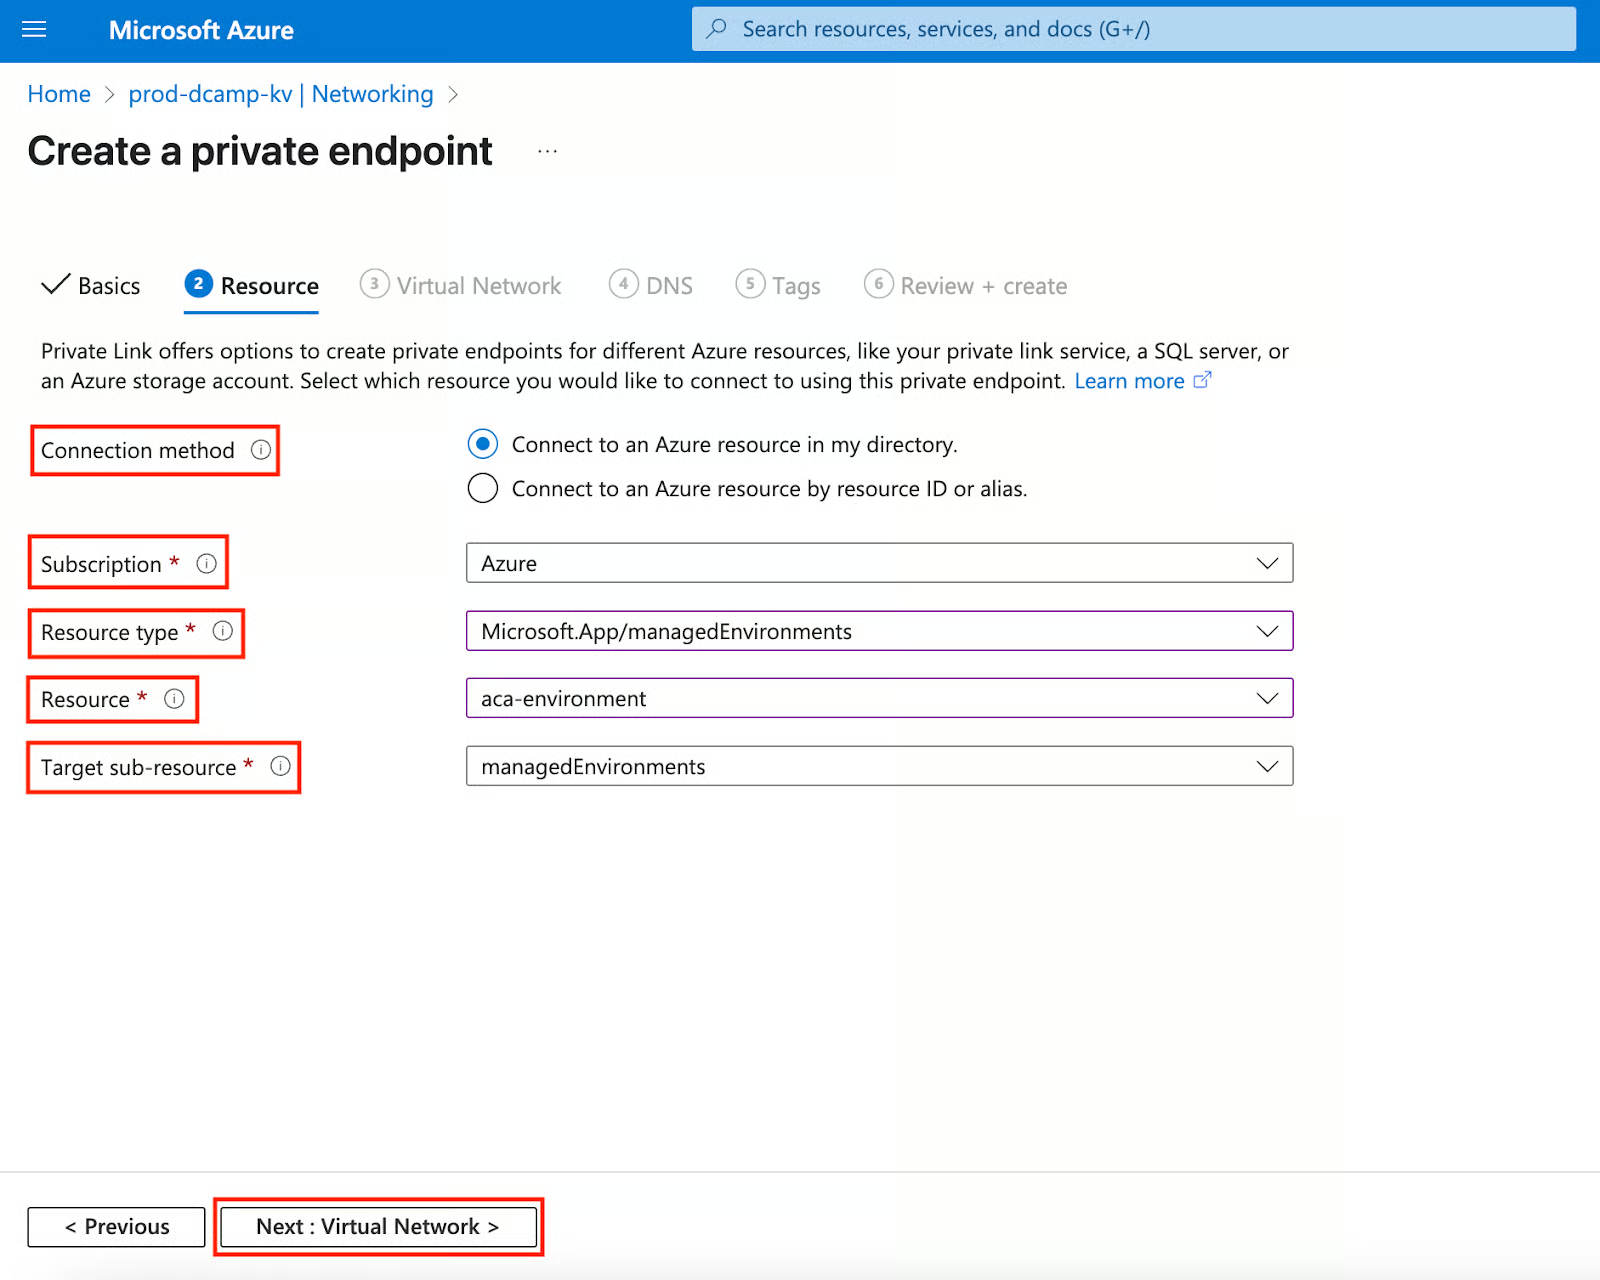
- In the Resource section, select the following:
- Connection method (You can connect to an Azure resource in my directory or connect to an Azure resource by resource ID or alias. But I’ll be going with Connect to an Azure resource in my directory because I already have a created resource I want to connect to).
- Subscription (Use an existing one or create a new one).
- Resource type (Select from the drop-down, e.g., Microsoft.App/managedEnvironments).
- Resource (Select any resource from the drop-down of your selected resource type).
- Target sub-resource (This auto-generates from your selected resource type).
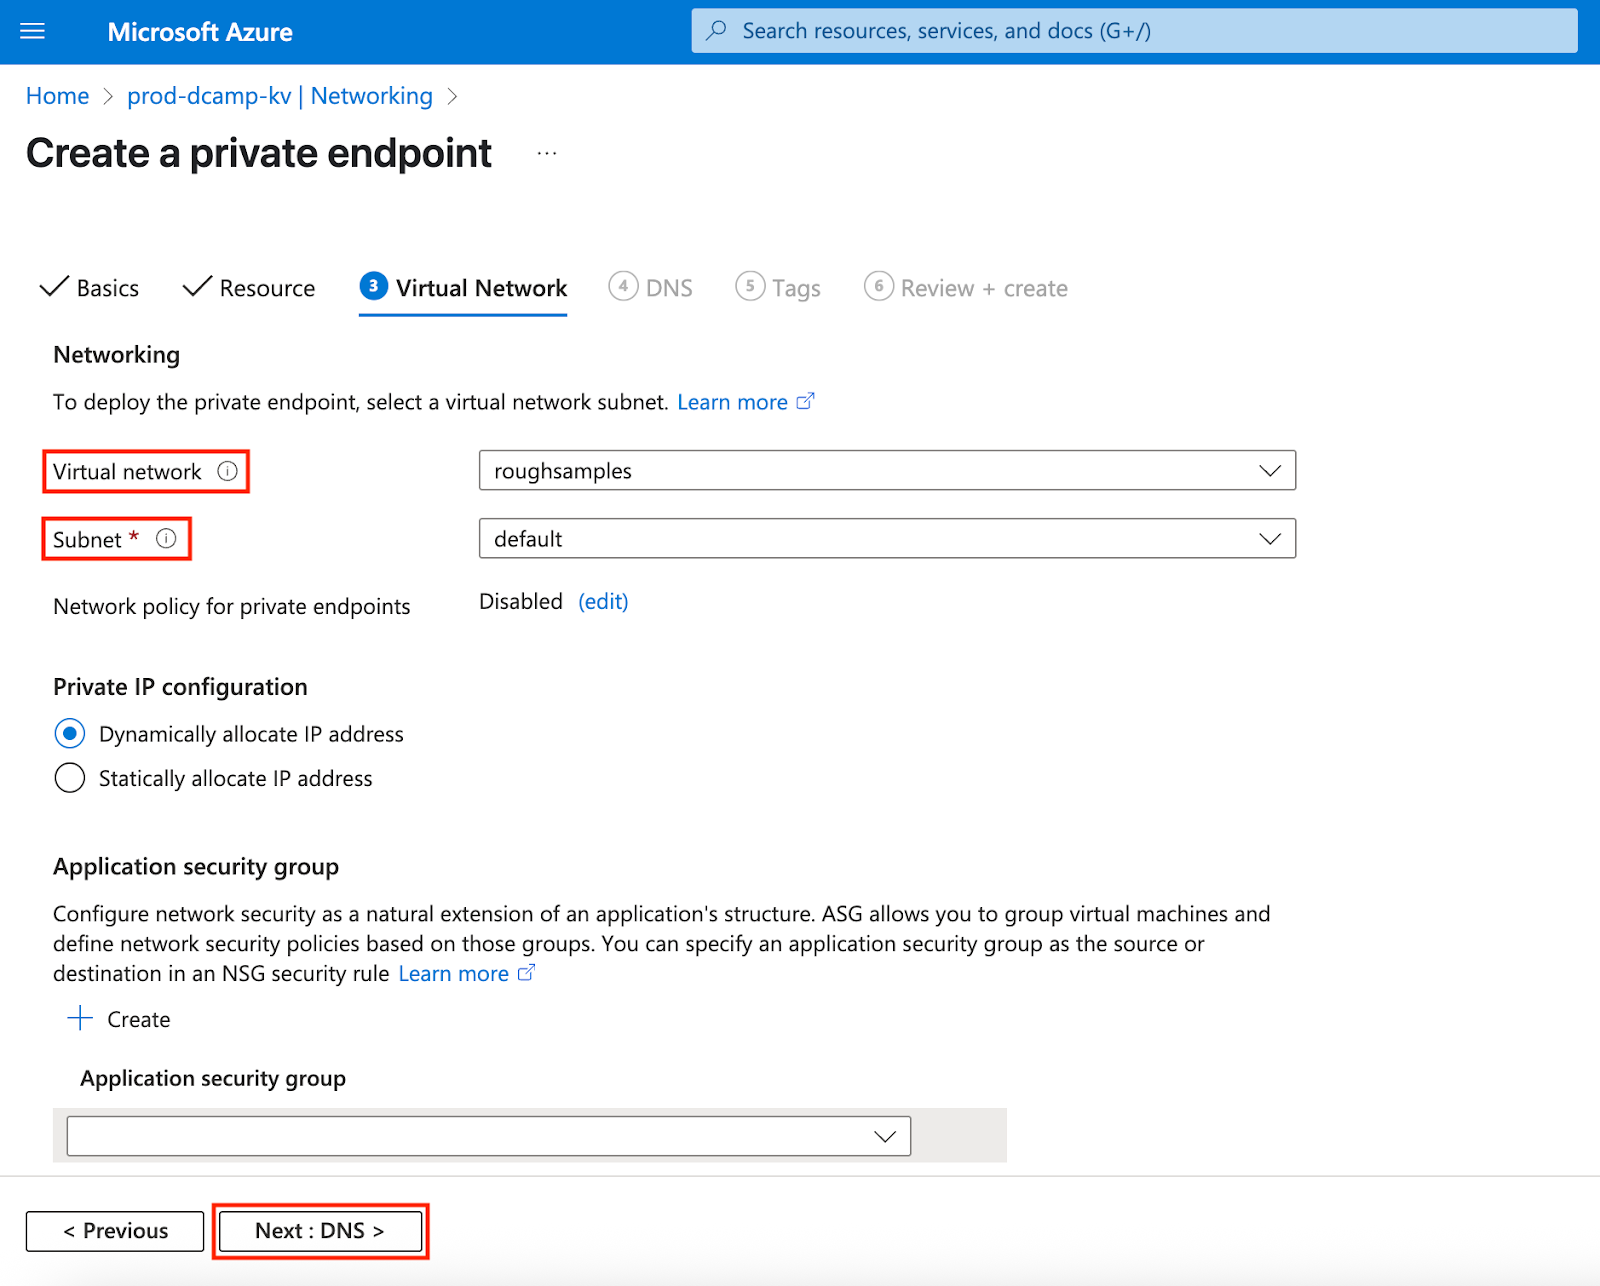
- Click Next: Virtual Network > to go to the next step.
- In the Virtual Network section, select an existing Virtual network from your list of existing virtual networks. After, leave everything else at the default, including the Subnet, unless you have specific needs.
- Click Next: DNS > to go to the next step.
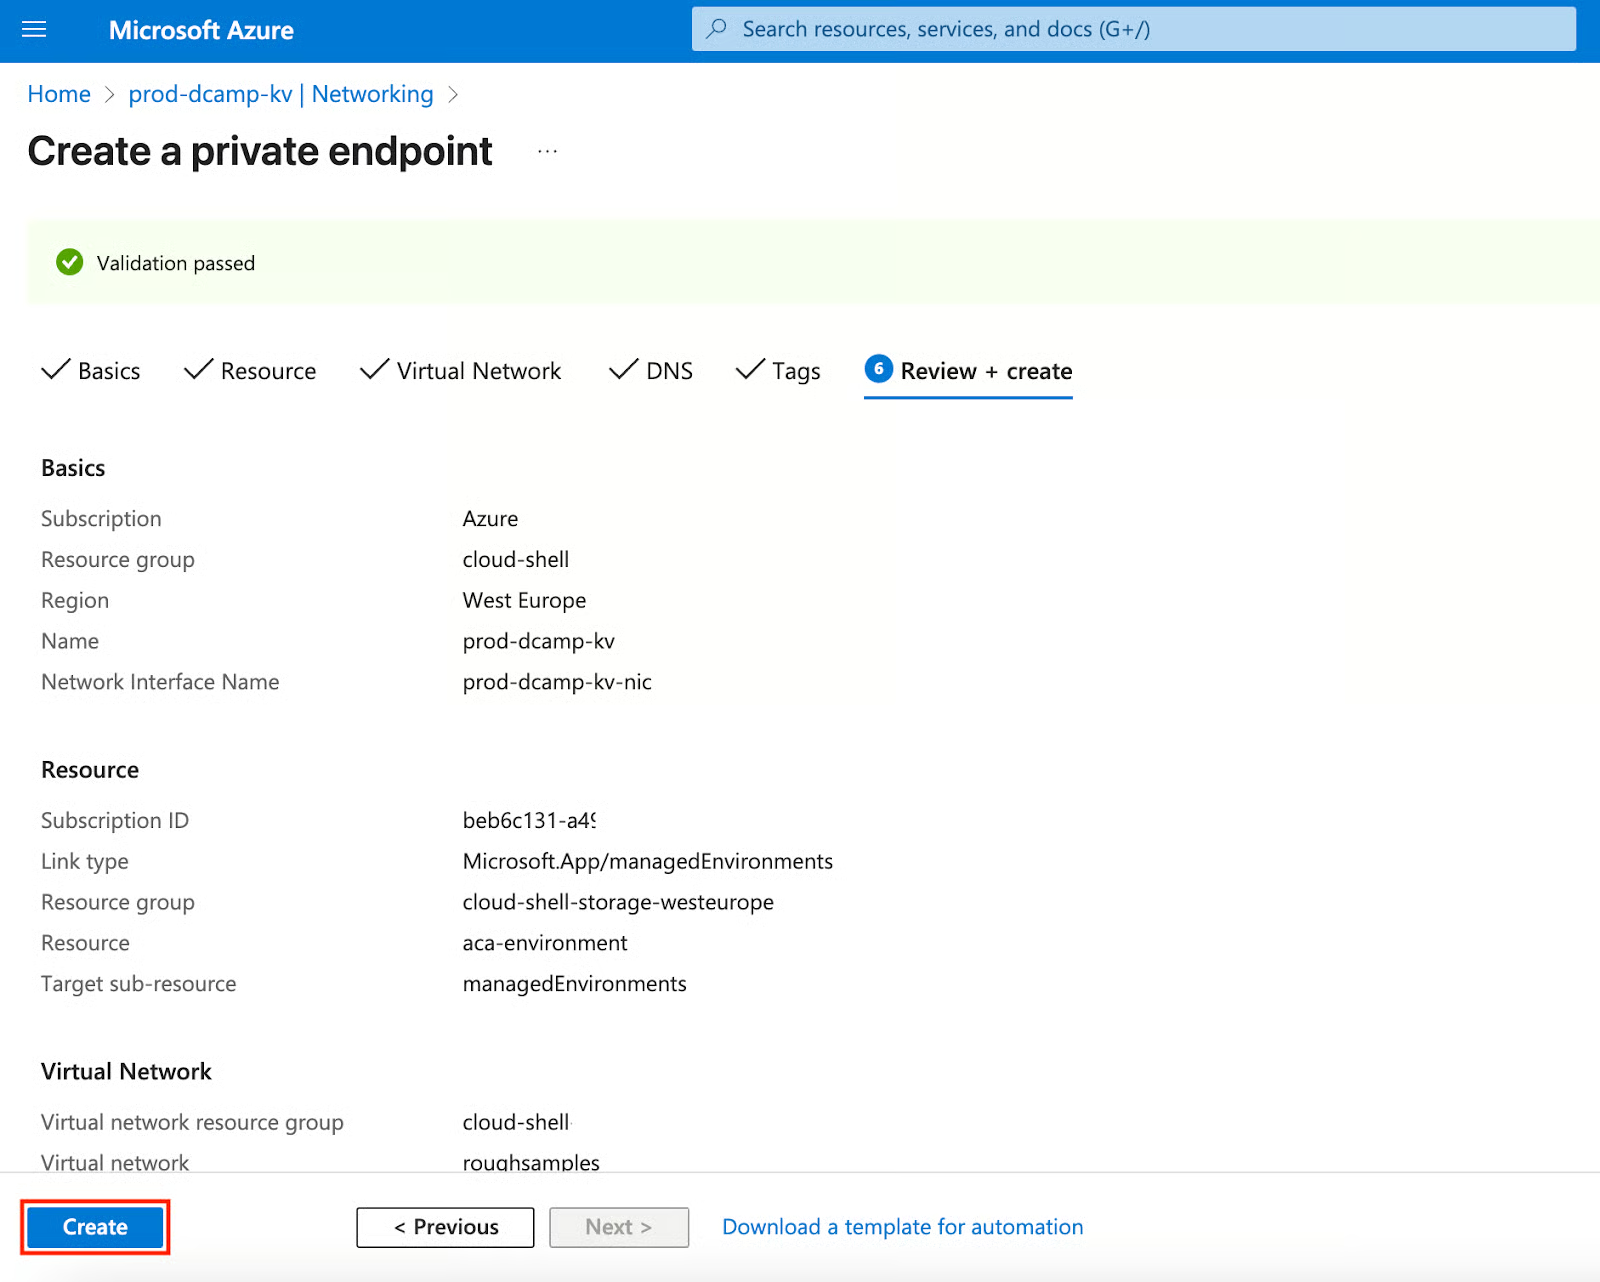
- From here, through DNS, Tags, to Review + create, leave them at the default unless you have specific needs. After configuring all settings, Azure performs validation checks. You’ll get a Validation Passed notification on your screen.
- Click Create.
Private endpoints are more complex than firewalls and virtual networks, but are necessary for organizations with strict network isolation requirements. I typically recommend this approach for financial services, healthcare, and government clients where network segmentation is mandatory.
Firewalls and virtual networks
Firewalls and virtual networks are used for public access from all networks or specific IP address ranges and subnets. This practice is best for client-facing applications, external applications, and development environments accessed via the Internet.
Let’s learn how to set up firewalls and virtual networks for our Key Vault:
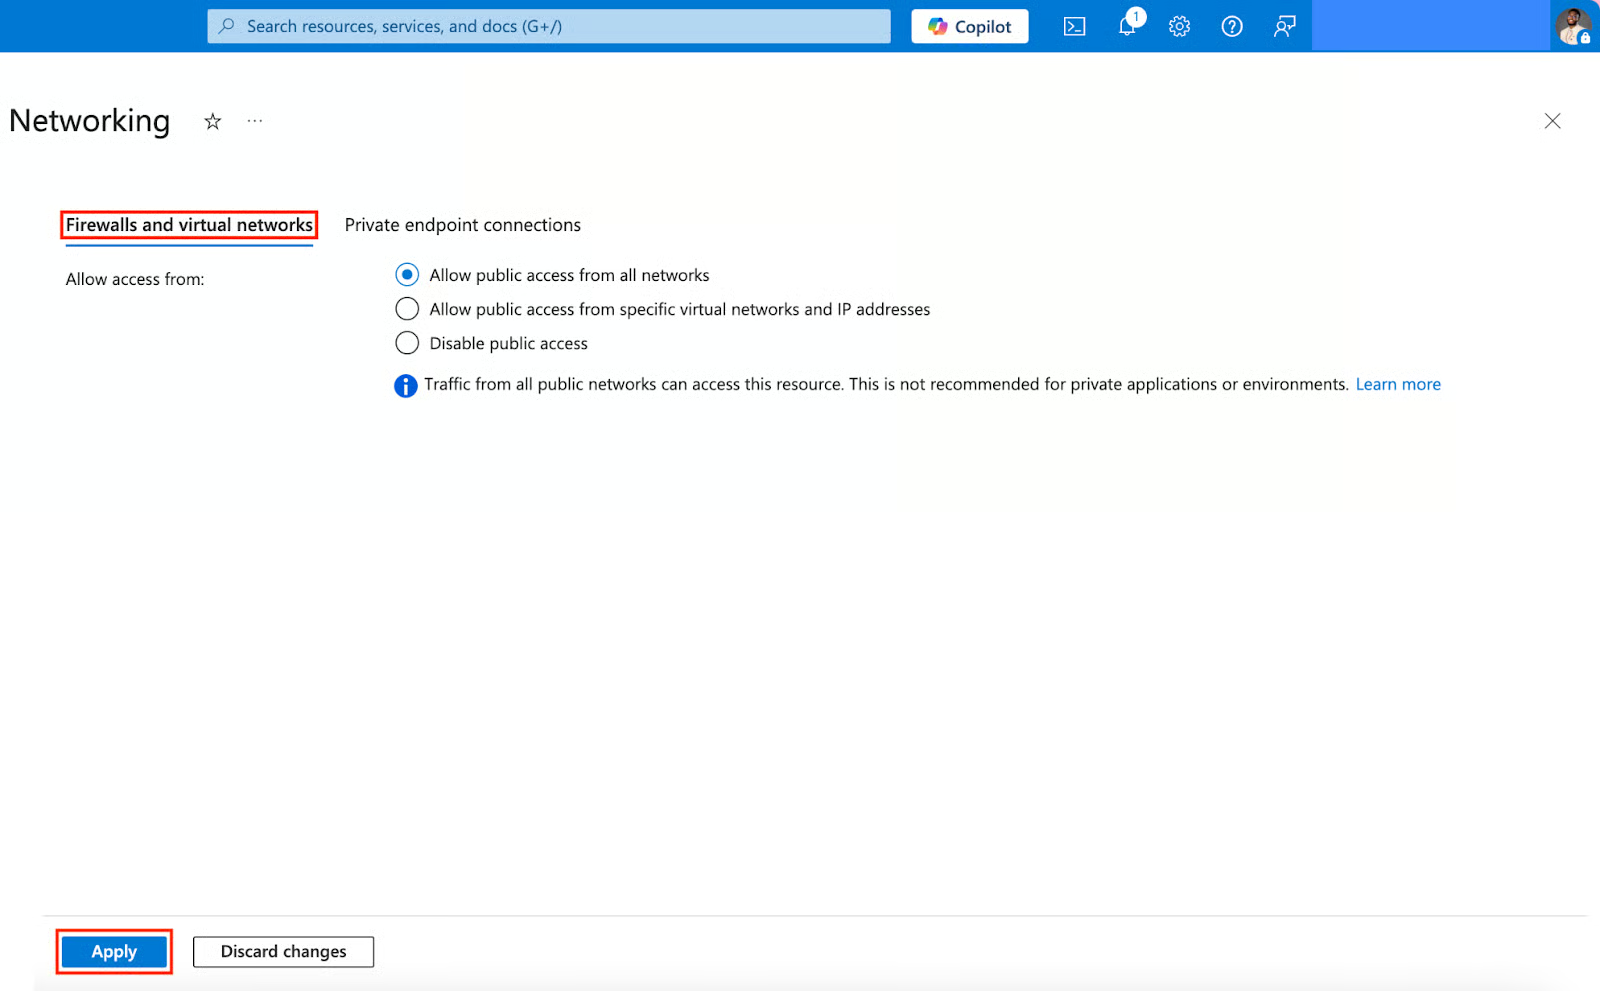
- On the left plane of your Key Vault, navigate to Settings, click the drop-down, and select Networking.

- Navigate to Firewalls and virtual networks. You can allow access from:
- Allow public access from all networks (Only use this if you’re okay with anyone on the internet trying to reach your Key Vault).
- Allow public access from specific virtual networks and IP addresses (Only trusted networks or IP addresses can come in).
- Disable public access (Only private, specially connected routes (like private endpoints) can access your Key Vault).
- After selecting any access, click Apply.
Firewalls and virtual networks have a basic security level and are less complex than private endpoints, but are not advised for use in private environments and applications.
Managing Secrets, Keys, and Certificates
Effective vault management goes beyond storage; it requires proper lifecycle management, rotation strategies, and access patterns that developers will follow. Now that our vault is ready and secure, let’s efficiently store and manage what goes inside.
Storing and retrieving secrets
How you structure and name your secrets directly affects maintainability. Secret management is the backbone of any Key Vault implementation. Let’s learn how to store and retrieve our secrets in our Azure Key Vaults.
Add Secrets Securely
To add secrets securely to your Key Vault, follow the steps below:
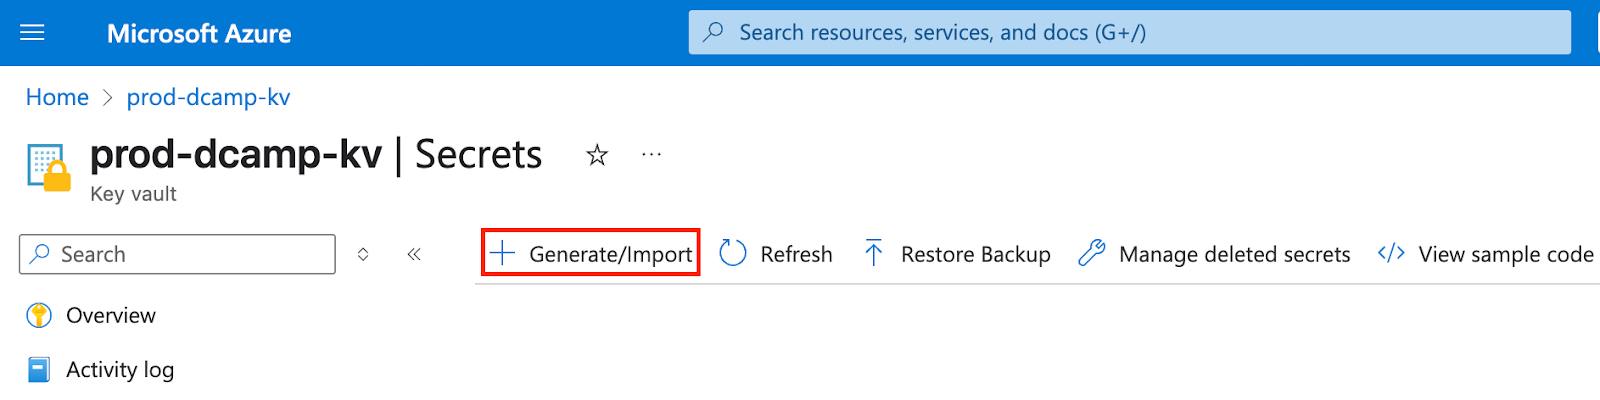
- On the left plane of your Key Vault, navigate to Objects, click the drop-down, and select Secrets.

- Navigate and click + Generate/Import at the top to begin the creation process.
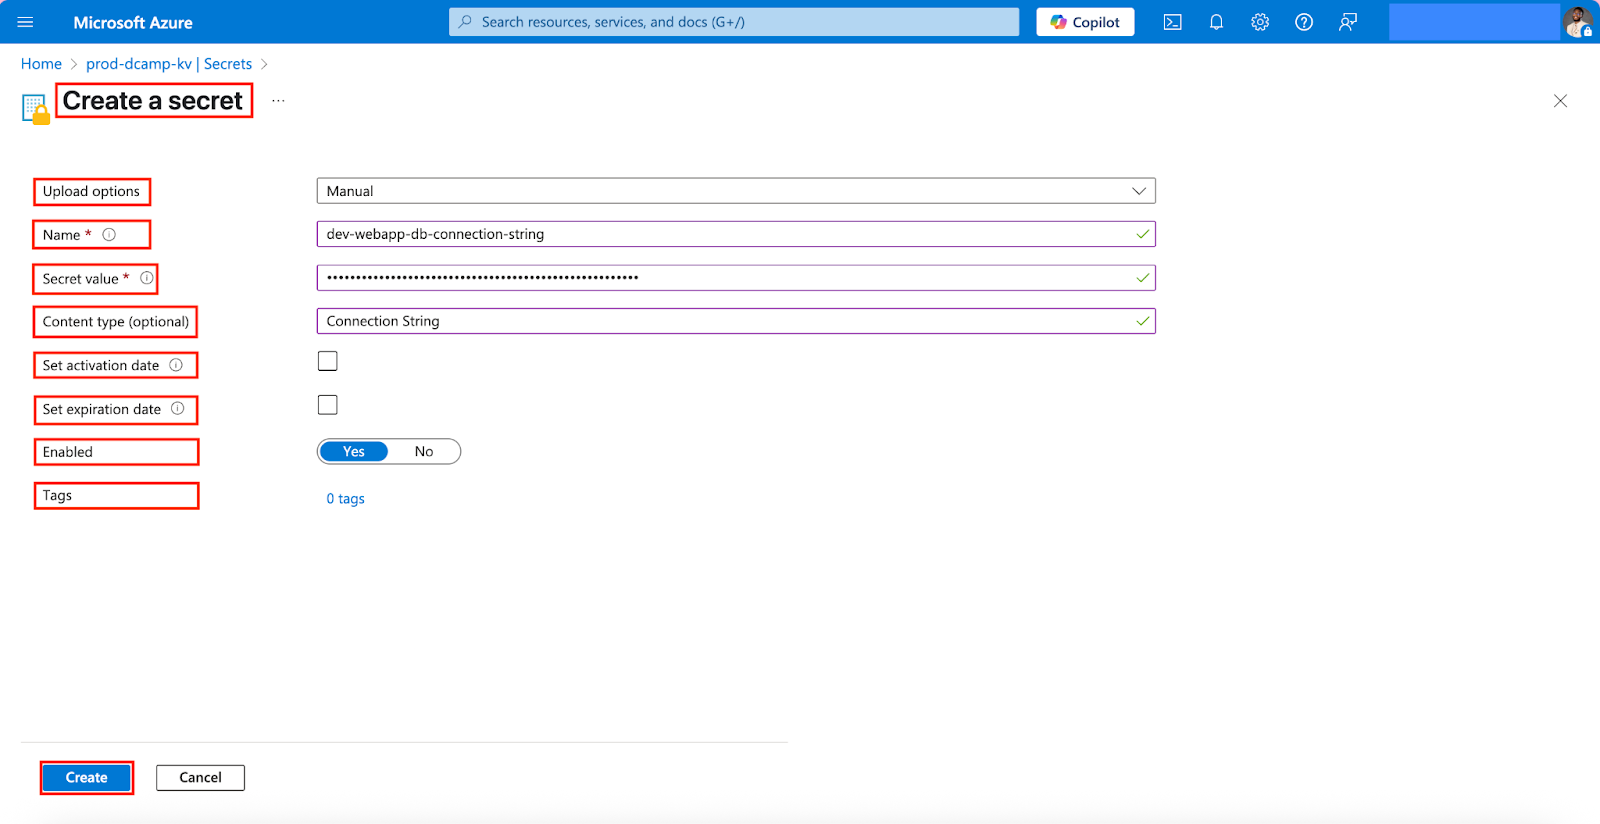
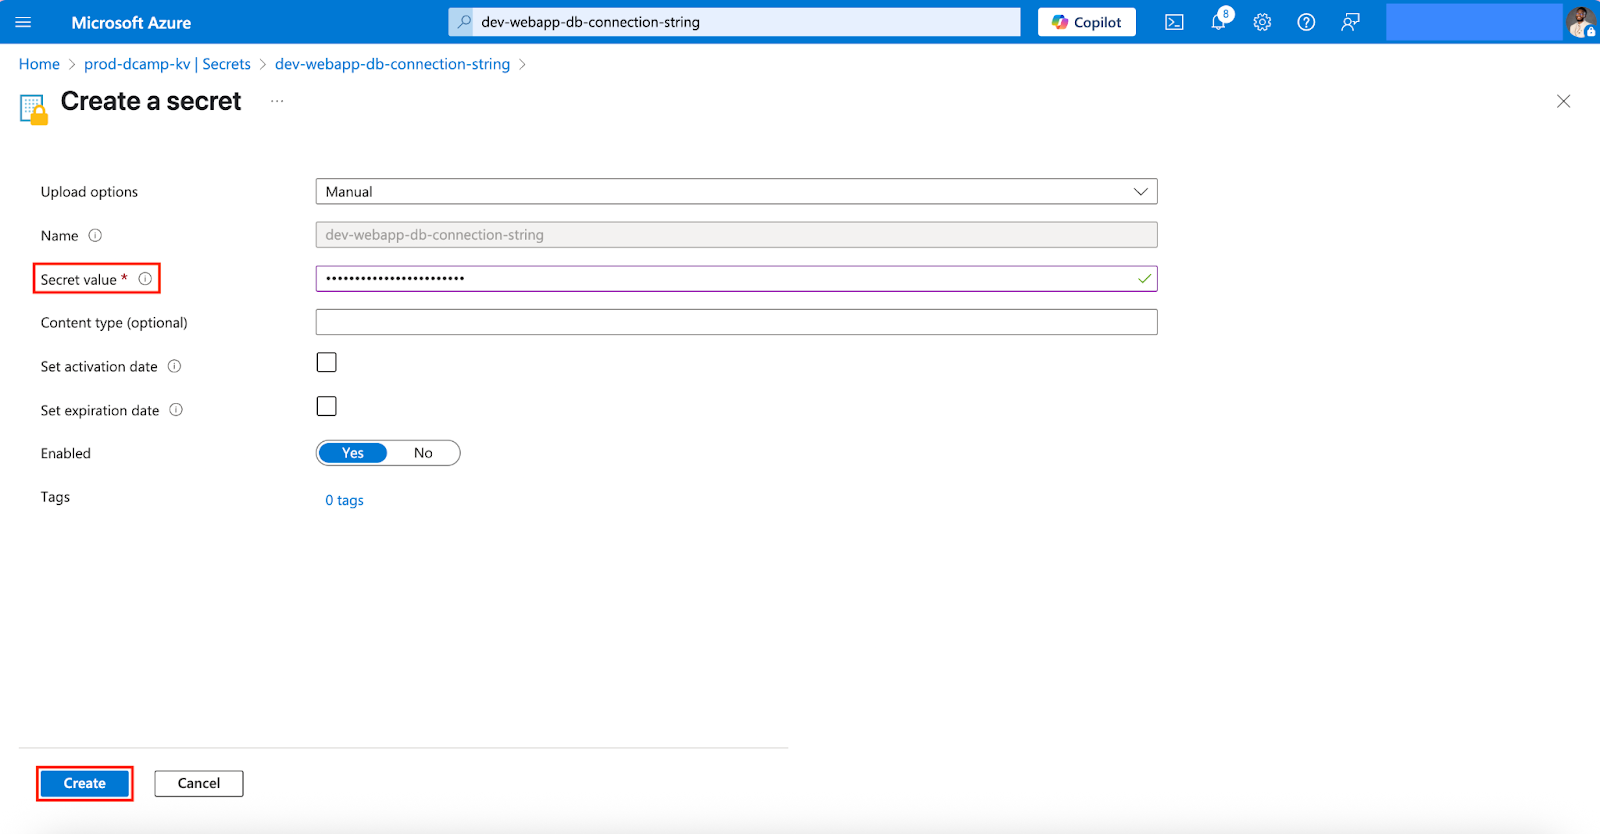
- In the Create a secret form, select and fill in the following:
- Upload options (Choose Manual for individual secrets).
- Name (Always use a descriptive, environment-prefixed name, e.g., dev-webapp-db-connection-string).
- Secret value (Store the secret value, e.g., Server=myserver.database.windows.net;Database=mydb;...).
- Content type (optional) (Although this is optional, it’s a good practice to add context for other team members, e.g., Connection String).
- Set activation date (Let’s leave it blank since this is for immediate use, not a scheduled secret rollout).
- Set expiration date (Let’s also leave this blank; it’s used to force regular secret rotation).
- Enabled (Let’s keep Yes as default).
- Tags (Let’s skip this, but we can add organizational tags like Environment:Development).
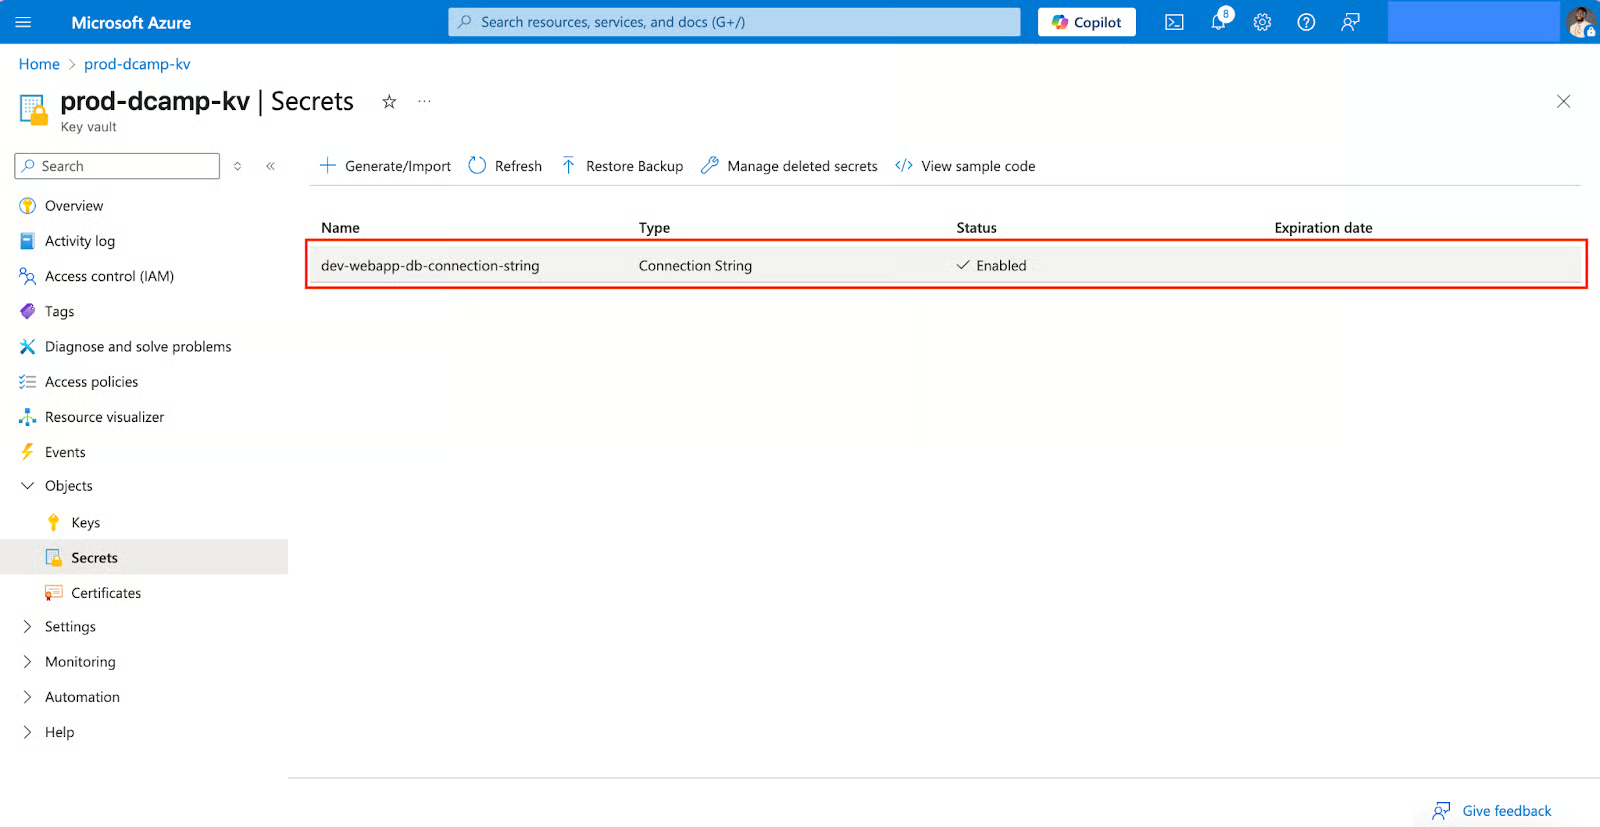
- Click Create to store your secret. The secret appears in your secrets list.
I once worked on a project where poor naming conventions led to operational chaos, especially during incident response.
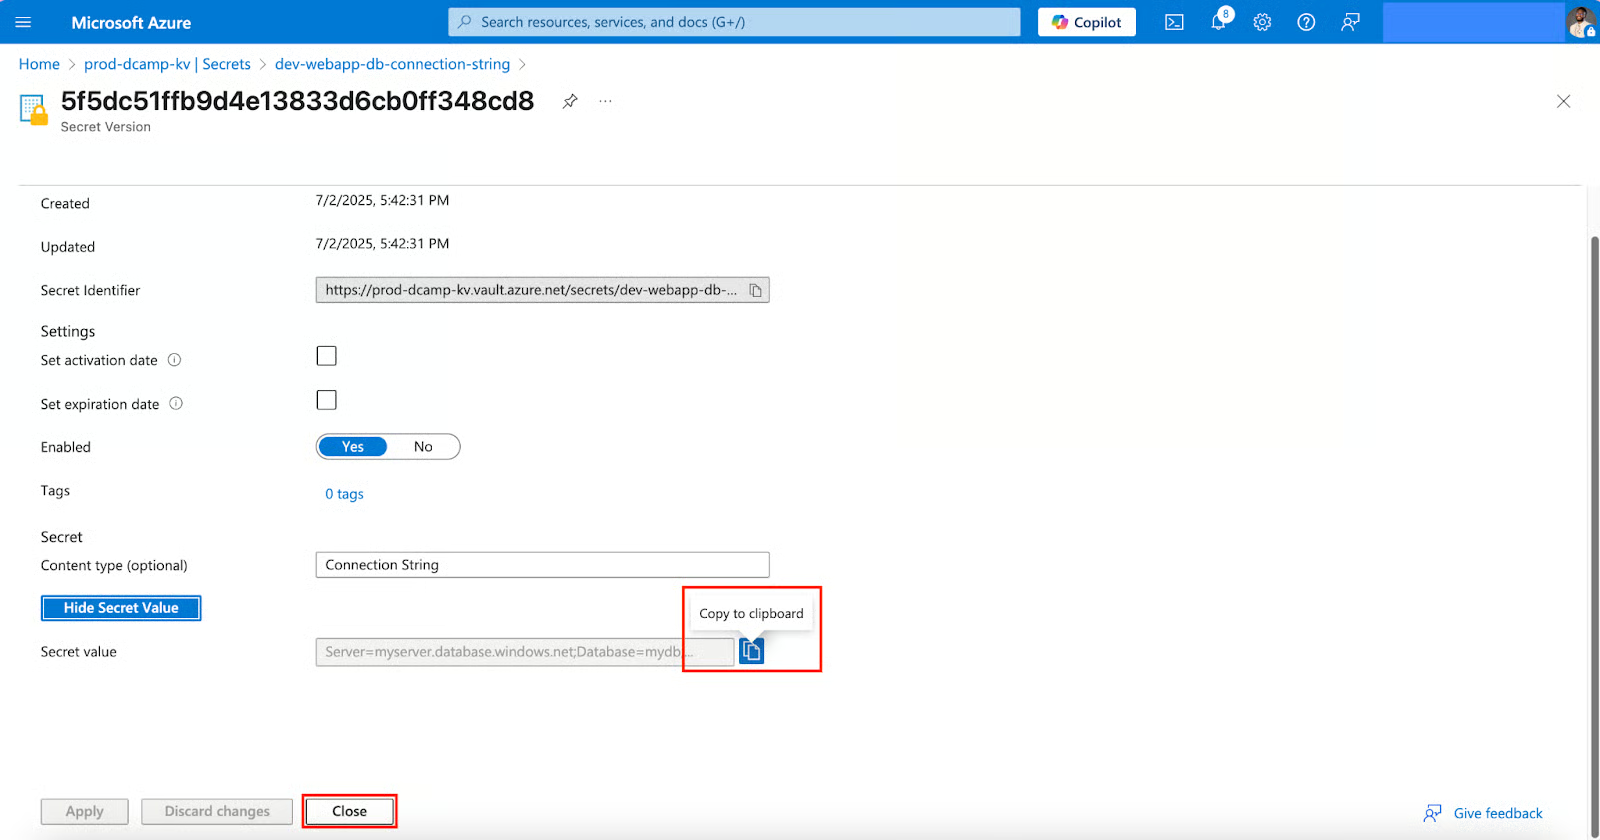
Retrieve Secret Values
To retrieve and access your secret details, follow the steps below:
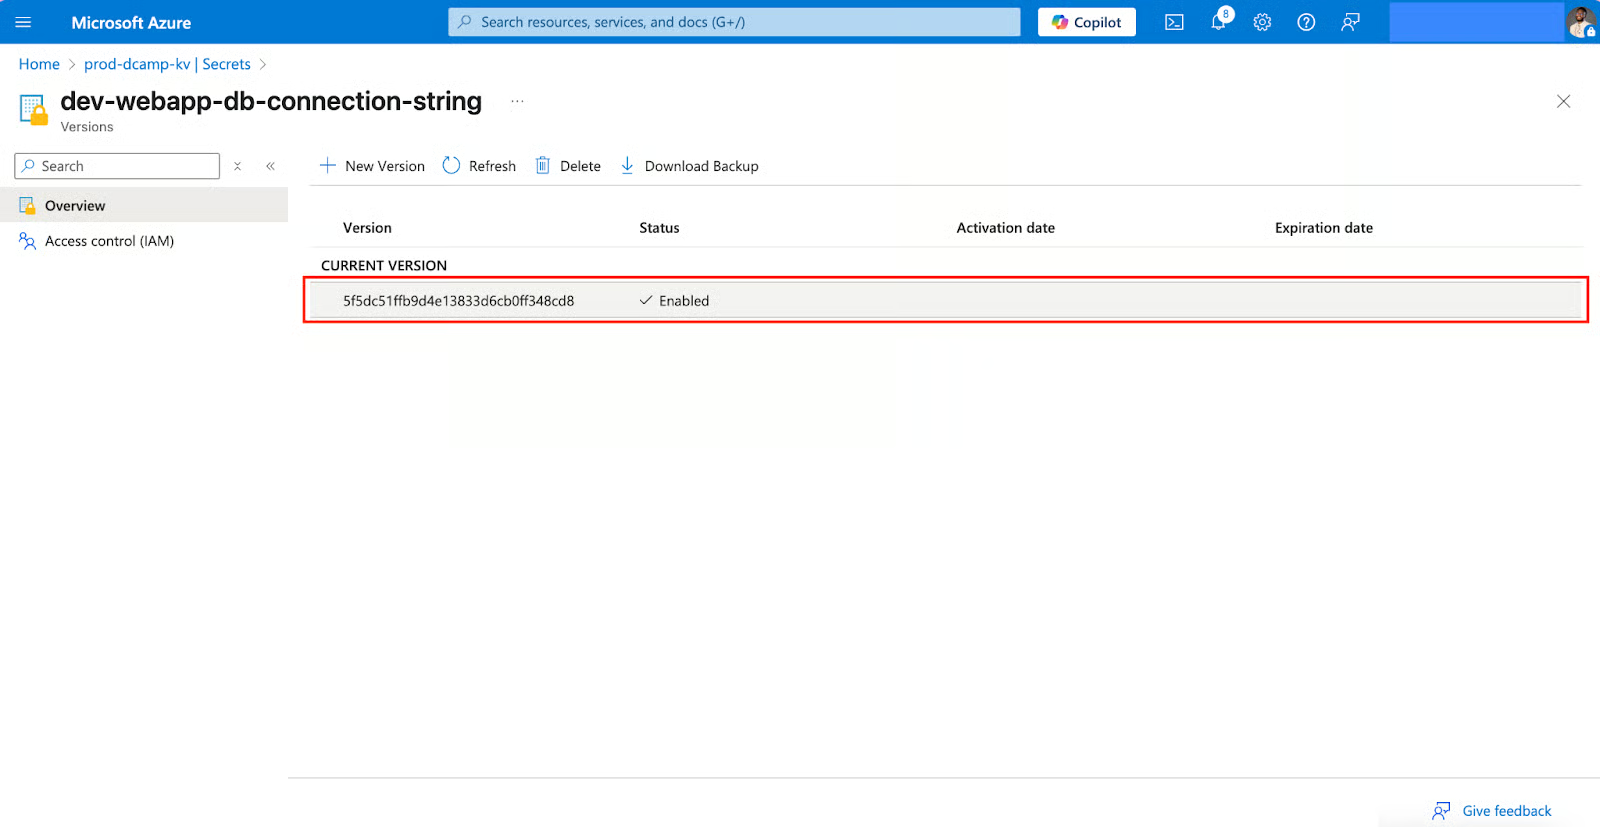
- Navigate and click on your secret name in the list.
- You’ll see the secret versions and properties. Click on the CURRENT VERSION.
- Click Show Secret Value to reveal the stored value.
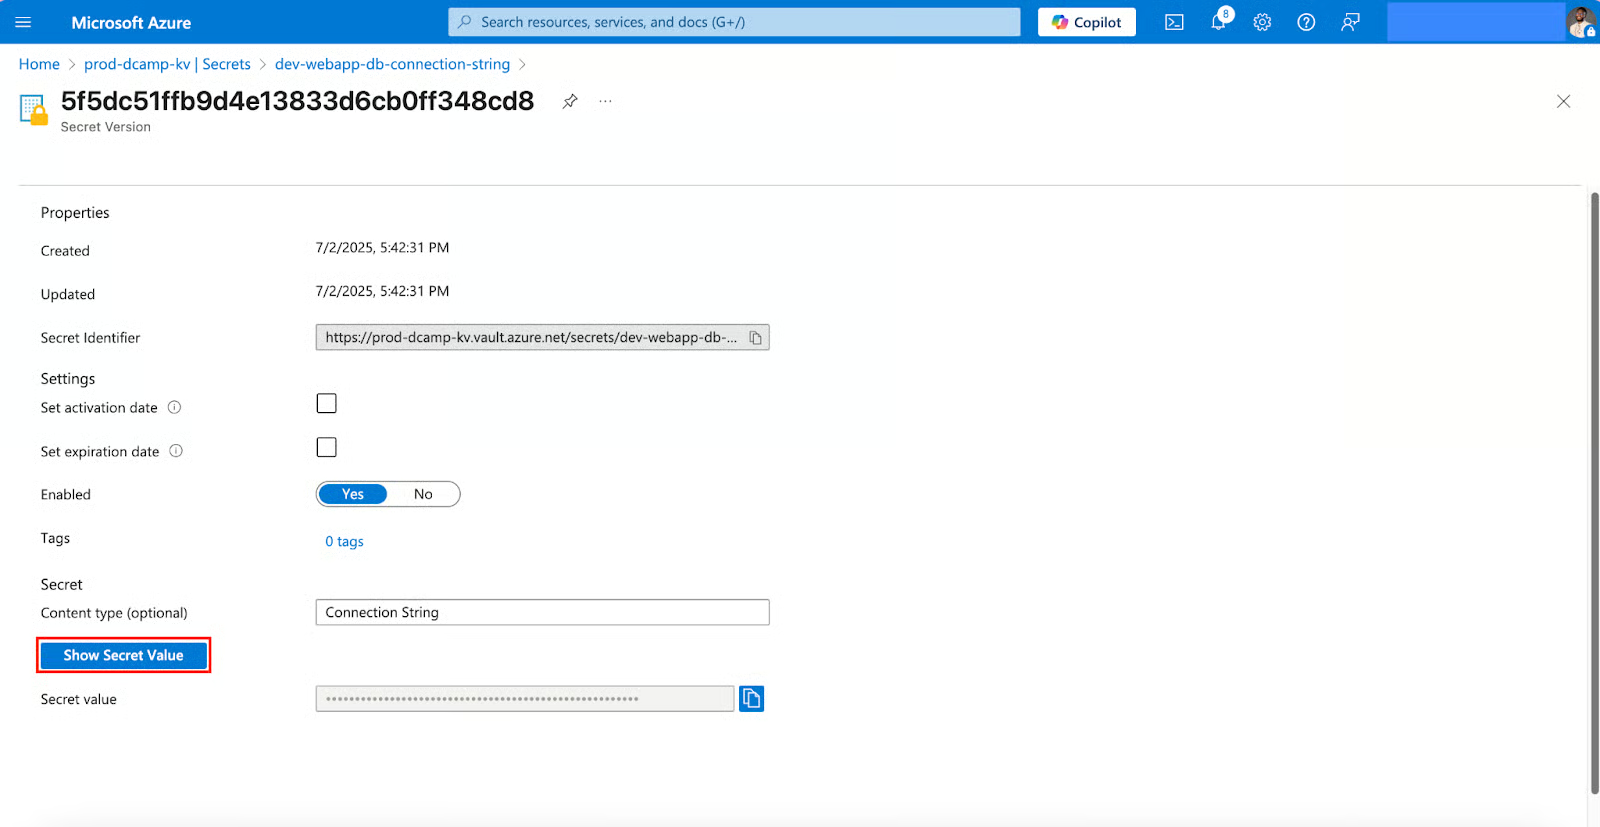
- Right after, use the Copy to clipboard icon to safely copy your secret value. Click Close.
Update Existing Secrets
To update your existing secrets, follow the steps below:
- Navigate back to your secret. At the top of the page, click + New Version.

- Enter the new secret value in the Secret value section (e.g., x9T#Lm72!qRz@VjP4dXs^BwE). Click Create.
- Immediately after this creation, you’ll notice a new version.
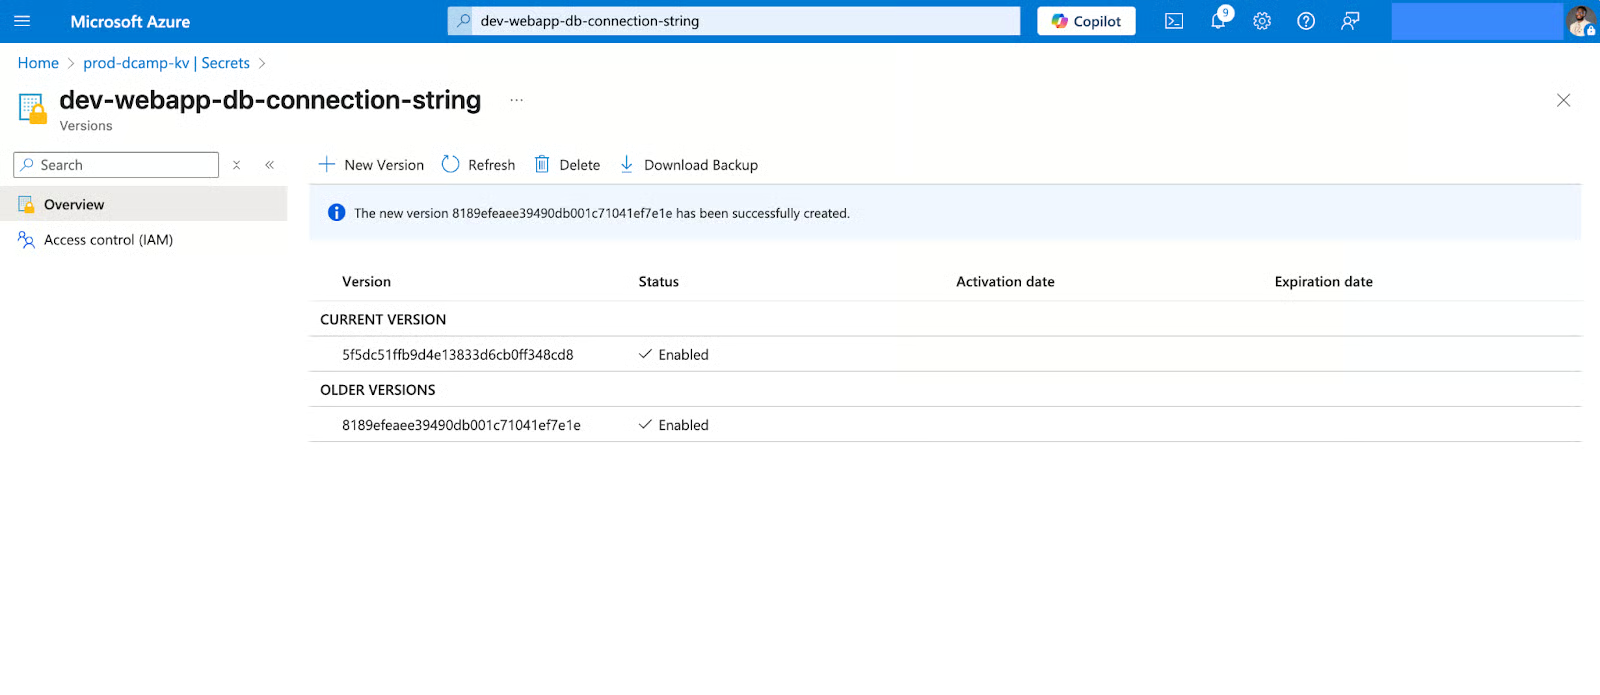
In my years of experience, I’ve witnessed automatic versioning come to the rescue, especially if you need to quickly fall back on a previous secret value. Applications are constantly upgraded to the latest version (unless specified otherwise), and older versions are kept if you need to roll back to a previous version.
Deleting Secrets Securely
Here are the detailed steps to delete a secret from your Azure Key Vault, using both soft delete and permanent delete (purge):
Soft delete
If you need to delete a secret temporarily and are unsure if you’ll need it before the retention period ends, you must soft delete it. Here’s how to go about it:
- Navigate back to your secret. At the top of the page, click the Delete button.
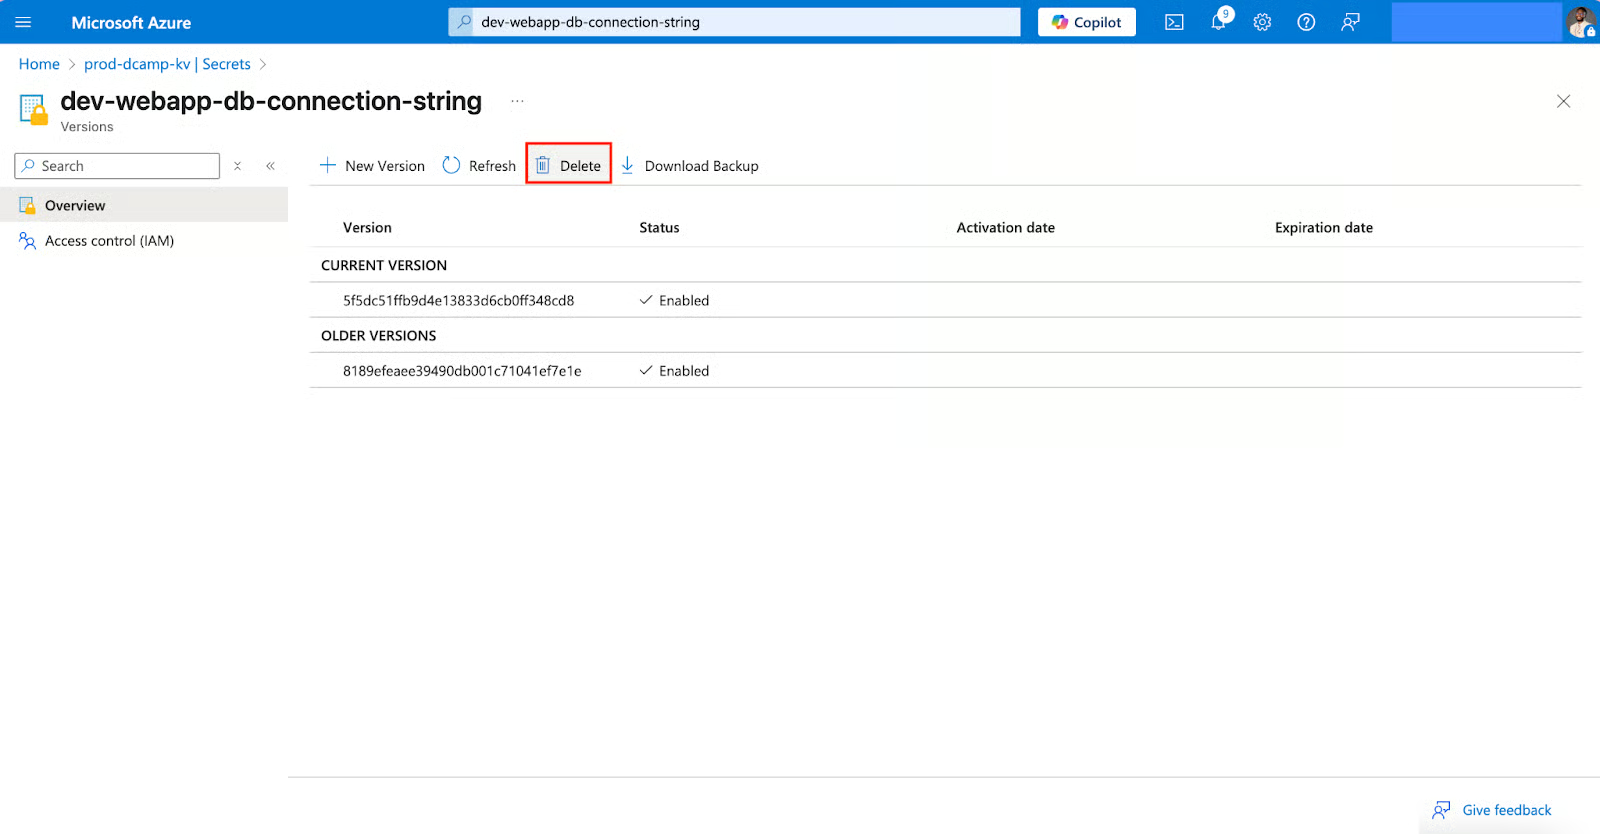
- You’ll get a confirmation message asking if you want to delete the secret. Click Delete to confirm the deletion.
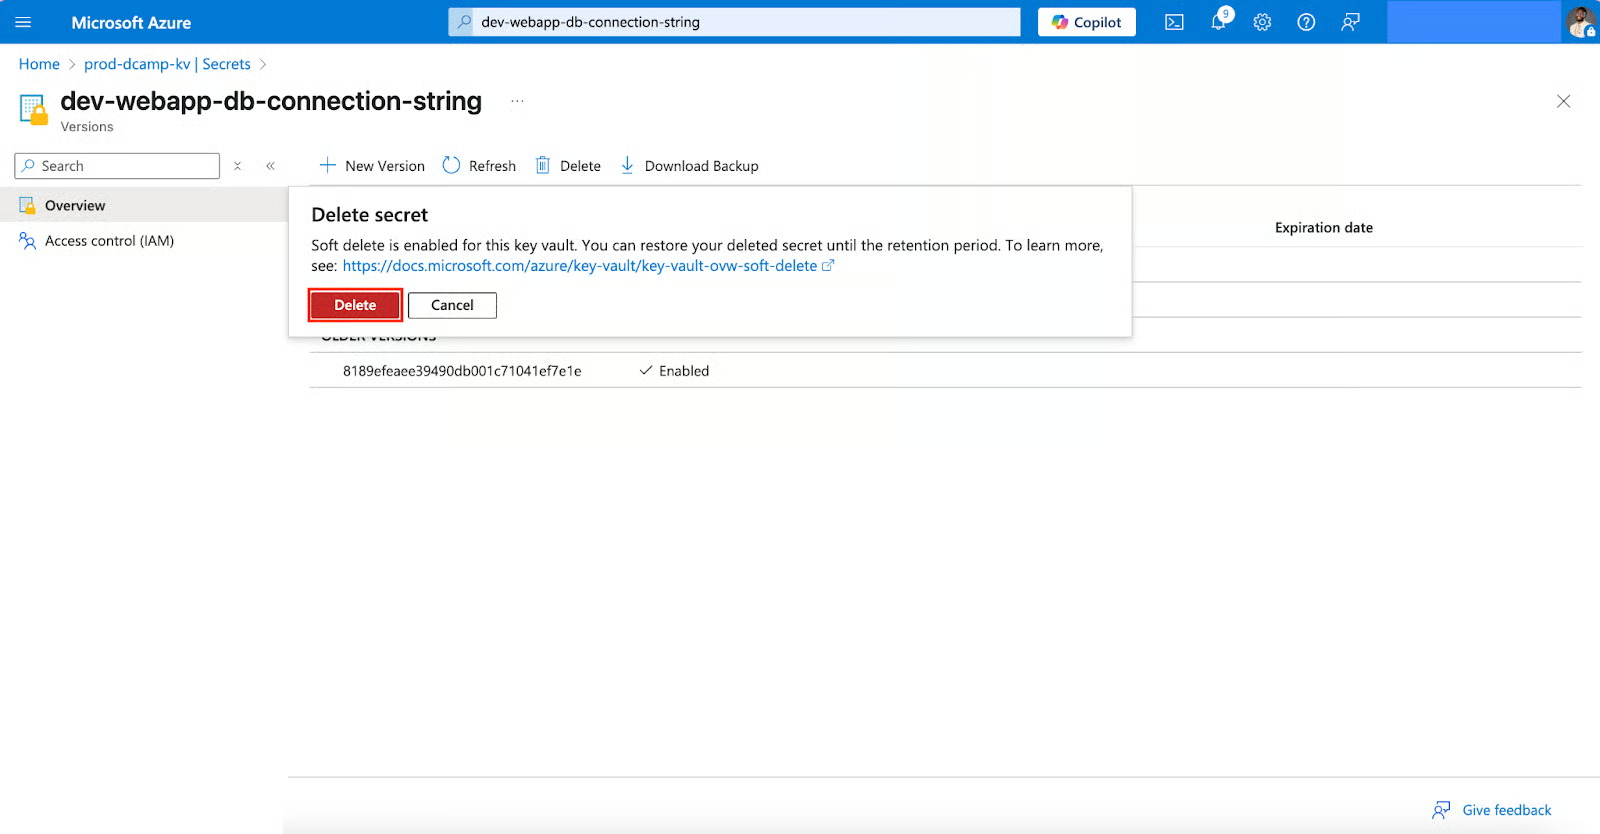
Soft delete has a retention period; you can set it anywhere between 7 and 90 days, with 90 days being the default. During this time, the secret name cannot be reused.
To Permanently Delete (Purge):
If you need to reuse the secret name immediately, you must purge it. Here’s how to go about it:
- Go to Manage deleted secrets in the Secrets section.
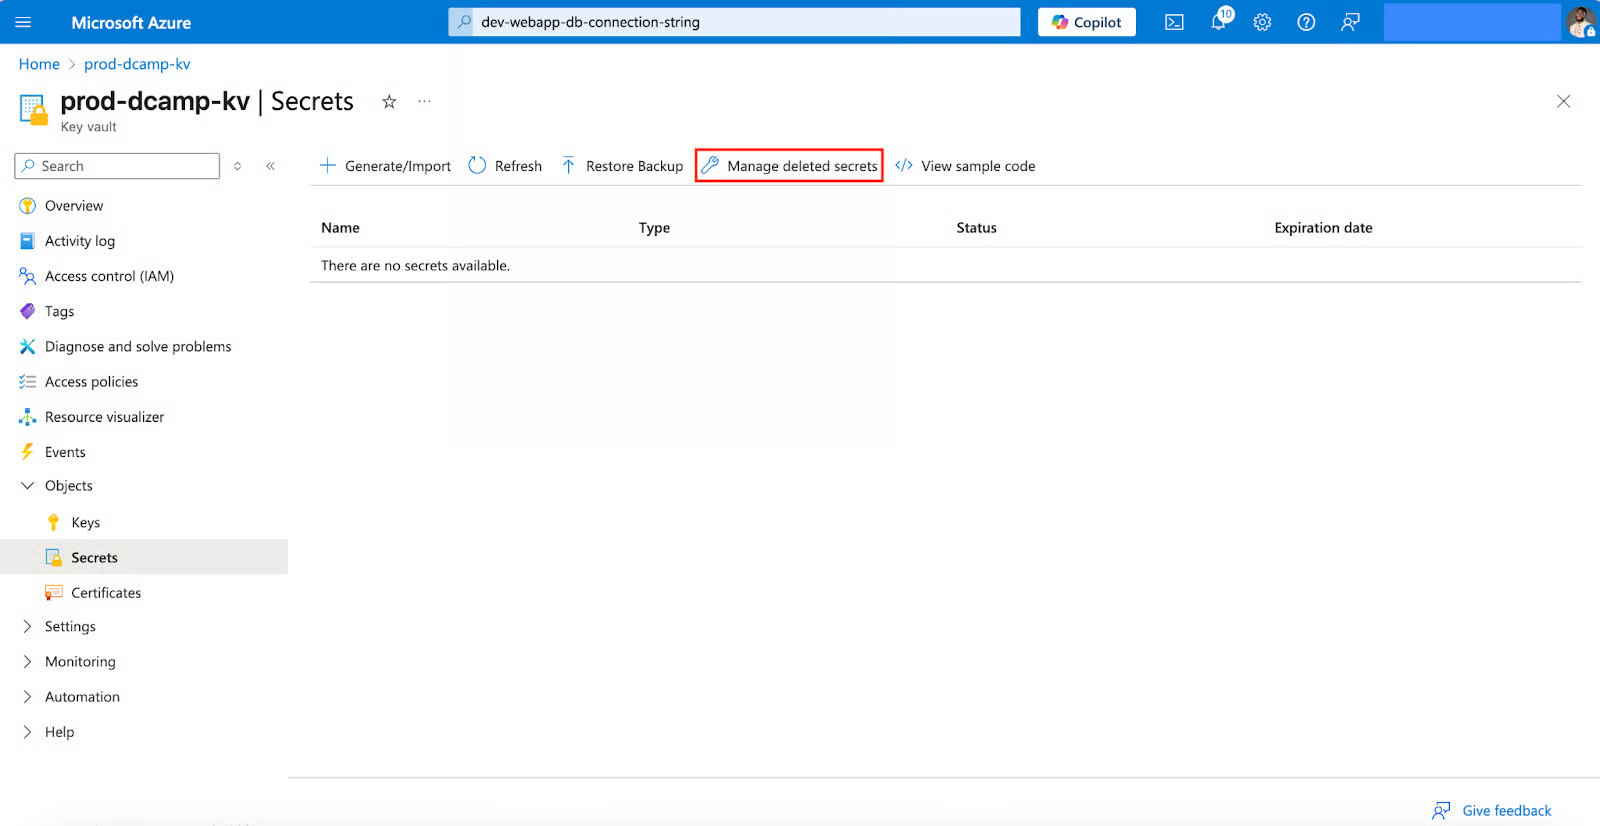
- Select your deleted secret and click Purge. This permanently removes the secret and cannot be undone.

The deletion process is immediate once confirmed, but remember that soft delete provides a safety net for accidental deletions.
Key management and encryption
Encrypting your keys requires more planning than storing secrets. Over the years, I've learned that getting the key hierarchy from scratch prevents costly restructuring later. Let’s dive in and understand how key management and encryption work in our Key Vault:
Understanding Key Types
Azure Key Vault supports multiple key types for different use cases and specific cryptographic operations. Now, let’s dive deeper and learn about them:
|
Key Type |
Algorithm |
Use Cases |
Performance |
|
RSA 2048 |
RSA-OAEP, RSA-PSS |
RSA 2048 can be used for general encryption, digital signatures, and SSL/TLS |
Good |
|
RSA 3072/4096 |
RSA-OAEP, RSA-PSS |
RSA 3072/4096 can be used for high-security encryption, such as Blockchain, IoT devices, and many more |
Slow |
|
EC P-256 |
ECDSA, ECDH |
EC P-256 can be used for digital signatures and key agreement |
Fast |
|
EC P-384/521 |
ECDSA, ECDH |
EC P-384/521 can be used for high-security signatures |
Moderate |
Understanding key types before setting up an encryption key is always a great practice. Imagine taking down a wrong key setup that has been integrated into your application, which has already been deployed to production and is live to your users.
Create Encryption Keys
First things first, let’s create our encryption key:
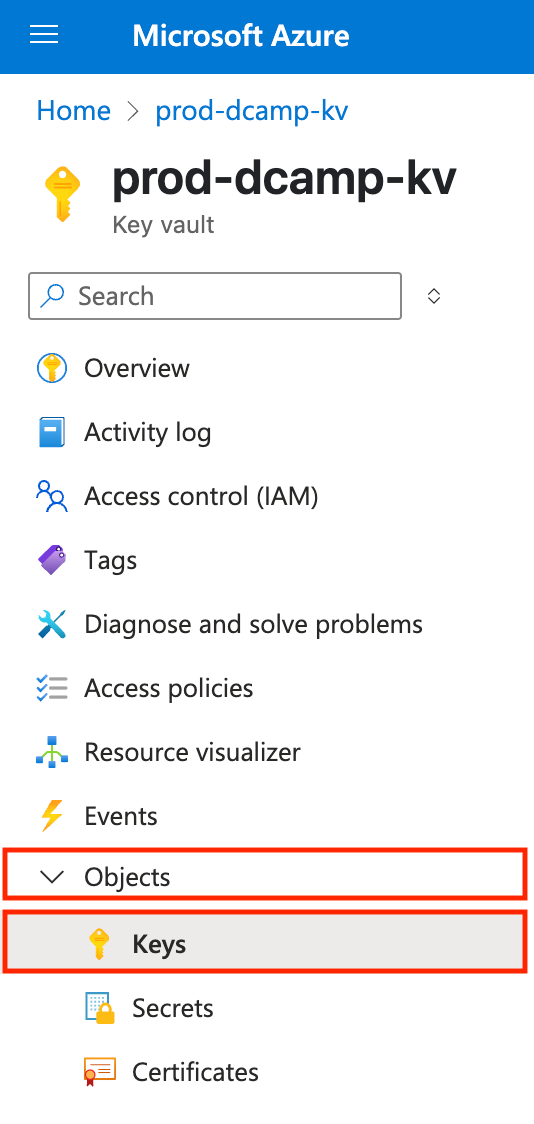
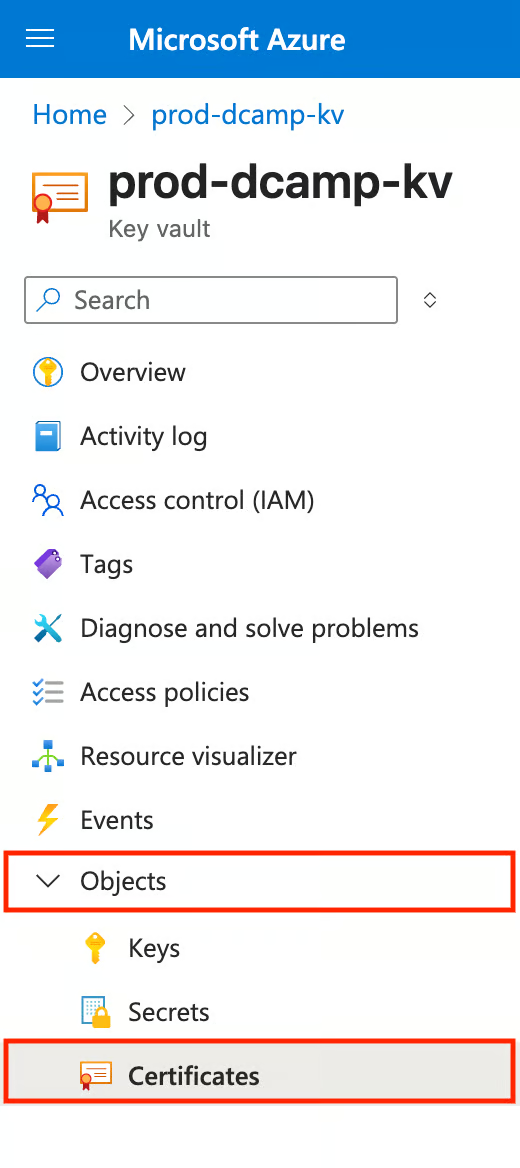
- On the left plane of your Key Vault, navigate to Objects, click the drop-down, and select Keys.
- Navigate and click + Generate/Import at the top to begin the creation process.
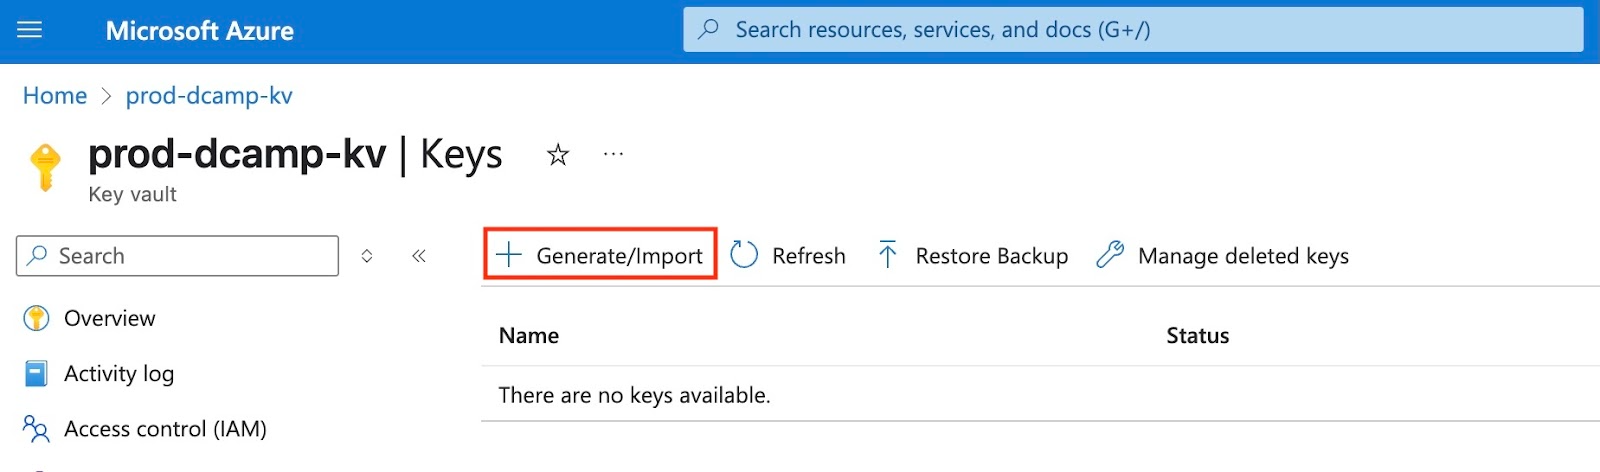
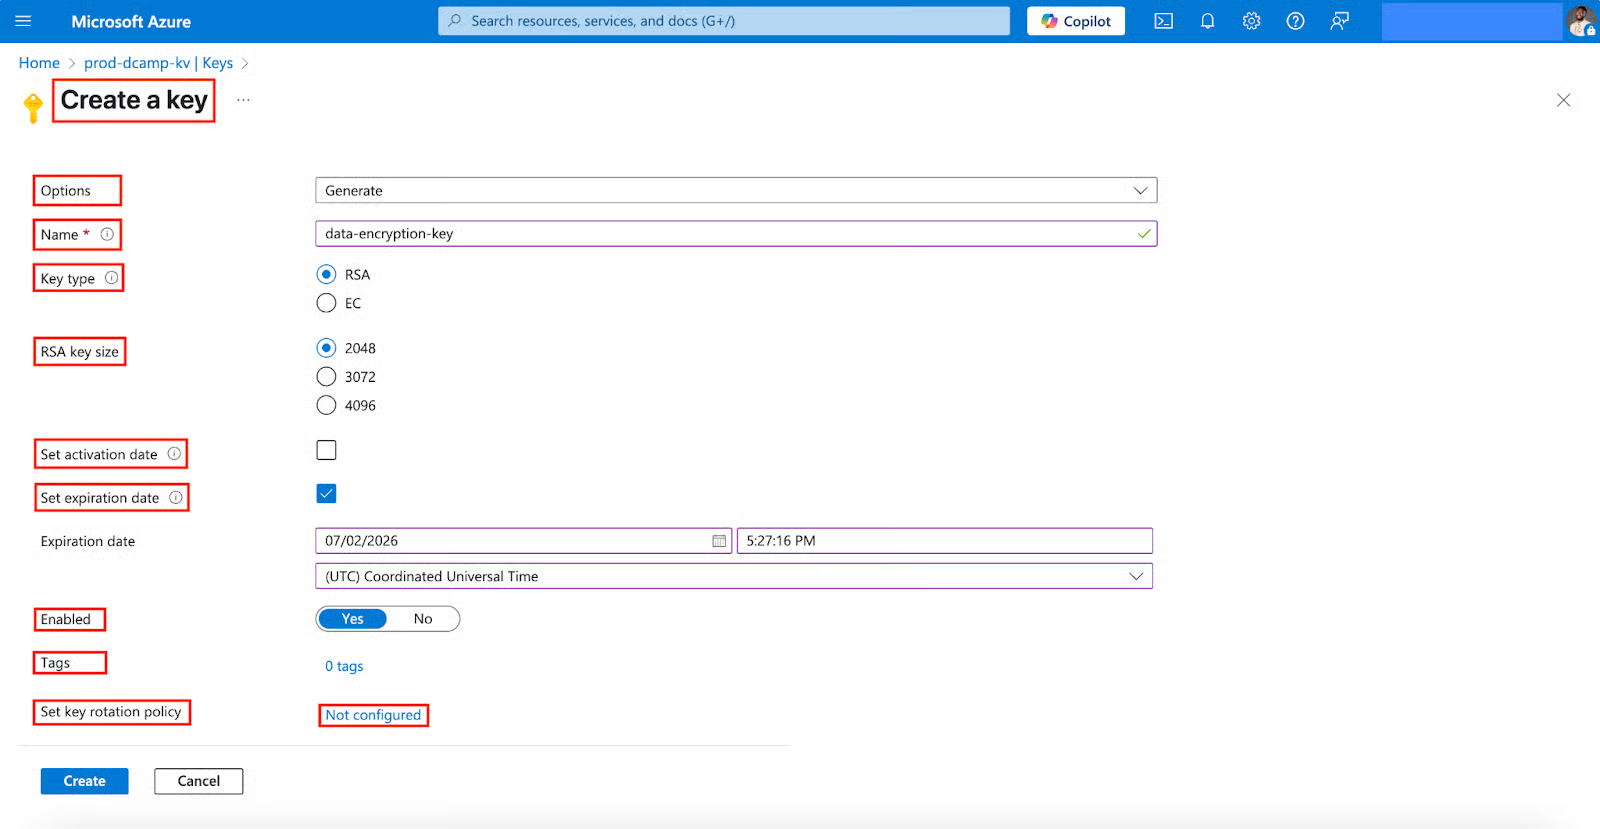
- In the Create a key form, select and fill in the following:
- Options (Choose Generate to create a new key in your Key Vault).
- Name (Always use a descriptive name, e.g., data-encryption-key).
- Key type (Select RSA, which is most widely supported).
- RSA Key Size (Let’s select 2048; this balances security and performance).
- Set activation date (Let’s leave it blank since this is for immediate use, not a scheduled secret rollout).
- Set expiration date (Let’s select 1 year from now so it can force regular key rotation).
- Enabled (Let’s keep Yes as default).
- Tags (Let’s skip this, but we can add organizational tags like Environment:Development).
- Set key rotation policy (Click on the Not configured to open the Rotation policy page to configure your policy).
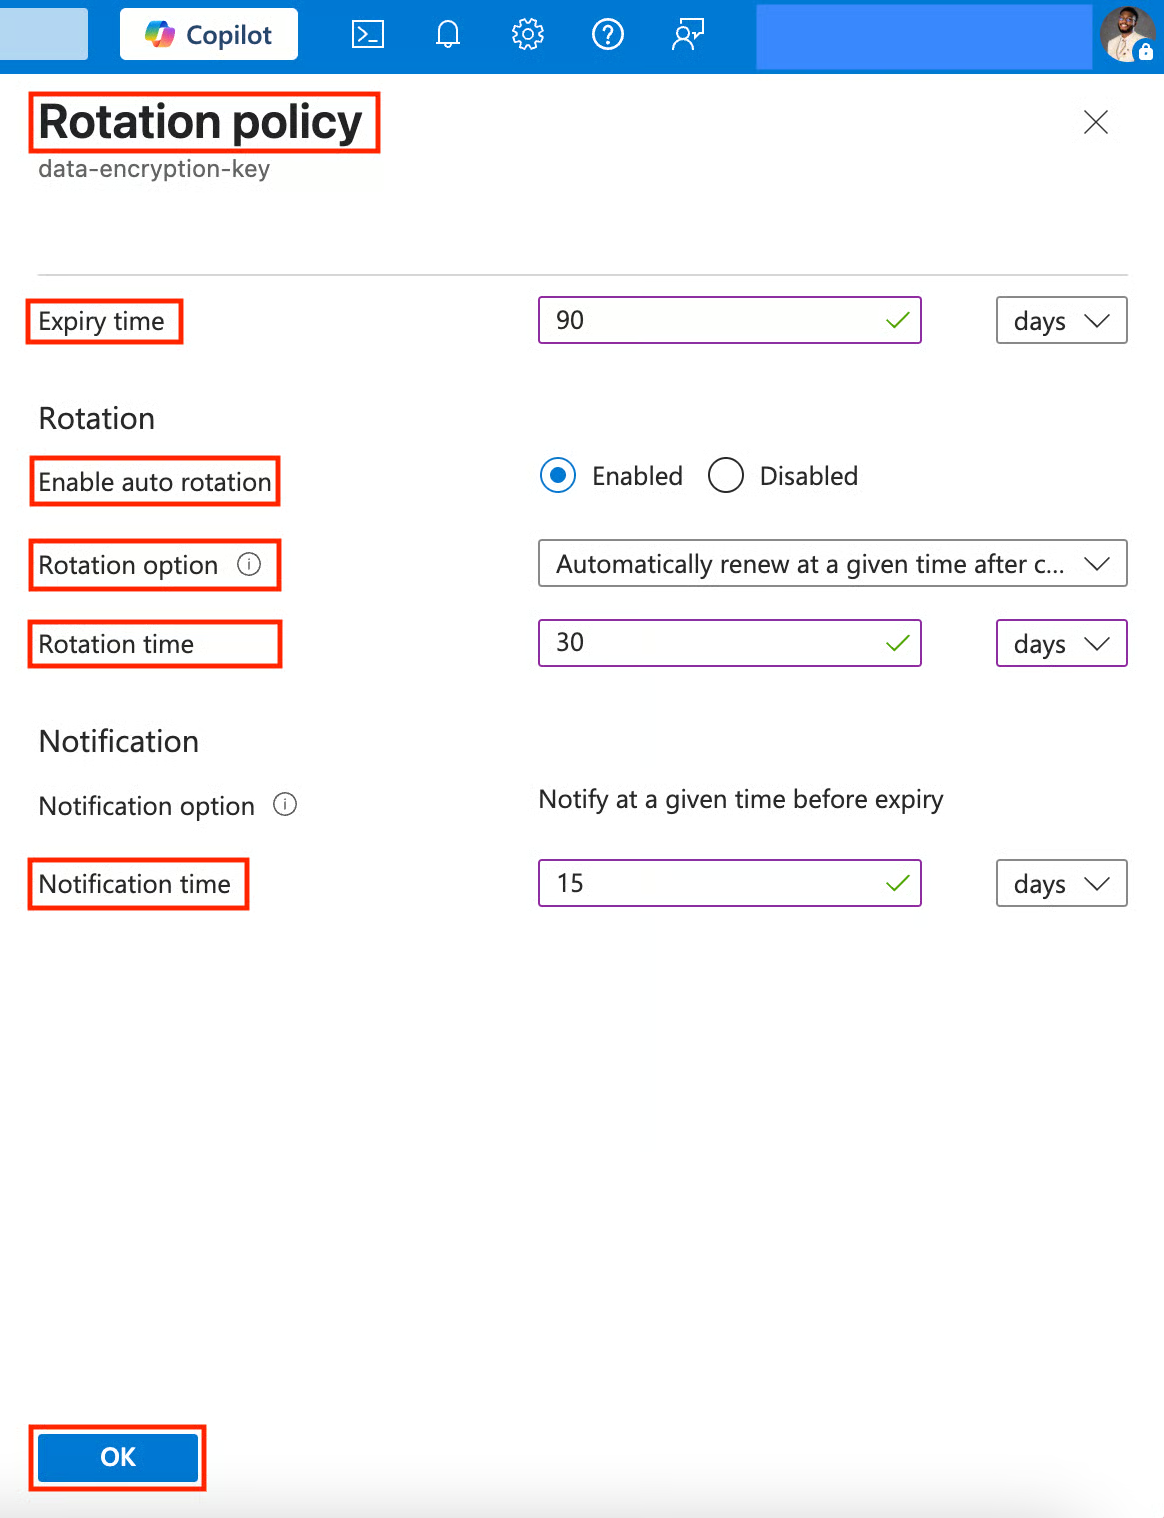
- In the Rotation policy page, select and fill in the following:
- Expiry time (The expiry time must be at least 28 days; let’s input 90 days).
- Enable auto rotation (Select Enabled to activate the rotation policy).
- Rotation option (Select Automatically renew at a given time after creation).
- Rotation time (The rotation time cannot be less than 7 days; let’s choose 30 days).
- Notification time (The notification time cannot be less than 7 days; let’s choose 15 days).
- Click OK.
- In the Create a key form, you’ll notice that the Set key rotation policy is now configured. Click Create.
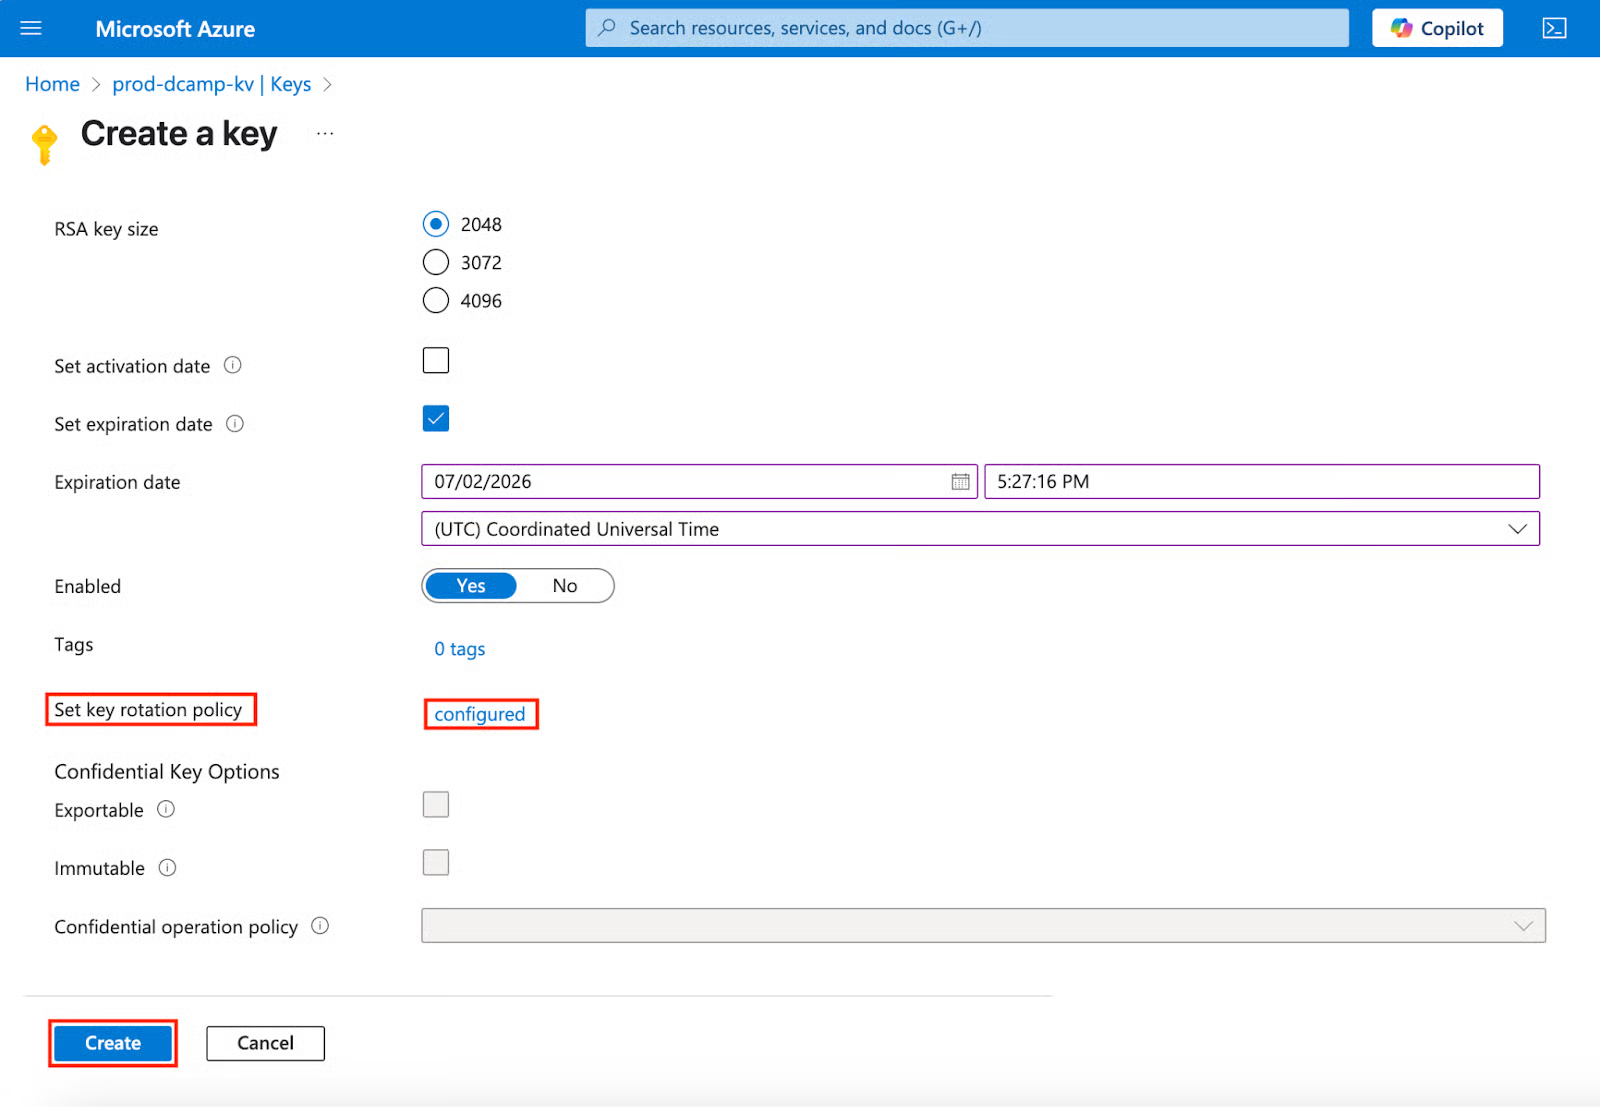
In my experience, I advise individuals and organizations to enable automated key rotation to avoid stale keys and meet compliance. When setting up your infrastructure, security shouldn't be optional.
Certificate management
The issue with certificate management is that its infrastructure gets more complicated as a company expands. However, Azure Key Vault’s certificate management has the operational strengths to automate all these burdens and make everything seamless. Let’s understand how certificate management works in our Key Vault:
Import Existing Certificate
In our key vault, let’s import an existing certificate:
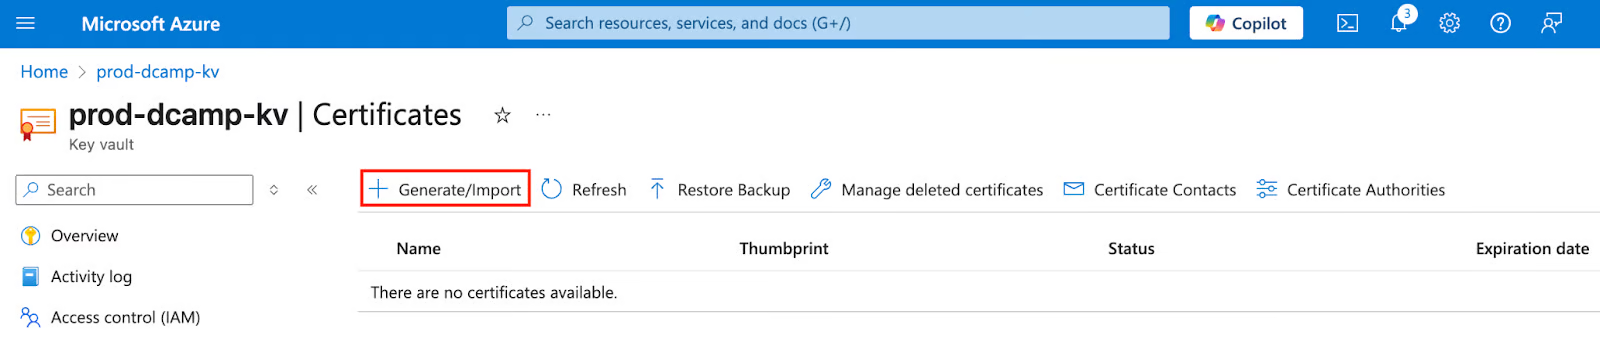
- On the left plane of your Key Vault, navigate to Objects, click the drop-down, and select Certificates.
- Navigate and click + Generate/Import at the top to begin the importation process.
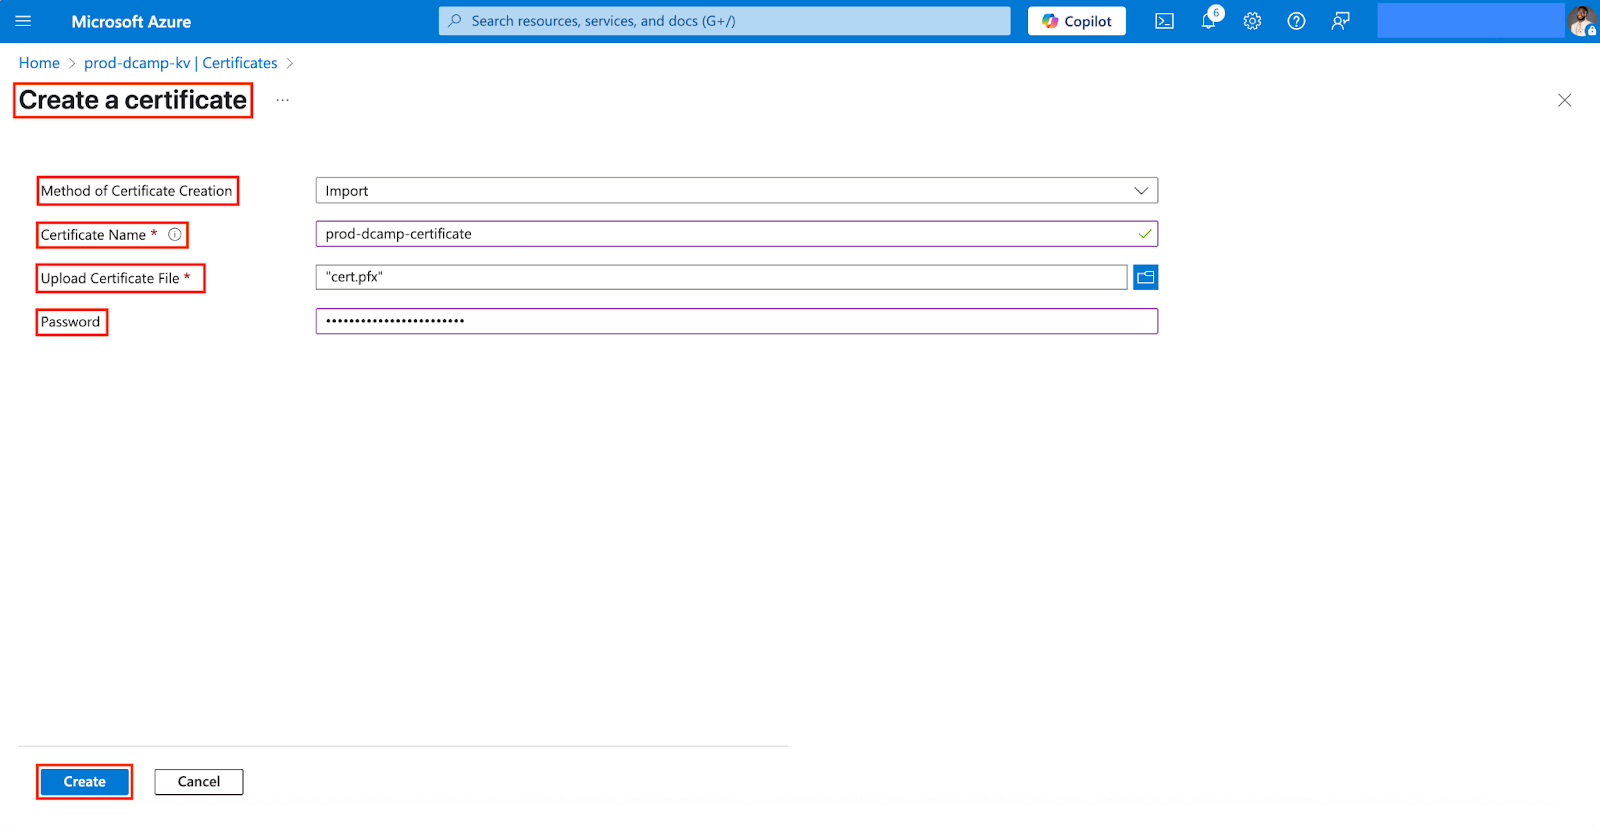
- In the Create a certificate form, select and fill in the following:
- Method of Certificate Creation (Select Import to bring an existing certificate into your Key Vault).
- Certificate Name (Always use a descriptive name, e.g., prod-dcamp-certificate).
- Upload Certificate File (Click Select a file and choose your .pfx file from your local computer).
- Password (Enter your password, e.g., x9T#Lm72!qRz@VjP4dXs^BwE).
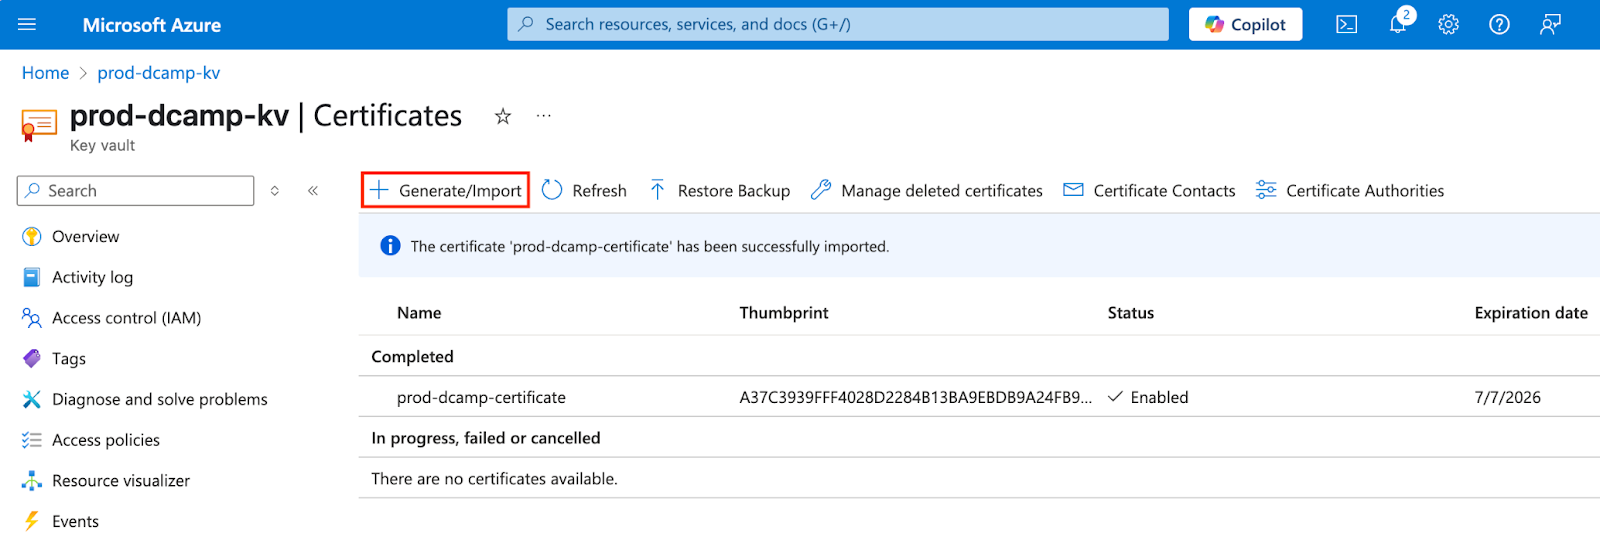
- Click Create.
Generate Self-Signed Certificate
This is usually used for development environments. Let’s create a self-signed certificate:
- Click + Generate/Import at the top of the Certificates page to begin the creation process.
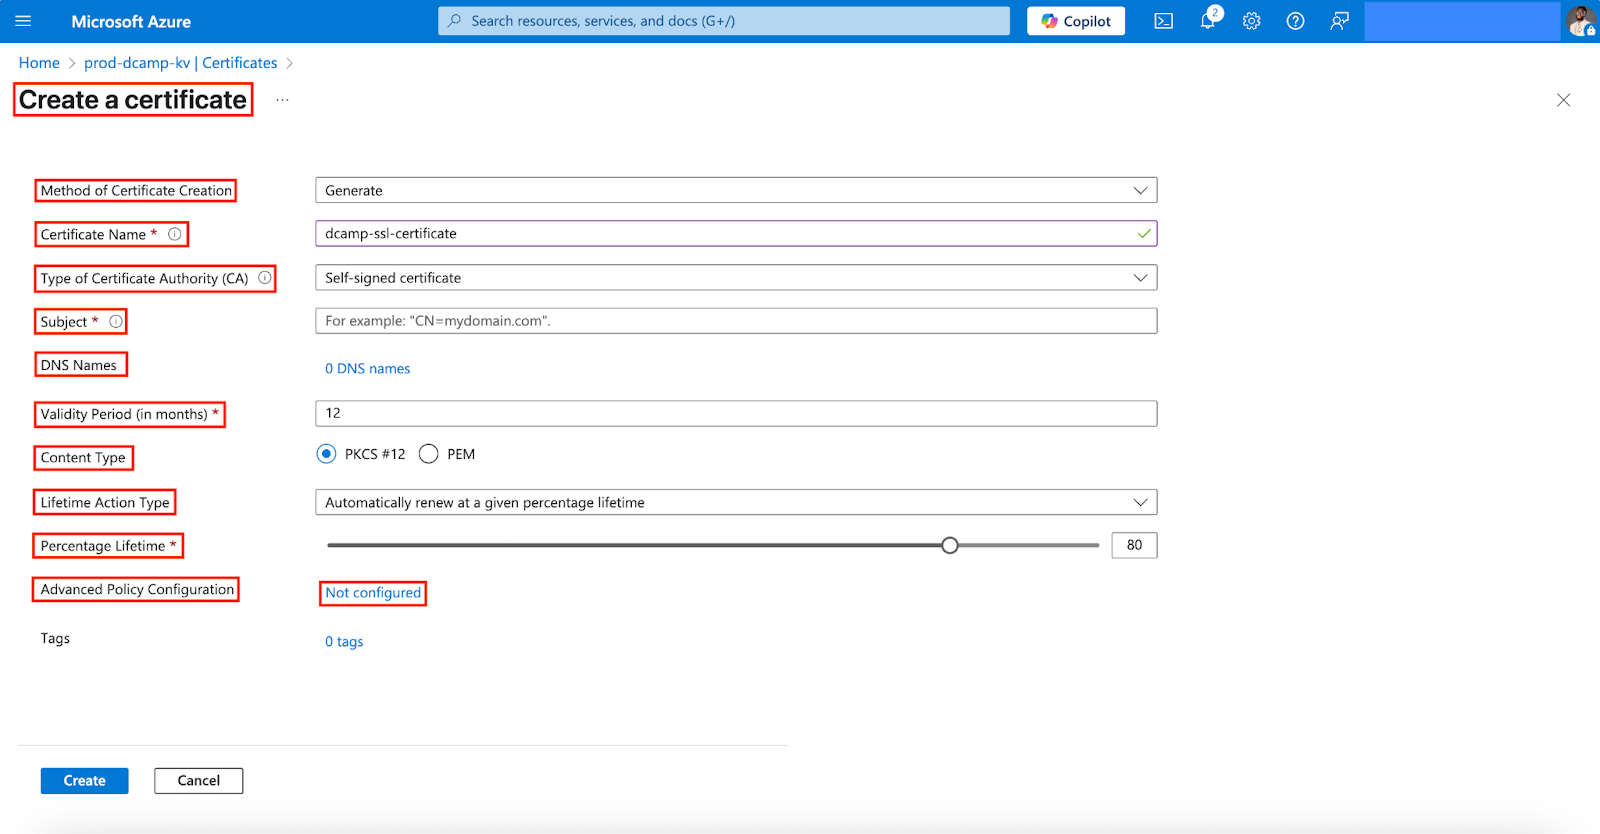
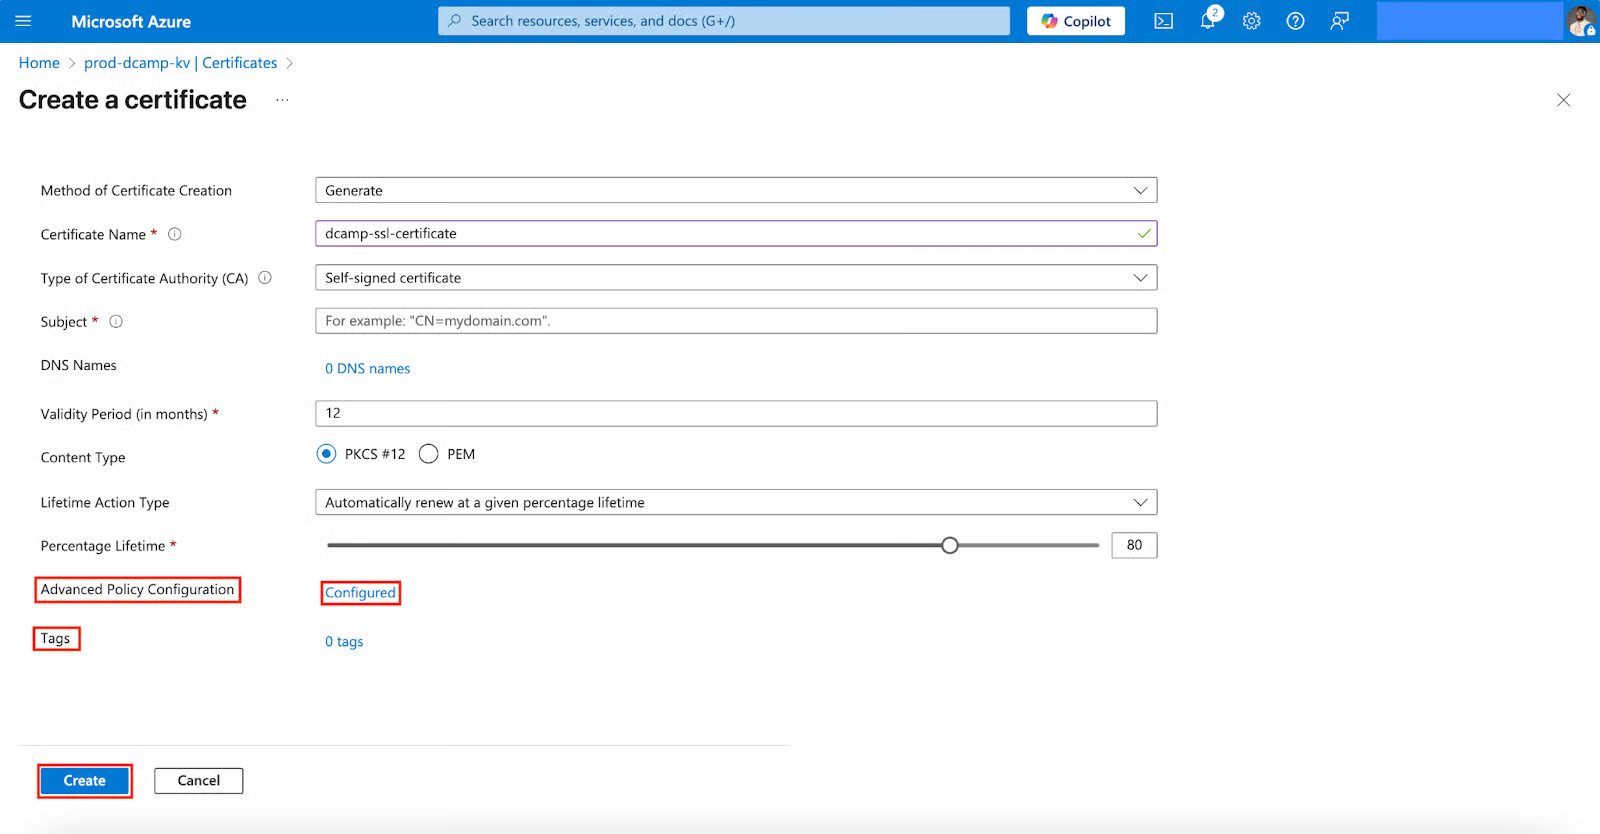
- In the Create a certificate form, select and fill in the following:
- Method of Certificate Creation (Select Generate to create a new certificate in your Key Vault).
- Certificate Name (Always use a descriptive name, e.g., dcamp-ssl-certificate).
- Type of Certificate Authority (CA) (Select Self-signed certificate).
- Subject (Input the subject domain, e.g., CN=prod-ssl.mydomain.com).
- DNS Names (Add prod-ssl.mydomain.com to DNS names).
- Validity Period (in months) (Leave 12 as default).
- Content Type (Select PKCS #12).
- Lifetime Action Type (Select: Automatically renew at a given percentage lifetime).
- Percentage Lifetime (Drag or input 80).
- Advanced Policy Configuration (Click on the Not configured to open the Advanced Policy Configuration page to configure your policy).
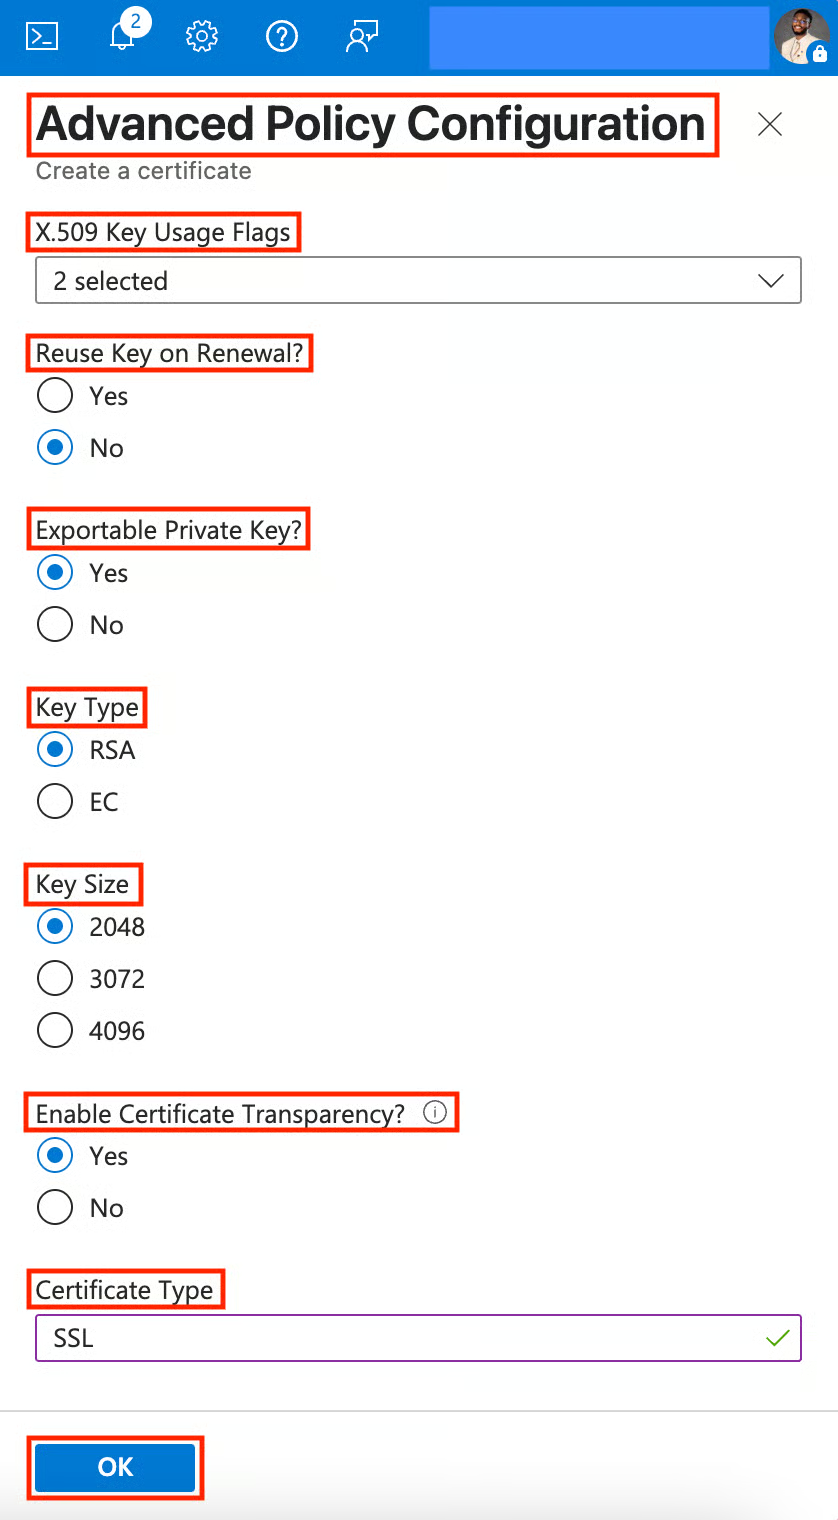
- In the Advanced Policy Configuration page, select and fill in the following:
- Extended Key Usages (EKUs) (Leave this as default).
- X.509 Key Usage Flags (Select Digital Signature and Key Encipherment).
- Reuse Key on Renewal? (Select No for better security).
- Exportable Private Key? (Select Yes).
- Key Type (Select RSA).
- Key Size (Select 2048).
- Enable Certificate Transparency (Select Yes).
- Certificate Type (Input SSL).
- Click OK.
- In the Create a key form, you’ll notice that the Advanced Policy Configuration is now configured. Skip Tags and click Create.
From experience, managing certificates in Azure Key Vault can feel tricky, especially when dealing with .pfx files, expiration, and automation at scale. But once you get the hang of the process, it becomes a powerful part of your security and infrastructure skills.
Integration and Automation
What differentiates an enterprise-grade Key Vault from a basic Key Vault lies in automation and integration patterns. I’ve understood that organizations with the smoothest Key Vault adoption focus heavily on developer experience during implementation.
Using managed identities for access
Managed identities eliminate the need to store credentials in code or configuration files, a fundamental part of security. Let’s learn how to enable and use managed identities for secure, passwordless access.
Enable Managed Identity for App Service
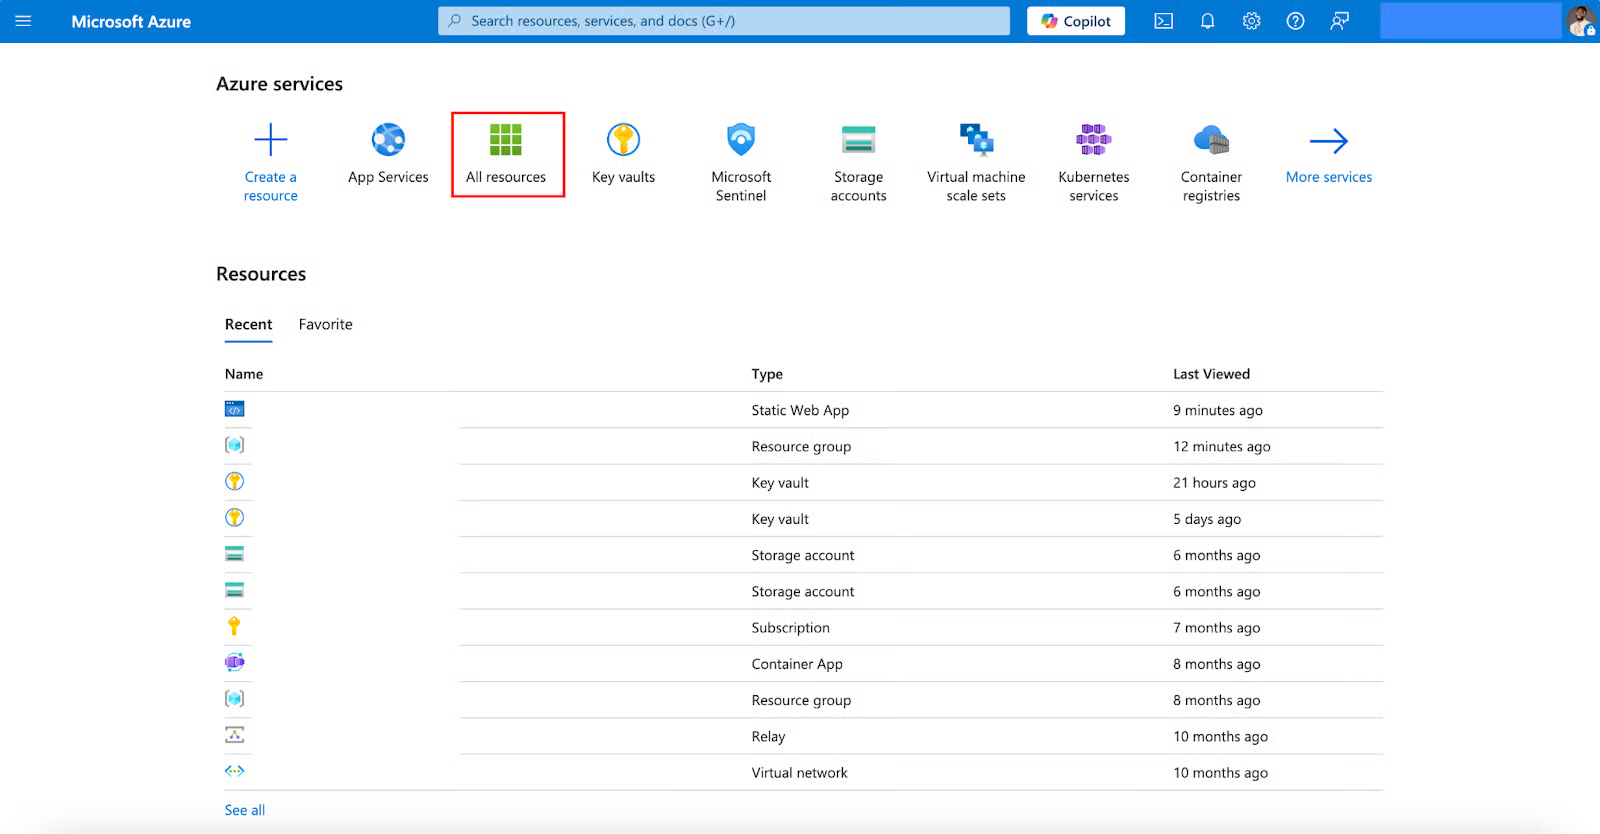
- In the Azure portal’s home page, navigate to All resources and select your App Service.
- On the left plane of your App service, navigate to Settings, click the drop-down, and select Identity.
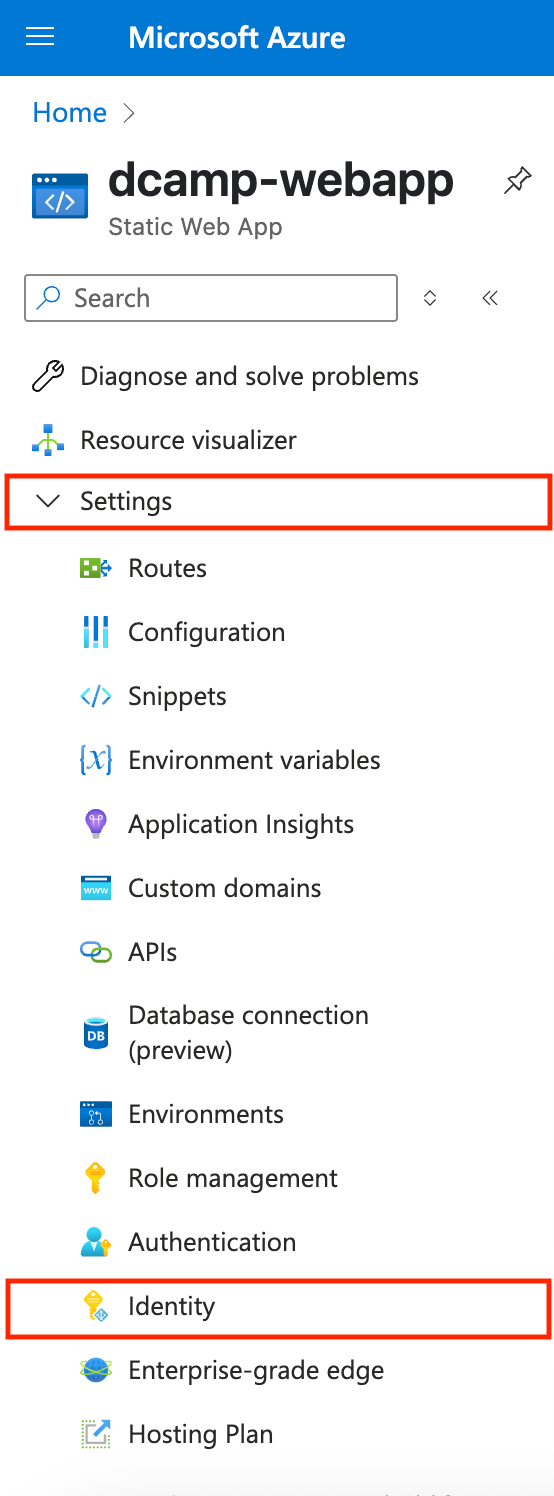
- In the System assigned tab, toggle Status to On. Click Save.
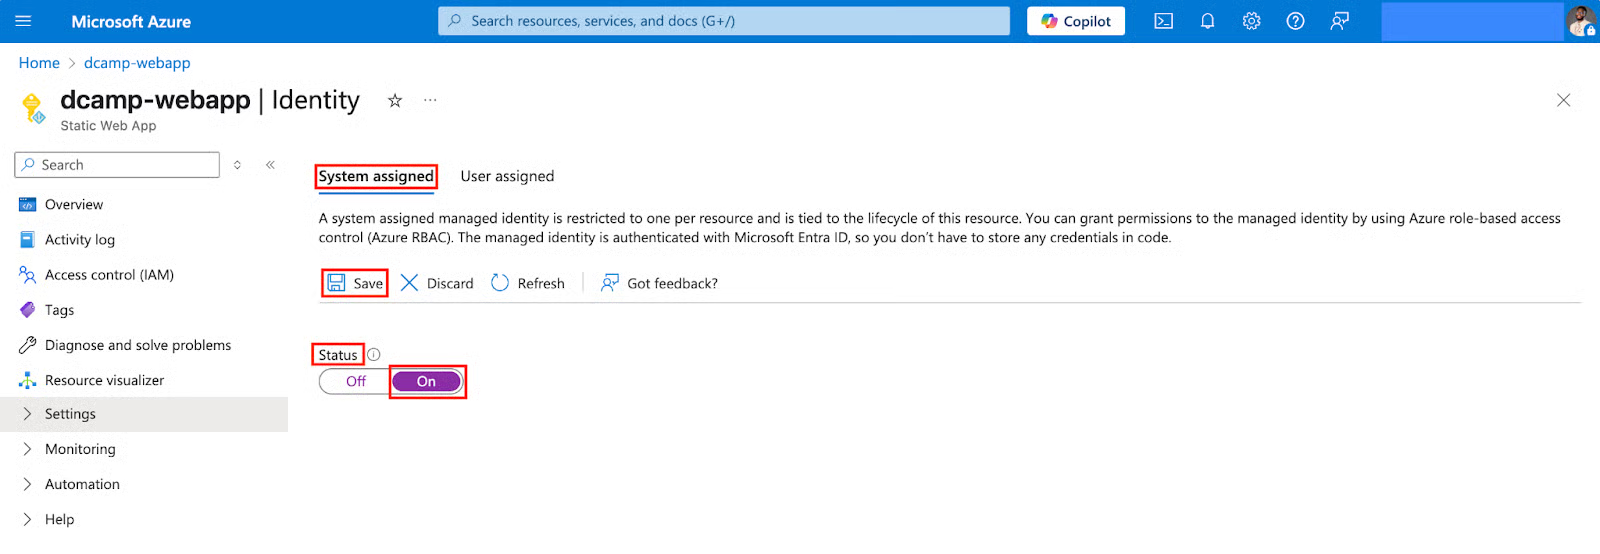
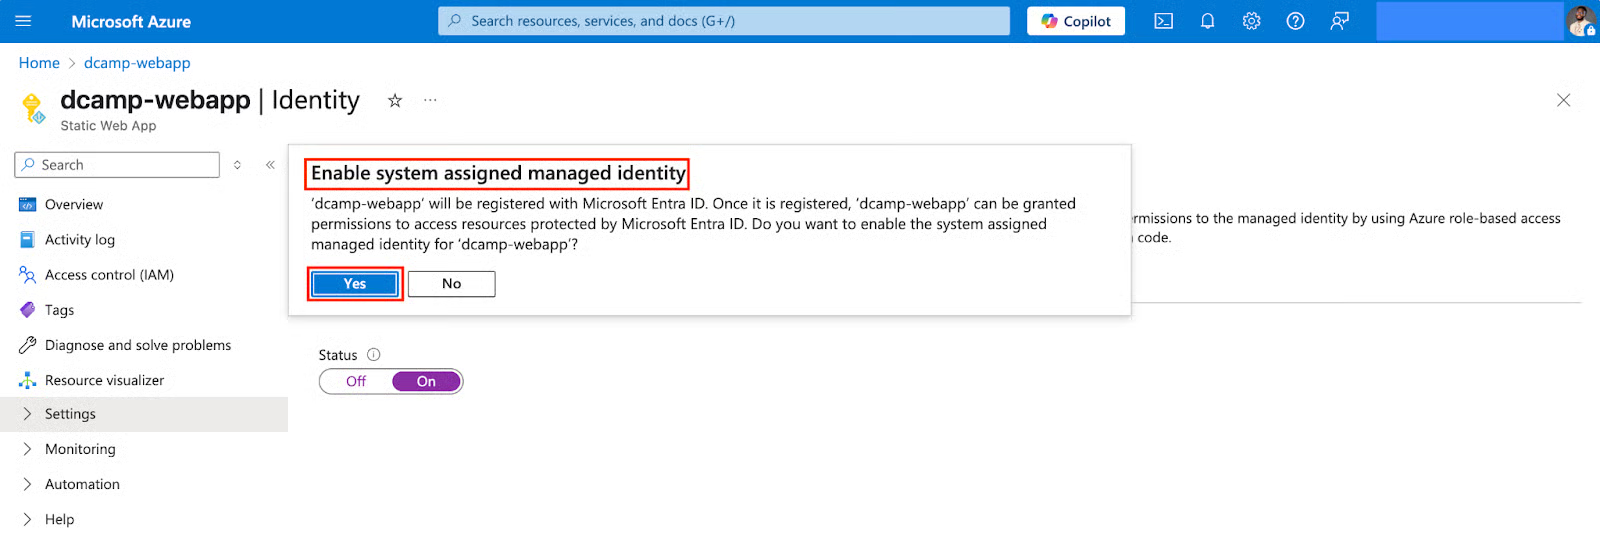
- You’ll get a pop-up message showing Enable system assigned managed identity, click Yes.
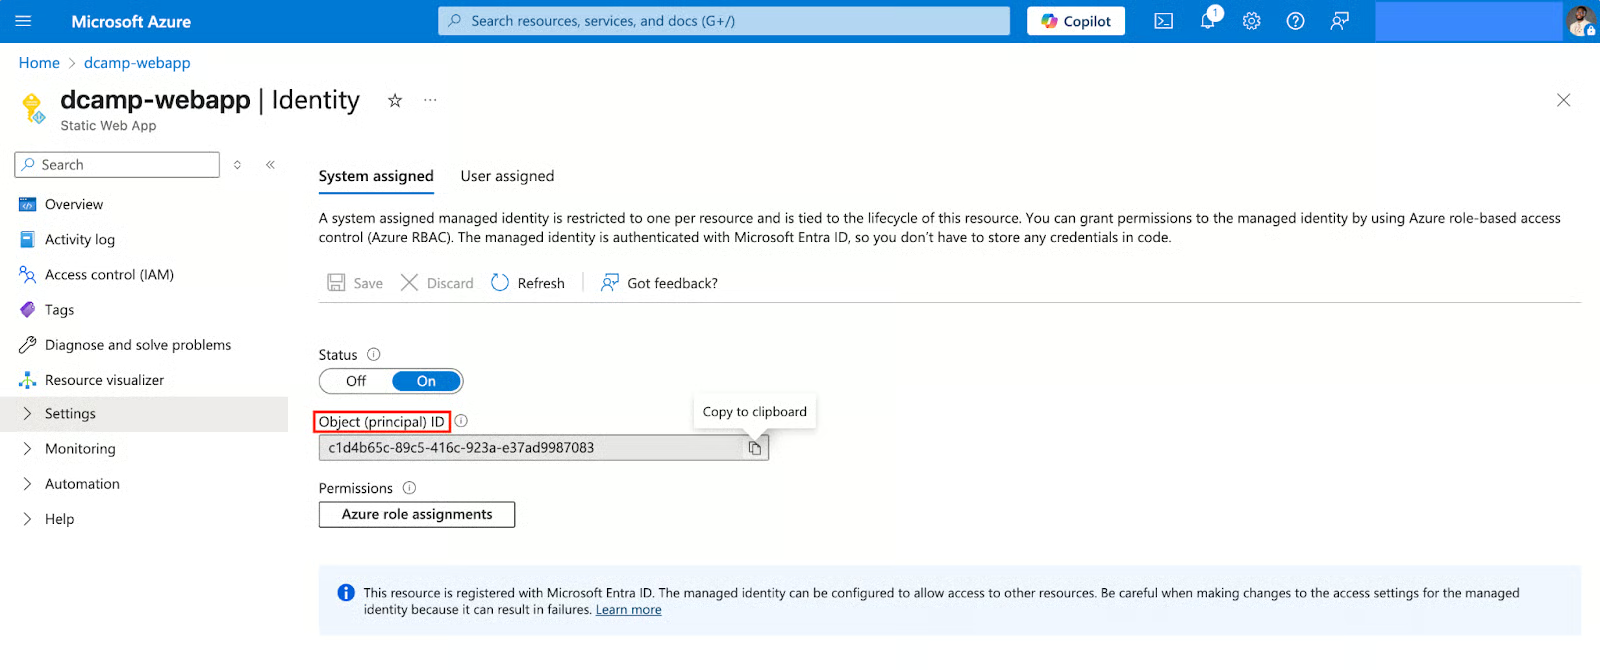
- Azure creates a unique identity for your application. Copy the Object (principal) ID for the next step (e.g., c1d4b65c-89c5-416c-923a-e37ad9987083).
Grant Key Vault Access to Managed Identity
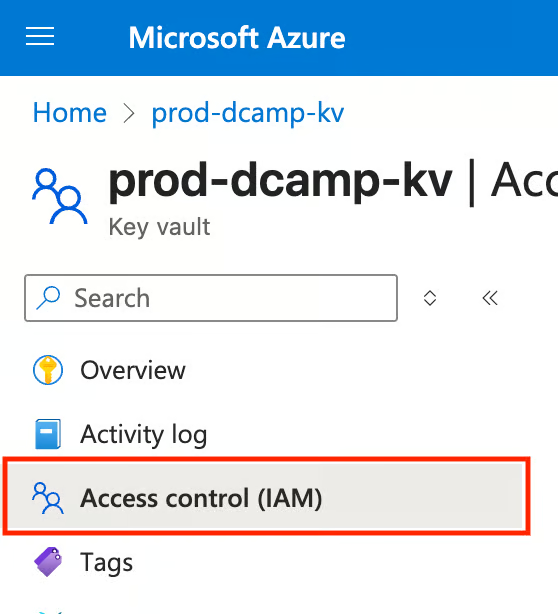
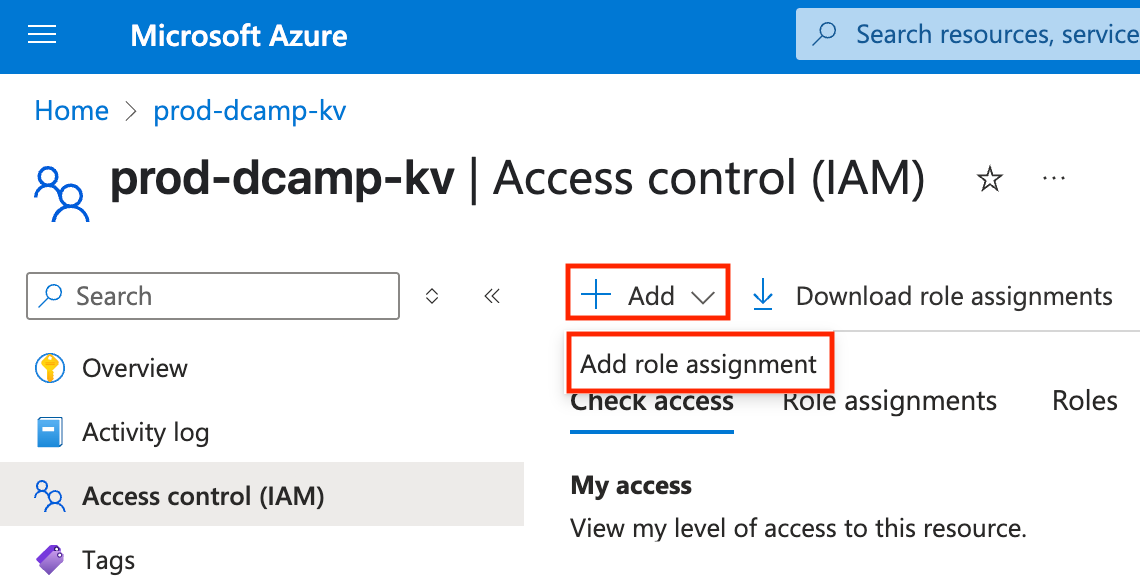
- Navigate back to your Key Vault, on the left plane of your Key Vault, click on the Access Control (IAM) tab.
- Click + Add and select Add Role Assignment from the drop-down.
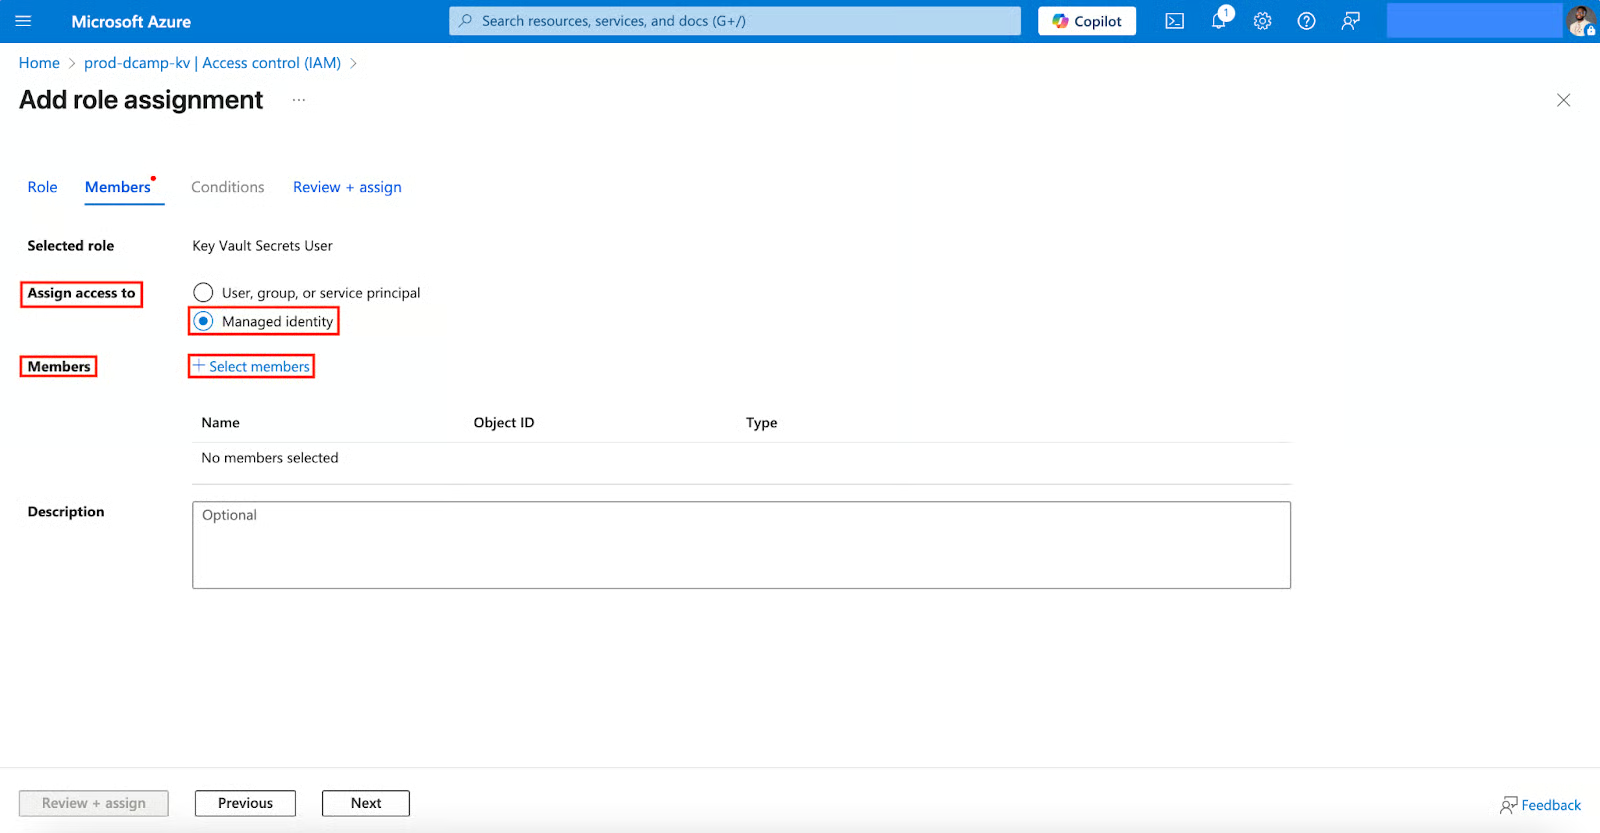
- In the Add role assignment, select and assign the Key Vault Secrets User (Read secret contents only). Click Next.

- Select the following in the Members Tab:
- Assign access to (Select Managed identity).
- Members (Click + Select members).
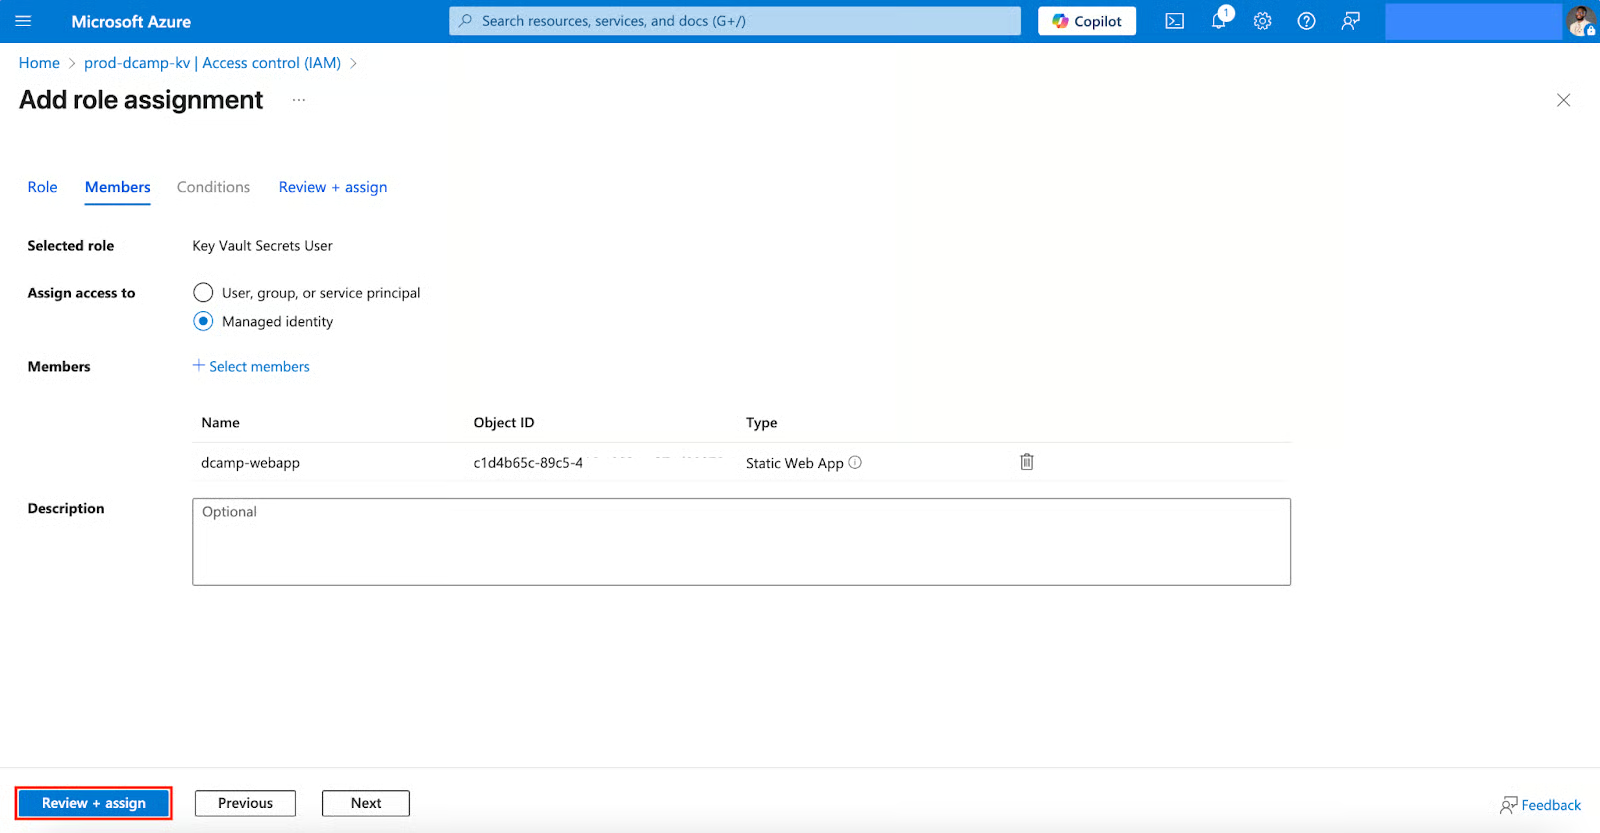
- Select the following in the Select managed identities tab:
- Subscription (Select your subscription).
- Managed identity (Choose App Service).
- Select (Choose your App Service, you can search by name).
- Click Select.

- Click Review + assign.
In my experience, using managed identities with roles like Key Vault Secret User makes secure access easy by eliminating the need for hardcoded secrets in your code base. It enhances both security and maintainability, especially in production environments.
Want to master web app hosting on Azure? Check out the Azure App Service Tutorial and learn how to build, deploy, and scale applications with ease.
Integrating with CI/CD and DevOps
DevOps integration requires balancing security with developer productivity. I always recommend starting with strict controls and gradually adding convenience features. Let’s understand how we can integrate our Key Vault with Azure DevOps.
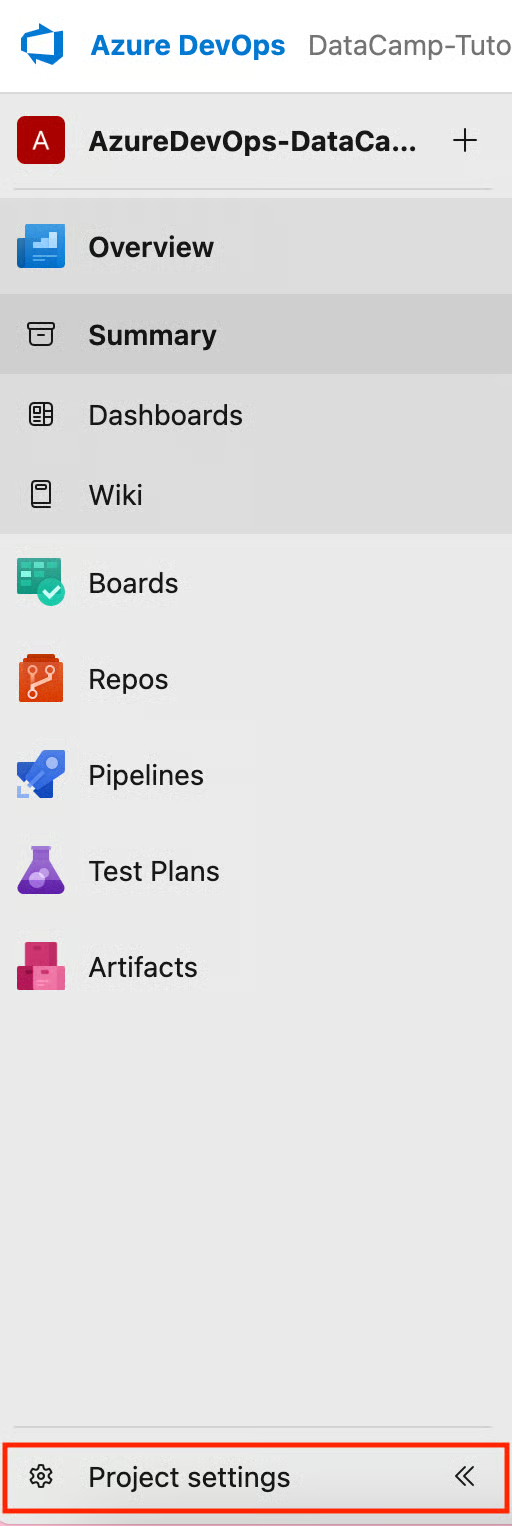
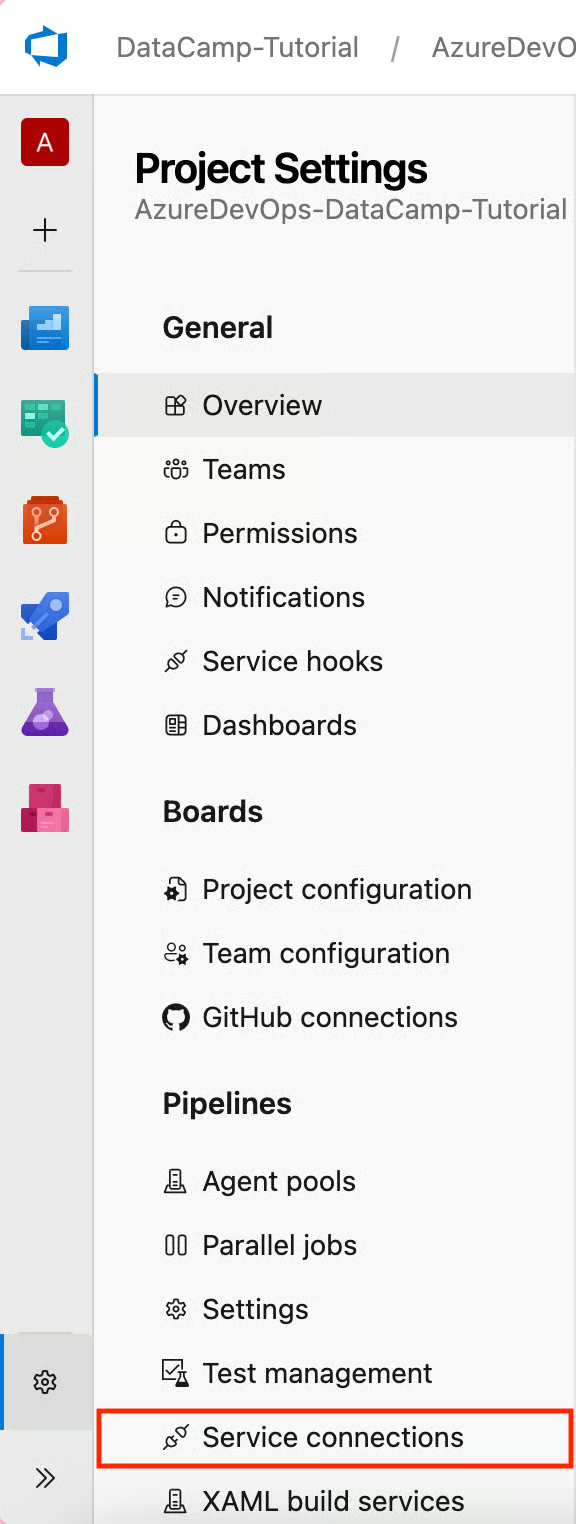
- First, you’ll have to sign in to our Azure DevOps account. In Azure DevOps, navigate to Project settings at the bottom left.
- Click Service connections under the Pipelines section.
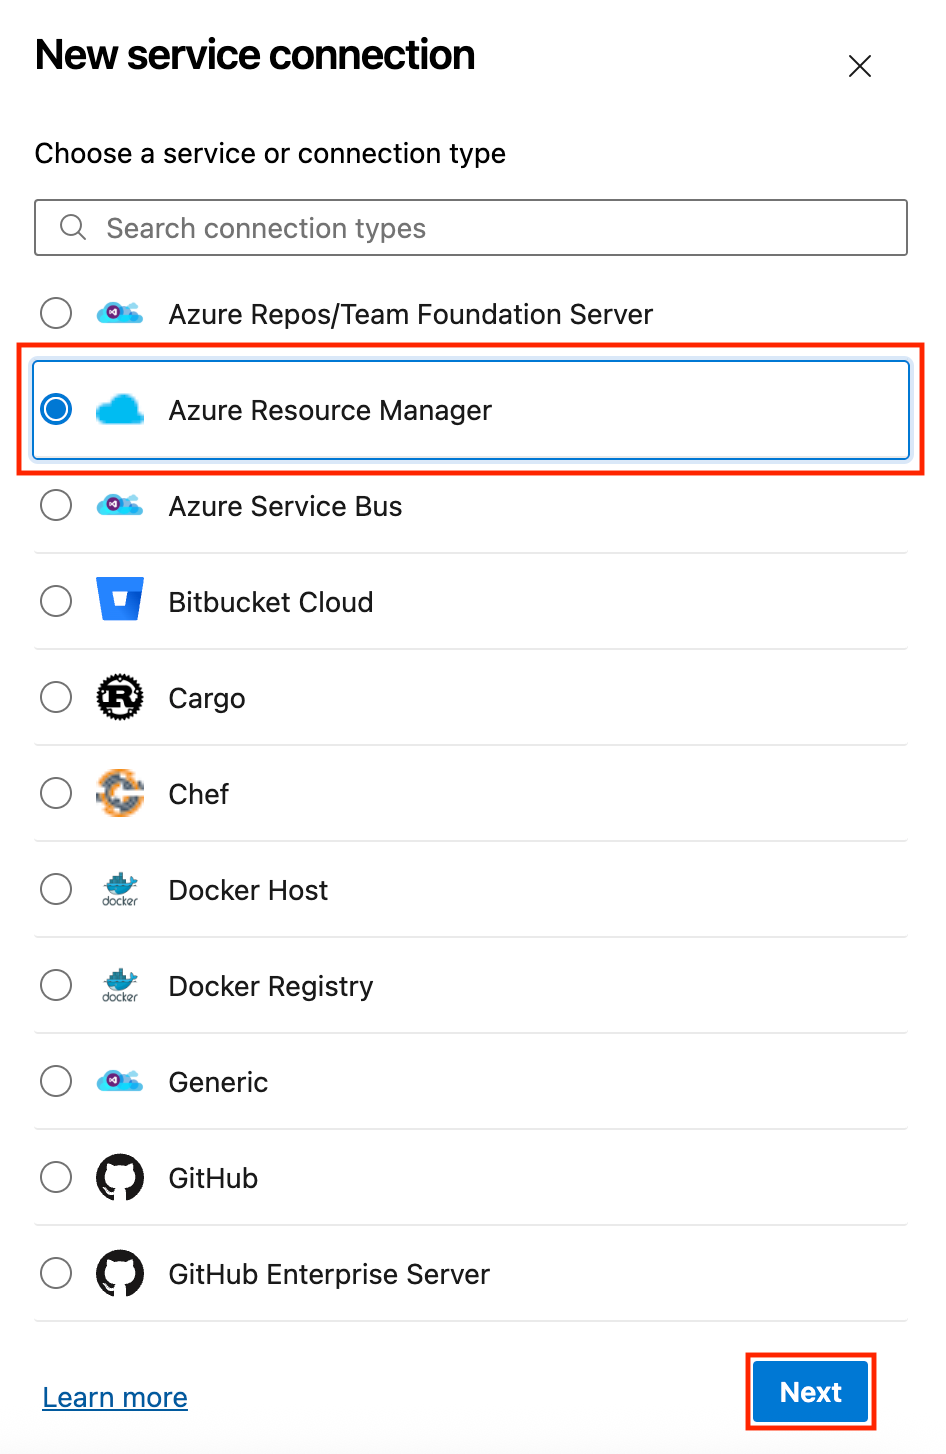
- Click New Service Connection.

- Select Azure Resource Manager and click Next.
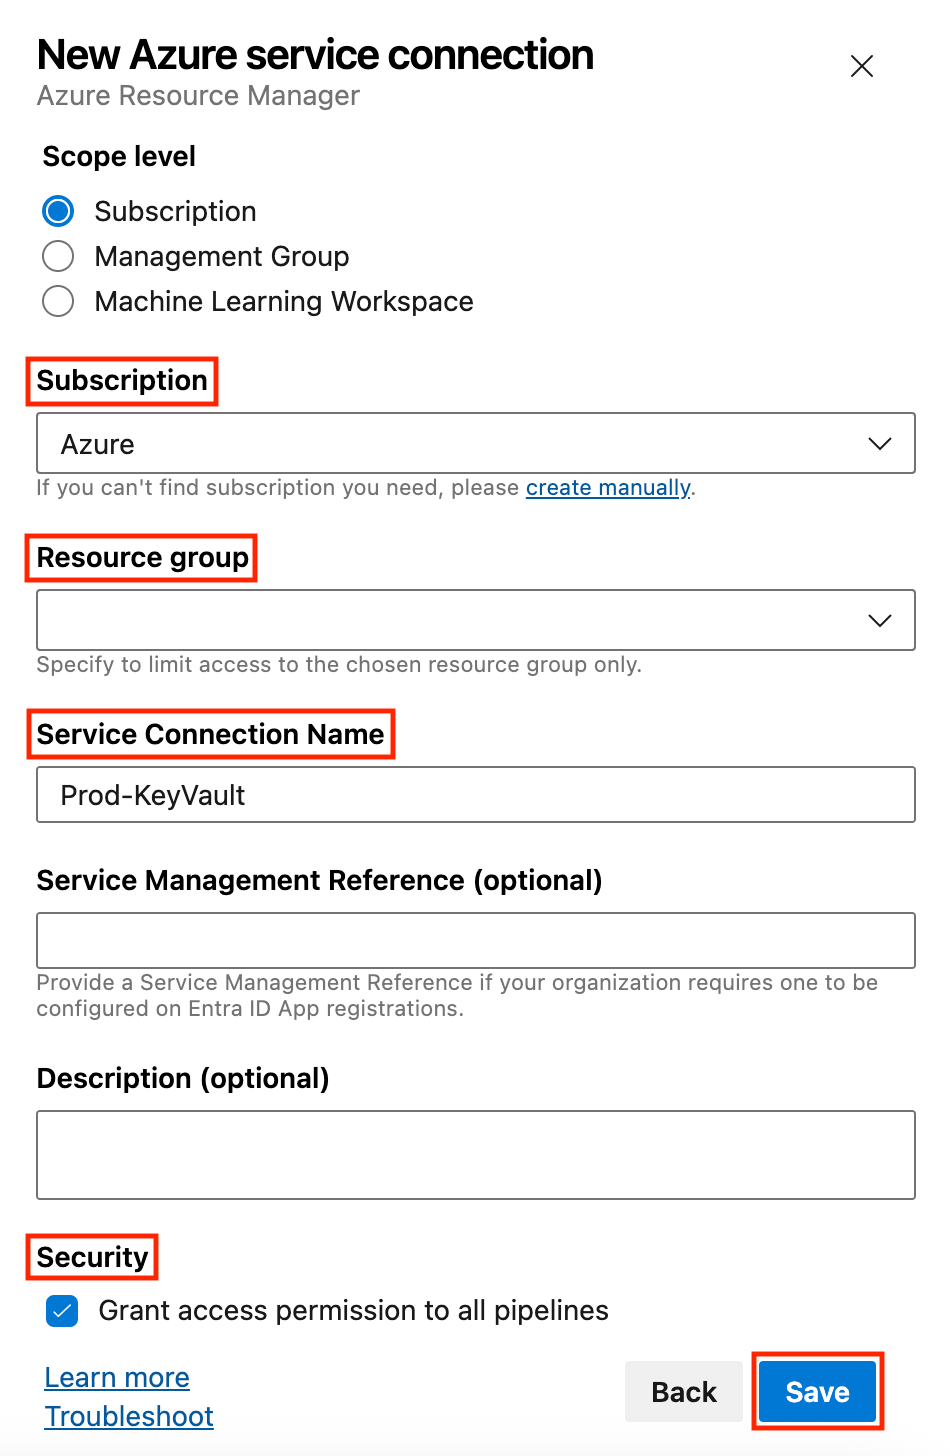
- Configure your Connection Details by selecting and inputting the following:
- Subscription (Select your Azure subscription).
- Resource Group (Select your Key Vault's resource group, although this is optional, use it to limit access to only that resource group).
- Service Connection Name (Input a name for your service connection, e.g., Prod-KeyVault).
- You can leave out the Service Management Reference and Description.
- Security (Check the Grant access permission to all pipelines box).
- Click Save.
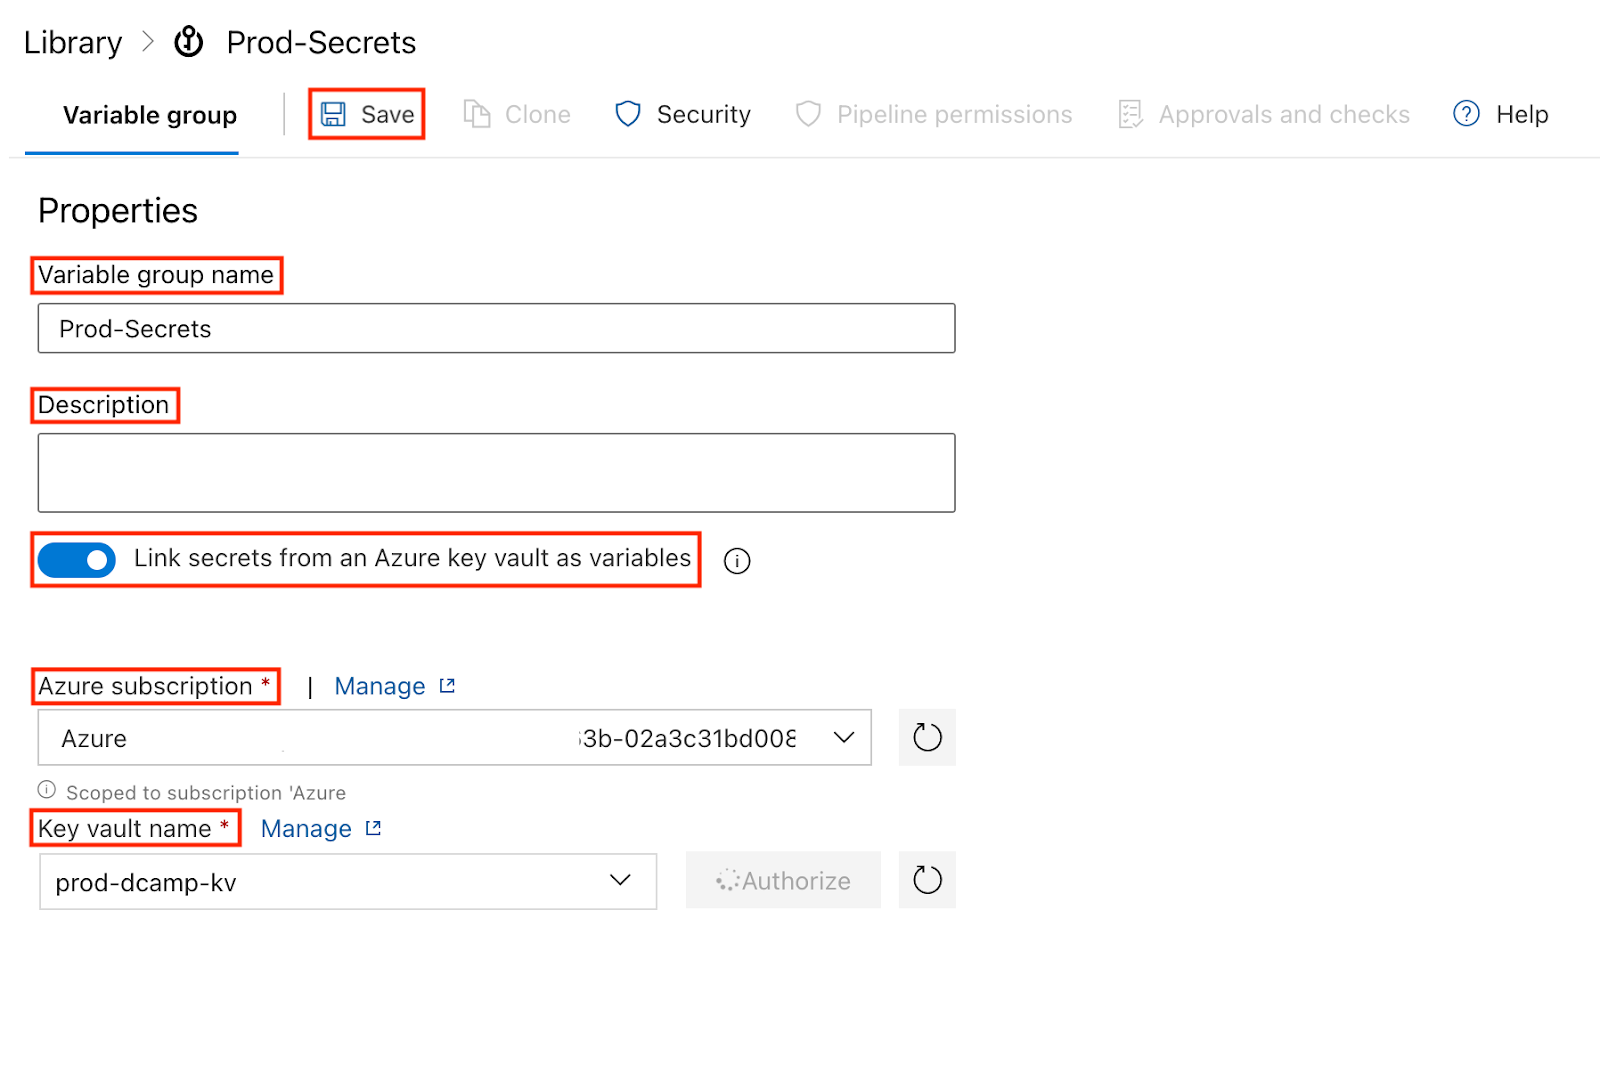
- Navigate to the Pipelines section, select Library, and click + Variable group to create a variable group.
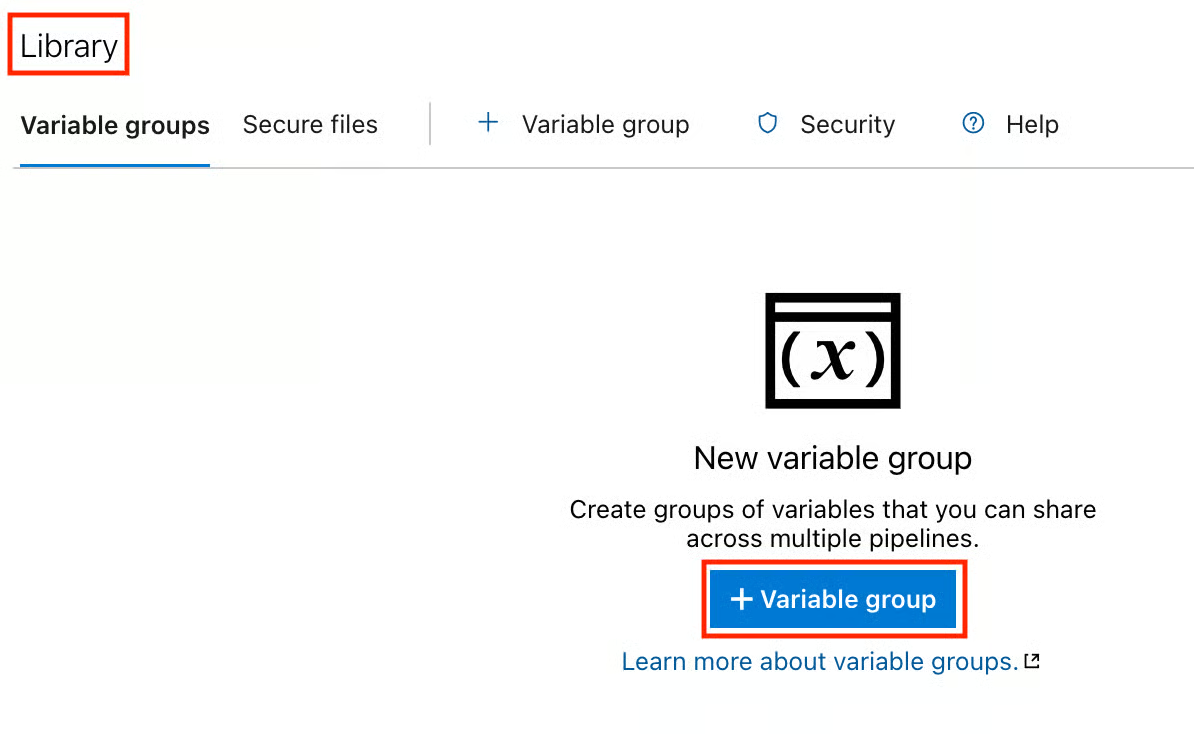
- In the Variable group page, select and fill in the following under the Properties section:
- Variable group name (Always use a descriptive name, e.g., Prod-Secrets).
- Description (You can briefly describe your variable group, but this is not required).
- Link secrets from an Azure key vault as variables (Click the Toggle On).
- Azure subscription (Select your previously created service connection).
- Key vault name (Select your Key Vault, e.g., prod-dcamp-kv).
- Click Save.
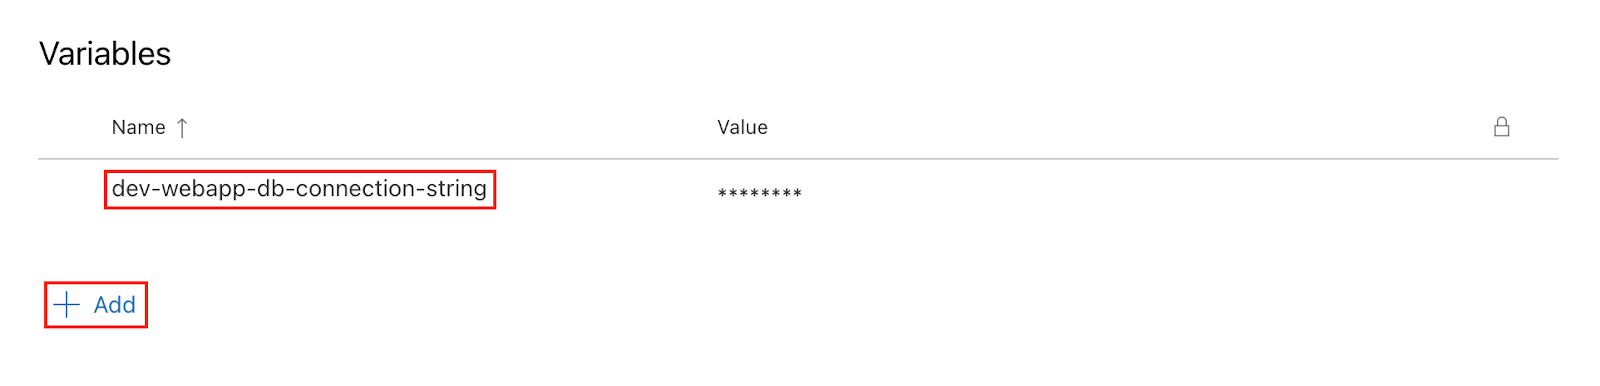
- Click + Add under Variables. Select the secrets you want to make available (e.g., dev-webapp-db-connection-string).
Note: Each secret becomes a pipeline variable.
- Use this YAML template to create a new pipeline in Azure Pipelines:
# azure-pipelines.yml
trigger:
- main

pool:
  vmImage: 'ubuntu-latest'

variables:
- group: 'Prod-Secrets'  # The variable group linked to your Key Vault

stages:
- stage: Deploy
  jobs:
  - job: DeployApplication
    steps:
    - task: AzureWebApp@1
      inputs:
        azureSubscription: 'Azure-KeyVault'
        appName: 'dcamp-webapp'
        appSettings: |
          -ConnectionStrings:DefaultConnection "$(dev-webapp-db-connection-string)"
          -ApiKeys:ThirdParty "$(api-key)"
Integrating Azure Key Vault into your pipeline early saves you a lot. It helps you keep secrets secure and your deployments clean.
If you’re new to deployment practices, the Azure DevOps and Azure Pipelines tutorials provide a solid foundation in core DevOps concepts and tools.
Infrastructure as Code (IaC) deployments
Infrastructure as Code ensures consistent, repeatable Key Vault deployments across environments. I prefer Terraform for its provider ecosystem and state management capabilities.
If you're entirely new to Terraform, check out these tutorials on getting started with Terraform and Terraform on Azure, which explain the fundamentals and how to use it for infrastructure as code.
Set up Terraform and Azure CLI
Let’s get into it by setting up Terraform and Azure CLI on your local computer.
- First, you’ll have to install Terraform and Azure CLI.
- After your installations, verify your installations by running the commands below:
terraform --version
az --version- Next, you authenticate with Azure.
- Run az login in your Azure CLI to authenticate with Azure.
- Set your subscription using az account set --subscription "your-subscription-id”
Create Terraform Configuration
Next, you’ll create a new directory for your Terraform code and add these files:
In your directory, create a main.tf file and add this:
#HCL

terraform {
  required_providers {
    azurerm = {
      source  = "hashicorp/azurerm"
      version = "~>3.0"
    }
  }
}

provider "azurerm" {
  features {
    key_vault {
      purge_soft_delete_on_destroy = true
    }
  }
}

# Data source for current client configuration
data "azurerm_client_config" "current" {}

# Resource group
resource "azurerm_resource_group" "keyvault" {
  name     = var.resource_group_name
  location = var.location

  tags = var.common_tags
}

# Key Vault
resource "azurerm_key_vault" "main" {
  name                = var.keyvault_name
  location            = azurerm_resource_group.keyvault.location
  resource_group_name = azurerm_resource_group.keyvault.name
  tenant_id           = data.azurerm_client_config.current.tenant_id

  sku_name = var.keyvault_sku

  # Enable RBAC authorization
  enable_rbac_authorization = true

  # Network access configuration
  default_action = var.default_action

  dynamic "ip_rule" {
    for_each = var.allowed_ips
    content {
      ip_range = ip_rule.value
    }
  }

  # Enable soft delete and purge protection for production
  soft_delete_retention_days = var.soft_delete_retention_days
  purge_protection_enabled   = var.purge_protection_enabled

  tags = var.common_tags
}

# Role assignments
resource "azurerm_role_assignment" "keyvault_admin" {
  scope                = azurerm_key_vault.main.id
  role_definition_name = "Key Vault Administrator"
  principal_id         = var.admin_principal_id
}
In your directory, create a variables.tf file and add this:
#HCL

variable "resource_group_name" {
  description = "Name of the resource group"
  type        = string
}

variable "location" {
  description = "Azure region for resources"
  type        = string
  default     = "East US"
}

variable "keyvault_name" {
  description = "Name of the Key Vault"
  type        = string
}

variable "keyvault_sku" {
  description = "SKU of the Key Vault"
  type        = string
  default     = "standard"
}

variable "default_action" {
  description = "Default network access action"
  type        = string
  default     = "Deny"
}

variable "allowed_ips" {
  description = "List of allowed IP addresses"
  type        = list(string)
  default     = []
}

variable "admin_principal_id" {
  description = "Principal ID for Key Vault administrator"
  type        = string
}

variable "soft_delete_retention_days" {
  description = "Number of days to retain soft-deleted items"
  type        = number
  default     = 90
}

variable "purge_protection_enabled" {
  description = "Enable purge protection"
  type        = bool
  default     = true
}

variable "common_tags" {
  description = "Common tags for all resources"
  type        = map(string)
  default = {
    Environment = "production"
    ManagedBy   = "terraform"
  }
}
Create Environment-Specific Variables
In your directory, create a production.tfvars file and add this:
#HCL

resource_group_name = "rg-keyvault-production"
location           = "East US"
keyvault_name      = "kv-prod-eastus-myapp"
keyvault_sku       = "standard"
default_action     = "Deny"
allowed_ips        = ["203.0.113.0/24"]  # Your IP range
admin_principal_id = "your-user-object-id"
purge_protection_enabled = true

common_tags = {
  Environment = "production"
  Project     = "myapp"
  ManagedBy   = "terraform"
  CostCenter  = "engineering"
}
Deploying your infrastructure
Now, it’s time to deploy your infrastructure to Azure.
- First, initialize Terraform in your directory.
terraform init- Plan your deployment.
terraform plan -var-file="production.tfvars"- Apply your configuration.
terraform apply -var-file="production.tfvars"- Verify your deployment. The final step is to check the Azure Portal to confirm the resources you have created and test access to your Azure Key Vault.
In my experience, tools like Terraform save time and bring consistency and clarity to cloud deployments, especially when working in teams.
Event-driven secret management
Let’s say your live application SSL certificate expires, and your system can detect this immediately and trigger an automated workflow to update certificates across all your services, this is the power of event-driven secret management. Let’s learn how to use Event Grid to trigger workflows on secret changes.
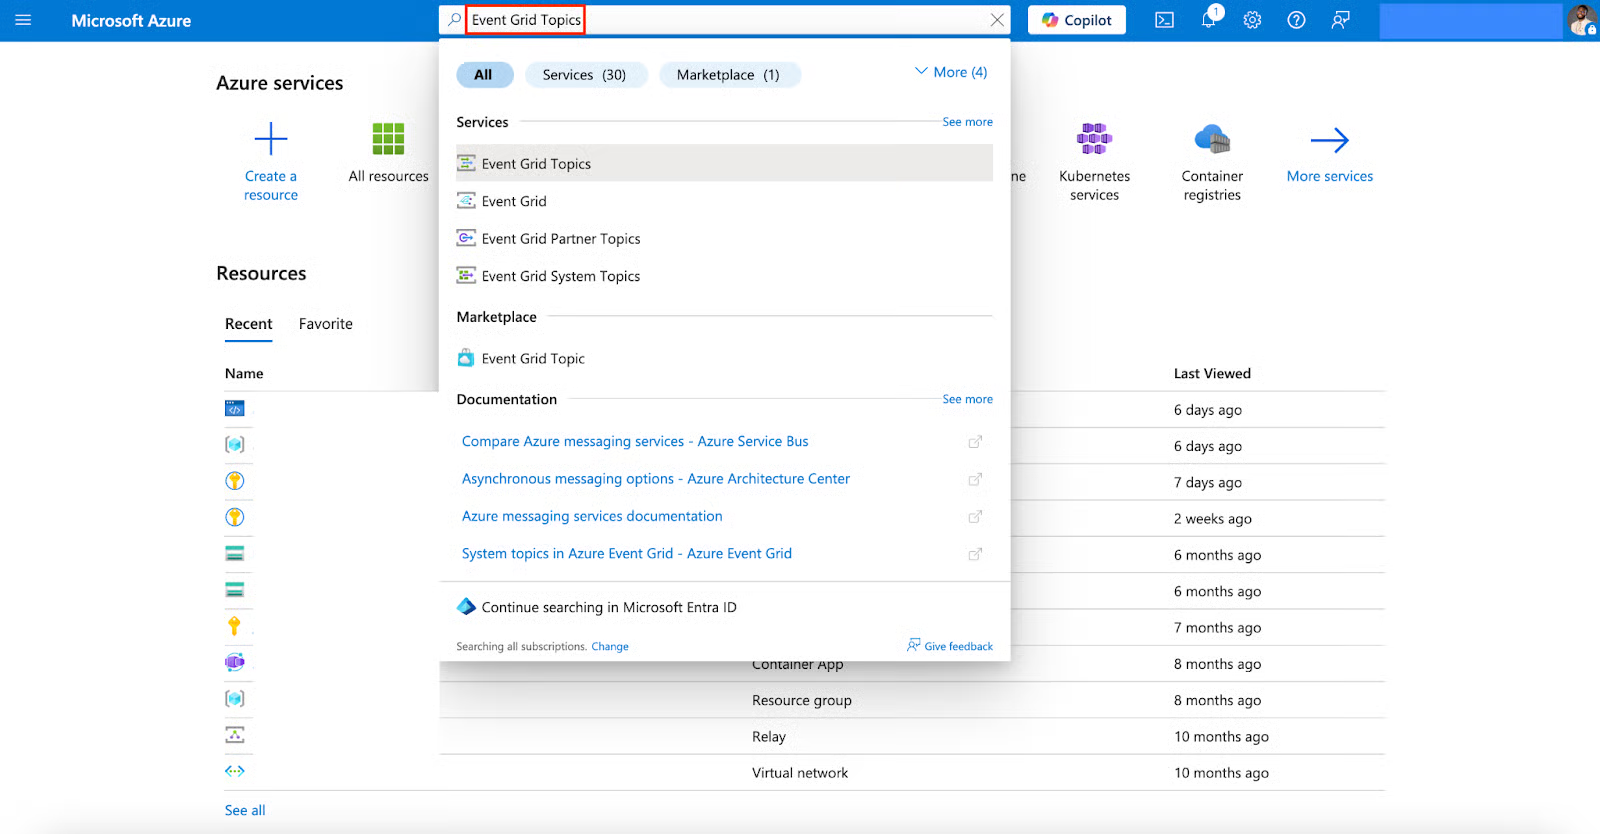
Create an Event Grid Topic
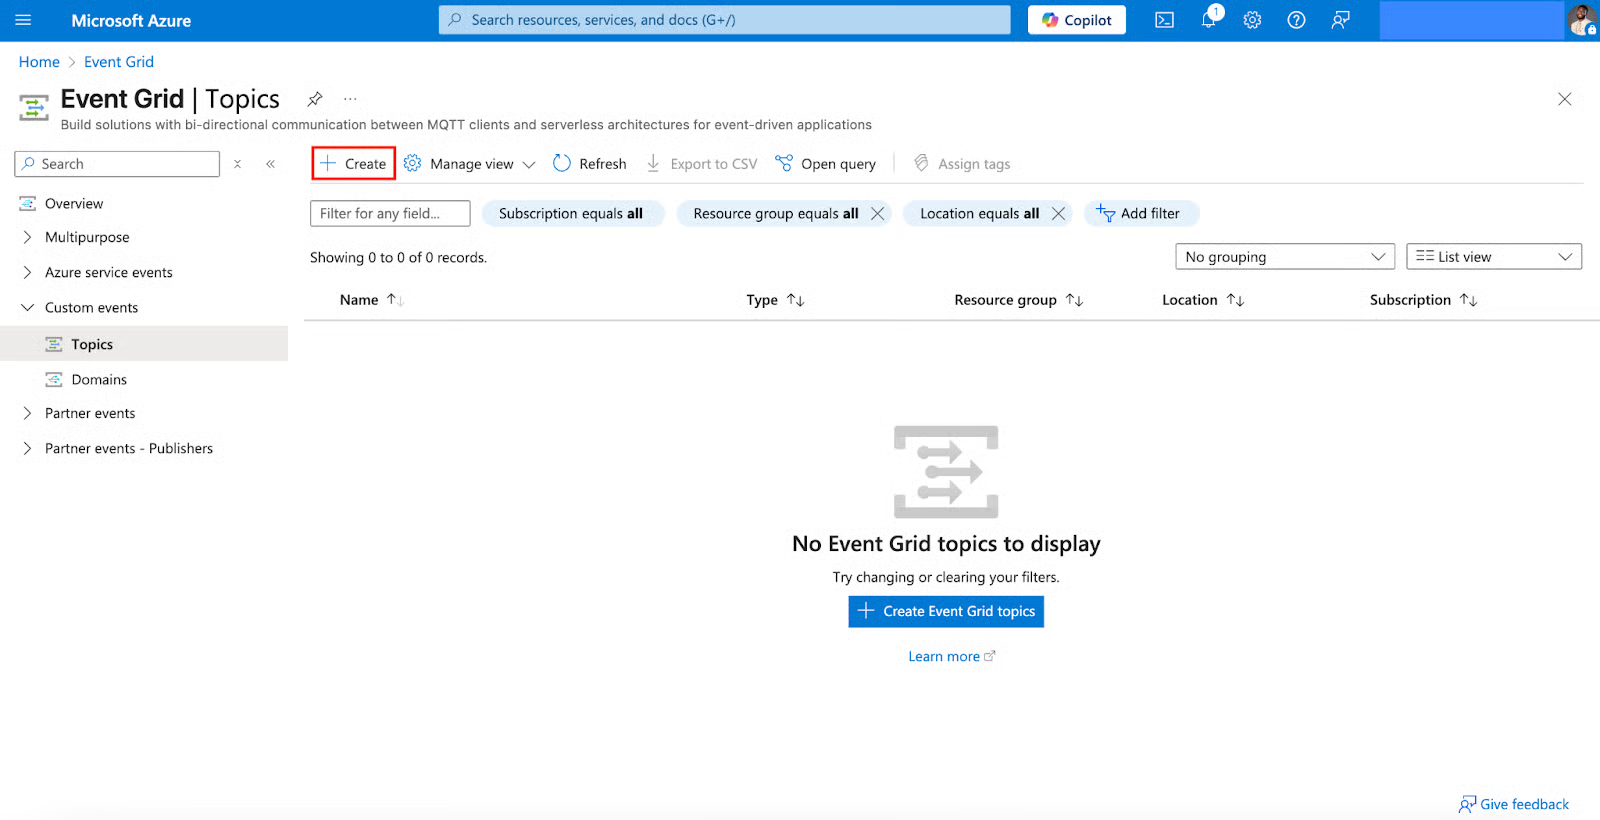
- In the Azure Portal, search for and select Event Grid Topics.
- Click + Create.
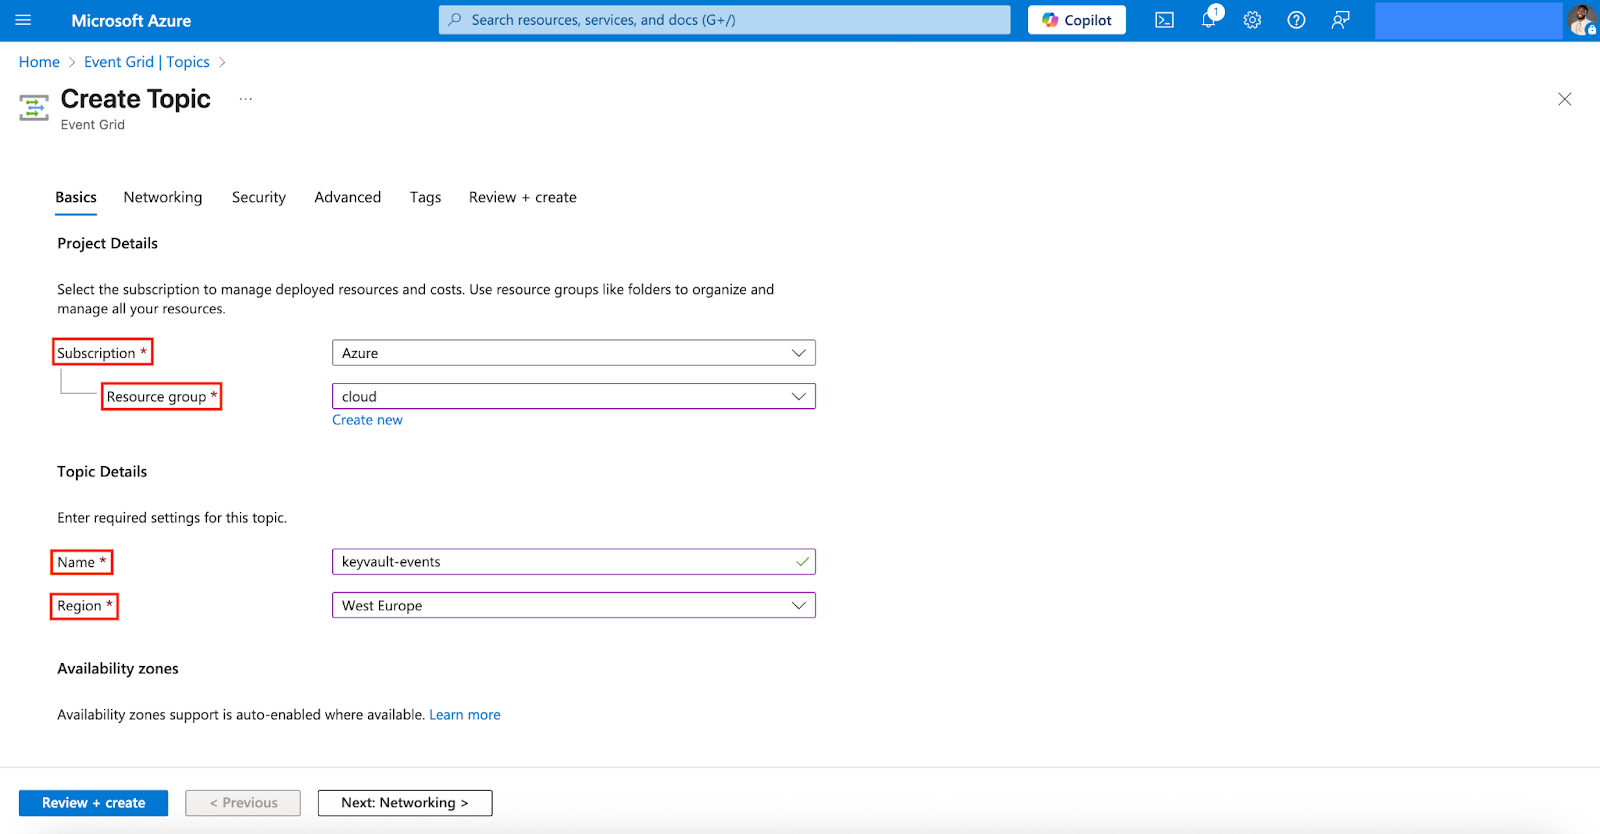
- In the Create Topic section, select and fill in the following:
- Subscription (Use an existing one, the same as your Key Vault).
- Resource group (Use an existing one, the same as your Key Vault).
- Name (Use a descriptive name, e.g., keyvault-events).
- Region (Select a region similar to your Key Vault).
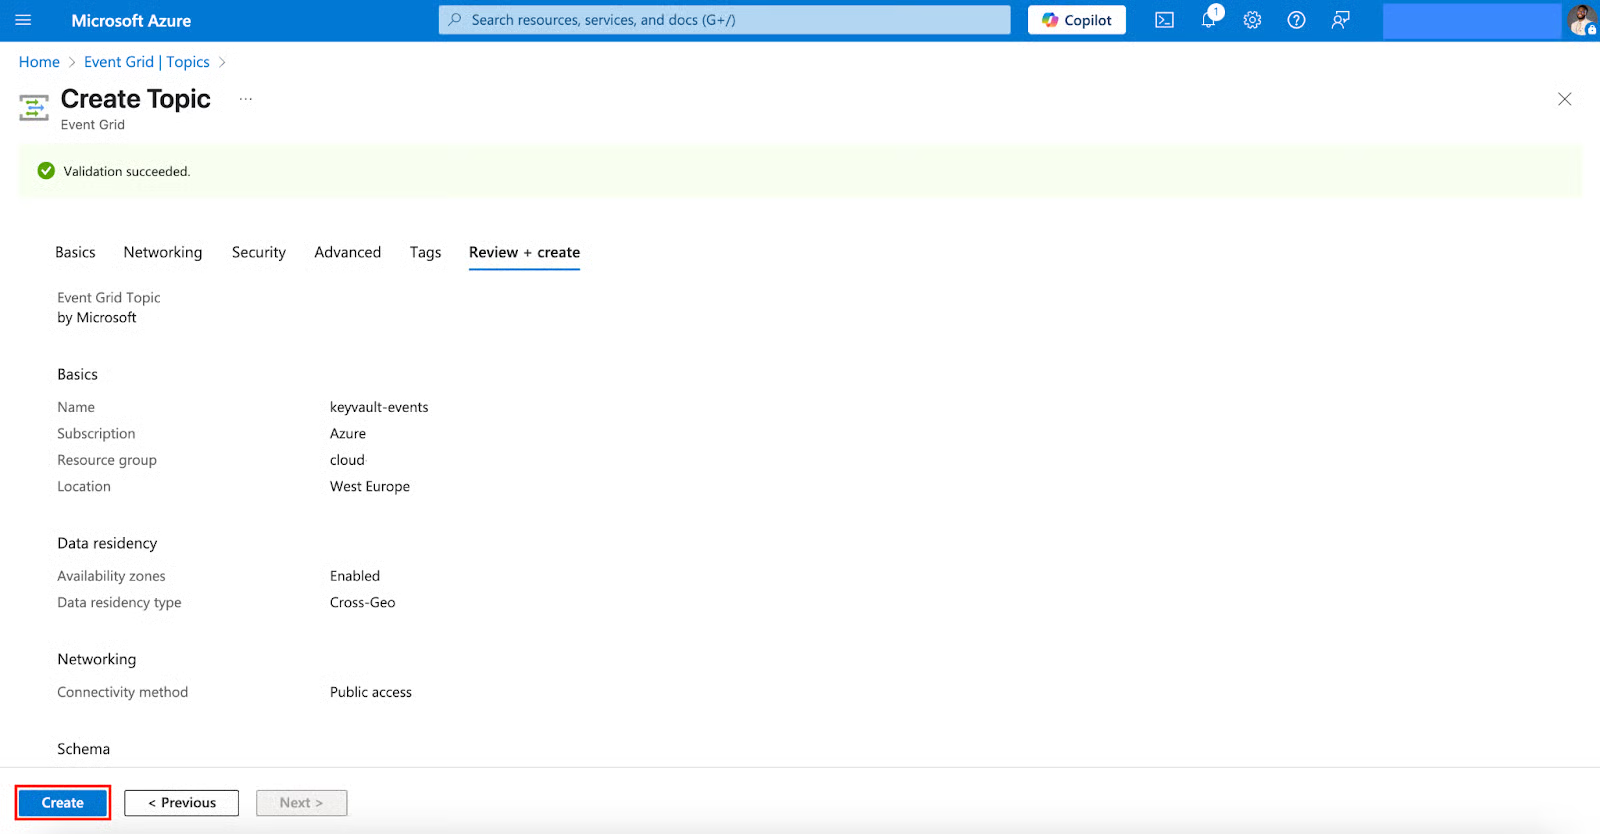
- From Networking through Security, Advanced, and Tags to Review + create, leave them at defaults unless you have specific needs. Click Create.
Create an Azure Function for Event Processing
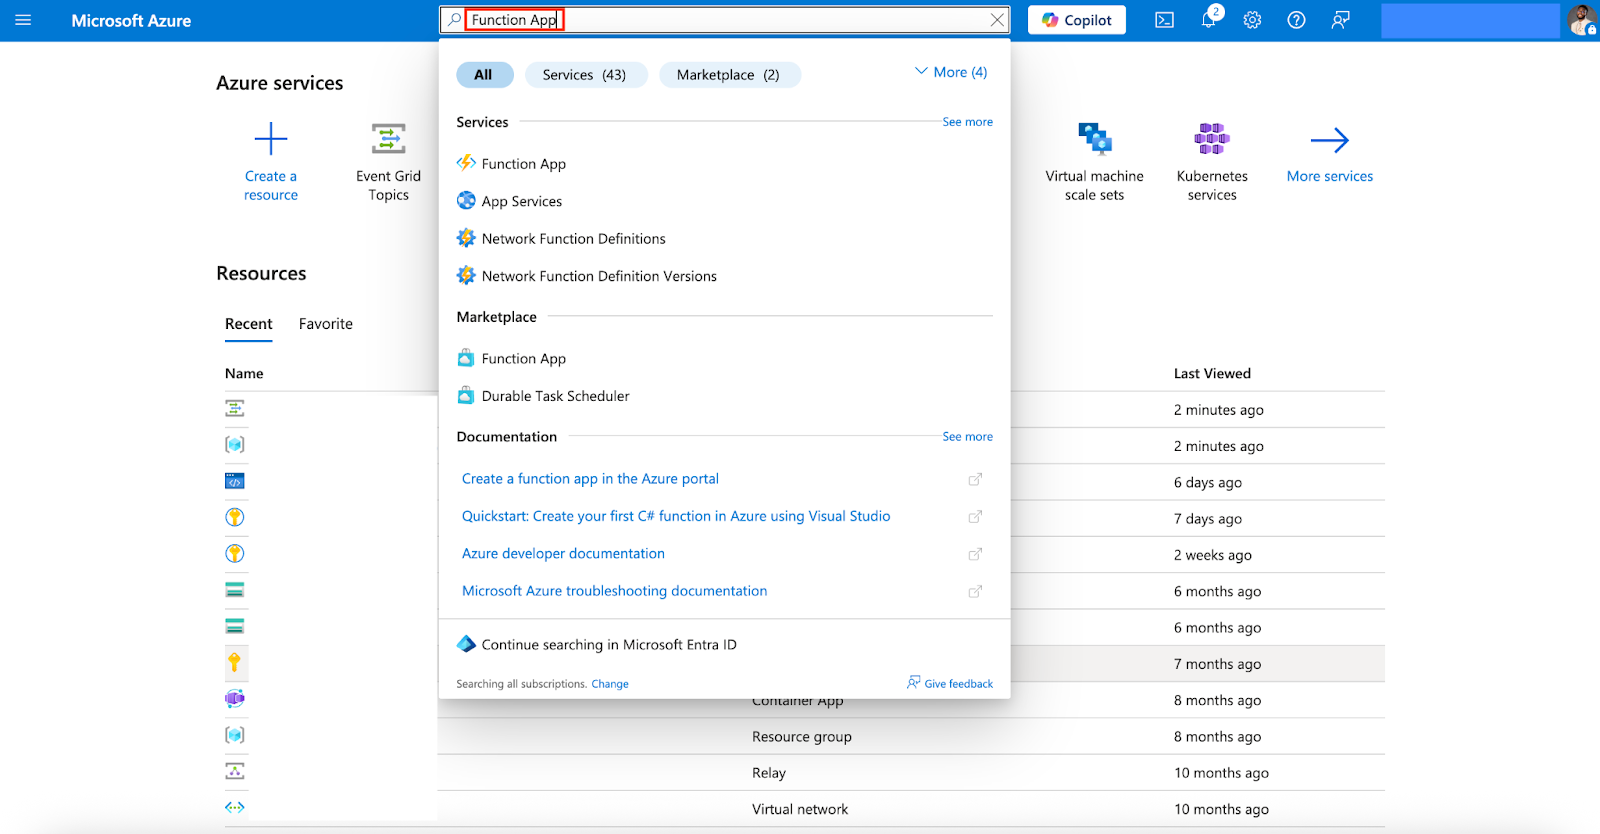
- In the Azure Portal, search for and select Function App.
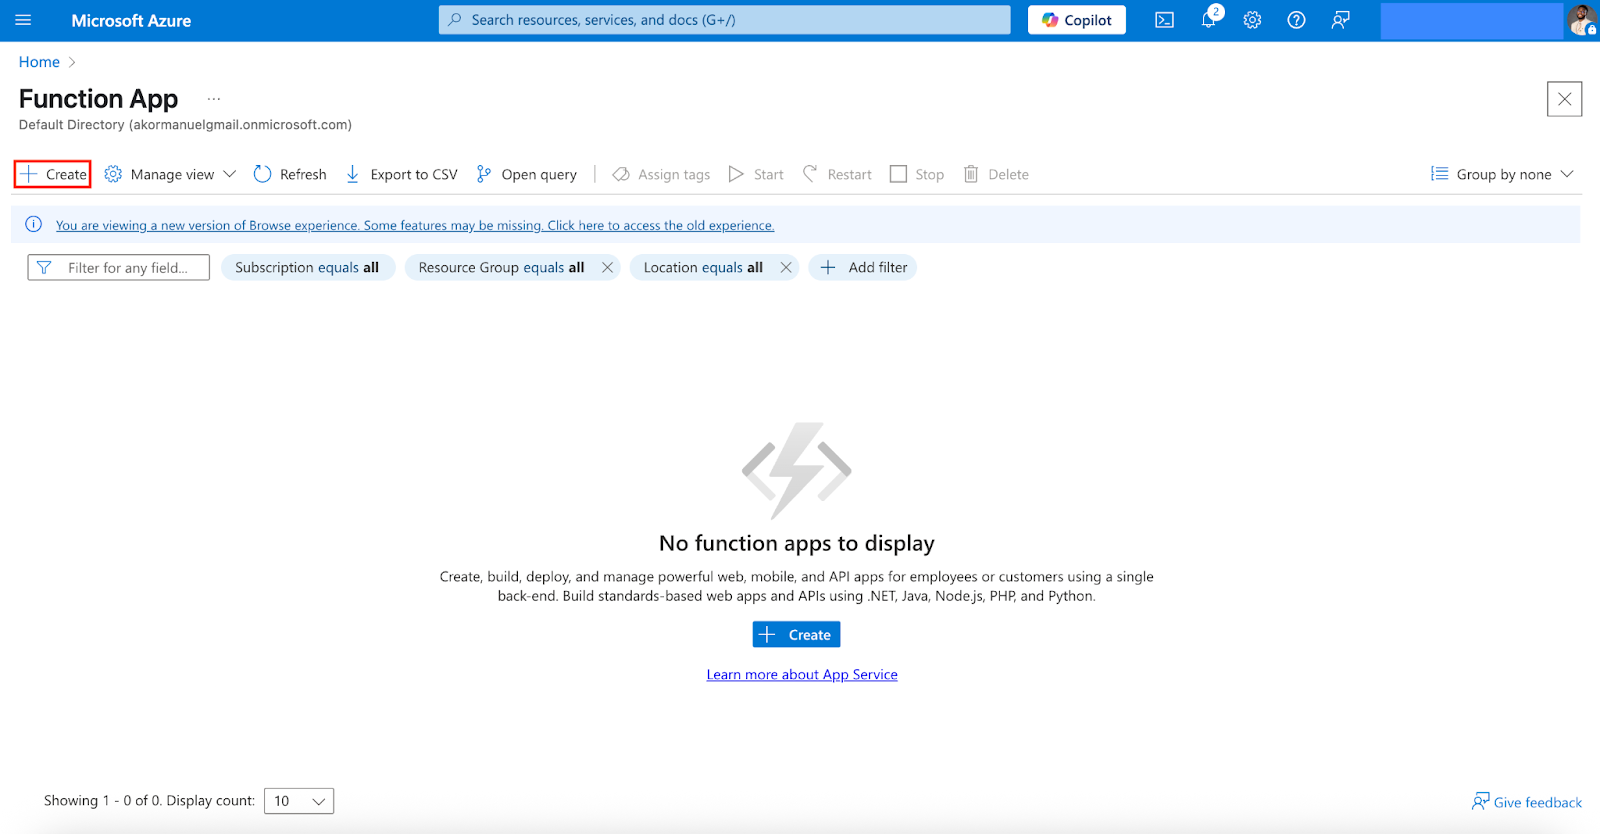
- Click + Create.
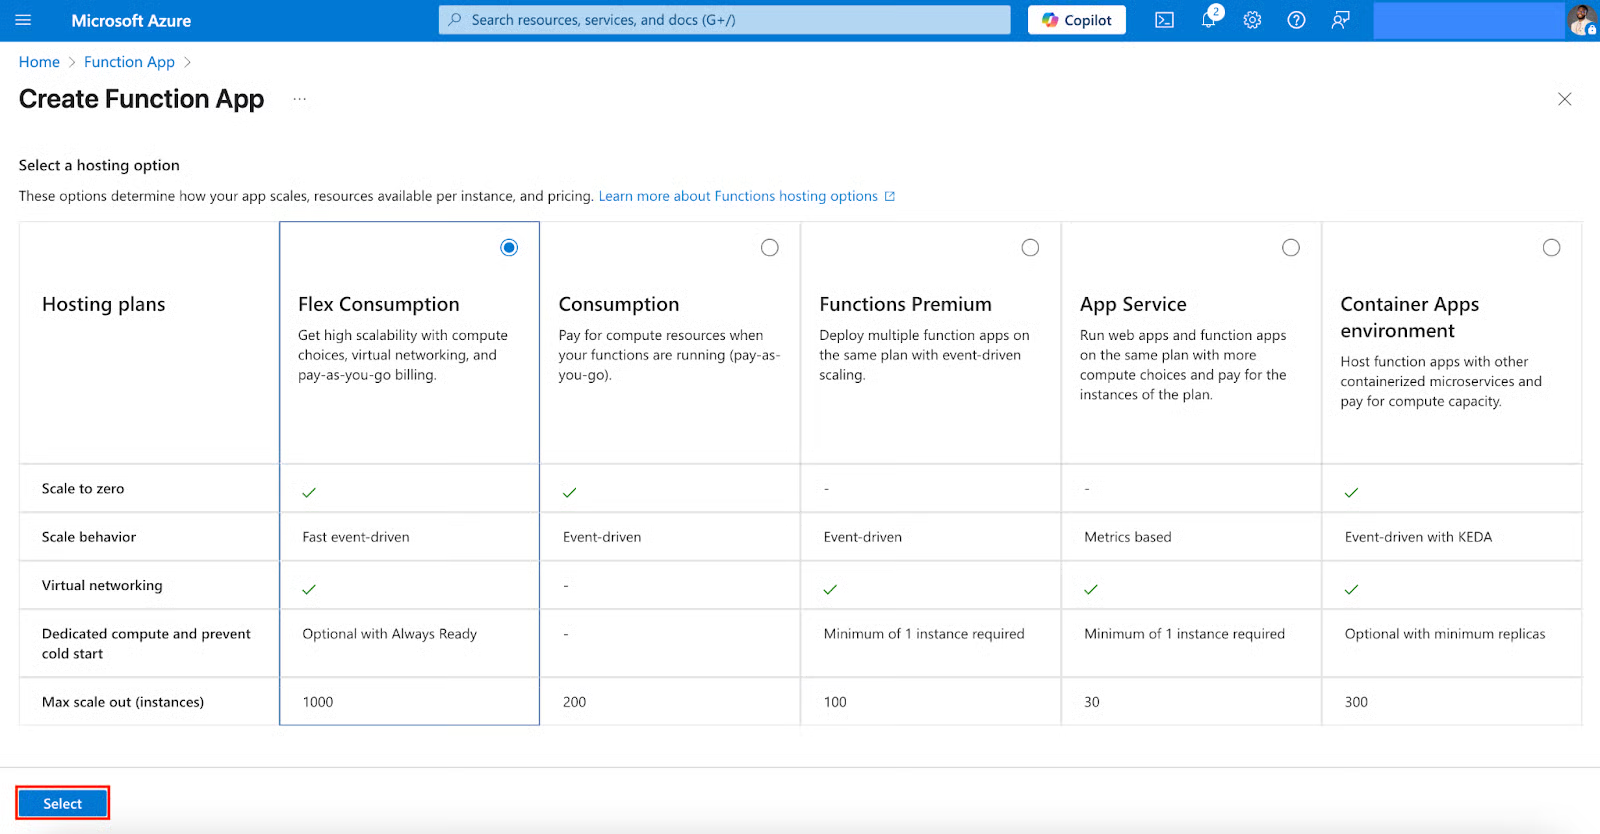
- Click on a hosting plan and Select to continue the creation process.
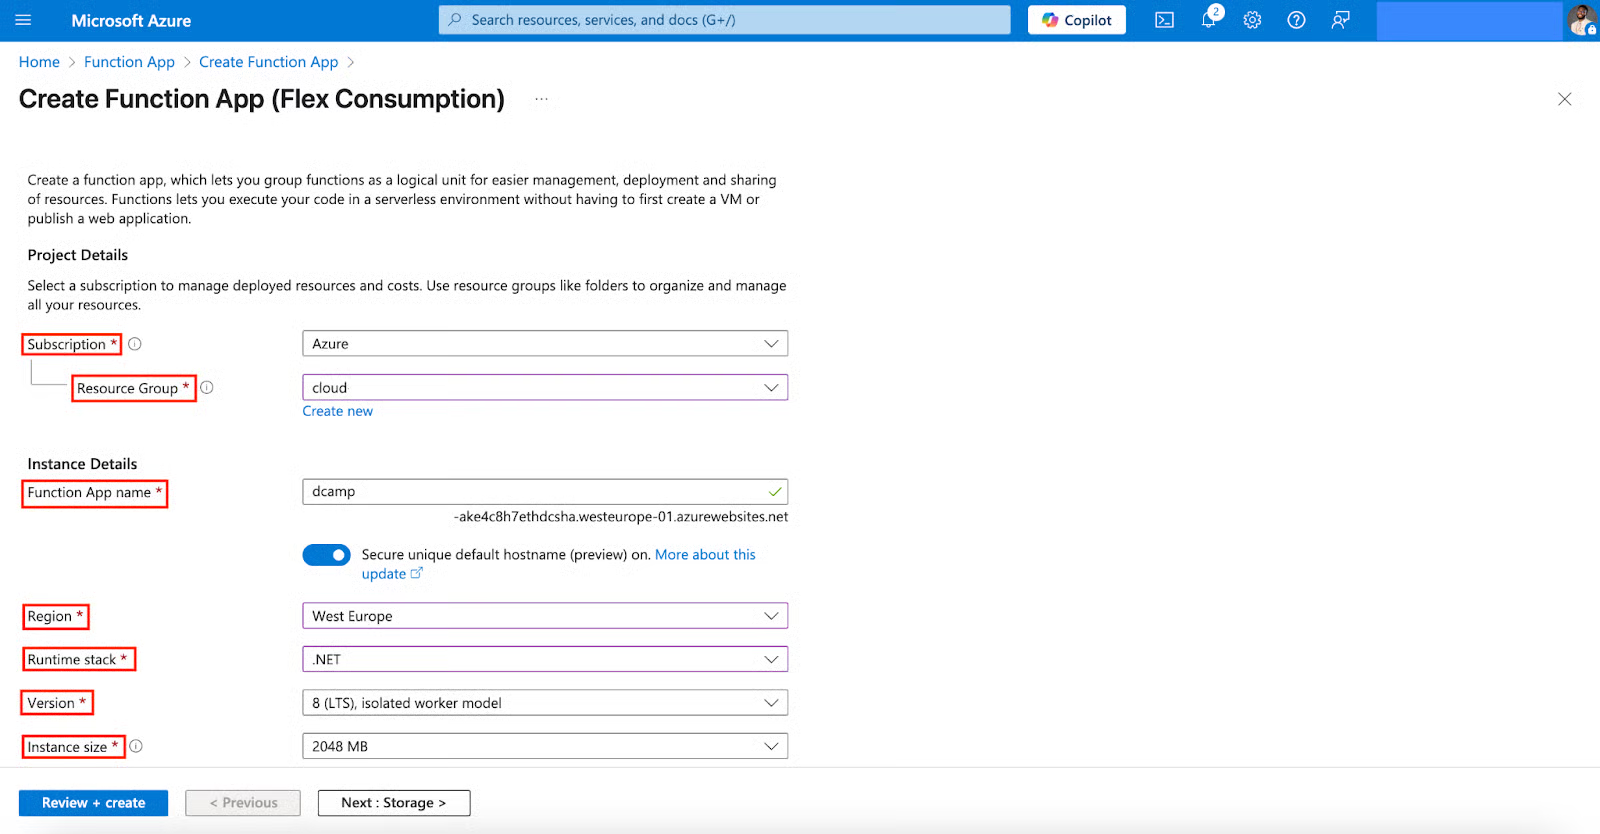
- In the Create Function App section, select and fill in the following:
- Subscription (Use an existing one, the same as your Key Vault).
- Resource group (Use an existing one, the same as your Key Vault).
- Function App Name (Use a globally unique name).
- Region (Select a region similar to your Key Vault).
- Runtime stack (Select .NET).
- Version (Select 8 (LTS), isolated worker model).
- Instance size (Select 2048MB).
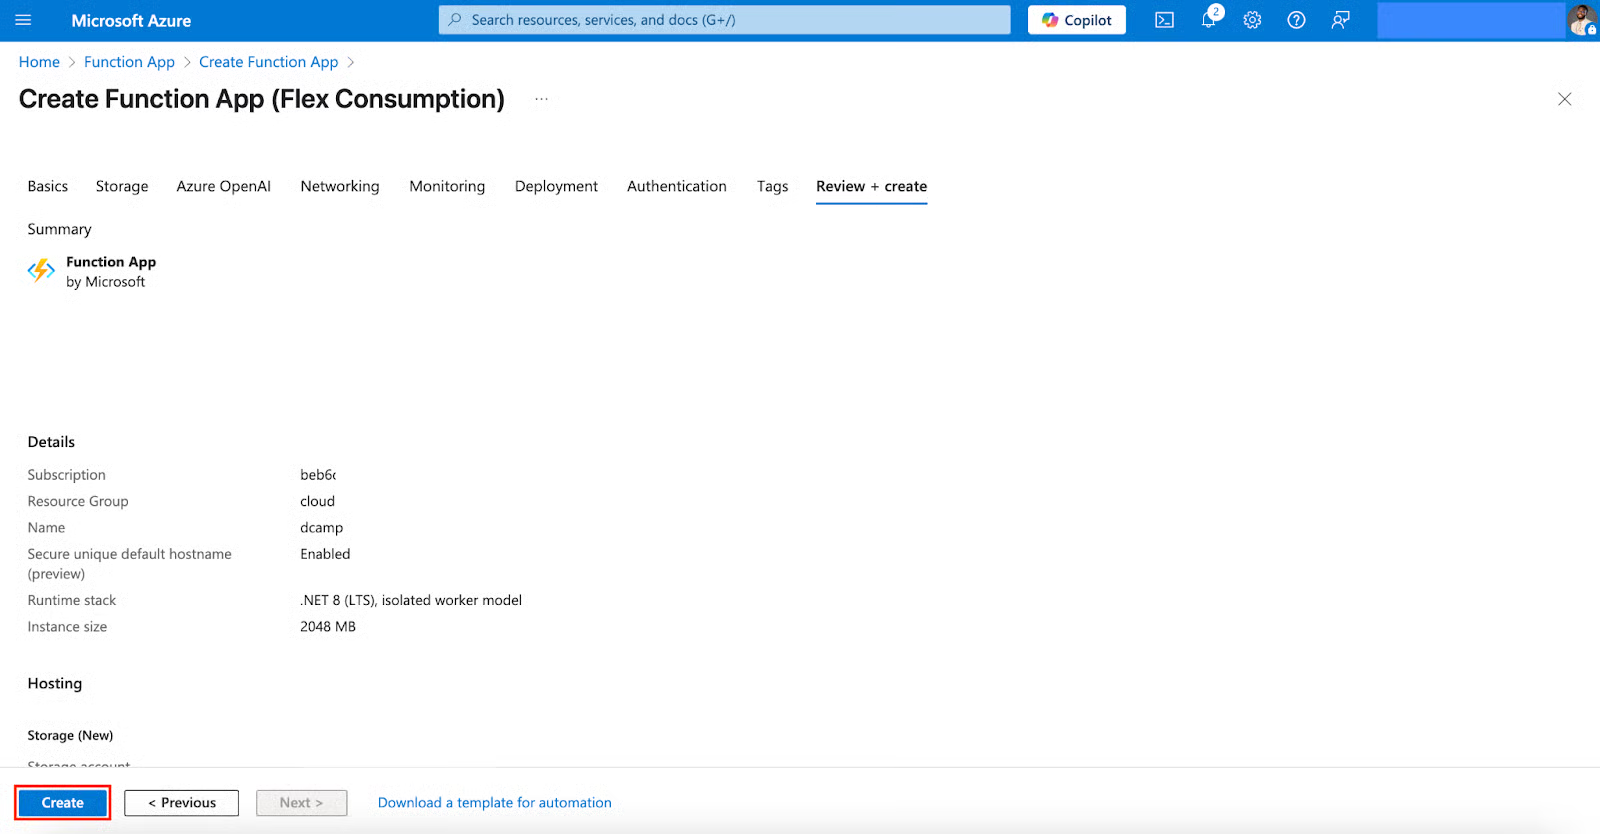
- From Storage through Azure OpenAI, Networking, Monitoring, Deployment, Authentication, and Tags to Review + create, leave them at defaults unless you have specific needs. Click Create.
Create an Event Subscription
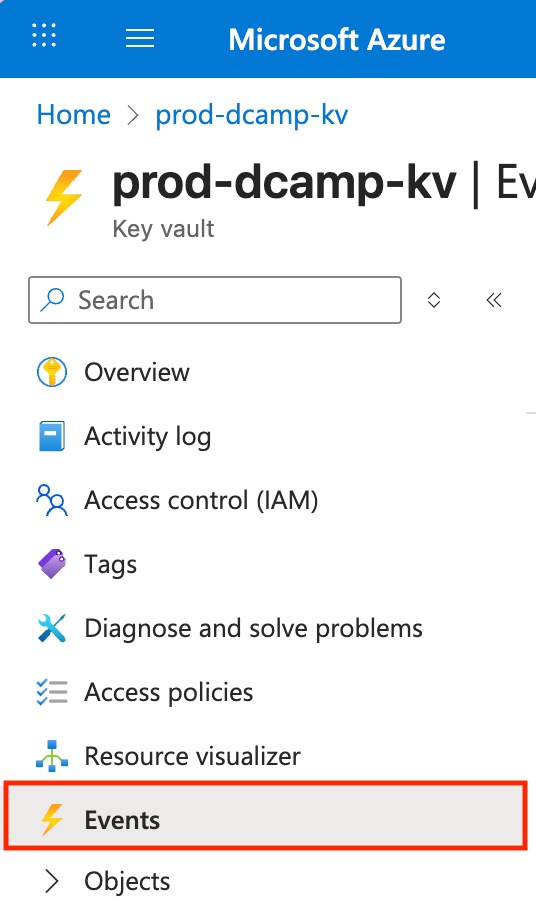
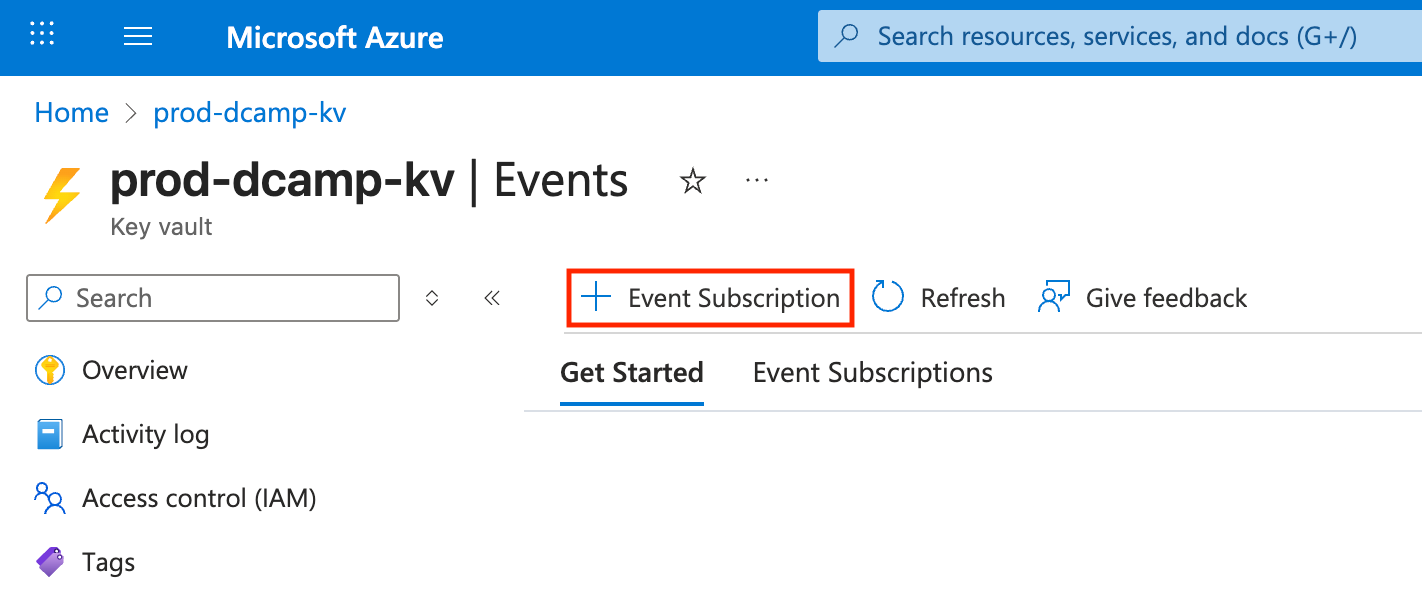
- In your Key Vault, navigate to Events on the left plane.
- Click + Event Subscription to start the creation process.
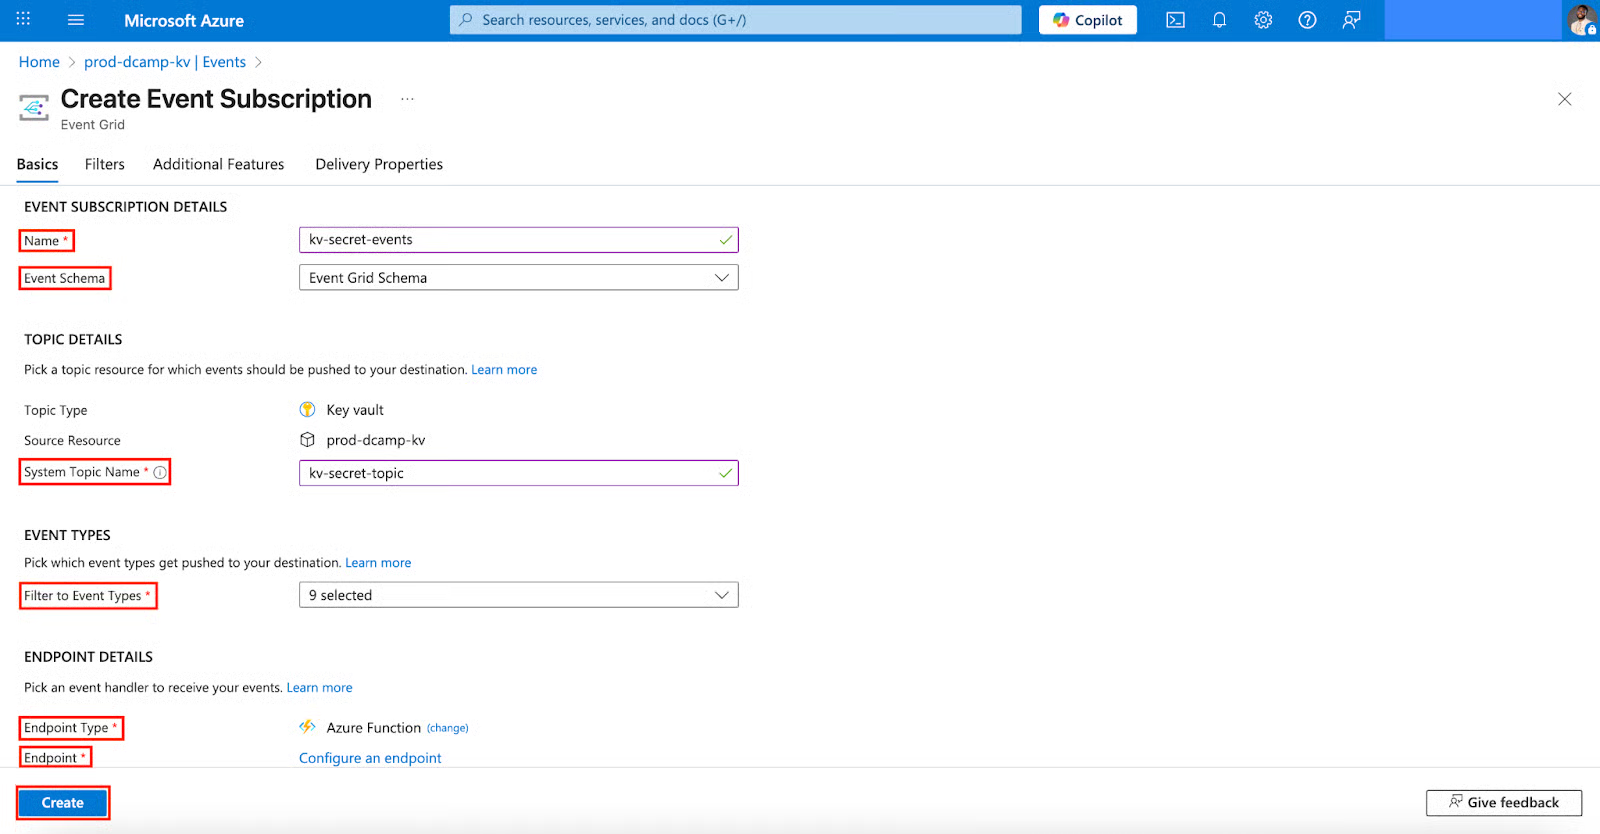
- In the Create Event Subscription page, select and fill in the following:
- Name (Always use a descriptive name, e.g., kv-secret-events).
- Event Schema (Select Event Grid Schema).
- System Topic Name (Always use a descriptive name, e.g., kv-secret-topic).
- Filter to Event Types (9 selected is already on default, leave it like that).
- Endpoint Type (Select Azure Function).
- Endpoint (Configure an endpoint by selecting your Subscription, Resource group, Function app, Slot, and Function).
- Click Create.
Now go to your Key Vault, and create or update a secret. You’ll notice that your Azure Function will automatically trigger in response.
In my experience, building and automating event-driven workflows isn’t just for saving time, but it makes your infrastructure more responsive and secure.
Best Practices and Compliance Guidelines
Now that we’ve covered the core uses of Azure Key Vault and many more, let’s take a closer look at how to get the most out of it by following these best practices.
RBAC and access policies
The foundation of Key Vault security always starts with who can access what. I’ve had an encounter where I granted board permission to make things work, only to regret it later when they need to audit access, and unauthorized access occurred.
Azure Key Vault offers access models: Access Policies (the traditional approach) and Azure RBAC (the newer, more granular option). In my experience, RBAC is the way forward for most organizations, especially if you already use it in your Azure environment.
Setting Up RBAC for Key Vault
Here's how to configure RBAC properly using bash and powershell:
# bash
# Enable RBAC on your Key Vault
az keyvault update --name "your-keyvault-name" \
    --resource-group "your-resource-group" \
    --enable-rbac-authorization true
# powershell
# Assign specific roles to users or service principals
New-AzRoleAssignment -ObjectId "user-or-service-principal-id" \
-RoleDefinitionName "Key Vault Secrets User" \
-Scope "/subscriptions/{subscription-id}/resourceGroups/{resource-group}/providers/Microsoft.KeyVault/vaults/{vault-name}"If you’re new to PowerShell and CLI or want to upskill, check out this PowerShell vs. Command Line Interface course.
Core RBAC Roles and When to Apply Them
|
Role |
Use Case |
Permissions |
|
Key Vault Administrator |
When someone needs complete control over the Key Vault, including managing settings, access, and contents. |
This role has full access to the key vault and all objects. |
|
Key Vault Secrets Officer |
Ideal for users who need to manage secrets but don’t need full admin access. |
This role can create, delete, and manage secrets, but not manage access or settings. |
|
Key Vault Secrets User |
When someone just needs to read secrets, such as app developers or services pulling credentials. |
This role can only read secrets, but cannot make changes or manage them. |
|
Key Vault Crypto Officer |
Best for users handling cryptographic keys, especially in security-sensitive applications. |
This role can manage keys (creating, deleting, importing) and perform cryptographic operations. |
|
Key Vault Reader |
Useful for auditing or monitoring purposes, without needing access to secrets or keys. |
This role can view Key Vault metadata, properties, and settings, but cannot access contents like key or secret values. |
Best practices for organizing access and roles
- Follow the principle of least privilege: Always give and assign users and applications only the permissions they need, nothing more and nothing less.
- Use service principals for applications: Never use personal accounts for automated access because they’re more secure, easier to manage, and not tied to a specific person. Service principals give your application its identity with only the permissions it needs.
- Implement time-based access: Always use Privileged Identity Management (PIM) for administrative access because it reduces risk. Request just-in-time access (which requires PIM setup); users only get admin access when needed and for a limited time.
Key rotation policies and backup
Static keys and secrets are security risks waiting to happen. Azure Key Vault can automatically regenerate new keys and notify your applications when a key needs rotation or expires.
Why must expiration, rotation, and backup policies be set for business continuity? I once worked with a client who used the same API key for three years across multiple environments. When that key was compromised, it took days to identify all the affected systems.
Best practices for key rotation policies and backup
- Set expiration dates: Always assign expiry dates to keys and secrets so they don’t stay active forever. Regularly giving expiry dates to your keys and secrets reduces the risk of a key or secret getting exposed.
- Enable Auto-Rotation: Always use Azure Key Vault’s built-in rotation feature to rotate keys at set intervals (e.g., every 90 days).
- Configure Backup: Regularly back up your keys and secrets to a secure location, so they can be restored if deleted or corrupted. Backups ensure your apps keep working, even if a key is lost or compromised.
To ensure your infrastructure's smooth running and security, continuously rotate your keys often, back them up, and don’t let them live forever. Many standards (like ISO, GDPR) require secure key management practices.
Audit logging and monitoring
Audit logging and monitoring keep your environment secure, compliant, and easier to manage. Adding this to your Key Vault resource helps you detect and respond fast to unauthorized access or breaches. Also, it makes it easier to investigate problems and understand root causes.
Key Metrics to Monitor
Let’s look at the core metrics to monitor in our Key Vault, as well as their normal range, alert threshold, and what they indicate:
|
Metric |
Normal Range |
Alert Threshold |
What It Indicates |
|
Successful Requests |
Steady baseline |
N/A |
Healthy operations |
|
Failed Requests |
< 1% of total |
> 5% |
Potential access issues |
|
Request Latency |
< 100ms |
> 500ms |
Performance problems |
|
Vault Availability |
99.9%+ |
< 99% |
Service health issues |
Best practices for audit logging and monitoring
- Firstly, it’s essential to configure and enable diagnostic log settings on all critical resources to capture detailed activities of your Key Vault.
- For advanced security monitoring, integrate your Key Vault with Azure Sentinel and Azure Monitor for centralized, real-time monitoring and alerting for Azure Key Vault.
- Review your logs frequently and set up alerts to spot any unusual activity.
- Always retain logs according to compliance requirements. Many laws and regulations require you to keep detailed logs to prove that you protect data adequately.
- It’s necessary to automate responses where possible to speed up incident handling.
You can't secure what you can't see; keeping track of what’s happening in your systems is recommended to spot issues or suspicious activity early.
Regulatory compliance and advanced features
Compliance isn't just about checking boxes; it's about building your customers' trust and protecting your business. Over the years, some organizations have failed to meet compliance, resulting in millions of fines from regulatory authorities.
Managing compliance requirements
Let’s look at some common compliance standards, key requirements, and key vault features:
|
Standard |
Key Requirements |
Key Vault Features |
|
FedRAMP |
FedRAMP’s key requirement is a Government-approved encryption. |
FedRAMP’s Key Vault features include FIPS 140-2 Level 2 HSMs |
|
HIPAA |
HIPAA’s key requirements are encryption at rest/transit and audit logs. |
HIPAA’s Key Vault features include HSM-backed keys and diagnostic logging. |
|
SOX |
SOX’s key requirements are access controls and change tracking. |
SOX’s Key Vault features include RBAC and audit trails. |
|
PCI DSS |
PCI DSS’s key requirements are key management and secure storage. |
PCI DSS’s Key Vault features include Hardware security modules. |
Emerging features and security enhancements
As a security practitioner, simplifying complex security concepts and applying best practices early can make a huge difference, especially when scaling your workloads or facing compliance audits. Let’s look at some essential and emerging features that can help enhance the security of our infrastructure:
- HSM-Protected Keys
Hardware Security Module (HSM) protected keys are used for high security, and it’s recommended for organizations with strict security requirements.
- Network Security Controls
This is implemented to protect your Key Vault at the network level. It involves configuring network access restrictions and enabling private endpoints.
- Certificate Auto-Rotation
A recent addition from Microsoft Azure for automatic certificate renewal from supported Certificate Authorities. This saves you from doing it manually and avoiding downtime or expired certificates; you just need to configure auto-rotation for certificates.
- Managed HSM
The managed Hardware Security Module is a private and dedicated
HSM instance built for organizations that require the highest protection level for their sensitive keys and cryptographic operations.
In my experience, taking on these features early helps you build for today and tomorrow. You don’t need to turn everything about your existing infrastructure over at once, but a little network control, or setting up auto-rotation, can make all the difference.
Conclusion
And that’s a wrap! By now, we’ve seen that Azure Key Vault isn’t just for storing keys, secrets, or certificates but for building a comprehensive security foundation for your infrastructure. From my experience, success comes down to three key principles: appropriate access control, proactive monitoring, and routine maintenance when setting up and implementing your Key Vault.
Remember that learning without implementing gives the illusion of competence; security is a process rather than a final goal. I advise you to begin with a pilot project, implement these practices gradually, and always test your procedures before you need them in production.
For deeper technical implementation details, check out Microsoft's official Azure Key Vault documentation and consider pursuing Azure security certifications to formalize your expertise.