
Course
Understanding Microsoft Azure
3 hr
47.1K
If your CI/CD pipeline keeps breaking or feels slow and clunky, you’re not alone. I’ve dealt with failed builds, mismatched environments, and teammates accidentally overwriting my work. Azure Pipelines takes away these frustrations with a cloud-hosted service that can build, test, and deploy almost any project on any platform.
That’s why in this tutorial, I’ll show you how to:
Let’s get started!
Azure Pipelines is a cloud-based solution that simplifies application development, testing, and deployment.
It's a component of the Azure DevOps toolkit, which supports the entire software development lifecycle. It is also a flexible option for teams of all sizes because it supports various platforms and programming languages. GitHub, Azure Repos, and other well-known version control systems are integrated with it.
The core features of Azure Pipelines include:
|
Service |
Purpose |
|
Multi-platform support |
Azure Pipelines automates the building and deployment of applications for various operating systems, such as Linux, macOS, and Windows. |
|
Integration with version control |
Azure Pipelines connect to your code repositories like Azure Repos, GitHub, and other well-known version control systems. |
|
YAML-based pipeline configuration |
Azure Pipelines lets us define our build and deployment processes as code, enabling version control. |
|
Continuous integration and Continuous deployment (CI/CD) |
Azure Pipelines facilitates the end-to-end process of integrating code changes and deploying applications. |
In my experience, Azure Pipelines is helpful for anyone wanting to have proper CI/CD within their team. It is flexible, scalable, and integrates well with other Azure services.
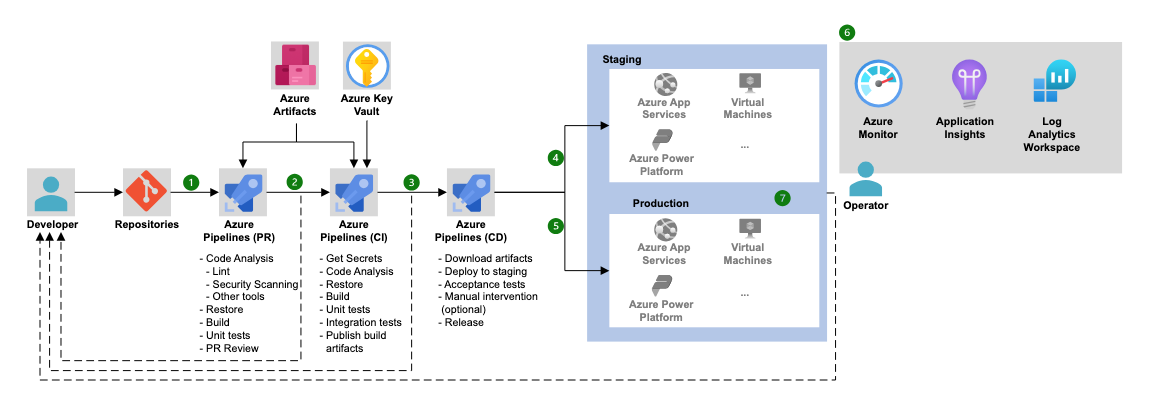
Azure Pipelines Architecture (Source: Microsoft).
If you're looking for a broader understanding of Azure DevOps beyond pipelines, this Azure DevOps tutorial walks through the whole CI/CD lifecycle from start to finish.
To work with the Azure Pipelines environment, we must first set up everything to foster an end-to-end build, test, and deployment process.
Before diving into creating your first pipeline, ensure you have the following:
If you need to brush up on the broader Azure ecosystem, I recommend checking out the Understanding Microsoft Azure course.
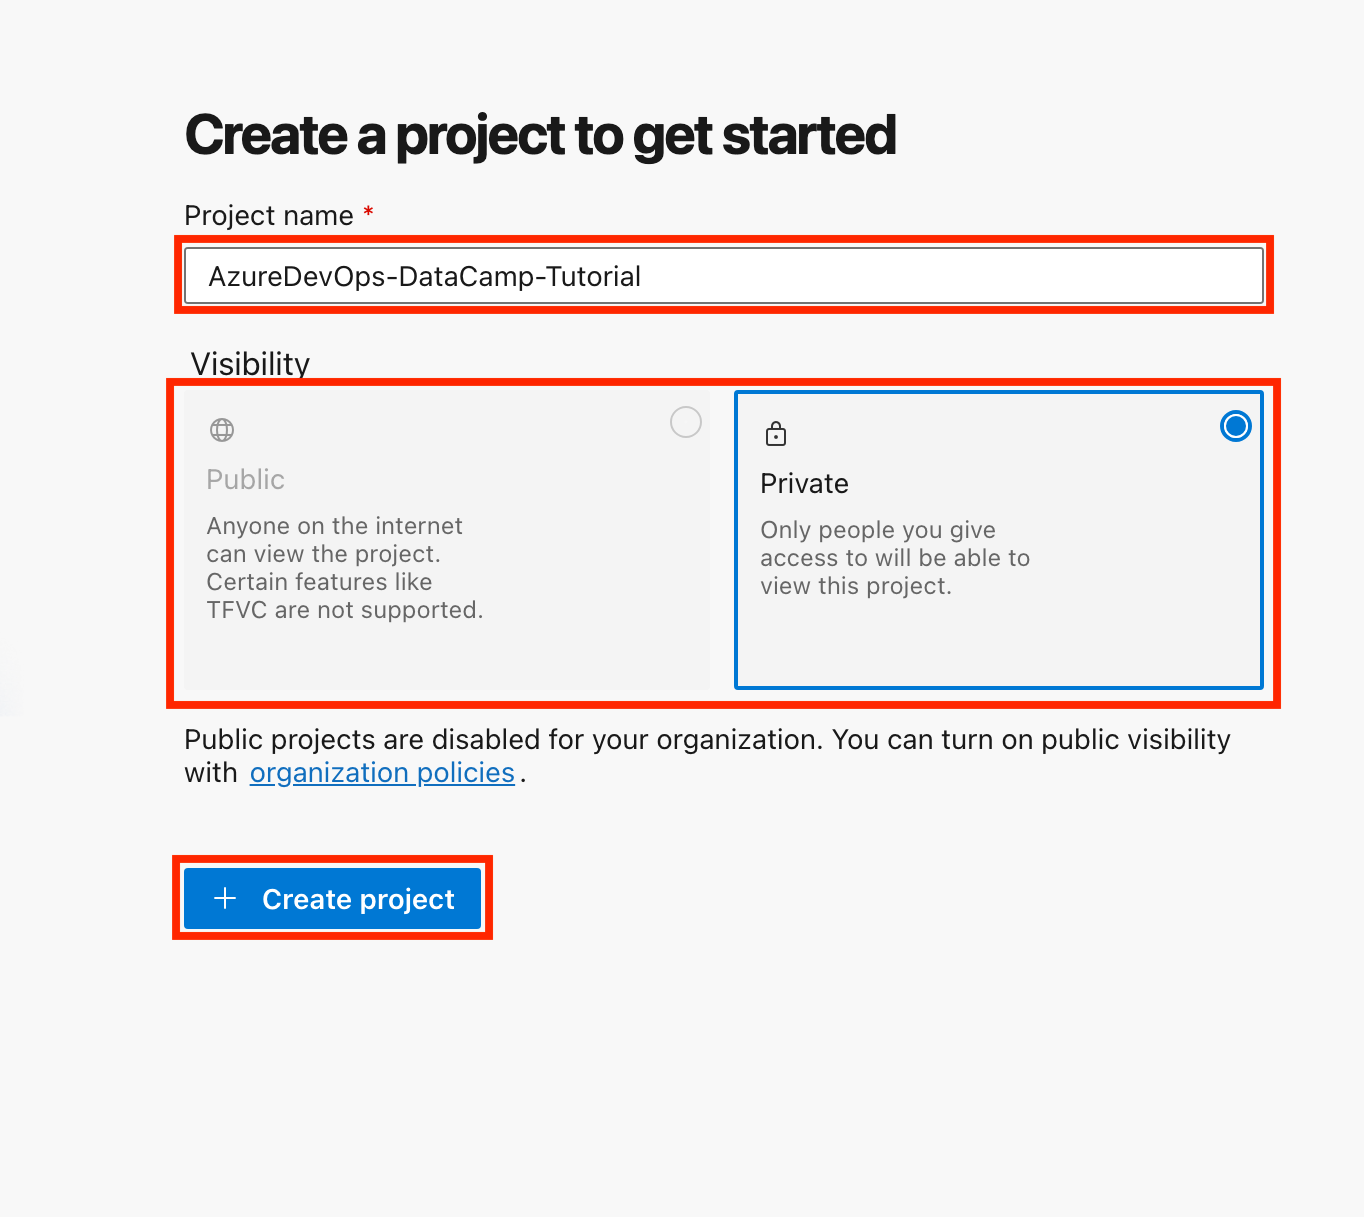
Now that your Azure DevOps account and organization are all set up, let’s create our first project and repository.
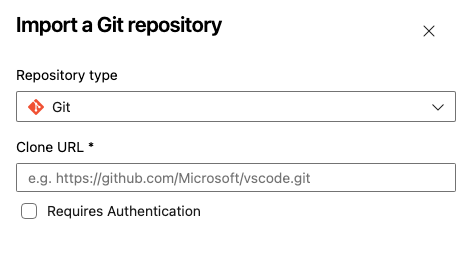
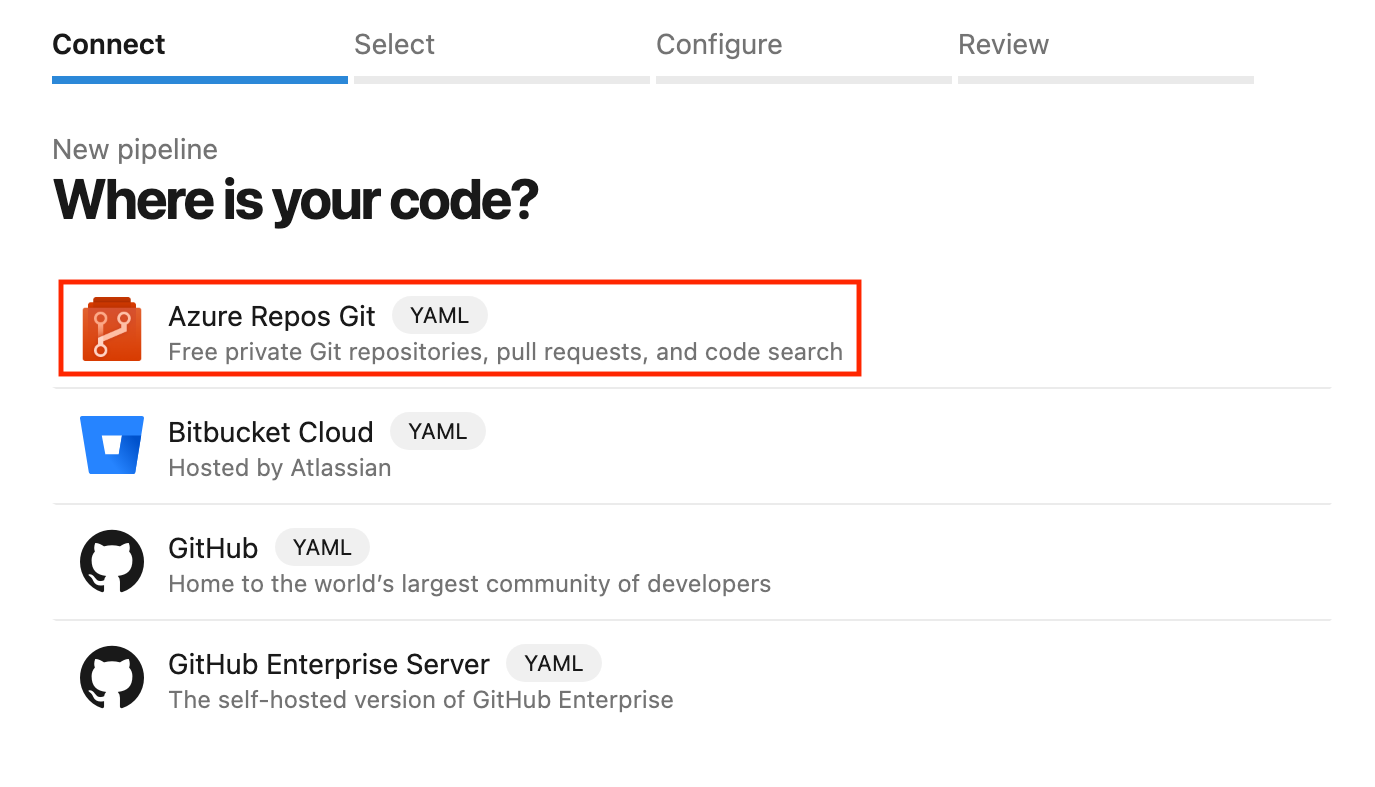
For this tutorial, we’ll use Azure Repos as our code repository. If you're just starting out or don’t have a specific reason for choosing TFVC, I advise you to choose Git.
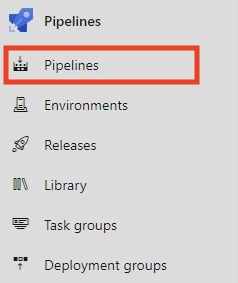
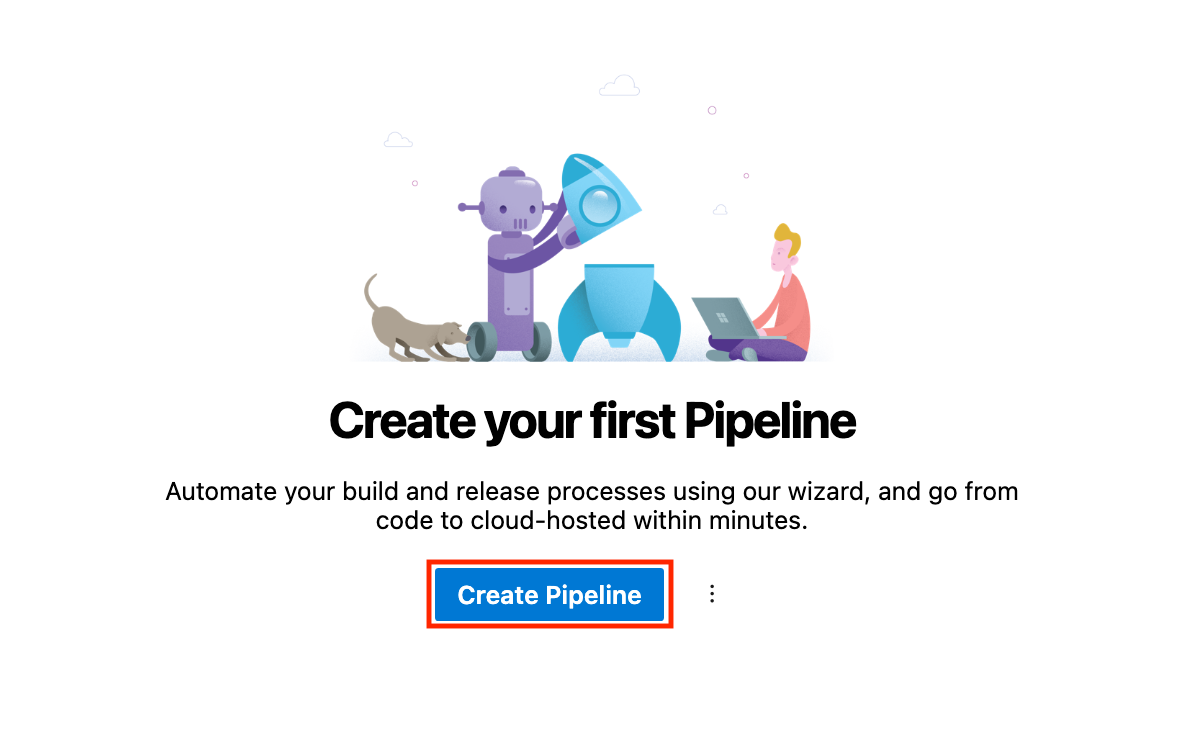
It’s time to create our first pipeline. Follow the steps below:
Azure Pipelines provides two ways to define your pipelines:
.yaml or .yml file in your source repository, enabling versioning and better collaboration.|
Aspect |
YAML Pipelines |
Classic Editor |
|
Version control |
YAML Pipelines support version control and are stored in the source code repository. |
Classic Editor doesn’t support version control. It’s a Graphical User Interface (GUI) based. |
|
Flexibility |
YAML Pipelines have high-end flexibility. |
Classic Editor has limited flexibility. |
|
Best for |
YAML Pipelines are best for long-term, complex workflows and automation. |
Classic Editor is best suited for quick setups. |
In my experience, YAML pipelines provide more flexibility and are better for teams following Infrastructure as Code (IaC) practices. But this Classic Editor is perfect for fresher with a more visual way to do things.
However, for long-term scalability, YAML pipelines are recommended over Classic Editor.
Now, let’s see how we can build with Azure Pipelines.
In this section, we will specify the steps Azure Pipelines takes to build your code, such as installing dependencies, compiling, and running tests. We are going to express these steps in a configuration file in our source code repo using YAML, a simple, human-readable way to describe steps in a recipe.
Here’s a simple example of a YAML pipeline:
# This section defines the trigger(s) for the pipeline.
# 'main' specifies that the pipeline will run whenever changes are pushed to the 'main' branch.
trigger:
- main  # automatically triggers this pipeline when changes are made to the 'main' branch.

# This defines the pool where the pipeline will run.
# 'ubuntu-latest' specifies the virtual machine image for executing tasks.
pool:
  vmImage: 'ubuntu-latest'  # This uses the latest Ubuntu image provided by Azure DevOps.

# Steps contain the individual tasks or actions that the pipeline will execute.
steps:
- script: echo Hello, world!  # A script task to run shell commands. This one prints "Hello, world!".
  displayName: 'Run my first pipeline script'  # A friendly name for this step, making it easier to identify in the pipeline logs.
Let’s break down the code step by step:
trigger: Specifies the branch that triggers the pipeline (e.g., main).pool: Defines the build agent (e.g., ubuntu-latest).steps: Lists the tasks to execute, such as installing dependencies and running a build script.To add build steps to your YAML pipeline, you must define the ‘script’ under the ‘steps’ section.
For a simple Node.js application, for instance, our azure-pipelines.yml file below contains code that Azure DevOps automatically created.
# Node.js
# Build a general Node.js project with npm.
# Add steps that analyze code, save build artifacts, deploy, and more:
# https://docs.microsoft.com/azure/devops/pipelines/languages/javascript

trigger:
- main

pool:
  vmImage: 'ubuntu-latest'

steps:
- task: NodeTool@0
  inputs:
    versionSpec: '20.x'
  displayName: 'Install Node.js'

- script: |
    npm install
    npm run build
  displayName: 'npm install and build'
Let’s take a look at the build steps in the YAML pipeline above:
NodeTool@0 task to specify the Node.js version. npm install to install project dependencies. npm run build to compile the code. Our pipeline can be triggered manually or set to run automatically when events like branch pushes occur.

main branch to trigger the pipeline automatically. Here’s an example:trigger:
- mainAfter running your pipeline, you can view logs and troubleshoot any problems.
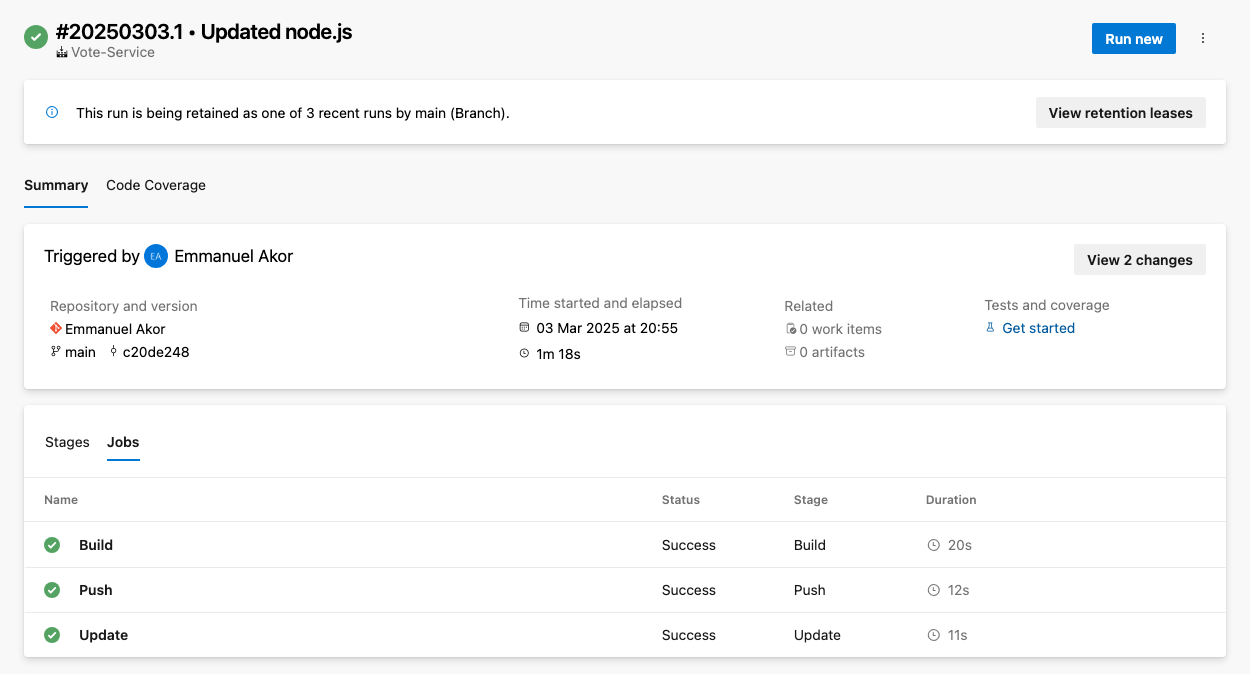
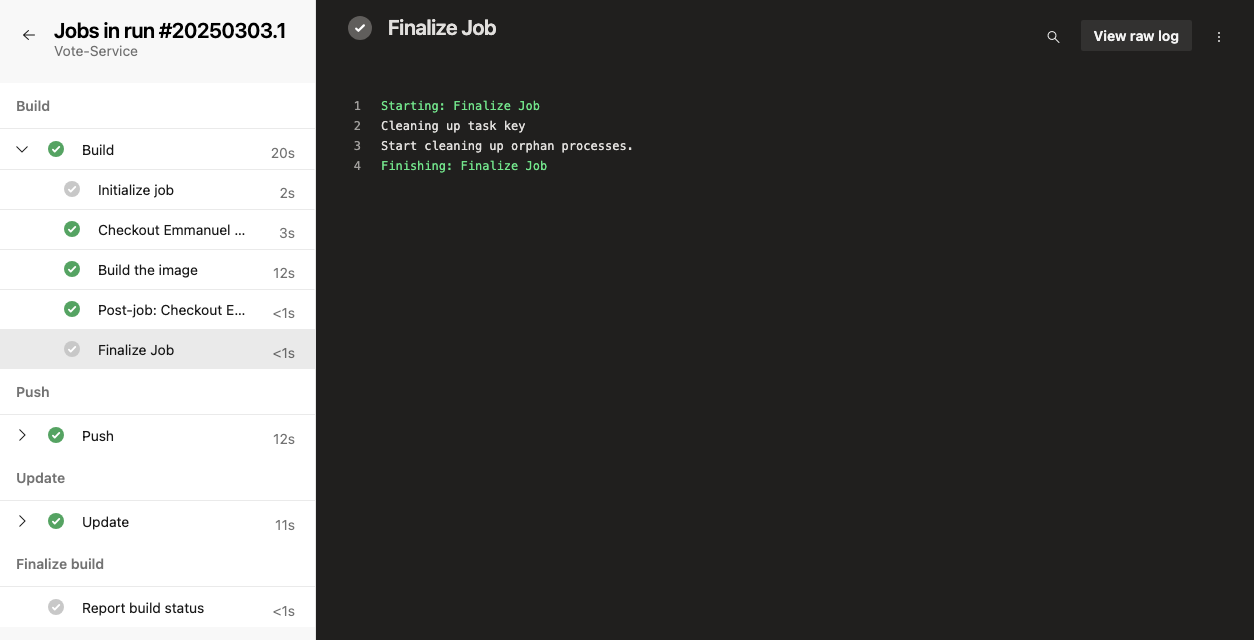
To access logs, go to your pipeline run summary and select the specific job or task. This will display the logs for that step; just like the image below, you can choose any jobs (Build, Push, or Update) to view the raw logs.
To troubleshoot common issues, you can check your pipeline for common problems like timeouts, resource constraints, or misconfigurations.
You add tests to your pipeline to ensure code quality and catch issues early in development. In Azure Pipelines, you can integrate units, integration, or other tests by adding steps in your pipeline configuration.
Include testing steps in your pipeline to guarantee code quality. You can use popular frameworks like Jest, Mocha, or NUnit. For example, here’s how to add unit tests with Jest:
- script: |
npm test
displayName: 'Run unit tests with Jest'There is built-in test reporting in Azure Pipelines. You can set up test result publishing for simpler tracking and view test results in the pipeline logs. This is how:
PublishTestResults@2 task to display results. This makes the overall tracking easier. For example:- task: PublishTestResults@2
inputs:
testResultsFiles: '**/test-results.xml'
testRunTitle: 'Unit Tests'In the deployment steps in your Azure pipeline YAML file, you can automatically deploy your application to several environments, such as testing, staging, and production. In this section, we will review a few ways to deploy with Azure Pipelines.
Azure Web Apps is a service in the Azure Portal that enables you to develop, deploy, and manage web applications at scale.
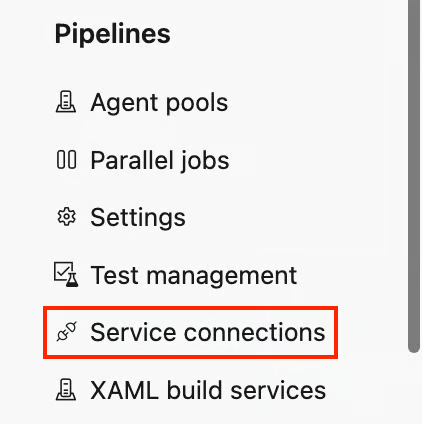
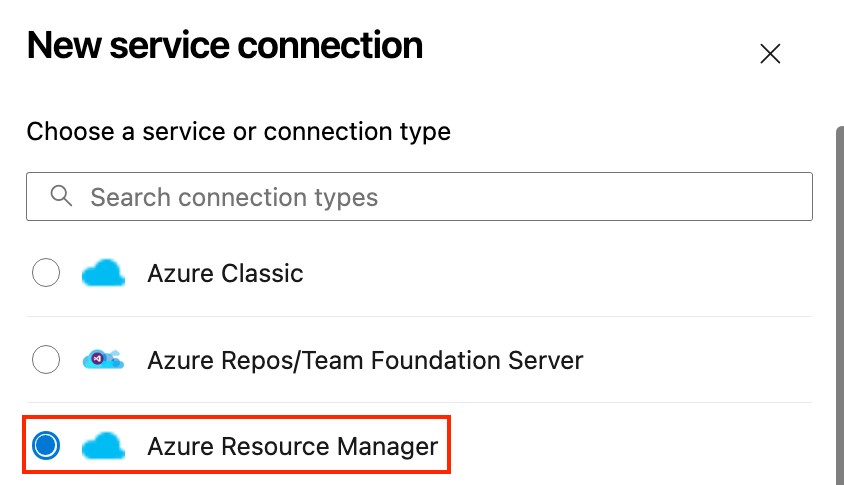
To deploy to Azure Web Apps, you must link the two services. Here’s how to:


Here is an example of a YAML deployment pipeline for a simple Node.js app to Azure App Service:
# Define the task for deploying to an Azure Web App
- task: AzureWebApp@1
inputs:
# This specifies your Azure subscription service connection
azureSubscription: 'your-azure-subscription'
# This specifies the name of your web app
appName: 'your-app-name'
# This specifies the location of the app package or files to be deployed
package: '$(Build.ArtifactStagingDirectory)'Let’s break down the code above, so you can adapt it for your use case:
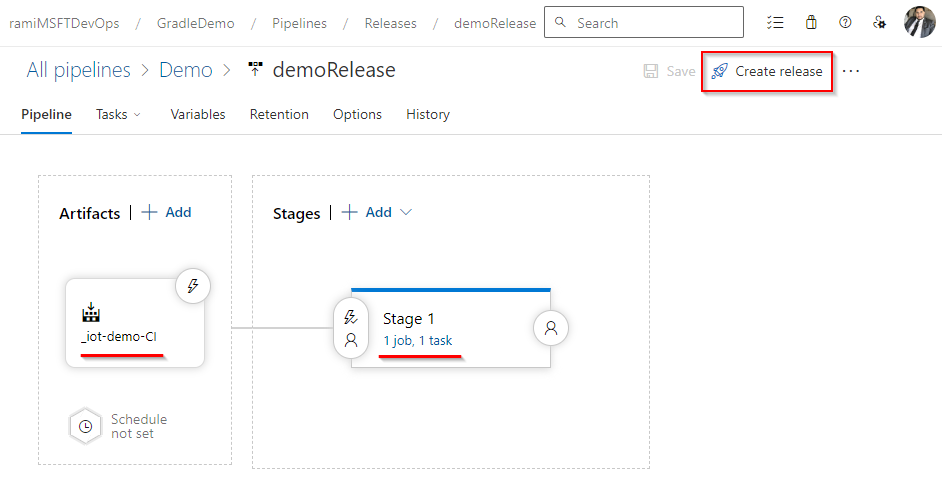
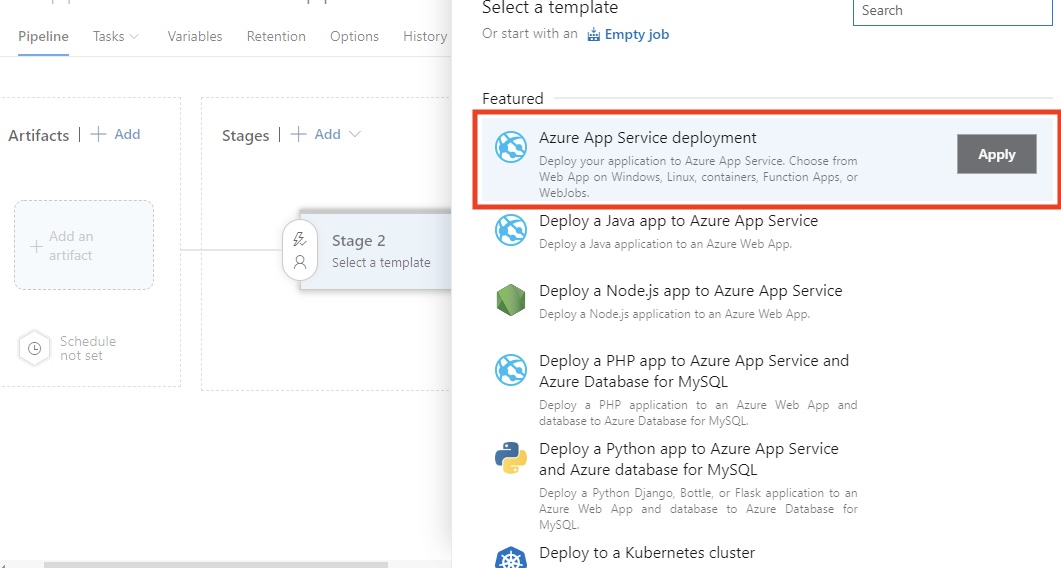
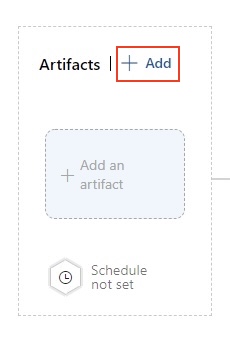
your-azure-subscription with the name of the service connection that gives access to your Azure subscription.your-app-name with the actual name of your web app in Azure. $(Build.ArtifactStagingDirectory) with the directory to put the web app package or files for deployment. $(Build.ArtifactStagingDirectory) — This variable points to the folder where your build artifacts (your app files) sit after they have been built.Once everything in our code passes all the tests and checks, the next step is to set up our continuous deployment. Follow the steps described below.
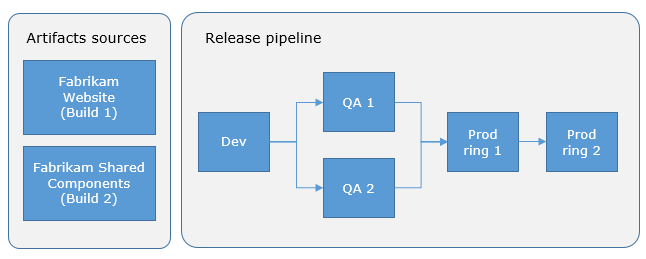
Azure release pipeline deployment model (Source: Microsoft)

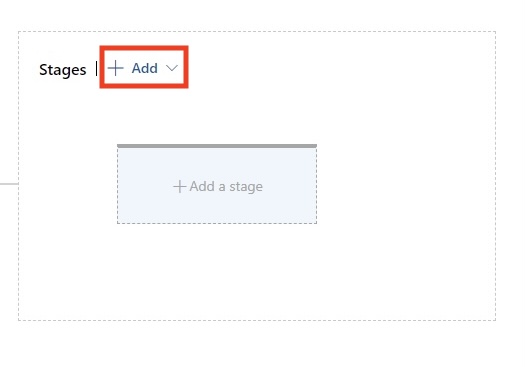
In my experience, this phase is necessary for maintaining stability in demanding development settings. Approvals and gates provide control and ensure that only high-quality code reaches production.
Kubernetes makes it easy to run reliable and scalable containerized applications. When using Azure Kubernetes Service (AKS), you get a managed environment that simplifies deployment and operations. In this section, I’ll walk through how to deploy your application to AKS using Azure Pipelines.
You can create an AKS cluster using the Azure portal or CLI. Here is a basic Bash CLI command to provision cluster:
az aks create \
--resource-group <ResourceGroupName> \
--name <AKSClusterName> \
--node-count 3 \
--enable-addons monitoring \
--generate-ssh-keysLet’s break down the command above:
--resource-group: This indicates the Azure resource group in which the AKS cluster will be created.--name: This refers to the name of your AKS cluster.--node-count: This sets the number of nodes in the cluster (e.g., 3 in this example).--enable-addons monitoring: This makes monitoring and analytics possible with Azure Monitor for Containers.--generate-ssh-keys: This automatically generates SSH keys for secure node access if not provided.Don’t forget to replace <ResourceGroupName> and <AKSClusterName> with your actual resource group and cluster names.
Kubectl needs to be configured after your AKS cluster is set up. This ensures your pipeline agent or local computer can use kubectl to communicate with the cluster.
You can speed up your Azure tasks using command line tools—this Azure CLI cheat sheet is a handy reference.
Let’s take a basic deployment YAML file for deploying a Docker image to Kubernetes as an example:
# This defines the API version and the kind of Kubernetes resource we are creating.
# 'apps/v1' is the API version, and 'Deployment' is the resource type.
apiVersion: apps/v1
kind: Deployment
# Metadata contains information to identify the resource uniquely.
# 'name' specifies the name of the Deployment.
metadata:
name: my-app # Name of the Deployment, used for identification.
# "spec" specifies the intended deployment state.
spec:
# Number of replicas/pods we want for this Deployment.
replicas: 3 # Ensures high availability by running three app replicas.
# Selector is used to define the labels that this Deployment will manage.
selector:
matchLabels:
app: my-app # This ensures that only Pods with the label 'app: my-app' are managed by this Deployment.
# Template specifies the blueprint for the pods created by the Deployment.
template:
metadata:
labels:
app: my-app # Labels for the Pods, matching the selector above.
# A specification for the containers of the Pods.
spec:
containers:
- name: my-app # Name of the container. This is useful for linking to the container in logs, etc.
image: mycontainerregistry.azurecr.io/my-app:latest # Pull the container image you will call from your container registry.
ports:
- containerPort: 80 # The container listens on port 80.In your YAML pipeline, include a task to deploy to AKS.
# This defines a task for deploying Kubernetes manifests within an Azure DevOps pipeline.
- task: KubernetesManifest@0 # Task type for working with Kubernetes manifest files.
inputs:
# This configures what to do with the Kubernetes manifest files.
action: 'deploy' # 'deploy' action ensures the Kubernetes manifests are applied to the cluster.
# This defines the namespace where the Kubernetes resources will be deployed.
namespace: 'default' # 'default' is the namespace for deploying resources. Change if needed.
# All this does is point to the manifest files that define the desired state of your Kubernetes resources.
manifests: '$(Build.ArtifactStagingDirectory)/manifests/*.yaml'
# The 'manifests' variable points to the location of all the YAML files (e.g., Deployment, Service, etc.) that will be applied during the deployment.
# To access private container registry images, use the image pull secret.
imagePullSecrets: 'my-registry-secret'
# This instructs Kubernetes on which secret to use when pulling images from a private container registry.
# Ensure that 'my-registry-secret' exists in the namespace before the deployCommit and push the YAML file to trigger the deployment.
AKS simplifies container orchestration, making managing scaling, updates, and rollbacks easier. In my experience, it’s a must-have for modern cloud-native applications.
Earlier in my career, building pipelines wasn’t the biggest challenge—having a fast and reliable pipeline was. A well-optimized pipeline doesn’t just make builds faster; it also reduces team frustration, lowers deployment risks, and accelerates delivery.
I’ll share some tips and strategies you can use to keep your Azure DevOps Pipelines fast, organized, and dependable.
The installation of dependencies is yet another common pipeline bottleneck. Whether you are working with npm, .NET, or other package managers, repeatedly downloading the same dependencies can waste significant time. Caching dependencies and artifacts between runs drastically cuts execution time.
Here’s how to cache dependencies in Azure Pipelines.
First, you have to identify the package managers, such as:
node_modules)pip packages)Azure Pipelines supports caching mechanisms, such as the Cache@2 task, which allows you to cache dependencies between pipeline runs.
Let’s take a simple caching for Node.js as an example:
# This task is used to cache files to speed up your pipeline.
- task: Cache@2 # This is the task name for caching files in Azure Pipelines.
inputs:
# Key is used to identify the cache. It combines npm (package manager), operating system (OS), and package-lock.json files.
key: 'npm | "$(Agent.OS)" | package-lock.json'
# RestoreKeys is an optional value used when the specific cache key is not found. It helps to find a fallback cache.
restoreKeys: |
npm | "$(Agent.OS)"
# Path defines the location of files or folders to be cached.
# Here, we are caching the 'node_modules' directory to avoid reinstalling dependencies.
path: '$(Build.SourcesDirectory)/node_modules'
# CacheHitVar is a variable that stores whether the cache was successfully used (restored).
# This can be checked later in the pipeline to decide if tasks need to run.
cacheHitVar: 'NPM_CACHE_RESTORED'You can then conditionally skip install if cached. This is a smart check before completing the installation of npm. It's an efficient condition-based logic.
Let’s take a simple example below:
# This step runs the command to install Node.js dependencies using npm.
- script: npm install # Installs packages listed in the package.json file.
# The condition checks whether the cache was restored successfully.
# This step will run if the cache is not restored ('NPM_CACHE_RESTORED' is not true).
condition: ne(variables.NPM_CACHE_RESTORED, 'true') # Run only if the cache is not restored.This example of simple caching for a Node.js application saves the npm cache directory using package-lock.json as a key. When your dependencies don’t change, it restores them, saving minutes on every build.
I have witnessed caching drastically reduce build time, especially in large projects, but only if cache keys are thoughtfully chosen. In one of my past projects, this cut a Node.js application's build time by 55%.
A successful pipeline isn’t just about green ticks, visibility, and fast feedback. When something breaks, you want your team to know instantly. Here’s how to stay ahead of issues.
Azure DevOps provides built-in widgets to display pipeline status, recent runs, failure rates, and average durations.
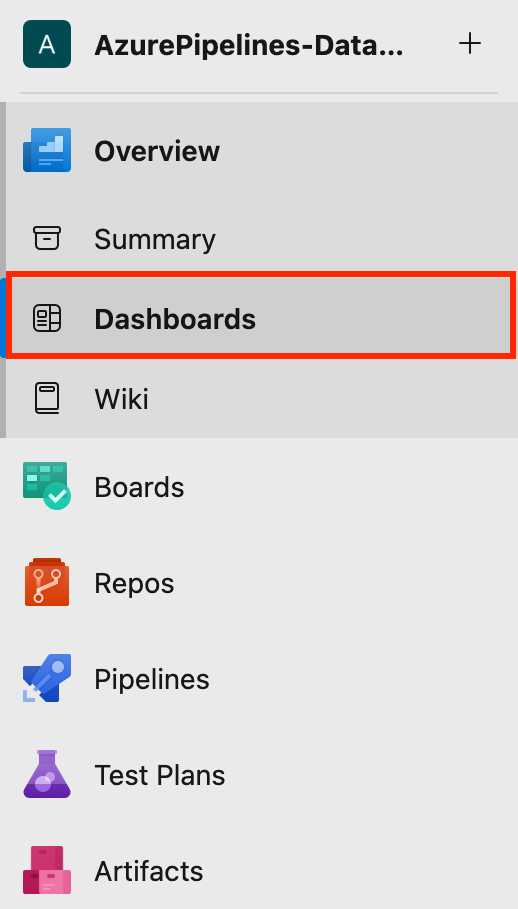
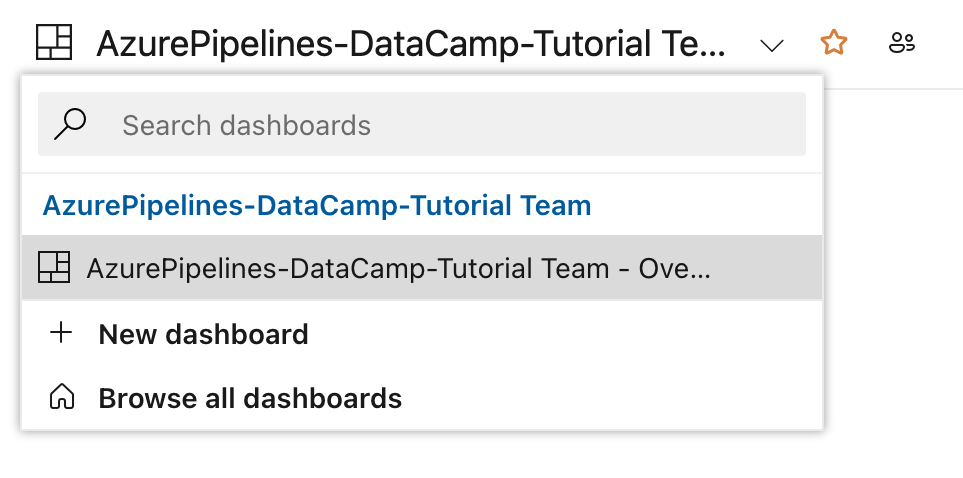
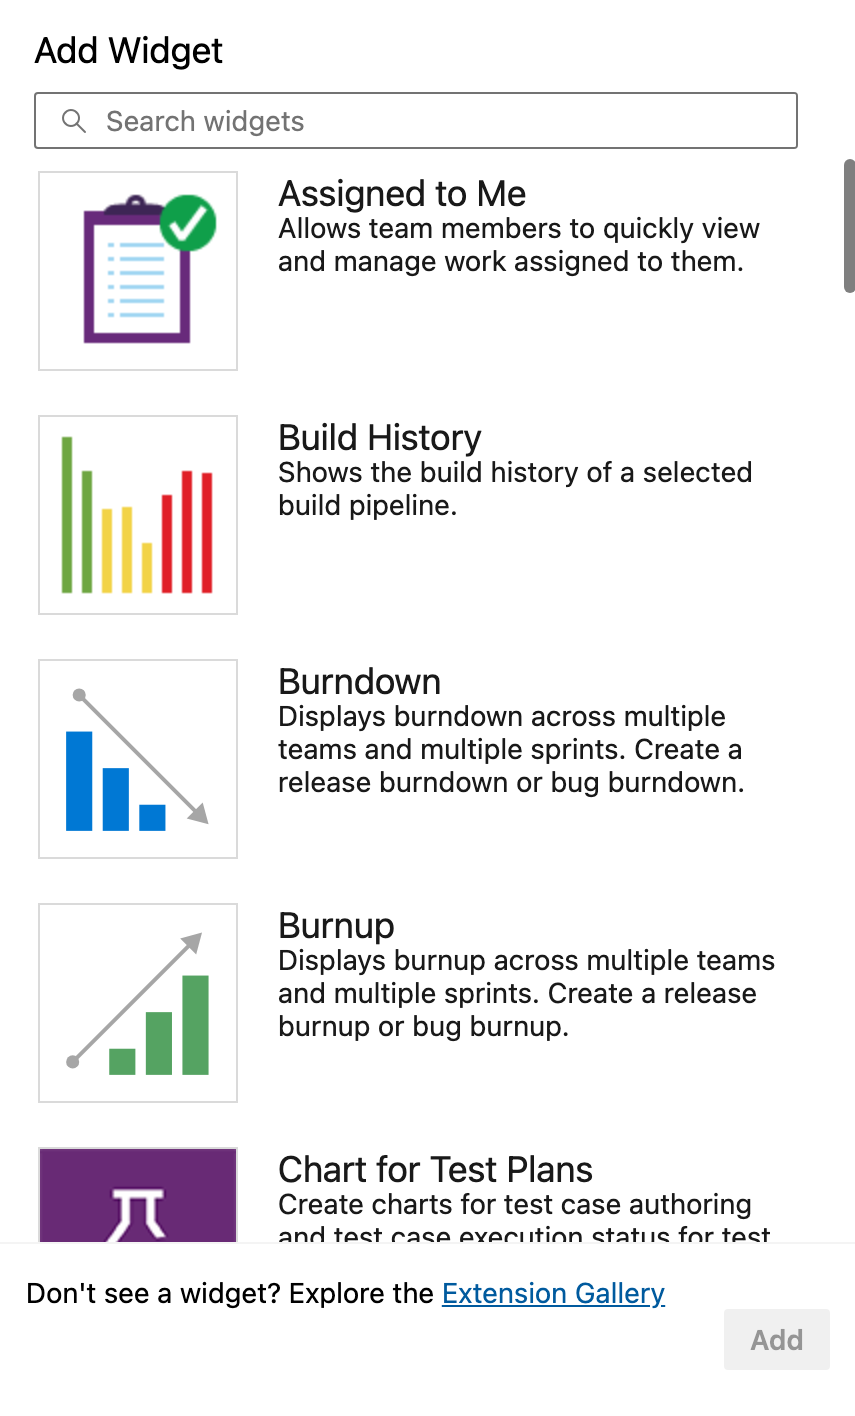
These are essential for tracking pass/fail trends, seeing which environments are problematic, and more.

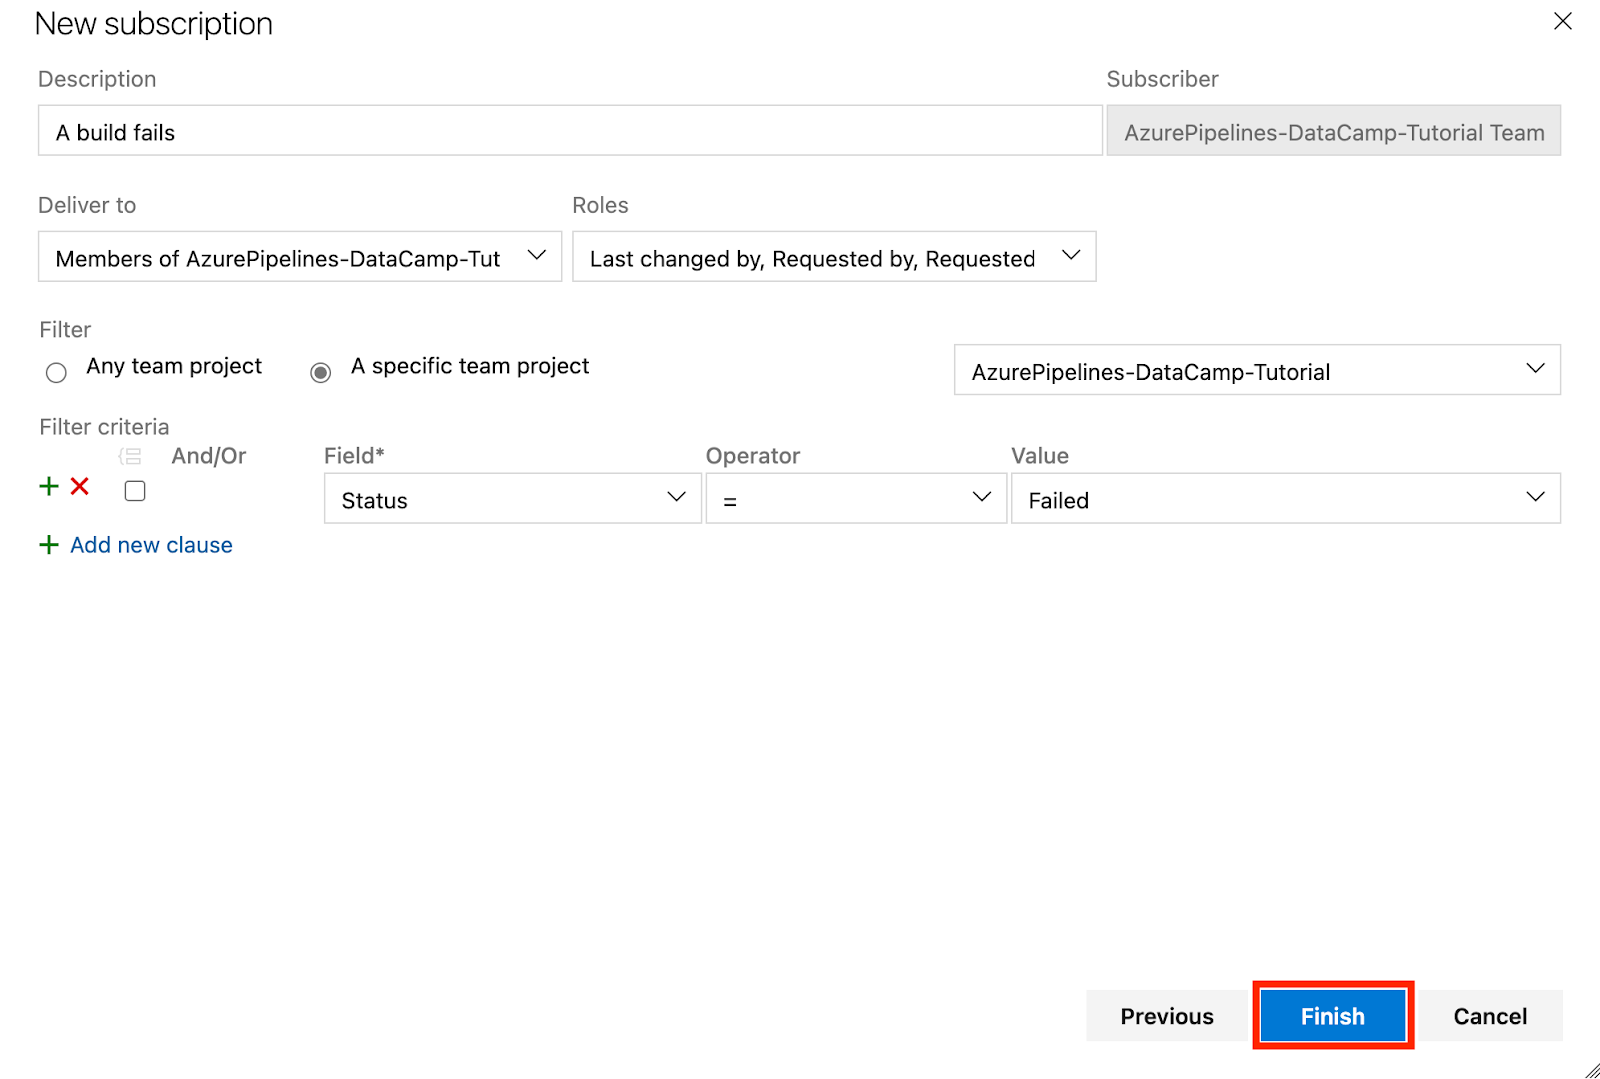
Let’s take a scenario: In the Category section, select Build; in the Template section, select “A build fails”, and click Next.
You have an interface like this below:

I once missed a critical deployment failure because alerts weren’t set up. Since then, I have always set up and configured team alerts for every production deployment. That way, I never miss a broken build or delay in my release cycle.
We know that even if your pipeline works, it could be slow, and slow pipelines kill productivity. So identifying bottlenecks early saves trouble later.
Pipeline metrics shed light on the performance of builds and deployments. This is how to get to them.
First, you must enable Analytics Views under the project settings and connect to Power BI or explore via built-in charts.
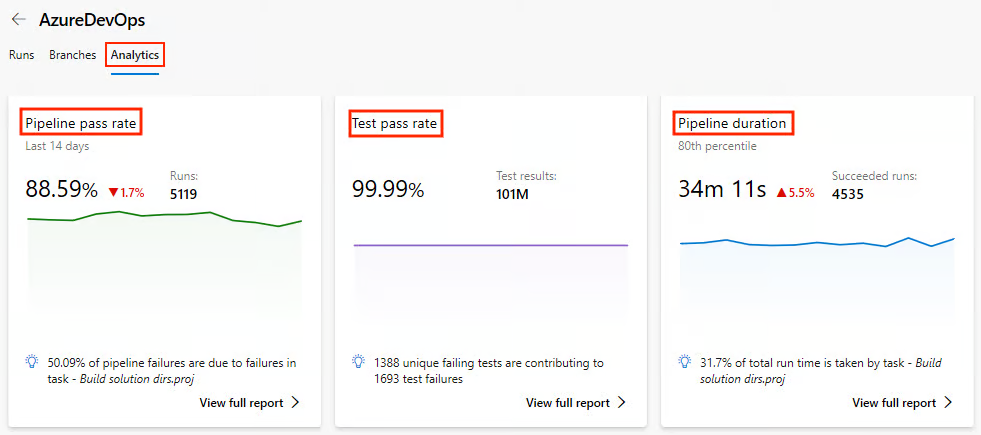
Let’s further explore what key metrics we can monitor in analytics and why they matter:
|
Metric |
Why It Matters |
|
Build Duration Trends |
This helps spot slowdowns over time easily. |
|
Failure Rate by Branch |
This helps identify unstable features. |
|
Time in Queue |
This helps detect agent shortages. |
A few months ago, I worked on a client’s pipeline, and what stood out most was the Time in Queue. I once discovered that my team and I had overloaded a self-hosted agent pool, and 40% of our pipeline time was spent waiting for an available runner. No one saw it coming until the analytics made it obvious.
We could fix that by adding two more self-hosted agents and distributing the load by job type. The results were immediate; the average build time for the pipeline dropped by roughly 35%.
So, beyond metrics, the timeline logs are gold, especially for long-running tasks. Over the years, I have habitually added custom log markers inside critical steps of scripts to pinpoint exact delays.
Let’s take a simple example here:
# This step prints a message to the console in the pipeline logs.
# It helps to mark the start of the dependency installation process.
echo "=== START: Dependency Install ===" # Display a message indicating the beginning of dependency installation.Now that we’ve covered the core services of Azure Pipelines and many more, let’s look at how to get the most out of them by following these best practices.
Let’s shift from performance to structure, because a fast pipeline that’s hard to maintain will still hurt any team.
When multiple teams or environments share pipelines, things often get messy. You’ll need structure. One giant pipeline for development, staging, and production environments leads to chaos.
To organize your pipeline, you must separate it into environments. Let’s look at a simple structure below.
|
Environment |
Pipeline Name |
Trigger |
|
Development |
|
Feature branches (Runs on every commit) |
|
Staging |
|
Pull requests → Staging (Manual trigger) |
|
Production |
|
Manual or release pipelines (Approval required) |
Key things to understand from this simple structure:
From experience, this separation makes debugging easier and allows junior developers to deploy to the Dev environment without risking the Production environment.
DevOps is about cutting manual workflow and improving automation across the software development process.
YAML code is error-prone when copied and pasted between projects. Azure DevOps has pipeline templates for DRY (Don’t Repeat Yourself) setup via YAML pipelines. You can reuse the YAML pipeline templates across multiple projects, design your pipelines consistently, and even reduce the pipeline processing time.
Let’s take a simple reusable build template as an example.
First, define your build template, build-template.yml:
# Here we configure the platform and the build configuration.
parameters:
buildPlatform: 'Any CPU' # This specifies the build platform (e.g., Any CPU, x86, x64).
buildConfiguration: 'Release' # This specifies the build configuration (Release) to avoid warning.
# A pipeline is composed of steps (a series of tasks that will be executed)
steps:
- task: DotNetCoreCLI@2 # Task for running .NET Core commands in the pipeline.
inputs:
command: 'build' # This runs the 'build' command to compile the project(s).
projects: '**/*.csproj' # This specifies to build all .csproj files in the repository.
arguments: '--configuration ${{ parameters.buildConfiguration }}'
# This passes the build configuration parameter (e.g., Release or Debug) to the command.Use your build template in your main pipeline:
# A pipeline job is a group of tasks. Here, the job is named 'Build'.
jobs:
- job: Build # The job name where the build process occurs.
# Steps define the tasks or actions the pipeline will perform.
steps:
- template: templates/build-template.yml # Reference an external YAML template for reusable steps.When working on projects, especially in collaborative environments, it's common to use sensitive information such as database connection strings, API keys, passwords, or tokens. If these secrets are hardcoded in your codebase or exposed in logs, they can be easily compromised.
Let’s look at ways to securely manage our secrets and variables using Azure Pipelines secrets and variable groups.
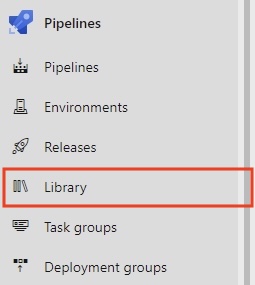
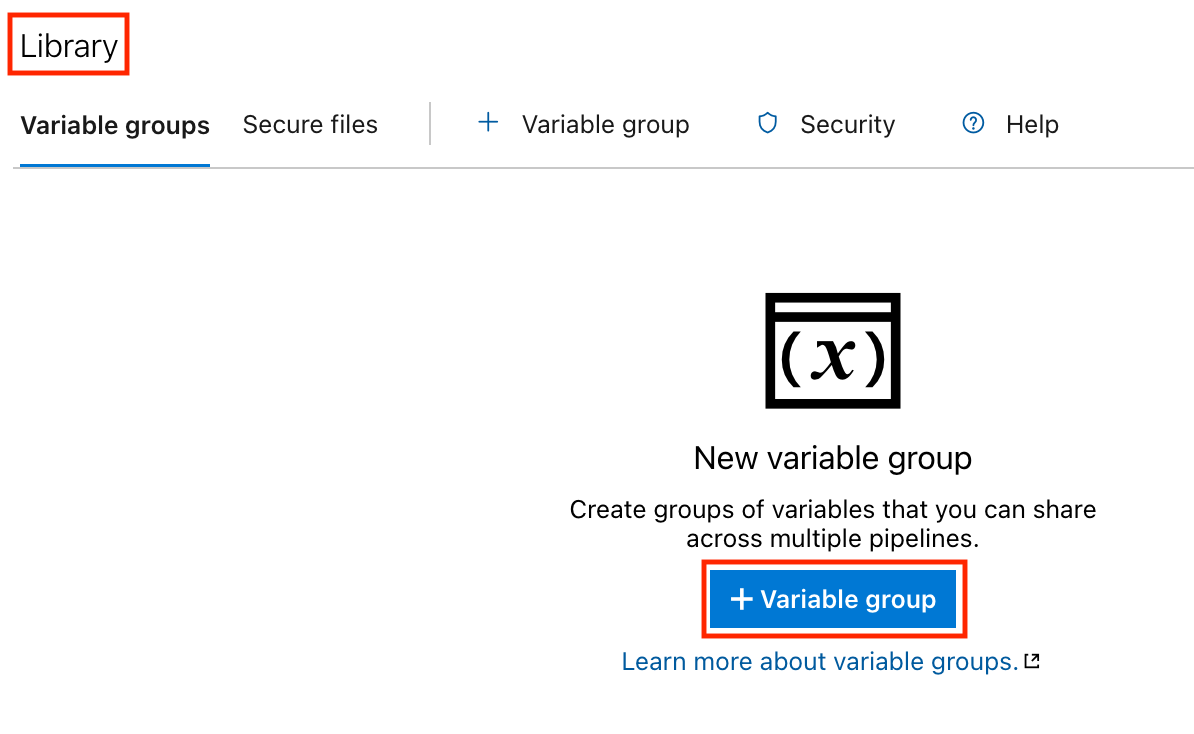
MyAppSecrets).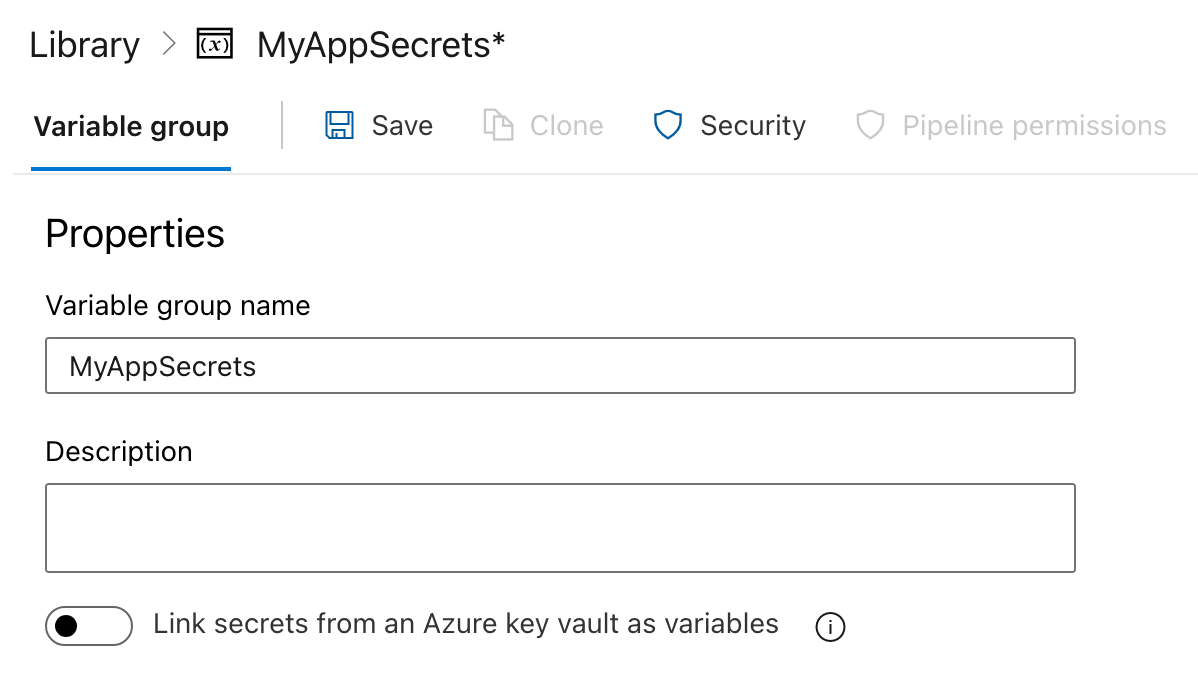
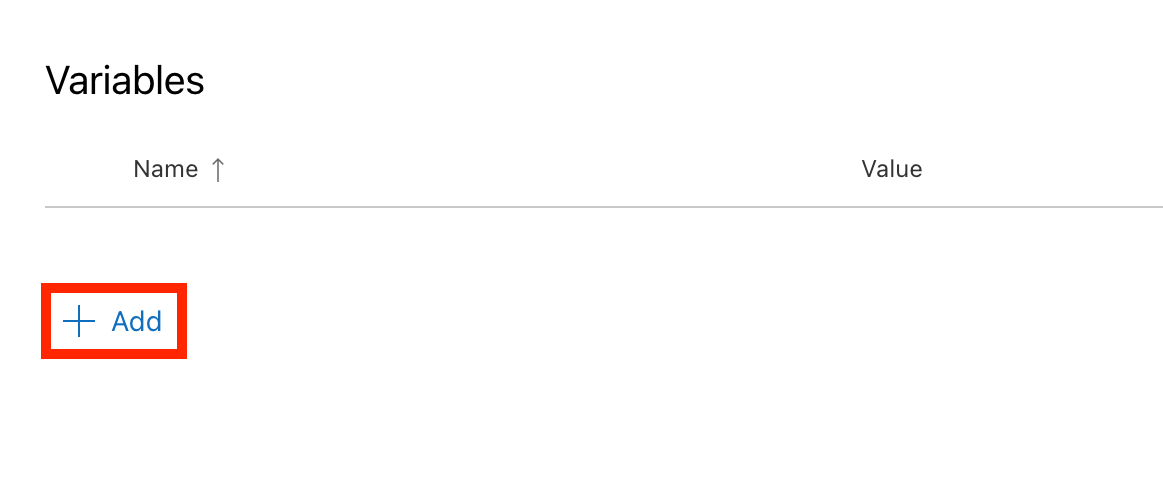
DB_CONNECTION_STRING).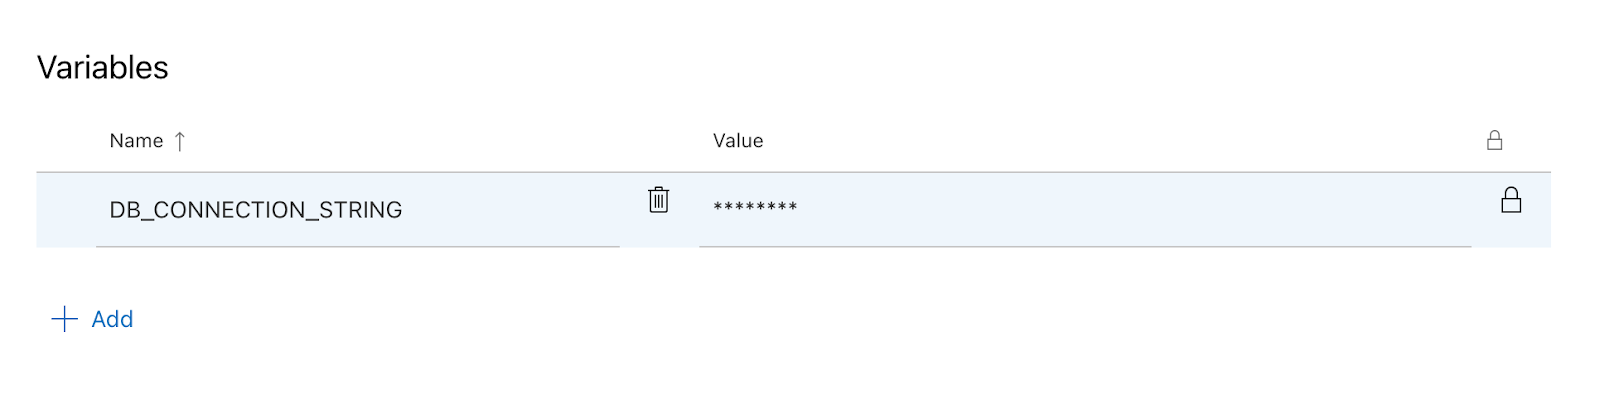
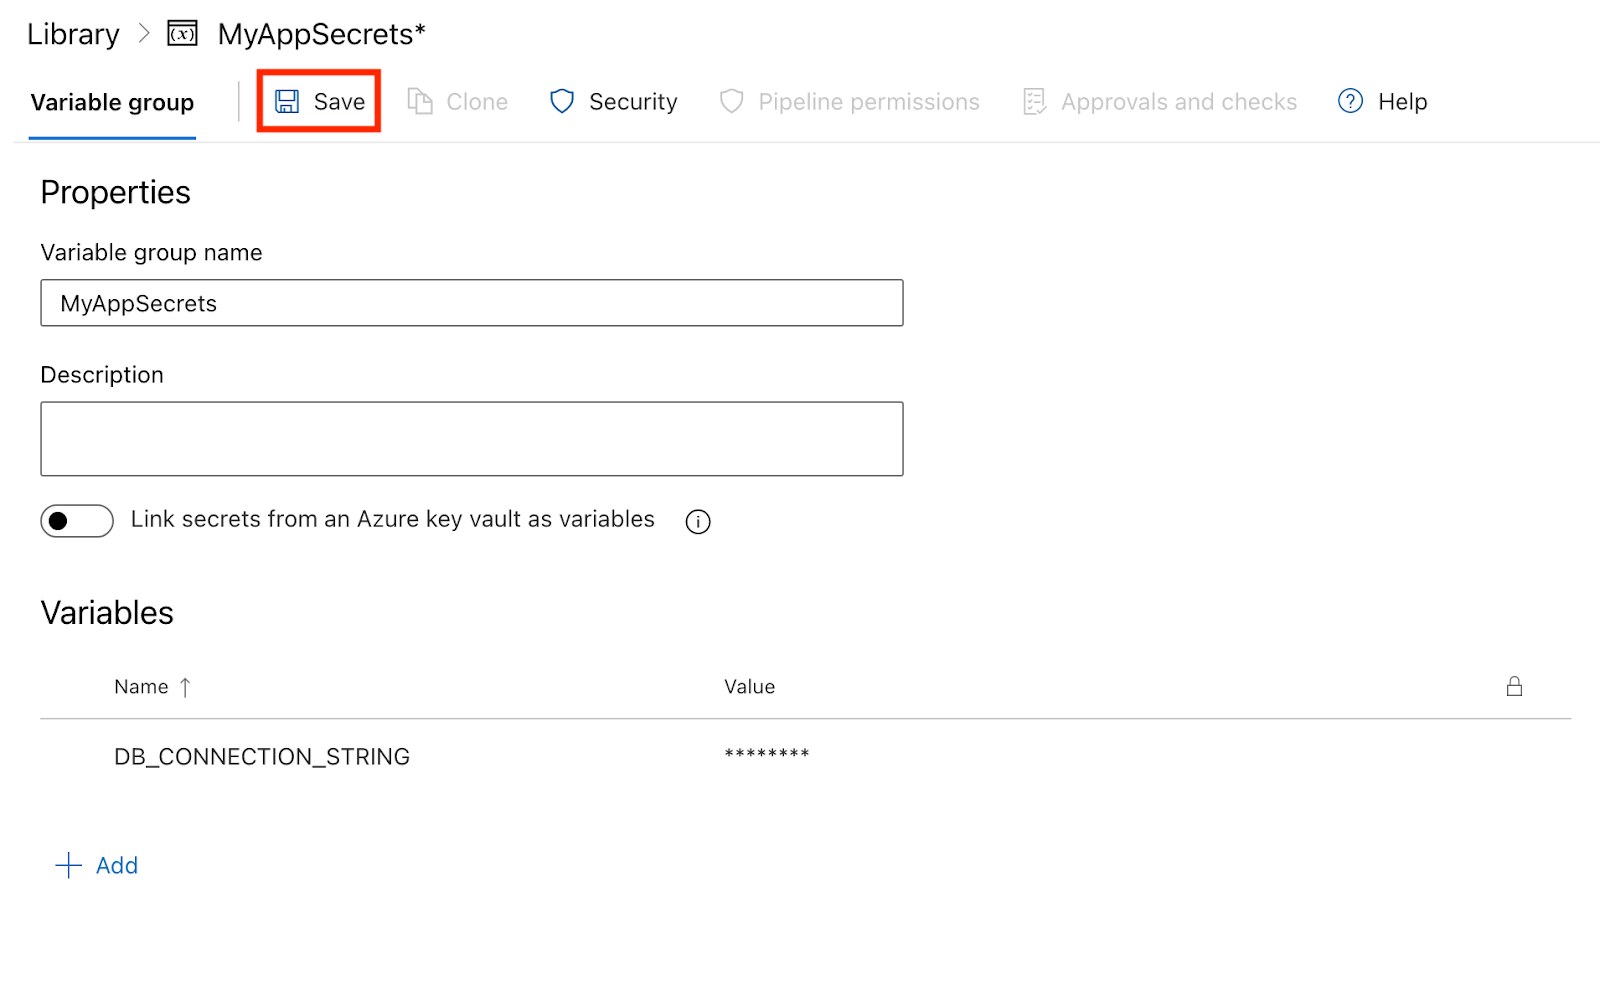
Now that you have created a variable group with secrets, you can use these variables in your pipeline YAML file.
variables:
- group: MyAppSecrets$(VariableName). Here’s an example of how to use the DB_CONNECTION_STRING in a script step:# This defines the trigger for the pipeline.
# The pipeline runs automatically whenever changes are pushed to the 'main' branch.
trigger:
- main # Trigger the pipeline on changes to the 'main' branch.
# The pool specifies the environment where the pipeline will run.
# 'ubuntu-latest' means the pipeline will use the latest Ubuntu operating system image.
pool:
vmImage: 'ubuntu-latest' # Use the latest Ubuntu image provided by Azure Pipelines.
# Variables section defines reusable values for the pipeline.
# 'group: MyAppSecrets' links to a variable group that stores sensitive information like secrets.
variables:
- group: MyAppSecrets # Load secrets, such as database credentials, from a variable group.
# Steps define the tasks that the pipeline will execute one by one.
steps:
- script: |
echo "Connecting to the database..." # Print a message indicating the start of database connection.
echo "Connection String: $(DB_CONNECTION_STRING)" # Display the database connection string from the variable group.
displayName: 'Connect to Database' # A simple name for this step that appears in the pipeline logs.In this tutorial, we walked through the full journey of using Azure Pipelines—from setting up your first pipeline to building, testing, deploying, monitoring, and optimizing it.
The deployment phase takes practice. Start simple, keep improving, and with time, you’ll gain confidence and fluency in managing CI/CD workflows. Azure Pipelines gives you the tools, you bring the iteration and learning.
With consistent effort, you can streamline your development process and become confident in shipping high-quality software at scale.
To dive deeper into Azure DevOps and Microsoft Azure, check out the following resources:
Learn more about Azure with these courses!
Course
Course
Course
Tutorial
Emmanuel Akor
Tutorial
Moez Ali
Tutorial
Karen Zhang
Tutorial
Florin Angelescu
Tutorial
Emmanuel Akor
Tutorial
Moez Ali