
Course
Deploying AI into Production with FastAPI
4 hr
4.5K
AI coding tools face a context problem . They forget what you’re actually trying to build when projects get big and conversations get long. Amazon Web Services says they can fix this with Kiro, their new agentic IDE that brings order to messy vibe coding and helps you ship faster. After waiting a month on the waitlist, I finally got to test it.
Currently, Kiro is still in preview mode. There are no benchmark results, not many user stories, and very few people have actually used it day-to-day. The official docs only tell part of the story, leaving you to guess if it really works as promised. We’re going to fix that by testing every feature Kiro claims to have against real coding problems.
We keep our readers updated on the latest in AI by sending out The Median, our free Friday newsletter that breaks down the week’s key stories. Subscribe and stay sharp in just a few minutes a week:
Kiro is AWS’s new AI-powered coding environment that promises to fix the messy parts of AI-assisted development. Unlike other AI IDEs that just generate code from prompts, Kiro focuses on something called “spec-driven development,” turning your ideas into clear plans before writing any code. It’s designed to bridge the gap between quick prototyping and building real software.
Here are the key features of Kiro:
The core idea is moving beyond “vibe coding,” where you keep prompting until something works. Instead, Kiro creates structured plans, breaks down complex features into manageable tasks, and keeps AI agents focused on your actual goals. This approach helps maintain context across long conversations and big projects — the exact problem most AI coding tools struggle with.
Kiro is currently free during its preview phase and includes access to Claude Sonnet models for free. The tool works on Mac, Windows, and Linux, supporting most popular programming languages.
The hardest part of using Kiro isn’t the setup itself — it’s getting off that waitlist and receiving your access code. Once you have it, the installation process is straightforward: download the app, verify with your code, and log in. You’ll quickly notice that Kiro looks and feels like another VS Code clone with some visual tweaks, but that familiarity is actually helpful.
During setup, Kiro lets you import all your existing VS Code settings and extensions, which sounds great in theory. You can even add Kiro to your terminal path so you can open projects with a simple kiro command. However, if you've moved to other VS Code-based editors like Cursor, you might hit some friction—Kiro doesn't support importing from these newer tools.
This created some headaches for me since I hadn’t touched VS Code in months. When I imported my old VS Code configuration, it brought along a bunch of outdated extensions and keybindings I no longer wanted.
Even worse, some of my important keybindings stopped working because Kiro overrides certain shortcuts for its own AI features. After sorting through all that, you essentially end up with another VS Code-based editor — just one with a completely different AI and chat experience at its core.
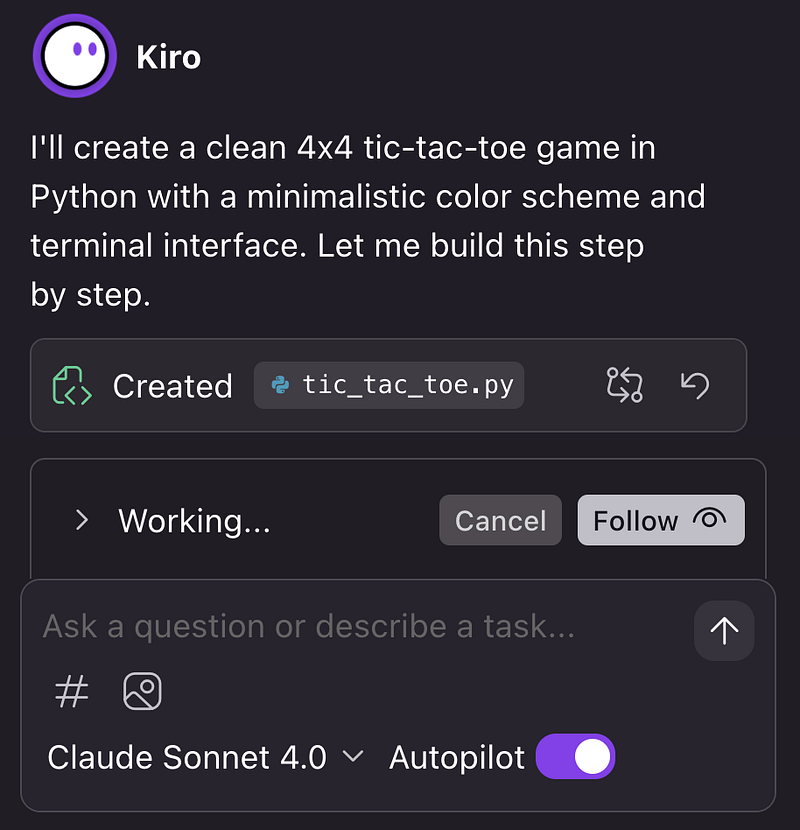
Let’s put Kiro to the test by building something. I created an empty directory and opened it with the kiro command to start fresh. For this test, I'm using the same tic-tac-toe example I've used to review other agentic IDEs like Cline, Cursor, and Trae AI. So far, Cursor has been the winner—it built the best tic-tac-toe game in one shot while others needed tweaks to get it right.
First, I opened the chat panel with Ctrl/Cmd + L and switched to a “vibe session” with autopilot mode turned on. A vibe session is Kiro’s take on traditional AI coding, where you just keep prompting until you get what you want — no structure, just pure iteration.
With autopilot enabled, I didn’t have to approve every single change Kiro wanted to make. I also selected Claude Sonnet 4 as the model, though it’s worth noting that the thinking mode isn’t available in vibe sessions.
Here’s the prompt I used to build the game:
I want to build a 4x4 tic-tac-toe game in Python with a clean terminal interface. The game should support two players taking turns, detect wins in rows, columns, and diagonals, and handle draws. It should have colored elements, not just black and white, but the color system must be minimalistic.When I hit enter, Claude Sonnet 4 immediately got to work. Unlike other IDEs that show you every code change in real-time, Kiro gives you a “watch the agent work” button —you can choose whether to see the live updates or just wait for the results. This is actually refreshing since watching agents code gets old fast, especially on longer tasks.
The results were impressive. Kiro finished the project in just over 200 lines of code, while other IDEs I tested needed at least 250 lines. Even better, the game perfectly captured my requirements and ran flawlessly — possibly even better than Cursor’s version.
The terminal interface looked clean, and Kiro made smart design choices like putting row and column numbers at the grid edges rather than creating separate reference grids like Cursor did.
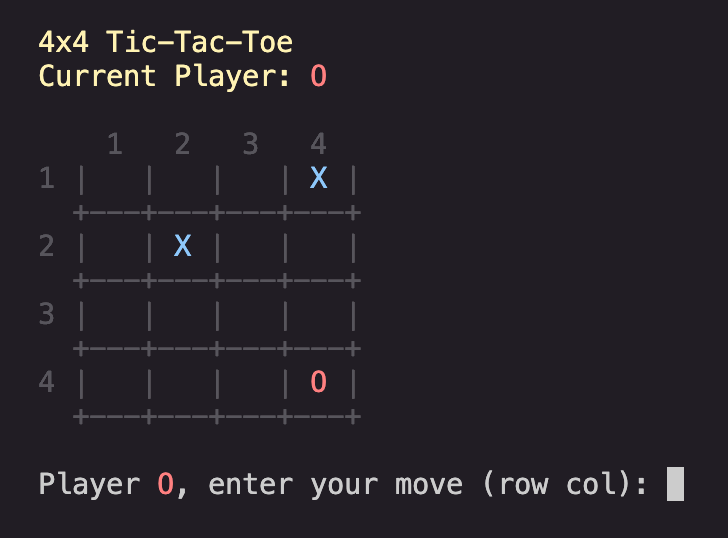
What really stood out was the “spatial” reasoning. Other agents I tried (except Cursor) consistently failed at placing X’s and O’s in the dead center of grid cells — a notoriously hard problem that usually requires multiple screenshots and corrections. Kiro nailed this on the first try, even without using Claude’s thinking mode. The square grid design was spot-on, and the game pieces appeared exactly where they should.
Now, let’s build a more challenging project using spec sessions.
The tic-tac-toe success with vibe sessions raised an important question: what happens when projects get more challenging? This is where Kiro’s other approach — spec sessions — comes into play.
While other AI coding tools call it SOLO mode, plan mode, or architect mode, spec-driven development follows the same core idea: create a detailed plan before writing any code.
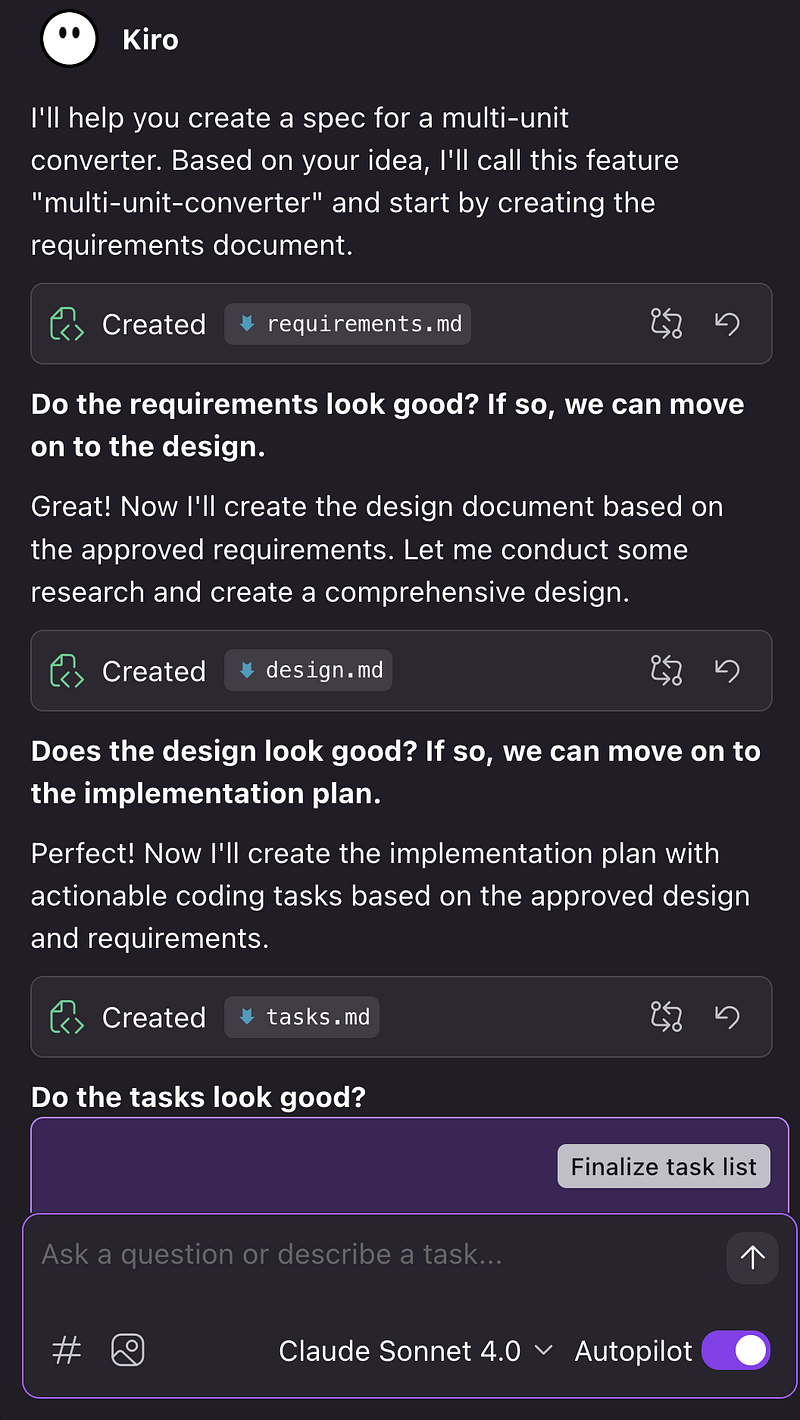
I tested this with two projects of different complexity levels. Spec sessions work through a clear process that creates three planning documents before any coding begins:
For the challenging test, I chose something that would push the planning system:
Build a web application that displays the Mandelbrot set in one canvas with zoom functionality. Show the corresponding Julia set in a split-screen canvas based on the cursor position over the Mandelbrot set. Include smooth zooming, color gradients, and real-time Julia set updates as the mouse moves.The spec generation worked well. Kiro methodically worked through each phase, noting down mathematical precision, performance requirements, and user interaction details.
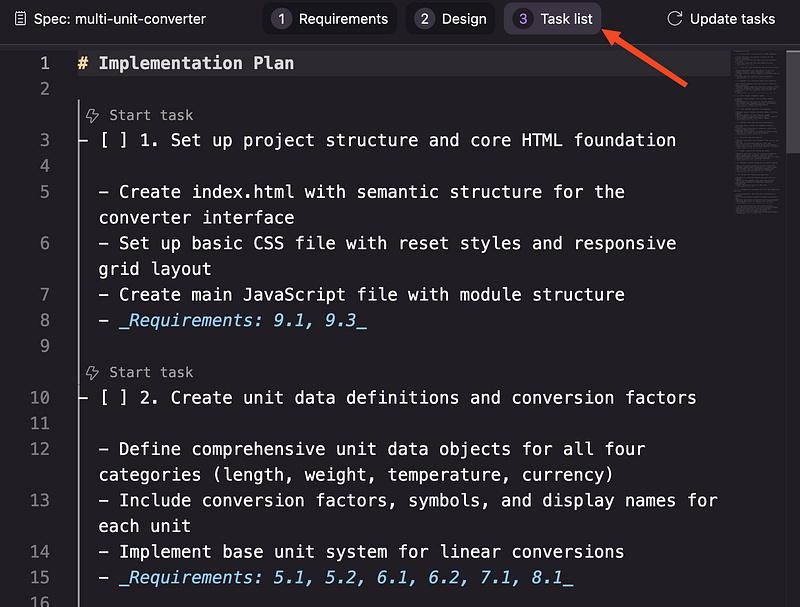
The requirements document captured detailed behaviors using proper EARS notation. The design phase laid out coordinate transformation algorithms, fractal calculation methods, and real-time rendering strategies. The task breakdown created over 25 discrete steps, from basic HTML setup to advanced mathematical utilities.
Since Kiro offers Claude Sonnet 4 for free during preview (regular mode only), the planning quality was solid for no-cost access. However, the execution phase revealed growing pains. Kiro opens new terminal windows for each command, which slows things down, and terminal commands would finish but the chat wouldn’t always register completion, requiring manual copy-pasting of outputs. This made debugging tedious, so I moved to a simpler project.
The unit converter project told a different story:
Create a multi-unit converter for length, weight, temperature, and currency with dropdown selectors, real-time conversion, and swap functionality.Here, the spec process felt almost too thorough. Kiro still created detailed requirements and broke the work into 11 tasks, but for a straightforward web app, this level of planning might be overkill. Despite the same terminal issues, the agent delivered a working converter after six tasks.
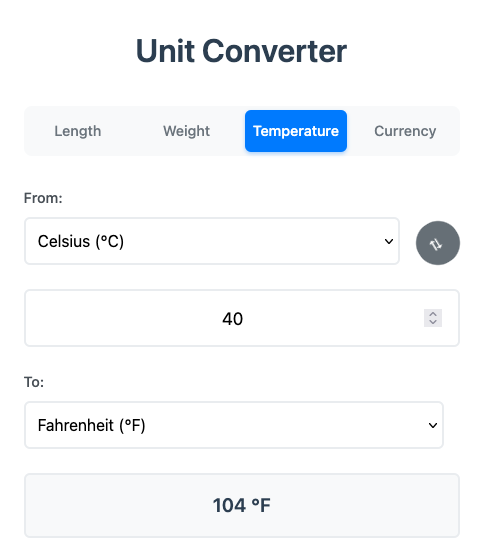
Comparing both experiences revealed when spec sessions matter most. For the Mandelbrot project, the upfront planning was invaluable — no other approach could have organized that mathematical work so well. For the unit converter, you’d probably get faster results with vibe sessions.
The real strength of spec mode is the planning quality it provides. These documents create roadmaps that work whether you’re coding with AI or collaborating with other developers. Advanced projects with mathematical algorithms or multiple interconnected systems benefit enormously from this structure, while simpler builds might not need the overhead.
If you’re tackling something with real mathematical depth or interconnected systems, spec sessions give you the structure you need. For quick prototypes or simple tools, vibe sessions offer a more direct path. As Kiro improves terminal integration and adds more powerful models post-preview, spec sessions will likely become the go-to approach for any project with significant architectural demands.
As mentioned, terminal support still needs some work to provide a smooth experience. While Kiro’s terminal integration has good bones — you can describe what you want in plain language like “install the project dependencies” and it translates this into actual commands — the execution often gets stuck. The terminal issue might be related to my specific setup (which uses oh-my-zsh), but other IDEs like Cline and Trae AI handle the same environment without problems.
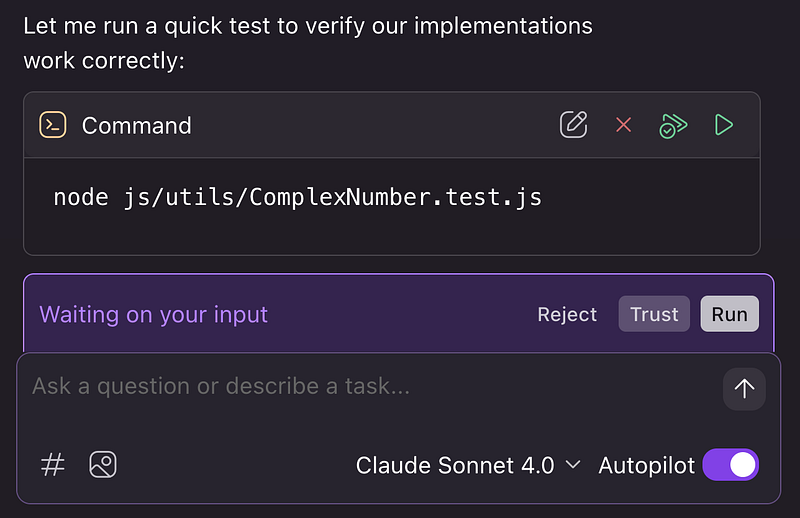
The security features are well-designed. New terminal commands need your approval before running, and you can add commonly used, harmless commands to a trust list, like ls, cat, and pwd. For other commands, you can trust at different levels—the exact command, variations of it, or all commands with the same root.
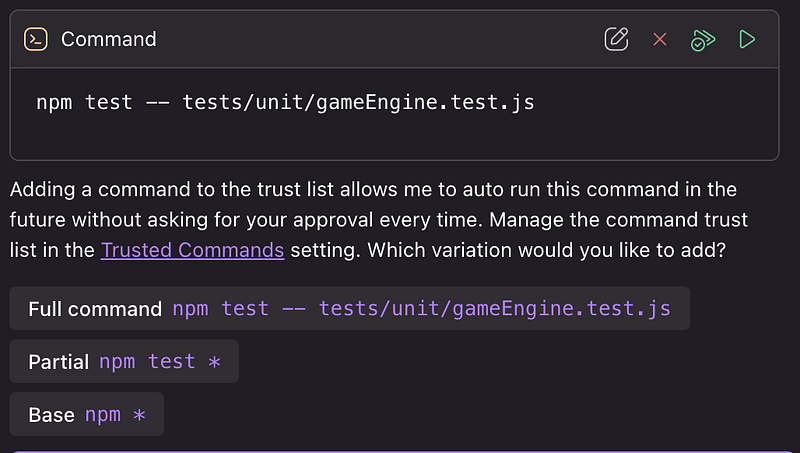
Kiro also flags dangerous patterns like command substitution and output redirection that could cause security issues.
You get four options when Kiro suggests a terminal command: Modify, Reject, Run, or Run and Trust.
The system maintains command history and can reference recent terminal output in conversations using #Terminal which is essential during debugging.
While terminal integration issues can slow down active development, Kiro offers another powerful feature that works independently of terminal execution — agent hooks.
Every developer knows the frustration of repetitive tasks: remembering to write tests for new functions, adding license headers to files, or catching issues before they reach production. You probably have mental checklists of things to do after saving files, but these manual processes are easy to forget when you’re focused on solving complex problems.
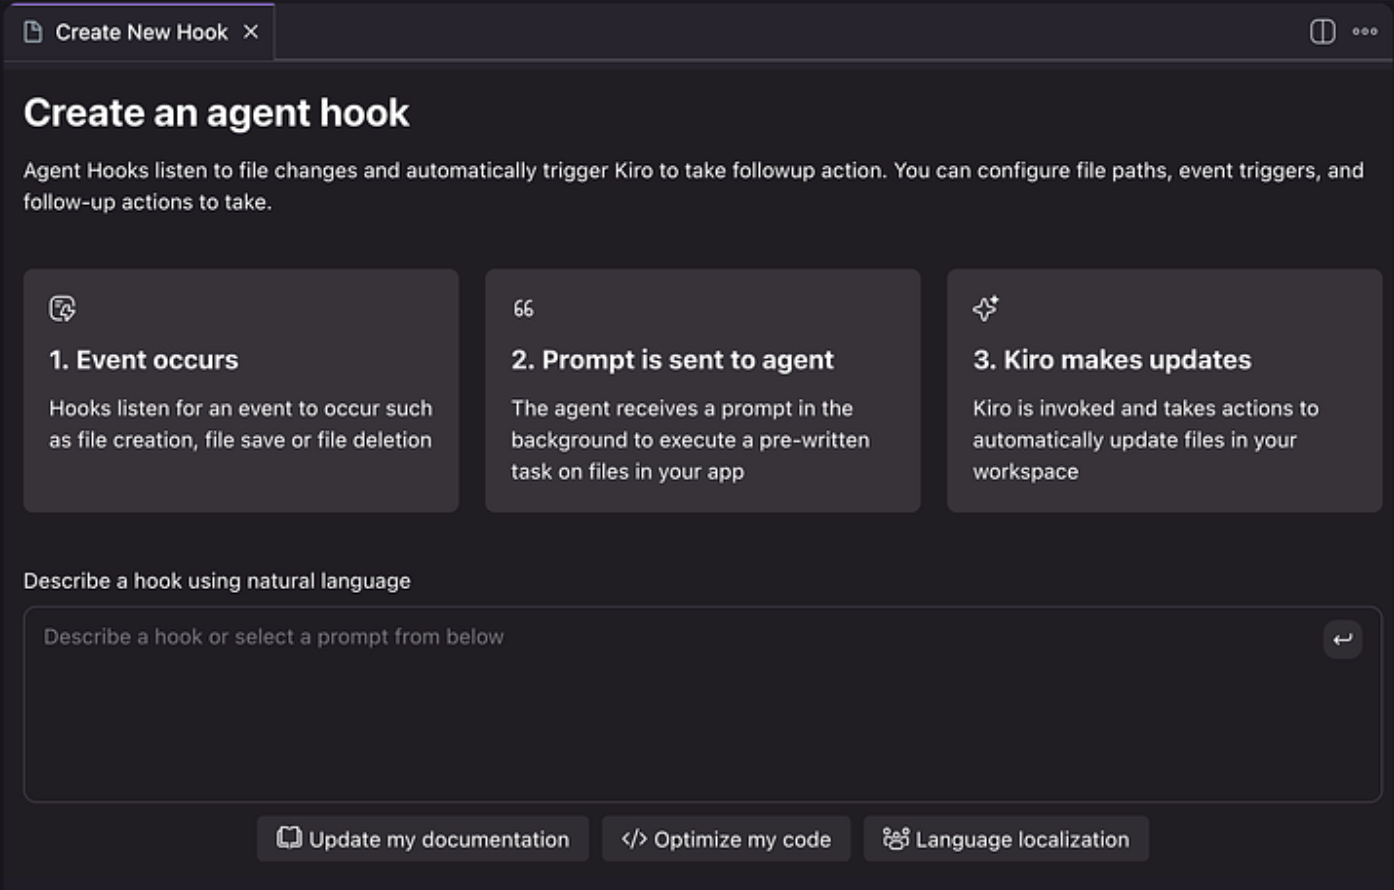
Agent hooks solve this by automating routine tasks through intelligent triggers. The system follows a simple process: it detects specific events in your IDE, executes a predefined prompt when those events occur, and then the agent performs the requested actions automatically. This automation transforms how you work by handling background tasks while you focus on building features.
Let’s walk through creating a practical hook that saves time during development — an automatic commit message generator. This hook will analyze your file changes and suggest meaningful commit messages, eliminating the mental overhead of writing good commit messages every time you’re ready to save your work.
First, you create the hook through Kiro’s interface. Navigate to the Agent Hooks section in the Kiro panel and click the + button, or use Cmd + Shift + P and type "Kiro: Open Kiro Hook UI." For our commit message generator, we want it to trigger on file save events and target all files with the pattern **/*.
Here’s the hook instruction:
When files are saved, analyze the changes and generate a commit message:

1. Review what files were modified and what changed
2. Identify the type of change (feature, fix, refactor, docs, etc.)
3. Write a clear, concise commit message following conventional commits format
4. Include the scope if changes are focused on specific components
5. Keep the summary under 50 characters when possible
6. Add a longer description if the changes are complex

Output the suggested commit message in a code block for easy copying.
Once you save this hook, it starts monitoring your workspace. Every time you save files, the hook analyzes what changed and suggests an appropriate commit message. Instead of staring at a blank commit dialog, wondering how to describe your work, you get instant suggestions based on the actual changes you made.
The beauty of this approach is that it works with your natural development flow. You make changes, save files, and automatically get commit message suggestions without any extra steps. You can create similar hooks for other repetitive tasks like updating documentation when APIs change, or adding boilerplate code when new components are created.
When designed well, hooks become invisible helpers that maintain consistency and prevent common oversights without requiring any changes to how you actually write code.
Hooks handle automation well, but there’s another challenge when working with AI coding assistants: explaining your project’s rules repeatedly. You find yourself telling the AI about your preferred libraries, coding style, file organization, and project decisions over and over. Each new chat starts from scratch, and you waste time explaining things that should stick around.
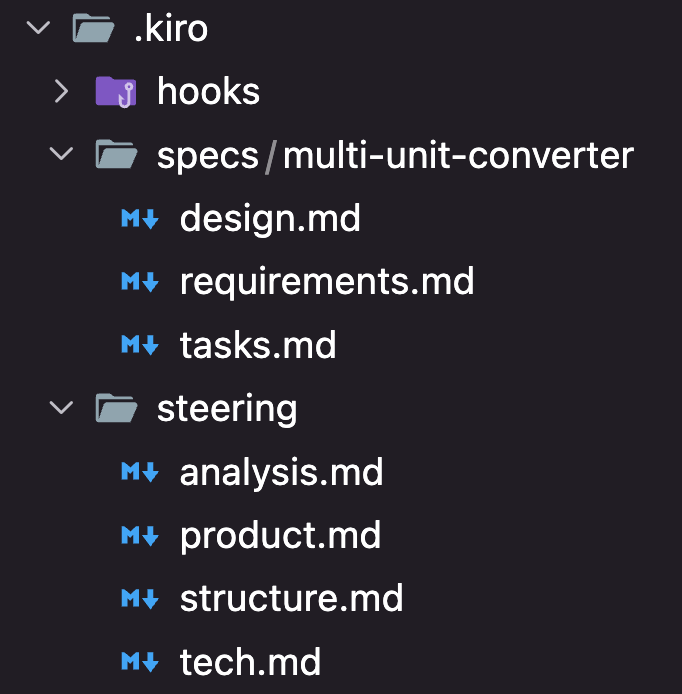
Steering fixes this by giving Kiro lasting knowledge about your project through markdown files. Instead of explaining your rules in every chat, steering files make sure Kiro always follows your established patterns and standards. The system stores this knowledge in .kiro/steering/ files that become part of your project.
This lasting context changes how AI helps work on your project. Rather than starting each conversation by explaining your setup and preferences, Kiro already knows your project’s basics and creates code that matches your existing patterns right away.
If you already have a working project with specs set up, Kiro automatically populates basic steering docs for you with a click of a button. You can always change them or add your own custom steering files for specific needs. Navigate to the Steering section in the Kiro panel and click the + button to create a new steering file.
When you create custom, you control when they get loaded using inclusion patterns. The most useful pattern is conditional inclusion, which loads steering files only when working with specific file types. Here’s how you set it up:
---
inclusion: fileMatch
fileMatchPattern: "analysis/**/*.py"
---

# Your custom standards here
The inclusion: fileMatch tells Kiro to load this steering file automatically when you work on files that match the pattern. The fileMatchPattern uses standard glob patterns to target specific files or folders. You could use "*.py" for all Python files, "tests/**/*" for test files, or "docs/*.md" for documentation files.
You can also use inclusion: always to load steering files in every interaction, or inclusion: manual to load them only when you reference them with #filename in chat. This gives you control over when different types of guidance appear.
The key is making steering files focused and specific. Instead of one huge file with all your standards, create separate files for different concerns — one for API patterns, another for testing approaches, another for deployment procedures. This keeps context relevant and prevents information overload.
Once you save a steering file, it immediately becomes available across all Kiro interactions that match your inclusion pattern. Your project knowledge gets preserved and shared automatically, making both human team members and AI assistants more effective at following your established practices.
After testing Kiro thoroughly, the natural question becomes: how does it compare to Cursor? Cursor is currently the leader in AI-powered coding environments. The comparison shows interesting differences that mostly come down to how long each tool has been around and different ideas about how AI should help developers.
The biggest difference is timing. Cursor started in 2023 while Kiro entered preview in mid 2025. This head start shows how polished and stable Cursor is, plus how much community support it has.
Cursor works with most major AI providers. You get access to Claude Sonnet 3.7/4.0, GPT-4.0/5.0, and Google Gemini models. You can switch between models based on what you need. Kiro only offers Claude Sonnet 3.7 and 4.0. Both are powerful models, but you can’t use thinking mode. The limited choice means less flexibility.
The deeper difference is how each tool thinks about AI help. Cursor follows the traditional approach — you chat with the AI, get code suggestions, improve them, and repeat until you get what you want. Kiro’s spec-driven approach needs more planning upfront but can handle bigger, more complex projects with better organization.
Community support shows how much Cursor’s head start matters. When you have problems with Cursor, you can check forums, Discord servers, or Reddit communities where thousands of developers share solutions. Kiro is still new. When issues like the terminal problems happen, you’re mostly on your own to figure out fixes.
This community gap affects troubleshooting, learning materials, and add-ons from other developers. Cursor has lots of documentation, video tutorials, and tips from the community. Kiro’s documentation is good but limited. You won’t find much community-created content yet.
Cursor lacks some advanced features that make a big difference for managing project context. Both tools share similar basic features — adding terminal logs to chat, including URLs or images in conversations. But Cursor doesn’t have Kiro’s steering or specs system for storing project details that last between chat sessions.
You can create these files yourself in Cursor, but they won’t work as well as Kiro’s built-in system. Trust me on this — I’ve used Cursor for a long time and tried manually creating project context files. They work, but they don’t work with the AI the way Kiro’s steering system does.
For pricing, Kiro is free during preview but will likely match Cursor’s pricing when it launches fully. Kiro’s website shows planned subscription tiers: Pro at $20/month and Pro+ at $40/month, just like Cursor.

Both tools have basic support for MCP servers, but neither offers an easy marketplace for installing servers with one click. IDEs like Trae AI and Cline are ahead here. They make it easier to connect external tools and databases.
Comparing code quality needs months of side-by-side testing, which I haven’t done fully. But there’s an interesting angle: Kiro’s parent company is AWS, and they’re direct investors in Anthropic. This means Claude models in Kiro might eventually become better than versions in other IDEs. Kiro could potentially request custom model changes or get early access to new Claude features. This is just speculation, but AWS’s relationship with Anthropic suggests possible advantages later.
The choice between Kiro and Cursor depends on your project needs and how you like to work. If you work on complex, long-term projects that benefit from structured planning and persistent context, Kiro’s spec-driven approach offers real advantages. If you prefer quick iteration and need mature tooling with lots of model options, Cursor remains the safer choice for now.
|
Feature |
Kiro |
Cursor |
|
Development Approach |
Spec-driven with planning phase |
Traditional chat iteration |
|
AI Models |
Claude Sonnet 3.7/4.0 only |
Claude, GPT-4, Gemini |
|
Thinking Mode |
Not available |
Available with some models |
|
Context Management |
Steering files + specs system |
Manual file inclusion |
|
Community Support |
Limited (new product) |
Large, active community |
|
Terminal Integration |
Needs improvement |
Reliable and fast |
|
Automation |
Agent hooks system |
Manual triggers only |
|
MCP Support |
Basic integration |
Basic integration |
|
Pricing (Pro tier) |
$19–39/month (planned) |
$20/month |
|
Code Quality |
High (Claude-focused) |
High (multi-model) |
|
Project Complexity |
Better for large projects |
Better for quick iteration |
|
Learning Curve |
Steeper (new concepts) |
Gentle (familiar patterns) |
Kiro is an interesting step forward in AI coding tools, especially for teams working on big projects that need structure. The spec-driven approach really helps with larger builds where regular chat-based coding doesn’t work well.
Features like steering files and agent hooks show promise for keeping project context and handling routine tasks automatically. But the terminal problems and limited model choices stop it from replacing more mature tools like Cursor right now.
If you’re working on big projects that would benefit from planning ahead and keeping context between sessions, Kiro is worth trying while it’s free. The structured workflow works well when you need consistency across large codebases or need to coordinate with teammates.
But if you need reliable daily coding help with lots of model options and strong community support, Cursor is still the safer pick. As Kiro gets better and fixes its problems, it could become a good choice for developers who value structure over speed. The AWS backing and focus on business features suggest this tool will keep improving quickly.
If you want to learn more about other agentic IDEs, here are some of our previous posts:
Learn AI with these courses!
Course
Course
Course
Tutorial
François Aubry
Tutorial
Bex Tuychiev
Tutorial
Bex Tuychiev
Tutorial
François Aubry
Tutorial
Aashi Dutt
Tutorial
Aashi Dutt