Large language models (LLMs) are now integral to numerous tech domains, with most products now incorporating some level of LLM-based features. However, deploying these models on personal devices like laptops, desktops, or smartphones has faced significant obstacles due to hardware limitations.
In response, the PyTorch team has introduced Torchchat, an adaptable framework aimed at enhancing the efficiency of LLMs across various hardware platforms. This breakthrough approach facilitates effective local processing on a wide array of devices, potentially making advanced AI models more accessible.
PyTorch is a leading open-source machine learning framework developed by Facebook's AI Research Lab (FAIR). It supports various applications, including computer vision and natural language processing.
In this article, we’ll provide an overview of the capabilities of Torchchat and learn how to set it up locally.
Develop AI Applications
Torchchat Capabilities
Torchchat offers four primary functionalities:
- Running LLMs utilizing Python with PyTorch.
- Operating self-contained models on a desktop application or server without Python.
- Executing models on a mobile device.
- Evaluating a model's performance.
Run LLMs using Python with PyTorch
This mode enables running an LLM on a machine that has Python and PyTorch installed. We can interact with the model directly in the terminal or by setting up a server with a REST API. This is what we'll focus on setting up in this article.
Operating self-contained models
Torchchat uses AOT Inductor (Ahead-of-Time Inductor) to create a self-contained, distributable executable for PyTorch inference programs, specifically in the form of a dynamic library with no dependency on Python and PyTorch.
This approach caters to the need to deploy models in a production environment where there is a requirement for model runtime stability across updates and changes in the serving environment, ensuring that models remain operational without the need for recompilation.
AOT Inductor focuses on optimizing model deployment by enabling efficient, binary distribution formats that are fast to load and ready to execute, addressing the limitations and overhead associated with text formats like TorchScript. It leverages code generation and optimization techniques for both CPU and GPU performance, aiming to reduce overhead and improve execution speed.
Executing on mobile devices
For mobile device execution, Torchchat leverages ExecuTorch. Similarly to AOT Inductor, ExecuTorch optimizes the model for execution on a mobile or embedded device. It produces a PTE artifact that can later be used to execute the model.
Evaluating a model
The evaluation mode of Torchchat can be used to evaluate an LLM’s performance on various tasks available in the lm_eval. This is an important feature for people doing research who wish to evaluate their new models on commonly used benchmarks.
Why Use Torchchat
Running an LLM locally instead of relying on a third-party cloud API such as Open AI’s API presents a variety of use cases and benefits, catering to different needs and scenarios.
- Privacy-sensitive applications: For industries dealing with sensitive data, like healthcare, finance, and legal, running LLMs locally ensures that confidential information does not leave the organization’s infrastructure, complying with data protection regulations.
- Real-time applications: Applications requiring low-latency responses, such as interactive chatbots, real-time content generation, and live monitoring systems, can benefit from running LLMs locally, eliminating the latency introduced by network transmission to and from a cloud API.
- Offline or low connectivity scenarios: In environments with poor or no internet connectivity, local deployment enables the use of LLM applications, such as field research, remote education, and in-flight entertainment systems.
- Cost control and optimization: For high-volume or continuous-use cases, local deployment can be more cost-effective, avoiding the per-request pricing models of cloud APIs and potentially leveraging existing computational resources.
If you’re interested in learning more about running an AI model locally on a device instead of in the cloud, I recommend this blog post on Edge AI.
Local Setup With Python
Let’s set up Torchchat locally step by step. We’ll start with cloning the Torcchat repository.
Clone or download the code
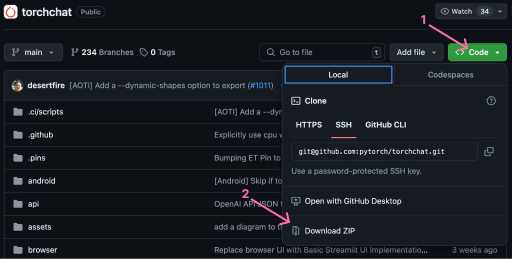
The first step in setting up Torchchat locally is to clone the Torchchat repository. Having Git installed, we can clone the repository by opening a terminal and running the command:
git clone git@github.com:pytorch/torchchat.gitAlternatively, we can download the repository using the Github interface.

Installation
We’re going to assume that Python 3.10 is already installed. For a guide on how to install Python, check out this article.
To install Torchchat, open a terminal in the Torchchat folder. We start by creating a virtual environment:
python -m venv .venvIn short, a virtual environment is a self-contained directory for a project, containing its installation directories for Python libraries, packages, and sometimes even a specific version of Python itself. This ensures that each project has precisely the versions of the software it needs to run, without interference from other projects and their requirements.
With the virtual environment created, we need to activate it. We can do so with the command:
source .venv/bin/activateFinally, we need to set up the environment by installing all the dependencies required for Torchchat to run. Torchchat provides an installation script, install_requirements.sh, which we can run with the command:
./install_requirements.shTorchchat should now be installed and ready to be used. We can verify the installation by listing the available Torchchat commands, like so:
python torchchat.py --helpUsing Torchchat Locally With Python
With Torchchat installed, we can start to run LLMs on our local machine.
Listing all supported models
TorchChat supports a wide range of LLMs. We can list the supported models using the list command:
python torchchat.py listThe full list of models can all be found in their GitHub repository.

The “Notes” section provides useful information about the model, such as the best use case and the model alias used to specify the model when using Torchchat commands.
Downloading a model
Torchchat uses Hugging Face as a distribution channel for the models. Hugging Face is a collaborative platform with tools that empower anyone to create, train, and deploy NLP and ML models using open-source code. To learn more about it, check out this blog post on What Is Hugging Face.
Before downloading a model, we need to:
- Install the Hugging Face command line interface
- Create an account on Hugging Face
- Create an access token
- Login using the hugging face command line interface
To install the Hugging Face command line interface, we use pip:
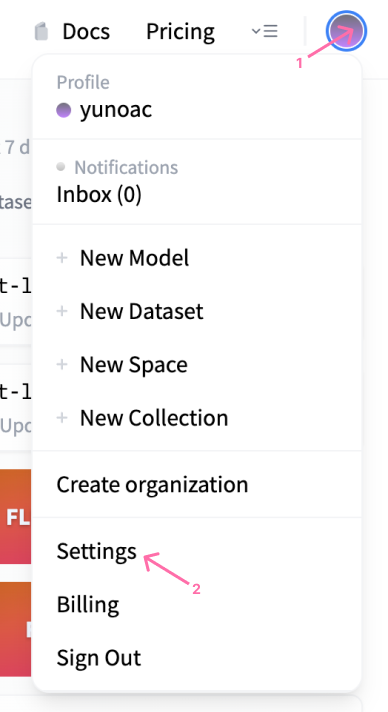
pip install huggingface_hubThen, we can navigate to the Hugging Face website to create an account. After creating an account, we can make an access token by visiting the profile settings:

In the profile, we can open the “Access Tokens” menu to create a new token:

Regarding the token permissions, read permissions are enough for this article. Note that when the token is created, we need to copy it to the clipboard because we won’t be able to see it again later.
Using the token, we can log in using the following command:
huggingface-cli loginOnce we are logged in, we can download a model using the download command. Note that some of these models can be quite large so make sure that you have enough disk space. For illustrative purposes, we’ll use the stories15M model, a small story generation model. This is a good model to start with because it’s fast to download and doesn’t require special permissions.
To download it, we do:
python torchchat.py download stories15MRunning a model
After downloading the model, we can use the chat or generate commands. To generate text, we need to provide a prompt using the --prompt argument. Here’s an example:
python torchchat.py generate stories15M --prompt “Once upon a time”The above command will instruct Torchchat to generate text using the stories15M model with the prompt ”Once upon a time”.
To execute the model in chat mode, we use the chat command without a prompt.
python torchchat.py chat stories15M The chat command will start an interactive chat in the terminal where we can chat back and forth with the LLM. Note that some of the models are more suited to be used with the generate mode, while others are better suited for the chat mode. This information is available in the “Notes” section of the model documentation.
Requesting access to a model
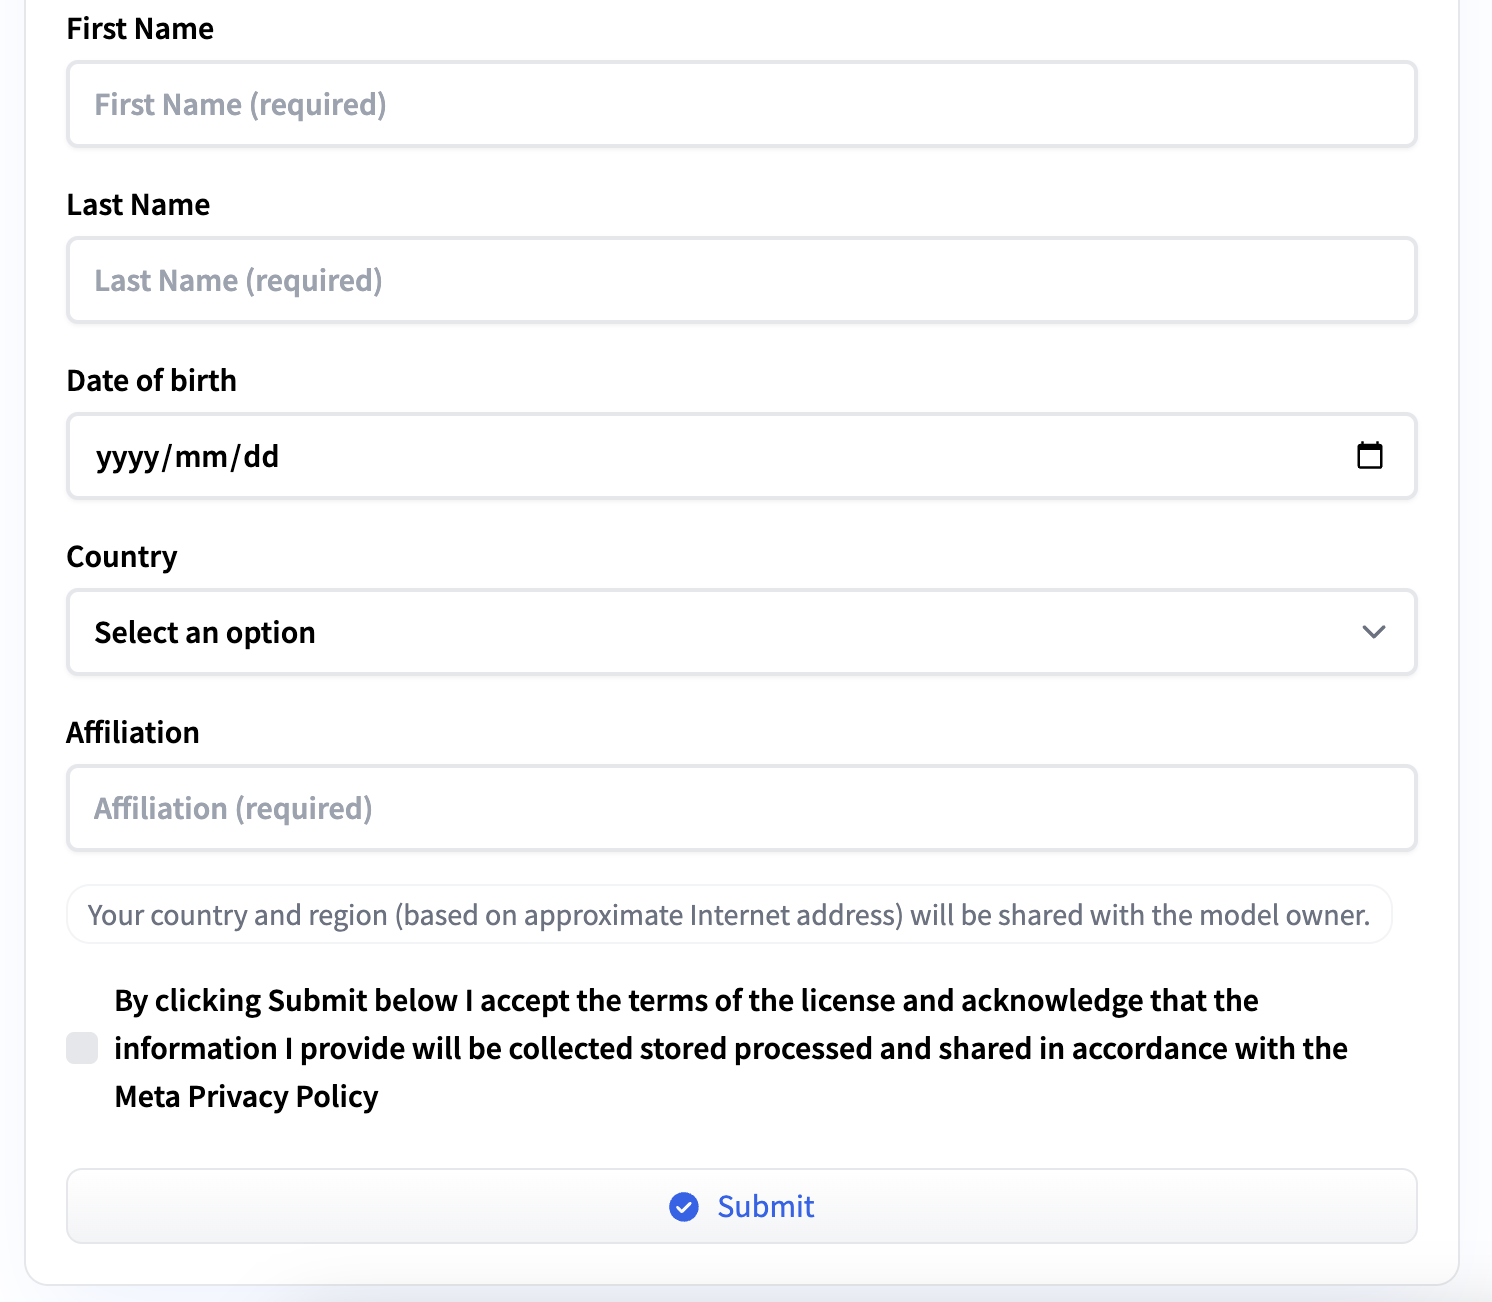
Some models like llama3 require special access to be downloaded. If we try to download such a model, we’ll get an error message:
Access to model meta-llama/Meta-Llama-3-8B-Instruct is restricted and you are not in the authorized list. Visit https://huggingface.co/meta-llama/Meta-Llama-3-8B-Instruct to ask for access.We can request access by following the URL provided in the error message. We need to fill in a short form with personal information and agree to the terms of service. You’ll receive an e-mail once access is granted.

Advanced Usage
Torchchat provides a few additional options when running LLMs locally, making it possible to adapt them to our needs and hardware. Let’s explore a few of these options.
Controlling the precision
LLMs rely heavily on matrix multiplication, which involves multiplying many floating point numbers. Several data types exist to represent floating point numbers in the computer with varying precision.
Higher precision can ensure that the nuances captured during training are faithfully represented during inference, especially for complex tasks or nuanced language understanding. However, using high-precision numbers can significantly slow down inference. The right data type depends on the trade-off between speed and accuracy.
To set the data type when running the LLM, we can use the --dtype parameter, for example:
python torchchat.py chat --dtype fast stories15MJust-In-Time compilation
The --compile flag enables Just-In-Time (JIT) compilation of the model. JIT refers to a technique used to optimize the inference performance by dynamically compiling parts of the model into machine-level code at runtime instead of interpreting them each time they are executed. This approach can significantly improve efficiency and speed for models running on various hardware platforms.
Using JIT will lead to higher startup times because of the extra compilation step but inference will run faster. Here’s how we would use chat together with JIT:
python torchchat.py chat --compile stories15MNote that this option might not be supported on all types of hardware. In this case, Torchchat will ignore the compilation step and run the LLM without it.
Quantization
Quantization is a technique used to reduce the model size and increase its inference speed without significantly compromising its performance or accuracy. This is particularly important for deploying LLMs on edge devices or in environments where computational resources, memory, and bandwidth are limited.
In a nutshell, quantization involves converting the weights and activations of a neural network from floating-point representation (usually 32-bit floats) to lower-bit representations, such as 16-bit integers, 8-bit integers, or even binary representations in some cases.
This is different than setting the precision with --dtype. Quantization acts on the model weights directly, creating a smaller model, while the data type specifies the type of data used in the inference calculations.
Using quantization in Torchchat requires a JSON configuration file and can be used like so:
python torchchat.py chat --quantize config.json stories15MFor more details on the format of the config.json configuration file or on how quantization works in Torchchat, check their quantization documentation page.
Device specification
We can specify the device used to execute the LLM by using the --device option. For example, to run it on CUDA, we would use:
python torchchat.py chat --device cuda stories15MConclusion
Torchchat is a big step in the democratization of LLM inference. It makes it easy for anyone to efficiently run LLMs on a wide range of devices.
Torchchat offers a lot more capabilities than what we introduced in this article. We provided the necessary explanations for anyone to get started with running LLMs locally on their computer using Python and PyTorch. I strongly encourage you to further explore Torchchat.


