Course
Data Version Control (DVC) is a game-changer for data scientists and ML engineers. It allows us to benefit from software engineering best practices that were previously hindered by the sheer size of modern datasets. In this tutorial, we will learn all about it.
Here are some topics that you should be familiar with before we dive head-first into the tutorial:
- Version control with Git
- Python fundamentals
- Machine learning fundamentals
- Terminal
- Managing GitHub repositories
Let’s get started!
What Is Data Version Control (DVC)?
DVC (Data Version Control) is a powerful tool that tackles a significant pain point in data science projects: managing large datasets within version control systems.
Traditional version control systems like Git are fantastic for code, but they struggle with massive datasets. Trying to store them directly in Git can lead to slowdowns or often crashes.
DVC acts as a bridge between Git and your data storage solution. It keeps track of data changes and versions within Git but stores the data files elsewhere — on a separate hard drive, cloud storage, or wherever you prefer. This keeps your Git repository lightweight and efficient.
Benefits of using DVC
These are some specific areas where DVC can help enhance your data science and machine learning projects.
- Experiments: DVC lets you see exactly how your data and models evolved over time. Need to revisit an experiment from a few months ago? DVC can show you the specific data version used, allowing you to compare and analyze with ease.
- Collaboration: Sharing data science projects with colleagues can be messy. DVC ensures everyone works with the same data versions, eliminating confusion and wasted time.
- Reproducibility: One of the biggest challenges in data science is replicating results. DVC allows you to capture the exact data and model versions used in your experiments, making it easy to reproduce them later.
DVC Key Concepts
DVC is not a complex tool to learn, but it does take some time to understand its most important concepts. These concepts are crucial for using its commands correctly and avoiding time-consuming and rage-inducing mistakes later. So, in this section, we will cover some DVC internals and key terms.
1. DVC is technically not a version control system
When you get down to the technical details, DVC is not a version control system because we already have Git, the king. However, we know that Git is not good at versioning large files. Even the creator of Git, Linus Torvalds, admits this fact. Git is only good (extremely good) at detecting changes to small files.
So, DVC does not reinvent the wheel for large files but uses a workaround to take advantage of Git’s capabilities.
Assume you have a massive dataset in a folder called images. When you add a large file or a directory to DVC (using the dvc add images command), the tool creates a small metadata file named images.dvc. If you print the contents of this metadata file, you will see the following:
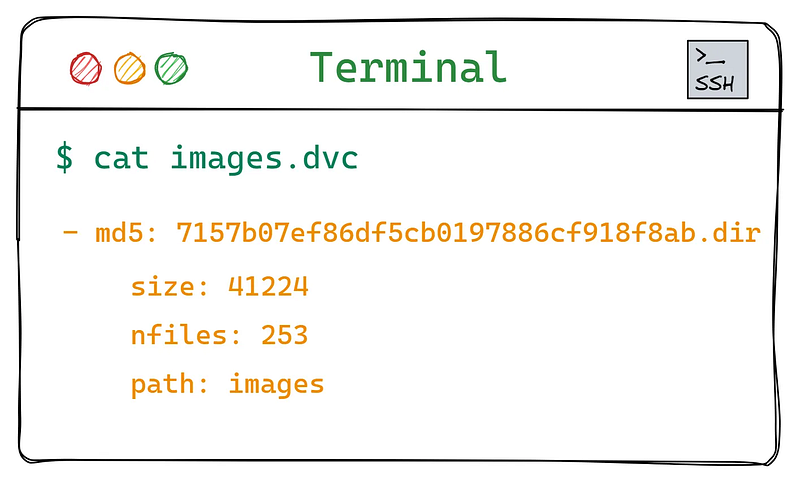
Contents of the images.dvc file.
The images.dvc file lists the images dataset folder size, number of files, and, most importantly, an MD5 hash. MD5 is a popular hashing function that produces 32 hexadecimal characters given a file or folder as input. The hash changes entirely, even if a single bit is changed in the tracked asset.
Using these hash values, Git is able to track large assets, no matter their size. Here is how it happens:
- You add an asset to DVC with
dvc add asset asset.dvcfile is generated for the added asset with a unique MD5- Under the hood, DVC also adds the asset to
.gitignoreso that Git doesn't track it - You start tracking the
asset.dvcfile withgit add asset.dvc - Then, anytime you make a change to the large file, its MD5 hash changes in the
asset.dvcfile. You capture this change by callinggit add asset.dvcagain.
There are some more details to this process, but we already have a good overview of what will happen when we start running specific DVC commands.
2. DVC cache
When you initialize Git inside a folder, it creates a hidden .git directory that holds Git-related configurations, its internals, and metadata. The same happens when you initialize DVC.
Among the contents of the hidden .dvc folder, you only need to worry about the DVC cache located under .dvc/cache. When you start tracking a large asset with DVC, it gets copied to this cache. The asset's subsequent versions will be stored there as well.
For example, let’s say you are tracking a 1GB CSV file with DVC. Its current version is added to the cache with its MD5. Then, if you change something in the file (like renaming its columns or making a transformation), the new version is also added to the cache with a new MD5. Yes, you guessed correctly — each file version takes up 1 GB of disk space! That is one of the unavoidable aspects of data version control.
On the bright side, things are a bit different for large directories. If you are tracking a folder with thousands of images and you make a change that affects only a few files, DVC doesn’t create a duplicate of the entire directory. Only the affected images will be saved in the cache with their new MD5s.
DVC has a few caching strategies that can significantly improve memory optimization. One is creating a central cache for the entire network of computers that has access to company data. For more details, read the Large Dataset Optimization page of the DVC user guide.
3. DVC remote
One of the main purposes of DVC is to facilitate collaboration among team members when large assets are involved. To do so, it needs a central place everyone can access to store large datasets, models, and their versions.
Git uses hosting platforms like GitHub to store your code files and their versions remotely. However, as mentioned before, Git can’t handle large files; the same goes for GitHub. For this reason, DVC requires you to set up a different remote to handle large assets separately.
This remote storage, separate from the cache, can be on your machine or any cloud provider such as AWS, GCP, or Azure. Just like you frequently push your code commits with git push to GitHub, you should frequently push the changes in your cache to this DVC remote.
The remote storage location will be listed inside the .dvc/config file. Since Git tracks the entire .dvc directory, users will get a copy of this configuration file when they clone or fork your GitHub repository. Then, they can pull the large assets with a single dvc pull command.
We will take a closer look at this workflow soon.
Getting Started With DVC: Hands-On Tutorial
Let’s get our hands dirty with some code and terminal commands! We will set up a simple project structure that mimics a real-world scenario and get a sense of how to use DVC commands.
1. DVC installation and initialization
First, create a new virtual environment, preferably with Conda, and install DVC along with any other libraries we might need:
$ conda create -n dvc_tutorial python=3.9 -y
$ conda activate dvc_tutorial
$ pip install dvc
$ pip install pandas numpy scikit-learn
Then, create a new directory for the project, some sub-directories, and a couple of Python scripts:
$ mkdir dvc_tutorial; cd dvc_tutorial  # Create the working directory
$ mkdir src data models # Create sub-directories
$ touch src/split.py src/train.py  # Create some scripts
We will populate the data directory with a single CSV file for now:
$ curl https://raw.githubusercontent.com/BexTuychiev/medium_stories/master/fu-datasets/diamonds.csv -o data/diamonds.csvNext, we initialize Git and make our first commit:
$ git init
$ git add src
$ git commit -m "Initial commit"
Note that at this point, we are only tracking the src directory with Git. To track data as it will contain large assets in the future, we need DVC, so we initialize it:
$ dvc init
Initialized DVC repository.
You can now commit the changes to git. First, let’s see what they are:
$ git status
The output of git status after running dvc init.
As you can see, we have a new .dvc directory along with .dvcignore file. Let's add those to Git and make another commit:
$ git add .dvc .dvcignore
$ git commit -m "Initialize DVC"
Now, we can finally add diamonds.csv to DVC tracking:
$ dvc add data/diamonds.csvOnce the command runs, let’s look at the contents of data:
$ ls -a data
.  ..  .gitignore  diamonds.csv  diamonds.csv.dvc
The output shows that the data directory now contains two more files. One is a placeholder .dvc file for the CSV, and another is a .gitignore. Let's look inside
$ cat data/.gitignore
/diamonds.csv
We can see that Git now ignores diamonds.csv. Let's look at the placeholder diamonds.csv.dvc file:
$ cat data/diamonds.csv.dvc
outs:
- md5: d25dba43d0c7286e246a5e05e8e13605
 size: 2571905
 hash: md5
 path: diamonds.csv data
As expected! So now, all we have to do is capture these two files with Git:
$ git add data
$ git commit -m "Add initial version of the dataset to DVC"
2. Capturing new versions of large assets in DVC
Let’s say you want to make a change to the diamonds.csv file by adding more rows to it:
$ cp data/diamonds.csv /tmp/diamonds.csv  # Copy the file
$ cat /tmp/diamonds.csv >> data/diamonds.csv  # Concatenate the copy to the original
When you call dvc status, you should see that DVC detects the change:
$ dvc status
The output of dvc status.
So, you should run dvc add data/diamonds.csv to capture the change:
$ dvc add data/diamonds.csvIf you look at Git status, you will see that data/diamonds.dvc file was modified:
$ git status
On branch master
Changes not staged for commit:
 (use "git add <file>..." to update what will be committed)
 (use "git restore <file>..." to discard changes in working directory)
       modified:   data/diamonds.csv.dvc
To capture the change to diamonds.csv.dvc, you make a new Git commit:
$ git add data/diamonds.csv.dvc
$ git commit -m "Add more rows to diamonds.csv"
3. Switching between different versions of large assets in DVC
Right now, our Git commit history shows two different versions of the data folder:
$ git log --oneline
c6d5985 Split the data into training and tests
e32dd4c Add initial version of the dataset to DVC
56c1c87 Initial commit
Let’s say we want to return to the initial version when there wasn’t training and test sets inside it. That version of the data folder is linked to the commit with the hash e32dd4c, as shown above. First, we go back to that commit with git checkout:
$ git checkout e32dd4cThen, we check out with DVC as well so that the data.dvc file reverts to that version of the data directory:
$ dvc checkoutJust like that, the diamonds.csv file is back to its original version.
Right now, your current working directory reflects the old version of your repository. Git calls this scenario “detached HEAD state,” which means Git is not showing you the latest version of the repository. If you want to make changes in a detached HEAD state, Git requires you to create a new branch with git switch:
$ git switch -c new_branchIn this branch, you can write code that names diamonds.csv differently. Then, you can track the new changes with dvc add:
$ mv data/diamonds.csv data/new_diamonds.csv  # Rename the dataset
$ dvc add data/new_diamonds.csv
$ git add data
And finally, create a new commit:
$ git commit -m "Rename the diamonds dataset"Now, you have another version of the diamonds.csv file. One version is inside the master branch with extra rows. The other is inside the new_branch with a different name but without extra rows. To go back to the master branch, you only need to check it out:
$ git checkout master
$ dvc checkout
If you print the contents of data, you will see that diamonds.csv and diamonds.csv.dvc files are back:
$ ls data
.gitignore  diamonds.csv  diamonds.csv.dvc
To be safe, whenever you call git checkout, you should always call dvc checkout as well.
Also, don’t forget to bring back the original diamonds.csv (without duplicate rows):
$ rm data/diamonds.csv
$ cp /tmp/diamonds.csv data/diamonds.csv
$ dvc add data/diamonds.csv
$ git commit -a -m "Bring back diamonds.csv"
4. Setting up AWS S3 as remote storage for DVC
In this section, we will make our repository available to the public by pushing it to GitHub. I created a repository called dvc_tutorial under my account. You should do the same. Then, you can run the following commands to push the local repository to GitHub:
$ git remote add origin https://github.com/YourUserName/dvc_tutorial.git
$ git push --set-upstream origin master
Remember to update “YourUserName” with your actual Github user name.
The above commands only push our code files, DVC configurations, and .dvc files. To push the large assets inside the cache, we need to set up a separate remote using a cloud provider (by default, the remote is located on your machine).
First, install AWS CLI using the platform-specific instructions from this page of CLI docs. Then, run aws help to make sure it is installed correctly.
If so, install the dvc_s3 package to enable support for S3 buckets:
$ pip install dvc_s3The next step is to sign in to your AWS console and create a new user:
- Go to the IAM console. Click “Users” and “Create user.”
- Give the new user a name. I named mine
dvc-tester. - In permissions, select “Attach policies directly” and choose the “AdministratorAccess” policy. Click “Next” and then “Create user.”
- Note that the user will have access to nearly everything in your AWS account.
- Select the newly created user and go to “Create access key.”
- For the access key use case, select “Command Line Interface (CLI)” and click “Next”.
- Once the access key is created, download its CSV file and store it safely.
The following GIF shows all the steps in detail.
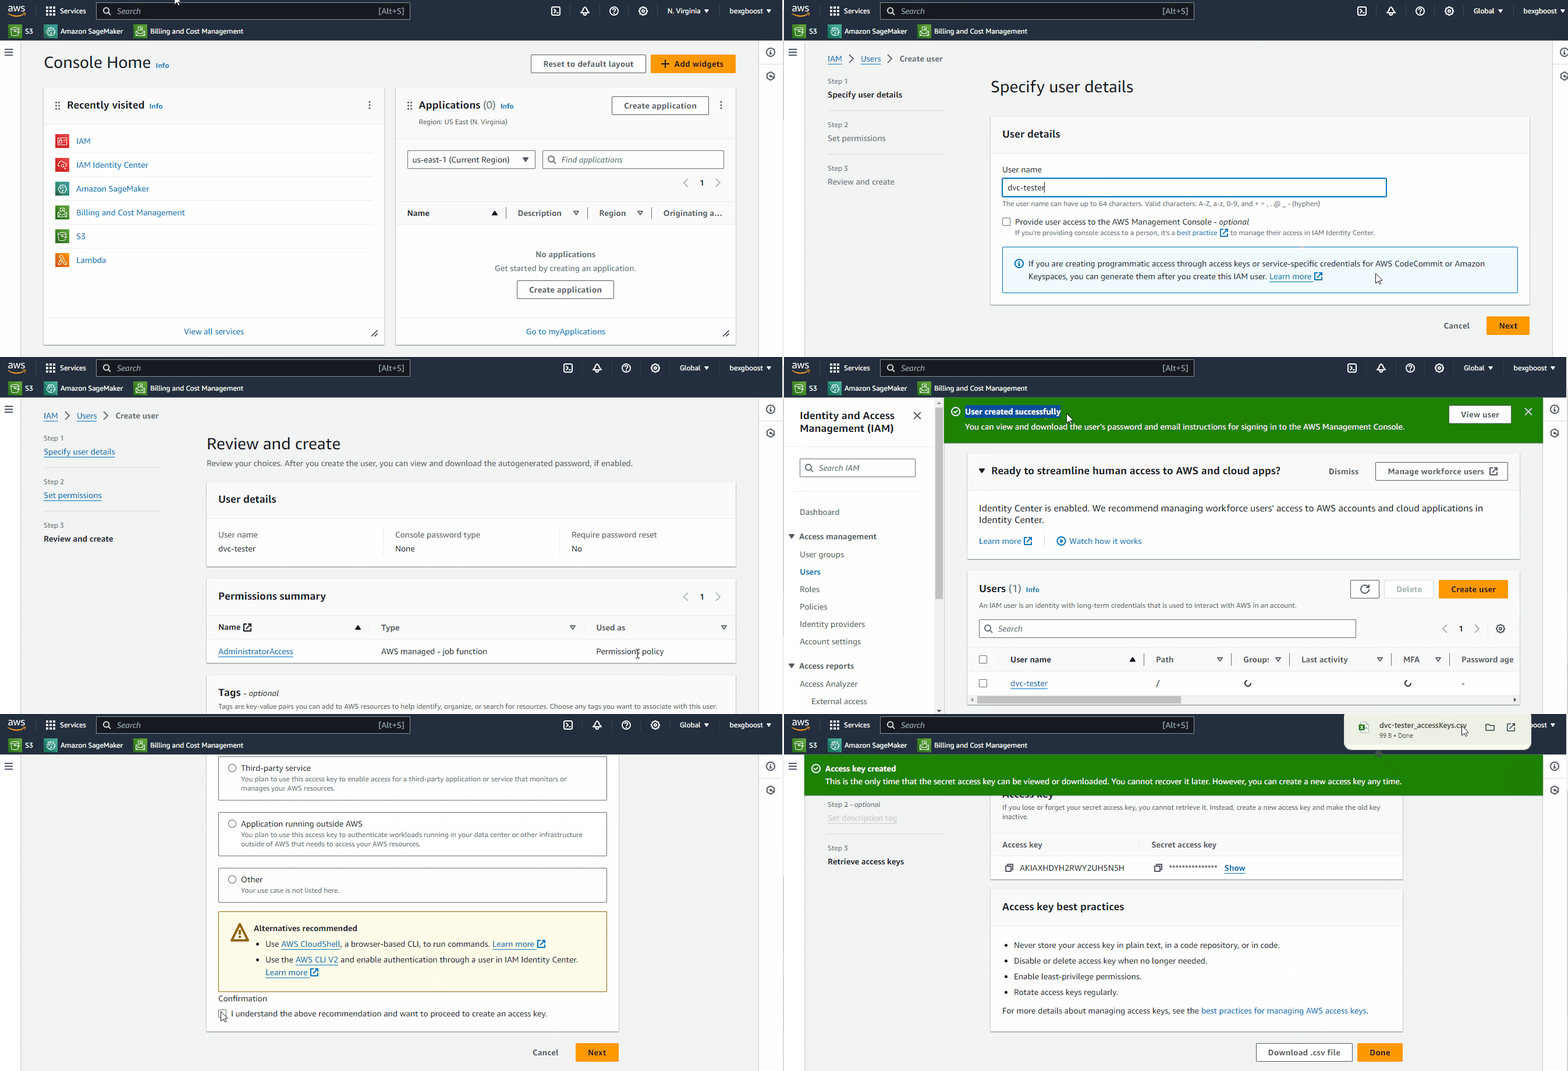
Creating a user in AWS IAM.
Then, create a credentials file under the .aws directory if it doesn't exist already:
$ touch ~/.aws/credentialsInside it, paste the following contents replacing your actual keys from the downloaded CSV file:
[default]
aws_access_key_id = YOUR_ACCESS_KEY
aws_secret_access_key = YOUR_SECRET_KEY
Then, return to the terminal and call aws configure to finish authentication. You will be able to create an S3 bucket afterward:
$ aws s3 mb s3://dvc-tutorial-datacamp
make_bucket: dvc-tutorial-datacamp
I named my bucket dvc-tutorial-datacamp but yours must be different from this one, as all S3 buckets must have unique names. Once the bucket is created, you can add it as a remote to DVC with dvc remote add remote_name remote_link command:
$ dvc remote add aws-remote s3://dvc-tutorial-datacamp
$ dvc remote default aws-remote  # Set it as default
Finally, you can call dvc push to send the contents of DVC cache to S3:
$ dvc pushIf you call git status now, you will see that the .dvc/config file is modified. Capture this change with Git:
$ git commit -a -m "Add AWS S3 as a DVC remote"Now, whenever you call git push, don't forget to push with dvc push as well.
5. Managing data pipelines in DVC
Data science projects usually consist of multiple stages that need to be executed in order:
- Load data
- Clean, preprocess, and split data
- Train a machine learning model
- Deploy the model
Each stage produces outputs that need to be fed to the next stage to arrive at the final result. When you use DVC, tracking these outputs can quickly get out of hand because you may run each stage or all of them many times until you are satisfied with the results—calling dvc add before and after each stage is error-prone and time-consuming.
DVC introduces a build system to define, execute, and track data pipelines to solve this issue. In our src directory, we have two scripts to represent two stages:
$ ls src
split.py  train.py
If we add these scripts as pipeline stages, we will be able to run them all one by one using a single command:
$ dvc reproThe repro command will take care of all the steps:
- Adding and tracking the outputs of all scripts
- Feeding the outputs from one script to the other
- Producing a final result
But before we get to that, we have some work to do.
First, we have to populate the split.py and train.py files with code. So, update split.py with the code from this GitHub gist I prepared.
In the gist, split.py applies preprocessing steps, such as normalizing numeric features and encoding categoricals, before splitting the dataset. Note that split.py takes diamonds.csv as input and produces train.csv and test.csv files.
I’ve prepared another gist for the train.py script, which takes the two CSVs as inputs, trains an SGDRegressor model on the training set, and evaluates it on the test set. In the end, it produces two outputs: the trained model and the model performance in a metrics.json file.
Now, one by one, we add these scripts as pipeline stages using dvc stage add commands. They have the following syntax:
$ dvc stage add -n stage_name \
               -d dependency_1 -d dependency_2 \
               -o output_1 \
               command_to_run_the_stage
Let’s modify the above for the split.py script (we will break it down afterward):
$ dvc stage add -n split \
               -d data/diamonds.csv -d src/split.py \
               -o data/train.csv -o data/test.csv \
python src/split.py-n: The name of the stage. In our case, we are naming itsplit.-d: A switch to specify stage dependencies. They are usually the script to run the stage and any input files the script takes. In our case, there are two dependencies: thediamonds.csvfile andscript.py.-o: Any outputs this stage produces, i.e.,train.csvandtest.csvfiles.- Lastly, the command to execute the stage.
Let’s add the training script as a stage, too:
$ dvc stage add -n train \
               -d data/train.csv -d data/test.csv -d src/train.py \
               -o models/model.joblib \
               -M metrics.json \
               python src/split.py
Once we are done adding stages, we can run them all with a single command:
$ dvc repro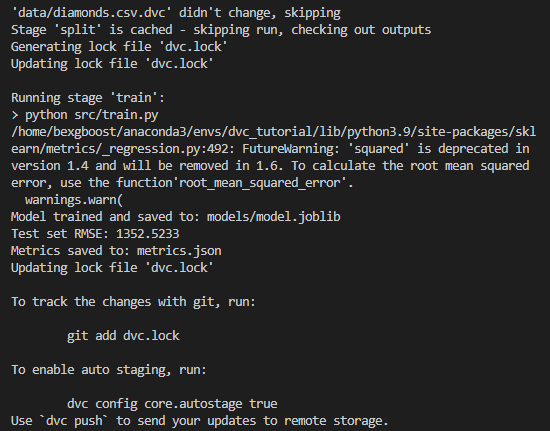
The output of dvc repro.
If you run git status now, you will see that model.joblib.dvc file was created even though we didn't run dvc add model.joblib. That's the beauty of DVC pipelines: any output specified with the -o switch is automatically added to DVC tracking.
If you don’t want the output to be put under DVC, you can specify it with the -O (uppercase) tag. There is also the -M switch for adding metrics files to pipelines like we did with metrics.json. DVC doesn't track those as well.
Now, let’s make a commit for the initial run of the pipeline:
$ git add .
$ git commit -m "Initial run of the pipeline"
DVC pipelines are also smart. For example, if you modify the last stage ( train.py) and call dvc repro, DVC only runs the stages that were changed. In other words, only the training stage is executed because DVC had cached the results of previous stages. Let's test it by making a small adjustment to train.py:
$ echo "print('\nThis is a new message')" >> src/train.py
$ dvc status
The output of dvc status.
As you can see, DVC status shows that one of the pipeline stages was modified. So, let’s rerun everything (or what changed):
$ dvc repro
'data/diamonds.csv.dvc' didn't change, skipping
Stage 'split' didn't change, skipping
split is skipped since it didn't change. Isn't that neat?
Don’t forget to capture every run of your pipeline with a Git commit so that you can come back to them later:
$ git commit -a -m "Modified train.py"Also, frequently run push commands so that remote repositories are up-to-date:
$ git push; dvc push6. Cloning DVC repositories
If you visit the GitHub repository you created for the tutorial project, you will see that your DVC-related files are there:
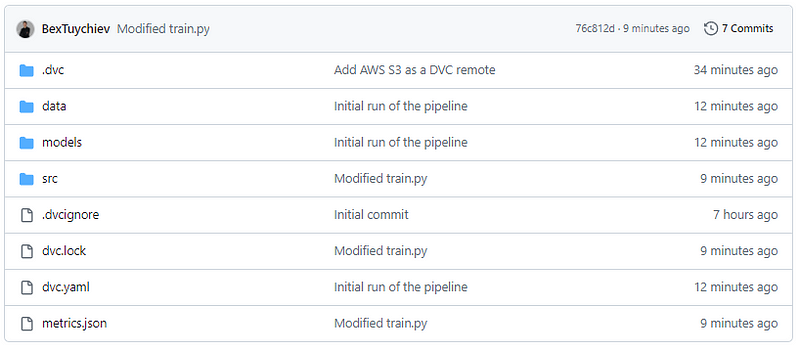
GitHub repository with DVC files.
When a teammate clones your project, they will also download it in that state. Try executing the following command on another machine:
$ git clone https://github.com/BexTuychiev/dvc_tutorial.git
$ cd dvc_tutorial
All they are missing is the DVC cache, which is located inside your AWS remote, so they have to run dvc pull:
$ dvc pullFor pull to work, their AWS credentials must be set up, and they must have the same level of access to the S3 bucket as you.
Conclusion
In this article, we have learned about a popular data version control framework : DVC. In recent years, it has boomed in popularity as it addresses a painful need in data projects: the ability to write reproducible code even when massive files and datasets are involved. With DVC, data scientists can enjoy the best practices and workflows software engineers have used for decades.
First, we learned the important concepts around DVC and how they relate to your everyday work. Then, we started a hands-on project, where we learned everything from initializing DVC to running pipelines with it.
If you want to know more about version control and production machine learning workflows, check out the following resources:
- Introduction to Git
- All About Git Tutorial
- CI/CD Pipelines in Machine Learning
- Introduction to MLFlow Course
Thank you for reading!
FAQs
How does DVC differ from traditional version control systems like Git?
DVC is designed specifically for versioning large data files, machine learning models, and data pipelines, whereas traditional version control systems like Git are optimized for tracking code and small text files. DVC integrates seamlessly with Git but stores data separately, often in cloud storage, to handle the size and complexity of data in data science and machine learning projects. This separation ensures efficient storage, versioning, and sharing of large datasets without burdening the Git repository.
How can I share my DVC-tracked data with my team members?
To share DVC-tracked data with your team, ensure that your data is stored in a remote storage location (e.g., AWS S3, Google Drive, Azure). Then, use DVC commands to push your data to this remote storage. Team members can clone the Git repository, set up the same remote storage, and use DVC commands to pull the data. This ensures everyone has access to the same versions of data and models.
Can DVC be integrated with continuous integration (CI) pipelines?
Yes, DVC can be integrated with CI pipelines to automate testing and deployment processes in data science and machine learning projects. By incorporating DVC commands within your CI configuration (e.g., GitHub Actions, GitLab CI, Jenkins), you can ensure that the correct data versions are fetched and the pipeline stages are executed automatically. This helps maintain consistency and reproducibility across different environments.
How does DVC handle large datasets that can't fit into my local machine's storage?
DVC allows you to work with large datasets by storing them in remote storage (e.g., cloud storage like AWS S3, Google Drive, Azure). Using the dvc pull command, you can download only the specific versions of data you need for your work. This way, you don't need to keep all versions of the data on your local machine, saving storage space while enabling access to different data versions as required.
What are some common pitfalls to avoid when using DVC?
Common pitfalls to avoid when using DVC include:
- Not regularly pushing changes to remote storage: Ensure you frequently push your data changes to avoid losing progress and to facilitate collaboration.
- Improper remote storage configuration: Double-check your remote storage setup to avoid access issues or data loss.
- Ignoring large files in Git: Use DVC to handle large files instead of trying to version control them directly with Git.
- Not versioning the dvc.yaml and .dvc files: Ensure these files are tracked by Git to maintain pipeline and data versioning consistency.
- Overlooking DVC commands in CI/CD pipelines: To automate data and model handling, integrate DVC commands into your pipelines.

I am a data science content creator with over 2 years of experience and one of the largest followings on Medium. I like to write detailed articles on AI and ML with a bit of a sarcastıc style because you've got to do something to make them a bit less dull. I have produced over 130 articles and a DataCamp course to boot, with another one in the makıng. My content has been seen by over 5 million pairs of eyes, 20k of whom became followers on both Medium and LinkedIn.


