
Course
Introduction to GitHub Concepts
2 hr
43.3K
Git diff is your window into the changes happening in your code repository. At its core, it’s a command that shows you the differences between various states of your files — whether that’s comparing your current work against what you’ve already staged or comparing changes between branches and commits. Think of it as Git’s way of answering the question, “What’s changed?” When you run git diff, Git analyzes the content of files line by line, identifying what's been added, removed, or modified, and presents this information in a standardized format that highlights exactly what changed and where.
Git diff helps developers ensure code quality by providing a clear view of modifications before they’re committed. Here, we’ll cover how to use this essential command effectively, from basic comparisons to advanced techniques that will improve your development workflow and team collaboration.
To follow along with this tutorial, you should be familiar with these Git concepts:
If you need to brush up on these concepts, these resources will help:
You’ll need Git installed on your system to follow the examples. All commands can be run in a terminal or command prompt.
Every developer needs to know what’s changed in their code , whether they’re working solo or on a team of hundreds. Without git diff, you’d be left guessing which lines you’ve altered, making troubleshooting and collaboration nearly impossible.
Git diff is essential for change management and serves as the foundation for building quality software through effective review processes. When examining changes, git diff provides the context needed to understand not just what changed but why those changes matter.
This direct visibility into code evolution helps teams maintain standards and prevent bugs from reaching production.
As projects grow in complexity, git diff becomes truly indispensable for several key reasons:
To effectively use git diff, it’s necessary to understand the underlying architecture that enables these comparisons — Git’s “Three-Tree” model.
To understand git diff, you first need to grasp Git’s fundamental “three-tree” architecture. Despite the name, these aren’t actual trees in the file system but rather three distinct states where your code exists.
Think of these states as three different versions of your project that Git keeps track of simultaneously: the Working Directory (your actual files), the Staging Area (or index, where changes are prepared for committing), and the Repository (the committed history of your project stored in the .git directory).
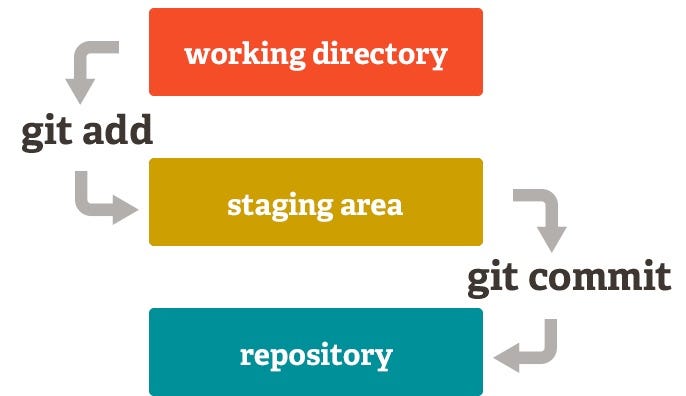
The Working Directory contains the files you’re actively editing — this is where you write code, make changes, and test your work. The Staging Area acts as a preparation zone where you select which changes should be included in your next commit . You can think of it as a loading dock where packages (your changes) are organized before shipping.
Finally, the Repository stores the complete history of your project as a series of commits , snapshots of your code at specific points in time, linked together to form a historical chain.
Git diff operates by comparing these three states in various combinations. When you run git diff without arguments, it compares your Working Directory to the Staging Area, showing changes you've made but haven't staged yet.
Using git diff --staged compares the Staging Area to the last commit, showing what will be included in your next commit.
And git diff HEAD compares your Working Directory directly to the last commit, showing all uncommitted changes regardless of staging status.
These comparison points form the foundation for all diff operations in Git:
git diff)git diff --staged)git diff HEAD)git diff commit1-hash commit2-hash)Understanding this architecture gives you the mental model needed to effectively use git diff for pinpointing exactly what’s changed, where, and when in your codebase.
With this architectural understanding in place, we can now explore how to use git diff commands in practice to gain insights into your code’s evolution across these three states.
Let’s create a sample data analysis project to demonstrate git diff in action. We’ll set up a small repository with Python scripts, CSV data, and text files that we can modify throughout this tutorial.
# Create and initialize our project
mkdir data-analysis-project
cd data-analysis-project
git init

# Create initial files
echo "# Data Analysis Project\nA sample project to demonstrate git diff functionality." > README.md
echo "import pandas as pd\n\ndef load_data(filename):\n return pd.read_csv(filename)\n\ndef analyze_data(data):\n return data.describe()" > analysis.py
echo "id,name,value\n1,alpha,10\n2,beta,20\n3,gamma,30" > data.csv
echo "DEBUG=False\nDATABASE_PATH=./data/" > config.txt
echo "def normalize_data(data):\n return (data - data.min()) / (data.max() - data.min())" > utils.py

# Make our first commit
git add .
git commit -m "Initial commit with basic project structure"

# Check the directory structure
> tree

.
├── README.md
├── analysis.py
├── config.txt
├── data.csv
└── utils.py
Our project now has five files under version control, giving us a foundation to demonstrate various diff scenarios. As we progress, we’ll modify these files to showcase how git diff reveals changes in different contexts.
When you run a git diff command, the output follows a standardized format designed to clearly indicate what’s changed. Let’s modify our analysis.py file to see a diff in action:
# Update analysis.py with a new function
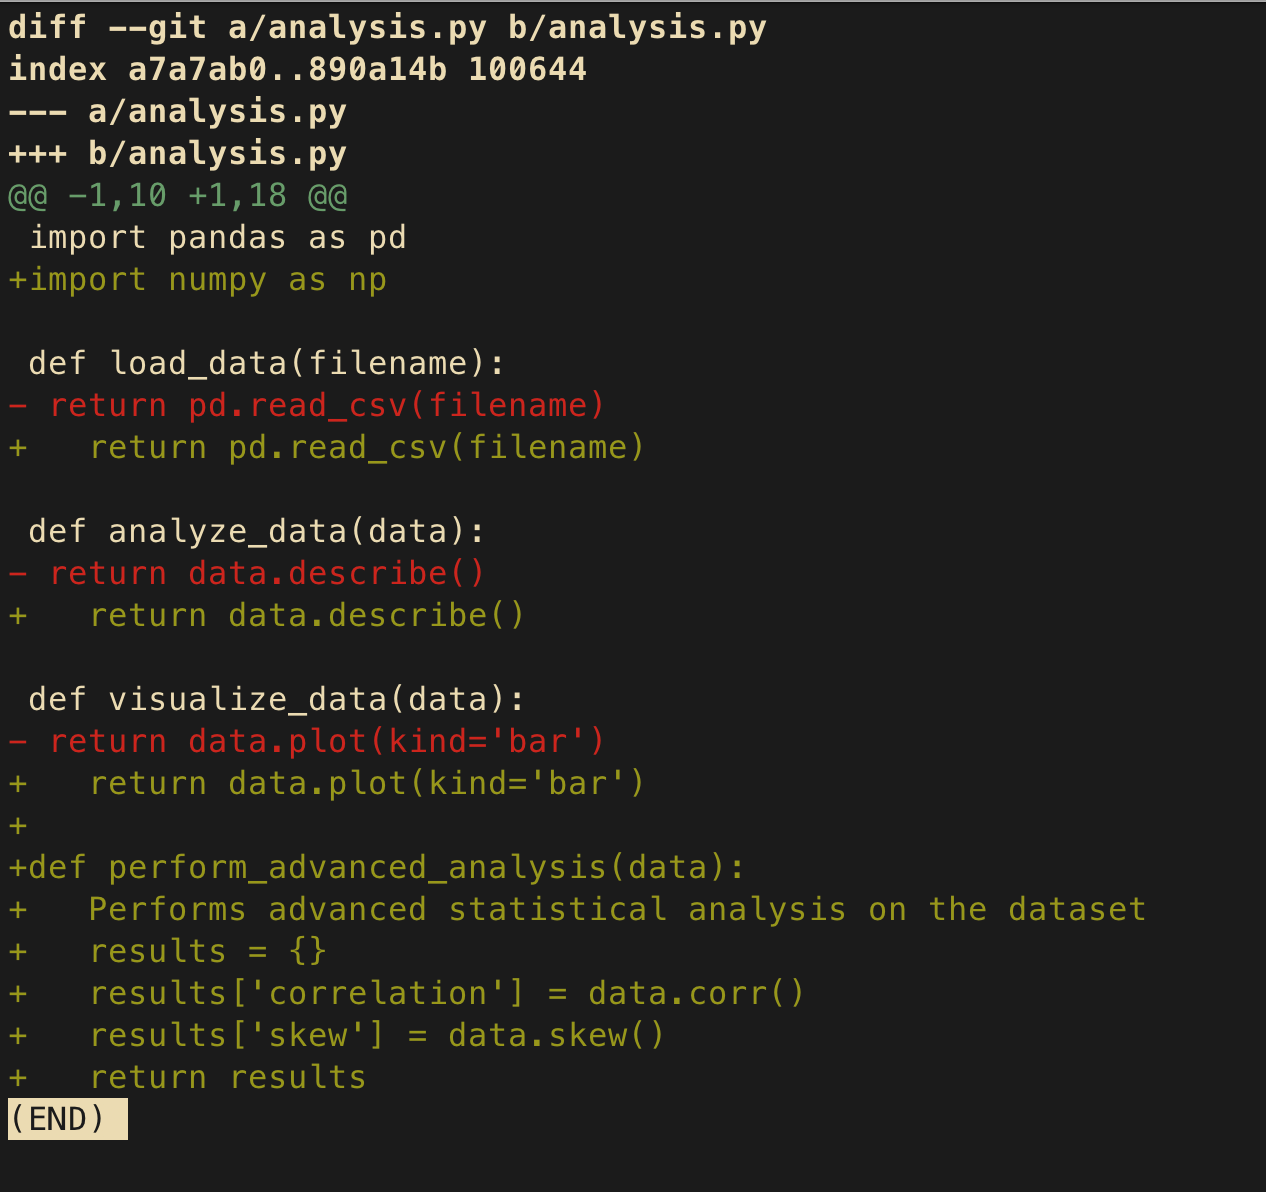
echo "import pandas as pd\n\ndef load_data(filename):\n return pd.read_csv(filename)\n\ndef analyze_data(data):\n return data.describe()\n\ndef visualize_data(data):\n return data.plot(kind='bar')" > analysis.pyNow let’s examine the resulting git diff:
git diffYou’ll see output similar to this:

Note: To quit the git diff output, press “q” on your terminal.
Let’s break down this output:
diff --git a/analysis.py b/analysis.py) shows which file is being compared, which is analysis.pyindex db0e049..a7a7ab0 100644) shows internal Git identifiers for the before and after versions--- a/analysis.py and +++ b/analysis.py) indicate the "before" and "after" files@@ -5,3 +5,6 @@) shows which lines were affected. This notation can be interpreted as:-5,3 means starting at line 5 in the original file, 3 lines are shown in the diff+5,6 means starting at line 5 in the modified file, 6 lines are shown in the diff5. The content changes with lines starting with + showing additions
In larger files, git diff groups change into “hunks” — sections of the file that contain changes. Each hunk has its own header with line numbers to help you locate the changes in the file.
Running git diff without arguments compares your Working Directory (current state of files) to the Staging Area (changes ready to be committed). This is useful for reviewing what you've changed but haven't yet prepared for your next commit.
Let’s modify multiple files to demonstrate:
# Update README.md
echo "# Data Analysis Project\nA sample project to demonstrate git diff functionality.\n\n## Installation\nRun \pip install -r requirements.txt" > README.md

# Update data.csv
echo "id,name,value\n1,alpha,10\n2,beta,20\n3,gamma,30\n4,delta,40" > data.csv
Now let’s stage only the README.md changes:
git add README.mdRunning git diff now will show only the unstaged changes to data.csv and the analysis.py file above:
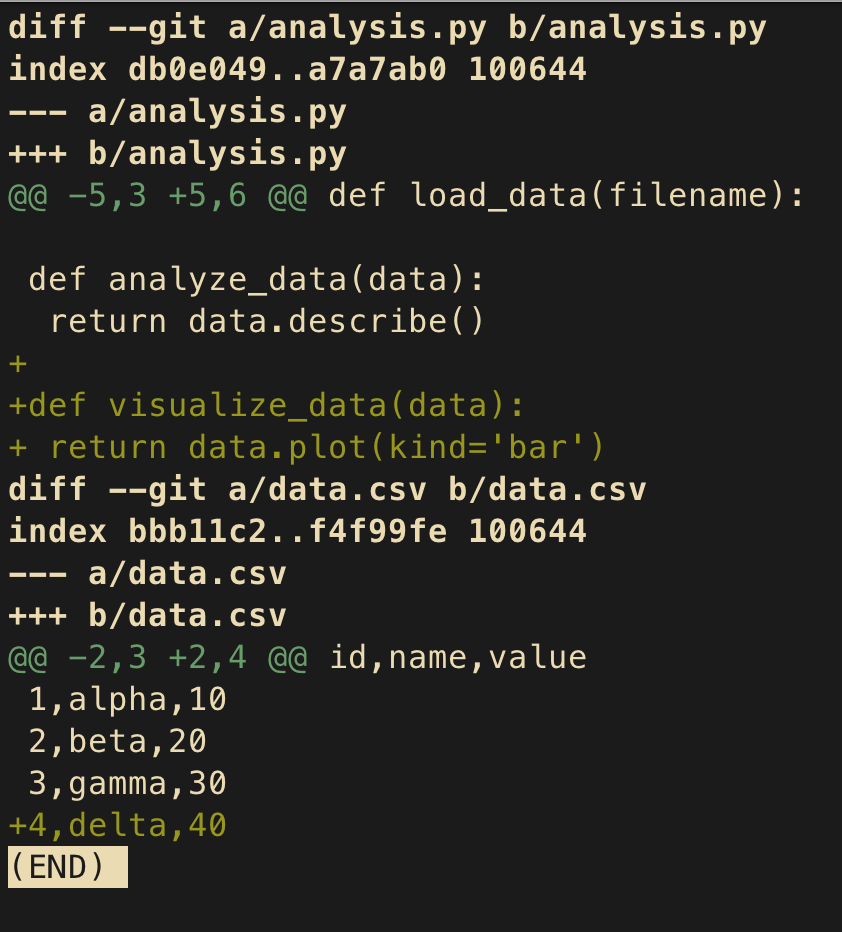
This helps you focus on what you haven’t staged yet. If you want to see what you’ve already staged:
git diff --staged # or git diff --cached (they're synonyms)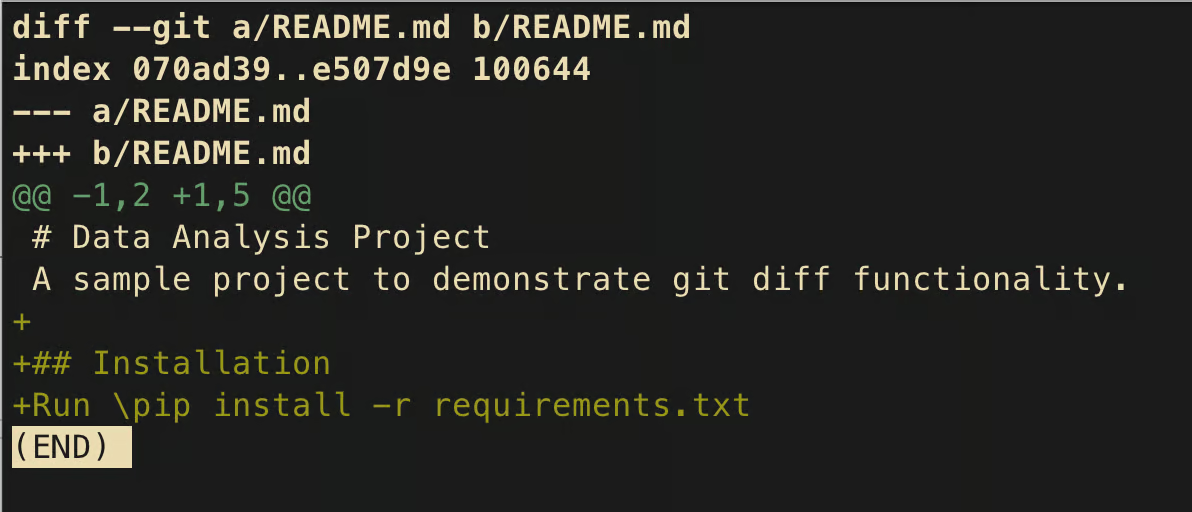
This will show the changes to README.md that are staged and ready to commit. This workflow is crucial for building clean, logical commits. You can stage portions of your work that make sense together, review the staged diff to verify it’s a coherent unit of change, and then commit it.
The git diff --staged command compares your Staging Area to your last commit. This shows you exactly what will be included in your next commit if you run git commit now.
Let’s stage our data.csv changes and examine what’s staged:
git add data.csv
git diff --staged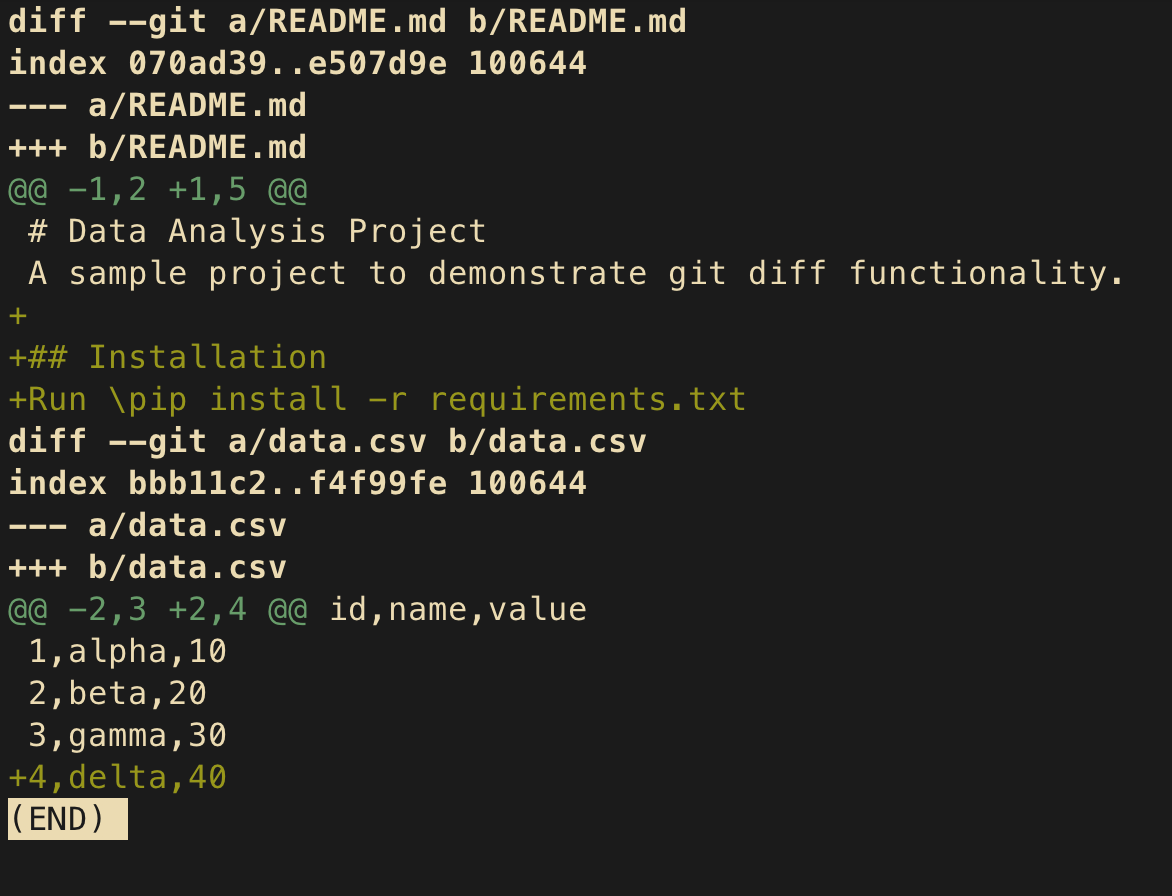
The output will now show changes to both README.md and data.csv, as both have been staged. This review step is critical before committing — it acts as your last line of defense against committing unintended changes.
A common workflow might look like:
git diff to review all changesgit add <file> selectively to stage logical groups of changesgit diff --staged to verify what's about to be committedgit commit -m "Your message"This methodical approach helps maintain a clean, meaningful commit history that makes it easier to understand how your project evolved and to pinpoint where issues might have been introduced. As you gain experience, these diff commands will become second nature, serving as your constant companions in the development process.
Let’s make our commits before moving on to the next stage:
# data.csv and README.md are to be committed
git commit -m "Modify data.csv and README.md files"

# Stage and commit analysis.py
git add analysis.py
git diff --staged  # Review the changes one more time
git commit -m "Add a new function to analysis.py"Now that we understand the basics of git diff, let’s explore more powerful techniques that will enhance your ability to track and analyze changes in your projects. We’ll continue working with our data analysis project to demonstrate these intermediate concepts.
Git is built around the concept of references — pointers to specific states of your code. These references include branches, commits, and tags. The git diff command can compare any two of these references to show what changed between them.
Let’s create a new branch for developing a feature and make some changes:
# Create and switch to a new branch
git checkout -b feature/advanced-analytics

# Modify the analysis.py file with a new function
echo "import pandas as pd
import numpy as np

def load_data(filename):
   return pd.read_csv(filename)

def analyze_data(data):
   return data.describe()

def visualize_data(data):
   return data.plot(kind='bar')

def perform_advanced_analysis(data):
   """Performs advanced statistical analysis on the dataset"""
   results = {}
   results['correlation'] = data.corr()
   results['skew'] = data.skew()
   return results" > analysis.py

# Commit the changes
git add analysis.py
git commit -m "Add advanced analysis function"
Now we can compare our feature branch to the main branch:
git diff main feature/advanced-analyticsThis command shows all differences between the two branches — every file that’s been modified, added, or deleted. You’ll see the changes we made to analysis.py, including our new imports and function (press enter multiple times as the full diff is truncated in the terminal).
To compare with a specific commit, you can use the commit hash:
git log --oneline # Find the commit hash you want to compare with
git diff 7b3105e # Replace 7b3105e with the actual commit hash you want to compareThis comparison capability becomes invaluable when:
When working with large repositories, you often want to focus on changes to specific files or directories rather than seeing all the differences. Git diff makes this easy by allowing you to specify paths.
Let’s make changes to multiple files:
# Update config.txt
echo "DEBUG=True
DATABASE_PATH=./data/
LOG_LEVEL=INFO" > config.txt

# Update utils.py
echo "def normalize_data(data):
   return (data - data.min()) / (data.max() - data.min())

def clean_data(data):
   return data.dropna()" > utils.py
To see changes to only the config file:
git diff config.txtOr to compare a specific file between branches:
# Compare analysis.py file between main and feature/advanced-analytics branches
git diff main feature/advanced-analytics -- analysis.py
The -- in the command above helps Git distinguish between references and file paths. This is particularly useful when:
Git diff provides several options to adjust how differences are displayed, making it easier to focus on meaningful changes.
For instance, when dealing with code formatting changes, whitespace differences can obscure important semantic changes. Let’s demonstrate with a formatting change:
# Make a whitespace change to analysis.py
sed -i '' 's/    return/  return/g' analysis.py  # Reduce indentation
Now, comparing with standard git diff shows whitespace changes (notice how the return statements are misaligned):
git diff analysis.py

# OUT:
--- a/analysis.py
+++ b/analysis.py
@@ -2,17 +2,17 @@ import pandas as pd
import numpy as np

def load_data(filename):
-    return pd.read_csv(filename)
+  return pd.read_csv(filename)

def analyze_data(data):
-    return data.describe()
+  return data.describe()

def visualize_data(data):
-    return data.plot(kind='bar')
+  return data.plot(kind='bar')

def perform_advanced_analysis(data):
    Performs advanced statistical analysis on the dataset
    results = {}
    results['correlation'] = data.corr()
    results['skew'] = data.skew()
-    return results
+  return results
But we can ignore whitespace changes (this shows no changes as we only removed whitespace):
git diff -w analysis.py # or --ignore-all-spaceAnother useful option is controlling context lines — the unchanged lines shown around modifications:
git diff -U1 analysis.py  # Show only 1 line of context (default is 3)
git diff -U5 analysis.py  # Show 5 lines of context
These contextual options are particularly valuable when:
By mastering these intermediate techniques, you’ll have much finer control over how you review and understand changes in your codebase, making your development workflow more efficient and your code reviews more effective.
Let’s commit the latest changes before we move on to advanced git diff applications:
git add .
git commit -m "Modify analysis.py, config.txt, and utils.py"Building on our understanding of git diff’s intermediate techniques, let’s explore some advanced applications that will take your Git skills to the next level. These advanced techniques are particularly useful when working on complex codebases or collaborating with larger teams.
While Git’s built-in diff is powerful, sometimes a visual diff tool provides better clarity, especially for complex changes. Git allows you to configure external tools to enhance your diff experience.
Let’s set up a popular visual diff tool. We’ll use VSCode as an example, but similar configuration works for tools like Beyond Compare, Meld, or KDiff3:
# Configure Git to use VSCode as the diff tool (project-specific)
git config diff.tool vscode
git config difftool.vscode.cmd "code --wait --diff \$LOCAL \$REMOTE"

# To use other popular tools, you could use:
# For Beyond Compare (project-specific):
git config diff.tool bc3
git config difftool.bc3.path "/path/to/beyond/compare"

# Installation commands:
# For Beyond Compare:
# On macOS: brew install --cask beyond-compare
# On Ubuntu: sudo apt-get install beyond-compare
# On Windows: Download from https://www.scootersoftware.com/download.php

# Note: To apply these settings globally instead of just the current project,
# add the --global flag to each command, for example:
# git config --global diff.tool vscode
Now instead of using git diff, you can use:
git difftool main feature/advanced-analyticsThis will open your configured visual diff tool to display the changes. Here is what Beyond Compare looks like:
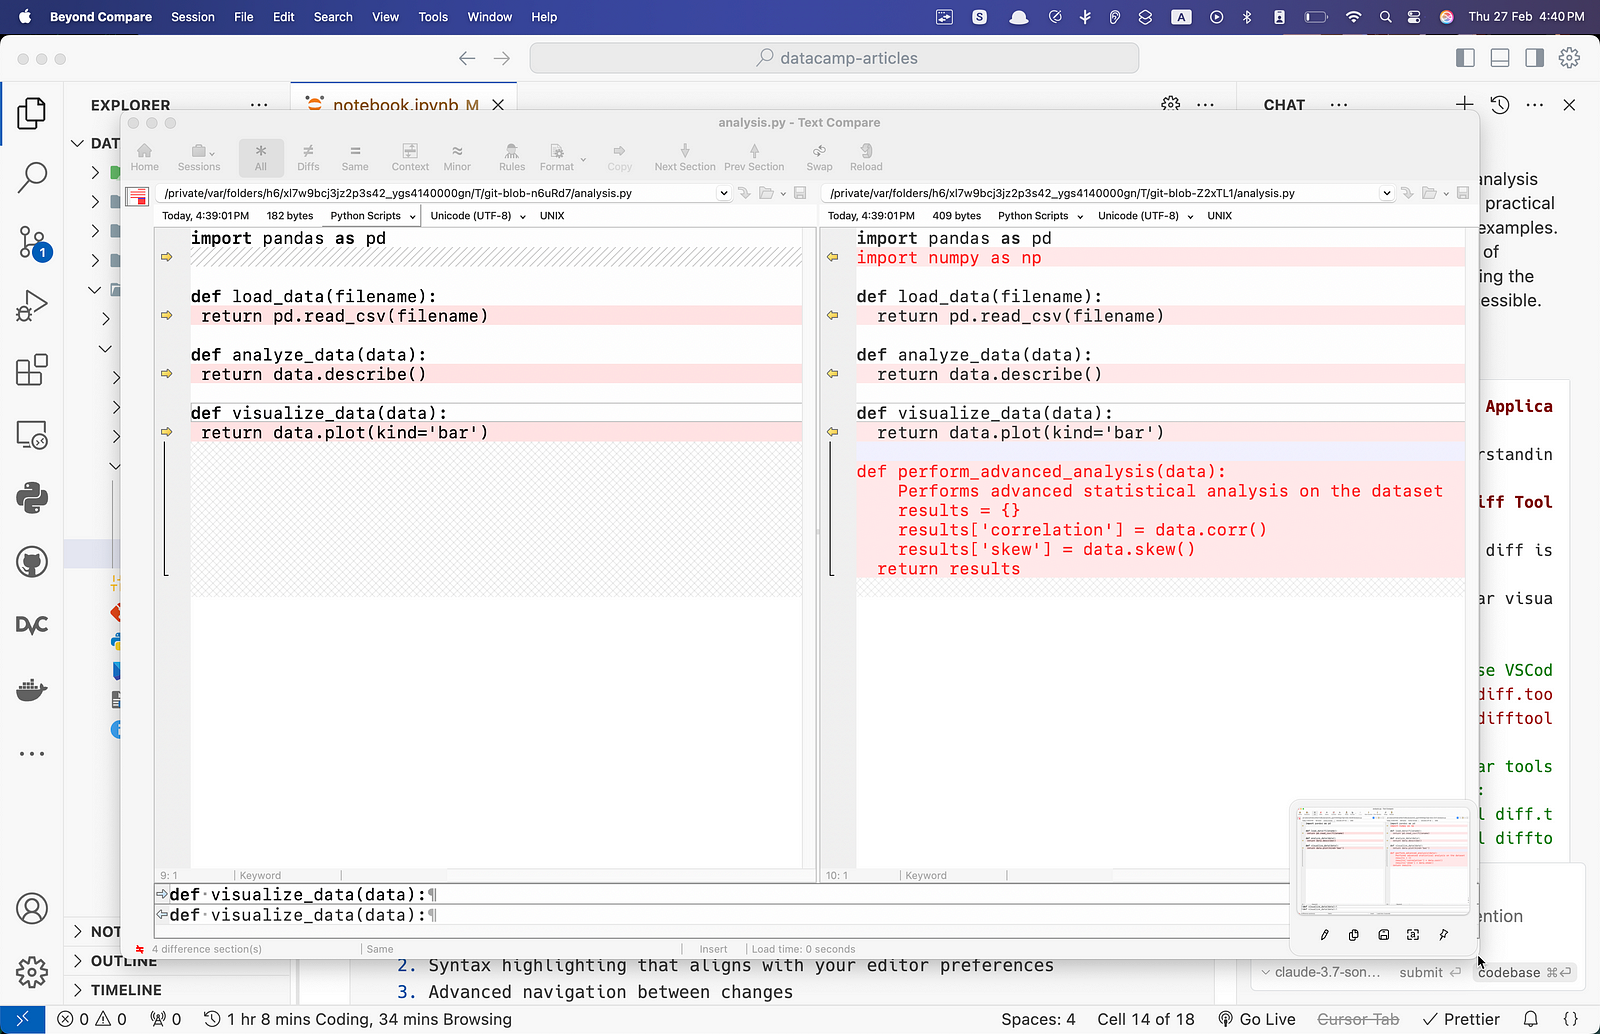
Visual diff tools provide several advantages:
When reviewing large changes or files with complex structures (like nested JSON or XML), visual diff tools can dramatically improve comprehension and efficiency.
Git offers specialized diff commands that give you more granular control for specific use cases. Let’s explore some of these powerful commands:
git diff-tree examines differences between tree objects (directories):
# Get the hash of the last two commits
LAST_COMMIT=$(git rev-parse HEAD)
PREV_COMMIT=$(git rev-parse HEAD~1)

# Show changes in the last commit
git diff-tree --patch $PREV_COMMIT $LAST_COMMIT
git diff-index compares the working tree with the index (staging area) or a tree:
# Compare working directory with the index
git diff-index --patch HEAD
git diff-index is particularly useful for scripting and automation. It allows you to programmatically check what changes would be included in your next commit, making it valuable for pre-commit hooks and validation scripts.
For example, you might use it in a CI/CD pipeline to verify that certain files haven’t been modified or to ensure that configuration changes follow specific patterns before allowing commits.
git diff-files shows changes between files in the working directory and the index:
# Check differences for specific files
git diff-files --patch config.txt
These specialized commands are particularly useful for:
One of git diff’s most powerful applications is analyzing how code has evolved over time, which can be crucial for debugging or understanding feature development.
Let’s examine a specific commit using the special ^! notation:
# Get the hash of our advanced analytics commit
ANALYTICS_COMMIT=$(git log --oneline | grep "advanced analysis" | cut -d ' ' -f 1)

# Show only changes introduced in that specific commit
git diff $ANALYTICS_COMMIT^!
The ^! syntax is shorthand for comparing a commit with its parent, showing exactly what changed in just that commit.
To trace how a specific file evolved over time:
# Analyze how analysis.py changed over the last 3 commits
git log -p -3 analysis.py
When hunting for a bug, you can use git diff with git bisect:
# Add a bug to simulate a regression
echo "import pandas as pd
import numpy as np

def load_data(filename):
   # Bug: accidentally returning None instead of the data
   pd.read_csv(filename)
   return None

def analyze_data(data):
   return data.describe()

def visualize_data(data):
   return data.plot(kind='bar')

def perform_advanced_analysis(data):
   results = {}
   results['correlation'] = data.corr()
   results['skew'] = data.skew()
   return results" > analysis.py

git add analysis.py
git commit -m "Update analysis.py with a hidden bug"

# Now use git bisect to find when the bug was introduced
git bisect start
git bisect bad  # Mark current commit as containing the bug
git bisect good main  # Mark the main branch as working correctly

# Git will check out commits for you to test
# Once found, you can examine the exact change that introduced the bug
git diff HEAD^!
Git bisect is a powerful debugging tool that performs a binary search through your commit history to find which commit introduced a bug. Combined with git diff, it creates an efficient workflow:
1. Start the bisect process with git bisect start
2. Mark the current commit as bad (containing the bug) with git bisect bad
3. Mark a known good commit (where the bug doesn’t exist) with git bisect good <commit-hash>
4. Git automatically checks out a commit in the middle of your history for you to test.
5. After testing the current commit, tell git the result:
git bisect badgit bisect good6. Git will continue checking out different commits based on your feedback (after each git bisect bad/good command), narrowing down the search each time. Repeat the testing and marking process until git identifies the first bad commit.
7. Once git finds the problematic commit, it will display a message indicating which commit introduced the bug.
8. Examine exactly what changed in the identified commit with: git diff HEAD^!
9. This command shows you precisely what code was modified in the commit that introduced the bug, allowing you to focus your debugging efforts on those specific changes.
10. Get out of bisect at any time with: git bisect reset This will return you to the branch you were on before starting the bisect process.
11. You can also automate the bisect process with: git bisect run <test-script> Where is a command that returns 0 for good commits and non-zero for bad commits.
This workflow dramatically reduces debugging time, especially in large codebases with many commits between working and broken states.
These history analysis techniques are invaluable for:
By mastering these advanced git diff applications, you’ll be able to navigate your project’s history with precision, debug issues more efficiently, and gain deeper insights into your codebase’s evolution.
Git diff offers a wide range of options to customize its output and behavior for specific situations. Here’s a comprehensive reference of the most commonly used parameters to enhance your differential analysis:
git diff - Compare working directory to staging areagit diff --staged (or --cached) - Compare staging area to last commitgit diff HEAD - Compare working directory to last commitgit diff <commit> - Compare working directory to specific commitgit diff <commit1> <commit2> - Compare two specific commitsgit diff <branch1> <branch2> - Compare two branchesgit diff -- <path> - Limit comparison to specific file or directorygit diff --stat - Show summary of changes (files changed, insertions, deletions), a very useful option for large diffsgit diff --name-only - Show only names of changed filesgit diff --name-status - Show names and status (added, modified, deleted) of changed filesgit diff -w (or --ignore-all-space) - Ignore whitespace changesgit diff --ignore-space-change - Ignore changes in amount of whitespacegit diff --color-words - Show word-level differences with colorgit diff --word-diff - Show word-level differences in a different formatgit diff -U<n> - Show n lines of context (default is 3)git diff --no-prefix - Don't show a/ and b/ prefixes in diff outputgit diff --binary - Show changes to binary filesgit diff -S<string> - Look for changes that add or remove the specified stringgit diff -G<regex> - Look for changes that match the specified regex patterngit diff --pickaxe-all - When using -S or -G, show all changes in the file, not just matching onesgit diff --patch-with-stat - Show patch and stats summarygit diff --compact-summary - Show stats summary in a compact formatgit diff --numstat - Show stats in a machine-friendly formatgit diff --summary - Show creation/deletion summaryThese options can be combined to create powerful, targeted comparisons. For example, to see word-level changes in a specific file while ignoring whitespace:
git diff --color-words -w -- analysis.pyOr to find all places where a specific function might have been added or removed:
git diff -S"def perform_advanced_analysis" main feature/advanced-analyticsUnderstanding these options helps you cut through noise and focus precisely on the changes that matter, making your code review and analysis workflows more efficient. Whether you’re hunting for bugs, preparing for a pull request, or just trying to understand what changed, the right git diff option can make your task significantly easier.
Throughout this article, we’ve explored git diff as a versatile command for viewing code changes. We’ve covered comparing working files against staged changes, examining differences between branches and commits, and using specialized commands for deeper insights. Incorporating git diff into your workflow helps build cleaner commits, catch issues early, and facilitate better code reviews.
Whether working solo or in a team, mastering git diff elevates you from simply writing code to understanding how your codebase evolves over time.
To continue building your Git expertise, check out these valuable resources:
These resources will help you build on what you’ve learned about git diff and elevate your version control mastery to the next level.
Top DataCamp Courses
Course
Course
blog
Srujana Maddula
15 min
Tutorial
François Aubry
Tutorial
Kurtis Pykes
Tutorial
Abid Ali Awan
Tutorial
François Aubry
Tutorial
Zoumana Keita