
Track
GitHub Foundations
10 hr
Git is an essential tool for anyone working with code, whether you're a software developer, data scientist, data engineer, or machine learning practitioner. It allows teams to collaborate on the same project simultaneously while providing a clear history of code modifications, making tracking and managing updates easy.
In this article, I’ll walk you through the most commonly used Git commands, their syntax, and how to apply them in your daily work!
The basic steps of working with Git include creating a repository, copying an existing one, and editing the code. This section discusses these foundational git functions in detail, along with the syntax to implement them.
Need to install Git? follow this guide to install Git on your system.
The git init command creates a new Git repository or reinitiates an existing one.
When you run the command, your current directory becomes a Git repository, allowing you to track its changes. It adds a hidden .git folder in the directory, where Git stores all metadata, version history, and logs related to the project.
To copy a Git repository from one location to another, we use the git clone command. It usually copies an existing repository, including logs and versions, from remote servers like GitHub or GitLab to your local machine.
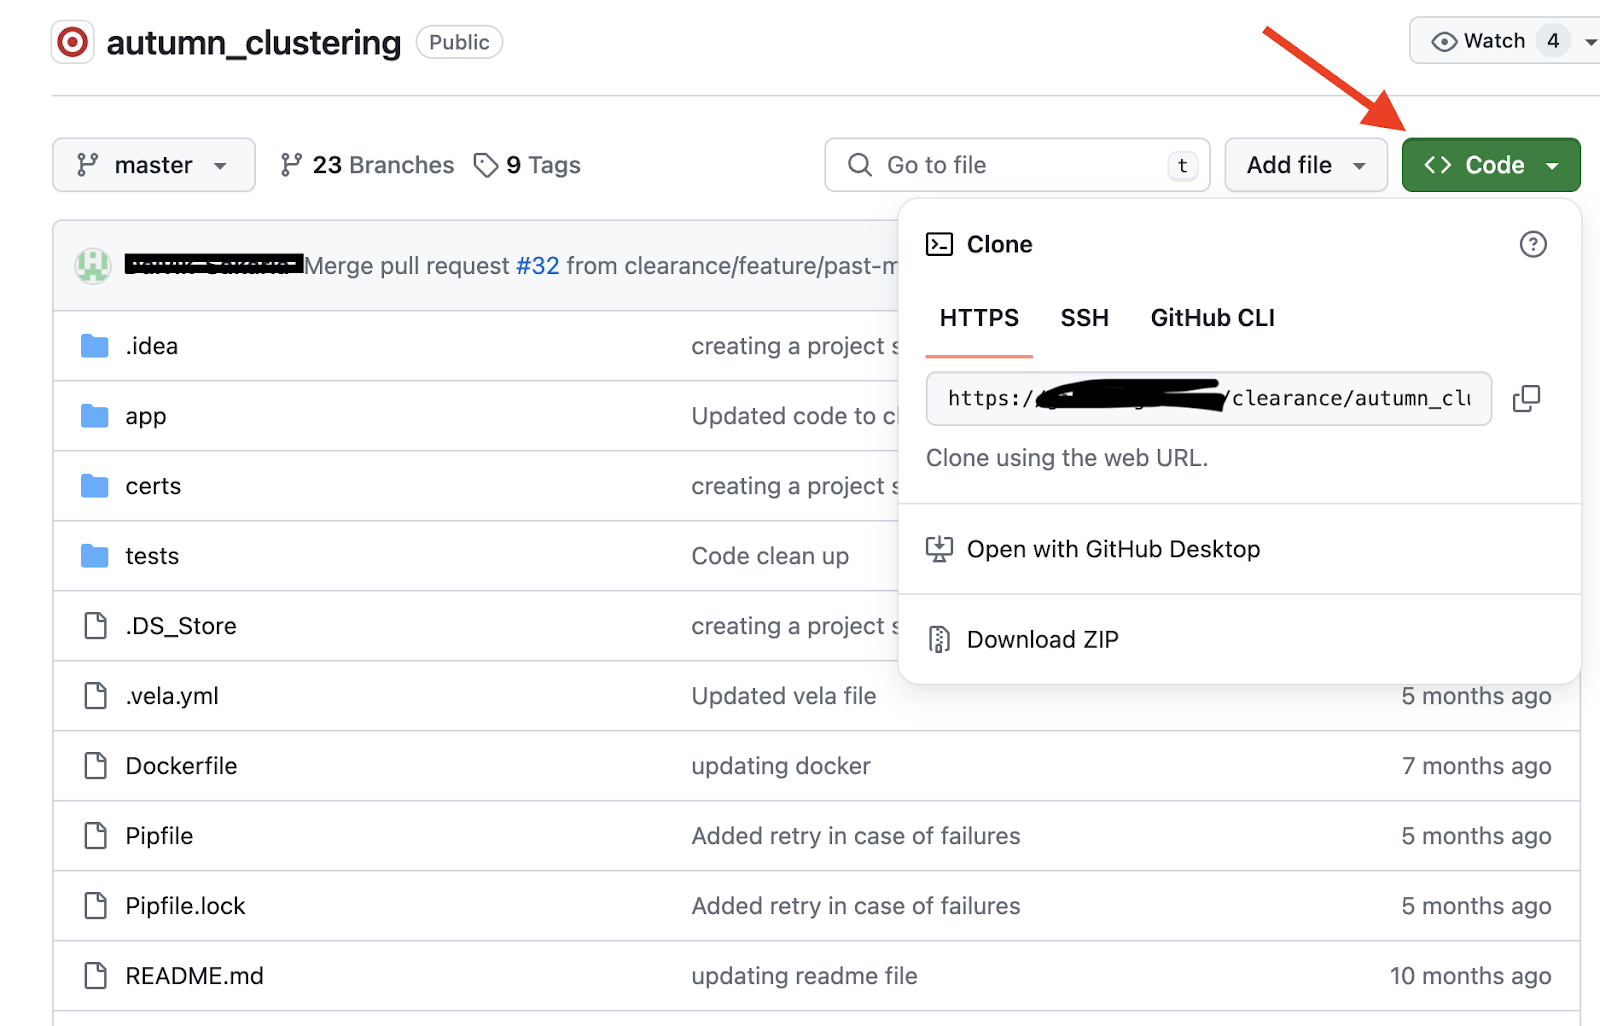
Step 1: Navigate to the GitHub repository you want to clone and click “Code”.
git clone command
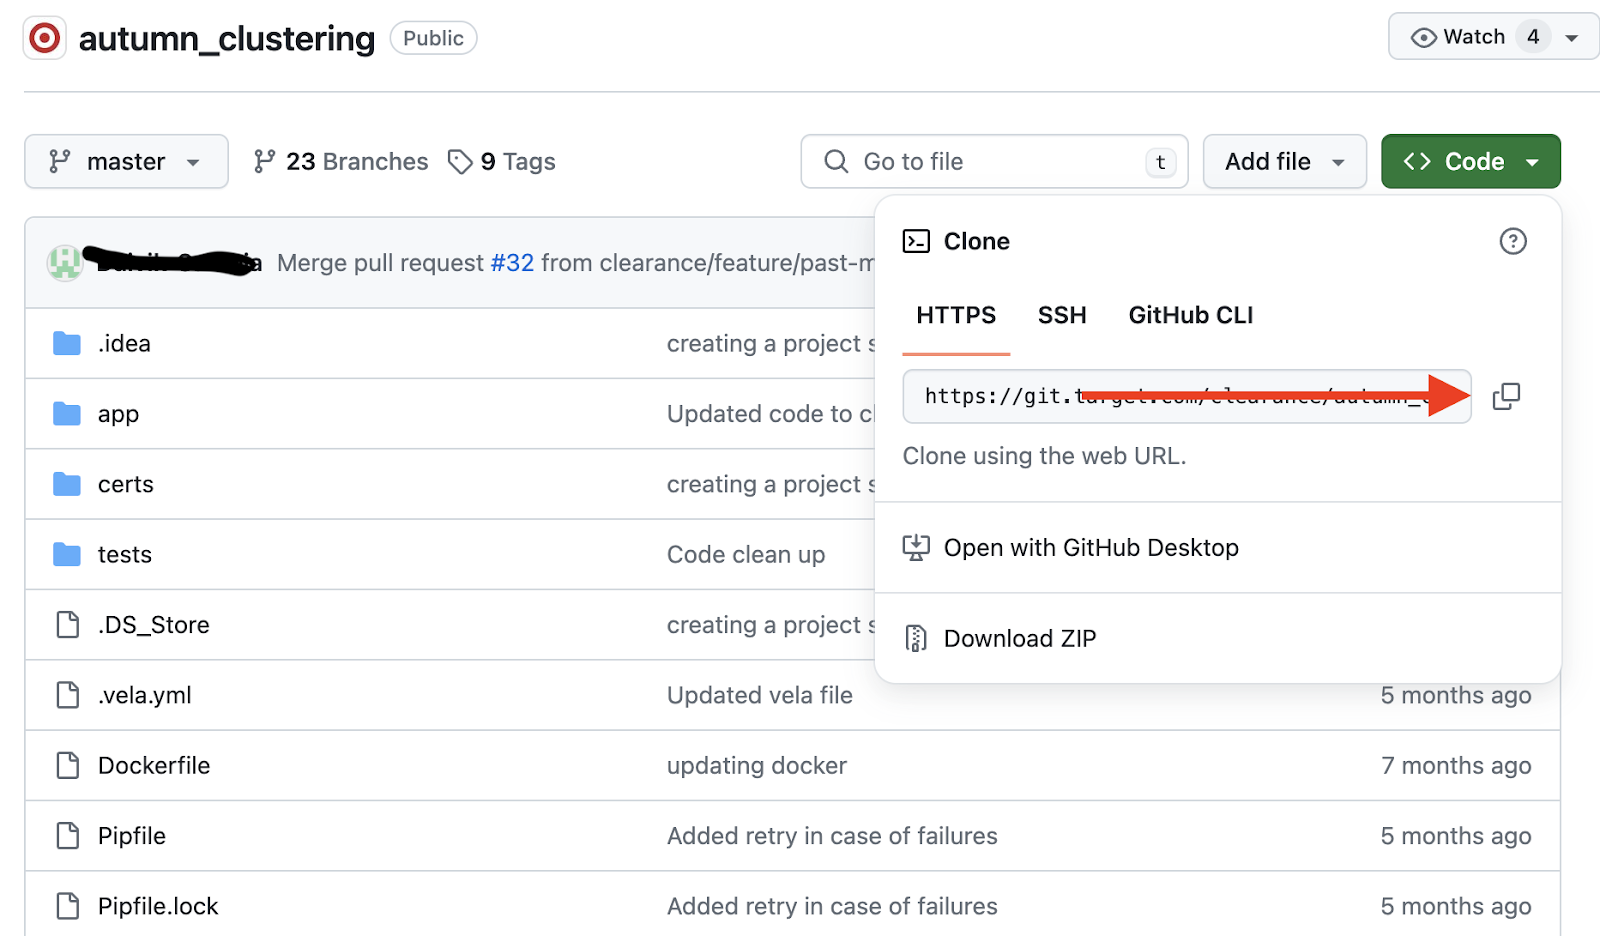
Step 2: Copy the URL as shown in the image.
git clone basic command
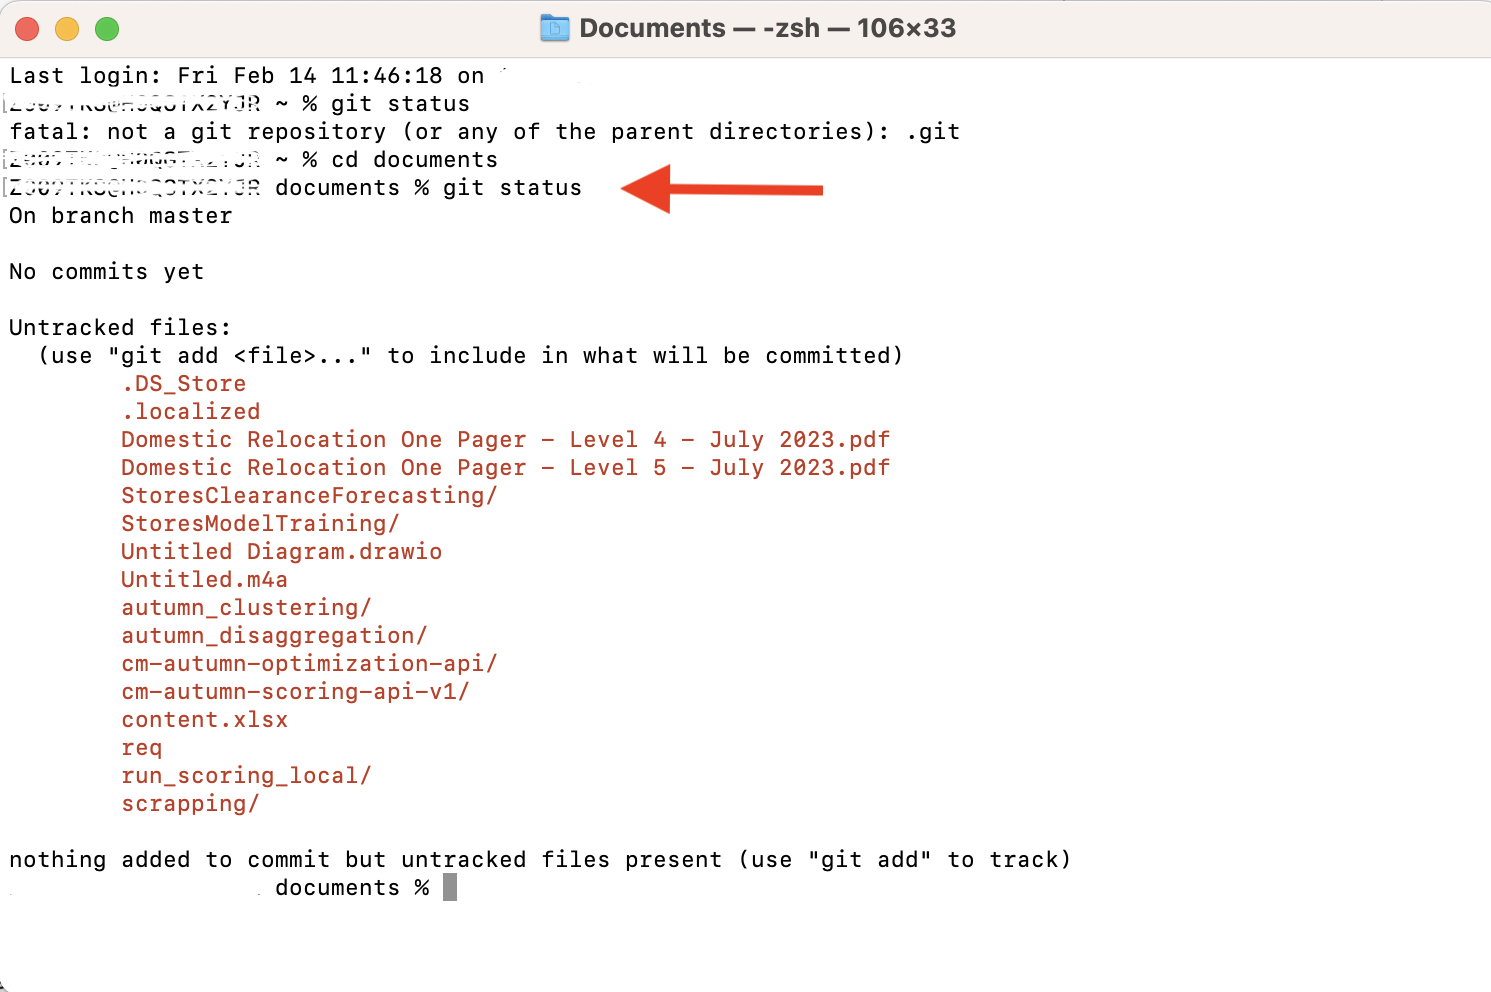
Step 3: Go to the directory where you want to clone this repository in the local machine and execute the following command:
git clone <copied_URL>The git status command shows us details about:
Here’s the syntax:
git status
Git status command
The git add command adds your changes to the staging area. It tells Git that the repository should update these changes once the user runs the commit command.
git add . : stages the changes made to all files. git add <file_name>: includes only the changes made to a specific file in the staging area.A git commit command saves the changes you have made (or staged) to the local repository. Each time you run git commit, Git creates a snapshot of your repository at that point. This allows you to roll back to a previous commit whenever needed.
Here’s the syntax:
git commit -m "commit_message"The commit message is a brief description of the changes made in a commit.
GitHub hosts various applications on its remote servers, allowing developers to track and manage them. In this section, we’ll see how to extract, transfer, and interact with those remote repositories using Git commands.
Want to learn how GitHub works? Start with an Introduction to GitHub Concepts to understand repositories, pull requests, and collaboration best practices.
The git remote add command creates a connection between your local Git repository and the remote Git repository, enabling you to push and pull changes between them:
git remote add <repo_name> <remote_url><repo_name>: a nickname for the remote repository(“origin” by default).<remote_url>: remote repository URL.The git push command syncs your remote repository with the local repository. Once you run this command, the remote repository will reflect all the changes you committed locally.
git push <remote> <branch><remote>: alias to the remote repository (“origin” by default).<brach>: name of the branch you want to push.There are some variations of git push, for example:
git push ---all originThe above command pushes all your local branches to the remote repository.
git push --force origin mainThe above command overwrites the main branch on the remote repository with your local main branch. Be cautious while using it, as the remote main branch might lose all its history.
The git pull command fetches and merges the changes in the remote repository with those in the local repository.
The git pull command combines two commands: git fetch and git merge.
First, git fetch retrieves all changes from the remote repository, including new commits, tags, and branches. Then, git merge executes, integrating those changes to the current local branch.
Here’s the syntax:
git pull origin feature-branchThe above command fetches data from the feature_branch on the remote repository and commits it to your current local branch.
The git fetch command lets you review changes in the remote repository before merging them into your local. It downloads the changes and updates them to remote tracking branches. For those unfamiliar, remote tracking branches are copies of remote repository branches.
For example, the following command downloads the changes in the remote repository and updates them in remote tracking branches under origin:
git fetch originGit branching allows developers to work independently on new features or bug fixes without affecting the main repository. Once the changes are ready, merging integrates them into the primary codebase. Let’s explore the key commands involved in this process.
The git branch command lists, creates, or deletes branches. A branch is another version of your repository.
If you’re developing a new feature for your application, you can create and work on a new branch.You can merge this new branch to the main branch once the changes are ready and tested. This allows you to work on new features independently without directly messing with the main line.
git branch: outputs the list of all branches in the repository.git branch <branch_name>: creates a new branch named “branch_name”.git branch -d <branch_name>: Deletes the branch named “branch_name”.The git checkout command can do two things: switch between branches or restore files to a previous state.
git checkout branch_name command was used to switch from your current branch to another. But it wasn’t just for switching from the existing one; you can also create and switch to a new branch.The following command creates a new branch named “feature_branch” and switches to it:
git checkout -b feature_branchHowever, in the latest version of Git, git checkout is replaced with git switch to restore files.
git checkout -- <file-name>You can also do it with a file from another branch as follows:
git checkout <branch-name> -- <file-name>If you have done some work in a new branch, you can merge it to the main branch using git merge to implement the changes. Git performs merge in two ways:
For example:
      C---D---F (feature-branch)
     /
A---B---E---G (main)
At commit B, the feature branch C is created. The main branch has extra commits, E and G, even after creating the feature branch. Therefore, the feature is merged into the main, creating a new merge commit M as follows:
      C---D---F (feature-branch)
     /         \
A---B---E---G---M (main)
git rebase is another way to integrate changes between branches, but it works differently compared to git merge. Merge keeps the full history of both the main and feature branches. Rebase, on the other hand, overwrites the commit history to make it linear and clean.
Moreover, merge requires an extra merge commit, while rebase does not create any new commits. Git rebase performs two steps:
For example:
      C---D---F (feature-branch)
     /
A---B---E---G (main)git checkout feature_branch.git rebase main: Moving the entire feature branch onto the main branch by reapplying the commits C, D, F as C’, D’, and F’ on top of the latest commit G on the main branch. This creates a linear commit history as follows:A---B---E---G---C'---D'---F' (main)Since merge and rebase operations are often confused, here’s a summary of the differences:
|
Merge |
Rebase |
|
It preserves the entire commit history of both branches. |
It overwrites the commit history to make it linear. |
|
An extra merge commit is created. |
No extra commits are created. |
|
The branch structure is visible in the history. |
It makes the commit history look like a straight line. |
|
Use it to keep track of each branch’s commit history, including a timeline of when they were merged. |
Use it when you need clear and easy-to-understand commit history. |
Want to learn more about working with remote branches? Learn how to check out and track remote branches using git checkout in this step-by-step tutorial.
Git provides several commands to view history and undo the changes at different stages of development. Relevant commands are discussed here.
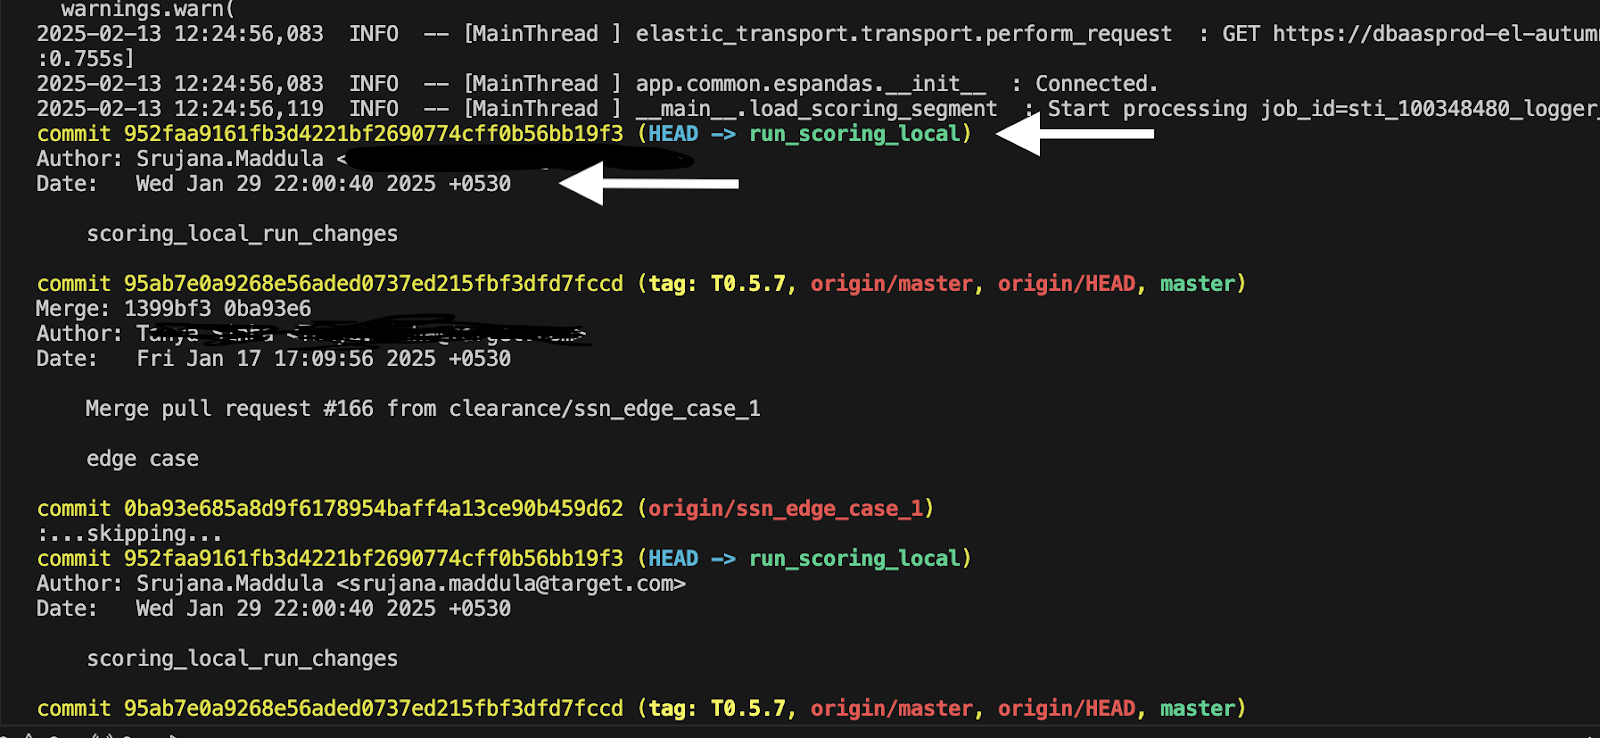
The git log command displays the entire commit history of your current branch. It includes four key fields: commit, author, date, and commit message.
git commit history
The git diff displays the differences between various states of your repository—whether you're comparing your current directory against the staging area, the staging area against the last commit, or even two files or branches, whatever you specify.
git diff - shows the difference between your current working directory and staging area. git diff -- cached: shows the differences between the staging area and the last commit.git diff commit1 commit2 - the difference between commit 1 and commit 2.git diff branch1..branch2 - compares the differences between branch 1 and branch 2.The git reset command lets you undo changes by resetting the current HEAD to a specific previous state. To move the HEAD to a previous commit, you have three variations: “soft”, “mixed”, and “hard” to use with the reset command.
git reset --soft HEAD~1
git reset --mixed HEAD~1
git reset --hard HEAD~1
Need to undo changes in Git? Explore the differences between git reset and git revert in this detailed guide.
When working in Git, you may need to temporarily set aside changes without committing them or clean up unnecessary files cluttering your repository. This is where Git stashing and cleanup commands come in handy.
Suppose you want to move to a previous state but don't want to commit your current progress; you can use git stash. This saves your uncommitted changes temporarily and resets your working directory to the last committed state.
If you have stashed some changes in the past and want to include them in your working directory, use the command git stash pop. This will apply the latest stashed changes to the current directory and remove them from the stash list.
The git clean command deletes untracked files from the Git repository. Use git clean -n command to preview what will be deleted before executing the clear command!
Looking to clean up your Git history? Learn how to combine multiple commits into one with this Git squash tutorial.
Git allows you to configure user settings at different levels. Let’s explore them here.
The git config command allows you to customize Git settings according to your needs. You can configure settings at three levels: local, system, and global level.
These are some common git config commands:
git config -list: Displays Git settings of all levels.git config --global user.name "Your_name": Sets the Git username for all repositories on your system to “Your_name”.git config --global user.email "your.email@example.com": Sets the email address for all repositories on your system.We know that master is the default main branch when initializing a Git repository. But you can rename it to whatever you wish using the following command:
git config --global init.defaultBranch "srujana_master"In the command above, we replaced the default master branch with "srujana_master" at the global level (for all repositories in the system).
You can apply other global-level settings. For example, to change your default text editor to VS code, run the following command:
git config -global core.editor "code-w"You could also create your own Git commands. For example:
git config --global alias.slice branchThe above command creates a new alias slice for branch. So, if you meant to create a new branch, you can execute git slice branch_name instead of git branch branch_name.
Here’s a summary of the Git commands we have explored for you to keep handy:
Using Git effectively goes beyond tracking changes—it’s about maintaining a clean, structured, and collaborative workflow. Following best practices helps ensure that your repository remains organized, your commit history is meaningful, and your development process runs smoothly.
Here are some key habits to adopt when working with Git:
Git is a powerful tool for tracking changes, collaborating with others, and maintaining a well-structured development workflow. In this article, I covered essential Git commands and best practices to help you manage your projects more effectively.
Of course, there’s always more to learn! If you’re just getting started, check out Introduction to Git to build a solid foundation. For those looking to refine their skills further, Intermediate Git dives deeper into advanced workflows and techniques.
Need a quick Git reference for future projects? Keep essential commands handy with this Git cheat sheet!
Learn more about Git with these courses!
Track
Course
Course
Tutorial
Kurtis Pykes
Tutorial
Austin Chia
Tutorial
Bex Tuychiev
Tutorial
Mark Pedigo
Tutorial
Mark Pedigo
Tutorial
Kenny Ang