Track
"Commit early, commit often" is a popular mantra in software development when using Git. Doing so ensures that each change is well-documented, enhances collaboration, and makes it easier to track the project's evolution. However, this can also lead to an overabundance of commits.
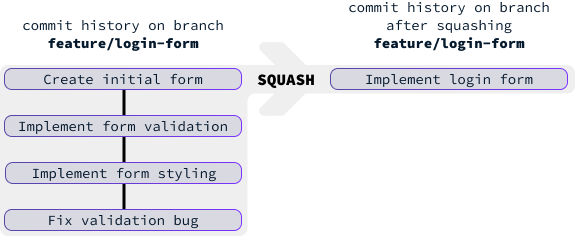
This is where the importance of squashing commits comes into play. Squashing commits is the process of combining multiple commit entries into a single, cohesive commit.
Become a Data Engineer
For instance, let’s say we work on a feature implementing a login form, and we create the following four commits:
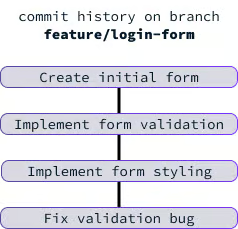
Once the feature is completed, for the overall project, these commits are too detailed. We don’t need to know in the future that we ran into a bug that was fixed during development. To ensure a clean history in the main branch, we squash these commits into a single commit:
How to Squash Commits in Git: Interactive Rebase
The most common method to squash commits is using an interactive rebase. We start it using the command:
git rebase -i HEAD~<number_of_commits>Replace <number_of_commits> with the number of commits we want to squash.
In our case, we have four commits, so the command is:
git rebase -i HEAD~4Executing this command will open an interactive command-line editor:
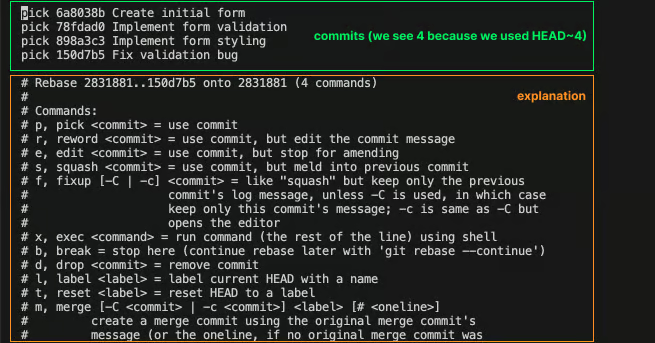
The upper section displays the commits, while the bottom contains comments on how to squash commits.
We see four commits. For each, we must decide which command to execute. We care about the pick (p) and squash (s) commands. To squash these four commits into a single commit, we can pick the first one and squash the remaining three.
We apply the commands by modifying the text preceding each commit, specifically changing pick to s or squash for the second, third, and fourth commits. To make these edits, we need to enter the “INSERT” mode in the command-line text editor by pressing the i key on the keyboard:
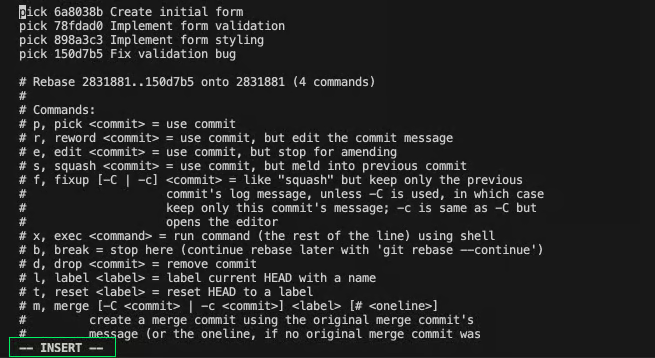
After pressing i, the text -- INSERT -- will appear at the bottom, indicating that we have entered insert mode. Now, we can move the cursor with the arrow keys, delete characters, and type as we would in a standard text editor:
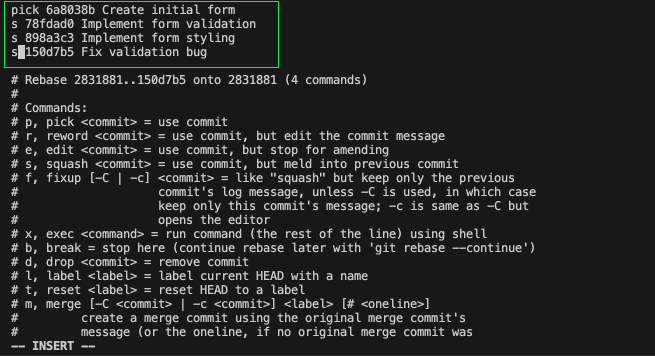
Once we're satisfied with the changes, we need to exit insert mode by pressing the Esc key on the keyboard. The next step is to save our changes and exit the editor. To do this, we first press the : key to signal the editor that we intend to execute a command:
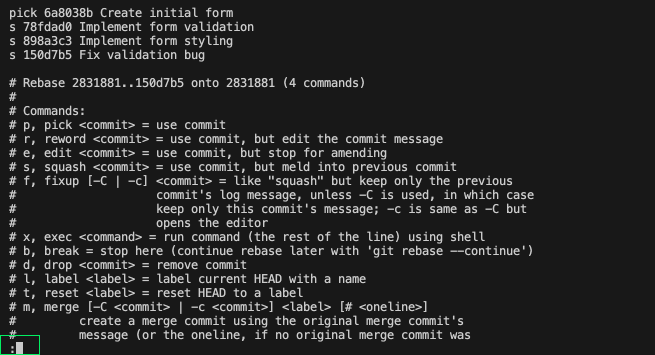
At the bottom of the editor, we now see a semicolon : prompting us to insert a command. To save the changes, we use the command w, which stands for "write". To close the editor, use q, which stands for "quit". These commands can be combined and typed together wq:
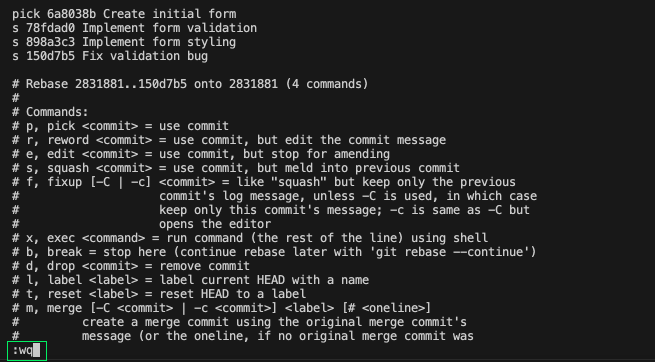
To execute the command, we press the Enter key. This action will close the current editor and open a new one, allowing us to input the commit message for the newly squashed commit. The editor will display a default message comprising the messages from the four commits we are squashing:
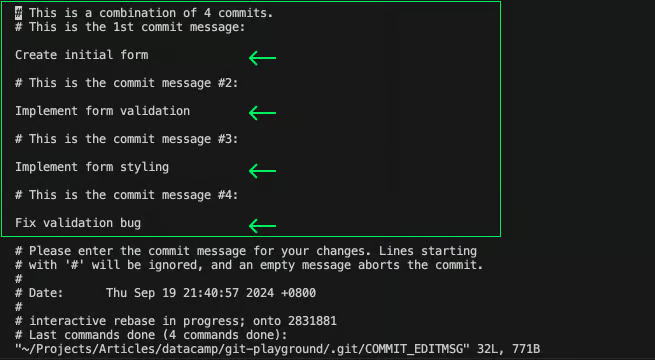
I recommend modifying the message to accurately reflect the changes implemented by these combined commits—after all, the purpose of squashing is to maintain a clean and easily readable history.
To interact with the editor and edit the message, we press i again to enter edit mode and edit the message to our liking.
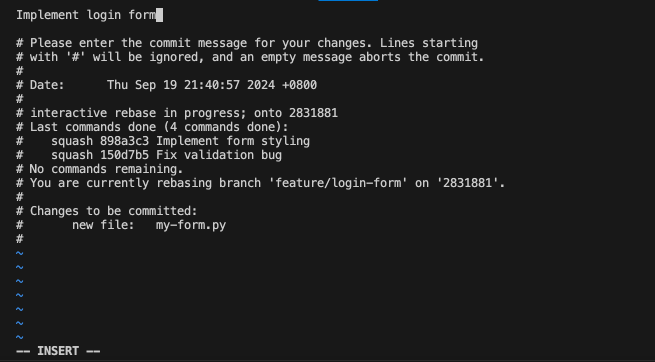
In this case, we replace the commit message with "Implement login form." To exit edit mode, we press Esc. Then save the changes by pressing :, inputting the wq command, and pressing Enter.
How to View the Commit History
Generally, recalling the entire commit history can be challenging. To view the commit history, we can use the git log command. In the mentioned example, before performing the squash, executing the git log command would display:
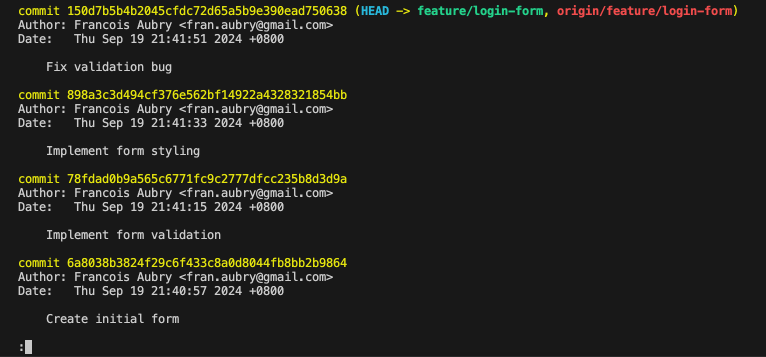
To navigate the list of commits, use the up and down arrow keys. To exit, press q.
We can use git log to confirm the success of the squash. Executing it after the squash will display a single commit with the new message:

Pushing squashed commit
The command above will act on the local repository. To update the remote repository, we need to push our changes. However, because we changed the commit history, we need to force push using the --force option:
git push --force origin feature/login-formForce pushing will overwrite the commit history on the remote branch and potentially disrupt others working on that branch. It’s good practice to communicate with the team before doing this
A safer way to force push, which reduces the risk of disrupting collaborators, is to instead use the --force-with-lease option:
git push --force-with-lease origin feature/login-formThis option ensures we only force push if the remote branch hasn't been updated since our last fetch or pull.
Squashing specific commits
Imagine we have five commits:
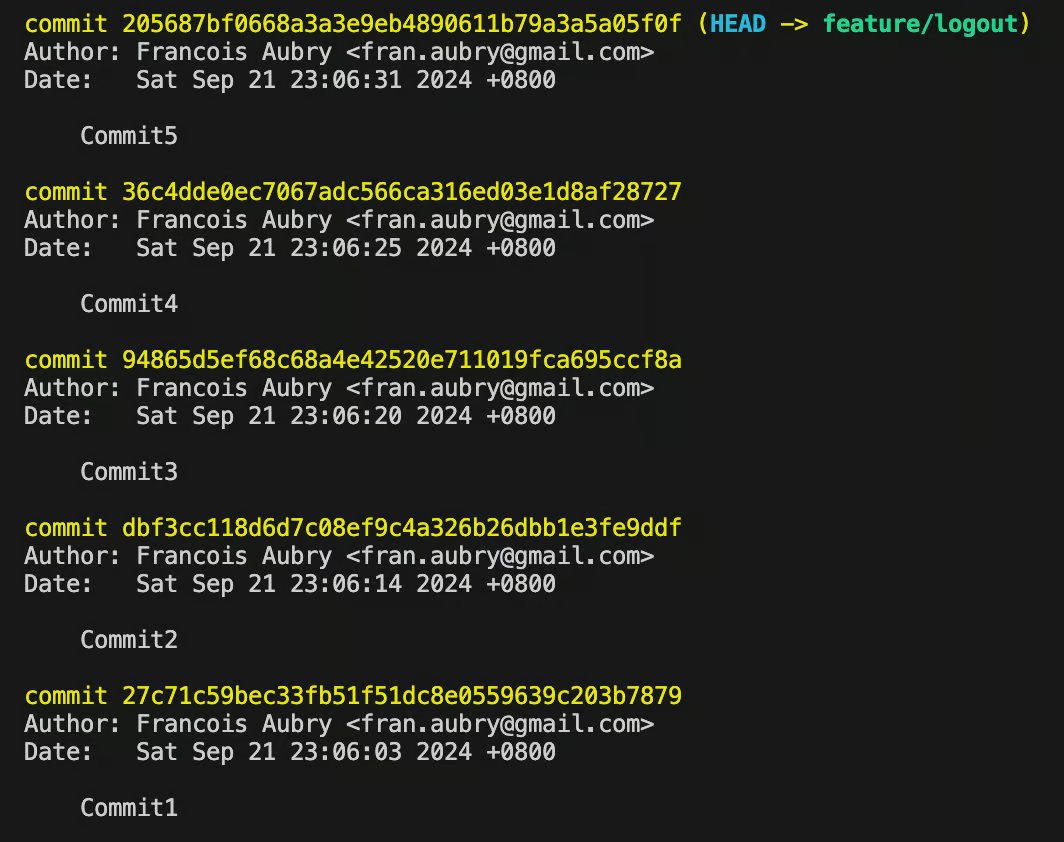
Suppose we want to keep commits 1, 2, and 5 and squash commits 3 and 4.
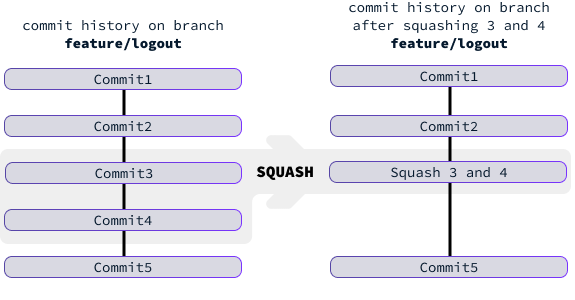
When using interactive rebase, commits marked for squashing will be combined with the directly preceding commit. In this case, it means we want to squash Commit4 so that it merges into Commit3.
To do this, we must initiate an interactive rebase that includes these two commits. In this case, three commits suffice, so we use the command:
git rebase -i HEAD~3Then, we set Commit4 to s so that it is squashed with Commit3:
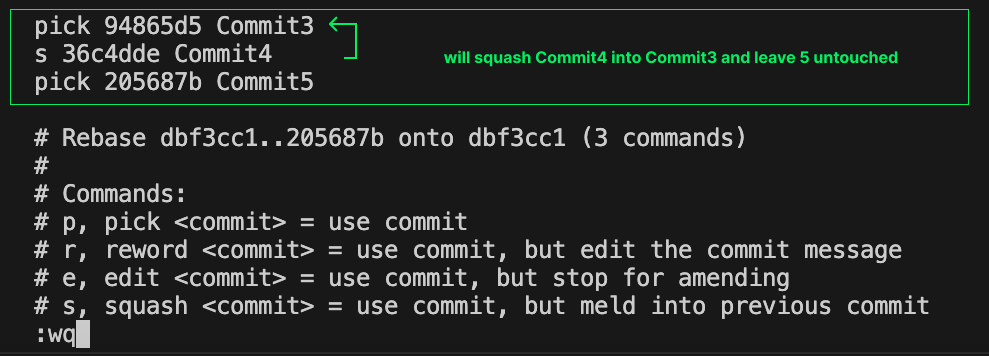
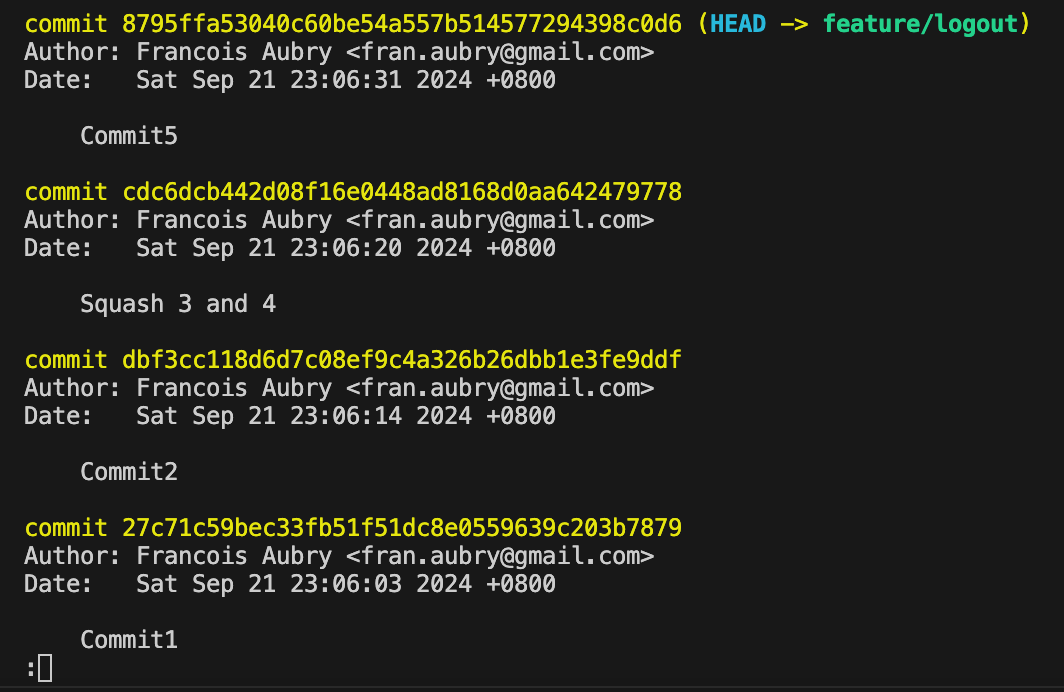
After executing this command and listing the commits, we observe that commits 3 and 4 have been squashed together while the rest remain unchanged.
Squashing from a specific commit
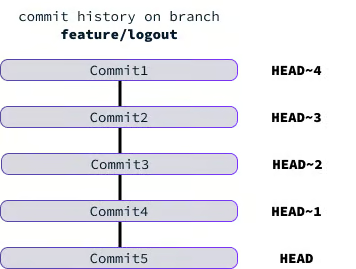
In the command git rebase -i HEAD~3, the HEAD portion is a shorthand for the most recent commit. The ~3 syntax is used to specify an ancestor of a commit. For instance, HEAD~1 refers to the parent of the HEAD commit.
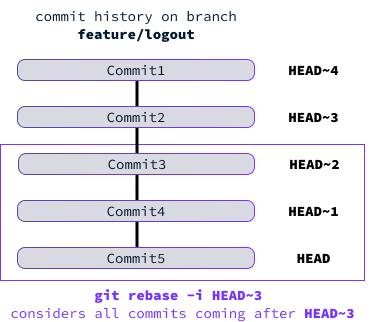
In an interactive rebase, the considered commits include all ancestor commits leading up to the commit specified in the command. Note that the specified commit is not included:
Instead of using HEAD, we can specify a commit hash directly. For example, Commit2 has a hash of dbf3cc118d6d7c08ef9c4a326b26dbb1e3fe9ddf, so the command:
git rebase -i dbf3cc118d6d7c08ef9c4a326b26dbb1e3fe9ddfwould start a rebase considering all commits made after Commit2. Therefore, if we want to start a rebase at a specific commit and include that commit, we can use the command:
git rebase -i <commit-hash>~1Resolving Conflicts When Squashing Commits
When we squash commits, we combine multiple commit changes into a single commit, which can lead to conflicts if changes overlap or diverge significantly. Here are some common scenarios where conflicts might arise:
- Overlapping changes: If two or more commits being squashed have modified the same lines of a file or closely related lines, Git may not be able to automatically reconcile these changes.
- Differing changes state: If one commit adds a certain piece of code and another commit modifies or deletes that same piece of code, squashing these commits can lead to conflicts that need to be resolved.
- Renaming and modifying: If a commit renames a file and subsequent commits make changes to the old name, squashing these commits can confuse Git, causing a conflict.
- Changes to binary files: Binary files do not merge well using text-based diff tools. If multiple commits change the same binary file and we try to squash them, a conflict can occur because Git can't automatically reconcile these changes.
- Complex history: If the commits have a complex history with multiple merges, branching, or rebases in between, squashing them can result in conflicts due to the non-linear nature of changes.
When squashing, Git will attempt to apply each change one by one. If it encounters conflicts during the process, it will pause and allow us to resolve them.
Conflict will be marked with conflict markers <<<<<< and >>>>>>. To handle the conflicts, we need to open the files and manually resolve each by selecting which part of the code we want to keep.
After resolving conflicts, we need to stage the resolved files using the git add command. Then we can continue the rebase using the following command:
git rebase --continueFor more on Git conflicts, check out this tutorial on how to resolve merge conflicts in Git.
Alternatives to Squashing with Rebase
The git merge --squash command is an alternative method to git rebase -i for combining multiple commits into a single commit. This command is particularly useful when we want to merge changes from a branch into the main branch while squashing all the individual commits into one. Here’s an overview of how to squash using git merge:
- We navigate to the target branch into which we want to incorporate the changes.
- We execute the command
git merge --squash <branch-name>replacing<branch-namewith the name of the branch. - We commit the changes with
git committo create a single commit that represents all the changes from the feature branch.
For example, say we want to incorporate the changes of branch feature/login-form into main as a single commit:
git checkout main
git merge --squash feature-branch
git commit -m "Implement login form"
These are the limitations of this approach compared to git rebase -i:
- Granularity of control: Less control over individual commits. With rebase we can pick which commits to merge while merge forces to combine all the changes into one commit.
- Intermediate history: When using merge, the individual commit history from the feature branch is lost in the main branch. This can make it more difficult to track the incremental changes that were made during the development of the feature.
- Pre-commit review: Since it stages all changes as a single change set, we cannot review or test each commit individually before squashing, unlike during an interactive rebase where each commit can be reviewed and tested in sequence.
Conclusion
Incorporating frequent and small commits into the development workflow promotes collaboration and clear documentation, but it can also clutter the project's history. Squashing commits strikes a balance, preserving the important milestones while eliminating the noise of minor iterative changes.
To learn more about Git, I recommend these resources:

