
Git Status: How To Track Changes in Your Project with Confidence

Learn how to use the git status command to monitor your repository’s state. This guide is perfect for beginners and early‑career practitioners who want an optimized Git workflow.
Apr 1, 2025  · 15 min read

When working on a complex Git project, it’s easy to lose track of which files have been modified, staged, or remain untracked. That’s where git status comes in. This essential Git command provides a clear and comprehensive snapshot of a repository’s current state—highlighting which files have changed, what’s ready to commit, and what still needs attention.

Whether you're resolving merge conflicts, reviewing staged changes, or ensuring nothing is left behind before a commit, git status offers the visibility needed to stay organized.

In this guide, I’ll explain each section of the git status output and discuss advanced customizations, helping you gain better control over your version control workflow.

What is Git Status?

The git status command provides a real-time summary of the state of your Git repository. Specifically, it compares the working directory (your local files) and the staging area (also known as the index) with the last committed snapshot. This allows you to see which files have been modified, which changes are staged and ready to commit, and which new files remain untracked.

By running git status, developers can verify that the right changes are being staged or committed, catch overlooked edits, and avoid introducing incomplete updates. This is especially valuable when managing multiple branches or resolving merge conflicts, as it gives precise feedback about what Git is tracking and what it isn’t.

Understanding how git status reflects the interaction between the working tree, staging area, and repository history is key to using Git effectively and avoiding common mistakes.

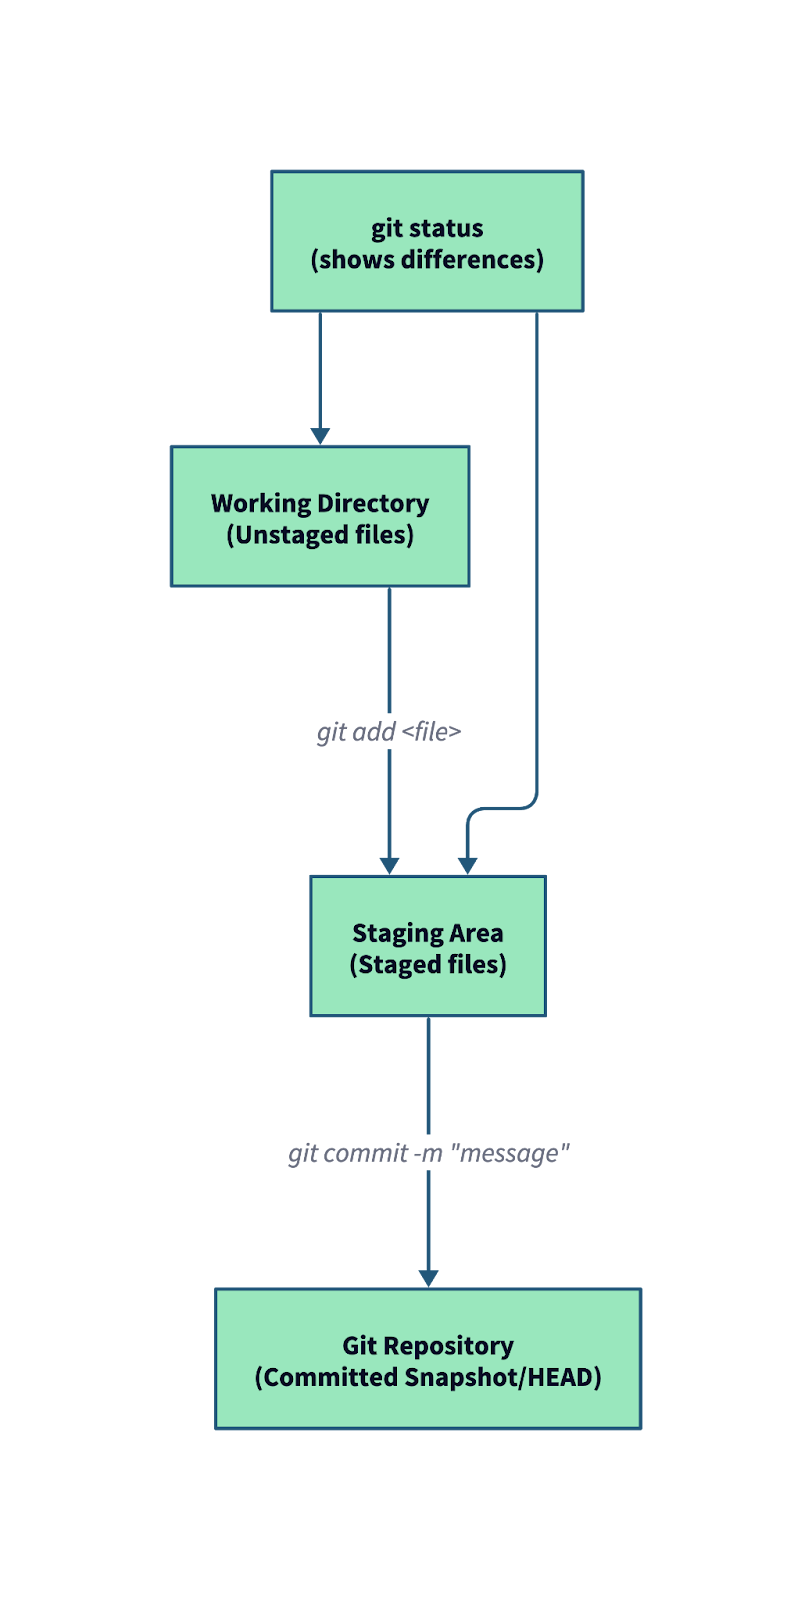
The diagram above illustrates the relationship between the working directory, staging area, and repository (commit history)—along with how git status fits in:

  • Unstaged changes (modified files in your working directory) show up as "Changes not staged for commit."
  • Staged changes (files added to the index with git add) appear as "Changes to be committed."
  • Untracked files (new files Git hasn’t seen before) are also listed, prompting you to add them or ignore them.
  • If you're in the middle of a merge, git status will also tell you about conflicts and what steps to take next.

Example git status output:

$ git status

On branch feature/login
Changes to be committed:
  (use "git restore --staged <file>..." to unstage)
        modified:   src/auth.js

Changes not staged for commit:
  (use "git add <file>..." to update what will be committed)
  (use "git restore <file>..." to discard changes in working directory)
        modified:   src/utils.js

Untracked files:
  (use "git add <file>..." to include in what will be committed)
        src/new-feature.js

For a broader understanding of Git and its role in version control, check out this complete guide to Git.

Learn Git Fundamentals Today

For beginners: Master version control using Git.
Start Learning For Free

How to Use Git Status

Here’s a step‑by‑step approach to leveraging git status effectively in your workflow.

If you haven’t configured Git yet, this setup guide walks you through installation and initial configuration across systems.

Basic usage of git status

  • Open your terminal:

Use your preferred terminal or command-line interface. This gives you direct access to run Git commands and view your repository’s state in real time.

  • Navigate to your project directory:

Use the cd command to change into the folder where your Git project is located.

cd /path/to/your/project
  • Run git status:

Once inside your project directory, run the following command.

git status

As we saw before, Git will return an output that typically includes:

  • The current branch name.
  • A list of staged changes ready to be committed.
  • A list of modified but unstaged files.
  • Any untracked files—new files that haven’t yet been added to Git.

Using the short format

If you need a quick snapshot without the extra detail, the short format is your friend:

git status --short

This concise view lists each file on one line with status symbols, which is especially useful when scanning for a particular change or integrating this command into a script.

Example output:

 M index.html
A  new-script.js
?? temp.txt

Interpreting the output:

  • The first character indicates the staging area status.
  • The second character indicates the working directory status.

Code

Meaning

M

Modified

A

Added

D

Deleted

??

Untracked file

MM

Modified in both stages

AM

Added, then modified

Understanding the -u option in git status

The -u option (short for --untracked-files) allows you to control how untracked files are displayed in your output, which can be relevant in projects with many generated files. Here’s what each mode means:

  • normal (the default)

 Shows untracked files in a standard, space‑efficient format.  

Example: 

git status -u normal

This is the standard behavior most developers see when running git status.

  • all

Lists every untracked file—even those ignored by default.  

Example: 

git status -u all

This mode gives you complete visibility, which can be helpful when debugging file generation issues or reviewing what’s being excluded via .gitignore.

  •  no

Hides untracked files to let you focus solely on changes to files already tracked by Git. 

Example:

git status -u no

In one of my larger projects—a Node.js application with a complex build process—the output of git status was cluttered with temporary files, caches, and build artifacts. Adding the -u no option allowed me to focus exclusively on tracked file changes without distractions from temporary or auto-generated files.

Customizing the output with --porcelain

For scripting or automation tasks, predictable output is essential. The --porcelain option provides a clean, stable, machine-readable format of git status that is ideal for use in custom tools or CI/CD workflows:

git status --porcelain

This mode mimics the short format (--short) but guarantees consistent output across Git versions and configurations. Unlike the default git status, which may include extra line breaks, hints, or color depending on user settings, --porcelain strips away all such formatting—ensuring scripts can reliably parse the output.

Next Steps After Running Git Status

After you’ve run git status and analyzed the output, it’s time to decide your next move—whether that's staging files, committing updates, or cleaning up your working directory. Here’s how to proceed.

Staging files for commit

Staging prepares your changes for inclusion in the next commit. You can choose to stage individual files or everything at once.

  • Stage a specific file:

Use this when you want precise control over what gets committed.

git add <file-name>
  • Stage all changes:

This includes modified and newly added files in the current directory.

git add .
  • Stage all tracked file changes only (excluding new untracked files):
git add -u

I recommend reviewing the changes using git status or git diff carefully before staging to avoid accidentally including unwanted files. Pairing git status with the git diff command gives even deeper insights into what’s changed in your files.

Committing changes

After staging your changes, the next step is to create a commit. A clear and descriptive commit message not only records what changed but also why the change was made—making it easier to understand the project's history over time.

git commit -m "Describe your changes here"

Best practices for commit messages:

  • Use the imperative mood (e.g., “Fix login bug”, not “Fixed login bug”).
  • Keep the summary line under 50 characters when possible.
  • If needed, use a multi-line message (git commit without -m) to separate the summary and detailed explanation.

I have learned that taking an extra minute to write a meaningful commit message can save countless hours during later reviews or debugging sessions. Once your changes are reviewed, consider squashing your commits to clean up your Git history.

Handling untracked files

Untracked files can clutter your git status output, especially in projects with build artifacts, logs, or dependency directories. If there are files or directories you never intend to track, you can exclude them by adding entries to a .gitignore file in the root of your repository.

# Ignore dependency folders and log files
node_modules/
*.log

# Ignore system files
.DS_Store
Thumbs.db

This ensures that only the relevant files are in your repository, keeping the output of git status clean and focused. When you need to remove lingering untracked files from your working directory, git clean is also an interesting tool.

Reviewing status regularly

Running git status frequently is a simple yet powerful habit that helps maintain a clean and controlled development workflow. You can avoid common mistakes like committing incomplete changes or overlooking untracked files by checking the status of your working directory and staging area at regular intervals—especially before commits, branch switches, or merges.

I now incorporate this step into my daily routine, dramatically reducing errors in my commit history.

Troubleshooting Common Git Status Issues

Even with its simplicity, sometimes git status can output overwhelming or confusing information. Here are a few common issues and how to handle them.

Unwanted untracked files

In large projects, especially those using various build tools, you might see many files you never meant to track. If these appear, verify your .gitignore settings, and if necessary, remove them from tracking using:

git rm --cached <file-name>

After updating your .gitignore and using git rm --cached, run git status again to verify that the file is no longer tracked or showing up unnecessarily.

Overwhelming output

In projects with many files—especially those generating logs, caches, or temporary assets—the output from git status can become noisy and hard to scan. This makes it difficult to focus on the meaningful changes that need attention.

In this case, you can display a concise, one-line-per-file summary:

git status --short

Or hide untracked files completely from the output:

git status -u no

Together, these options make git status more focused and digestible—especially in larger codebases or automated workflows.

Conclusion

In summary, git status is an indispensable tool that offers you a real‑time window into your repository’s health. By mastering its default view, the short format, and advanced options like the -u flag, you can streamline your Git workflow and avoid common pitfalls. Experiment with these modes on your projects and notice how the clarity in managing changes accelerates your development process.

If you’re new to Git, understanding git status becomes even more powerful when paired with git init, the command that initializes repositories. If you haven't already, check out my Git Init Tutorial to learn how to set up a repository from scratch.

And if you're eager to deepen your Git skills even further, explore these DataCamp courses:

  • Intermediate Git – Enhance your skills with branching, merging, and conflict resolution techniques.
  • GitHub Foundations – Learn how to integrate Git with GitHub for collaborative projects.

Happy coding—and here’s to staying in perfect sync with your repository!

Learn Git Fundamentals Today

For beginners: Master version control using Git.

FAQs

How is git status different from git diff?

While git status shows a summary of changes, git diff displays the actual content differences between files, offering a more detailed comparison.

Can I customize the output of git status?

Yes, using options like --short, --porcelain, and -u, you can tailor the output to be more concise or script-friendly, depending on your needs.

What is the difference between staged and unstaged changes in Git?

Staged changes are added to the index and ready to be committed, while unstaged changes are still in your working directory and haven’t been marked for commit.

How do I ignore files that show up in git status?

You can add file patterns to a .gitignore file to prevent certain files (like logs or build artifacts) from appearing as untracked in git status.

Why do untracked files keep appearing in git status?

Untracked files are those not added to the Git index. They may keep showing up if not ignored explicitly in .gitignore or staged with git add.

How can git status help prevent bad commits?

By running git status before committing, you can review all staged and unstaged changes, ensuring you don’t miss files or accidentally commit something incomplete.

Is git status useful in resolving merge conflicts?

Absolutely. git status highlights conflicts and guides you on how to resolve them before finalizing a merge.

How often should I use git status in my workflow?

Frequently! Using git status before staging, committing, or switching branches helps you stay organized and avoid costly mistakes.


Khalid Abdelaty's photo
Author
Khalid Abdelaty
LinkedIn

Data Engineer with Python and Azure cloud technologies expertise, specializing in building scalable data pipelines and ETL processes. Currently pursuing a B.S. in Computer Science at Tanta University. Certified DataCamp Data Engineer with demonstrated experience in data management and programming. Former Microsoft Data Engineer Intern at Digital Egypt Pioneers Initiative and Microsoft Beta Student Ambassador leading technical workshops and organizing hackathons.

Topics

Learn more about Git with these courses!

Course

Introduction to GitHub Concepts

2 hr
26K
Learn how to use GitHub's various features, navigate the interface and perform everyday collaborative tasks.
See DetailsRight Arrow
Start Course
See MoreRight Arrow
Related

Tutorial

Git Commit Tutorial: How to Track and Document Code Changes

Master the essentials of the git commit command and elevate your version control skills. Learn the basics of staging and committing changes, writing effective messages, and using advanced options.
Kurtis Pykes 's photo

Kurtis Pykes

15 min

Tutorial

Git Init: How to Initialize and Set Up a Git Repository

Learn how to set up a Git repository with git init, connect to a remote, configure settings, and troubleshoot common issues—all in one beginner-friendly guide.
Khalid Abdelaty's photo

Khalid Abdelaty

15 min

Tutorial

Git Diff Explained: A Complete Guide with Examples

Learn how to use git diff to track code changes effectively, from basic comparisons to advanced techniques. Discover visualization tools, specialized commands, and workflows for better code management.
Bex Tuychiev's photo

Bex Tuychiev

12 min

Tutorial

Git Setup: The Definitive Guide

In this tutorial, you'll learn how to set up Git on your computer in different operating systems.

Olivia Smith

7 min

Tutorial

Git Rebase: A Beginner’s Guide to Streamlined Version Control

Learn how to use Git rebase to keep your commit history clean and improve collaboration. This guide covers step-by-step instructions, best practices, and common pitfalls to avoid when rebasing branches in Git.
Derrick Mwiti's photo

Derrick Mwiti

8 min

Tutorial

GitHub and Git Tutorial for Beginners

A beginner's tutorial demonstrating how Git version control works and why it is crucial for data science projects.
Abid Ali Awan's photo

Abid Ali Awan

9 min

See MoreSee More