
Git Tag Tutorial: How to Create, Manage and Use Tags

Learn how to use Git tags effectively to mark important milestones, organize your workflow, and improve project collaboration.
Apr 15, 2025  · 8 min read

I’m a machine learning engineer. If there is one essential thing I’ve learned, clean versioning is more than good practice. It’s critical for reproducibility and collaboration.

Git tags are essential for marking stable states in code. They help make releases, roll back to a previous version, or integrate with CI/CD workflows. Whether you are working on code, data, or new machine learning models, Git tags make your life easier, regardless of your background or role.

In this tutorial, I’ll explain everything you need to know to apply and master Git tags. Ready to see how Git tags can simplify your development life? Let’s dive in.

>If you first want a quick overview of Git, I recommend reading GitHub and Git Tutorial for Beginners.

What Is a Git Tag?

A Git tag is a simple yet powerful way to mark specific points in a project’s history. Think of it as placing a sticky note on a particular commit, saying, “This is important.” 

Git tags commonly label release versions, milestones, or stable checkpoints in your codebase. They are fixed references to a specific commit but don’t create a new commit. Once you tag a commit, that label stays anchored to it unless you manually move or delete the tag.

The master branch with two Git tags

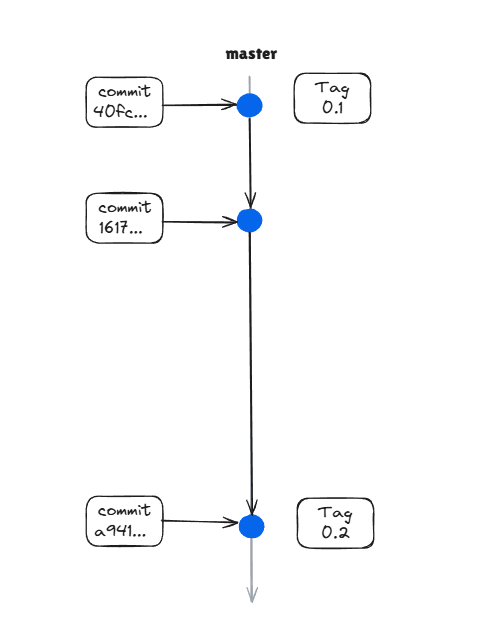
The master branch with two Git tags. Image by author.

There are two main types of tags:

  • Lightweight tags: These are like simple bookmarks. They point to a specific commit without any additional information. They’re fast and easy to create, often used for local reference or quick debugging, but they don’t store metadata like the author or a message.
  • Annotated tags: These are more robust and are stored as full Git objects. They include the tagger’s name, email, date, and message and can even be cryptographically signed. Annotated tags are ideal for marking release points or sharing tags with a team.

>To learn more about Git, I recommend checking out the Foundations of Git or Intermediate Git courses.

Learn Git Fundamentals Today

For beginners: Master version control using Git.
Start Learning For Free

How to Create and Manage Git Tags

Creating and managing Git tags is straightforward. Let’s break down the different types of tags and how to apply them.

Creating lightweight tags

A lightweight tag is like a pointer to a commit. It doesn’t include metadata, just the tag name and the commit it points to.

To create one, you can run: 

git tag v1.0.0

This command creates a lightweight tag pointing to the current HEAD commit. 

You can alternatively create a tag for a specific commit by providing the commit hash:

git tag v1.0.0 5c5fc06

Lightweight tags are helpful for quick, local references, especially in solo development projects or temporary work.

Creating annotated tags

Annotated tags store more information, such as the tagger's name, email, date, and message. They’re stored as full Git objects and are ideal for tagging official releases or milestones.

You can create one running: 

git tag -a v1.0.0 -m "Release version 1.0.0"

This command creates an annotated tag called v1.0.0 with the message "Release version 1.0.0".

You can also tag a specific commit:

git tag -a v1.0.0 5c5fc06 -m "Tagging older commit"

Annotated tags offer better documentation, integrate well with CI/CD tools, and help teams track history more transparently.

Tagging specific commits

Sometimes, you must tag a commit that’s not the latest. For this, you can first fetch the history of commits and then select the commit hash for which you want to create a tag.

For fetching the commit hash, you can run the following:

git log --oneline

Copy the commit hash from the list, then:

git tag -a v1.0.0 <commit-hash> -m "Tagging v1.0.0 release"

Verifying created tags

To list all tags in your repository, use:

git tag

If you want to filter tags, for example, only versions starting with v1., use:

git tag -l 'v1.*'

To view details about a specific tag, run:

git show v1.0.0

Working with Git Tags

Once you’ve created Git tags, you’ll often need to share, update, or interact with them as part of your development or release workflow. This section covers the most common tasks for working with tags in local and remote repositories. 

Pushing tags to a remote repository

Tags aren’t automatically pushed to remote repositories when you run git push. You have to push them explicitly.

To push a single tag:

git push origin v1.0.0

To push all tags at once:

git push --tags

Tags must be pushed so your teammates or CI/CD pipelines can access them. Tags are often also used as deployment triggers, especially following versioned release flows. You can read more about how to push and pull branches in the Git Push and Pull Tutorial.

Deleting tags

If you want to delete a tag, you can do it locally and remotely.

To delete it locally, run the following:

git tag -d v1.0.0

To then delete the same tag from the remote repository:

git push origin --delete v1.0.0

You can also directly delete the tag from GitHub or GitLab’s web UI. 

>If you want to learn more about GitHub and how to use it, I recommend the courses GitHub Foundations and GitHub Concepts.

Checking out tags

You can checkout your repository to the state of a specific tag by running:

git checkout v1.0.0

However, this puts you in a detached HEAD state. This means you’re no longer on a branch, and any new commits won’t belong to any branch unless you explicitly create one:

git checkout -b hotfix-v1.0.0

Checking out a specific tag helps debug or review a particular release version without affecting your current development branch. It is also used to build your production application from a specific version, for example, when a Docker image needs to be built.

Tagging after a commit

If you need to update a tag, for example by changing it to a different commit or by changing the message, you can simply force an update by running:

git tag -f -a v1.0.0 5c5fc06 -m "retagging"

You can also run the same without a commit hash to simply add the tag to the current HEAD.

>If you need a quick overview of the traditional Git commands, I recommend the Complete Git Cheat Sheet.

Best Practices for Using Git Tags

Knowing how to create and manage tags is one thing, but using them effectively is another. When used wisely, tags can boost your workflow, documentation, and team communication.

Using tags for versioning

Tags are perfect for semantic versioning, which is the recommended way of versioning your releases. 

In semantic versioning, your version numbers follow the format MAJOR.MINOR.PATCH, for example, v.1.2.0.

MAJOR versions are for more extensive and breaking changes, while MINOR versions are for newly added features, and PATCH are for bug fixes.

Semantic versioning is very powerful. It clearly communicates the scope of changes, helps developers understand compatibility, and works well with automated tools like CI/CD triggers.

Stick to a consistent naming convention. Choose a pattern (e.g., always prefix with v) and follow it across all your releases.

Tagging releases

Tags are ideal for marking key release stages in your project. Here are some helpful tag types you might consider:

  • v1.0.0-alpha: Internal testing version
  • v1.0.0-beta: Public beta release
  • v1.0.0: Final production release

By tagging these stages, you can share testing builds with others more easily, roll back to earlier releases, and keep a clean history of production deployments. 

You can further improve the process by using annotated tags for releases to capture proper context and documentation.

Avoiding overuse of tags

As handy and powerful as tags are, they can become useless when overused. Tags should only mark meaningful points in your project’s history, like stable versions, major feature completions, milestones, or deadlines. 

Tagging every commit clutters your repository and defeats the purpose of quick navigation. Keep it clean and purposeful!

A good rule of thumb is that it probably doesn't need a tag if you wouldn’t deploy or announce it.

Troubleshooting Git Tags

Even with best practices, you’ll sometimes encounter issues while working with Git tags, especially when working with teams or syncing with remote repositories. This section covers how to handle the most common problems.

Handling detached HEAD state

When you check out a specific tag using:

git checkout v1.0.0

Git puts you in a detached HEAD state, as mentioned before. This means you’re not on a branch, so if you make a commit, it won’t belong to any branch and may be lost unless you act. 

You can fix it by creating a branch by running the following:

git checkout -b hotfix-v1.0.0

Now you are working on a branch and can commit and push changes as usual.

Resolving tag conflicts

Conflicts can happen when the same tag name points to different commits locally and remotely. 

This often occurs when you delete and recreate a tag locally, or someone else force-pushes a tag.

There are two options for resolving that issue.

Option 1: Delete and re-push the tag

git tag -d v1.0.0
git push origin --delete v1.0.0
git tag -a v1.0.0 -m "Corrected tag"
git push origin v1.0.0

Option 2: Force-push the updated tag

If you're sure your local tag is the correct one, and you have permission:

git push origin -f v1.0.0

But be careful with that option, as force-pushing can overwrite others' changes. Only use it when you’re confident or after communicating with your team.

Conclusion

Git tags are quite a powerful tool when used wisely. In this tutorial, you learned:

  • What Git tags are and when to use them
  • How to apply Git tags in your repository
  • Best practices for using Git tags
  • How to troubleshoot common issues when working with Git tags

Whether releasing machine learning models, pushing updates to a data product, or collaborating in a team, tags help you mark meaningful moments in your project’s timeline. They keep things organized, reproducible, and easy to roll back or deploy.

I rely on Git tags all the time. They save me hours by letting me roll back to stable versions when bugs pop up or trigger automated CI/CD workflows. I use them to tag and version Docker images for production builds, ensuring that everything I ship is fully traceable and documented.

So start using tags today and transform your Git workflow!

Learn Git Fundamentals Today

For beginners: Master version control using Git.

FAQs

What is a Git tag used for?

A Git tag marks specific points in a repository's history, often for releases or important milestones.

What’s the difference between lightweight and annotated Git tags?

Lightweight tags are simple references to a commit, while annotated tags store metadata like the author, date, and message.

What happens when I check out a tag in Git?

You enter a “detached HEAD” state, meaning you’re not on a branch, and any commits won’t be saved to a branch unless you create one.

How do I create a Git tag?

Use git tag <tagname> for a lightweight tag or git tag -a <tagname> -m "message" for an annotated tag.

Are Git tags commonly used in CI/CD workflows?

Yes. Tags can trigger automated builds or deployments in CI/CD pipelines, especially when tagging release versions.


Patrick Brus's photo
Author
Patrick Brus
LinkedIn

I am a Cloud Engineer with a strong Electrical Engineering, machine learning, and programming foundation. My career began in computer vision, focusing on image classification, before transitioning to MLOps and DataOps. I specialize in building MLOps platforms, supporting data scientists, and delivering Kubernetes-based solutions to streamline machine learning workflows.

Topics

Learn more about Git with these courses!

Course

Introduction to Git

2 hr
24.5K
Discover the fundamentals of Git for version control in your software and data projects.
See DetailsRight Arrow
Start Course
See MoreRight Arrow
Related

Tutorial

Git Commit Tutorial: How to Track and Document Code Changes

Master the essentials of the git commit command and elevate your version control skills. Learn the basics of staging and committing changes, writing effective messages, and using advanced options.
Kurtis Pykes 's photo

Kurtis Pykes

15 min

Tutorial

Git Status: How To Track Changes in Your Project with Confidence

Learn how to use the git status command to monitor your repository’s state. This guide is perfect for beginners and early‑career practitioners who want an optimized Git workflow.
Khalid Abdelaty's photo

Khalid Abdelaty

15 min

Tutorial

Git Merge Tutorial: A Comprehensive Guide with Examples

Learn how to merge branches efficiently in Git with this step-by-step tutorial. Explore different merge strategies, resolve conflicts, and apply best practices to keep your Git history clean.
Srujana Maddula's photo

Srujana Maddula

15 min

Tutorial

GitFlow Tutorial: Branching for Features, Releases, and Hotfixes

A practical guide to mastering GitFlow, with hands-on setup, branching strategies, and workflow tips for smoother team collaboration and version control.
Patrick Brus's photo

Patrick Brus

15 min

Tutorial

Git Init: How to Initialize and Set Up a Git Repository

Learn how to set up a Git repository with git init, connect to a remote, configure settings, and troubleshoot common issues—all in one beginner-friendly guide.
Khalid Abdelaty's photo

Khalid Abdelaty

15 min

Tutorial

Git Setup: The Definitive Guide

In this tutorial, you'll learn how to set up Git on your computer in different operating systems.

Olivia Smith

7 min

See MoreSee More