Course
I started learning Git early in university, but my workflow was pretty basic then—everything happened on the master branch. We only started creating separate branches once collaboration began, and even then, those branches lived far too long, making merges painful and confusing.
That all changed when I landed my first full-time job. I came across this seemingly complex GitFlow diagram. But to my surprise, it made everything easy. It brought order to the chaos, with clear guidelines for working with features, managing releases, and handling bugfixes and hotfixes.
In this tutorial, I’ll explain how GitFlow works, how to set up the powerful GitFlow extension, and how to use it in your daily development. Whether you’re part of a team or managing a solo project with multiple developers, GitFlow can boost your productivity and be a game-changer!
What is GitFlow?
GitFlow is a popular Git branching model that provides a structured approach to managing your codebase, especially in collaborative environments. Introduced by Vincent Driessen in a 2010 blog post, GitFlow became broadly adopted because it clearly defines how and when to create branches for features, releases, and hotfixes.
GitFlow builds on Git’s branching and merging capabilities by introducing a consistent naming convention and a transparent workflow.
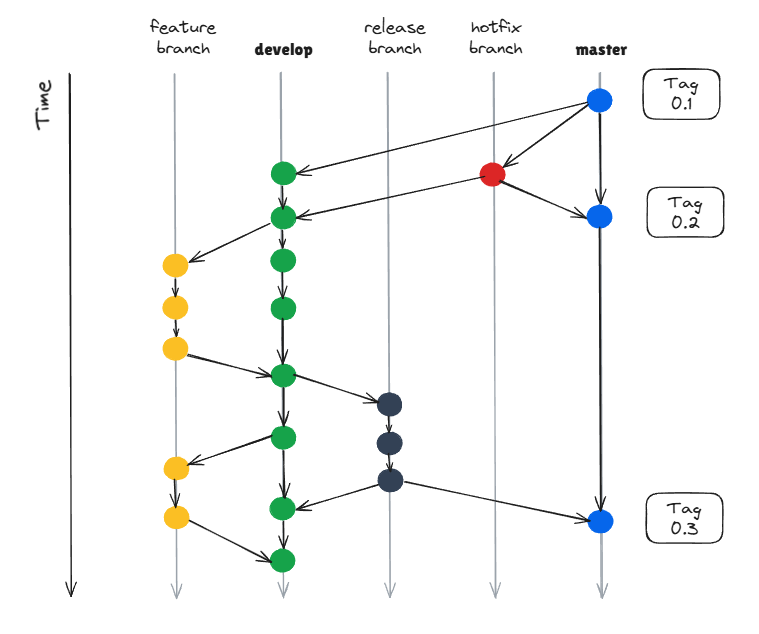
The GitFlow diagram. Image by author inspired by Vincent Driessen.
Instead of committing everything to main
or master
, GitFlow introduces dedicated branches with a specific purpose, such as:
develop
: The integration branch for new features. This is where all development happens before it’s ready for production.feature/*
: Used for working on individual features. These branches branch off fromdevelop
and merge back into it.release/*
: Helps finalize a new production version. This branch allows you to prepare for a release without freezing thedevelop
branch.hotfix/*
: For urgent fixes to the production code. These branches are created frommaster
and merged intomaster
anddevelop
.master
(or mostlymain
meanwhile): The branch containing the production-ready, stable code.
This flow helps keep your codebase clean and your release process predictable.
To learn more about Git, I recommend checking out the Foundations of Git or Intermediate Git courses.
GitFlow comes with the following key benefits:
- Improved collaboration: Everyone knows where to commit their changes and where to branch off.
- Parallel development: Teams can work on multiple features, releases, or fixes simultaneously without conflicts.
- Release readiness: You always have a clear picture of what’s ready for production.
- Hotfix efficiency: Urgent production issues can be fixed and released quickly without interrupting the ongoing development process.
Learn Git Fundamentals Today
Setting Up GitFlow
Before taking advantage of GitFlow’s structured branching model, you must set it up on your machine and initialize it in your repository. Thankfully, both steps are straightforward.
To use GitFlow, you should already have Git installed on your machine. You can read more about installing Git in the Git Install Tutorial.
Installing GitFlow
GitFlow is an extension of Git, so you’ll need to install it separately. By default, it doesn’t come bundled with Git. The installation process depends on your operating system.
For more detailed instructions on how to install GitFlow, read the official documentation.
Note: While the GitFlow extension above makes it easier to manage feature branches, releases, and hotfixes with simple commands, it's not strictly required. You can follow the GitFlow workflow using standard Git commands—as long as you're consistent with naming conventions and merging practices. The tool simply automates and enforces the process, which can be helpful for teams or larger projects.
macOS
If you’re using Homebrew, which is the most popular package manager for macOS, run:
brew install git-flow-avh
Linux (Debian/Ubuntu-based)
If you’re on a Debian-based system like Ubuntu, use:
sudo apt-get install git-flow
Windows
If you’re on Windows, you can install GitFlow via Git for Windows and add Git Bash to your terminal.
To check if GitFlow is installed, you can run:
git flow version
Initializing GitFlow in a repository
As a first step, you need to have an initialized Git repository before using GitFlow. You can read more in How to Initialize and Set Up a Git Repository.
Once GitFlow is installed, you can initialize it in any existing Git repository with:
git flow init
GitFlow will prompt you to configure several settings. Here’s a breakdown of what they mean and how to choose the right ones:
- Branch names: You will be asked for the default branch names.
- Production branch name (default:
master
) - Development branch name (default
develop
) - Prefixes for supporting branches: GitFlow uses naming conventions for its different types of branches.
- Feature branches:
feature/
- Bugfix branches:
bugfix/
- Release branches:
release/
- Hotfix branches:
hotfix/
- Support branches:
support/
(rarely used in practice) - Version tag prefix:
v
(e.g.v.1.2.0
)
The defaults work well for most teams, but you can customize them to match your organization’s naming standards.
Example output of initialization:
git flow init
Which branch should be used for bringing forth production releases?
- master
Branch name for production releases: [master]
Branch name for "next release" development: [develop]
How to name your supporting branch prefixes?
Feature branches? [feature/]
Bugfix branches? [bugfix/]
Release branches? [release/]
Hotfix branches? [hotfix/]
Support branches? [support/]
Version tag prefix? [] v
After initializing it, you can push the develop
branch to your remote repository. You can read more about how to push and pull branches in the Git Push and Pull Tutorial.
Using GitFlow for Development
Once GitFlow is initialized in your repository, you can start using its branching model to manage your development workflow. GitFlow provides high-level commands for working with features, releases, and hotfixes, making it easier to maintain structure and avoid Git chaos.
In the next subchapters, we’ll explore GitFlow in practice.
Creating feature branches
Feature branches are used to develop new functionality without affecting the main codebase.
You can create a feature branch by running:
git flow feature start <feature-name>
This command creates a new branch of develop
named feature/<feature-name>
. You can start developing your feature and commit to making changes as usual.
Finishing feature branches
When your feature is completed and tested, you can finish it with:
git flow feature finish <feature-name>
This does the following:
- Merges your feature branch into the
develop
branch. - Delete the local
feature/<feature-name>
branch.
If you encounter merge conflicts, resolve them manually and complete the merge using Git’s standard conflict resolution flow.
If you work in larger teams where pull requests need to be created and reviewed first, you can’t directly use the GitFlow finish command, but instead, you could do the following:
- Commit your work, then push the branch:
git push origin feature/<feature-name>
- Create a pull request from
feature/<feature-name>
intodevelop
on GitHub, GitLab, etc. - Request review, run tests, and get approvals.
- Once approved, merge via the platform’s UI and delete the branch.
If you want to learn more about GitHub and how to use it, I recommend the courses GitHub Foundations and GitHub Concepts. In other teams, you may follow the standard git flow feature finish
flow, but you need to ask for a review of your branch before merging it back to develop
and run tests on your code changes to ensure proper behavior.
Creating release branches
Release branches are created to prepare a new production version without blocking ongoing development on the develop
branch.
To start a release, run the following:
git flow release start <version-number>
This creates a new branch called release/<version-number>
. This branch is branched off develop
.
In this branch, you typically finalize version numbers, fix minor bugs, and update documentation and changelogs.
Finishing release branches
Once your release is ready for production, finish it with:
git flow release finish <version-number>
This command:
- Merges the release branch into both
master
anddevelop
. - Tags the release in
master
(e.g.,v1.0.0
). - Delete the local
release/<release-number>
branch.
Don’t forget to push your changes and tags:
git push origin master
git push origin develop
git push --tags
# or in short
git push origin master develop --tags
Creating hotfix branches
Hotfixes are used for urgent production fixes when a bug is found in the master
branch.
To start a hotfix:
git flow hotfix start <version-number>
This creates a hotfix/<version-number>
branch out of master
. You can now apply the changes and commit the fix.
Once done, finish it with:
git flow hotfix finish <version-number>
This:
- Merges the hotfix into
master
anddevelop
. - Tags the fix on
master
. - Deletes the local `hotfix/<version-number> branch.
Push your local changes and tags as usual:
git push origin master develop --tags
Hotfixes are especially powerful because they allow you to quickly fix production issues without interfering with ongoing development on the develop
branch.
Just imagine some new features already merged to develop
that you don’t want to release yet, but an urgent and serious bug in the production application needs to be fixed.
This is where hotfixes come in handy, as they are branched off master
and then only merged back into develop
.
GitFlow Branching Example
Let’s walk through two common workflows, a feature development cycle and a release with a hotfix, to see GitFlow in action and compare it with traditional Git commands.
By seeing both sides, you’ll better understand how the GitFlow extension simplifies the process by wrapping multiple Git steps into simple, standardized commands.
If you need a quick overview of the traditional Git commands, I recommend the Complete Git Cheat Sheet. If you want to get a quick overview of Git, I recommend reading GitHub and Git Tutorial for Beginners.
Feature development workflow
Let’s assume you’re implementing a new feature that allows users to authenticate to your application. You call this feature user-authentication
.
Using GitFlow:
git flow feature start user-authentication
# Work on the feature
git add .
git commit -m "feat: Implement basic user authentication"
# Once finished:
git flow feature finish user-authentication
git push origin develop
Now using regular Git:
# Create and switch to a new branch manually
git checkout -b feature/user-authentication develop
# Work on the feature
git add .
git commit -m "Implement basic user authentication"
# Once finished
git checkout develop
git merge feature/user-authentication
git branch -d feature/user-authentication
git push origin develop
As you can see, GitFlow reduces the number of commands and, therefore, the level of complexity. It is also less error-prone, like accidentally merging into the wrong branch.
To learn more about how merging in Git works, read Git Merge Tutorial: A Comprehensive Guide with Examples.
So now, let’s assume that you’re preparing for release 1.0.0
. But a short time after you’ve released the new version, a critical bug was found that needs to be fixed with a hotfix.
Using GitFlow:
# Start a release
git flow release start 1.0.0
# Make final tweaks, update version numbers
git commit -am "Prepare release v1.0.0"
# Finish the release
git flow release finish 1.0.0
git push origin master develop --tags
Now you’ve found the bug, and you need to create a hotfix:
# Start a hotfix
git flow hotfix start 1.0.1
# Apply the fix
git commit -am "Fix login issue in production"
# Finish the hotfix
git flow hotfix finish 1.0.1
git push origin master develop --tags
And doing all this again with regular Git commands:
# Release manually
git checkout -b release/1.0.0 develop
# Make changes
git commit -am "Prepare release v1.0.0"
# Merge manually
git checkout master
git merge release/1.0.0
git tag -a v1.0.0 -m "Release v1.0.0"
git checkout develop
git merge release/1.0.0
# Delete release branch
git branch -d release/1.0.0
git push origin master develop --tags
# Hotfix manually
git checkout -b hotfix/1.0.1 master
# Apply fix
git commit -am "Fix login issue in production"
git checkout master
git merge hotfix/1.0.1
git tag -a v1.0.1 -m "Hotfix v1.0.1"
git checkout develop
git merge hotfix/1.0.1
# Delete hotfix branch
git branch -d hotfix/1.0.1
git push origin master develop --tags
Best Practices for Using GitFlow
GitFlow is quite powerful and helps you manage your team's code. However, to get the most out of this structure, you should follow a few best practices.
These practices help maintain clean branches, reduce merge conflicts, and improve team productivity, especially in collaborative environments.
Consistent branch naming
Consistency is key in collaboration. Stick to GitFlow’s default naming conventions unless your team has a strong reason to customize them.
Recommended naming patterns:
- Feature branches:
feature/<feature-name>
- Release branches:
release/<version-number>
- Hotfix branches:
hotfix/<version-number>
You should also use kebab-case for multi-word names (e.g., feature/user-authentication
).
Small, frequent changes
Long-lived branches often lead to painful merges and massive pull requests that are hard to review.
I know what I’m talking about, as I already went through the merge conflict hell quite some times, and you want to avoid that if possible!
Instead, keep feature branches short-lived and focus on a single task. Commit and push regularly to avoid losing work or diverging too far from develop
.
Smaller, incremental changes are easier to test, review, and integrate.
Regularly syncing with develop
When working on a feature branch, you mustn’t fall behind. Ensure that you regularly pull the latest changes from the develop
branch to minimize merge conflicts later on:
git checkout feature/<your-feature>
git fetch origin
git rebase origin/develop
Staying in sync makes integration smoother and keeps your changes compatible with the features others are building.
Review and test before merging
Even though GitFlow supports direct merging with commands like git flow feature finish
, it’s best to use pull requests (PRs) or merge requests (MRs) for all merges into develop
and master
.
Benefits:
- Enables code review and approval workflows
- Triggers automated CI/CD checks
- Provides a clear audit trail of changes
This is especially critical in production-level environments where quality control matters.
Troubleshooting GitFlow
Even with a structured workflow like GitFlow, issues can arise, especially when working in teams or on long-running branches.
This section will cover the most common challenges and how to resolve them effectively.
Merge conflicts
Merge conflicts are common when working on one codebase with a larger team and are annoying.They typically occur when two branches have modified the same lines of code.
Steps to resolve a merge conflict:
- Stop the
git flow finish
process. - Manually merge the branch into its target:
git checkout develop
git merge feature/<your-feature>
- Git will prompt you to resolve conflicts. Open the conflicting files and look for conflicting markers like this:
<<<<<<< HEAD
Code from develop
=======
Code from feature branch
>>>>>>> feature/my-feature
- Edit and clean up the code manually.
- Once resolved, mark the files as resolved:
git add <resolved-file>
- Then complete the merge with:
git commit -m “resolve merge conflict …”
Cleaning up stale branches
Sometimes, your repository contains outdated feature
, release
, or hotfix
branches. To avoid confusion, keep your repository as clean as possible.
You can fix it by following the steps below:
- List all local branches:
git branch
- Delete a local branch:
git branch -d <branch-name>
- If the branch hasn’t been merged yet and you’re sure it can be deleted:
git branch -D <branch-name>
- Delete a remote branch:
git push origin --delete <branch-name>
It is essential to regularly check your branches and clean stale branches to keep your repository as clean as possible.
Conclusion
GitFlow is a robust framework for collaboration, clarity, and control in your development workflow. Whether working on a solo project with more people involved or contributing to a large team, GitFlow helps you stay organized by clearly separating feature development, releases, and hotfixes.
When I first started using GitFlow, it felt like a game-changer. No more merge chaos. No more guessing which branch to use. Every piece of work had its place, and every release followed a repeatable, reliable process. Over time, I’ve introduced GitFlow to every team I’ve worked with. And each time, it brought more structure, smoother collaboration, and fewer mistakes.
In this tutorial, you learned:
- What GitFlow is and why it’s helpful
- How to install and initialize GitFlow
- How to work with features, releases, and hotfixes
- Best practices to avoid common issues
- How to adapt GitFlow to modern workflows using pull requests
If you're ready to take your Git workflow to the next level, try using GitFlow in your next project. And if you're already familiar with the basics, start considering integrating it with your team’s CI/CD pipeline, review process, or even GitHub Actions.
Learn Git Fundamentals Today
FAQs
Is GitFlow still relevant in modern development workflows?
Yes, GitFlow remains useful, especially for release-driven teams. However, some teams prefer simpler models like trunk-based development or GitHub Flow for faster iterations.
Can I use GitFlow with GitHub, GitLab, or Bitbucket?
Absolutely. GitFlow works seamlessly with all Git-based platforms. You can use GitFlow CLI locally and integrate with pull requests, CI/CD, and review processes on those platforms.
What are alternatives to GitFlow?
Alternatives include GitHub Flow (ideal for continuous delivery), GitLab Flow (combines feature and environment-based flows), and trunk-based development for rapid delivery.
Does GitFlow work with CI/CD pipelines?
Yes, GitFlow pairs well with CI/CD. You can automate builds and deployments from develop
, release
, or master
branches depending on your setup.
What if I don’t want to use the GitFlow CLI tool?
That’s fine—you can follow GitFlow’s principles manually using standard Git commands. The CLI simply helps enforce naming and merging conventions.
How long should a GitFlow feature branch live?
Ideally, feature branches should be short-lived—just a few days. This reduces the risk of merge conflicts and keeps changes easier to test and review.
Can I customize GitFlow branch names and prefixes?
Yes. During initialization, GitFlow lets you choose your own names and prefixes to match your team’s naming conventions or deployment strategy.
How does GitFlow handle bugfixes differently from hotfixes?
Bugfix branches (optional) are used during development and branched off develop
. Hotfixes, on the other hand, are urgent patches to production and branch off master
.
Should I always use pull requests with GitFlow?
While not required, using pull requests adds a layer of review, testing, and traceability—making it highly recommended, especially in team settings.
I am a Cloud Engineer with a strong Electrical Engineering, machine learning, and programming foundation. My career began in computer vision, focusing on image classification, before transitioning to MLOps and DataOps. I specialize in building MLOps platforms, supporting data scientists, and delivering Kubernetes-based solutions to streamline machine learning workflows.