Track
Developing AI Applications
21 hr
The new GPT image model is protected, meaning that additional verifications are required to be able to use it. In this section, we describe how to set up the API. If you already have an API key, you can skip the first step.
The first step is to generate an API key. We can create one by logging into their platform and navigating to the API keys page. Then, we click the "Create new secret key" button.
Once the key is generated, create a file named .env and copy it with the following format:
OPENAI_API_KEY=<paste_your_api_key_here>A big difference with the other OpenAI models is that using the GPT image API requires us to verify our organization. The reason for this is that GPT-Image-1 can generate realistic and detailed images, which raises concerns about potential misuse, such as creating deepfakes or inappropriate content. By verifying organizations, OpenAI can better monitor usage and enforce its safety policies.
You can verify your organization even if you don't have a company. However, note that this process requires providing your government ID and completing facial verification.
To perform the verification, navigate to the general tab in the OpenAI API platform and click the button under the "Verifications" section.
The process is performed by a third party and consists of:
The process takes just a couple of minutes to complete, then about 15 minutes to be processed.
For this tutorial, we will install the following Python packages:
openai: The official OpenAI package that enables us to interact with their API.dotenv: A Python package that makes it easy to safely load the API key from the .env file we created above.We can install these using the command:
pip install openai dotenvLet's see how we can generate an image with gpt-image-1. Start by creating a new Python file, for example, generate_image.py, in the same folder as the .env file.
Then, import the necessary packages:
# Import the packages
from openai import OpenAI
from dotenv import load_dotenv
import os
import base64
import time
Note that os and base64 are built-in Python packages and don't need to be installed.
Next, we load the API key and initialize the OpenAI client:
# Load the API key
load_dotenv()
api_key = os.getenv("OPENAI_API_KEY")
# Initialize the OpenAI client
client = OpenAI(api_key=api_key)
Then, we ask the user to input a text prompt using the input() built-in function and send an image generation request to the API:
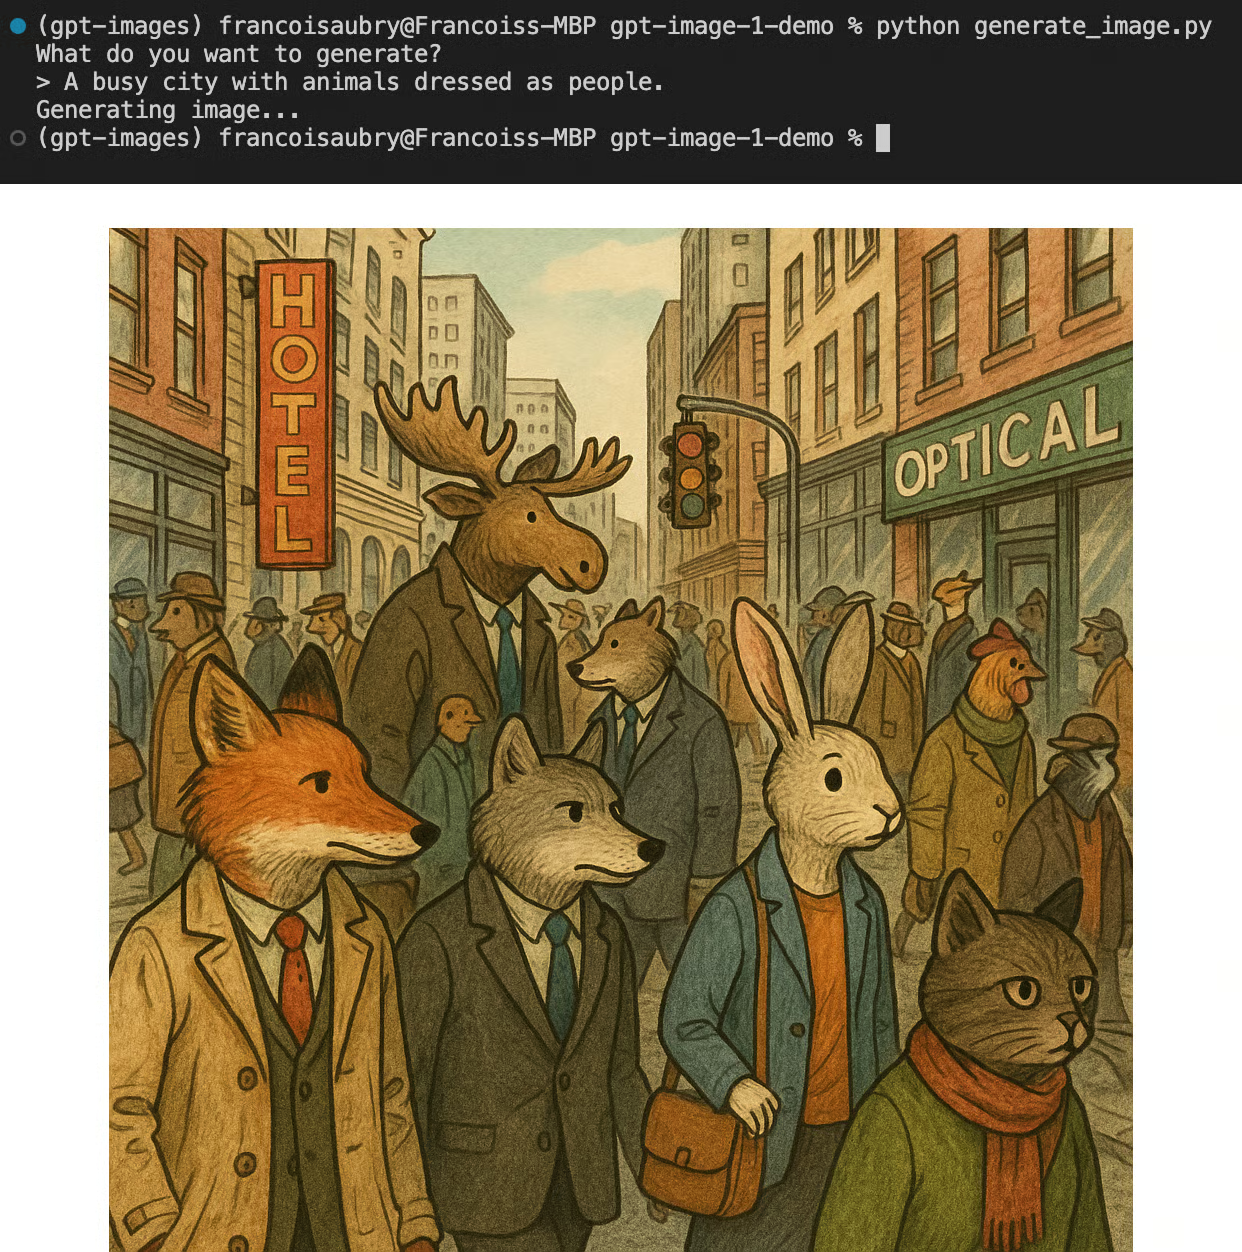
# Ask the user to input a prompt in the terminal
print("What do you want to generate?")
prompt = input("> ")
print("Generating image...")
# Send the prompt to the API
img = client.images.generate(
  model="gpt-image-1",
  prompt=prompt,
  background="auto",
  n=1,
  quality="high",
  size="1024x1024",
  output_format="png",
  moderation="auto",
)
Finally, we save the generated image into a file:
# Save the image into a file
image_bytes = base64.b64decode(img.data[0].b64_json)
with open(f"output_{int(time.time())}.png", "wb") as f:
  f.write(image_bytes)
The full script can be found here. To run this script, use the command:
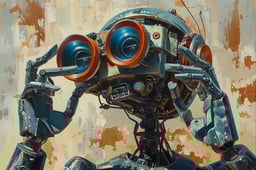
python generate_image.pyHere's an example with the output:
In this section, we describe the most relevant parameters of the gpt-image-1 model:
prompt: The textual instruction that describes what image we want the model to generate.background: The type of background for the image. It must be one of "transparent", "opaque", or "auto". The default value is "auto", in which the model will decide based on the content what the best background type is. Note that JPEG images don't support transparent backgrounds.n: The number of images to generate. Must be a number from 1 to 10.quality: The quality of the generated image. It must be one of "high", "medium", or "low", with the default being "high".size: The size of the image in pixels. It must be one of "1024x1024" (square), "1536x1024" (landscape), "1024x1536" (portrait).output_format: The image format. It must be one of "png", "jpeg", or "webp". The default is "png".moderation: The level of content moderation. Must be either "low" for a less restrictive filter or "auto", which is the default.We covered the most important parameters available for the gpt-image-1 model. For more details and a full list of parameters, check the official API documentation.
Here's a side-by-side comparison of images generated using the same prompt with different qualities:
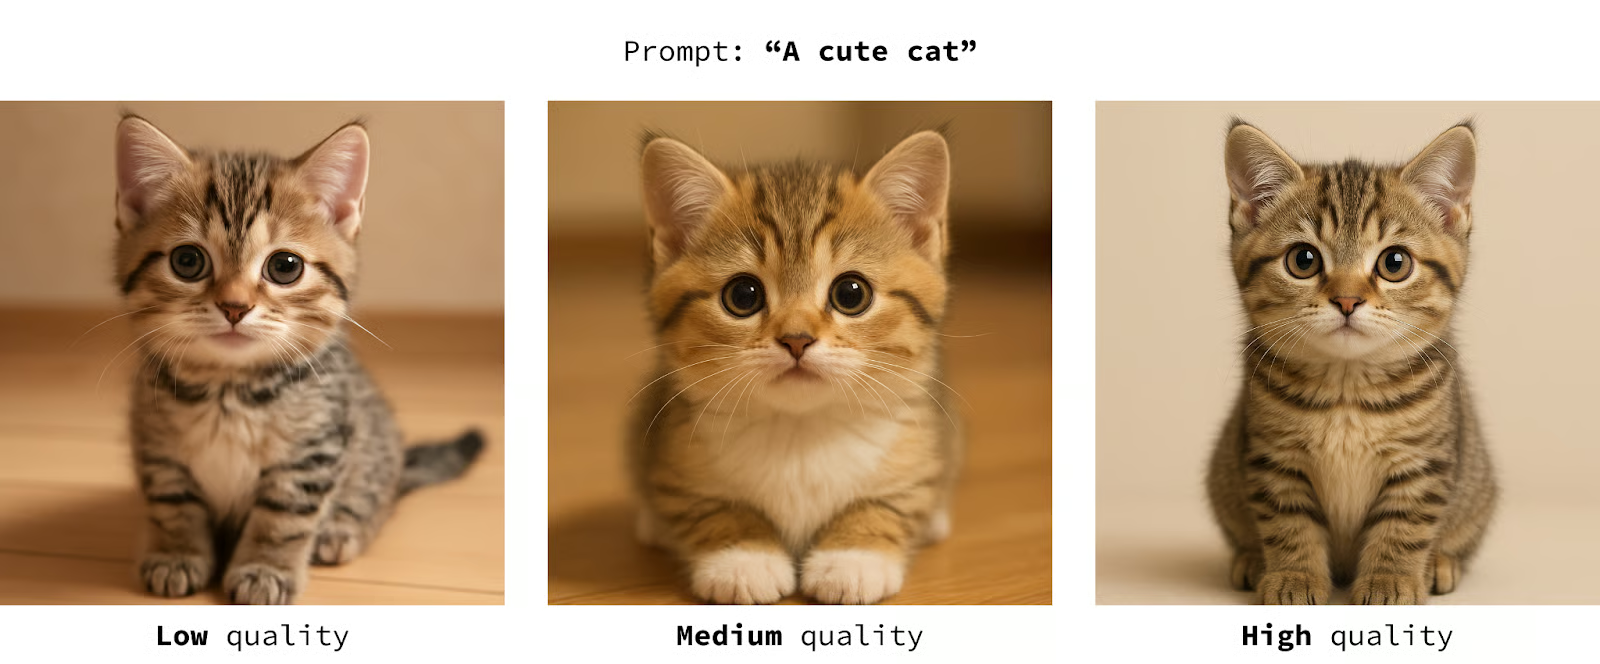
We see that the first cat (with the lowest quality) has some artifacts around the eyes, and that the image becomes significantly more realistic as the quality increases.
Here's another example with a cartoon-style output:
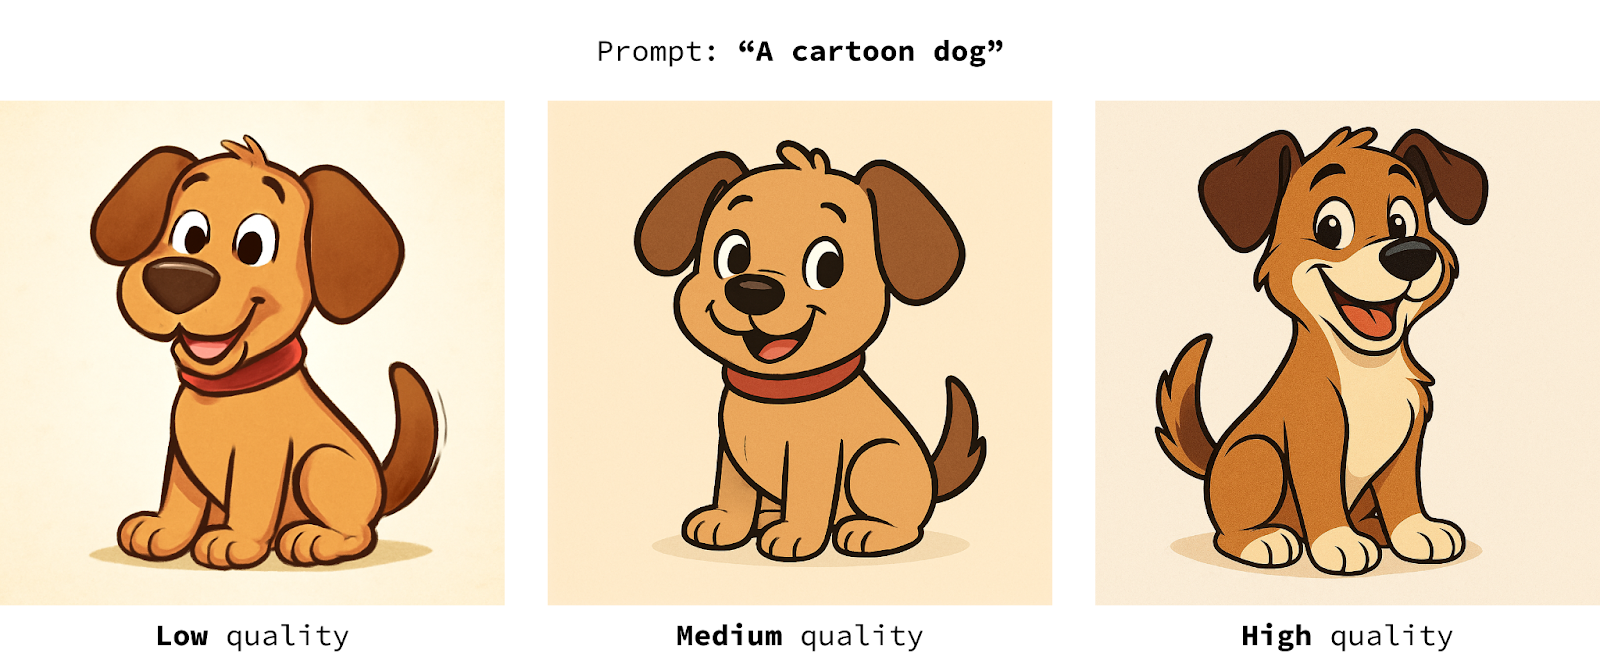
In this case, we also notice that the higher the quality, the more polished the image is. In my opinion, however, this is less relevant for content that's not supposed to be realistic.
Remember that the higher the quality, the higher the cost and the computation time, so it's a good idea to figure out a good trade-off, depending on the use case. I'd recommend trying the parameters from low to high to see the minimum value that gives acceptable results for each use case.
In my experiments, I found that the model mostly ignored this parameter. Here are side-by-side examples where I varied the background parameters and the transparency instructions in the prompt:
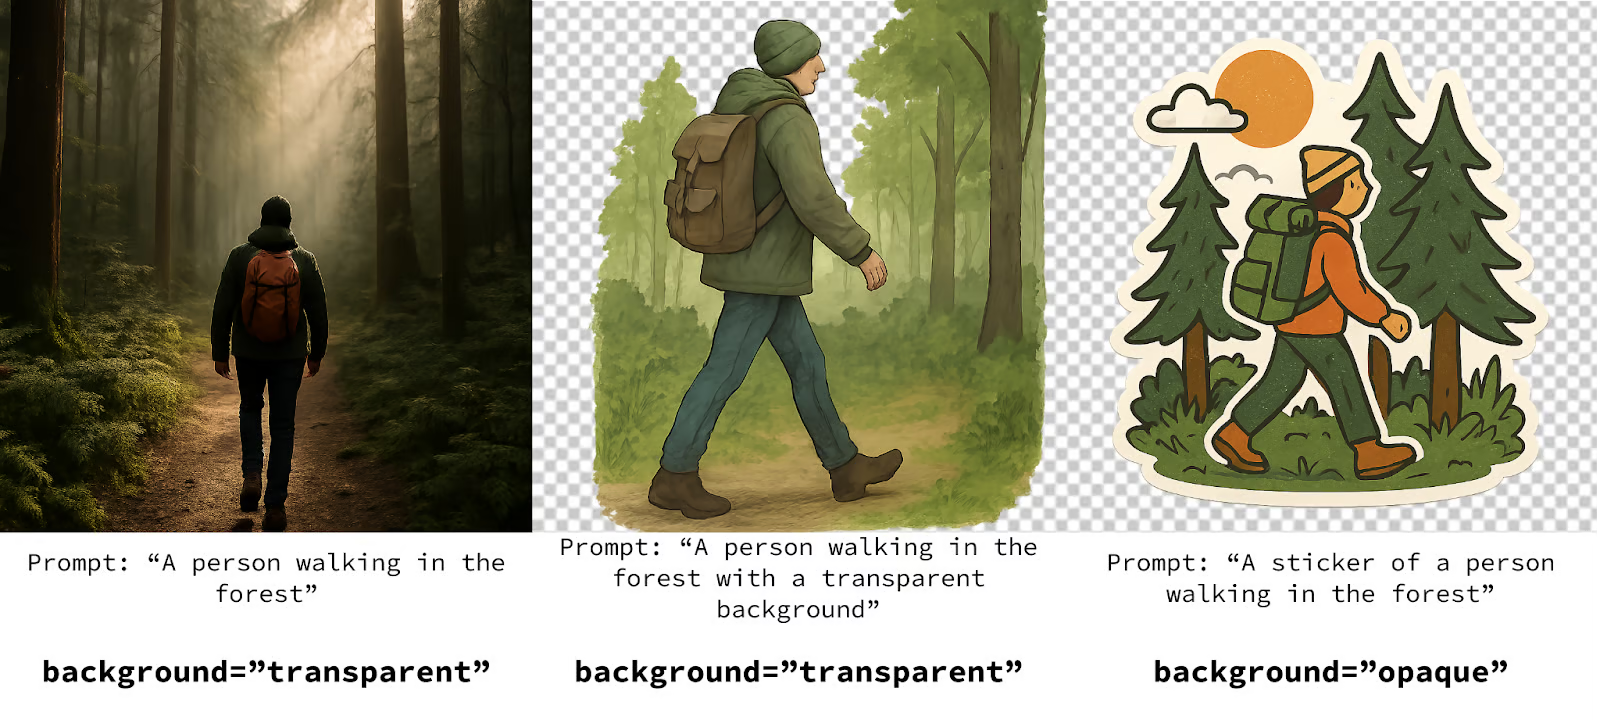
In the first example, the transparency parameter was ignored. In the second, I added the transparency instructions into the prompt, and it worked a little better. In the last, I asked for an opaque background but specified I wanted a sticker in the prompt and got a transparent background.
I still recommend using the parameter to match what you want, but make sure to also specify the desired result in the prompt to reinforce it.
As I mentioned in the introduction, the most exciting part of GPT-Image-1 is its ability to edit images. Let's start by learning how to ask it to edit an image and then explore a few use cases.
To edit images, most of the code can be reused. The only part that changes is that instead of using the client.images.generate() function, we use the client.images.edit() function.
Here's an example:
img = client.images.edit(
  model="gpt-image-1",
  image=[
    open("my-image.jpg", "rb"),
  ],
  prompt=prompt,
  n=1,
  quality="high",
  size="1024x1536",
)
The new parameter is image. This is a list of input images to be used in the edit. In this case, we only provide one image named my-image.jpg located in the same folder as the script.
Here's an example of using GPT Image 1 to edit one of my photos:
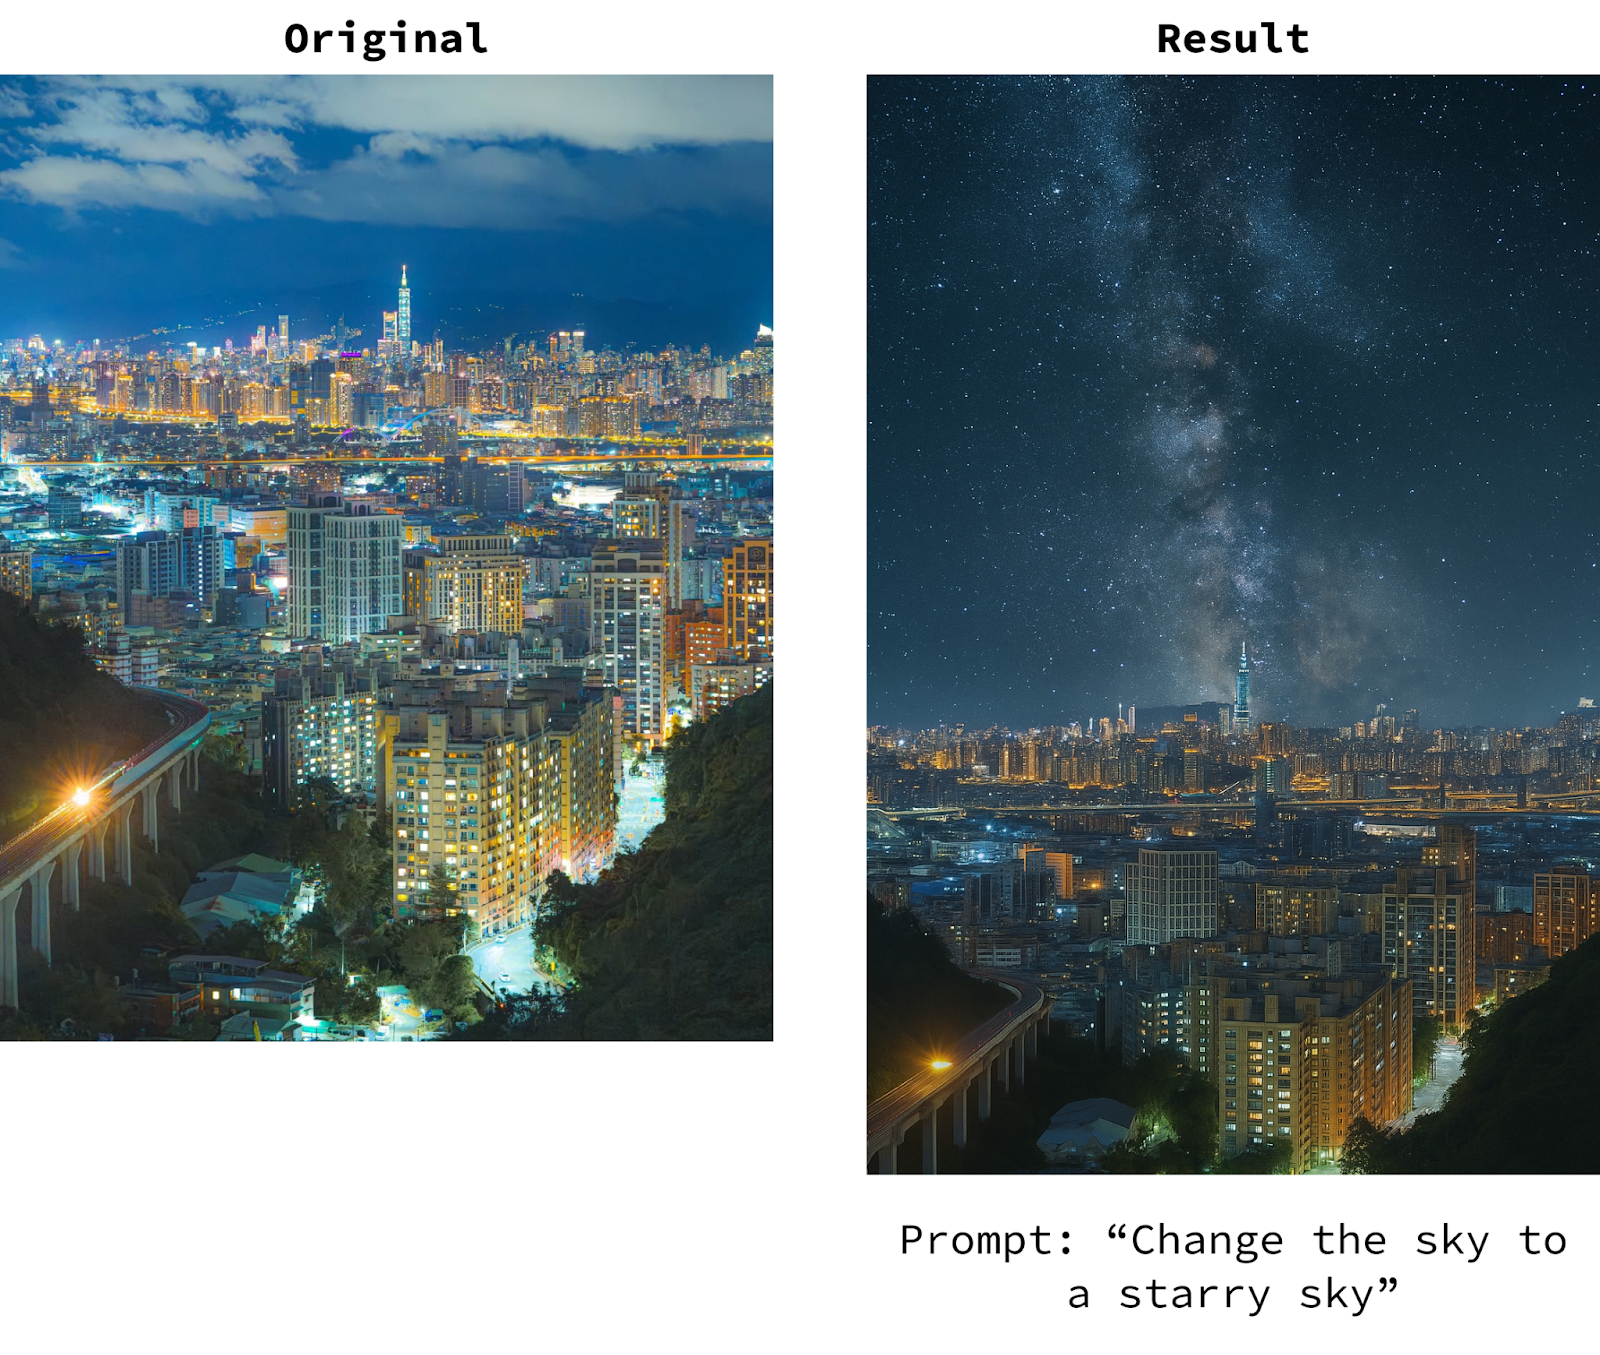
Note that because the original image has a portrait ratio, I used the portrait size 1024x1536. However, this isn't the same ratio as the original image. Even in editing mode, the model can only output images in the three sizes specified above.
The full editing script can be found here.
Editing mode provides a mask parameter that we can use to specify the areas where the image should be edited. The mask must be a PNG image of at most 4 MB and have the same size as the image. Areas with 100% transparency correspond to the areas that GPT Image 1 is allowed to edit.
We provide the mask in the same way as the image, except it isn't a list in this case:
img = client.images.edit(
  model="gpt-image-1",
  image=[
    open(sys.argv[1], "rb"),
  ],
  # We provide the mask like this
  mask=open("mask.png", "rb"),
  prompt=prompt,
  n=1,
  quality="high",
  size="1536x1024",
)
However, when I experimented with it, it didn't work very well, and I've seen reports online of people with similar issues.
Here's an example:
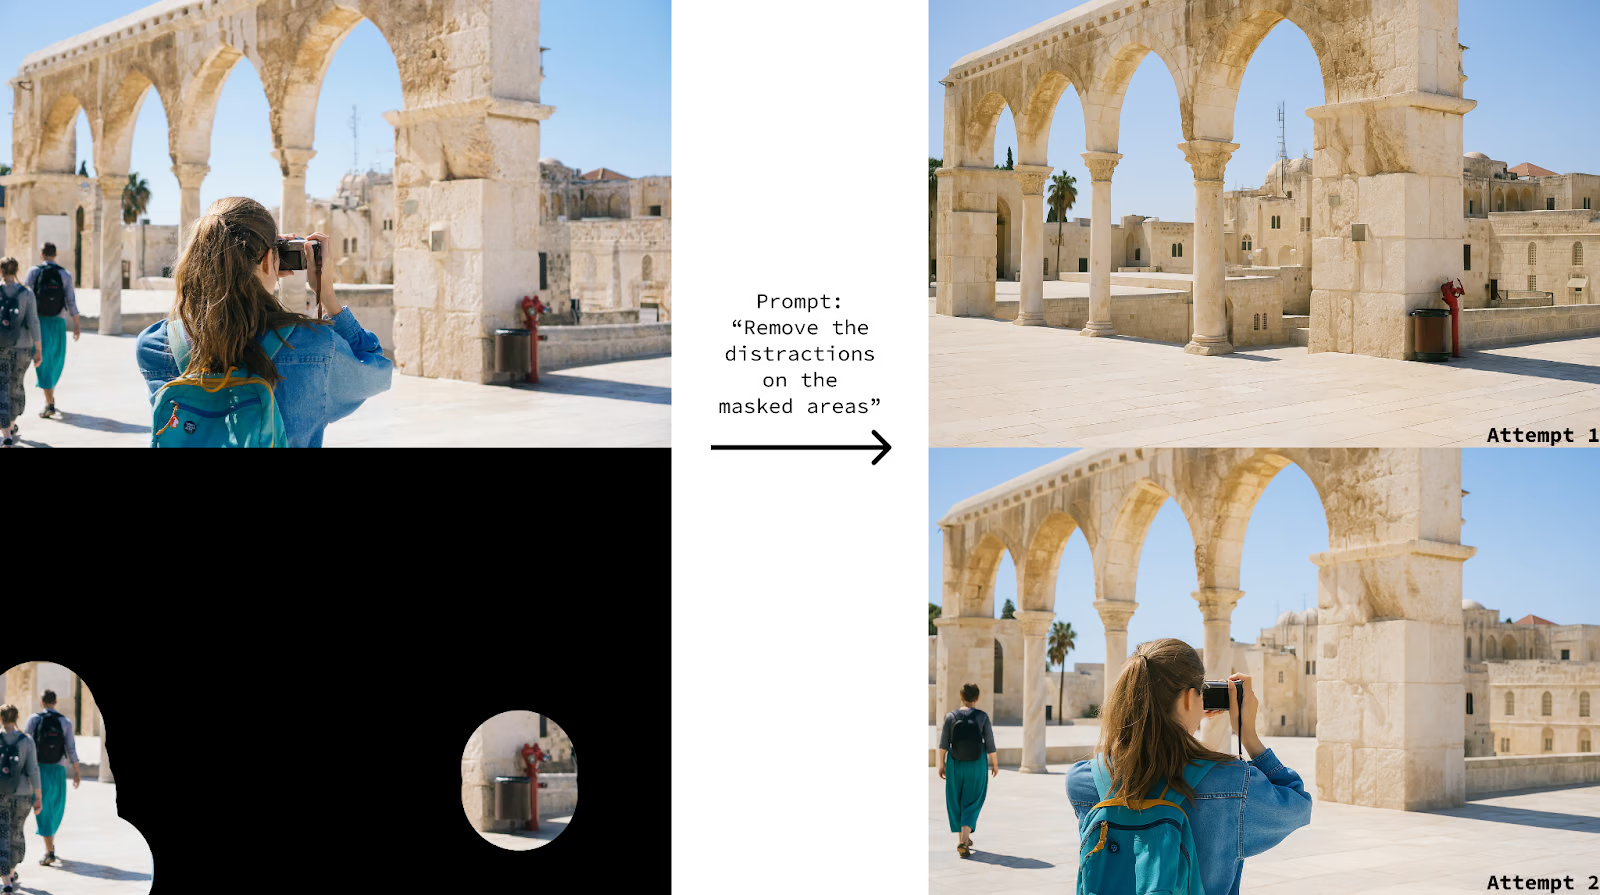
I've also tried using it to add elements at specific locations, and it didn't work consistently. Just like using the background parameter for image generation, I found that describing what I want in the prompt works best.
The model can process and combine multiple images at once. In the example below, we use it to create a marketing poster combining the images of these three individual drinks:
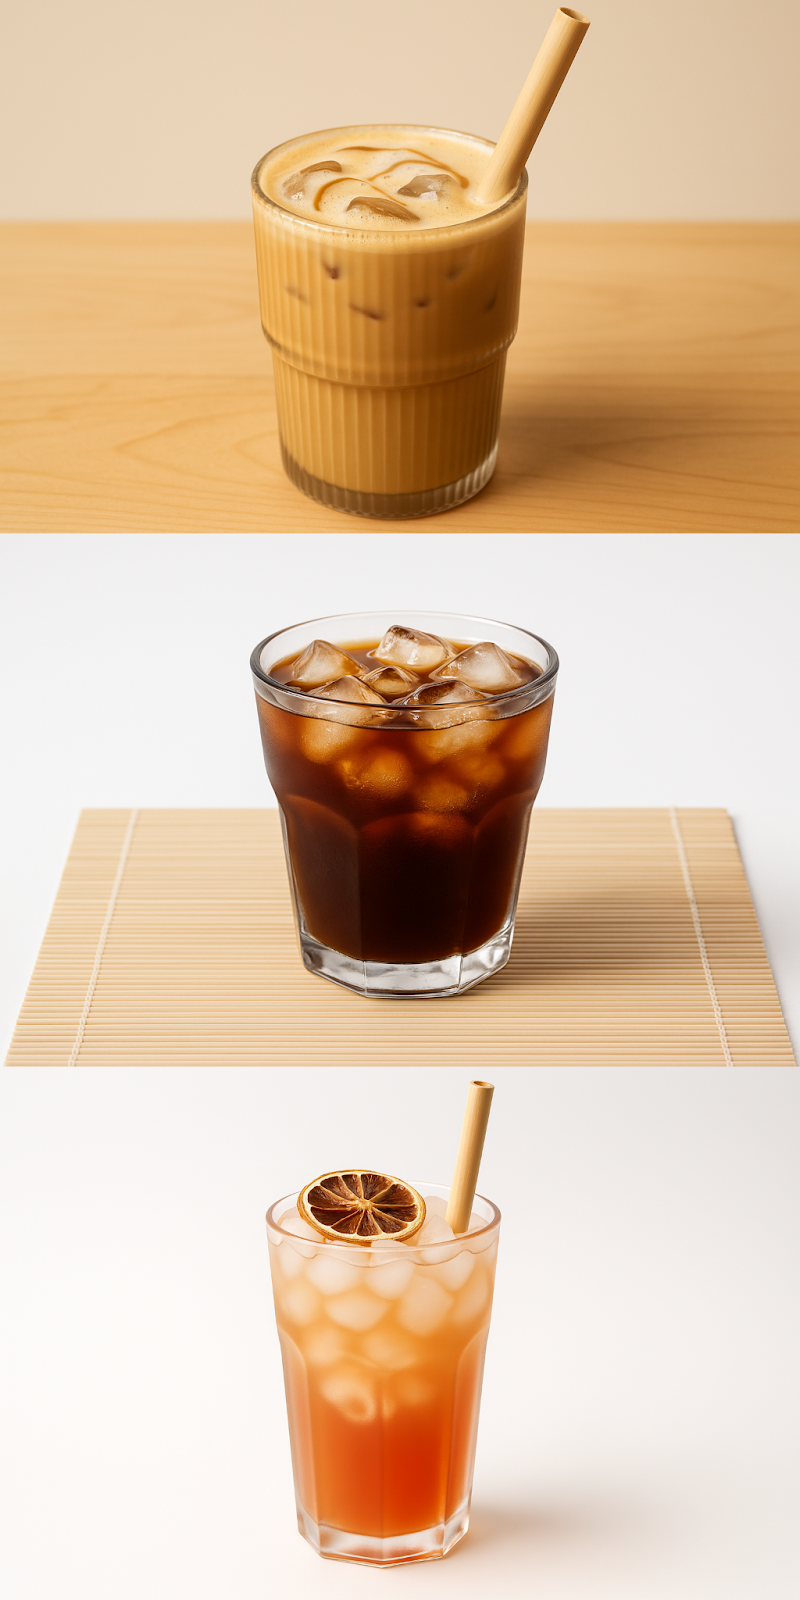
We provide the three images as a list in the image parameter, as follows:
prompt = """
Create a vibrant and eye-catching marketing poster to
promote the cold drinks offerings at our coffee shop.
"""
img = client.images.edit(
model="gpt-image-1",
# We can provide multiple images at once
image=[
open("latte.png", "rb"),
open("americano.png", "rb"),
open("icetea.png", "rb"),
],
prompt=prompt,
size="1536x1024",
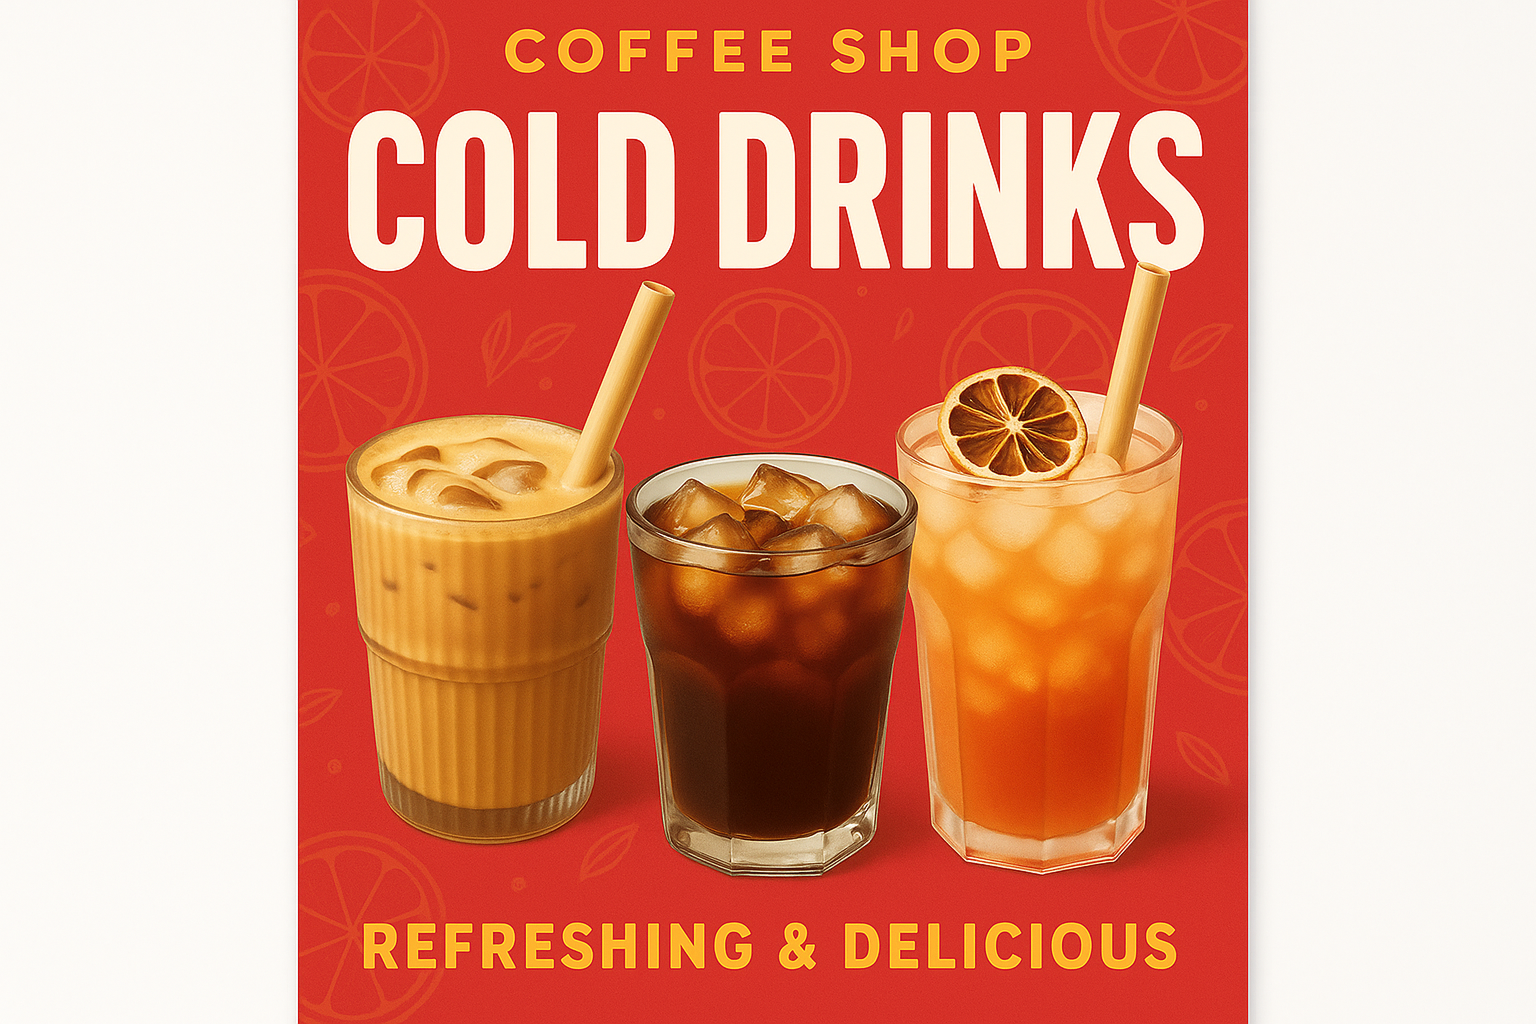
)Here’s the result:
Generating images is charged based on:
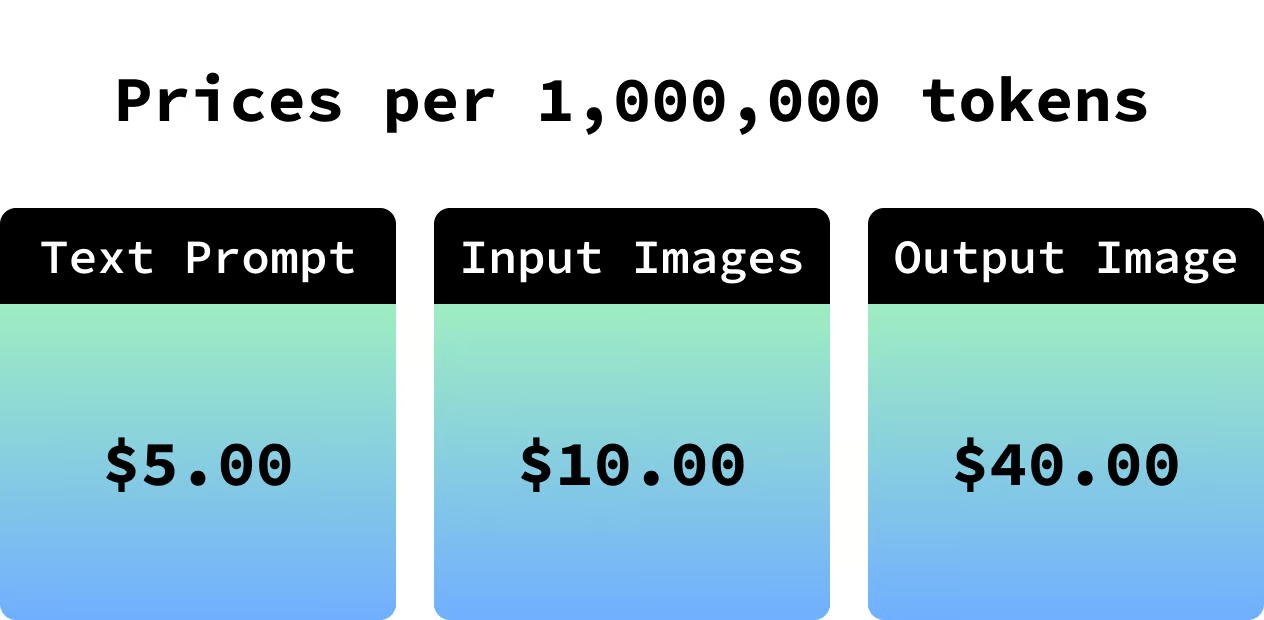
Sometimes it’s hard to get an idea of what these costs represent because we don’t know how many tokens an image consists of.
Because the dimensions of the output images are known, we know how many tokens are required for each, so we can give precise values for the output image tokens price (which is the most expensive part):
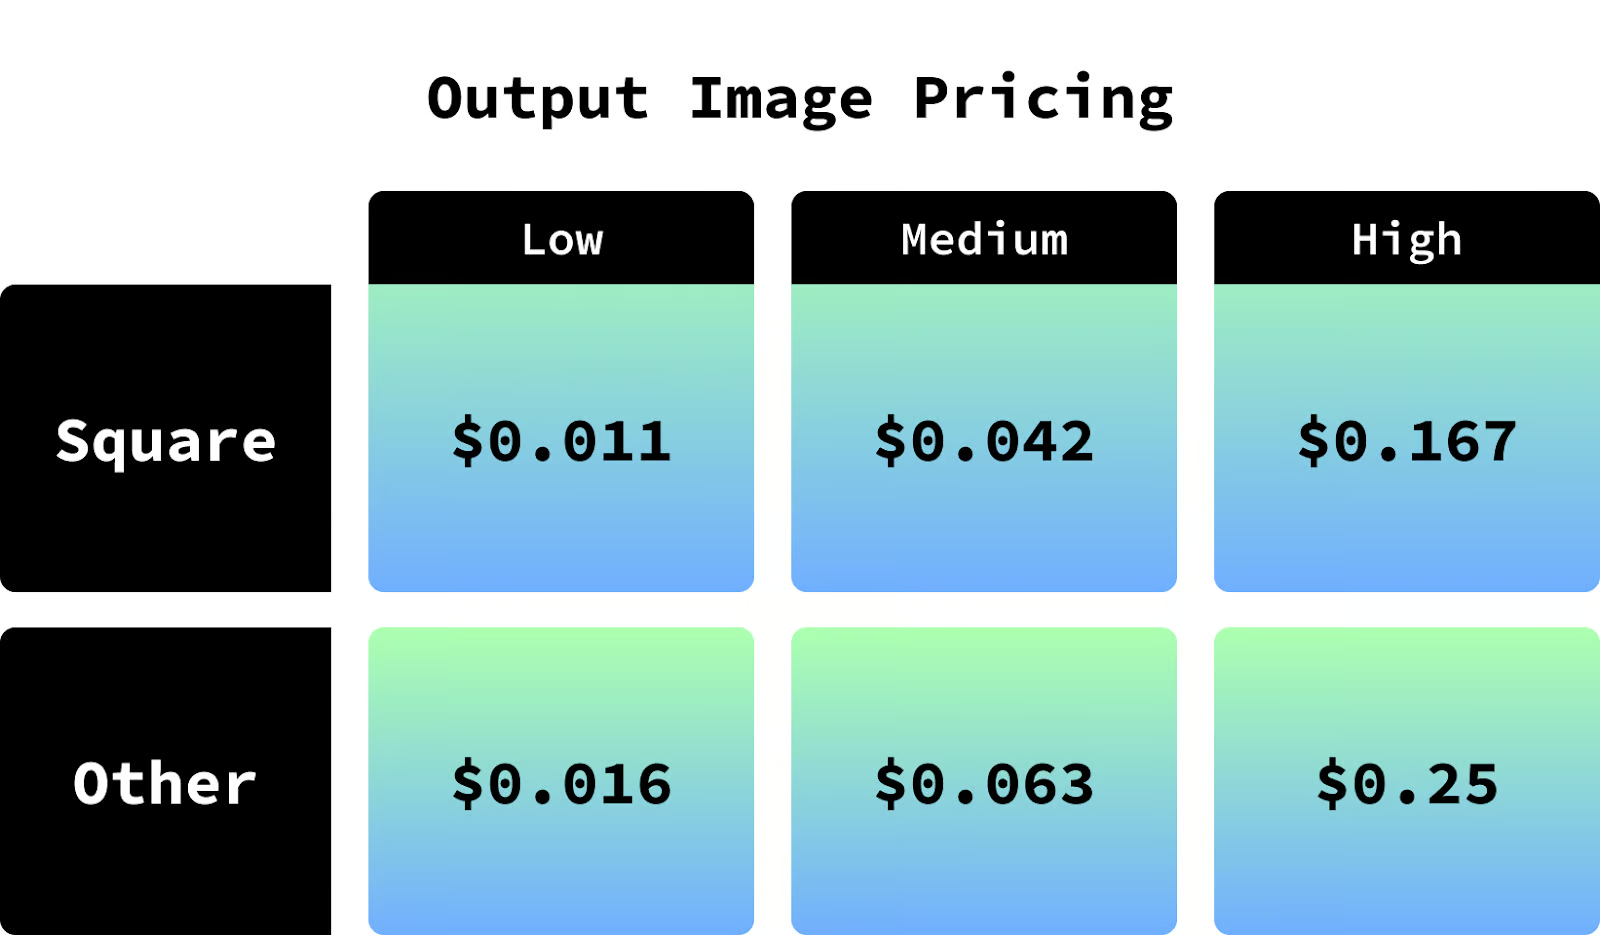
This pricing depends on to quality of the image and the size. For more details, check the GPT Image 1 pricing page.
When we generate an image, the API returns the number of tokens it used, so we can combine it with the above information to know exactly how much it costs.
We can display the amount of tokens used by printing out the usage field of the result:
img = client.images.generate(
  model="gpt-image-1",
  prompt=prompt,
  background="transparent",
  n=1,
  quality="medium",
  size="1024x1024",
  moderation="auto",
  output_format="png",
)
# Add this to see the usage
print("Prompt tokens:", img.usage.input_tokens_details.text_tokens)
print("Input images tokens:", img.usage.input_tokens_details.image_tokens)
print("Output image tokens:", img.usage.output_tokens)
Output:
Prompt tokens: 8
Input images tokens: 0
Output image tokens: 272Despite a few shortcomings from the API, like masking and transparency not being reliable enough, the model can execute with high precision the instructions provided in the prompt.
I think this model opens up many possibilities for building around it. In this tutorial, we learned the basics of how to use it. Here are a few ideas you might wanna explore to build on top of what you learned here:
Learn AI with these courses!
Track
Course
Course
blog
Tom Farnschläder
10 min
blog
François Aubry
8 min
Tutorial
François Aubry
Tutorial
Dimitri Didmanidze
Tutorial
Arunn Thevapalan
Tutorial
François Aubry