Course
Building AI Agents with Google ADK
1 hr
6.5K
Before making our first user request, we need an API key and a Python environment that is able to connect to the Grok API.
To create an API key you can use to authenticate the client with the API, you can follow these steps:
XAI_API_KEY=<your_api_key_here>While using the API can be more affordable than opting for a premium subscription, it isn’t free. Unlike the SuperGrok plan, which starts at $30 per month for a fixed subscription, API costs are entirely based on how much you use the service. However, if you want to access Grok 4 Heavy, things work differently: you’ll need an active SuperGrok Heavy subscription ($300 per month), even when using the API.
For a detailed breakdown of possible expenses, check out the pricing page on xAI.
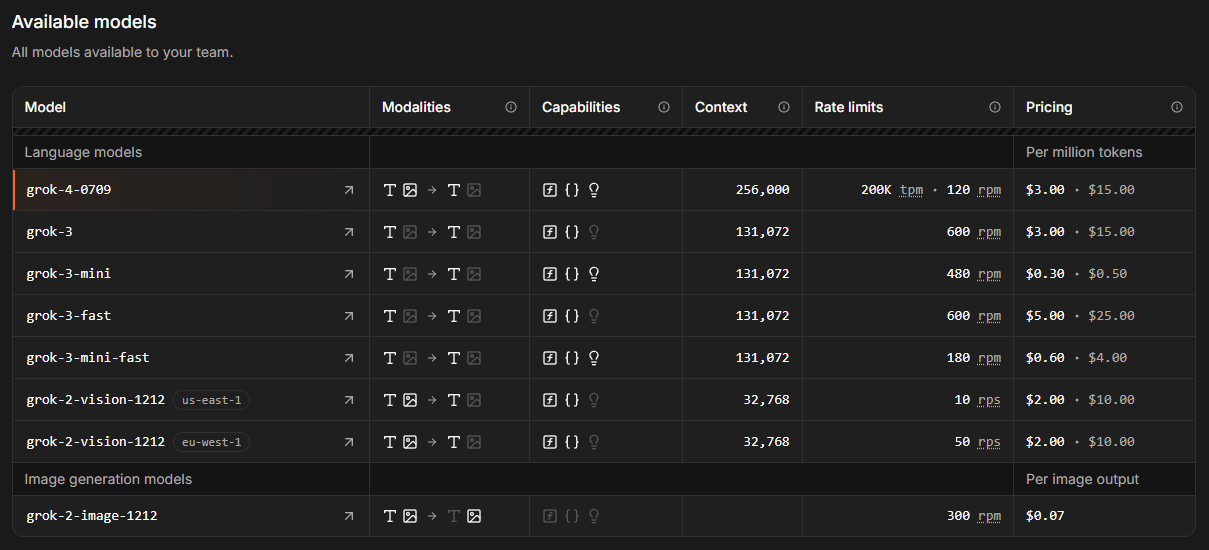
Source: xAI
Pricing for the Grok API is based on usage, measured per million tokens. For reference, one million tokens roughly equals 750,000 English words, whether as input or output. Although its context window size almost doubled in comparison to its predecessor, Grok 4 is priced exactly the same as the standard Grok 3 model. You’ll pay $3 for every million input tokens and $15 for every million output tokens.
To access the API, you’ll need to purchase credits. Starting out, it’s wise to use prepaid credits instead of automatic billing—this helps you avoid surprise charges. You can buy tokens and track your usage in the xAI console, under Invoices > Credits.
Once you have your API key and credits ready, the next step is to prepare your Python environment. You’ll need two packages for smooth API integration:
python-dotenv to load your API key from the .env file as an environment variable.openai client to interact with the Grok 4 API.To keep your project dependencies clean, it’s a good idea to use Anaconda. After installing Anaconda, set up a new environment called grok4 with Python 3.10 by running:
conda create -n grok4 python=3.10
conda activate grok4
With your environment active, install the required packages:
pip install python-dotenv openaiLet’s kick things off by writing our first script. Start by importing the necessary functions from the packages you installed, along with os to access your API key:
import os
from dotenv import load_dotenv
from openai import OpenAI
Next, use load_dotenv() from the dotenv package to load your environment variables, making your API key available to the script:
# Load environment variables
load_dotenv()
Now, initialize the API client by passing your API key (from the .env file) and the Grok server URL to the OpenAI class (we’ll use the OpenAI SDK in this tutorial, but Grok 4 also has a native xAI Python SDK, and it’s also compatible with Antrhopic’s SDK). Assign this to the variable client:
client = OpenAI(
    api_key=os.getenv("XAI_API_KEY"),
    base_url="https://api.x.ai/v1",
)
With these steps, your script is ready to send requests to Grok 4.
Now that we’ve set the stage, let’s test image recognition, one of Grok 4's new features. We’ll demonstrate this by uploading the photo below of a vegetarian lasagna and asking Grok to identify the visible ingredients.

To analyze an image with the Grok 4 API, we need to send a request that includes both an image and a prompt. The recommended way is to use an OpenAI-compatible Python client, specifying the model as grok-4 and including the image URL and your question in the messages array. The API will return a detailed response describing the image’s content, which can be accessed in the response object.
Before sending the request, we have to make sure the image meets the API requirements. Only JPEG and PNG formats are supported, and the file size must not exceed 20 MB. The image must be accessible via a direct link, and the server must send the correct Content-Type header (either image/jpeg or image/png).
After importing the necessary packages, loading your environment variables, and setting up the client, we can send our query like this:
# Sending the query
response = client.chat.completions.create(
    model="grok-4",
    messages=[
    {
      "role": "user",
      "content": [
        {
          "type": "image_url",
          "image_url": {
            "url": "https://shorturl.at/mVDEh",
            "detail": "high"
          }
        },
        {
          "type": "text",
          "text": "Which ingredients do you notice on the picture?"
        }
      ]
    }
  ],
    max_tokens=2000,
    temperature=0.2,  # lower temperature for more deterministic answers
)

# Print the response
print(response.choices[0].message.content)
Based on the picture, it looks like a delicious slice of vegetarian lasagna! Here's what I can clearly see in terms of ingredients (I'm basing this purely on visual cues, so it's not a full recipe—just what's noticeable):
### Main Visible Ingredients:
- **Pasta sheets/lasagna noodles**: The flat, layered pasta that's the base structure of the dish.
- **Tomato sauce**: A red, chunky sauce (likely marinara or similar) that's spread between layers and on top.
- **Cheese**:
- Melted, bubbly cheese on top (probably mozzarella or Parmesan, given the golden-brown spots).
- White, creamy cheese in the filling layers (looks like ricotta or cottage cheese).
- **Spinach (or similar greens)**: Dark green leaves mixed into the layers, giving it a veggie-packed look (this seems like a spinach lasagna variant).
- **Basil leaf**: A fresh green leaf garnishing the top for decoration and flavor.
It doesn't appear to have any meat (like ground beef or sausage), so it's likely a vegetarian version. If this is from a specific recipe or if you have more context, I could refine my observations! What do you think it is? 😊In this case, Grok even recognized that it’s a vegetarian version just from the picture—quite impressive!
Grok 4 is designed for advanced reasoning and can solve complex problems step by step. However, unlike some earlier models, Grok 4 does not expose its internal reasoning traces, so you can’t extract a detailed "thinking process" or chain-of-thought as a separate field from the API response. The output you receive is the final answer, not the model’s intermediate steps or raw reasoning content.
Additionally, Grok 4 does not support the reasoning_effort parameter used, for example, in Grok 3 mini (to learn how to use that parameter, check out this Grok 3 API tutorial). This means you cannot adjust how much “thinking” the model does before it comes to a final conclusion. Therefore, any reasoning query is constructed exactly like a normal query.
Let’s put Grok to the test with another lasagna-related reasoning task and prompt it to show its reasoning in the output.
# Send a basic reasoning query
response = client.chat.completions.create(
    model="grok-4",
    messages=[
        {"role": "user", "content": (
            "You want to cook lasagna for a dinner party, but several guests have dietary restrictions. One is vegetarian, one is lactose-intolerant, and another cannot eat gluten. You have six different lasagna recipes (classic, vegetarian, vegan, gluten-free, cheese-heavy, and meat-based). Which recipe or combination of recipes would best satisfy everyone, and what specific ingredient substitutions would you need to make? Explain your reasoning step by step."
        )}
    ],
    max_tokens=5000,
    temperature=0.2,  # lower randomness
)
# Print the final answer
print(response.choices[0].message.content)
Below, I'll explain my reasoning step by step for selecting the best recipe (or combination of recipes) to satisfy all guests at your dinner party, including the vegetarian, the lactose-intolerant person, the gluten-intolerant person, and everyone else (who presumably have no restrictions). I'll base this on logical inferences about what each recipe likely contains, since the problem doesn't provide exact ingredient lists. Then, I'll recommend specific ingredient substitutions and why this approach works.
(...)
### Step 3: Selecting the Best Recipe or Combination
- **Recommended approach**: Use a **combination of the vegan and gluten-free recipes** to create a single modified lasagna that everyone can eat. Start with the vegan recipe as your base (it already handles no meat and no lactose/dairy), then incorporate elements from the gluten-free recipe (e.g., ingredient swaps to eliminate gluten). This results in a **vegan, gluten-free lasagna**.
- Why not multiple lasagnas? Preparing separate dishes (e.g., one vegetarian, one gluten-free) could work but might not fully satisfy everyone in a shared meal—e.g., the lactose-intolerant guest couldn't eat a dairy-based vegetarian version. A single inclusive dish promotes unity at the party and simplifies cooking/serving. If you have time and oven space, you could make a small "classic" version on the side for unrestricted guests who prefer meat and cheese, but the modified vegan/gluten-free one would still be the core option.
- Why this combination over others? Vegan + gluten-free covers all restrictions without needing to add meat or dairy (which would violate rules). Starting with gluten-free and making it vegan would require more substitutions (e.g., removing meat and cheese), while vegan is already "80% there." Other combos (e.g., vegetarian + gluten-free) would still need dairy removals for lactose intolerance, making them less efficient.
This approach ensures:
- The vegetarian can eat it (no meat).
- The lactose-intolerant can eat it (no dairy/lactose).
- The gluten-intolerant can eat it (no gluten).
- Others can eat it (it's still a flavorful lasagna, though it won't have "real" meat or cheese—unrestricted guests might find it less indulgent, but it's a fair compromise).
(...)I trimmed Grok’s response to highlight the key points, but even with this shorter version, it’s clear the model did its job well. Grok went step-by-step to
Like its predecessor, Grok 4 supports function calling. It lets the model interact directly with external tools and services. This means Grok isn’t limited to generating text—it can also perform actions like fetching weather updates, checking event times, analyzing database records, or even operating smart home devices.
When you submit a request, Grok can determine if it needs extra data and will ask for a specific function to be called with the right parameters. The Python client takes care of running this function locally, passes the result back to Grok, and then you receive a complete, well-reasoned answer.
To work with function calling, we need to import the json package, which allows us to access the argument structure of any function that Grok calls. Next, we define a callback function that Grok will invoke when it requests specific data.
For this example, the suggest_lasagna_recipe function is a simple Python function that returns a fixed recipe suggestion. This hard-coded approach keeps the demonstration simple and avoids dependency on external services.
import json

# Define the callback function
def suggest_lasagna_recipe(ingredients: list) -> dict:
    # Very simplified logic for demo purposes
    if "zucchini" in ingredients:
        return {"recipe": "Vegetarian Zucchini Lasagna"}
    if "beef" in ingredients:
        return {"recipe": "Classic Beef Lasagna"}
    if "tofu" in ingredients:
        return {"recipe": "Vegan Tofu Lasagna"}
    return {"recipe": "Basic Cheese Lasagna"}
We also need to define the tool that Grok can call. This involves specifying the tool’s name, purpose, and required parameters in a JSON schema. This schema is sent to Grok with the request, informing it that it can call this tool whenever it needs extra information to support its reasoning.
# Define the JSON schema for the tool
tools = [
    {
        "type": "function",
        "function": {
            "name": "suggest_lasagna_recipe",
            "description": "Suggests a lasagna recipe based on available ingredients.",
            "parameters": {
                "type": "object",
                "properties": {
                    "ingredients": {
                        "type": "array",
                        "items": {"type": "string"},
                        "description": "List of available ingredients"
                    }
                },
                "required": ["ingredients"]
            }
        }
    }
]
Finally, the tools_map dictionary connects the function names Grok uses to the actual Python functions in your code. This mapping lets the client execute the requested function calls correctly.
# link the function names to the functions
tools_map = {
    "suggest_lasagna_recipe": suggest_lasagna_recipe
}
While manually defining tool schemas works well for simple projects, using a data validation library like Pydantic is highly recommended as your project grows. Pydantic provides automatic validation of function inputs, improved error handling, and results in cleaner, more maintainable code.
Let’s check if Grok uses our function when asked for a lasagna recipe. Here’s how the function calling workflow unfolds:
tools. # Step 1: Send the initial user request
messages = [
{"role": "user", "content": "I have beef, ricotta, and tomato sauce. Which lasagna can I make?"}
]
response = client.chat.completions.create(
model="grok-4",
messages=messages,
tools=tools,
tool_choice="auto",
)
# Step 2: Check if a tool call was requested
tool_calls = getattr(response.choices[0].message, "tool_calls", [])
if tool_calls:
for tool_call in tool_calls:
function_name = tool_call.function.name
print(f"{function_name} successfully called")
function_args = json.loads(tool_call.function.arguments)
# Find and call the matching local function
if function_name in tools_map:
function_result = tools_map[function_name](**function_args)
# Step 3: Add the function result back to the message history
messages.append(response.choices[0].message) # Assistant's tool call message
messages.append({
"role": "tool",
"tool_call_id": tool_call.id,
"content": json.dumps(function_result)
})
# Step 4: Send a new request including the tool response
final_response = client.chat.completions.create(
model="grok-4",
messages=messages,
tools=tools,
tool_choice="auto"
)
# Print the final answer
print("\nFinal Answer:")
print(final_response.choices[0].message.content)
else:
# No tool call: respond directly
print("\nNo tool call was requested. Final Answer:")
print(response.choices[0].message.content)suggest_lasagna_recipe successfully called
Final Answer:
Based on your available ingredients (beef, ricotta, and tomato sauce), you can make a **Classic Beef Lasagna**! (...)As we can see, Grok called our function and suggested the corresponding recipe.
You might also notice the tool_choice argument in the initial request. By default, “auto” lets Grok decide if and which function to call. If you want more control, you can force a specific function call, specify exactly which function to use, or turn off function calling entirely by changing this parameter.
Similar to function calling, structured outputs are a feature introduced with Grok 3. They let Grok deliver answers in a strict format like JSON rather than plain text. This approach makes it much easier to parse, validate, and use the model’s responses in your applications or workflows.
By setting up a schema in advance, you can be sure that Grok’s outputs are always consistent, machine-readable, and ready for further processing. This is especially handy when you need to extract structured data from documents or send AI-generated content straight into databases, dashboards, or automation tools, without worrying about unreliable text parsing.
To define the output schema, we use Pydantic, which makes structuring complex data simpler and more readable (this Pydantic tutorial will help you learn more). For this, you’ll need to import both BaseModel and Field from pydantic. Since our output contains a list of ingredients, we also import List from Python’s typing module to clearly specify the type of each list element.
While we could set up the schema using plain JSON, Grok sometimes returns output that doesn’t exactly match the expected structure. The meaning might be the same, but the schema could differ, which can cause issues if your application needs a specific format. This is especially true for nested elements like lists. That’s why I recommend using Pydantic—it helps make sure the structured output is validated and parsed reliably every time.
In our example, the schema—called Recipe—includes its name, the number of portions, and a list of ingredients. Each Ingredient is defined by its name, the amount needed for the recipe, its availability, price per kilogram, and information on whether the ingredient is vegetarian, vegan, or gluten-free. It’s handy to set default values in the schema itself, like we are doing for the number of portions.
# import additionally needed packages
from pydantic import BaseModel, Field
from typing import List

# Define the schema for the structured output
class Ingredient(BaseModel):
    name: str = Field(description="Name of the ingredient")
    amount: int = Field(description="Amount in g needed for recipe")
    is_at_home: bool = Field(description="Is the item already at home?")
    price: float = Field(description="Price of the ingredient in USD per kg")
    is_vegetarian: bool = Field(description="Is the ingredient vegetarian?")
    is_vegan: bool = Field(description="Is the ingredient vegan?")
    is_gluten_free: bool = Field(description="Is the ingredient gluten-free?")

class Recipe(BaseModel):
    name: str = Field(description="The name of the recipe")
    portions: int = Field(default=4, description="Amount of portions")
    ingredients: List[Ingredient] = Field(description="List of ingredients for the recipe")
There are a few details to keep in mind when making the request. Instead of using client.chat.completions.create(), we want to call client.beta.chat.completions.parse(). This signals Grok that we expect the output in a specific format, and our Recipeschema is passed as the response_format argument.
It’s also helpful to put all key instructions for the task in the system prompt. This keeps Grok 4 focused and consistent throughout the conversation. Since the schema is defined separately, the user prompt can concentrate on the task itself, without needing to list the required fields for the output JSON.
For example, you could set up Grok to play the role of an Italian chef, ensuring all the recipes it serves up are authentically Italian, so you won’t find pineapple sneaking onto your pizza!
# Send a prompt and request structured output
completion = client.beta.chat.completions.parse(
    model="grok-4",
    messages=[
        {"role": "system", "content": (
        "You are a master chef specialized in italian cuisine."
        "When asked about recipes, return the output in structured JSON format following the provided schema, without any extra text."
        )},
        {"role": "user", "content": (
        "I have beef, ricotta, and tomato sauce, and want to cook for 4 persons. Which lasagna can I make?"
        )}
    ],
    response_format=Recipe,
)
Once we’ve parsed Grok 4’s structured output, its benefits over plain text become clear. We can easily rearrange and customize the information to suit our needs, or even feed specific data points straight into automated workflows. In our example, this means we can quickly multiply ingredient prices per kilogram by the required amounts, add up costs based on what’s already in the pantry, and calculate the final price per portion with just a few steps.
# Access the parsed result
recipe = completion.choices[0].message.parsed


price = 0 # initialize price variable
print(f"Recipe: {recipe.name}")
print("Ingredients:")
for i in recipe.ingredients:
    print("- " + i.name + " " + str(i.amount) + " g")
    if not i.is_at_home:
        price += (i.price * i.amount / 1000)
print(f"Price per portion: USD {round((price/recipe.portions), 2)}")
Recipe: Classic Beef Lasagna
Ingredients:
- Ground beef 500 g
- Ricotta cheese 400 g
- Tomato sauce 800 g
- Lasagna noodles 300 g
- Mozzarella cheese 300 g
- Parmesan cheese 100 g
- Onion 200 g
- Garlic 20 g
- Olive oil 30 g
- Egg 50 g
Price per portion: USD 1.7625Grok 4 brings new features like a larger context window and better reasoning capabilities. Its image recognition and function calling open up exciting possibilities for combining AI with real-world data and actions, while structured outputs ensure reliable, machine-readable responses. The API setup is straightforward, allowing quick integration into your Python projects with just a few dependencies.
And if all the lasagna examples made you hungry along the way, you’re not alone—I might just have to grab a slice myself!
Learn AI with these courses!
Course
Course
Course
blog
Alex Olteanu
8 min
blog
Matt Crabtree
7 min
blog
Alex Olteanu
8 min
Tutorial
Tom Farnschläder
Tutorial
Aashi Dutt
Tutorial
François Aubry