What is PyCaret
Note: This tutorial was created in 2021, and PyCaret is no longer actively maintained; some steps may not work with current versions of DataLab or other tools.
PyCaret is an open-source, low-code machine learning library in Python that automates machine learning workflows. It is an end-to-end machine learning and model management tool that exponentially speeds up the experiment cycle and makes you more productive.
Compared with the other open-source machine learning libraries, PyCaret is an alternate low-code library that can replace hundreds of lines of code with a few lines only. This makes experiments exponentially faster and more efficient. PyCaret is essentially a Python wrapper around several machine learning libraries and frameworks such as scikit-learn, XGBoost, LightGBM, CatBoost, spaCy, Optuna, Hyperopt, Ray, and a few more.
The design and simplicity of PyCaret are inspired by the emerging role of citizen data scientists, a term first used by Gartner. Citizen data scientists are power users who can perform both simple and moderately sophisticated analytical tasks that would previously have required more technical expertise.
PyCaret is simple and easy to use. All the operations performed in PyCaret are sequentially stored in a pipeline that is fully orchestrated for deployment. Whether it’s imputing missing values, transforming categorical data, feature engineering, or even hyperparameter tuning, PyCaret automates all of it. To learn more about PyCaret, watch this one-minute video.
Modules in PyCaret
PyCaret’s API is arranged in modules. Each module supports a type of supervised learning (classification and regression) or unsupervised learning (clustering, anomaly detection, nlp, association rules mining). A new module for time series forecasting was released recently under beta as a separate pip package.
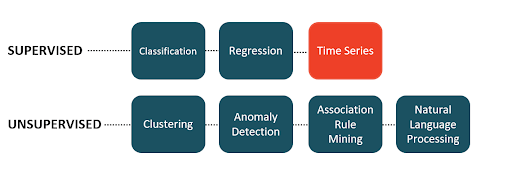 Image source: [Ali, Moez].
Installing PyCaret
Installing PyCaret is simple through pip and it takes only a few minutes. PyCaret's default installation only installs hard dependencies as listed in the requirements.txt file on the repo.
Note: This tutorial was created in 2021, and PyCaret is no longer actively maintained; some steps may not work with current versions of DataLab or other tools.
pip install pycaret
To install the full version:
pip install pycaret[full]
Features
PyCaret’s claim to fame is its simplicity. Compared to other automated machine learning softwares, PyCaret is extremely flexible, comes with a unified API, and has no learning curve.
PyCaret is loaded with functionalities. You can go from processing your data to training models, and then deploying them on the cloud within a few lines of code. It comes with a lot of preprocessing transformations that are applied automatically when the experiment is initialized. The model zoo of PyCaret has over 70 untrained models for supervised and unsupervised tasks.
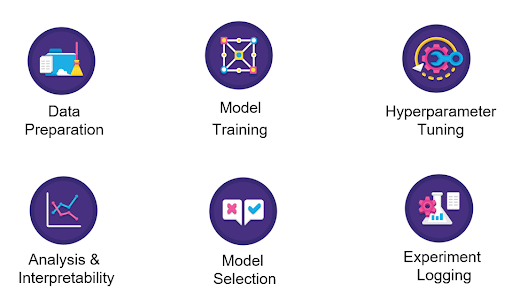
You can also use PyCaret on GPU and speed up your workflow by 10x. To train models on GPU simply pass use_gpu = True in the setup function. No change in code at all.
PyCaret is a glass-box solution. It comes with tons of functionality to interact with the model and analyze the performance and the results. All the standard plots like confusion matrix, AUC, residuals, and feature importance are available for all models. It also has integration with the SHAP library which is used to explain the output of any complex tree-based machine learning models.
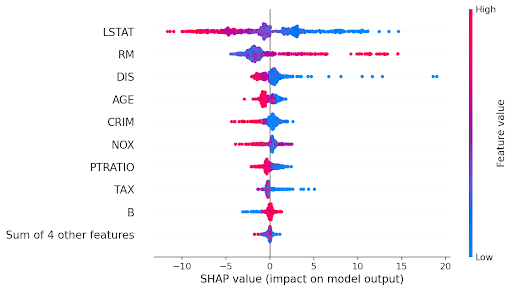 (An example beeswarm plot)
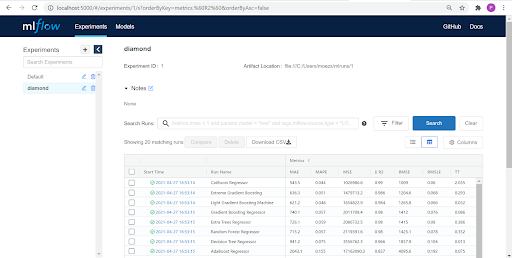
PyCaret also integrates with MLflow for its MLOps functionalities. It automatically logs metrics, parameters, and artifacts when you pass log_experiment = True in the setup function.
 (Image by Author)
Preprocessing in PyCaret
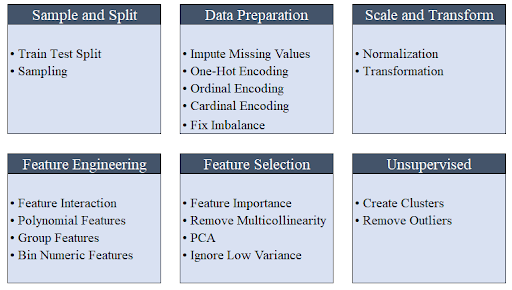
All the preprocessing transformations are applied within the setup function. PyCaret provides over 25 different preprocessing transformations that are defined in the setup function. Click here to learn more about PyCaret’s preprocessing abilities.
 (Image by Author)
Modules in PyCaret
| Module | Task |
|---|---|
| pycaret.classification | Supervised: Binary or multi-class classification |
| pycaret.regression | Supervised: Regression |
| pycaret.clustering | Unsupervised: Clustering |
| pycaret.anomaly | Unsupervised: Anomaly Detection |
| pycaret.nlp | Unsupervised: Natural Language Processing (Topic Modeling) |
| pycaret.arules | Unsupervised: Association Rules Mining |
| pycaret.datasets | Datasets |
Example: An end-to-end ML use-case
This is a typical machine learning workflow. Framing an ML problem correctly is the first step in any machine learning project and it may take from a few days to weeks in framing it right.
Data Sourcing and ETL (Extract-Transform-Load) may also vary in complexity depending on the organization’s maturity in technology and size. It is normal to see a team of data engineers working together in this phase.
The Exploratory Data Analysis (EDA) phase encompasses exploring the raw data to assess the quality of data (missing values, outliers, etc.), correlation among features, and test business hypotheses.
For data preparation and model training and selection, PyCaret does all the heavy lifting under the hood. Data preparation includes transformations such as missing value imputation, scaling (min-max, z-score, etc.), categorical encoding (one-hot-encoding, ordinal encoding, etc.) feature engineering (polynomial, feature interaction, ratios, etc.), and feature selection.
After data preparation, the model training and selection phase involves fitting multiple algorithms and evaluating performance using some kind of testing strategy (mostly cross-validation).
Finally, the chosen (best model) is deployed as an API end-point for inference. Once deployment is done, monitoring API and keeping a tab on model performance in production goes on for life.
 (An Image by Author)
Problem statement
Predict the price of diamond given the attributes like cut, color, shape, etc.
Data sourcing
# load the dataset from pycaret
from pycaret.datasets import get_data
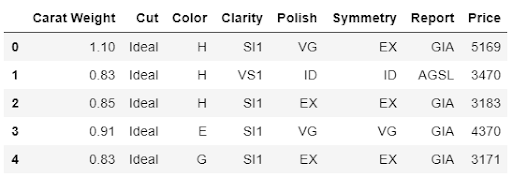
data = get_data('diamond')
Exploratory data analysis (EDA)
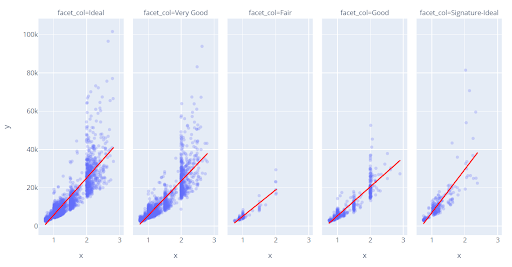
Let’s do some quick visualization to assess the relationship of independent features (weight, cut, color, clarity, etc.) with the target variable i.e. Price:
# plot scatter carat_weight and Price
import plotly.express as px
fig = px.scatter(x=data['Carat Weight'], y=data['Price'], facet_col = data['Cut'], opacity = 0.25, trendline='ols', trendline_color_override = 'red')
fig.show()
Let’s check the histogram of the target variable Price.
# plot histogram
fig = px.histogram(data, x=["Price"])
fig.show()
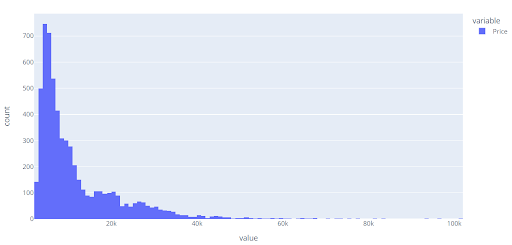
Notice that the distribution of Price is right-skewed, we can quickly check to see if log transformation can change the distribution (shape) of the target variable.
# plot histogram
data['logged_Price'] = np.log(data['Price'])
fig = px.histogram(data, x=["logged_Price"])
fig.show()
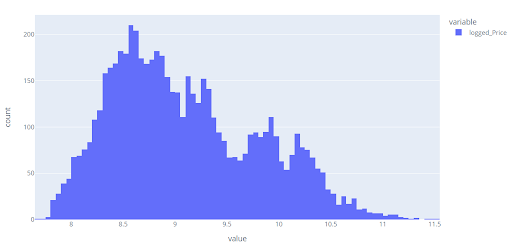
Data cleaning and preparation
All experiments in PyCaret must be initialized using the setup function. It is responsible for all the data preparation tasks required before model training. Besides performing some basic default processing tasks, PyCaret also offers a wide array of pre-processing features. Click here to learn more about all the preprocessing functionalities in PyCaret.
# initialize setup
from pycaret.regression import *
s = setup(data, target = 'Price', transform_target = True, log_experiment = True, experiment_name = 'diamond')
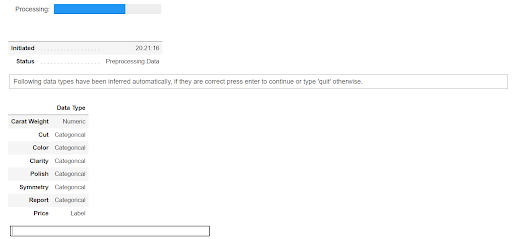
When you initialize the setup function in PyCaret, it profiles the dataset and infers the data types for all input features. If all data types are correctly inferred, you can press enter to continue. There is also a parameter that can be used to overwrite data types in PyCaret. Also, if you are using PyCaret in a Python script you can silent this confirmation by passing silent = True in the setup function.
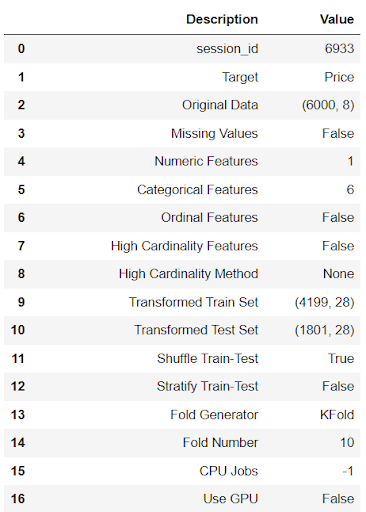 (Output from setup — truncated for display)
ML model training and selection
After setup, transformed data is available for model training. You can start the training process with the compare_models function. It will train all the algorithms available in the model zoo and evaluate multiple performance metrics using k-fold cross-validation.
# compare all models
best = compare_models()
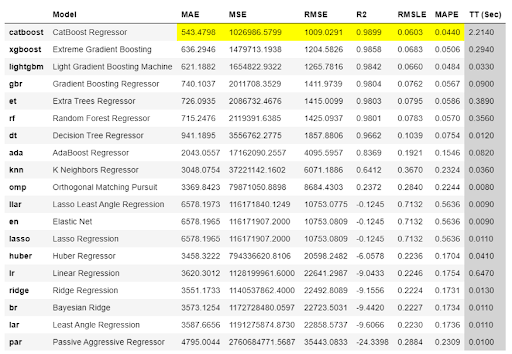 (Output from compare_models)
The output from the compare_models shows the averaged cross-validated metrics for all the models. The output is by default sorted by ‘R2’ (highest-to-lowest), but can be changed by passing a sort parameter in the compare_models function.
The best model (in this case, CatBoost Regressor) is returned upon completion of the compare_models. Only the best model is returned by default, but this can be changed with the n_select parameter. For example, passing n_select = 3 in the compare_models function will return top 3 models as a list.
# check the final params of best model
best.get_params()

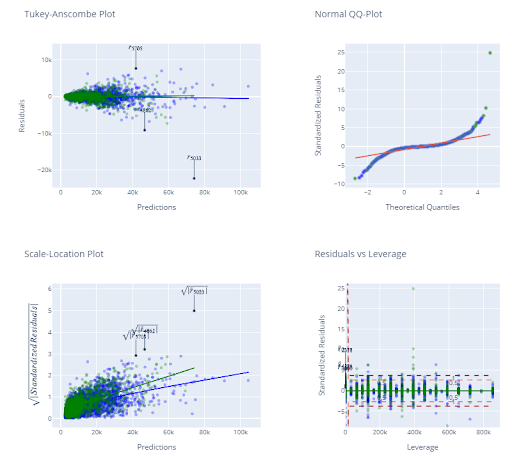
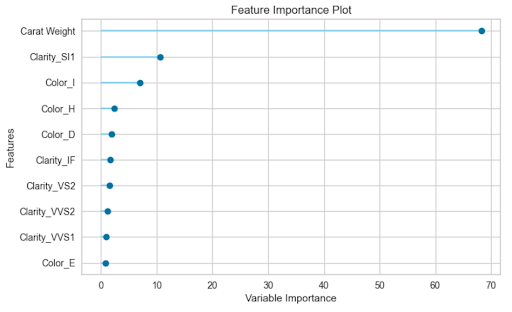
We can also check the diagnostics and a few other analysis plots using the plot_model function.
# check the residuals of trained model
plot_model(best, plot = 'residuals_interactive')
plot_model(best, plot = ‘feature’)
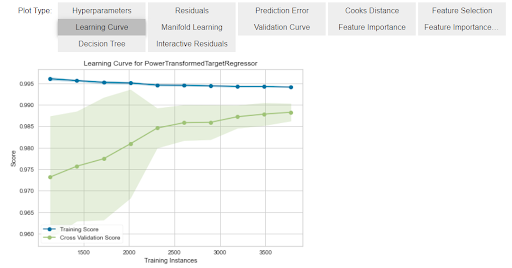
There is one more function called evaluate_model which is a convenient way to navigate all available analysis plots in the Jupyter Notebook.
evaluate_model(best)
Deployment and monitoring of ML model
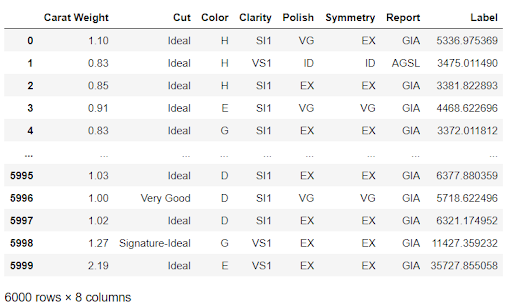
We can now use the final model to generate predictions on unseen data with the predict_model function:
# copy data and remove target variable
data_unseen = data.copy()
data_unseen.drop(‘Price’, axis = 1, inplace = True)
predictions = predict_model(best, data = data_unseen)
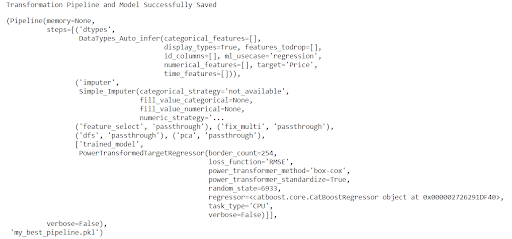
For future use, you can save the entire pipeline with the save_model function.
save_model(best, ‘my_best_pipeline’)
Experiment logging
Remember we passed log_experiment = True in the setup function along with experiment_name = 'diamond'. Let’s see what PyCaret has done behind the scenes. To see the magic, let’s initiate the MLflow server:
# within notebook
!mlflow ui

# from the command line
mlflow ui
Now open your browser and type “localhost:5000”. It will open a UI like this:
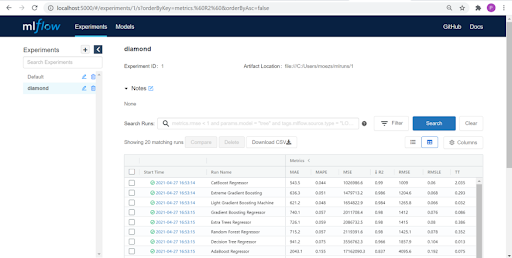
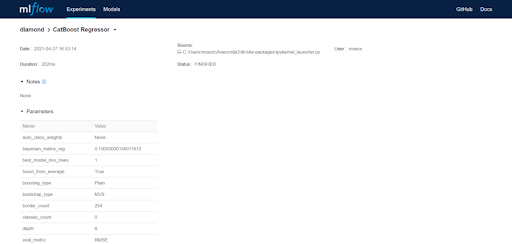
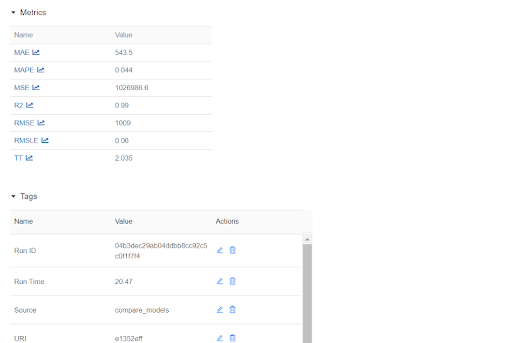
Each entry in the table above represents a training run resulting in a trained pipeline and a bunch of metadata such as DateTime of a run, performance metrics, model hyperparameters, tags, etc. Let’s click on one of the models:
PyCaret time series forecasting
PyCaret's new time series module is now available in beta. Staying true to the simplicity of PyCaret, it is consistent with the existing API and fully loaded with functionalities. Statistical testing, model training and selection (30+ algorithms), model analysis, automated hyperparameter tuning, experiment logging, deployment on cloud, and more. All of this with only a few lines of code (just like the other modules of PyCaret). If you want to use this new module in beta, you must install it in a separate conda environment in order to avoid dependency conflicts.
pip install pycaret-ts-alphaTime series data is one of the most common data types and understanding how to work with it is a critical data science skill if you want to make predictions and report on trends. If you would like to learn more about time-series analysis and forecasting in Python, DataCamp has a great collection of courses. You can start with Time Series with Python Learning track or one of these courses would also be a great choice:
- Introduction to Time Series Analysis in Python
- Machine Learning for Time Series Data in Python
- Time Series Analysis Tutorial
PyCaret Integrations
| Area | Integrations |
|---|---|
| Models | scikit-learn, XGBoost, LightGBM, CatBoost |
| GPU Training | RAPIDS.AI |
| Distributed Computing | RAY |
| Hyperparameter Tuning | tune-sklearn, optuna |
| Plotting & Analysis | plotly, yellowbrick, seaborn, matplotlib |
| NLP | gensim, spacy, nltk |
| MLOps | MLflow |
PyCaret FAQs
-
Is PyCaret available in Python only? Yes, PyCaret is only available in Python for now.
-
What’s the difference between PyCaret and other open-source machine learning libraries like scikit-learn, XGboost, LightGBM Compared with the other open-source machine learning libraries, PyCaret is an alternate low-code library that can replace hundreds of lines of code with few lines only. PyCaret is essentially a Python wrapper around several machine learning libraries and frameworks such as scikit-learn, XGBoost, LightGBM, CatBoost, spaCy, Optuna, Hyperopt, Ray, and a few more.
-
What use-cases are supported in PyCaret? As of 2.3.4 release PyCaret supports Binary/Multi-class Classification, Regression, Clustering, Anomaly Detection, Natural Language Processing (Topic Modeling), and Association Rules Mining. PyCaret also has recently released its new time-series module in beta as a separate pip installer.
-
Can we use PyCaret on the GPU? You can train models on GPU in PyCaret and speed up your workflow by 10x. To train models on GPU simply pass use_gpu = True in the setup function. There is no change in the use of the API, however, in some cases, additional libraries have to be installed as they are not installed with the default version or the full version.
-
Can we tune hyperparameters of the model in PyCaret? Yes, you can tune hyperparameters of any model automatically in PyCaret. It integrates with sklearn, optuna, tune-sklearn, and ray for different tuners such as Random Grid Search or Bayesian Grid Search.
-
Is PyCaret free to use? PyCaret is completely free and open-source and licensed under the MIT license.
| PyCaret Resources | ---- |
|---|---|
| ⭐ Tutorials | New to PyCaret? Check out the official notebooks! |
| 📋 Notebooks | Example notebooks created by the community. |
| 📙 Blog | Tutorials and articles by contributors. |
| 📚 Documentation | The detailed API docs of PyCaret |
| 📺 Video Tutorials | Our video tutorial from various events. |
| 📢 Discussions | Have questions? Engage with community and contributors. |
| 🛠️ <atarget="_blank" href="https://github.com/pycaret/pycaret/blob/master/CHANGELOG.md">Changelog | Changes and version history. |
| 🌳 Roadmap | PyCaret's software and community development plan. |
