Track
Our society has produced so much data at such a fast pace. Consequently, efficient and reliable infrastructure to store and manage all this data is more necessary than ever. Storage, management, and analysis systems are a core part of any modern organization and business.
This is where Azure Blob and Files steps in—probably one of the best storage options out in the market. They consist of efficient file storage in cloud computing. We will cover the key features, benefits, and use cases of Azure Blob Storage and Azure Files, along with practical steps for setting up and managing these services.
This guide aims to give a complete understanding of these services based on Microsoft Cloud Infrastructure.
What Are Azure Storage Solutions?
Let’s start with an overview of the main types of Azure storage solutions, giving us a chance to understand the key features and use cases.
Overview of Azure Storage
Azure Storage Account is a fundamental cloud-based service that offers scalable and highly available storage solutions for diverse data types, from unstructured data like documents, images, and videos to structured data like tables. There are two main options:
Azure Blob Storage
Blob Storage is perfect for storing unstructured data from images to videos, including documents, and backups. It is based on the concept of blob that we will further understand in the coming sections.
Azure Files
Azure File Storage offers file shares accessible through the Server Message Block (SMB) protocol. It's optimized for sharing files across multiple virtual machines or on-premises servers, which makes it perfect for collaboration and distributed apps.
Key differences
The main differences between both services are:
- Data types: While Blob storage is designed for unstructured data such as images or documents, Azure File is optimized for structured data that needs to be shared across multiple machines.
- Access protocol: While Blob Storage is accessed using Accessed via HTTP/HTTPS. The Azure Files are accessed using the Server Message Block (SMB) protocol.
As both services have their own properties and are optimized for dealing with different types of data, they are used for different scenarios.
Use-cases
Azure Blob Storage is ideal for storing large amounts of unstructured data that do not require a traditional file system, which includes:
- Backup and restore: Storing backups of databases, applications, and other critical data.
- Media storage: Storing large media files like videos and images.
- Big data analytics: Storing large datasets for analytics and machine learning.
- Content delivery: Serving static content such as images, videos, and documents to users.
Conversely, Azure File Storage is ideal for scenarios where files need to be shared across multiple virtual machines or on-premises servers, supporting traditional file system operations.
- File sharing: Sharing files across multiple virtual machines or on-premises servers.
- Lift and shift: Migrating existing applications that rely on traditional file shares to the cloud.
- Application configuration: Storing configuration files that need to be accessed by multiple instances of an application.
- Collaboration: Enabling collaborative work environments where multiple users need to access and modify the same files.
If you want to explore Azure services and its main use-cases further, you can check out DataCamp’s course on Azure Architecture and Services.
Benefits of using Azure for storage
Azure Storage Account offers several key features that make it a powerful tool for managing your data.
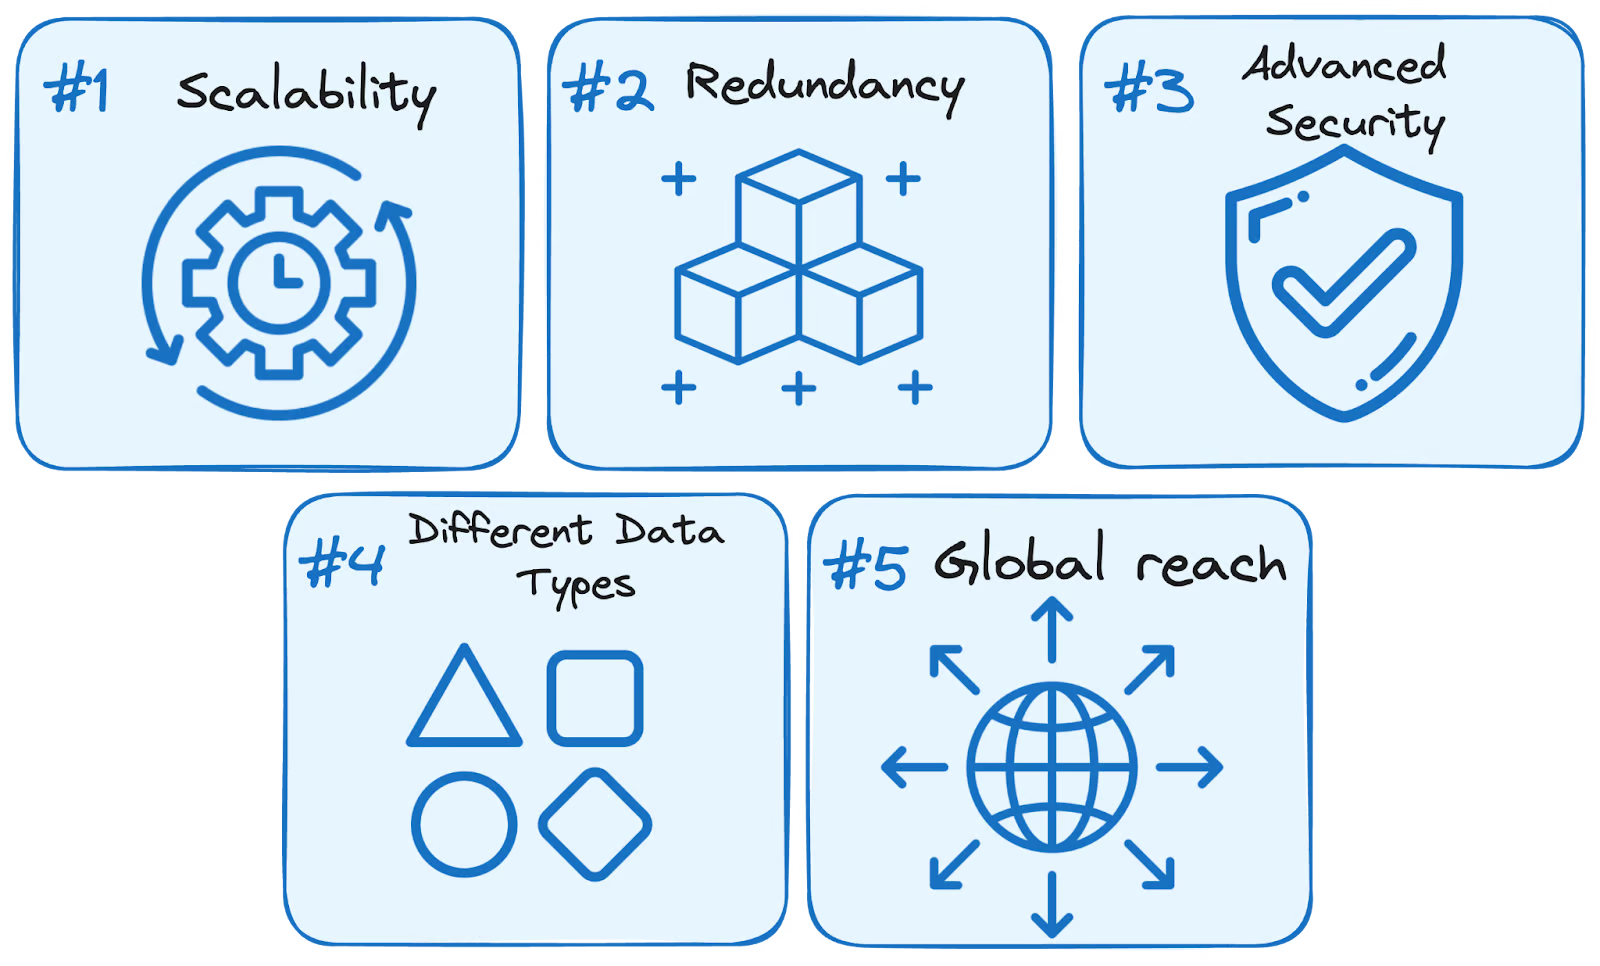
Image by Author.
- Scalability: It can easily grow to meet the increasing storage needs of your applications.
- Redundancy: Your data is replicated to ensure it's always available and durable.
- Security: It includes strong security measures and access controls to keep your data safe.
- Support for multiple data types: Whether you need to store blobs, files, queues, or tables, Azure Storage has you covered.
- Global reach: With availability in multiple regions, you can store data closer to your users, reducing latency.
Azure Storage is designed to be a reliable and versatile solution for all your data storage needs.
Getting Started with Azure
If you’re just getting started with Azure, you can check out our full guide on How to Set Up and Configure Azure. However, below, we’ve summarized the key points of setting up your Azure Storage account.
Setting up an Azure Storage account
To get started with Azure, you first need to create an account and sign in:
Step 1: Sign in to the Azure Portal
Sign in to your Azure account at portal.azure.com.
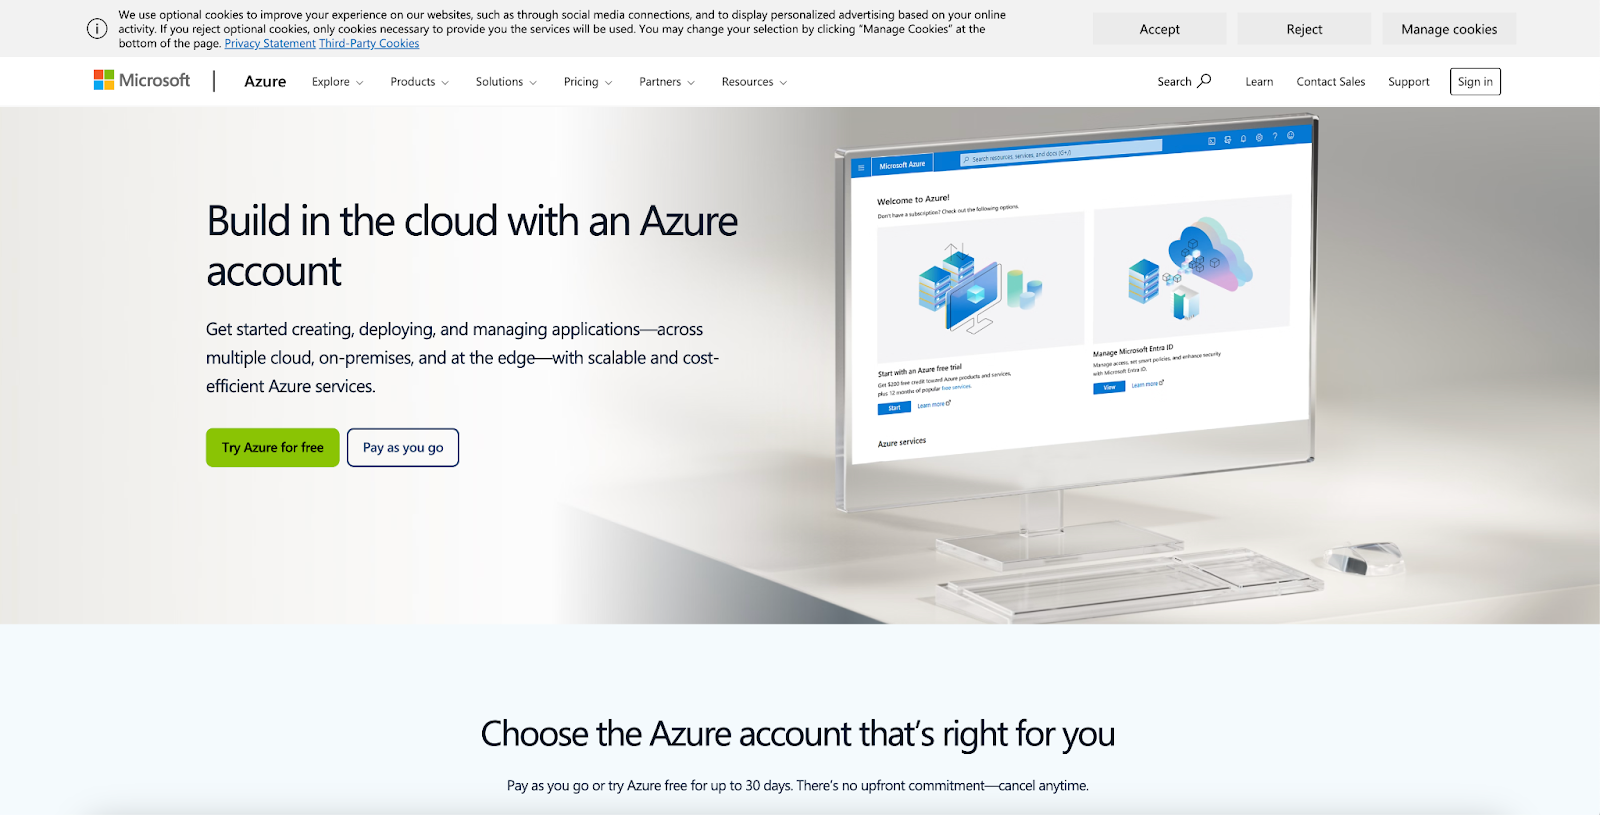
Screenshot of Azure landing website.
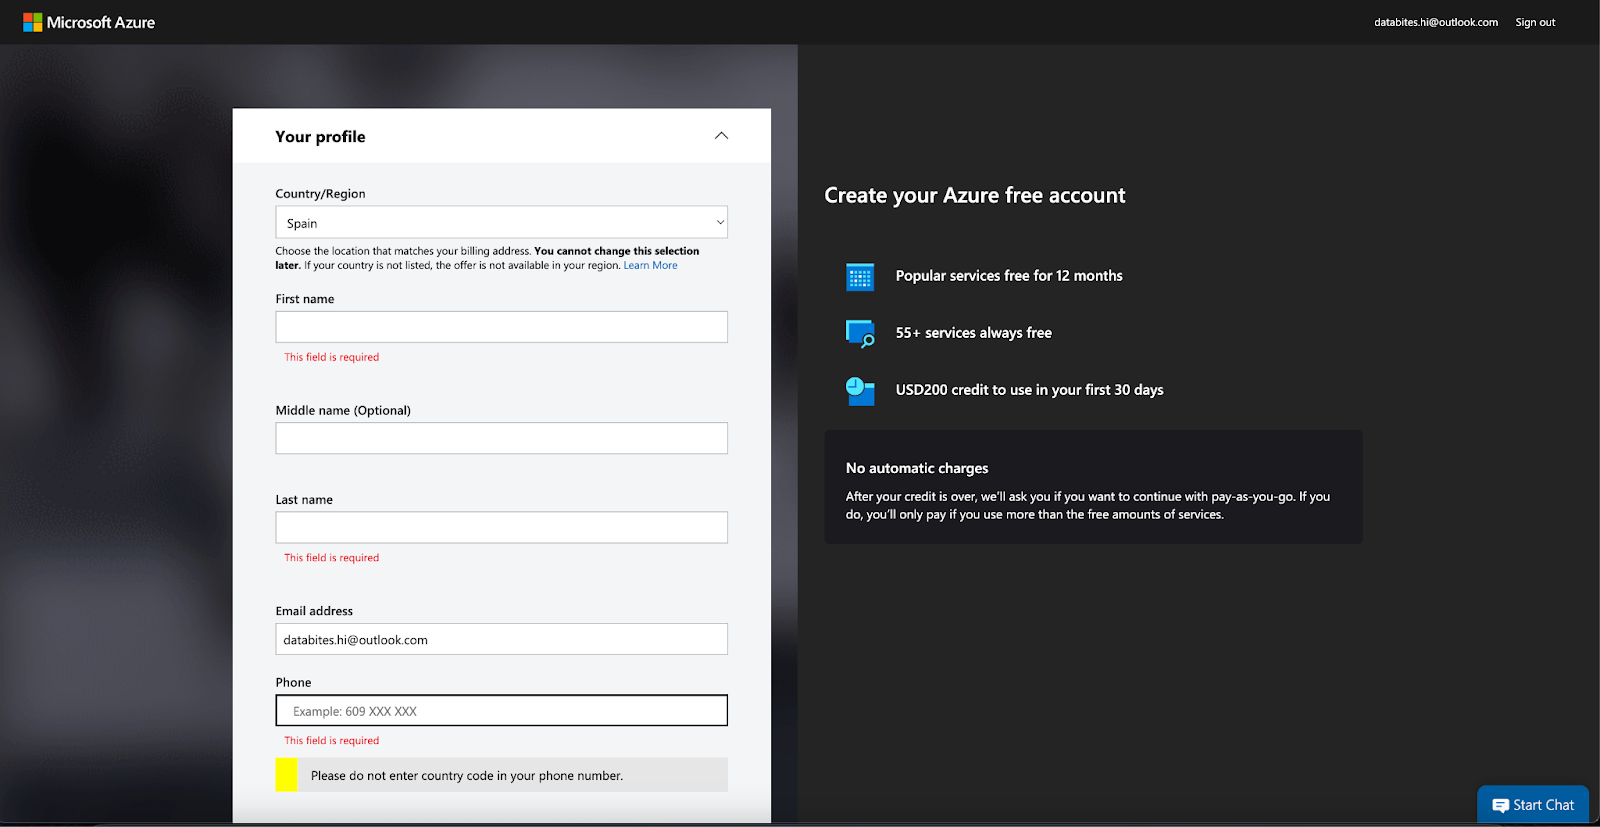
Step 2: Add your billing information and your personal details
Once you click on the Get Started button, you will have to share your personal details (including name, surname, and billing information) to activate your account.
Screenshot of Azure landing website.
Once you have an active account, you will get into your Azure main view. You should see something similar as the following image.
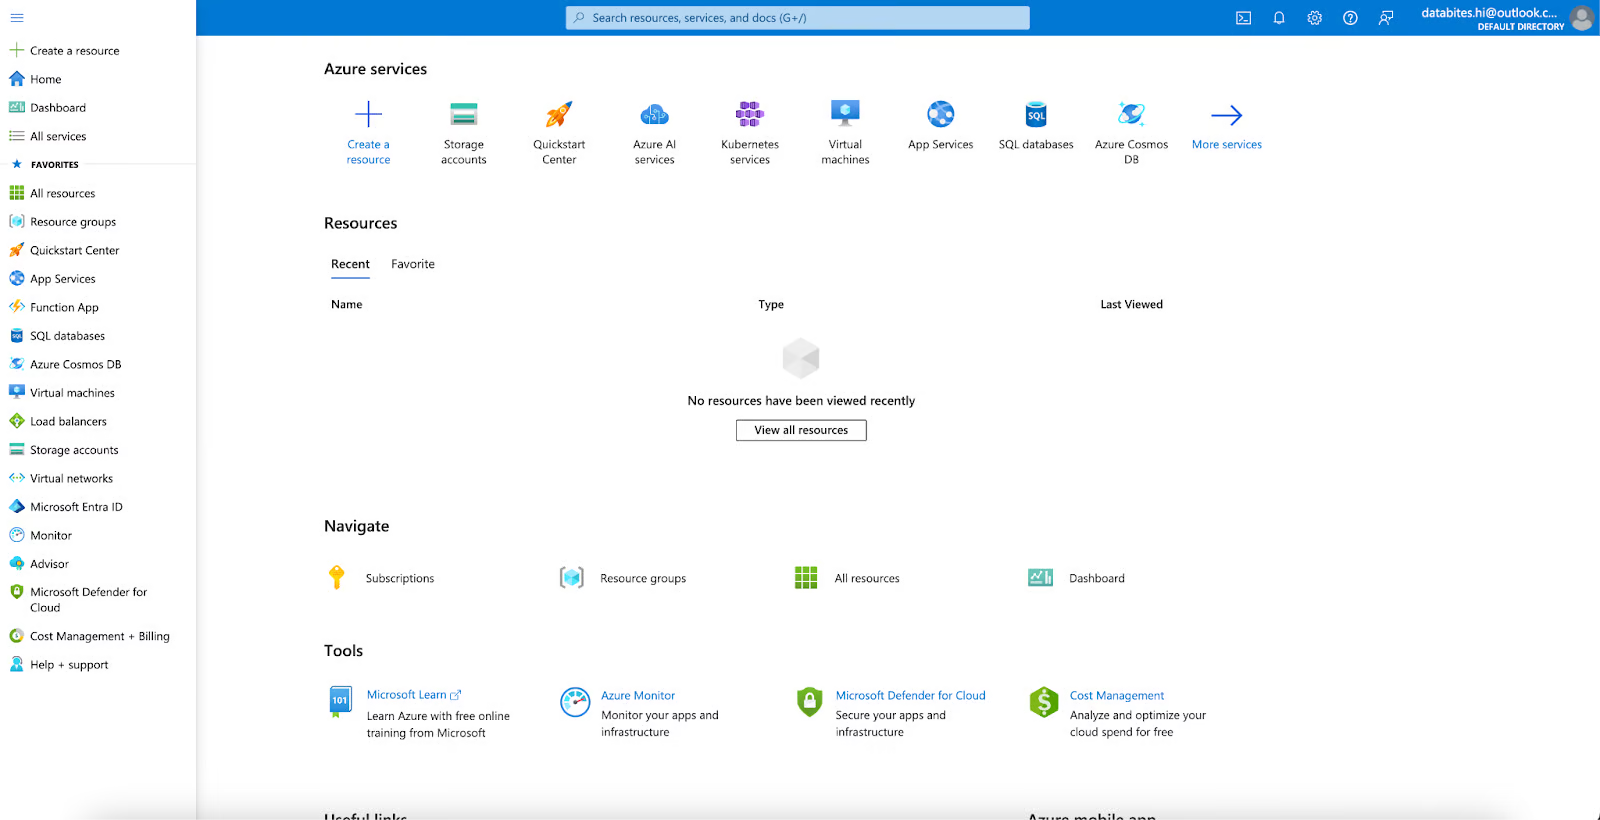
Screenshot of Azure main view.
So now that we have our Azure account active, we can keep learning more about its storage options.
Working with Azure Blob Storage
What is Blob Storage?
Azure Blob Storage is Microsoft's object storage solution for its cloud service. Blob Storage is optimized for storing massive amounts of unstructured data. This means data that doesn't adhere to a particular data model or definition and can include text, images, or sound.
It is specifically designed (and optimized) for:
- Serving images or documents directly to a browser.
- Storing files for distributed access.
- Streaming video and audio.
- Writing to log files.
- Storing data for backup and restore, disaster recovery, and archiving.
- Storing data for analysis by an on-premises or Azure-hosted service.
Types of blobs: block, append, and page blobs
Blob Storage offers three types of resources:
- Block Blobs: Optimized for storing large binary files.
- Page Blobs: Ideal for scenarios requiring random read/write operations, like virtual hard disks.
- Append Blobs: Best for data that needs to be appended, such as logs.
It is important to understand that to have an active Blob Storage service, we first need an Azure storage account.
Setting up an Azure Storage account
A storage account provides a unique namespace in Azure for all your data. Every object that you store in Azure Storage has an address that includes your unique account name. The combination of the account name and the Blob Storage endpoint forms the base address for the objects in your storage account.
Data (as Blobs) in Blob Storage is contained within a Storage Account. However, there is an additional layer to organize our data called containers.
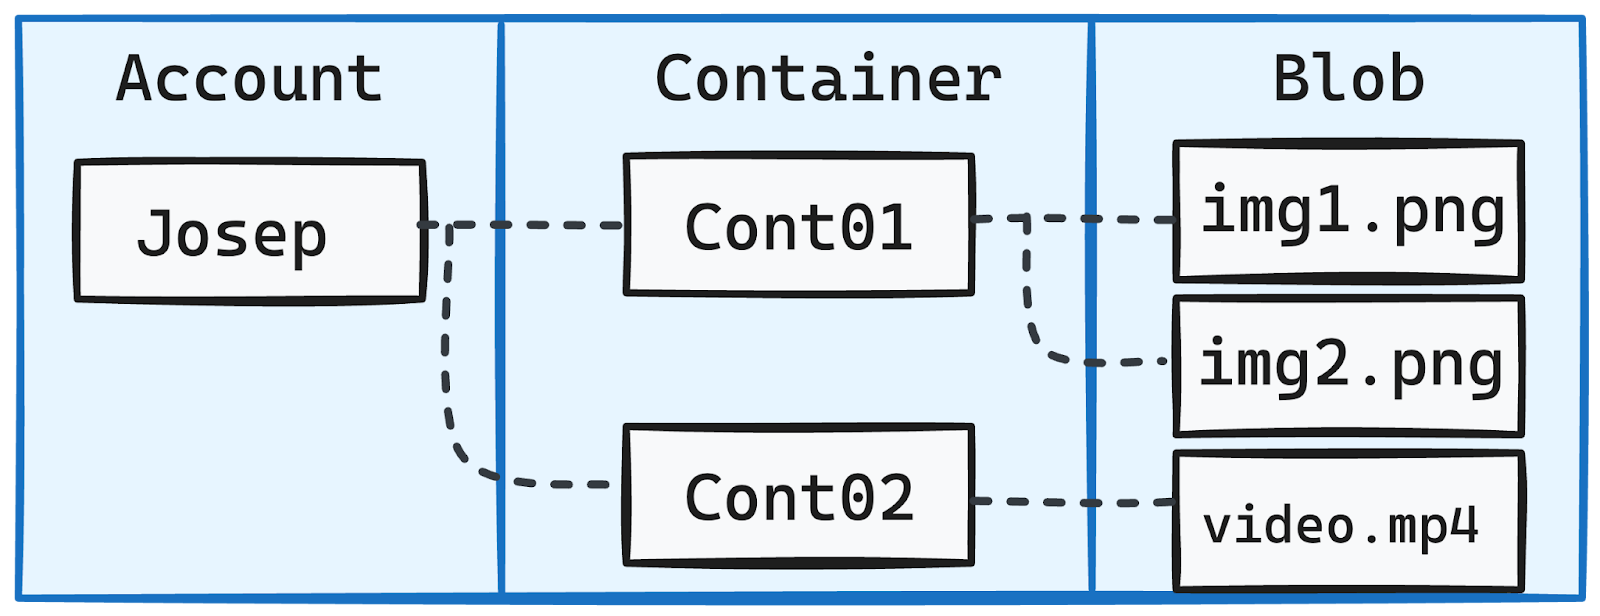
Image by Author. Organizing data within Blob Storage.
Step-by-step guide to creating a storage account
1. Creating a Resource Group
The first thing to do will be creating a resource group. You can easily find this service in the left-hand navigation bar.
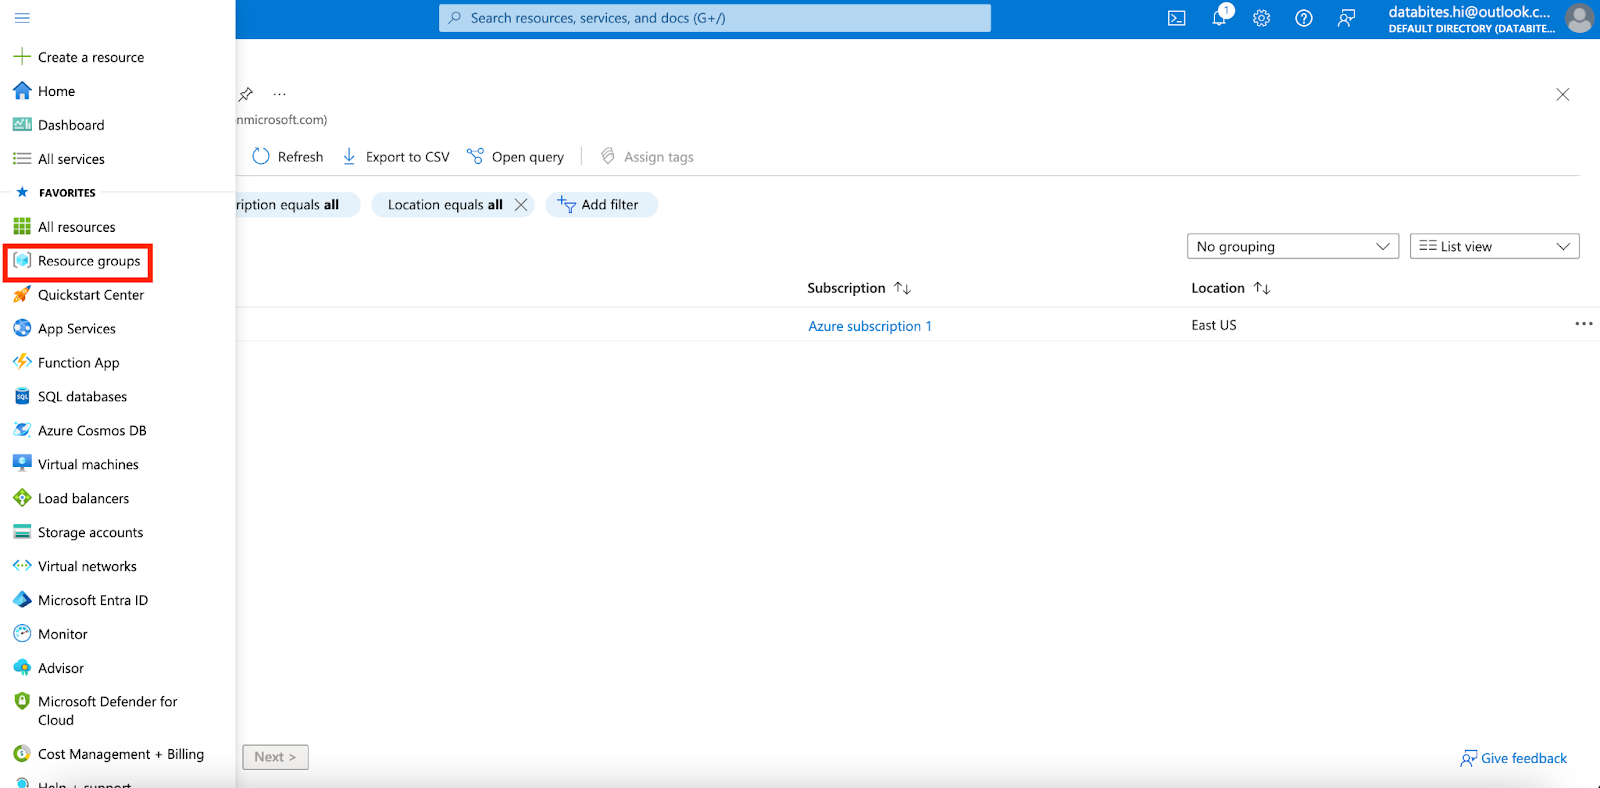
Screenshot of Azure main view. Going to Resource Group.
After that, you just need to create a new resource group and define a name for it. In my case, I am going to define the datacamp_tutorial resource group, as you can observe in the following image.
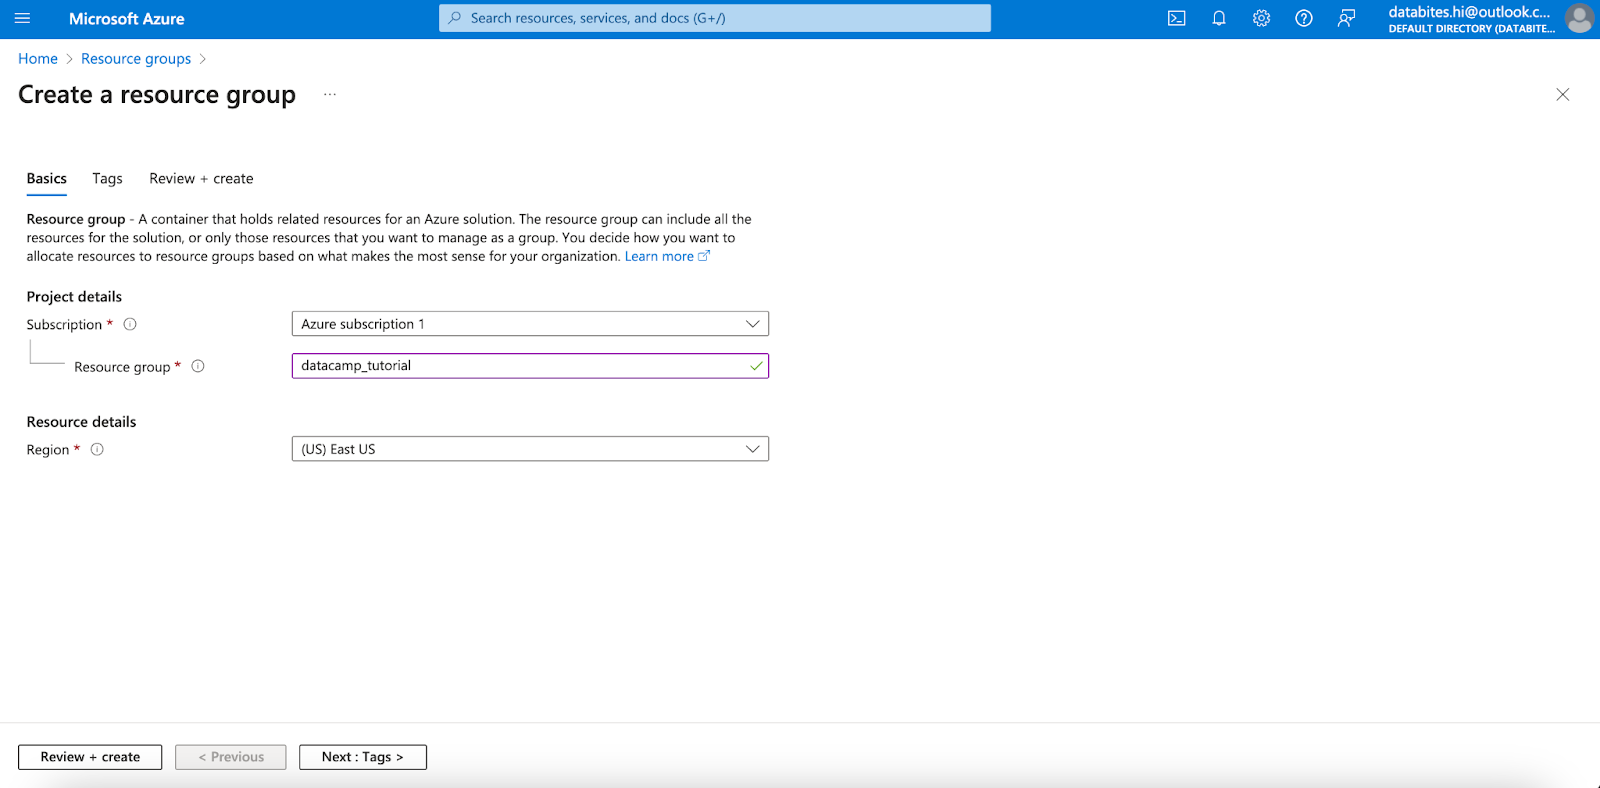
Screenshot of Azure main view. Creating a Resource Group.
Now you just need to press on the “Review + Create” button and the service will be deployed.
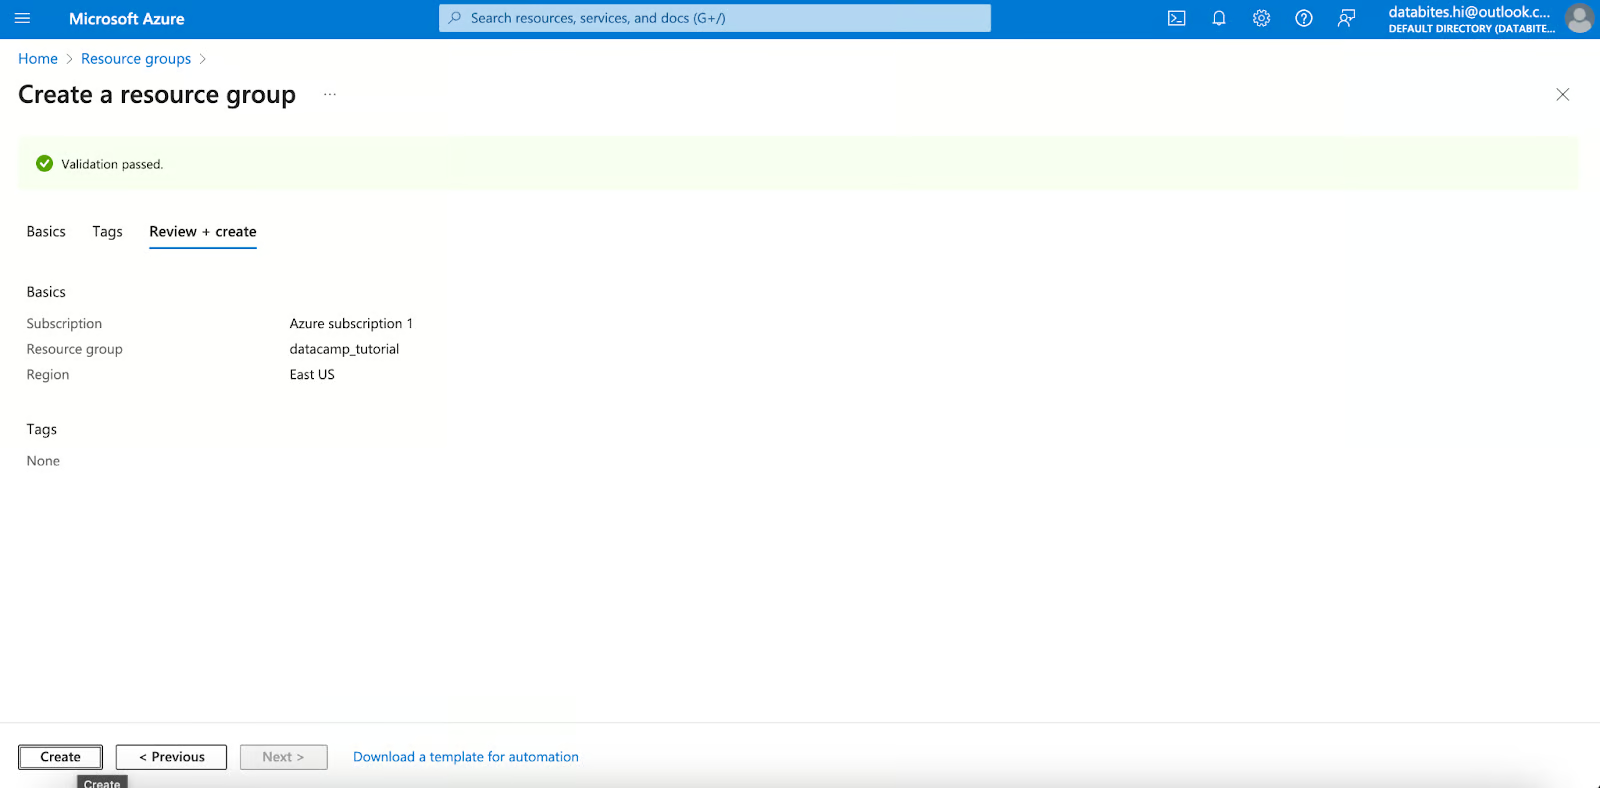
Screenshot of Azure main view. Creating the Resource Group.
2. Configure the Storage Account
Now that we have a resource group, we can easily move to the Storage Account service. Choose a unique name for your storage account.
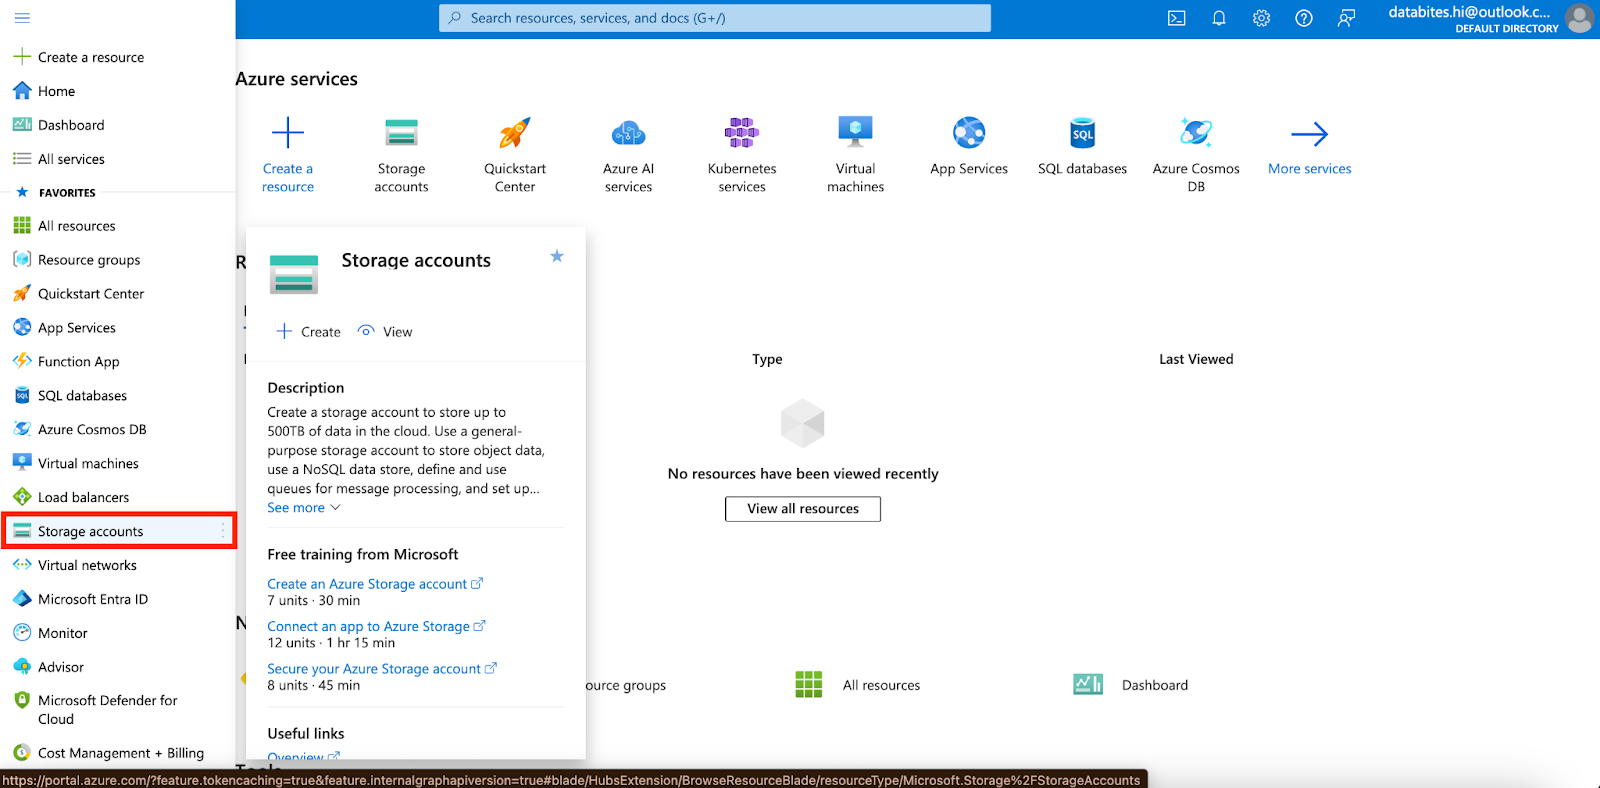
Screenshot of Azure main view. Going to the Storage Account Service.
Now we can review all the advanced features by clicking on the button “Next” or just click on the button “Preview + create”.
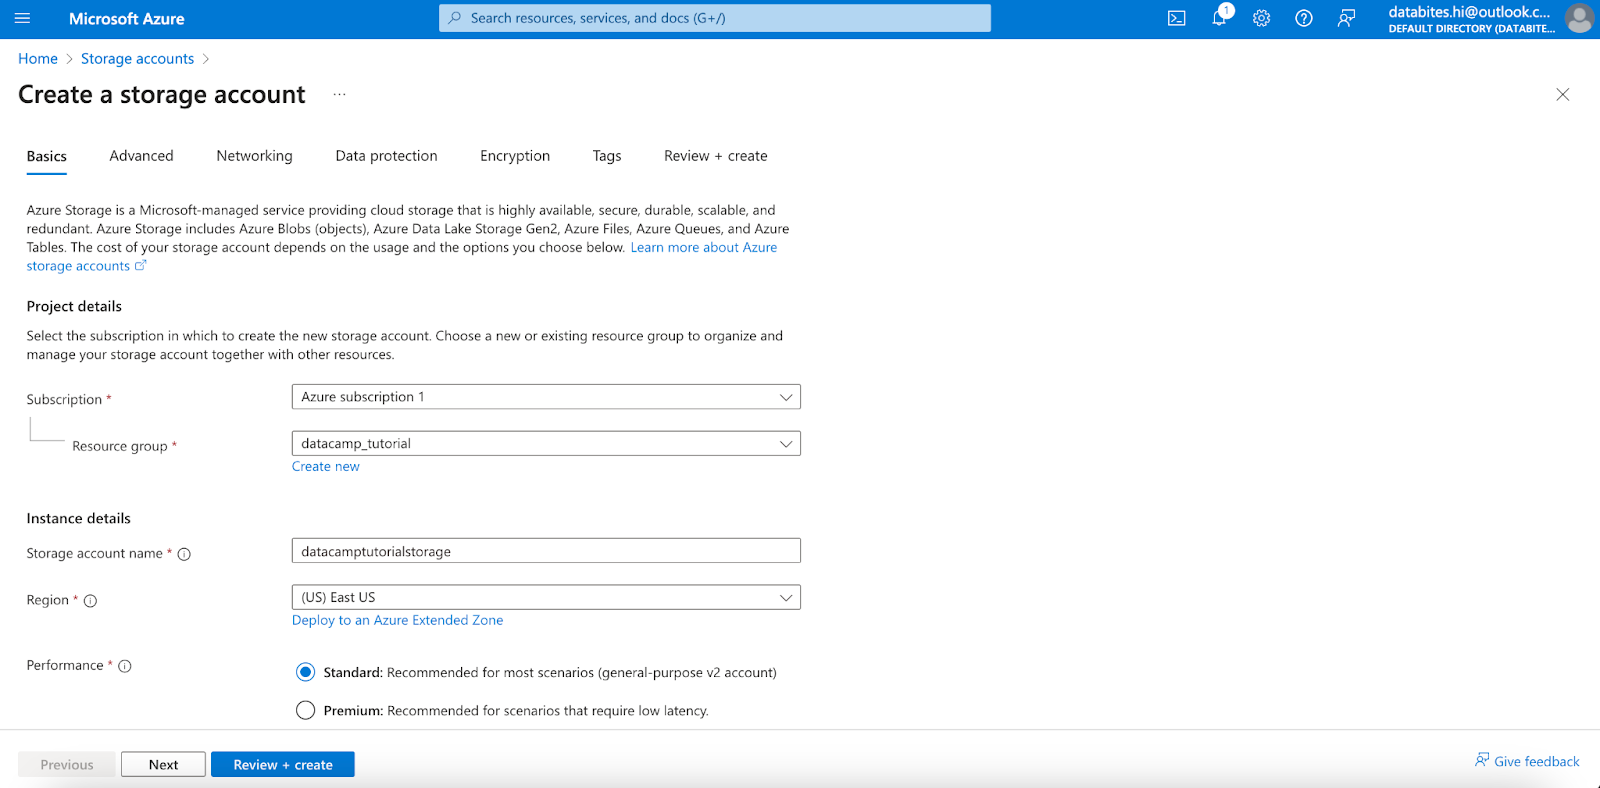
Screenshot of Azure main view. Defining our Storage Account.
The creation process will take some minutes to end. Once it is deployed, you should see a view like the following:
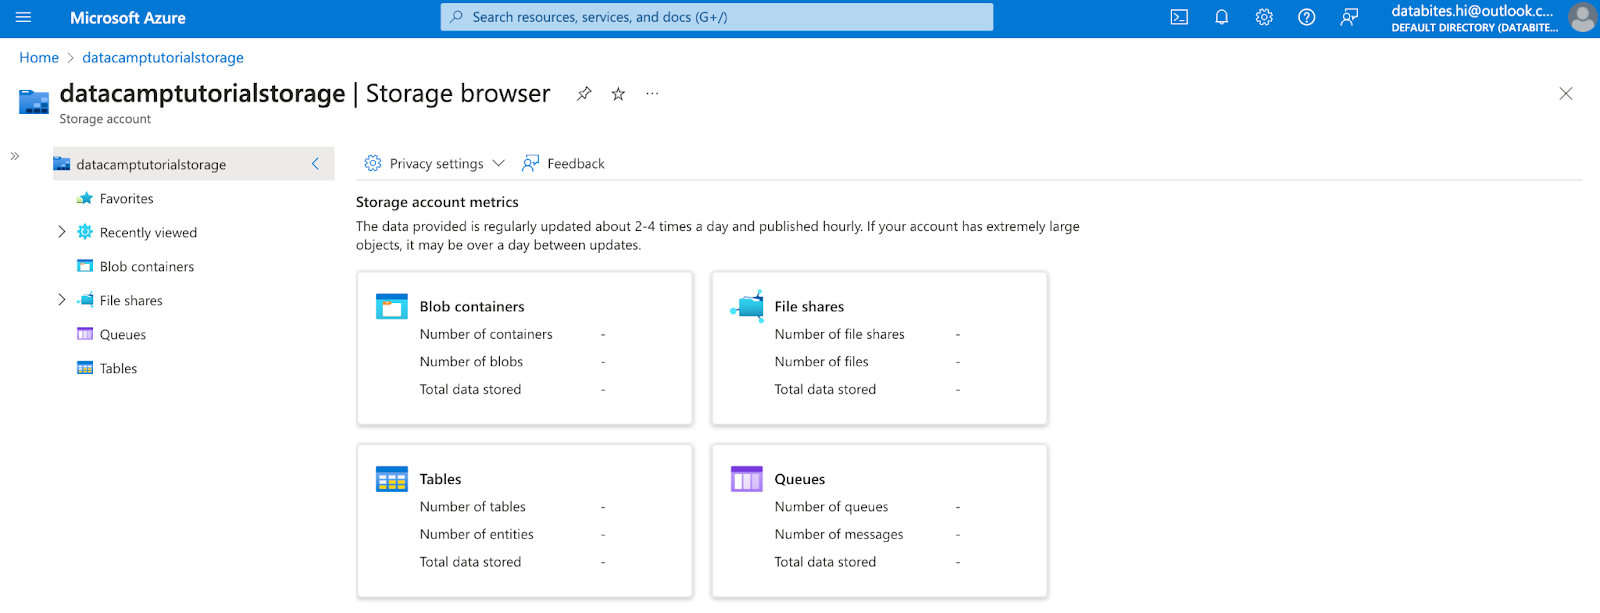
Screenshot of Azure main view. Storage Account deployed.
And now we have everything ready to start playing with our data!
Creating and managing containers
Just as we already discussed before, blobs are organized using containers. You can image them as directories in a file system. A storage account can include an unlimited number of containers, and a container can store an unlimited number of blobs.
An important thing to always keep in mind when creating containers is that their name must follow three rules:
- Container names can be between 3 and 63 characters long.
- Container names must start with a letter or number, and can contain only lowercase letters, numbers, or the dash (-) character.
- There cannot be two or more consecutive dash characters.
So now, let’s learn how to create a container.
Creating a container
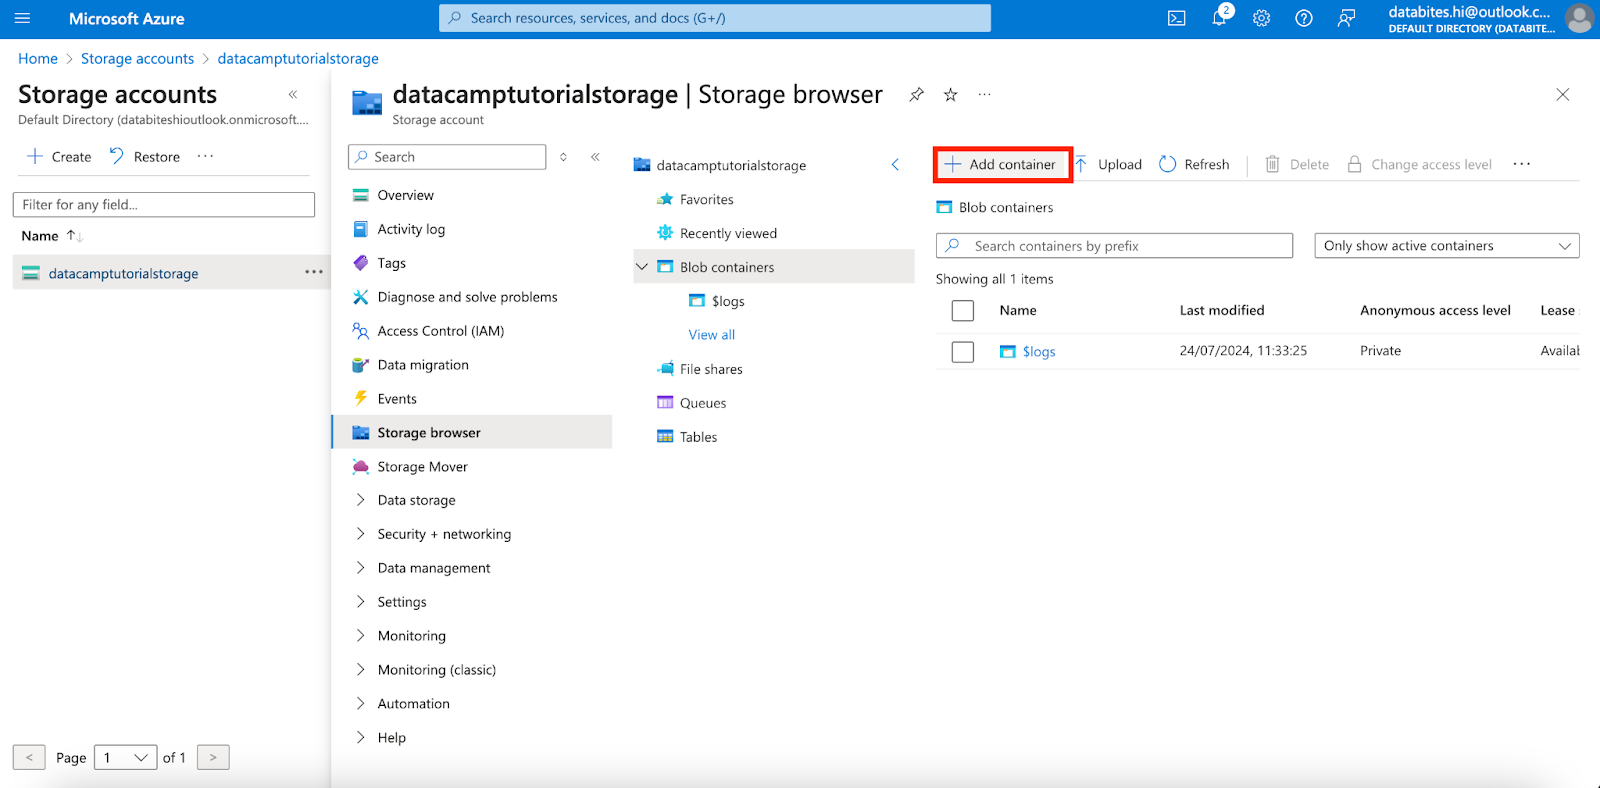
We can create a container using the Azure web interface.
- Open the storage account that you created.
- Click Storage browsers Blob containers.
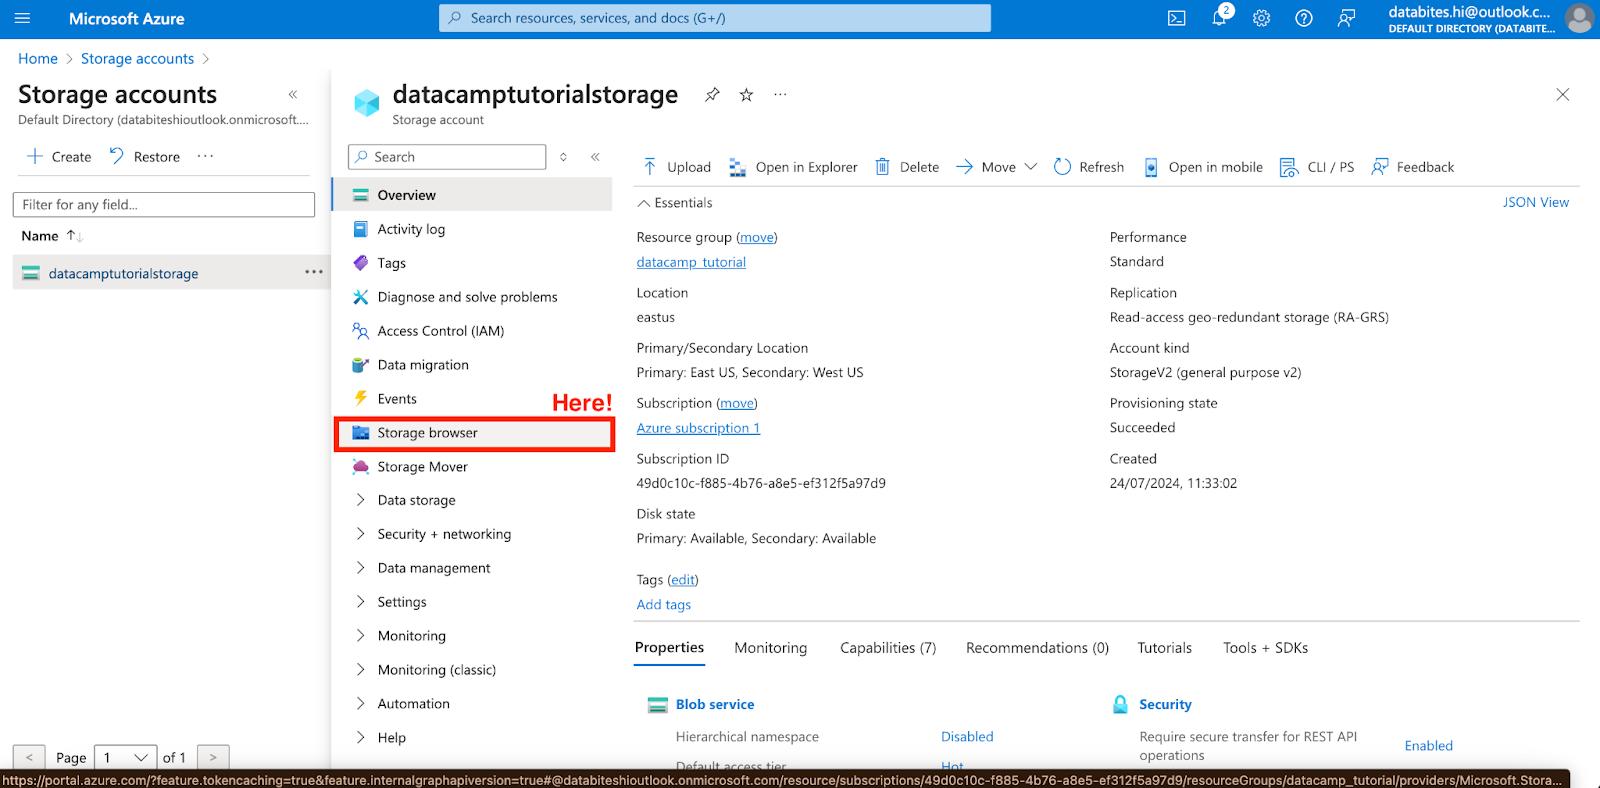
Screenshot of Azure main view. Creating a new container.
- Click Add container.
- Enter a name for the new container.
Screenshot of Azure Blob Storage view. Creating a new container.
- Click Create.
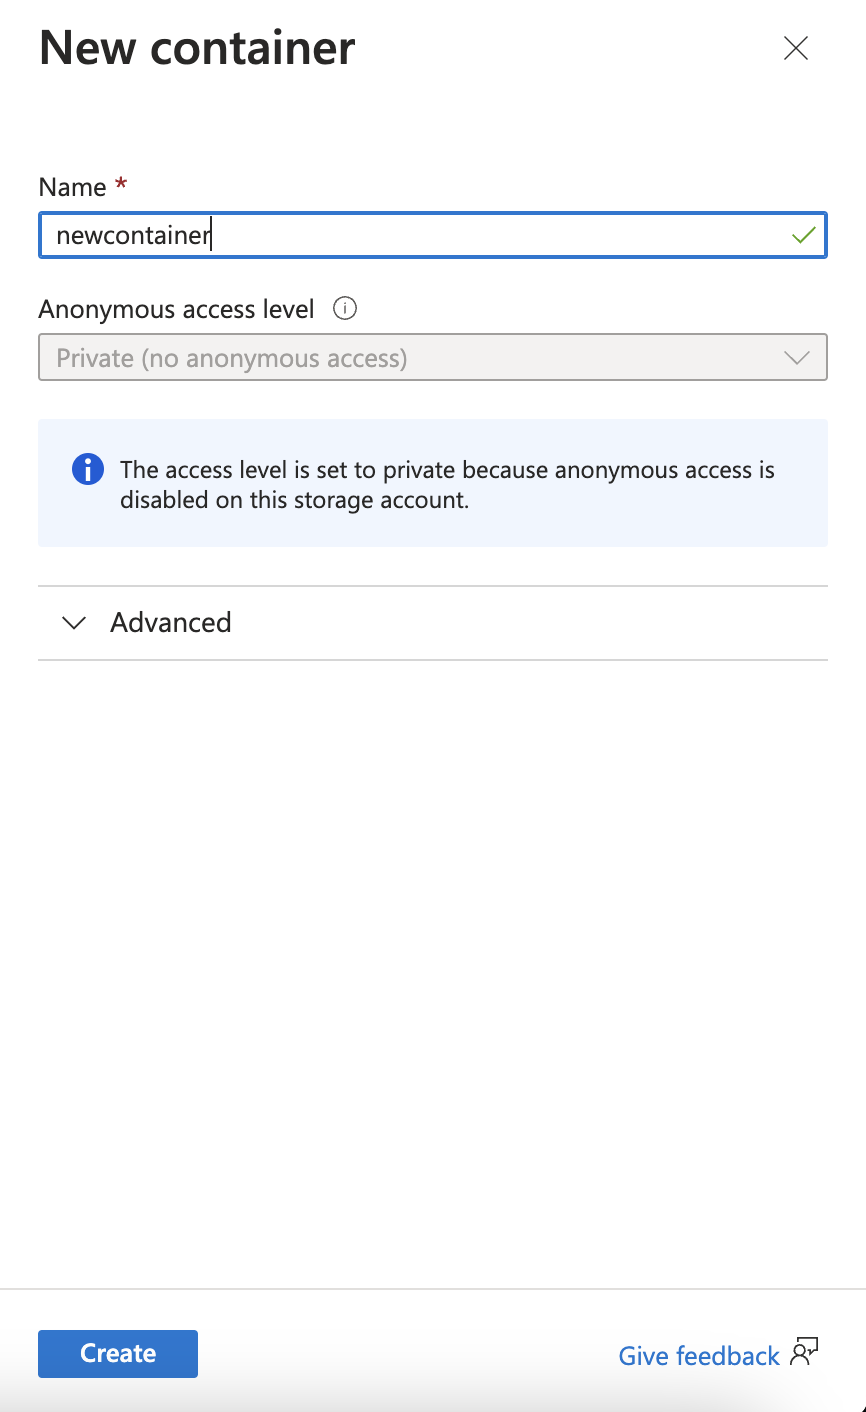
Screenshot of Azure Blob Storage view. Naming our new container.
And now we have our new container ready to be used!
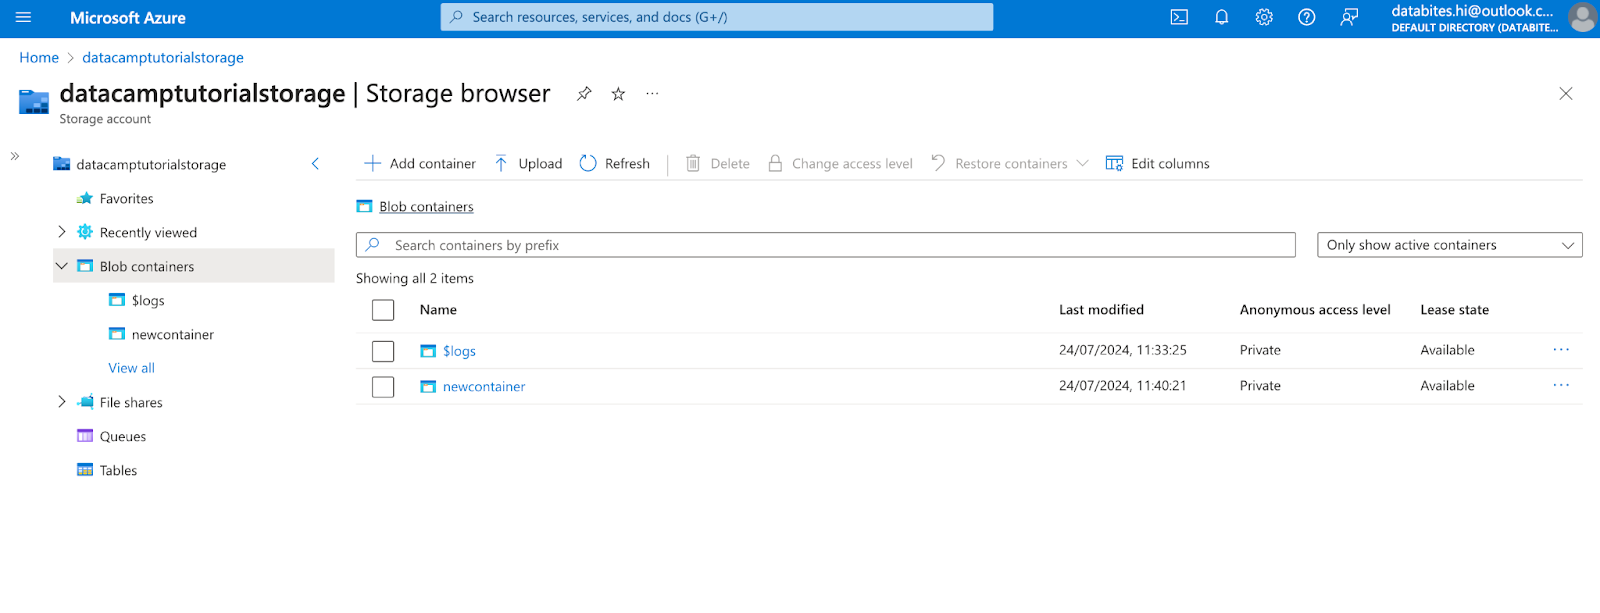
Screenshot of Azure Blob Storage view. Our new container.
Managing container properties
A container exposes both system properties and user-defined metadata.
- System properties exist on each Blob Storage resource. Some properties are read-only, while others can be read or set.
- The container meta-data is defined by the user. It consists of one or more name-value pairs that you specify for a Blob Storage resource. You can use metadata to store additional values with the resource.
To display its properties, just follow these steps:
- Navigate to the list of containers within your storage account.
- Select the checkbox next to the name of the container whose properties you want to view.
- Select the container's More button (...), and select Container properties to display the container's Properties pane.
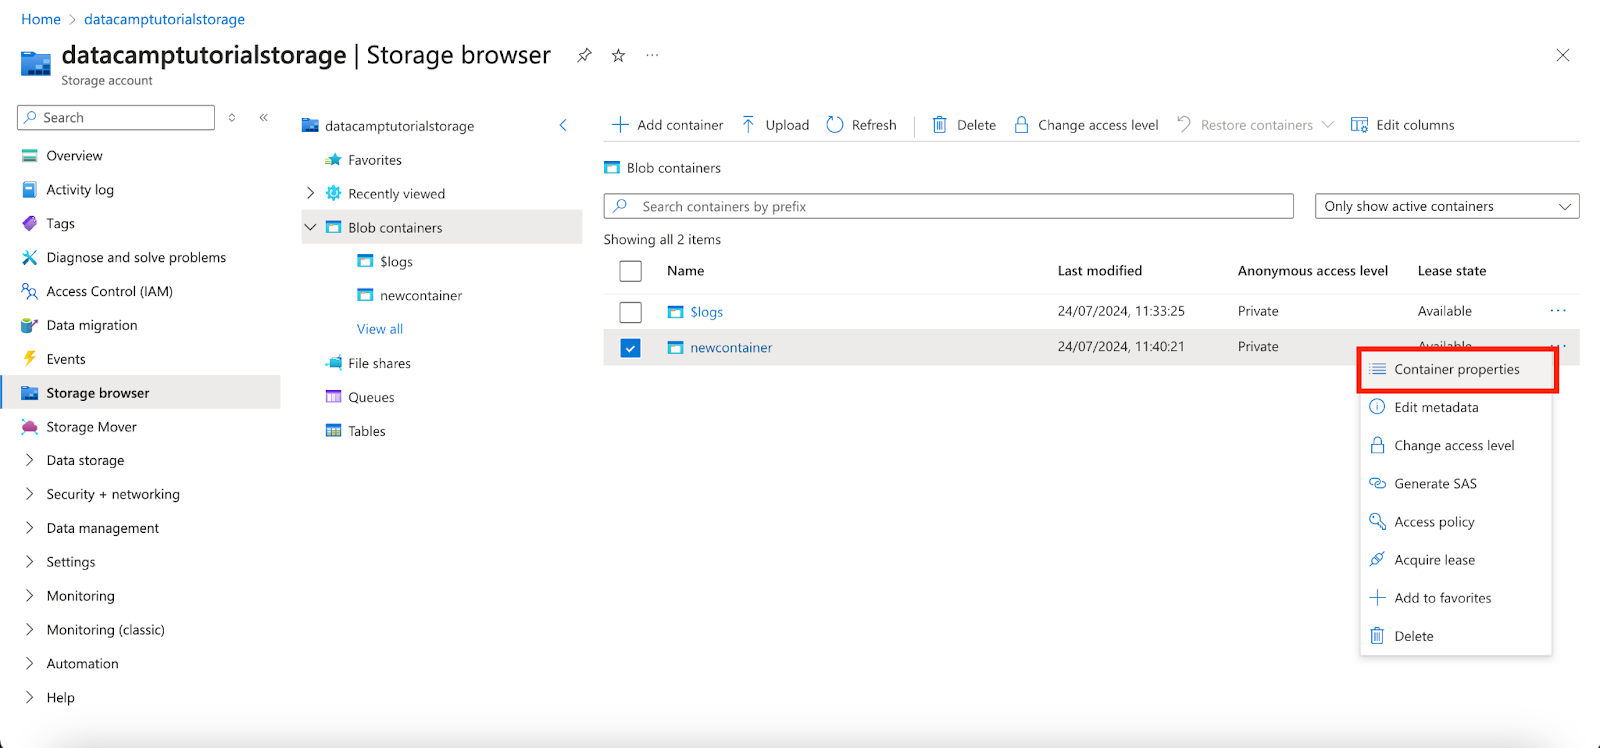
Screenshot of Azure Blob Storage view. Selecting Container’s properties.
Uploading, downloading, and managing blobs
Now that our container is active, we can start playing with blobs.
Uploading files to Blob Storage
To upload a blob to your new container in the Azure portal, follow these steps:
- Select the container “newcontainer” we just created. This container is new, so it won't yet contain any blobs.
- Select the Upload button to open the upload blade and browse your local file system to find a file to upload as a block blob.
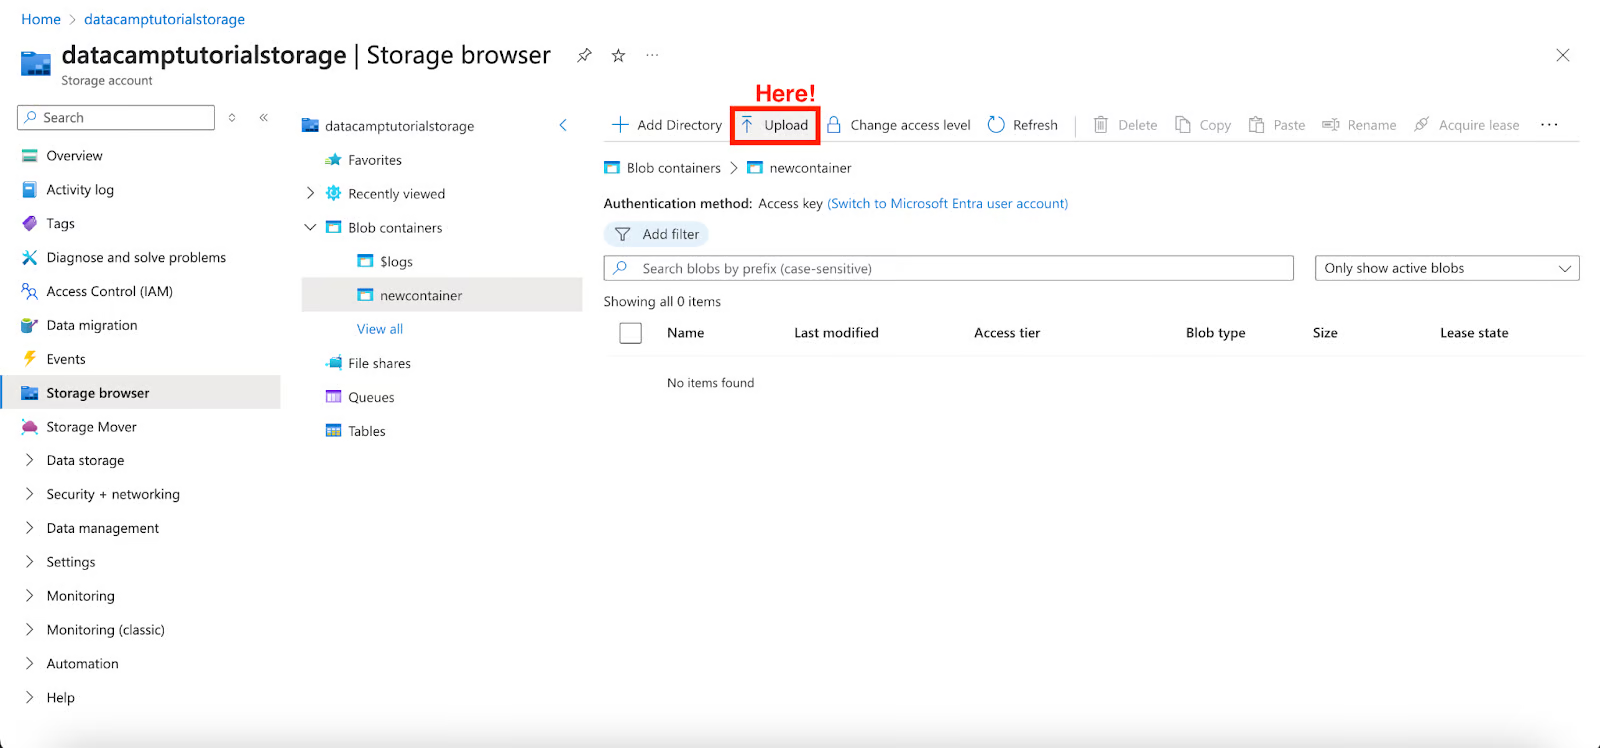
Screenshot of Azure Blob Storage view. Uploading a blob to our container.
- A new section will pop to select the data to upload.
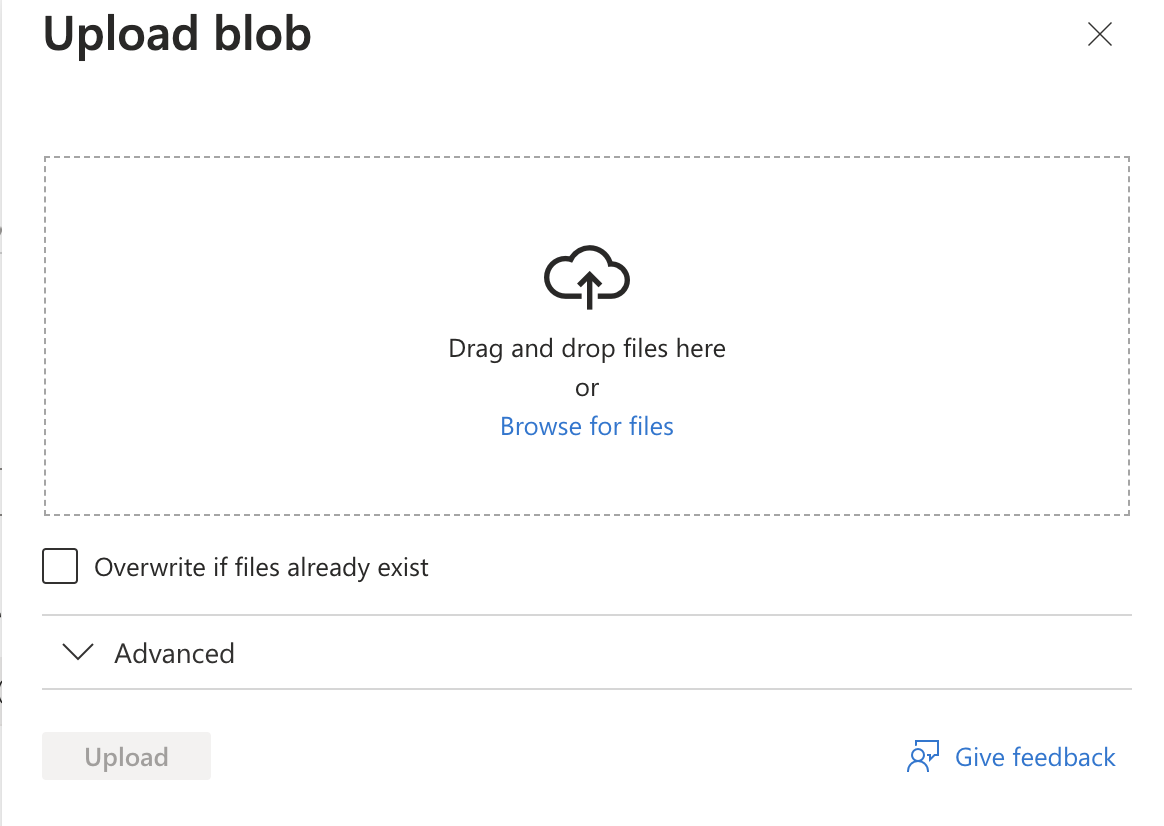
Screenshot of Azure Blob Storage view. Uploading a blob to our container.
- Select the local file to upload and click the “Upload” button to load the blob.
- Upload as many blobs as you like in this way.
You'll see that the new blobs are now listed within the container.

Screenshot of Azure Blob Storage view. Our new blob already contained in the container.
Downloading blobs
You can download a block blob to display in the browser or save it to your local file system. To download a block blob, follow these steps:
- Navigate to the list of blobs that you uploaded in the previous section.
- Right-click the blob you want to download, and select Download.
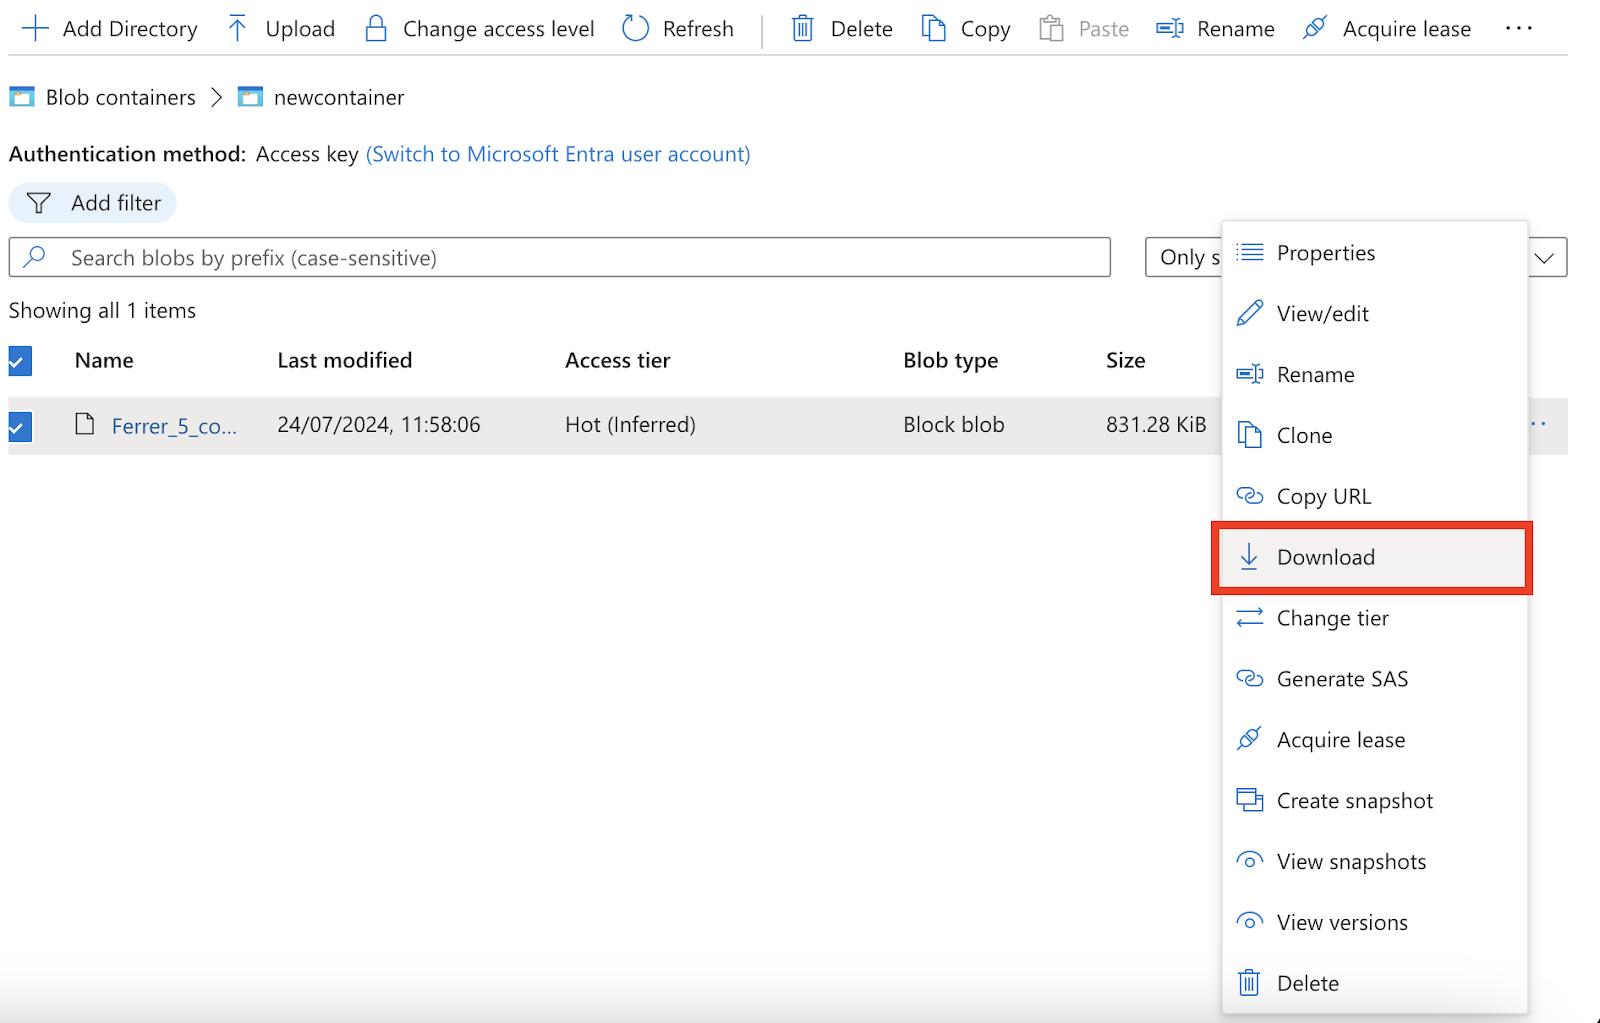
Screenshot of Azure Blob Storage view. Downloading a blob.
Managing blob metadata and properties
To edit our blob’s properties and metadata, we need to click again on the three dots (...) and just check the properties and metadata our blob presents.
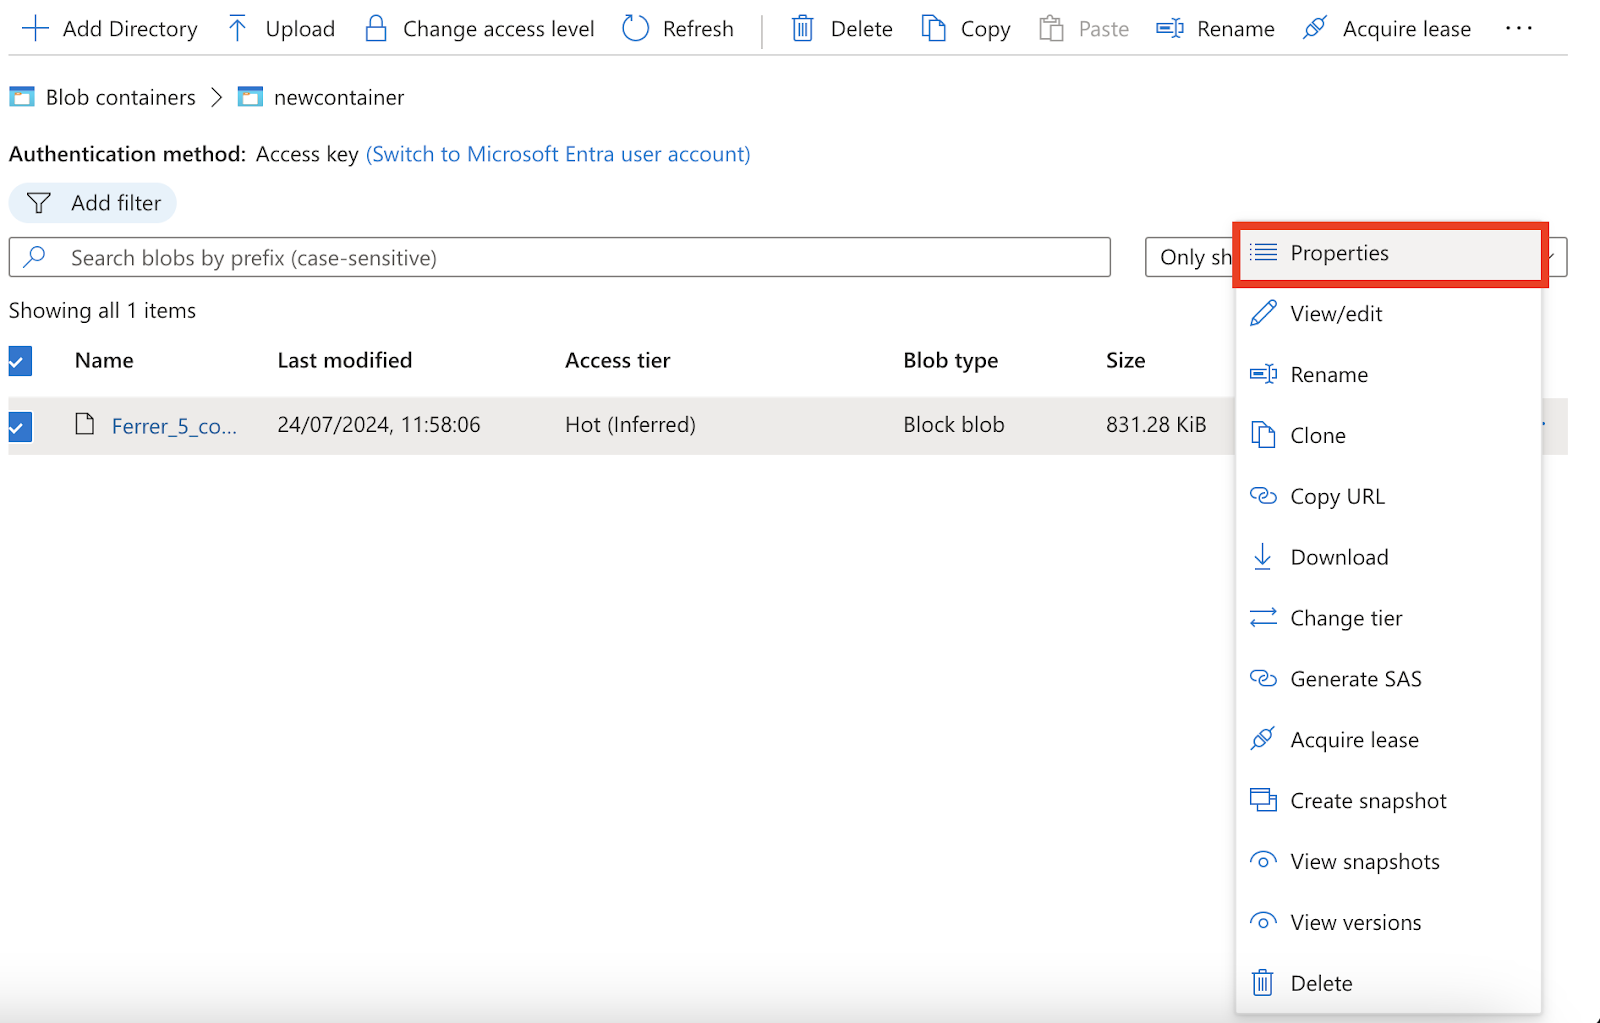
Screenshot of Azure Blob Storage view. Checking the properties of the blob.
Securing Blob Storage
Properly managing access to containers and their blobs is key to ensuring that your data remains safe, one of the most important characteristics of cloud-based services.
Shared Access Signatures (SAS)
Azure role-based access control (also known as Azure RBAC) determines what permissions a security principal has to a given resource. This is why, to grant access to a container, you'll assign an RBAC role at the container scope or above to a user, group, service principal, or managed identity. There’s more information about security in Azure official documentation.
To secure our blobs, we can use a shared access signature (SAS) that provides temporary, secure, delegated access to a client who wouldn't normally have permissions. To generate an SAS token, follow these steps:
- Go to our containers list.
- Select the checkbox next to the name of the container for which you'll generate an SAS token.
- Select the container's More button (...), and select Generate SAS to display the Generate SAS pane.
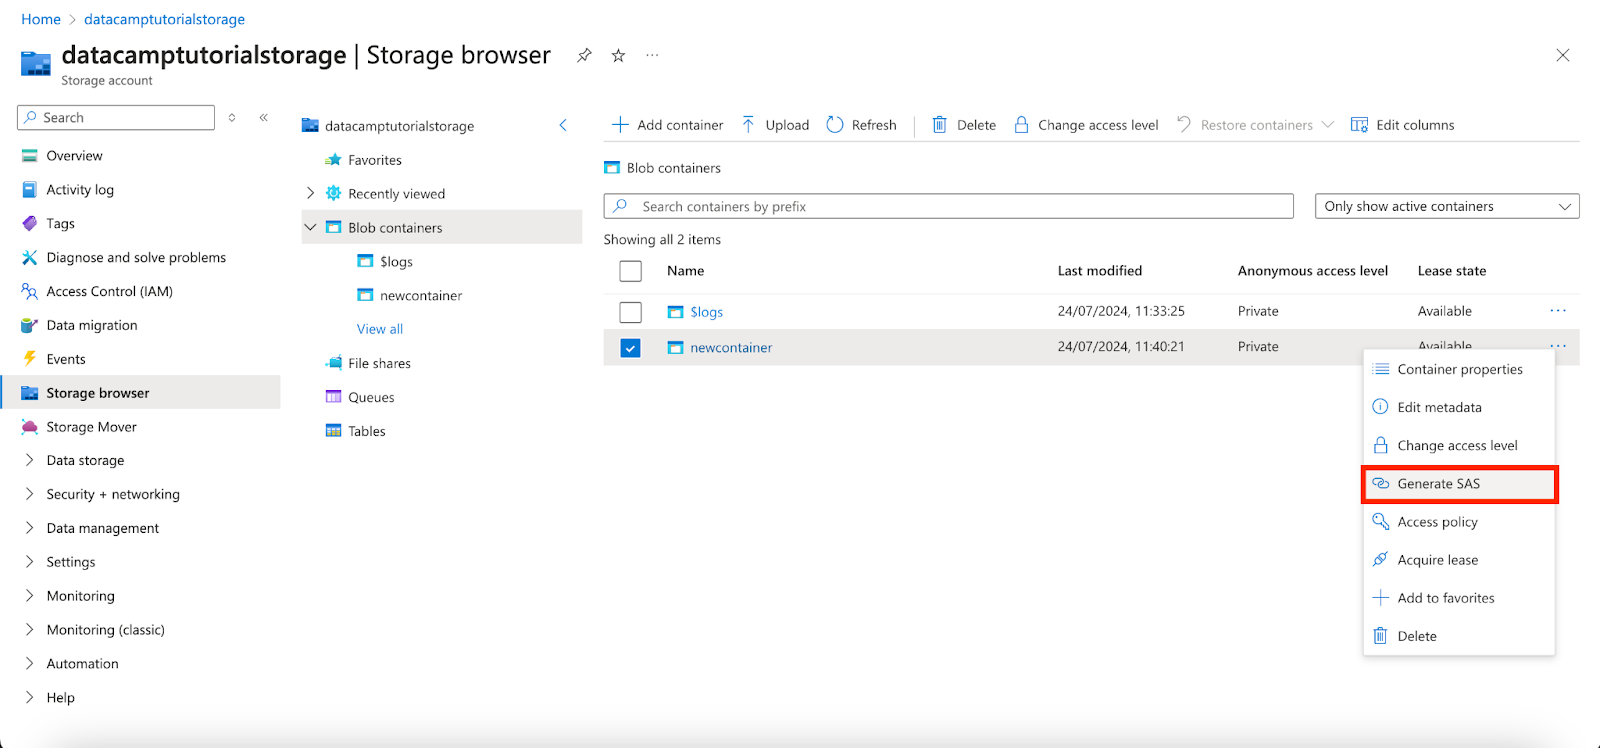
Screenshot of Azure Blob Storage view. Generating a SAS token.
- Now you should see the Generate SAS pane, select the Account key value for the Signing method field.
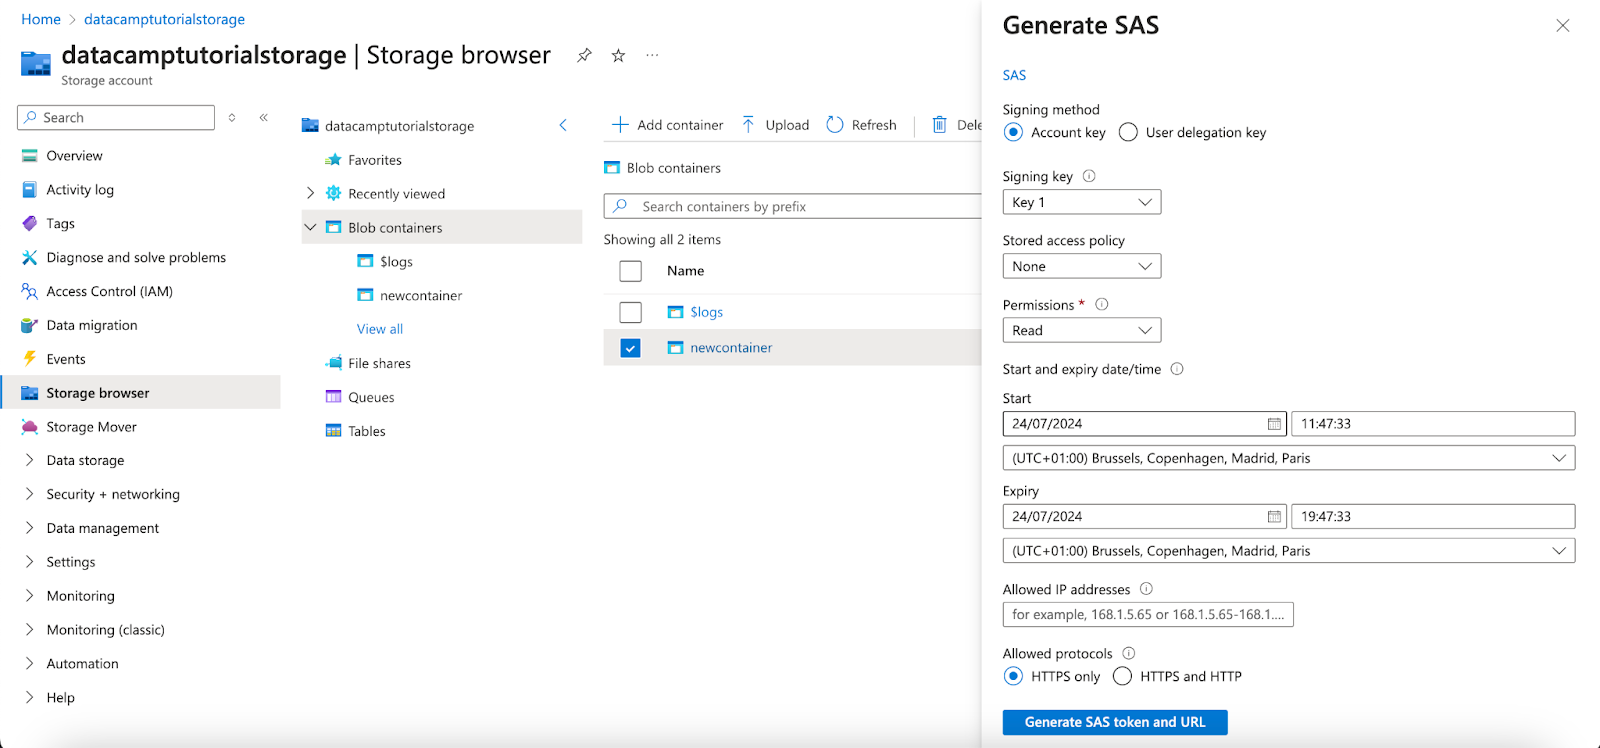
Screenshot of Azure Blob Storage view. Generating a SAS token pane.
- In the Signing method field, select Account key. Choosing the account key will result in the creation of a service SAS.
- In the Signing key field, select the desired key to be used to sign the SAS.
- In the Stored access policy field, select None.
- Select the Permissions field, then select the check boxes corresponding to the desired permissions.
- In the Start and expiry date/time section, specify the desired Start and Expiry date.
- Review your settings for accuracy and then select Generate SAS token and URL to display the Blob SAS token and Blob SAS URL query strings.
Access policies and permissions
Related to our previous section, we can configure policies and permission to let users access our data.
Configuring a stored access policy is a two-step process:
- The policy must first be defined.
- Then it must be applied to the container afterward.
To configure a stored access policy, follow these steps:
- Go back to our containers list.
- Select the checkbox next to the name of the container for which you'll generate an SAS token.
- Select the container's More button (...), and select Access policy to display the Access policy pane.
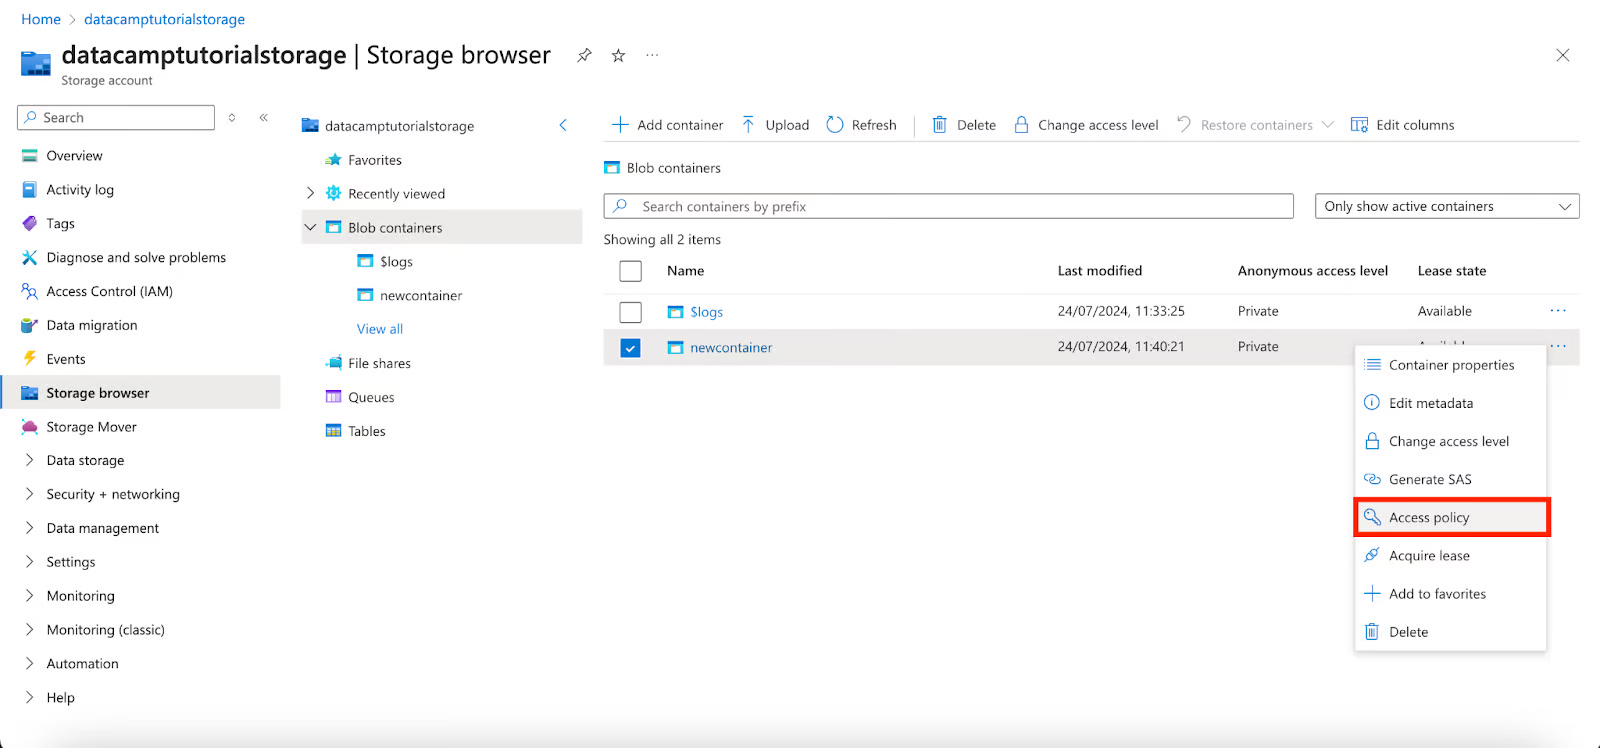
Screenshot of Azure Blob Storage view. Adding an access policy.
- Within the Access policy pane, select “+ Add policy” in the Stored access policies section to display the Add policy pane. Any existing policies will be displayed in either the appropriate section.
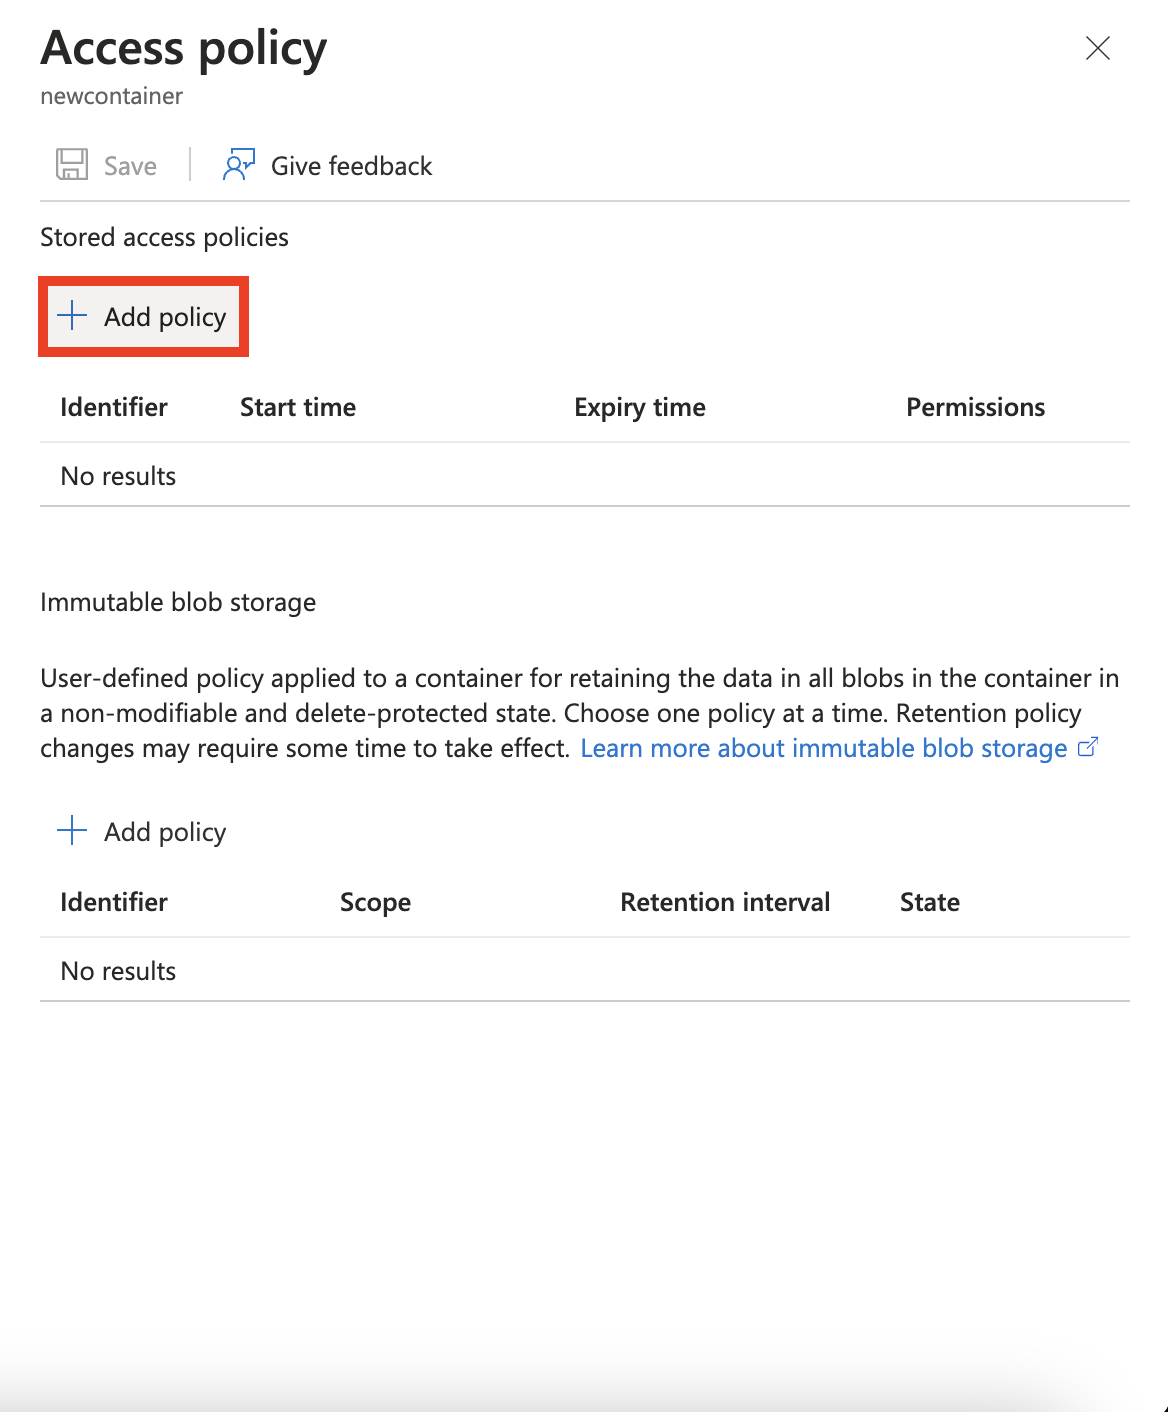
Screenshot of Azure Blob Storage view. Adding an access policy main view.
- Within the Add policy pane, select the Identifier box and add a name for your new policy.
- Select the Permissions field, then select the check boxes corresponding to the permissions desired for your new policy.
- Review your settings for accuracy and then select OK to update the Access policy pane.
You can learn more about policies in Azure following its official documentation.
Introduction to Azure Files
What is Azure Files?
Azure Files provides a cloud-based file system that you can use to store and share files.
With Azure Files, you can create and manage your file shares using the built-in UI, through the Azure CLI or PowerShell. Each file share is limited to 5TB, but you can operate multiple shares.
It is a fully managed file share in the cloud that is accessible via three main ways:
- The industry standard Server Message Block (SMB) protocol
- Network File System (NFS) protocol,
- Azure Files REST API.
So, it allows you to access files remotely or on-premises via API through encrypted communications.
Key features and benefits
Azure Files is a versatile cloud storage solution that can replace or supplement on-premises file servers and NAS devices, allowing popular operating systems like Windows, macOS, and Linux to mount file shares globally.
It simplifies cloud development by centralizing shared application settings, providing a convenient location for diagnostic logs, and facilitating developing processes by allowing quick access to tools and utilities without the need for copying.
Its main benefits are:
- Easy to use: It allows us to navigate to the path where the file share is mounted and open/modify a file once it is mounted in our computer.
- Fully managed: Azure file shares can be created without the need to manage hardware or an OS.
- Scripting and tooling: You can use PowerShell cmdlets and Azure CLI to create, mount, and manage Azure file shares as part of the administration of Azure applications.
- Resiliency: Azure Files is built to be always available.
Creating an Azure File Share
Here’s an easy-to-replicate step-by-step guide to creating an Azure file.
- Go back to the storage account we just created.
- On the storage account page, in the Data storage section, we select File shares instead of Blob containers as we did before.
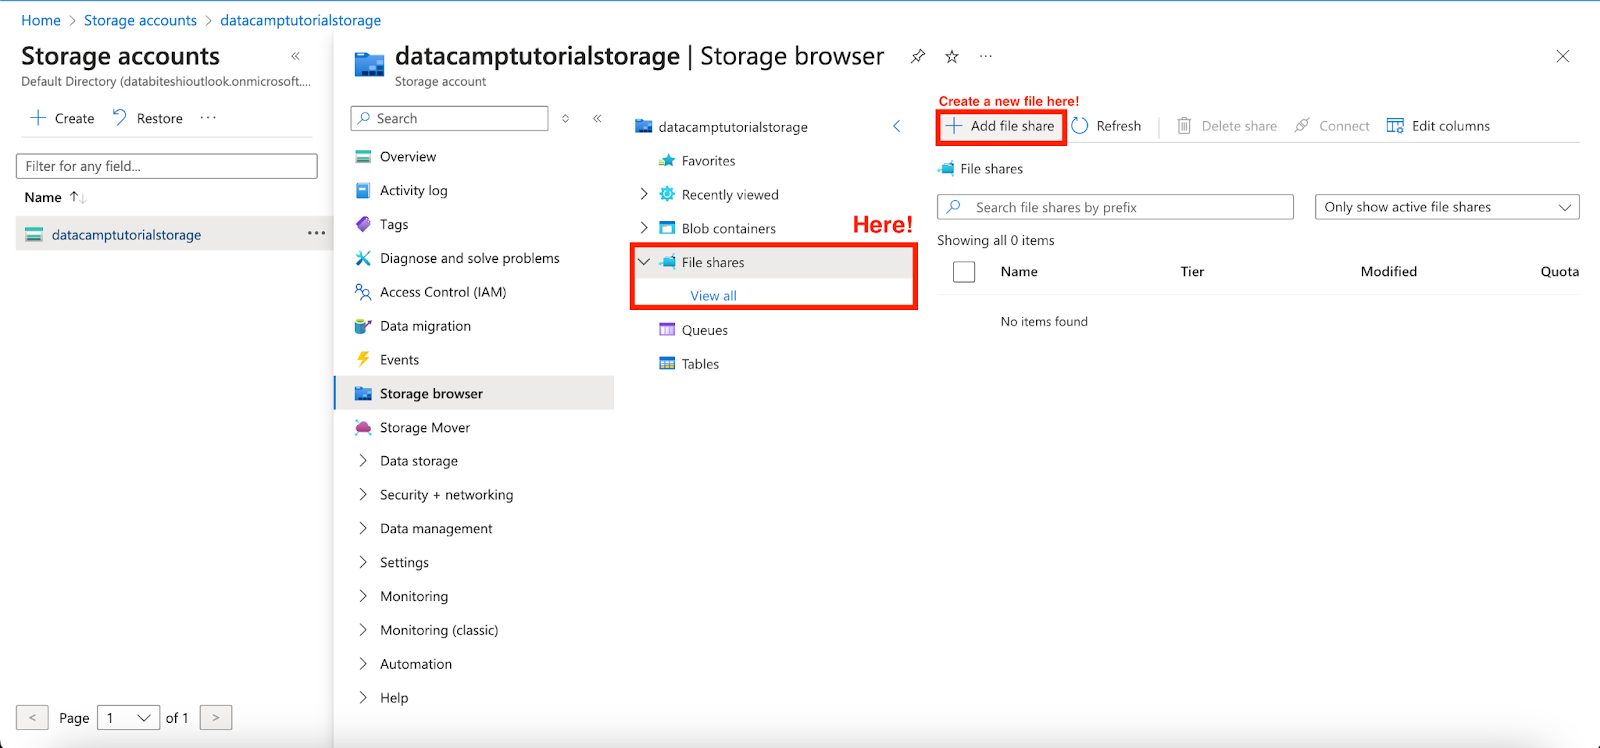
Screenshot of Azure Blob Storage view. Selecting Files.
- On the menu at the top of the File shares page, select “+ File share”. The New file share page drops down, as you can see in the image above.
- Now define a name for your new File share, in my case I will call it newfile. Always keep in mind that: File share names must be all lower-case letters, numbers, and single hyphens, and must begin and end with a lower-case letter or number.
- Leave Transaction optimized selected for Tier.
- It is important to notice that by default, backup is enabled when you create an Azure file share using the Azure portal. If you want to disable backup for the file share, uncheck the Enable backup checkbox. To create a new backup policy, check the official documentation.
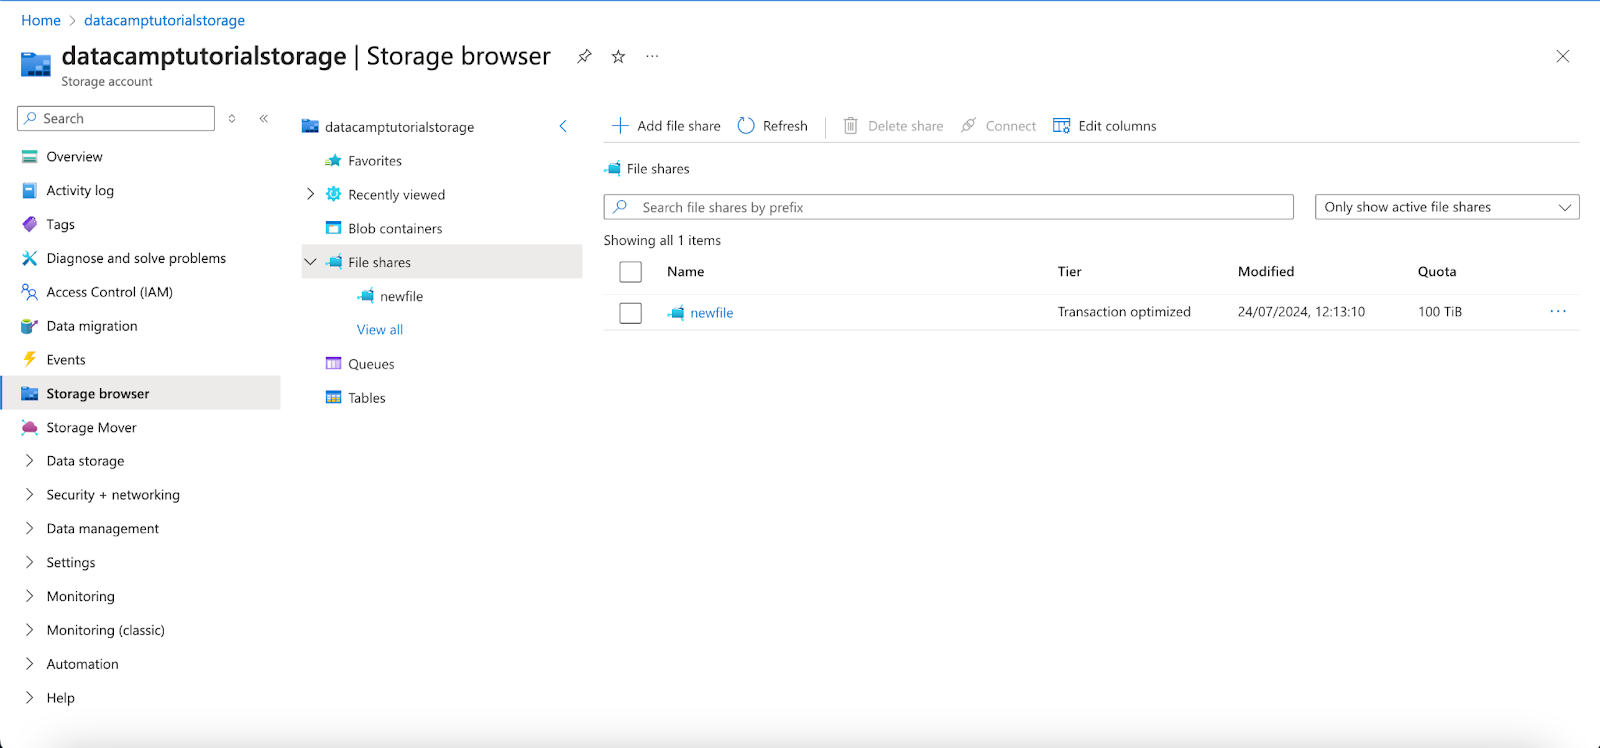
Screenshot of Azure Blob Storage view. Our new File share.
Connecting to Azure Files
Connecting from Windows, Linux, and macOS
Azure Files can be accessed from various operating systems using standard file-sharing protocols like SBM and NFS.
- SMB (Server Message Block): This protocol is widely supported across Windows, macOS, and Linux. It allows you to mount Azure file shares as network drives, enabling seamless integration with your existing file system.
- NFS (Network File System): This protocol is primarily used in Unix and Linux environments. Azure Files supports NFS, allowing you to mount file shares directly on your Linux systems for efficient file access and management.
Managing Azure Files
Now that we have our Azure File shares active, let’s see how can we manage our data using this service.
Uploading and managing files in Azure File Share
To upload and manage files in Azure File Share, you can use several tools including the Azure portal, Azure PowerShell, and Azure CLI.
Using Azure Portal
Create a directory
To create a new directory named myDirectory at the root of your Azure file share:
- On the File share settings page, select the newfile file share. The page for your file share opens, indicating no files were found.
- On the menu at the top of the page, select + Add directory. The New directory page drops down.
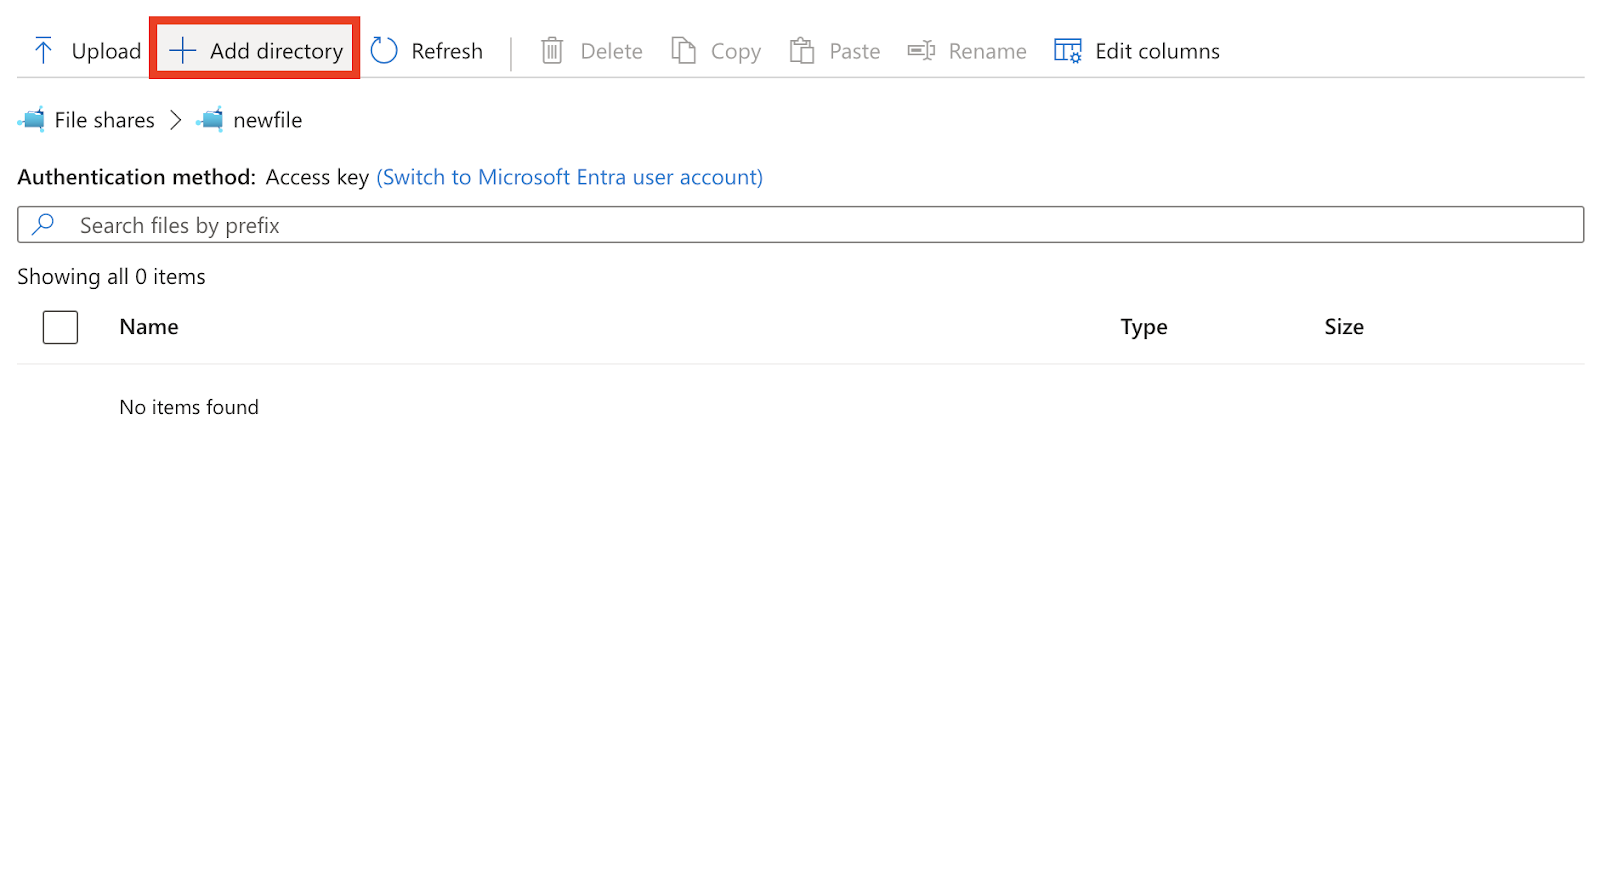
Screenshot of Azure Blob Storage view. Creating a new directory.
- Type myDirectory and then select OK.
Uploading a file
To upload a new file into our File Shares services, you need to create or select a file to upload.
- Select the myDirectory directory. The myDirectory panel opens.
- In the menu at the top, select Upload. The Upload files panel opens.

Screenshot of Azure Blob Storage view. Uploading a new file.
- Select the folder icon to open a window to browse your local files.
- Select a file and then select Open.
- In the Upload files page, verify the file name, and then select Upload.
- When finished, the file should appear in the list on the myDirectory page.
You can download a copy of the file you just uploaded (or any other file contained there) by right-clicking on the file and selecting Download.
Azure PowerShell, and Azure CLI
Azure CLI and Azure PowerShell can be accessed within the Azure cloud environment. Additionally, you have the flexibility to use both tools remotely from your local machine.
To activate them directly on the Azure interface, simply log in to the Azure Portal and locate the Cloud Shell icon.

Screenshot of Azure Blob Storage view. Activating Azure console.
Now a new terminal should appear in the lower part of your screen, as shown in the following image.
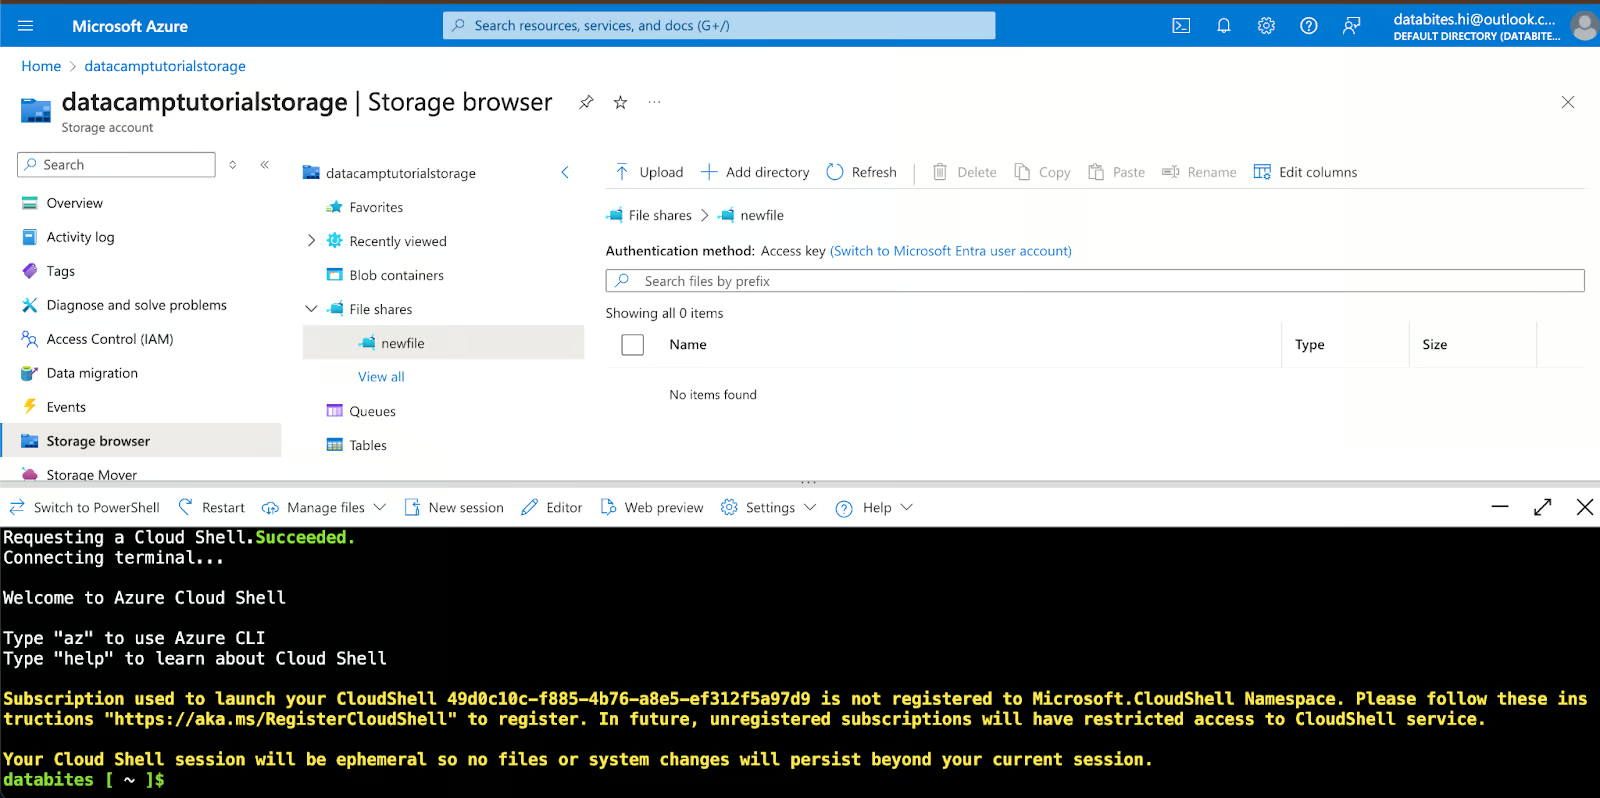
Screenshot of Azure Blob Storage view. Activating Azure console.
Now that we have our terminal activated, we can check all our existing storage account with the following command:
az storage account list --output table
Screenshot of Azure Blob Storage view. Using Azure console.
Using Azure PowerShell
If you prefer using the PowerShell directly on your computer, you can do it too.
- Install Azure PowerShell: If you haven’t already, install the Azure PowerShell module. You can find an easy-to-follow tutorial in the following Azure official documentation.
- Connect to Your Account: Use Connect-AzAccount to log in to your Azure account.
- Create and Manage File Shares using bash.
You can find an example template as follows:
# Create a file shareNew-AzStorageShare -Name "myshare" -Context $context# Upload a file$filePath = "C:\path\to\your\file.txt"Set-AzStorageFileContent -ShareName "myshare" -Source $filePath -Path "file.txt"Using Azure CLI
Azure CLI is a cross-platform command-line tool for managing Azure resources.
- Install Azure CLI: Install it from the official site.
- Log In to Your Account: Use az login to log in to your Azure account.
- Create and Manage File Shares
# Create a file shareaz storage share create --name myshare --account-name mystorageaccount --account-key myaccountkey# Upload a fileaz storage file upload --share-name myshare --source /path/to/file.txt --account-name mystorageaccount --account-key myaccountkeyConfiguring file share properties
Configuring file share properties, such as setting quotas, can be crucial for managing your storage efficiently. You can do it via three different ways:
Quota management
- Set Quota via Azure Portal: When creating a file share in the Azure portal, you can specify the quota in the "Quota" field.
- Set Quota via Azure PowerShell: When creating a new file, you can specify the quota directly in the bash command.
# Set quota for a file shareSet-AzStorageShareQuota -ShareName "myshare" -Quota 1024 -Context $context- Set Quota via Azure CLI: Just as before, you can define the quota when creating the file.
# Set quota for a file shareaz storage share update --name myshare --quota 1024 --account-name mystorageaccount --account-key myaccountkeyAccessing Azure Files programmatically
You can access Azure Files programmatically (remotely from your local computer) using Azure Storage SDKs for various programming languages such as Python, .NET, and Java.
Using Azure Storage SDKs
Azure Storage SDKs provide comprehensive tools to interact with Azure File Shares. You can find all the associated documentation in the “Azure Storage File Share client library for Python” by Mictosoft.
A template to connect directly your local Python environment with Azure would be:
from azure.storage.fileshare import ShareServiceClient# Initialize the ShareServiceClientservice_client = ShareServiceClient.from_connection_string("your_connection_string")# Create a file shareshare_client = service_client.create_share("myshare")# Upload a filewith open("localfile.txt", "rb") as source_file: share_client.get_directory_client().upload_file("file.txt", source_file)# Download a filewith open("downloaded_file.txt", "wb") as target_file: download = share_client.get_directory_client().get_file_client("file.txt").download_file() target_file.write(download.readall())Azure Blob Storage Advanced Features and Integrations
We already know that Azure Blob Storage is a powerful service for storing large amounts of unstructured data. Beyond its core capabilities, it offers advanced features and integrations that enhance its functionality and security.
Integrating Azure Blob Storage with Other Azure Services
Azure Blob Storage can be seamlessly integrated with various Azure services to create robust and scalable solutions, notably with Azure Data Factory and Azure Functions.
Azure Data Factory:
Azure Blob Storage can be connected with Azure Data Factory to store data. There are three main ways:
- Data ingestion: Ingest data from multiple sources into Azure Blob Storage.
- Data transformation: Transform and clean data within a pipeline and store the clean data directly into Blob Storage.
- Data export: Export processed data to various destinations, including Azure Blob Storage.
Azure Functions:
Another service that can be easily integrated with Blob Storage is Azure Functions. The main idea is to create a Function App in the Azure portal and add a Blob trigger specifying the path to the Blob container to monitor.
Advanced Security Features
Azure Blob Storage offers advanced security features to protect your data, including encryption and Azure Active Directory (AD) integration. There are two main advanced security features:
Encryption at Rest and in Transit
There are two types of data encryption:
- Encryption at Rest: Data is automatically encrypted using 256-bit AES encryption.
- Encryption in Transit: Data is encrypted using HTTPS during transfer.
Azure AD Integration for Authentication
Assign appropriate roles to Azure AD users or groups in your storage account.
Enable a system-assigned managed identity for Azure services and grant it access to your storage account.
- Role-Based Access Control (RBAC): Assign roles to control access to blob data.
- Managed Identities: Use managed identities to securely access blob storage without storing credentials in code.
Best Practices for Azure File Storage
Optimizing performance
There are different ways to optimize the performance of our Azure services. There are two that we always need to keep in mind:
Choosing the right storage tier
Choosing the right storage tier in Azure Blob Storage is crucial for optimizing performance and managing costs effectively. Azure Blob Storage offers several tiers tailored to different access patterns and performance needs:
- Premium Tier: Ideal for high throughput and low latency workloads, such as high I/O operations, transactional workloads, and big data analytics. It uses SSD-based storage for the highest IOPS and lowest latency, but comes at a higher cost due to its performance benefits.
- Hot Tier: Suitable for frequently accessed data like active databases, media files, and application data. It offers good performance at a moderate cost, optimized for frequent access.
- Cool Tier: Designed for infrequently accessed data that still requires immediate availability, such as backups, archival data, and disaster recovery files. It has lower storage costs than the Hot tier but higher access costs, making it cost-effective for less frequently accessed data.
- Archive Tier: Best for data that is rarely accessed and can tolerate high latency for retrieval, such as long-term archival data and compliance records. It provides the lowest storage cost but the highest access cost, ideal for long-term storage with minimal access.
Configuring caching and redundancy
Configuring caching and redundancy settings is essential for enhancing the performance and reliability of your Azure Blob Storage. These configurations help improve data access speeds and ensure data durability and availability. Some examples are:
Caching
Regarding cache, we can activate:
- Azure CDN: Distributes data globally, reducing latency and improving access speeds by caching content at edge locations.
- Azure Blob Storage Cache: Provides in-region caching for frequently accessed blobs, improving read performance by reducing latency.
If you want to understand Azure cloud services further, you can get started with the following webinar on Azure’s fundamentals.
Cost management
Effectively monitoring your Azure Blob Storage allows you to track your storage consumption and growth trends. By identifying areas for optimization, you can better control costs and allocate resources efficiently.
Understanding pricing models
Azure Blob Storage offers a flexible and comprehensive pricing model to meet diverse storage needs. Understanding the various components of this pricing model is crucial for effective cost management.
Always remember that costs are highly influenced by both storage tier and data operations (read, write, data retrieval…).
Strategies to reduce costs
Effective strategies can help manage and reduce Azure Blob Storage costs while ensuring optimal performance and data availability. Some good practices to keep in mind are:
- Right-sizing storage:Match data to appropriate tiers (Hot, Cool, Archive). Regularly review and adjust storage usage with Azure Cost Management.
- Data management: Implement lifecycle policies to transition or delete data. Optimize access by minimizing retrievals and compressing data.
- Monitoring and alerts: Use Azure Monitor to track usage and set alerts for anomalies. Analyze access patterns to adjust tiers and remove unused data.
- Cost-effective transfers: Use Azure Data Box for large transfers and Azure CDN to reduce egress costs. Leverage Azure Data Factory for efficient data movement.
Backup and disaster recovery
Azure offers various data redundancy options, such as Locally Redundant Storage (LRS), Zone-Redundant Storage (ZRS), Geo-Redundant Storage (GRS), and Read-Access Geo-Redundant Storage (RA-GRS). These options ensure data durability and high availability, even in the event of a data center failure. Selecting the right redundancy option for your data can help you achieve a balance between cost and reliability.
Implementing backup solutions
Azure offers robust backup solutions to ensure your data is protected and can be restored in case of accidental deletion or corruption. By utilizing Azure Backup, you can automate the backup process for various data types, including files, applications, and virtual machines. Azure Backup provides centralized management and monitoring, long-term retention, and the ability to restore data to any location, ensuring your data is secure and recoverable.
Planning for disaster recovery
Effective disaster recovery planning is crucial to maintaining business continuity. Azure provides several data redundancy options, such as Locally Redundant Storage (LRS), Zone-Redundant Storage (ZRS), Geo-Redundant Storage (GRS), and Read-Access Geo-Redundant Storage (RA-GRS). These options ensure data durability and high availability, even in the event of a data center failure. Selecting the right redundancy option for your data can help you achieve a balance between cost and reliability. By leveraging Azure Site Recovery, you can replicate workloads to a secondary location, ensuring quick recovery and minimal downtime during a disaster. Learn more about Azure Data Redundancy options here.
Conclusions
Azure Blob Storage and Azure Files provide robust, scalable, and secure solutions for managing unstructured and structured data, respectively, making them ideal for a wide range of use cases from media storage to collaborative file sharing.
If you’re totally new to the field, you can start with DataCamp’s Introduction to Azure. For more advanced users, some other good resources to follow are:
Azure File Storage FAQs
What are the main types of data that Azure Blob Storage is designed to store?
Azure Blob Storage is designed to store unstructured data such as images, videos, documents, and backups.
What protocol does Azure Files use for accessing its file shares?
Azure Files uses the Server Message Block (SMB) protocol for accessing its file shares.
What are the three types of blobs available in Azure Blob Storage?
The three types of blobs in Azure Blob Storage are Block Blobs, Page Blobs, and Append Blobs.
What is a key benefit of using Azure Storage for managing data?
A key benefit of using Azure Storage is its scalability, allowing it to grow to meet increasing storage needs of applications.
What redundancy options does Azure offer to ensure data durability and high availability?
Azure offers several redundancy options, including Locally Redundant Storage (LRS), Zone-Redundant Storage (ZRS), Geo-Redundant Storage (GRS), and Read-Access Geo-Redundant Storage (RA-GRS).
Josep is a freelance Data Scientist specializing in European projects, with expertise in data storage, processing, advanced analytics, and impactful data storytelling.
As an educator, he teaches Big Data in the Master’s program at the University of Navarra and shares insights through articles on platforms like Medium, KDNuggets, and DataCamp. Josep also writes about Data and Tech in his newsletter Databites (databites.tech).
He holds a BS in Engineering Physics from the Polytechnic University of Catalonia and an MS in Intelligent Interactive Systems from Pompeu Fabra University.
