Course
Introduction to Python
4 hr
6.9M
The creators of Homebrew say that it is the “missing package manager for macOS”. Packages are collections of files that are bundled together that can be installed and removed as a group. A package manager is a tool which automates the process of installing, updating, and removing packages.
If you are a Python user, you may have used the package manager pip or the package manager functionality of conda to install, update, or remove packages.
If you are an R user, you may have used the RStudio Package Manager to install, update, or remove packages.
Homebrew is a package manager designed for Mac that is useful to install. You will find that you can utilize Homebrew for data science as it makes it a lot easier to install additional technologies on Mac such as Apache Spark and the software Graphviz.
With that, let’s get started.
In order to install Homebrew, you need to install either the Xcode Command Line Tools (about 100 MB) or the full Xcode package (about 10 GB). In this tutorial, you will install Command Line Tools as they are a more reasonable size. Command Line Tools gives Mac users many commonly used tools, utilities, and compilers. One advantage of this is that when you install Command Line Tools, it installs Git which you need as Homebrew is essentially all Git and Ruby scripts underneath.
1. Open a new terminal. You can do this by clicking on the Spotlight magnifying glass at the top right of the screen, type terminal and then click on the Terminal icon. You can check if Command Line Tools or Xcode is installed by typing the command below in your terminal.
xcode-select -p
If you see a path output like in the image above, please skip to the "Install Homebrew" section of the tutorial. You already have Xcode or Xcode Command Line Tools installed.
If you see no output, proceed to step 3.
2. Type the following into your terminal to install Command Line Tools. If you see a prompt like the one in the image below, click on Install.
xcode-select --install
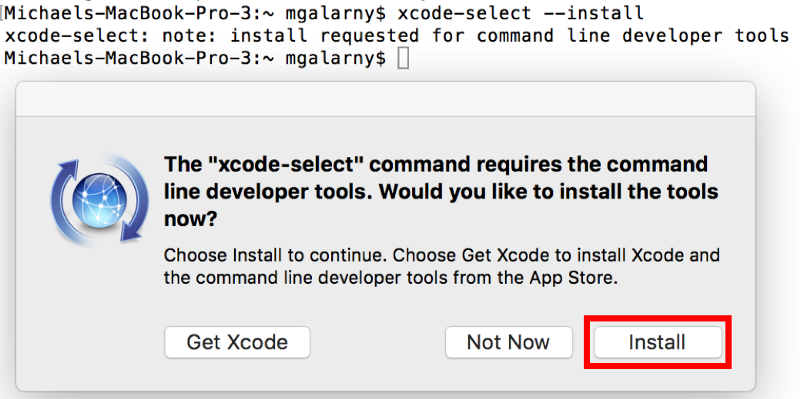
If a License Agreement appears, please read it and then click Agree.
3. Check again to see if Xcode Command Line Tools is installed. You can do this by opening a new terminal and typing in the command below.
xcode-select -p

Open a terminal and type the command below. You’ll be prompted to give your password, which is usually the one that you also use to unlock your Mac when you start it up. After you enter your password, the installation will start.
/usr/bin/ruby -e "$(curl -fsSL https://raw.githubusercontent.com/Homebrew/install/master/install)"

Let's now take a look at common homebrew commands.
The command below installs the package wget. You can substitute wget for the package you want to install.
brew install wget
The command below uninstalls the package wget. You can substitute wget for the package you want to uninstall.
brew rm wget
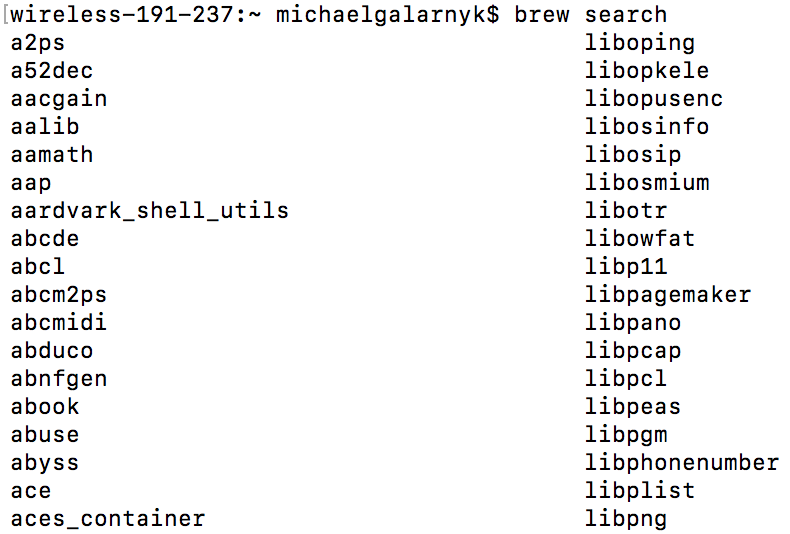
brew search lists all the possible packages that you can install. The image below shows the output of using brew search.
A more practical usage of the brew search command is to use a more refined query. For example, if you are are interested in installing Apache Spark, you can use the command below to see if there is a Apache Spark package to install.
brew search spark

From the image above, there is a potential Apache Spark package called apache-spark that might be useful to install. It might be be helpful to get more information on apache-spark which is where the command brew info comes in handy.
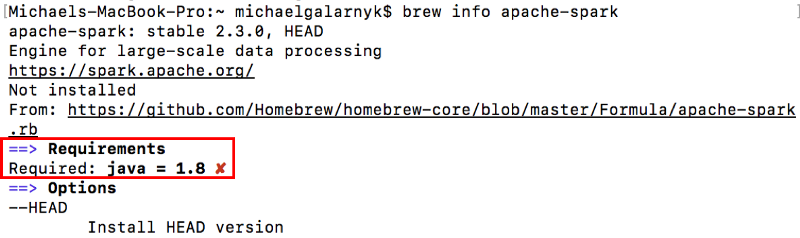
The command brew info is really useful to get more information on a package and to see the requirements of a package.
The command below gets more information on the package apache-spark.
brew info apache-spark
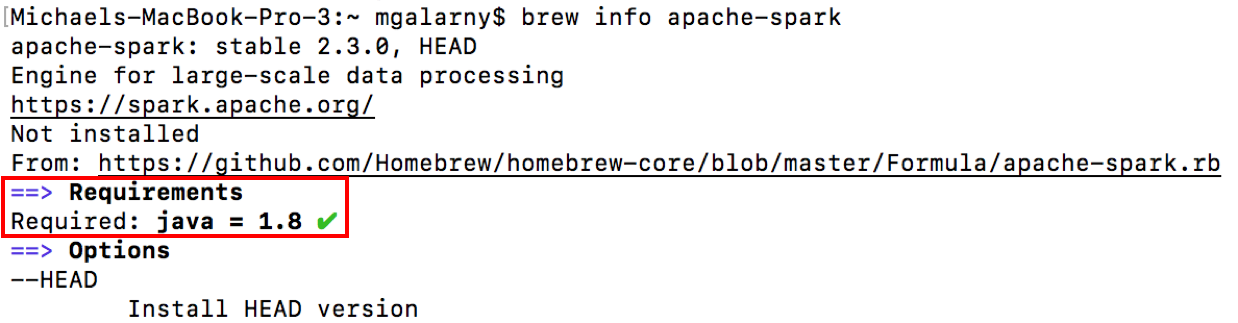
Notice that it lists that this package requires java version 1.8 and gives couple links to places where you can get more information on the specific package. The next section goes into more detail on how to install Apache Spark.
You will often find that Homebrew can be used to assist you in working with other technologies. This section includes two examples on how to use Homebrew for data science:
Homebrew can be used to install other technologies like Apache Spark. Apache Spark is not the easiest to install, but Homebrew makes it easier. The steps below go over how to install Apache Spark using Homebrew.
1. Look to see if there is a Apache Spark package on Homebrew using the command below.
brew search spark

2. Look for more information about the apache-spark to see if you have all the necessary dependencies.
brew info apache-spark
If the output of your command shows that you have Java, continue to step 3.

If the output of your command shows that you don’t meet the requirements, you will need to install Java before you proceed to step 3.
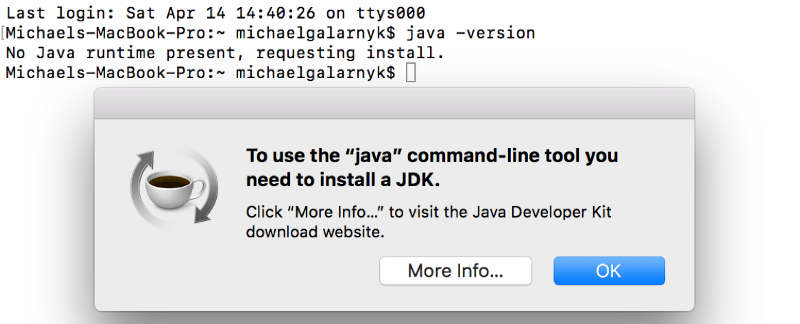
You can type the command below to see if you have Java. The image below shows the output if you don’t have Java installed. It is important to note that if you have an older version of Java, you will need to upgrade.
java -version
You can install Java using Cask. Cask is an extension to brew that allows management of graphical applications through the Cask project.
brew tap caskroom/versions
brew cask install java8
After installing Java, check that you have an appropriate version of Java.
java -version

3. Use the command below to install apache-spark.
brew install apache-spark

4. You can now open PySpark with the command below.
pyspark
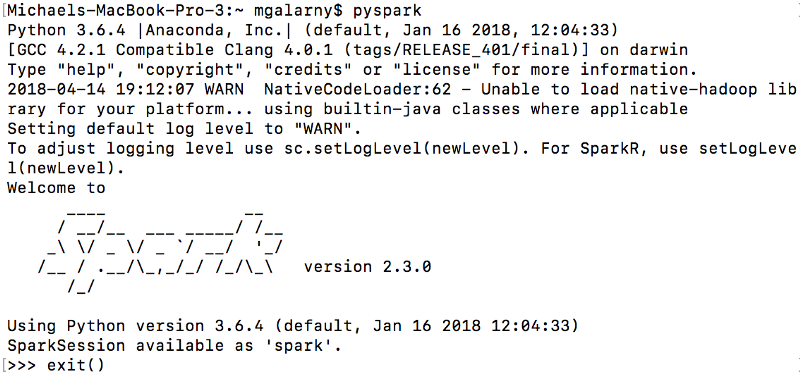
5. You can close pyspark with exit().
If you want to learn about PySpark, please see the Apache Spark Tutorial: ML with PySpark.
Graphviz is open source graph visualization software. Graph visualization is a way of representing structural information as diagrams of abstract graphs and networks. In data science, one use of Graphviz is to visualize decision trees (you can learn about decision trees here).
You can install GraphViz by using the command below.
brew install graphviz
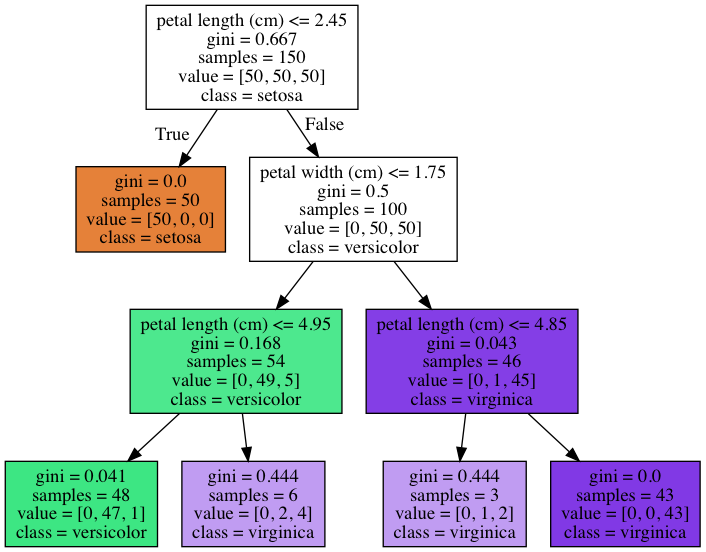
The python code below fits a decision tree on the famous Iris Dataset and exports a dot file (decisionTree.dot) of the decision tree you fit.
 from sklearn.datasets import load_iris
from sklearn import tree
iris = load_iris()
clf = tree.DecisionTreeClassifier(max_depth=3)
clf = clf.fit(iris.data, iris.target)
tree.export_graphviz(clf,
                     out_file="decisionTree.dot",
                     feature_names=iris.feature_names,
                     class_names=iris.target_names,
                     filled = True)
One of the strengths of decision trees is that they are easily interpretable. You can more easily interpret a decision tree by viewing it. This is where Graphviz comes in. In a terminal, you can type the command below to convert decisionTree.dot to an easy to view .png file.
dot -Tpng decisionTree.dot -o decisionTree.png
You can then open the .png file you created you view your decision tree.
It is important to note that sometimes package manager functionalities overlap. For example, it is also possible to install Graphviz through the package manager functionality of conda if you have Anaconda installed by using the command below.
conda install python-graphviz
This tutorial provides a quick guide on how to install and use Homebrew for data science. I hope you find this tutorial useful when you want to install Apache Spark or Graphviz. Homebrew has a wonderful website that you can look at for further commands. If you any questions or thoughts on the tutorial, feel free to reach out in the comments below or through Twitter.
Learn more about Data Science
Course
Course
Course
Tutorial
Olivia Smith
Tutorial
Francisco Javier Carrera Arias
Tutorial
DataCamp Team
Tutorial
Elena Kosourova
Tutorial
Minoo Ashtiani
Tutorial
Matthew Przybyla