
Track
Excel Fundamentals
16 hr
If you’re a data analyst or scientist, you’ve probably encountered minor issues that can turn into big headaches. One common problem in Excel is dealing with extra spaces in your data. They can mess things up and cause unexpected errors. Sometimes, two identical values won’t match just because of hidden spaces.
To fix this, Excel provides the TRIM() function, which removes all extra spaces and leaves only a single space between words. This makes the data cleaner and easier to work with.
The TRIM() function in Excel removes all the in-between, leading, and trailing spaces from the text, leaving only a single space between words.
=TRIM(text) Suppose I have a full name in cell A2 with extra space between the first and last name. Use the following formula:
=TRIM(A2)
Use the TRIM() function. Image by Author.
Let's learn how TRIM() cleans up extra spaces and fixes formatting issues with examples.
Sometimes, the data gets messy when we import it into Excel from external sources. There are often extra spaces scattered throughout, which can disrupt sorting, filtering, or even simple calculations.
Let’s say I have a dataset of customer details with inconsistent spaces, and I want to remove extra spaces from the cells at once. To do this, I enter the following formula in cell C2 and then double-click the fill handle to apply the formula to all the cells:
=TRIM(A2)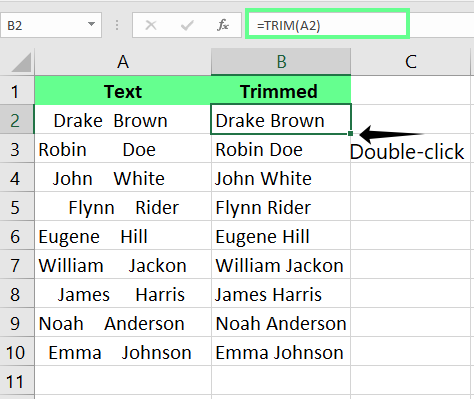
Remove extra spaces with the TRIM() function. Image by Author
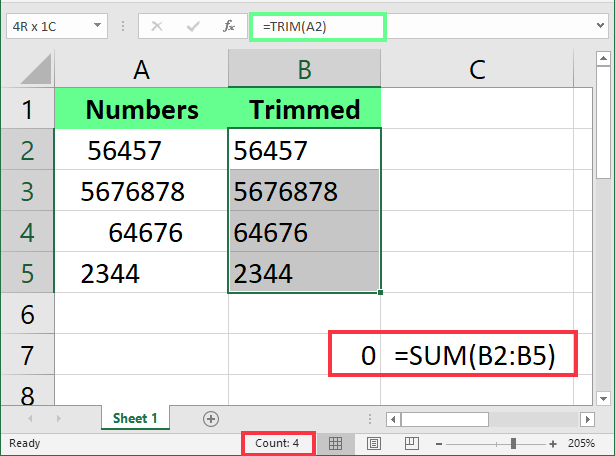
The TRIM() function only works with text. If we use it on a number, Excel will still treat it as text, which can cause issues when doing calculations.
TRIM() treats numeric values as text. Image by Author.
In the above example, we can see that TRIM() has cleaned up the spaces, but two things don’t look right:
First, the numbers are left-aligned instead of right-aligned. In Excel, numbers are generally aligned to the right.
Second, the status bar only shows COUNT(), and when I try to sum these values using SUM(), it returns zero.
To create a fix, we can wrap TRIM() inside the VALUE() function, like this:
=VALUE(TRIM(A2))This extra step converts the trimmed text back into a number.
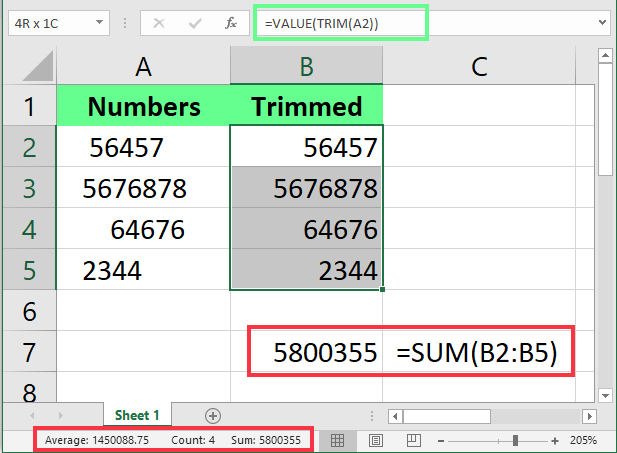
Wrap TRIM() inside the VALUE() function. Image by Author.
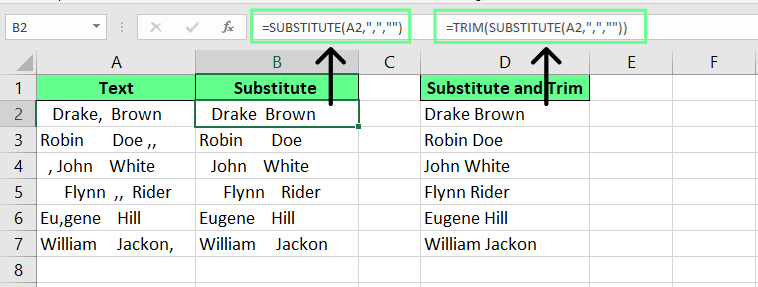
If we need to remove a specific delimiter from a text, we can use the SUBSTITUTE() function. Let's say, for example, my text has commas but I don't want them. I can use the following formula:
=SUBSTITUTE(A2,",","")This step by itself removes the commas but it does not remove extra spaces around them. So, to be more exact, I pair SUBSTITUTE() with TRIM():
=TRIM(SUBSTITUTE(A2,",",""))
Combine SUBSTITUTE() and TRIM(). Image by Author
Apart from its basic use, TRIM() can also perform advanced operations when combined with other Excel functions.
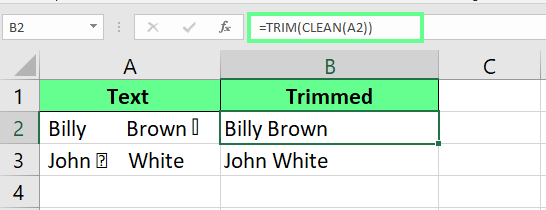
Sometimes, our data may have non-printable characters that TRIM() alone can’t handle. So I use the CLEAN() function and wrap it inside the TRIM().
=TRIM(CLEAN(A1))Here, TRIM() cleans the extra spaces, and CLEAN() removes non-printable characters.
Cleans non-printable characters. Image by Author.
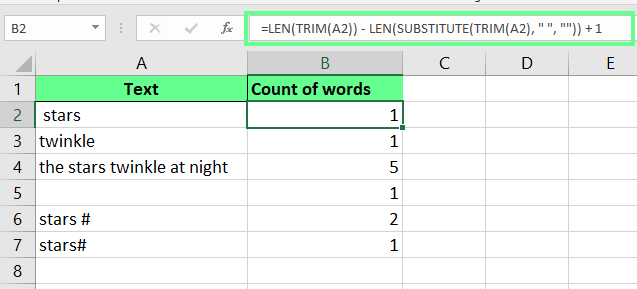
We can also use TRIM() to count the number of words in a cell. Take a look at the following formula:
=LEN(TRIM(A1)) - LEN(SUBSTITUTE(TRIM(A1), " ", "")) + 1 Here, TRIM(A1) removes the extra spaces, LEN(TRIM(A1)) counts all the characters in the cleaned-up text, including spaces, and LEN(SUBSTITUTE(TRIM(A1), " ", "")) removes all the spaces and counts only the actual characters. Then, to get the number of words, it subtracts the character count without spaces from the total count. And since the number of words is always more than the number of spaces + 1 in the formula gives the final word count.
Use TRIM() to count the words in a cell. Image by Author.
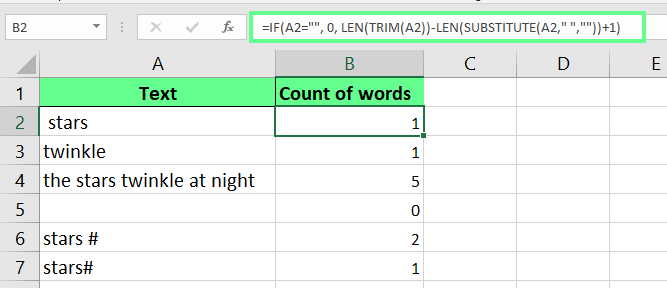
But this formula returns 1 for the empty cell. To avoid this, I tweak the above formula a little bit, and it returns 0:
=IF(A2="", 0, LEN(TRIM(A2))-LEN(SUBSTITUTE(A2," ",""))+1)
Count words with empty cells. Image by Author.
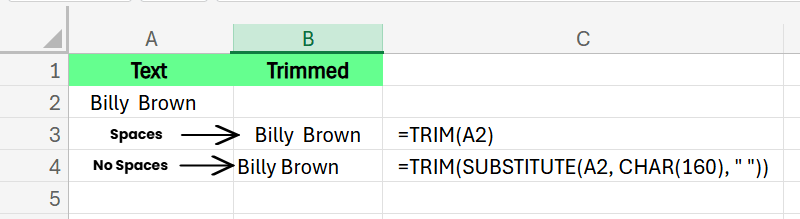
TRIM() removes spaces but not non-breaking spaces. These spaces look like regular spaces but behave differently since they are a unique Unicode character with a value of 160 in 7-bit ASCII. You may spot them in text copied from websites.
=TRIM(SUBSTITUTE(A1, CHAR(160), " "))Here, the CHAR(160) replaces the non-breaking spaces with normal ones, and then TRIM() removes any extra spaces.
Remove non-breaking spaces with TRIM() and SUBSTITUTE(). Image by Author.
Even though TRIM() is a simple function, I’ve encountered a few issues using it. Sometimes, it doesn’t work as I expect and gives errors. So, let’s look at some common problems and how I fix them.
If there is a #VALUE! error after using TRIM(), it’s likely because the function is applied to a numeric value instead of text. To fix this, I first check if the data is actually text. If I need to clean spaces in numbers, I wrap TRIM() inside the VALUE() function, as discussed above. This way, TRIM() removes any extra spaces, and VALUE() converts it back into a number.
If you use TRIM() on a large dataset, Excel may lag because it will recalculate every row with each change in the spreadsheet. To fix this, trim the data before importing, if possible. Or after applying TRIM(), copy the cleaned column and paste it as values (Ctrl + Alt + V > Paste Values). This removes formulas and improves performance.
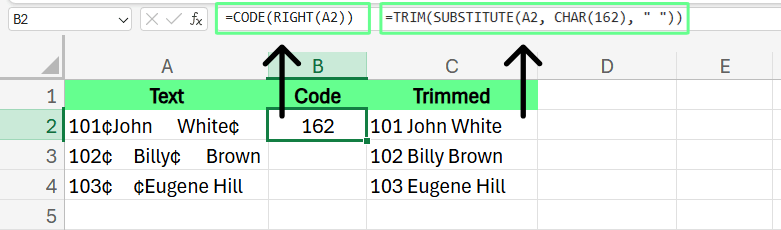
TRIM() only handles character code 32 in ASCII (7-bit encoding). So to check for hidden characters, I use the CODE() function:
To find the first character’s code, I use =CODE(LEFT(A1,1)).
To check the last character, I use =CODE(RIGHT(A1,1)).
To inspect a specific position, I use =CODE(MID(A1, n, 1)) (Replace n with the position number.)
For example, I have sample data, and in the first cell, the character is on the right of the text, so I use the following formula to check the code of the character:
=CODE(RIGHT(A2))Now I know the character is 162, so I easily remove it with SUBSTITUTE() and TRIM() like this:
=TRIM(SUBSTITUTE(A2, CHAR(162), " "))
Remove special characters with CODE(), SUBSTITUTE(), and TRIM(). Image by Author.
Once, I applied TRIM(), but nothing changed. After re-checking, I realized Excel was in manual calculation mode, so the formulas weren’t updating. To fix this, I went to Formulas > Calculation Options and set it to Automatic. Then, my formula worked perfectly.
You now know the TRIM() function removes extra spaces in Excel and prevents calculation issues. So, no matter what you’re doing, whether you are importing data or removing hidden or special characters, you don’t have to fix issues one by one. Instead, combine TRIM() with other functions like SUBSTITUTE(), CLEAN(), and VALUE() to get the best results.
To improve your Excel skills further, check out our Data Preparation in Excel course. It’ll help you clean and organize data easily. Once you’ve mastered that, check out our Data Visualization in Excel course and learn to convert raw data into clear, visual insights.
Learn Excel with DataCamp
Track
Track
Course
Tutorial
Laiba Siddiqui
Tutorial
Laiba Siddiqui
Tutorial
Laiba Siddiqui
Tutorial
Allan Ouko
Tutorial
Allan Ouko
Tutorial
Eugenia Anello