Course
Introduction to Excel
4 hr
237.2K
Let's take a look at basic cleaning, which involves addressing common issues like removing extra spaces.
Trailing white spaces can be annoying or problematic because they can lead to inconsistencies in data analysis and formatting issues.
There are two major ways to get rid of extra spaces in Excel. Let’s review both.
Here are the steps to get rid of extra spaces.
Select the range of cells where you want to remove extra spaces.
Use the Ctrl + H shortcut to open the Find and Replace dialog box.
In the Find what field, press the spacebar twice to enter two spaces.
In the Replace with field, press the spacebar once to enter a single space.
Click on Replace All.
Repeat the process until no more double spaces are found.
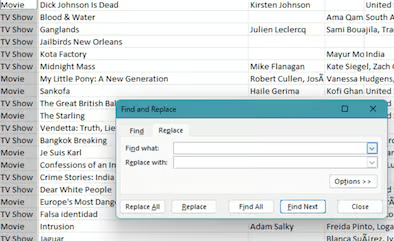 Find and replace the dialog box. Source: Image by Author
Create a new column for the cleaned data.
Enter the formula =TRIM(cell_with_extra_spaces) in the first cell of the new column.
Double-click the bottom right corner of the cell to apply the formula to the rest of the rows.
Copy the cleaned data and paste it as values to remove the formulas.
Blank cells can cause problems by breaking formulas, leading to errors in calculations and producing inaccurate analysis results. Here’s how to handle this issue.
Highlight the range of cells where you want to find and treat blank cells.
Press Ctrl + G to open the Go To dialog box.
Click on the “Special…” button. This opens the Go To Special dialog box.
Select the Blanks option and click OK. Now, you will see that all the blank cells in the chosen range are selected.
You can now enter a value or formula. Press Ctrl + Enter.
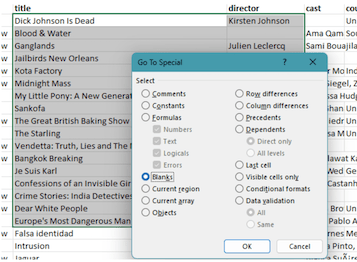 Select and treat blank cells. Source: Image by Author
Misspelled words can make data look unprofessional and difficult to understand, so it's important to correct them.
Check the entire worksheet or a specific range.
Go to the Review tab on the Ribbon.
Click the Spelling button in the Proofing group.
The Spelling dialog box will open, showing the first detected misspelled word and suggestions for correction.
Review and correct the misspelled words as needed.
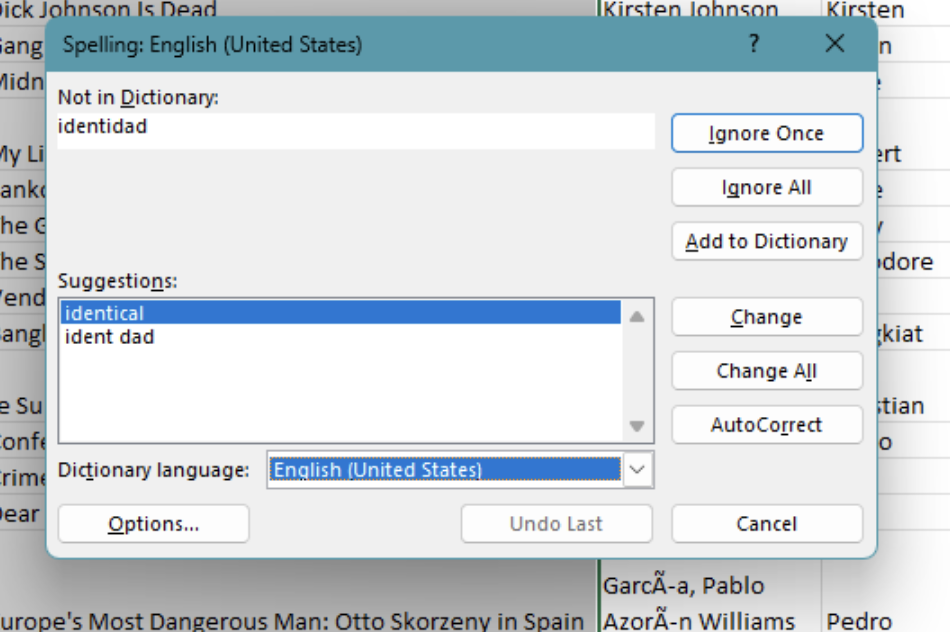 Spell checking. Source: Image by Author
Let's take a look at error handling, which involves addressing common issues like highlighting errors or removing duplicates.
Errors in your data can lead to incorrect results and poor decision-making, so it's crucial to identify and address them. Let’s see how to tackle this problem.
Select the range of cells you want to check for errors.
Go to the Home tab on the Ribbon.
In the Styles group, click on Conditional Formatting.
Select New Rule from the dropdown menu.
Choose Use a formula to determine which cells to format.
Enter the formula =ISERROR(cell) in the Format values where this formula is true field.
Click the Format… button to choose your desired formatting options.
Click OK after selecting your formatting options.
Click OK again in the New Formatting Rule dialog box to apply the rule.
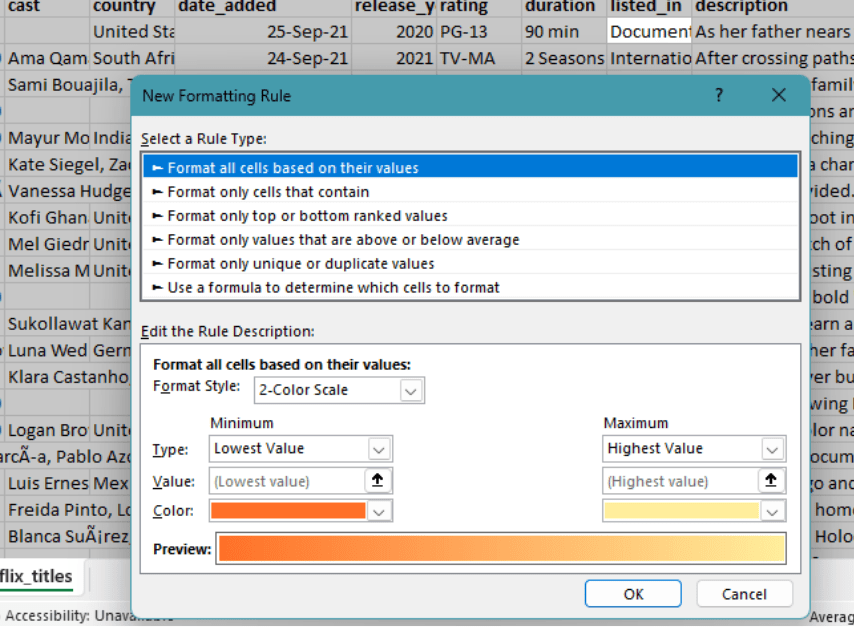 Using conditional formatting. Source: Image by Author
Duplicate entries can distort analysis and insights, so removing them ensures data accuracy.
Select the worksheet or range of cells from which you want to remove duplicates.
Go to the Data tab on the Ribbon.
Click on Remove Duplicates in the Data Tools group.
In the Remove Duplicates dialog box, specify which column to check for duplicates.
Click OK. Excel will display a message showing the number of duplicate values removed.
Duplicate rows can clutter your data and affect the reliability of your analysis. Here’s how to manage this.
Select the range from where you want to remove the duplicate rows.
Go to the Data tab on the Ribbon and click on Advanced in the Sort & Filter group.
In the Advanced Filter dialog box, select Copy to another location.
Set the List range to your selected range.
Set the Copy to field to the cell where you want the unique rows to be copied to.
Check the Unique Records Only box and then click OK.
Let's take a look at text operations like concatenating strings.
Combining multiple text strings into one cell can help create more meaningful and organized data by merging information from different sources into a single, cohesive format.
=CONCATENATE().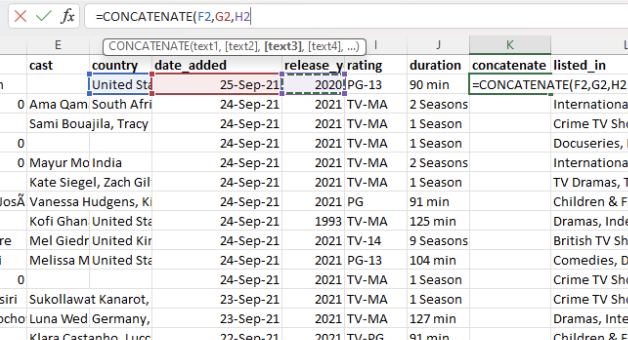 Concatenating cells. Source: Image by Author
Uniform text casing can improve readability and maintain consistency in your data. Let’s see how to adjust this.
Create a new column for the converted text.
Enter the formula in a cell: =UPPER() or =LOWER() or =PROPER()
Drag the fill handle to apply the formula to other cells if needed.
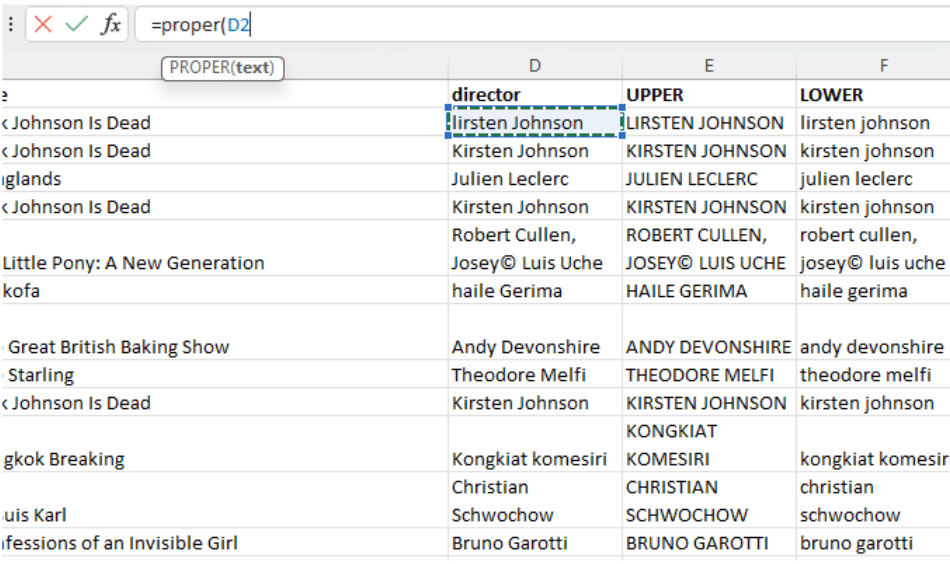 Changing the case of text. Source: Image by Author
Nonprinting characters such as tabs, line breaks, and special characters, can cause problems by disrupting data processing, making it difficult to analyze or visualize data correctly.
Identify the nonprinting characters you need to remove.
Select the cell containing the text with nonprinting characters.
In a new cell, use the following function: =CLEAN(text).
To remove extra spaces and nonprinting characters, use: =TRIM(CLEAN(text)).
Copy and paste the cleaned text to replace the original.
 Using the clean function in Excel. Source: Image by Author
Data transformation techniques are used to reorganize and reshape your data for better analysis, including parsing text and using tools like Flash Fill.
Separating text data into individual columns makes it easier to analyze specific components and ensures that each piece of information is distinctly categorized. This is the opposite of concatenation and is useful for breaking down complex data into manageable parts. Here’s how to go about it.
Select the data you want to split.
Go to the Data tab and click Text to Columns.
Choose Delimited or Fixed Width and click Next.
For Delimited, check the delimiters your data uses and click Next.
For Fixed Width, set column breaks in the Data Preview window and click Next.
Choose the data format for each column.
Click Finish.
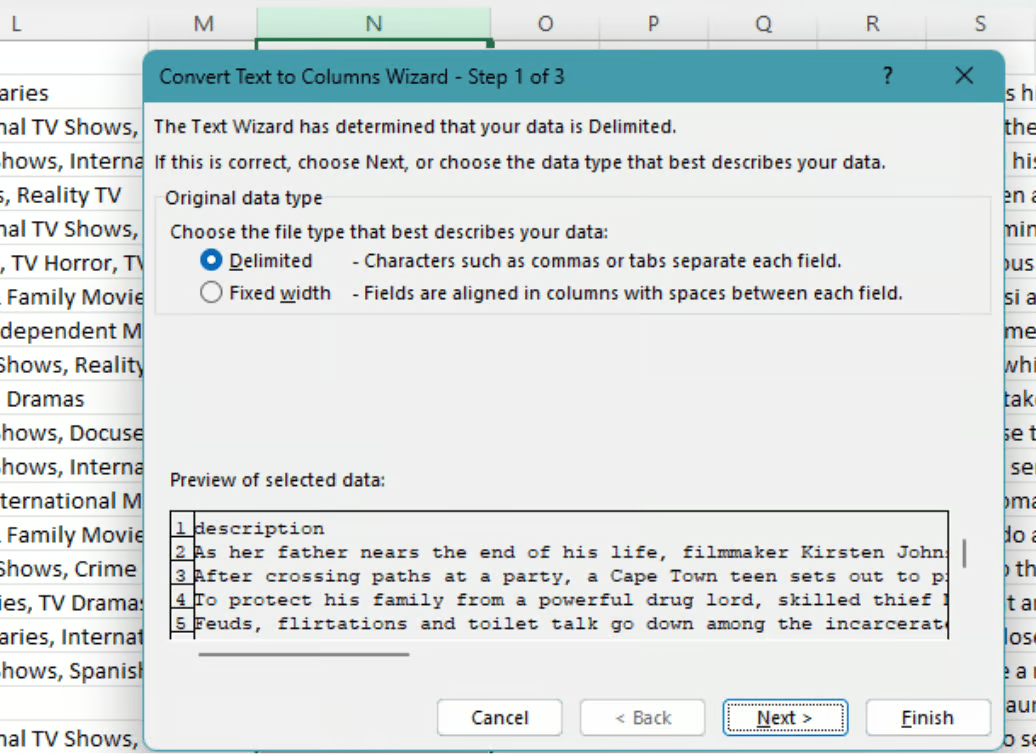 Using text to columns for data parsing. Source: Image by Author
Flash Fill automatically fills in values based on patterns it detects in your data. Here’s how you can use Flash Fill in Excel:
Enter data following a pattern in a cell next to your existing data.
Provide another example in the next cell to help Excel detect the pattern.
Select the cell with the example.
Go to the Data tab on the Ribbon.
Click on Flash Fill in the Data Tools group.
Excel will automatically fill the remaining cells based on the detected pattern.
Merging and splitting columns help organize data in a way that best suits your analysis needs. Follow these steps to merge cells:
Follow these steps to split columns:
Rearranging data can help present it in a more logical and accessible format. For transforming rows to rows and columns to columns:
Highlight the data you want to transform (including headers if necessary).
Right-click the selection and choose Copyor press Ctrl+C.
Select the cell where the transformed data begins.
Right-click the destination cell, choose Paste Special and then select Transpose.
You can also use Ctrl+Alt+V to open the Paste Special dialog box, then check the Transpose option and click OK.
To rearrange columns/rows:
Click the column header to select the entire column you want to move.
Right-click and choose Cutor press Ctrl+X.
Select the column where you want to move the cut column, right-click the column header, and choose Insert Cut Cells.
Similarly, for rows, select and cut the row you want to transfer to another row and paste it there.
Numerical and date fixes involve correcting and standardizing numerical data and dates to ensure they are accurate and formatted consistently.
Incorrect number formats can cause problems by leading to misinterpretations and calculation errors, as well as data sorting and comparison issues.
Properly formatted dates are crucial for accurate time-based analysis and reporting.
Highlight the cells containing the dates.
Go to the Home tab.
Click the Number Format drop-down menu and select Short Date or Long Date.
Gain the skills to maximize Excel—no experience required.
Learn Excel with DataCamp
Course
Course
Course
Tutorial
Laiba Siddiqui
Tutorial
Laiba Siddiqui
Tutorial
Laiba Siddiqui
Tutorial
DataCamp Team
Tutorial
Amberle McKee
Tutorial
Laiba Siddiqui