Track
Excel Fundamentals
16 hr
Excel includes a feature that lets us lock worksheets to prevent unwanted changes. This is designed to protect important data like financial records, reports, or shared files. This keeps things organized and prevents mistakes, especially when multiple people use the same document.
But sometimes, we may have to modify a protected sheet to update information, which can only be done by first unprotecting the sheet. In this guide, I’ll walk you through different methods to unprotect an Excel sheet, whether you have the password or not.
To unprotect an Excel sheet when you have a password:
This works for both individual sheets and entire workbooks. If the whole workbook is protected, the process is similar. The only difference is that instead of choosing Unprotect Sheet, click Protect Workbook under the Review tab and repeat step 2.
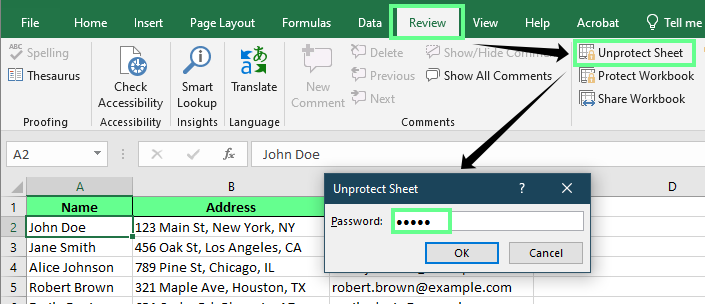
Unprotect the sheet with a password. Image by Author.
If we’ve forgotten the password of our sheet or received a locked Excel sheet, we can try to unprotect it in a couple of ways. Do know that modern versions of Excel use advanced encryption methods that are not so easy to bypass, but the following methods that we will explore might help.
If a protected sheet is locked and we don’t have the password, we can try unlocking it using a VBA macro. This is a brute-force approach and might only work with simple passwords. Also, don’t be surprised if it takes a long time to work through the possible combinations.
First, save the workbook to an older version of Excel. Go to File > Export > Change File Type > Excel 97-2003.
Open the protected sheet and press Alt + F11 to open the Visual Basic for Applications (VBA).
In the left panel, select the protected sheet (in my case, it's Employee Data) and paste the following password-breaking macro.
Sub UnprotectSheet()
    Dim i As Integer, j As Integer, k As Integer
    Dim l As Integer, m As Integer, n As Integer
    Dim password As String

    On Error Resume Next

    For i = 65 To 90
        For j = 65 To 90
            For k = 65 To 90
                For l = 65 To 90
                    For m = 65 To 90
                        For n = 65 To 90
                            password = Chr(i) & Chr(j) & Chr(k) & Chr(l) & Chr(m) & Chr(n)
                            ActiveSheet.Unprotect password
                            If Err.Number = 0 Then
                                MsgBox "Sheet Unprotected! Password Found: " & password, vbInformation, "Success"
                                Exit Sub
                            End If
                        Next n
                    Next m
                Next l
            Next k
        Next j
    Next i

    MsgBox "Could not unlock the sheet.", vbExclamation, "Failed"
End Sub
Click Run or press F5 to run the macro and wait for the process to complete. The macro will generate a new password, which may not be the original but can still unlock the sheet.
Click OK, and the sheet will be unprotected.
Once done, if the file format was changed earlier, rename it back to .xlsx to restore full functionality.
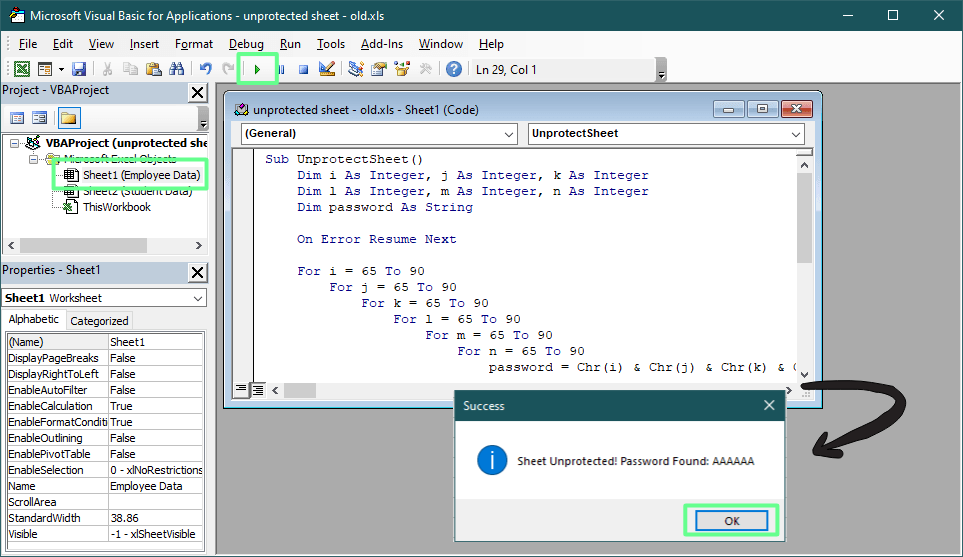
Crack the password using VBA macros. Image by Author.
In this last example, I'm looking for a password that I know is six characters long. If you're less sure about the password, you would need a different VBA script. Something too broad would take too long, and something too specific might not work, so be prepared to have to make several tries.
If VBA didn’t work or you’d rather not run a macro, another way to remove sheet protection is by editing the file’s internal structure. Excel files are compressed folders that contain multiple XML files, which means we can unlock a sheet by modifying the right one. Here’s how:
Create a backup/copy of your Excel file.
In the File Explorer, right-click the copied Excel file, select Rename, and change file extension from .xlsx to .zip. If a Rename pop-up appears, click Yes to confirm.
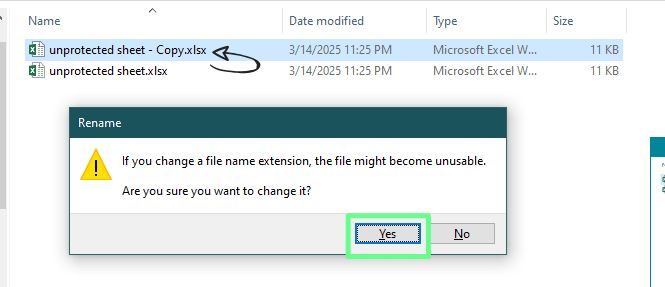
Change the xlsx file to a zip file. Image by Author.
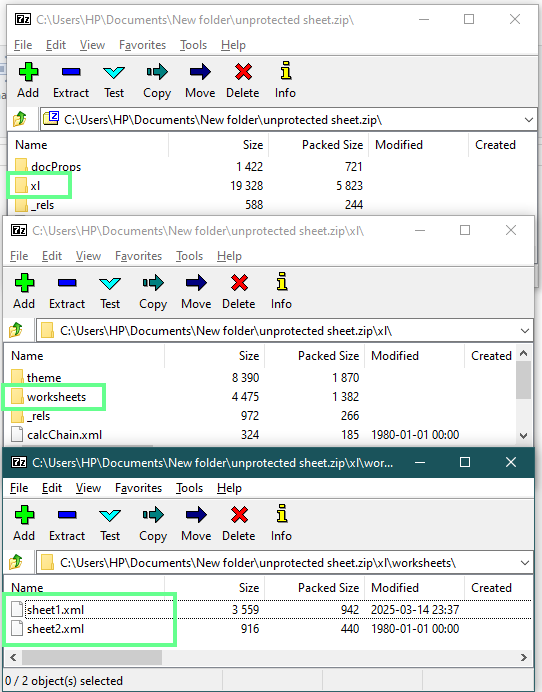
Locate the XML file inside the zip folder. Image by Author.
Locate the protected sheet’s XML file. If unsure which sheet is protected, open each XML file using Notepad or another text editor. Press Ctrl+F and search for the word protection. If the file contains a <sheetProtection> tag, this means the file is protected.
Now delete the entire <sheetProtection> tag, including the opening < and closing >. Press Ctrl +S to save the file.
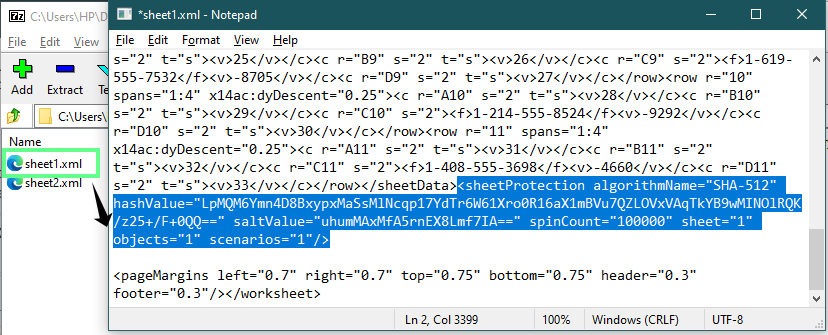
Unprotect the sheet using the zip file extension. Image by Author.
When closing the text editor, confirm any prompts to save modifications in the archive. Then, close the ZIP file.
Rename the file back from .zip to .xlsx.
Excel stores sheet protection settings inside these XML files. By removing the <sheetProtection> tag, we disable the lock without affecting the rest of the workbook. This method is quick, doesn’t require coding, and works even when we don’t know the password.
If you’re looking for the easiest way to remove sheet protection — without coding or modifying files — Google Sheets is a great option. When you upload a protected Excel file, Google Sheets automatically removes sheet protection so we can edit it freely.
Since Google Sheets does not support Excel’s sheet protection feature in the same way, it automatically removes the restrictions when converting the file. This makes it an easy, no-hassle solution.
If you want the sheet to remain protected but still edit specific cells, here’s how you can do it:
Suppose I have a dataset, and I want to share it with my client so they only write their address without editing anything else. To do so, first unprotect the sheet using any of the above methods. Then select the entire sheet by pressing Ctrl+A or the All Button. Now press Ctrl+1 to open the Format Cell, go to the Protection tab, and uncheck the Locked option.
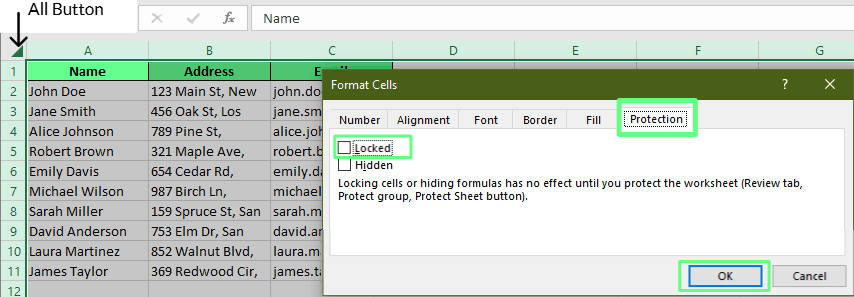
Unlock all the cells in the sheet. Image by Author.
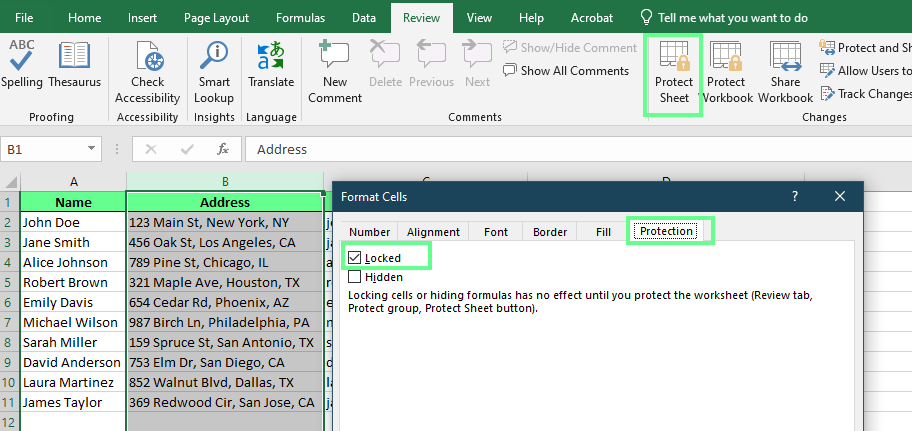
Now select all the columns except the Address column, lock them so the other person doesn't use them, and open the Format Cell window again (Ctrl+1) and check the Locked option under the Protection tab. On the review tab, select Protect Sheet and enter the password. This protects the entire sheet except the ones I unlocked and allows the user to edit only specific ranges.
TIP: To select the non-adjacent rows, hold the Ctrl key and select the cells. To select the adjacent rows or columns, just drag the cursor over the column headers.
Protect specific cells in the sheet. Image by Author.
If you cannot unprotect an Excel sheet, there are a few important things to consider:
Here is a table that I hope you find helpful. It's a summary of the different methods we discussed.
| Method | Password needed? | Difficulty | Works on encrypted files? | Best for |
|---|---|---|---|---|
| Review > Unprotect Sheet | Yes | Easy | Yes | When you know the password |
| VBA macro | No | Moderate | No | Simple passwords on older Excel formats |
| ZIP file method | No | Moderate | No | Removing sheet protection from .xlsx files |
| Google Sheets | No | Easy | No | Quick fix without coding |
Before we wrap up, we should say: The methods we covered are intended for ethical and legal use only. Unlocking an Excel sheet should only be done with proper authorization, such as when you have forgotten a password for your own file or have explicit permission from the file owner.
Bypassing password protection without permission may violate company policies, terms of service, or even legal regulations. If you are working with corporate data, consider reaching out to your IT department or system administrator for assistance rather than attempting to bypass protections yourself.
We’ve covered several ways to unprotect an Excel sheet, whether you remember the password or not. If you have the password, use Excel’s Unprotect Sheet option. If you don’t, you can try other tricks like VBA macros, changing the file extension, or using Google Sheets to get access.
While these methods work, it’s always a good idea to keep your passwords safe somewhere so you don’t lose your files. In addition, keep a backup of your files before making any changes. That way, you won’t lose any important data even if something goes wrong.
Finally, keep in mind that modern versions of Excel do use advanced encryption methods that are not so easy to bypass with techniques like these.
If you want to learn more about data, I recommend the Data Analysis in Excel course and the Data Preparation in Excel course. They’ll help you get better at organizing and analyzing data easily.
Learn Excel with DataCamp
Track
Course
Course
Tutorial
Laiba Siddiqui
Tutorial
Javier Canales Luna
Tutorial
Laiba Siddiqui
Tutorial
Laiba Siddiqui
Tutorial
Laiba Siddiqui
Tutorial
Allan Ouko