
Lernpfad
KI-Agent-Grundlagen
6 Std.
Die integrierten Skills von OpenClaw decken gängige Workflows ab, und auf ClawHub findest du unzählige weitere. Am wichtigsten sind aber häufig genau die Automationen, die es noch nicht gibt: passgenau auf deine Projekte und Tools zugeschnitten.
Dieses Tutorial zeigt dir, wie du zwei eigene Skills baust. Der erste kapselt ein Python-Skript, das Jupyter-Notebooks in Word-Dokumente umwandelt. Wenn du in Notebooks schreibst, aber .docx-Dateien an Redakteurinnen, Redakteure oder Stakeholder weitergibst, wird aus dem manuellen Export ein Slash-Befehl. Der zweite Skill erzeugt Bilder mit Nano Banana Pro über die Replicate API und ergänzt die Grundlagen um Anmeldedatenverwaltung und Umgebungsscoping.
Außerdem geht es um Docker-Sandboxing, Metadaten-Gating und das Veröffentlichen von Skills auf ClawHub. Für einen breiteren Blick auf die OpenClaw-Plattform lies OpenClaw Projects: What You Can Build und unseren Guide zu den Top-Agent-Skills.
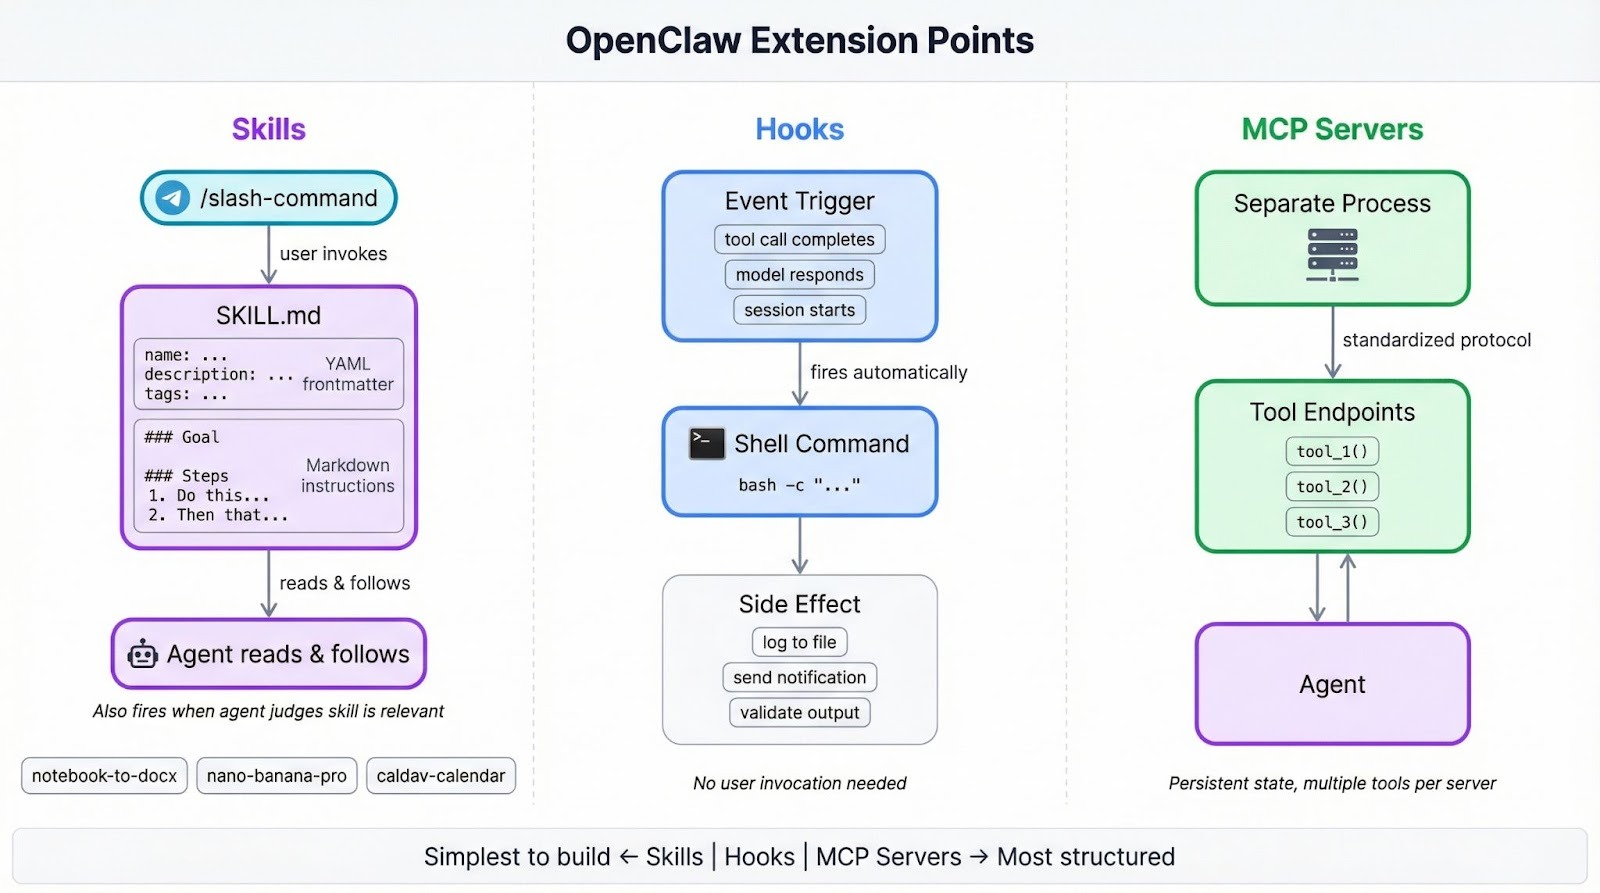
Über Skills bringst du dem OpenClaw-Agenten neue Verhaltensweisen bei. Das kann ein simpler Slash-Befehl sein, der Code formatiert, oder ein mehrstufiger Workflow, der PRs reviewt und Kommentare in Jira oder Slack postet.
Wenn du MCP-Server (Model Context Protocol) in Claude Code oder ähnlichen Tools genutzt hast, erfüllen Skills eine andere Rolle. MCP-Server sind separate Prozesse, die Tools über ein Standardprotokoll bereitstellen – ideal für Integrationen mit persistentem Zustand oder mehreren Tool-Endpunkten.
Skills sparen sich all das: Du schreibst Anweisungen in natürlicher Sprache, die der Agent zur Laufzeit liest und umsetzt. Das geht schneller, wenn du nur eine Sache automatisieren willst. Der Vergleich OpenClaw vs. Claude Code geht detaillierter auf die Trade-offs ein.
Hooks, die andere Erweiterungsstelle, werden automatisch ausgelöst, wenn etwas passiert – etwa wenn ein Toolaufruf endet oder das Modell eine Antwort generiert. Skills bleiben inaktiv, bis du einen Slash-Befehl tippst oder der Agent sie als relevant für die aktuelle Aufgabe einordnet.
OpenClaw liefert 49 Skills mit, die E-Mail, Kalender, GitHub, Browser-Automatisierung und mehr abdecken. Die Community hat tausende weitere auf ClawHub veröffentlicht. Zur Entwicklungshistorie der Plattform lies die Geschichte von MoltBot zu ClawdBot.
Du brauchst:
Wenn du OpenClaw lieber mit lokalen Modellen betreiben möchtest, erklärt das Tutorial „OpenClaw mit Ollama“ die Einrichtung.
Der erste Skill kapselt ein Python-Skript, das Jupyter-Notebooks in Word-Dokumente umwandelt, inklusive sauberer Behandlung von Markdown-Formatierung, Codeblöcken, Bildern, Tabellen und Hyperlinks, damit die .docx-Ausgabe die Struktur des Original-Notebooks beibehält. Wenn du regelmäßig Notebook-Inhalte an Personen übergibst, die in Word arbeiten, machst du daraus mit einem Slash-Befehl einen Ein-Schritt-Prozess.
Lege den Skill-Ordner im verwalteten Skills-Verzeichnis von OpenClaw an:
mkdir -p ~/.openclaw/skills/notebook-to-docxSkills in ~/.openclaw/skills stehen in allen Sitzungen zur Verfügung. Du kannst sie auch projektspezifisch unter <project>/skills ablegen, um sie auf diesen Workspace zu beschränken. Existiert ein Name an beiden Orten, gewinnt die Workspace-Version gegenüber der verwalteten, die wiederum eine gleichnamige mitgelieferte Version überschreibt.
Jeder Skill braucht genau eine Datei: SKILL.md. YAML-Frontmatter oben definiert, wie OpenClaw den Skill lädt, und der Markdown-Body darunter enthält die Anweisungen, denen der Agent zur Laufzeit folgt.
Erstelle ~/.openclaw/skills/notebook-to-docx/SKILL.md und beginne mit dem Frontmatter:
---
name: notebook-to-docx
description: Convert Jupyter notebooks to Word documents with proper formatting
user-invocable: true
metadata: {"openclaw": {"requires": {"bins": ["uv"]}}}
---
name ist zugleich der Slash-Befehl (/notebook-to-docx). description liefert dem Agenten einen Einzeiler, um die Relevanz zur aktuellen Aufgabe einzuschätzen. Mit user-invocable: true registrierst du den Slash-Befehl in deinem Telegram-Chat. Das metadata-JSON steuert das Laden: requires.bins weist OpenClaw an, den Skill zu überspringen, wenn uv nicht im System-PATH liegt – statt erst zur Laufzeit zu scheitern.
Wenn du das Gegenteil willst – der Skill darf nur feuern, wenn du den Slash-Befehl explizit tippst –, setze disable-model-invocation: true.
Tipp: YAML-Frontmatter unterstützt nur einzeilige Werte. Mehrzeilige Strings oder Block-Scaler führen zu Parserfehlern – deshalb ist metadata ein einzeiliges JSON-Objekt statt verschachteltem YAML.
Füge unter dem Frontmatter den Anweisungs-Body ein:
# Notebook to DOCX Converter

Converts Jupyter notebooks (.ipynb) to Word documents (.docx) with proper formatting.

## Usage

Run the conversion script:

	uv run --with nbformat --with python-docx --with Pillow python {baseDir}/notebook_to_docx.py <notebook_path> [output_path]

If output_path is not specified, creates a .docx file with the same name as the notebook.

## Features

- Markdown formatting preserved as Word styles (bold, italics, headings)
- Backticks preserved around inline code with monospace font
- Code blocks show triple backticks and language name, use Courier New font
- Non-code text uses Poppins font
- Images embedded with alt text
- Hyperlinks preserved and clickable
- Markdown tables converted to Word tables

## Requirements

- nbformat
- python-docx
- Pillow
{baseDir} ist eine Template-Variable, die zur Laufzeit auf den Skill-Ordner aufgelöst wird – du musst den Pfad also nicht hart codieren. Das ist wichtig, wenn jemand deinen Skill in ein anderes Verzeichnis installiert.
Die Flags uv run --with ziehen die drei benötigten Bibliotheken direkt nach, sodass der Skill eigenständig läuft und nicht voraussetzt, dass die Pakete bereits in der Umgebung vorhanden sind.
Das Python-Skript liegt im selben Ordner wie die SKILL.md. Mit rund 490 Zeilen ist es zu lang, um es hier abzubilden. Lade dir das vollständige Skript aus diesem Gist und speichere es als notebook_to_docx.py in ~/.openclaw/skills/notebook-to-docx/. Es unterstützt alle Features, die im Abschnitt „Features“ der SKILL.md oben gelistet sind.
Hier ist der Einstiegspunkt, damit du den groben Ablauf siehst:
def convert_notebook_to_docx(notebook_path, output_path=None):
	notebook_path = Path(notebook_path)
	if output_path is None:
    	output_path = notebook_path.with_suffix('.docx')
	else:
    	output_path = Path(output_path)

	with open(notebook_path, 'r', encoding='utf-8') as f:
    	nb = nbformat.read(f, as_version=4)

	doc = Document()
	create_styles(doc)

	style = doc.styles['Normal']
	style.font.name = 'Poppins'
	style.font.size = Pt(11)

	base_path = notebook_path.parent

	for cell in nb.cells:
    	if cell.cell_type == 'markdown':
        	process_markdown_cell(doc, cell.source, base_path)
    	elif cell.cell_type == 'code':
        	process_code_cell(doc, cell.source, cell.get('outputs', []))

	doc.save(output_path)
	print(f'Converted: {notebook_path} -> {output_path}')
return output_pathOpenClaw erstellt die Skill-Liste beim Start einer Sitzung als Snapshot, aber ein integrierter File-Watcher erkennt neue SKILL.md-Dateien nach rund 250 ms. Falls der Skill nicht erscheint, starte die Sitzung neu.
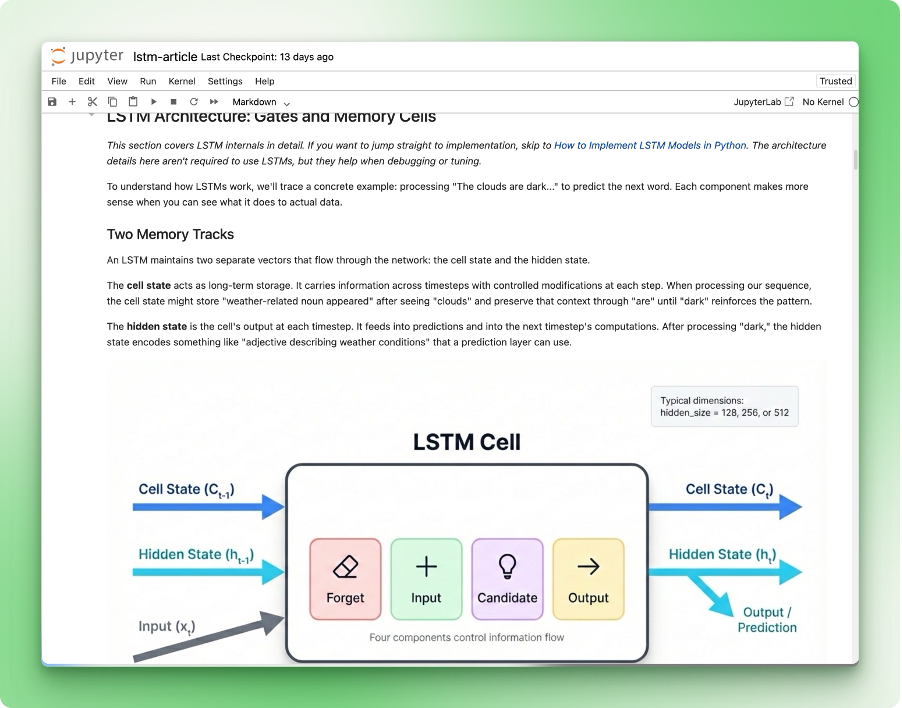
Hier das Notebook, das wir zum Testen verwenden:
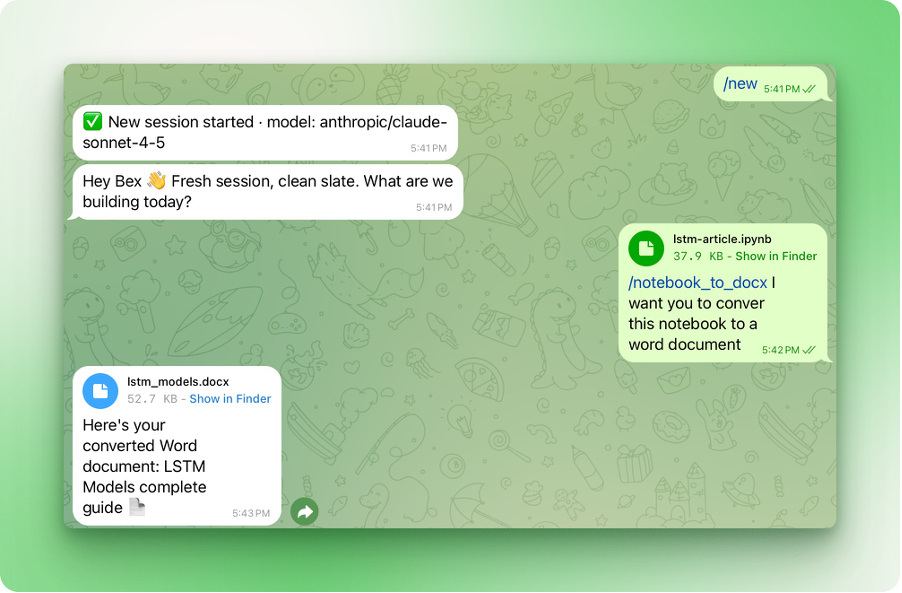
Öffne deinen Telegram-Chat mit OpenClaw und tippe /notebook-to-docx, dann gib an, welches Notebook konvertiert werden soll:
So sieht das resultierende Word-Dokument aus:
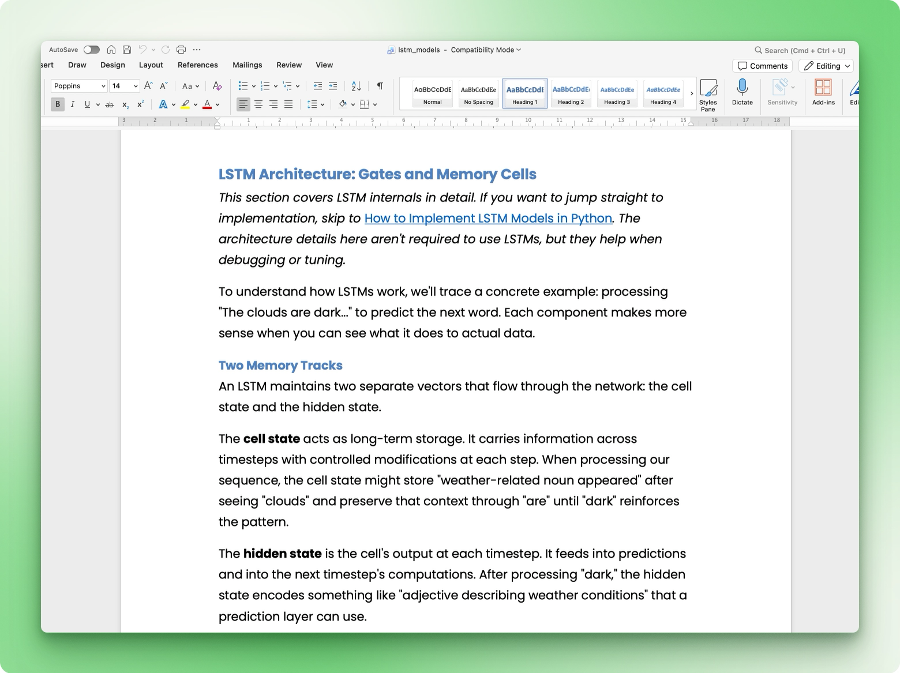
Überschriften, Codeblöcke, Inline-Formatierung und Hyperlinks landen in den passenden Word-Styles. Wenn in deiner Ausgabe etwas komisch aussieht, prüfe, ob die Featureliste in deiner SKILL.md zu dem passt, was das Skript unterstützt.
OpenClaw kann Toolausführung in Docker-Containern laufen lassen. So wird begrenzt, was ein fehlerhafter oder kompromittierter Skill auf deiner Maschine anrichten kann. Die Einstellung liegt unter agents.defaults.sandbox in ~/.openclaw/openclaw.json, mit drei Modi zur Auswahl:
"off" ist der Standard – Tools laufen direkt auf dem Host ohne Isolationsschicht."non-main" lässt deine primäre Chatsitzung auf dem Host, verschiebt Hintergrund- und automatische Sitzungen aber in Container."all" laufen alle Sitzungen in einem Container – unabhängig vom Kontext.Zusätzlich zum Modus wählst du einen Workspace-Zugriffslevel, der bestimmt, wie viel dein Container vom Dateisystem sieht. Der Standard, "none", gibt der Sandbox ein eigenes isoliertes Verzeichnis unter ~/.openclaw/sandboxes – ohne Zugriff auf deine Projektdateien.
Mit "ro" wird dein Workspace schreibgeschützt unter /agent gemountet – der Agent kann lesen, aber nichts verändern. "rw" geht weiter und gewährt Lese-/Schreibzugriff unter /workspace.
Eine funktionierende Konfiguration, die Hintergrundsitzungen sandboxed und ihnen Schreibrechte gibt, sieht so aus:
{
  "agents": {
	"defaults": {
  	"sandbox": {
    	"mode": "non-main",
    	"scope": "session",
    	"workspaceAccess": "rw"
  	}
	}
  }
}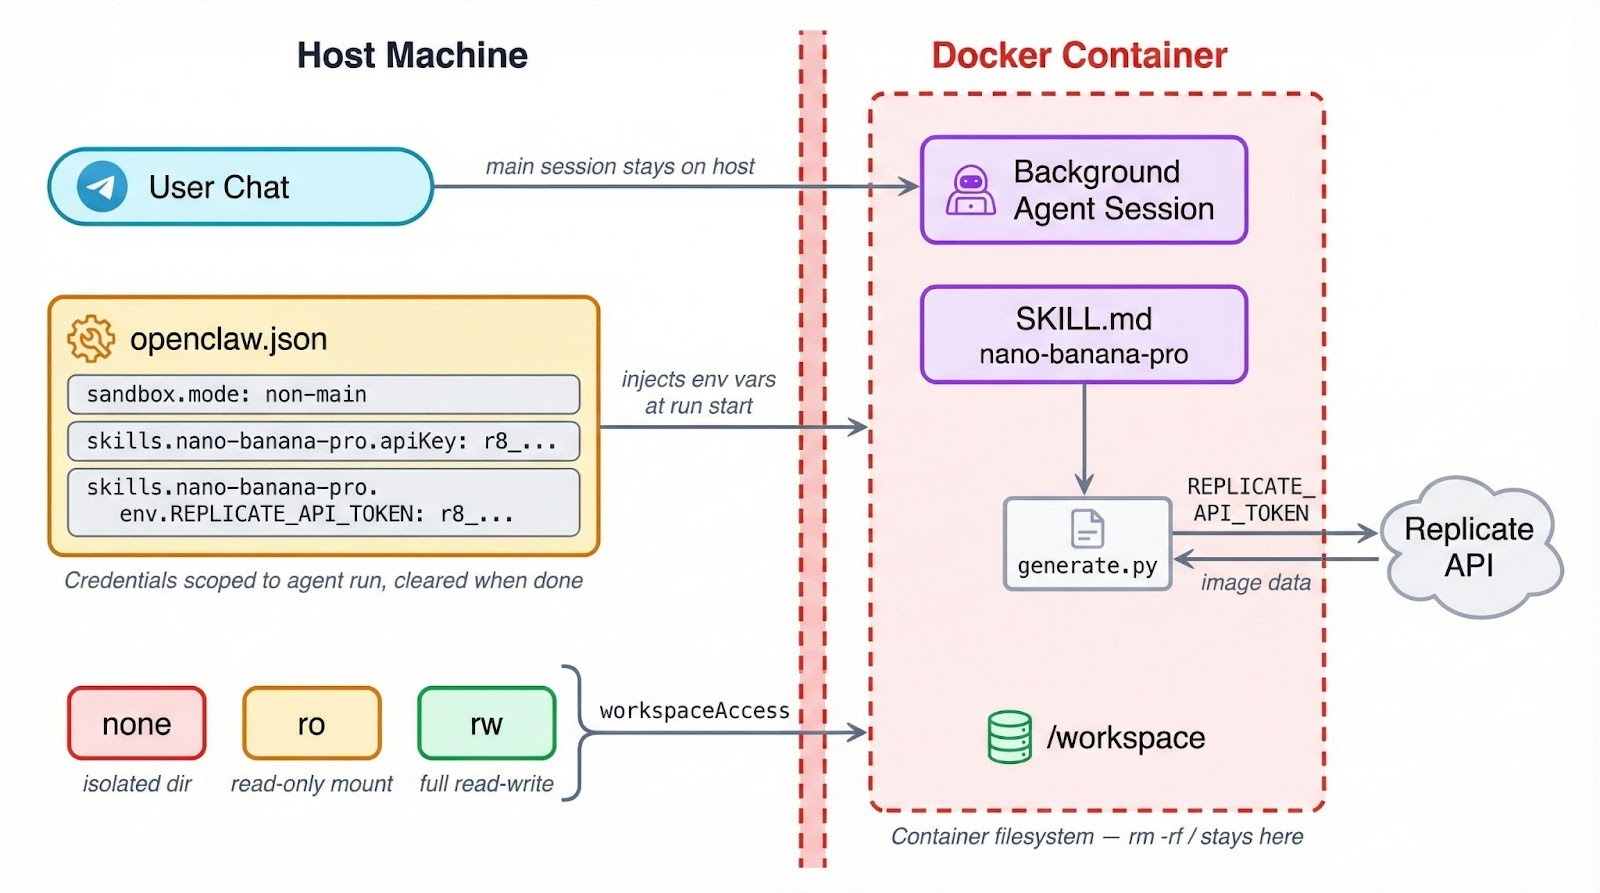
Das wird relevant, sobald deine Skills APIs aufrufen oder Anmeldedaten handhaben.
Wenn ein Skill im Container läuft, sind Umgebungsvariablen vom Host dort nicht automatisch verfügbar. Ein REPLICATE_API_TOKEN, den du in .bashrc exportiert hast, existiert in der Sandbox nicht. Secrets müssen stattdessen über das OpenClaw-Konfigsystem laufen – das richten wir im nächsten Abschnitt ein.
Tipp: Wenn dein Skill in den Metadaten requires.bins für ein CLI-Tool nutzt, läuft dieser Check beim Laden auf dem Host. Ist der Agent sandboxed, muss das Binary aber auch im Container vorhanden sein. Installiere es über sandbox.docker.setupCommand oder verwende ein eigenes Docker-Image.
Sandboxing begrenzt auch den Schaden bei fehlgeschlagenen Dateioperationen oder Shell-Kommandos. Ein Skill, der versehentlich rm -rf / ausführt, trifft das Container-Dateisystem – nicht deine echte Maschine. Ein guter Grund, es zu aktivieren, selbst wenn du deinem Code vertraust.
Mehr dazu, wie KI-Agent-Workflows Sicherheitsgrenzen umsetzen, findest du in AI Agent Workflows with Claude CoWork.
Der zweite Skill generiert Bilder mit Googles Nano Banana Pro (Gemini 3 Pro Image) über die Replicate API. Das bedeutet: Anmeldedaten-Verwaltung und Umgebungs-Gating zusätzlich zu den SKILL.md-Grundlagen.
Erstelle den Skill-Ordner:
mkdir -p ~/.openclaw/skills/nano-banana-proErstelle ~/.openclaw/skills/nano-banana-pro/SKILL.md und beginne mit dem Frontmatter:
---
name: nano-banana-pro
description: Generate or edit images via Gemini 3 Pro Image on Replicate
user-invocable: true
metadata: {"openclaw": {"emoji": "🎨", "requires": {"env": ["REPLICATE_API_TOKEN"], "bins": ["uv"]}, "primaryEnv": "REPLICATE_API_TOKEN"}}
---
Die Struktur entspricht dem ersten Skill, aber das Feld metadata übernimmt hier mehr. Es gibt zwei Gates: requires.env prüft, ob REPLICATE_API_TOKEN existiert, bevor der Skill geladen wird, und requires.bins prüft auf uv. Fehlt eines von beidem, wird der Skill stillschweigend übersprungen.
Das Feld emoji setzt ein Icon in der Telegram-Slash-Befehlsliste. Und primaryEnv mappt REPLICATE_API_TOKEN auf die apiKey-Abkürzung in der Konfiguration (Details im Abschnitt zu den Anmeldedaten unten).
Wenn die macOS-Skills-UI eine 1‑Klick-Installation für benötigte Binaries anbieten soll, füge dem Metadata-Block ein install-Array hinzu:
metadata: {"openclaw": {"requires": {"bins": ["uv"]}, "install": [{"id": "brew", "kind": "brew", "formula": "uv", "bins": ["uv"], "label": "Install uv (brew)"}]}}Unter Linux übernimmst du die Installation manuell oder über sandbox.docker.setupCommand.
Füge unter dem Frontmatter den Anweisungs-Body hinzu:
# Nano Banana Pro Image Generator

Generate and edit images using Google's Nano Banana Pro model via the Replicate API.

## Usage

Run the generation script:

	uv run --with replicate python {baseDir}/generate.py --prompt "<user prompt>" [--aspect-ratio 1:1] [--output image.png]

## Options

- --prompt: The image description (required)
- --aspect-ratio: Ratio like 1:1, 4:3, 16:9 (default: 1:1)
- --output: Output file path (default: generated_image.png)

## Tips

- For text in images, be specific about fonts, size, and placement
- The model supports resolutions up to 2K
- Safety filtering is on by default
Der Body ist kürzer als beim ersten Skill, weil das Generierungsskript die meiste Komplexität übernimmt. Die Template-Variable {baseDir} funktioniert genauso und löst sich zur Laufzeit auf den Skill-Ordner auf.
Füge ~/.openclaw/skills/nano-banana-pro/generate.py hinzu:
import replicate
import urllib.request
import argparse

def main():
	parser = argparse.ArgumentParser()
	parser.add_argument("--prompt", required=True)
    parser.add_argument("--aspect-ratio", default="1:1")
	parser.add_argument("--output", default="generated_image.png")
	args = parser.parse_args()

	output = replicate.run(
    	"google/nano-banana-pro",
    	input={
        	"prompt": args.prompt,
        	"aspect_ratio": args.aspect_ratio,
        	"output_format": "png",
        	"safety_filter_level": "block_only_high",
    	},
	)

	# Replicate returns a FileOutput; download the image
	url = str(output[0]) if isinstance(output, list) else str(output)
	urllib.request.urlretrieve(url, args.output)
	print(f"Image saved to {args.output}")

if __name__ == "__main__":
	main()
Das Skript parst die Argumente, ruft replicate.run() mit Modellname und Input-Parametern auf und lädt das resultierende Bild herunter. Die Bibliothek replicate liest REPLICATE_API_TOKEN automatisch aus der Umgebung.
Ergänze einen Eintrag in ~/.openclaw/openclaw.json:
{
  "skills": {
	"entries": {
  	"nano-banana-pro": {
    	"enabled": true,
    	"apiKey": "r8_your_replicate_token_here",
    	"env": {
      	"REPLICATE_API_TOKEN": "r8_your_replicate_token_here"
    	}
  	}
	}
  }
}
Es gibt zwei Wege, das Credential zu hinterlegen. Das Feld apiKey ist eine Abkürzung und mappt auf das, was primaryEnv in den Skill-Metadaten definiert. Der Block env gibt dir mehr Kontrolle, etwa wenn du mehrere Umgebungsvariablen injizieren musst.
Beide Ansätze werden auf die jeweilige Agenten-Run-Session gescopet. Sie werden zu Beginn gesetzt und am Ende wieder entfernt – sie landen also nicht in deiner globalen Shell-Umgebung.
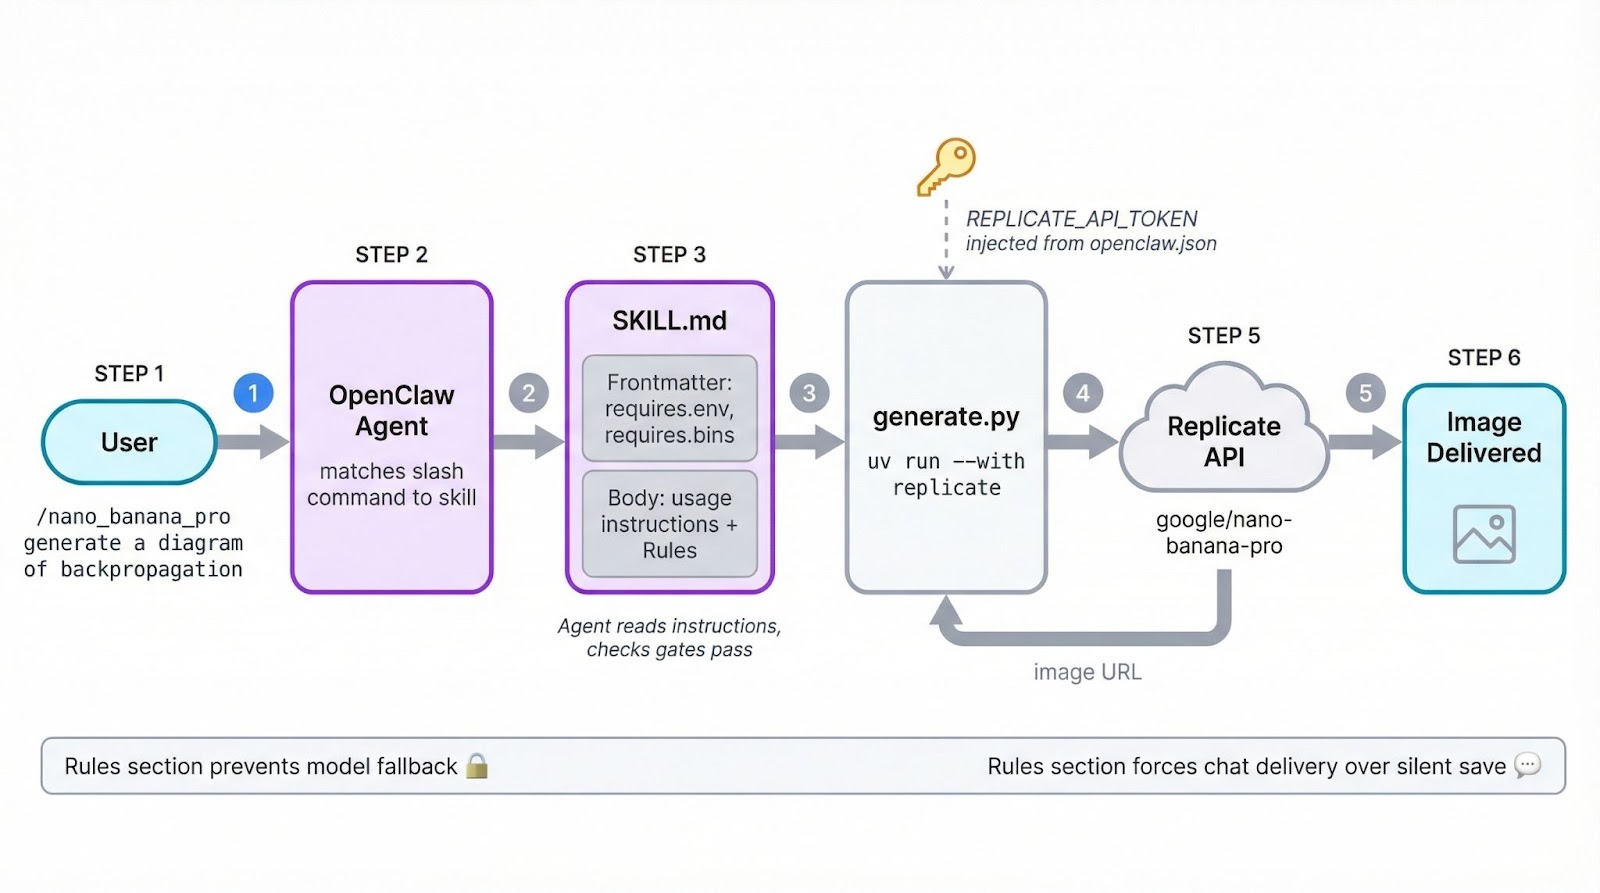
Starte eine neue OpenClaw-Sitzung und rufe den Skill auf:
/nano_banana_pro generate a beautiful and accurate diagram of how backpropagation worksHier ist das Diagramm, das der Skill via Nano Banana Pro auf Replicate erzeugt hat:
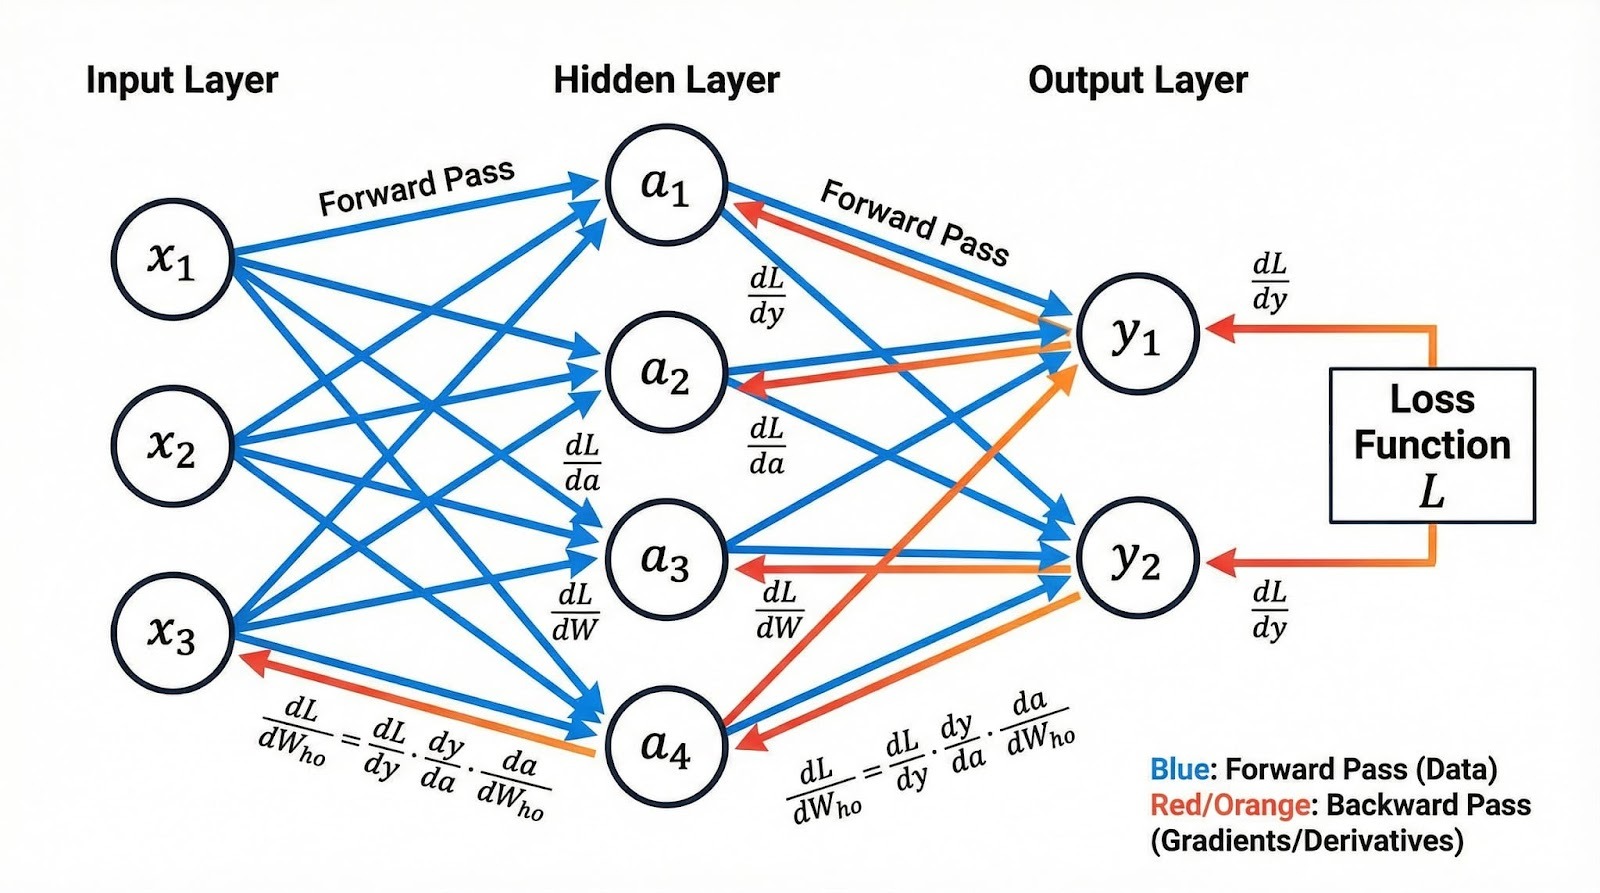
Das Bild ist da, aber der Weg dahin hatte einen Umweg. In der ersten Version dieser SKILL.md gab es keinen Abschnitt ## Rules, was dem Agenten Spielraum zum Improvisieren ließ. Als Nano Banana Pro wegen hoher Auslastung mit „service unavailable“ antwortete, entschied der Agent eigenmächtig, als Fallback google/nano-banana (die Non‑Pro-Variante) zu nutzen und erzeugte das Bild damit.
Aus Sicht des Agenten sinnvoll: die Aufgabe mit verfügbaren Mitteln abschließen. Aus deiner Sicht nicht das Gewünschte. Die Lösung war, Verhaltensregeln im Anweisungs-Body zu ergänzen:
## Rules

- Only use the google/nano-banana-pro model. Never fall back to other models like google/nano-banana or any alternative. If the model is unavailable or rate-limited, report the error to the user and stop.
- After generating an image, send the image file directly in the chat. Do not just save it to the workspace silently.
Der Agent behandelt SKILL.md-Instruktionen als Leitplanken und füllt Lücken mit eigenem Urteilsvermögen. Was du nicht verbietest, probiert er möglicherweise aus.
Wenn dir ein Verhalten wichtig ist – welches Modell genutzt wird, wohin die Ausgabe geht oder ob bei Fehlern erneut versucht wird –, schreibe es in einen Rules-Abschnitt.
ClawHub ist das öffentliche Verzeichnis für OpenClaw-Skills – kostenlos zum Stöbern und Installieren. Zum Veröffentlichen brauchst du einen mindestens eine Woche alten GitHub-Account.
Installiere die ClawHub-CLI global:
npm i -g clawhubAuthentifiziere dich dann:
clawhub loginDas öffnet deinen Browser für die GitHub-Anmeldung. Danach kannst du Skills im Terminal suchen, installieren und veröffentlichen.
So veröffentlichst du den Bildgenerierungs-Skill:
clawhub publish ~/.openclaw/skills/nano-banana-pro \
  --slug nano-banana-pro \
  --name "Nano Banana Pro" \
  --version 1.0.0 \
  --tags latest
Der --slug ist der eindeutige Bezeichner auf ClawHub und muss global einzigartig sein. Falls bereits jemand mit diesem Slug veröffentlicht hat, schlägt der Befehl mit „only the owner can publish updates“ fehl. Wähle in dem Fall einen anderen Slug, zum Beispiel yourname-nano-banana-pro.
Die Option --version folgt Semver. Bei jedem Update erhöhst du die Version und kannst optional ein Changelog angeben:
clawhub publish ~/.openclaw/skills/nano-banana-pro \
  --slug nano-banana-pro \
  --version 1.1.0 \
  --changelog "Added image editing with --image-input flag"
ClawHub führt eine Versionshistorie, damit Nutzende Änderungen prüfen und bei Bedarf zurückrollen können.
Für Bulk-Operationen scannt clawhub sync --all dein Skills-Verzeichnis und veröffentlicht alle neuen oder aktualisierten Skills in einem Rutsch:
clawhub sync --all --bump patchSo installierst du einen von anderen veröffentlichten Skill:
clawhub search "calendar"
clawhub install caldav-calendar
Installierte Skills landen standardmäßig in ./skills. OpenClaw erkennt sie in der nächsten Sitzung als Workspace-Skills.
Im Januar 2026 entdeckten Sicherheitsforscher bei Koi 341 bösartige Skills auf ClawHub – bekannt geworden als der ClawHavoc-Vorfall. Angreifer nutzten typosquattete Skill-Namen und gefälschte „Voraussetzungs“-Installationsschritte, um den Atomic macOS Stealer (AMOS), Reverse Shells und Payloads zur Anmeldedaten-Exfiltration zu verteilen.
Bis Mitte Februar 2026 wuchs die Zahl auf über 824 gemeldete Skills in Dutzenden Kategorien.
Lies vor der Installation eines Community-Skills dessen SKILL.md und Begleitdateien. Achte auf verdächtige „Prerequisite“-Schritte, verschleierten Code oder base64-codierte Kommandos. ClawHub blendet Skills mit drei oder mehr Nutzerreports automatisch aus – neue bösartige Skills können aber schneller auftauchen, als die Moderation sie entfernt.
Tools wie Clawdex scannen deine installierten Skills gegen eine Datenbank bekannter Schadpakete.
Behandle Drittanbieter-Skills mit der gleichen Vorsicht wie jeden externen Code: erst prüfen, dann ausführen.
Mit dem Format SKILL.md, dem Credential-Scoping über openclaw.json und der ClawHub-CLI hast du den kompletten Lifecycle: von der lokalen Automation bis zum geteilten Paket.
Der Hauptaufwand beim Bau eines neuen OpenClaw-Skills liegt in klaren Anweisungen im Markdown-Body und der Entscheidung, was du in den Metadaten gate-st. Der eigentliche Code – ob Konvertierungsskript oder API-Aufruf – liegt in separaten Dateien, die du unabhängig testen und iterieren kannst.
Wenn du über den Rahmen dieses Tutorials hinausgehen willst, zeigen die mitgelieferten Skills im OpenClaw-Repo, wie das Core-Team komplexere Workflows strukturiert. Die Übersicht zu Claude Opus 4.6 vertieft, wie die Modellauswahl das Agentenverhalten beeinflusst, und der Kurs Introduction to Claude Models bietet praxisnahe Übungen zu den Modellen hinter Agenten wie OpenClaw.
Top DataCamp Courses
Lernpfad
Kurs
Kurs
Blog
Tutorial
Kurtis Pykes
Tutorial
Satyabrata Pal
Tutorial
Sejal Jaiswal
Tutorial
DataCamp Team
Tutorial
Matt Crabtree