Course
AWS Concepts
2 hr
47.2K
In this section, I show how to set up Amazon Lex.
Note that the AWS user interface changes frequently. So, the layout and text of various sections and titles in the instructions and screenshots can change over time or from region to region.
I assume you already have an AWS account. If not, follow the instructions on the AWS Signup page and register a new account.
In this guide, we use the AWS console to set up and use Lex. Enter your AWS credentials to sign in to the AWS Lex console and land on the Lex home page.
The above leads to the Bots homepage (shown below). This page shows the list of Bots you have already created.
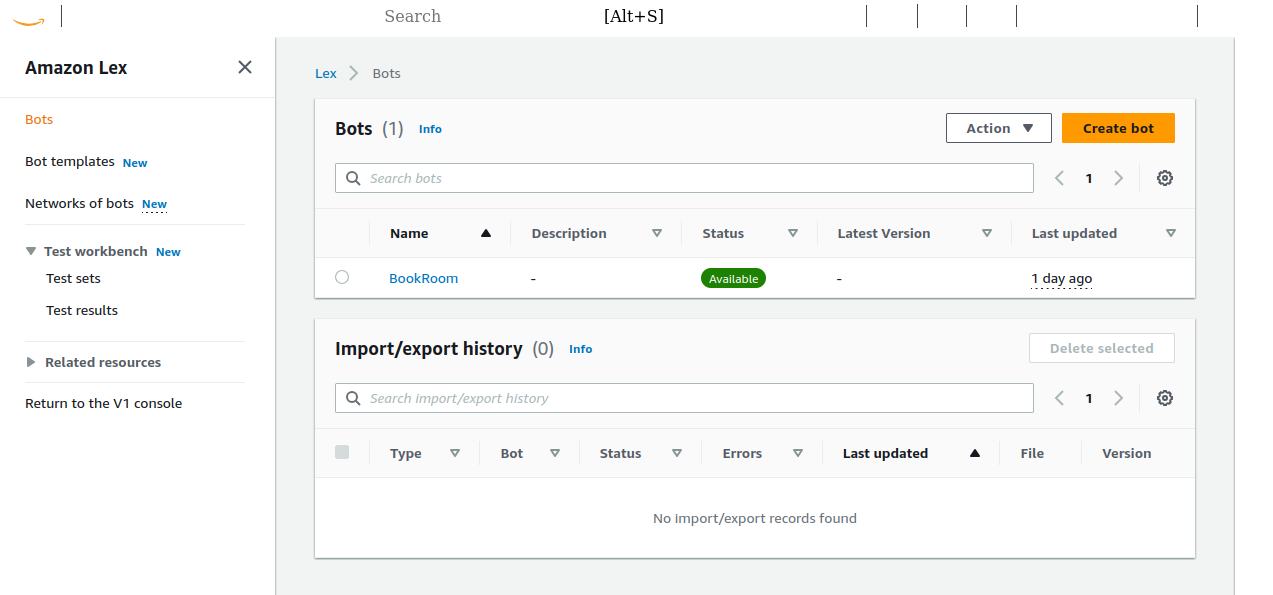
Amazon Lex Bots homepage.
This will lead to the configuration page for a new bot. It shows two methods of creating bots: Traditional and Generative AI.

Create a new bot.
We want to learn the process of setting up and configuring bots. So, choose the Traditional method and start with a blank bot.
You don’t need to update the optional advanced settings; just go to the next section.
You must also set up the bot’s language(s) because Lex bots are based on natural language processing (NLP).
Then, you’ll be led to the Intents page, which we will configure in the next section.
Having created a basic bot, I now explain how to configure it for our desired use case: booking a cab.
As the name suggests, intents represent the user’s intention or the goal of the conversation. For example, the user might want to book a hotel or a flight. Each bot can serve multiple goals.
Provided a few example texts (called sample utterances) for each intent, Lex uses NLP to recognize and match the user’s input to the right intent based on these utterances. For example, a taxi booking bot can have sample utterances such as “I want to book a cab,” “book me a cab from X to Y on this date,” etc.
After selecting Done on the bot creation page in the previous step, you will be taken to the page where you can create a new intent called NewIntent.
On the Intent page:
Lex needs a few sample utterances for each intent to recognize whether the user’s need matches the current intent.
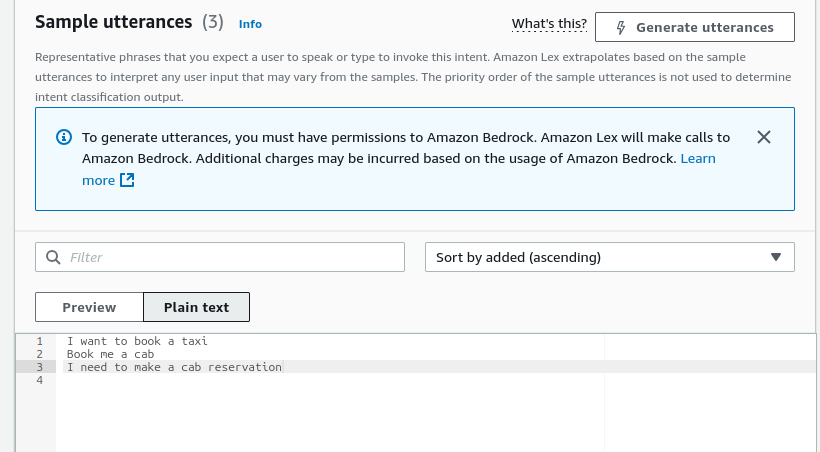
Sample utterances.
Lex bots follow a predefined conversation structure. The conversation flow outlines and gives the specifications for the components of the conversation. In this section, I explain how to design the conversation to communicate with the user and get the information needed to fulfill their request.
The bot needs to prompt the user for relevant information. Slots contain information that the bot needs to fulfill the user’s request. For example, the cab booking bot receives the starting and destination cities and the journey date as slot values.
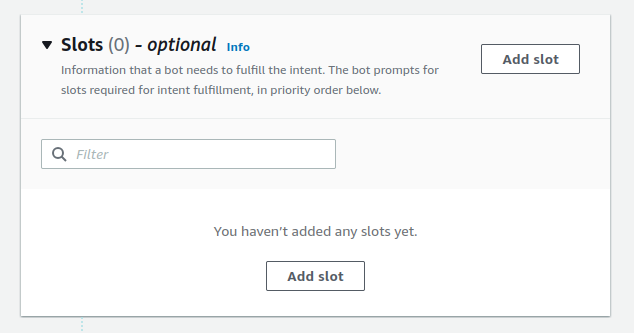
Add slots to intents.
For each slot, you need to specify these parameters:
SourceCity slot entered by the user.AMAZON.City, AMAZON.Date, etc. You can also add custom slot types (discussed later).|
Slot name |
Slot type |
Prompt |
|
SourceCity |
AMAZON.City |
Which city will you be traveling from? |
|
DestinationCity |
AMAZON.City |
Which city will you be traveling to? |
|
TravelDate |
AMAZON.Date |
On what date will you be traveling? |
Inbuilt slot types are not always sufficient for all use cases. For example, a cab booking service might have a slot type for the kind of car (compact, hatchback, sedan, SUV, etc.) the user wants.
To add a custom slot:
CabType) and a description for the new slot type. In this case, we have a few predetermined cab types. So, we restrict our slot values to these types.
Limo is an acceptable value for Limousine. 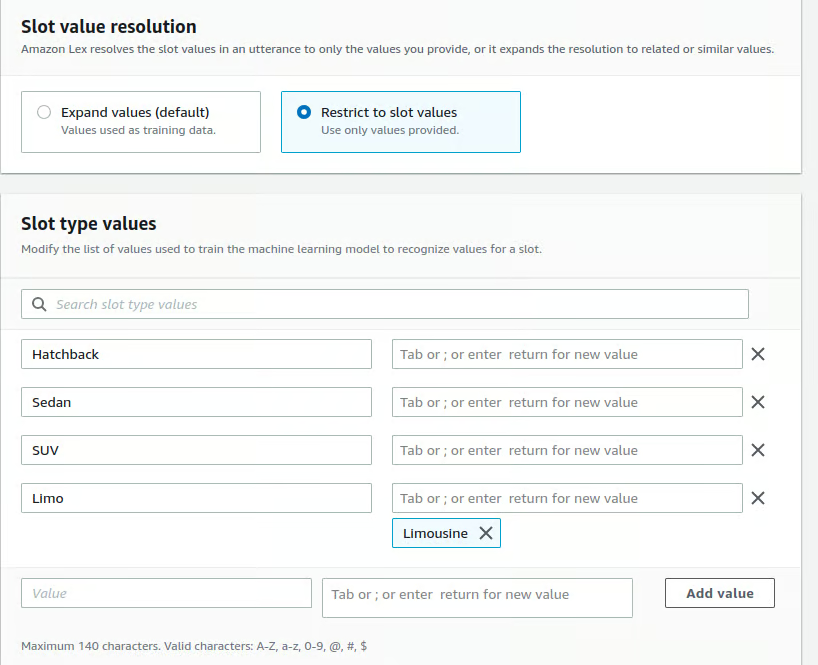
Custom slots.
When the user provides an invalid response to a prompt asking for a slot value, Lex repeats the prompt. The session terminates when the user repeatedly fails to give a proper response (like a valid city name).
Set up Lex to throw an error message (before terminating the session) if the user repeatedly fails to provide a valid slot value:

Error handling and failure response.
All bots have a FallbackIntent, which is invoked when the user’s input doesn’t match the existing intents. Because this intent is invoked as the default, its utterances cannot be customized.
FallbackIntent and end the conversation. 
Closing response.
Confirm the user’s intent after getting the appropriate values for the slots and before fulfilling the request.
It is common to include the slot values in the confirmation prompt. For example: “Please confirm (yes or no) that you want to make a booking from {SourceCity} to {DestinationCity} on {TravelDate}”.
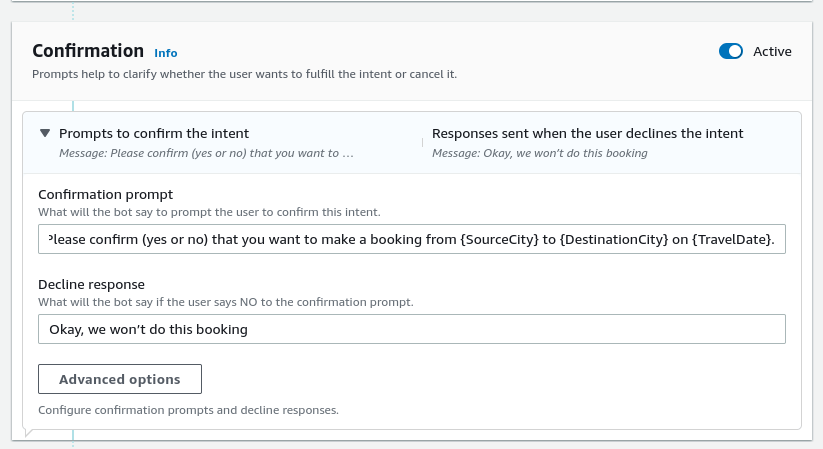
Confirmation prompt.
The fulfillment response indicates to the user that the bot is starting to service their request (booking the cab).
The closing response is the final message sent to the user. For example, “Thank you for traveling with us. Have a safe trip!”.

Fulfillment and closing responses.
Now that we have created the bot and its conversation structure, we can test it!
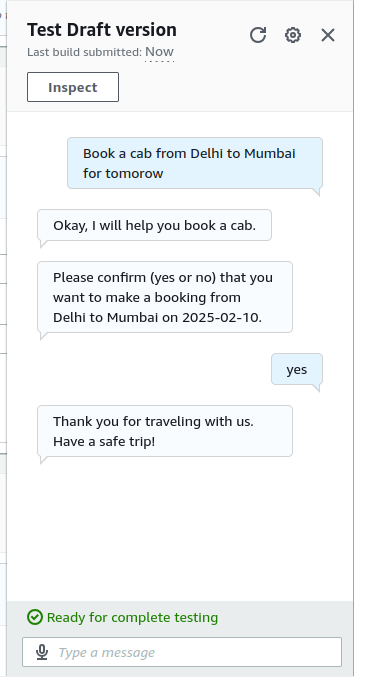
Testing the Amazon Lex bot.
Some of the sections, like Confirmation, Fulfillment, and Closing response, are, in principle, optional. To enable a section, enable the toggle switch.
In some cases, enabling a section or response automatically enables a Lambda function for that section. If a specific section has the Lambda function toggle set to “on” but there is no associated Lambda function, you’ll get an error like the one below:
Cannot call FulfillmentCodeHook for Intent CabBookIntent. BotAlias/LocaleId TestBotAlias/en_US doesn't have an associated Lambda Function.
The above error comes from the Fulfillment section. To resolve it, go to advanced settings in the relevant section and uncheck the option to use a Lambda function.
Another similar error occurs when the flow is misconfigured. For example, consider this error message at the build stage:
'ElicitSlot' next step at 'InitialResponse:CodeHook:Success' in intent 'CabBookIntent' contains invalid slotToElicit setting. slotToElicit must be a required Slot within the intent. Change the slot name in slotToElicit and try your request again.
To resolve this error, go in the Advanced options for the Initial response. Notice that the Dialog Code hook toggle is active. However, at this stage, we have not yet enabled Lamba functions nor configured them to initialize the conversation. Deactivate the code hook and update the bot; it should build normally.
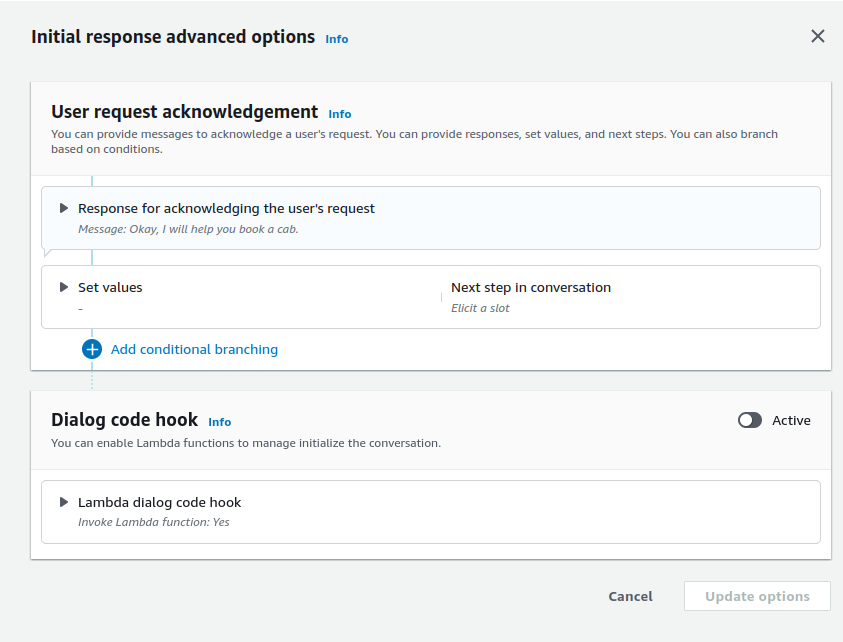
Advanced options for initial response.
Lex bots work by default with both text and voice.
Amazon Polly converts text to natural speech. It is used in speech-based applications, like newsreaders, games, bots, etc., to generate human-like speech from text. Since 2021, Amazon Lex has supported Amazon Polly Neural Text-to-Speech (NTTS). Thus, the Lex bot can directly generate natural-sounding voice responses.
To configure the bot’s voice:
In practice, a bot needs to communicate with other backend services. For example, a cab booking bot needs to send the trip information to an API endpoint and receive a successful response. Lambda functions help do this.
AWS Lambda functions are a way to write server-side logic and execute it without having to explicitly rent a VPS or compute instances.
To start with Lambda functions:
Python 3.x (3.13 at the time of writing) as the language and x86_64 as the processor to run the function. Below, we show a short Lambda function that sends a success message in the Fulfillment section:
import json
import urllib.request

def lambda_handler(event, context):
    slots = event['sessionState']['intent']['slots']
    intent = event['sessionState']['intent']['name']

    if event['invocationSource'] == 'FulfillmentCodeHook':
        message = "Lambda has placed your reservation"
        response = {
            "sessionState": {
                "dialogAction": {
                    "type": "Close"
                },
                "intent": {
                    'name':intent,
                    'slots': slots,
                    'state':'Fulfilled'
                    }
            },
            "messages": [
                {
                    "contentType": "PlainText",
                    "content": message
                }
            ]
        }
        return response
Configure the Bot to call this Lambda function:
$LATEST. Leave it unchanged. In this example, we want to use the Lambda function at the fulfillment stage:
Now, the response comes from the Lambda function:
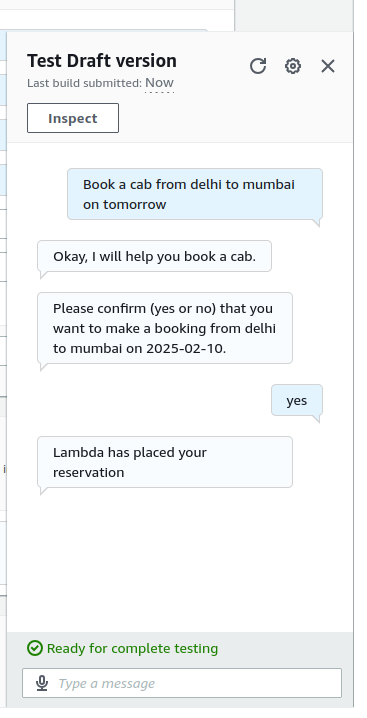
Testing the Lambda function integrated with the Lex bot.
After creating and testing the Lex bot, we are ready to deploy it. Deployment is a complex topic whose specifics depend on the individual use case. In this section, I provide an overview of various common deployment methods.
Lex can be integrated into web apps and mobile apps using the API, the SDK, or prebuilt libraries:
The steps below give an outline of how to deploy the chatbot as a webpage:
ChatBotUiLoader, which includes FullPageLoader() and IframeLoader constructors. These constructors’ load() function loads the bot in the page or iFrame, respectively..load() function. The snippet below shows the outline of a JavaScript function that deploys a Lex bot on a webpage:
 <!-- LexWebUi loader -->
  <script src="./lex-web-ui-loader.js"></script>
  <script>
    // instantiate the loader
    var lexWebUiLoader = new ChatBotUiLoader.FullPageLoader();

    var chatbotUiconfig = {
     cognito: {
       poolId:
     },
     lex: {
        initialText: 'How can I help you?',
        botName: 'CabBookBot'
      },
      ui: {
        toolbarTitle: 'Cab Booking Lex Bot',
        toolbarLogo: ''
      },
    };

    lexWebUiLoader.load(chatbotUiConfig)
      .then(function () {
        console.log('chatbot UI loaded');
      })
      .catch(function (error) {
        console.error('chatbot UI failed to load', error);
      });
</script>You can integrate the Lex bot with third-party messaging services like Facebook Messenger, Slack, and Twilio SMS.
In this section, we discuss how to integrate Lex with Facebook Messenger. Before starting, you need:
Below, I outline the steps to integrate the Lex bot with Facebook Messenger so that users who message your Facebook page can receive responses from the bot.
Now go to the Lex console and choose the bot you want to integrate with Messenger.
Go back to the Facebook developer console and open the app you created earlier.
You can now message the Facebook page with the Lex bot’s sample utterances and get relevant responses.
We wrote a simple Lambda function for the fulfillment section in the previous section. It only returned a text message: “Lambda has placed your reservation.” In practice, we would send the success message after fulfilling the request.
For example, the Lambda function sends a request with the user’s reservation details to the backend API, which does the booking and then replies to the user based on the API’s response.
Here’s how you would do the above:
slots in the Lambda function contains the slot values. Study its structure using a code beautifier to extract the appropriate values. SourceCity and pass this value to a backend API that handles the reservations. Add this code inside the lambda_handler() function:slots = event['sessionState']['intent']['slots']
print("slots - ", slots)
source_city = slots['SourceCity']['value']['interpretedValue']
print("source city - ", source_city)I now show how to make API requests from the Lambda function. For this example, we use the dummy API endpoint at ASDFast. This service allows you to send HTTP(S) requests to an API endpoint and receive a realistic response.
GET request to this endpoint. We then customize the message the bot sends to the user depending on the response status code of the GET request: res = urllib.request.urlopen(urllib.request.Request(
url='http://asdfast.beobit.net/api/',
headers={'Accept': 'application/json'},
method='GET'),
timeout=5)
message_success = "Lambda has placed your reservation"
message_failure = "Lambda could not place your reservation. Please retry."
message = message_success if res.status == 200 else message_failureThe complete Lambda function is shown below:
import json
import urllib.request
def lambda_handler(event, context):
print("event - ", event)
slots = event['sessionState']['intent']['slots']
intent = event['sessionState']['intent']['name']
print("slots - ", slots)
source_city = slots['SourceCity']['value']['interpretedValue']
print("source city - ", source_city)
print("intent - ", intent)
if event['invocationSource'] == 'FulfillmentCodeHook':
print("FulfillmentCodeHook")
       res = urllib.request.urlopen(urllib.request.Request(
           url='http://asdfast.beobit.net/api/',
           headers={'Accept': 'application/json'},
           method='GET'),
           timeout=5)

       message_success = "Lambda has placed your reservation"
       message_failure = "Lambda could not place your reservation. Please retry."
       message = message_success if res.status == 200 else message_failure
#message = "Lambda has placed your reservation"
response = {
"sessionState": {
"dialogAction": {
"type": "Close"
},
"intent": {
'name':intent,
'slots': slots,
'state':'Fulfilled'
}
},
"messages": [
{
"contentType": "PlainText",
"content": message
}
]
}
return responseLearn more about AWS with these courses!
Course
Course
Course
Tutorial
Rahul Sharma
Tutorial
Bex Tuychiev
Tutorial
Moez Ali
Tutorial
Zoumana Keita
Tutorial
Bex Tuychiev
code-along
Adel Nehme