
Track
AWS Cloud Practitioner (CLF-C02)
10 hr
Before you can start syncing files with S3, you'll need to set up and configure the AWS CLI properly. This might sound intimidating if you're new to AWS, but it'll only take a couple of minutes.
Setting up the CLI involves two main steps: installing the tool and configuring it. I'll go over both steps next.
Installing the AWS CLI varies slightly depending on your operating system.
For Windows systems:
For Linux systems:
Run the following three commands through the Terminal:
curl "https://awscli.amazonaws.com/awscli-exe-linux-x86_64.zip" -o "awscliv2.zip"
unzip awscliv2.zip
sudo ./aws/install
For macOS systems:
Assuming you have Homebrew installed, run this one line from the Terminal:
brew install awscliIf you don't have Homebrew, go with these two commands instead:
curl "https://awscli.amazonaws.com/AWSCLIV2.pkg" -o "AWSCLIV2.pkg"
sudo installer -pkg AWSCLIV2.pkg -target /
You can run the aws --version command on all operating systems to verify that AWS CLI was installed. Here's what you should see:
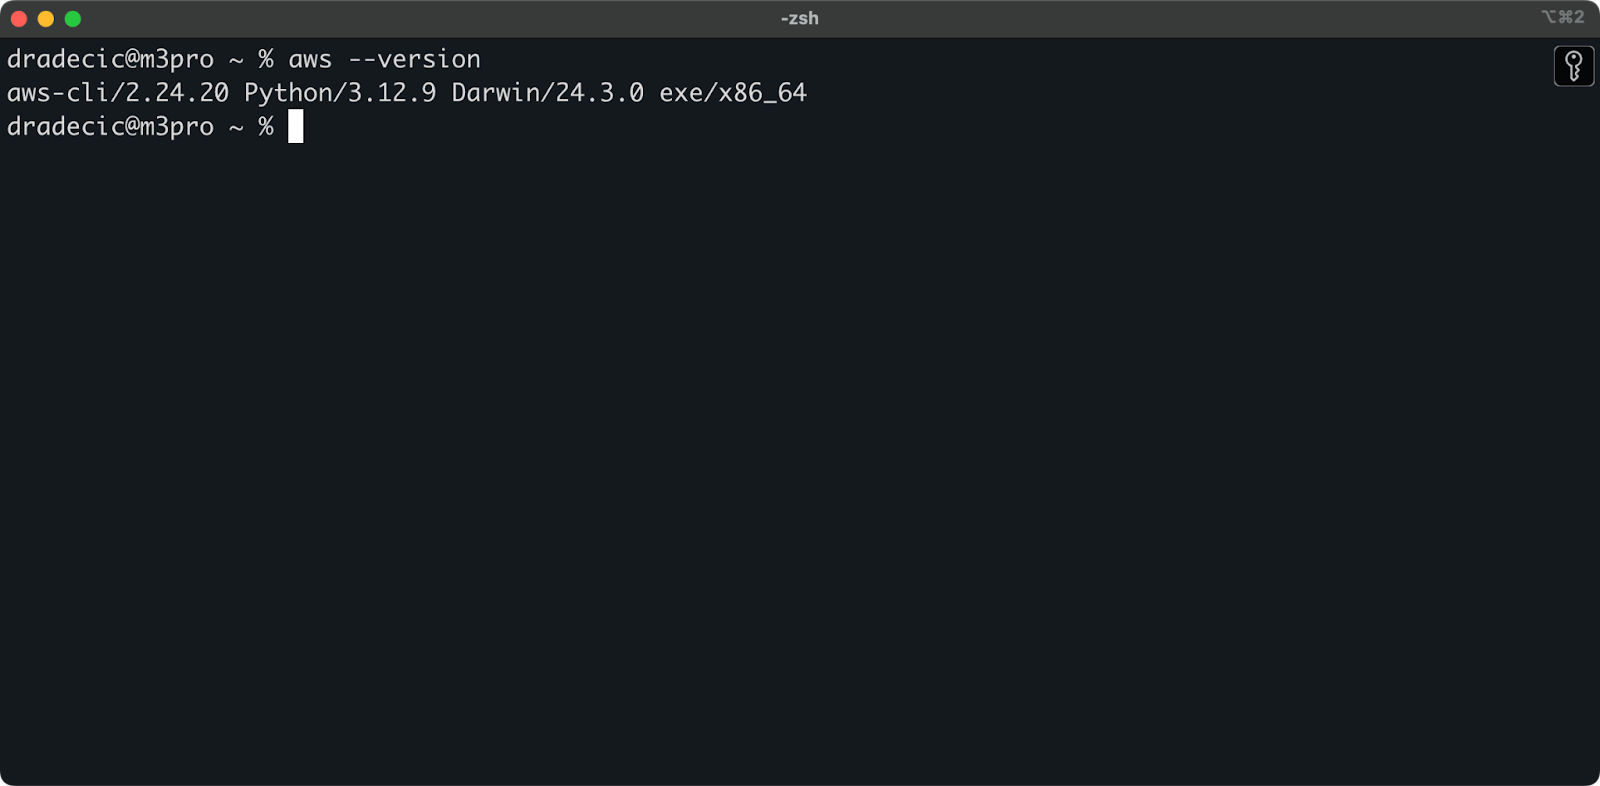
Image 1 - AWS CLI version
Now that you have the CLI installed, you need to configure it with your AWS credentials.
Assuming you already have an AWS account, log in and go to the IAM service. Once there, create a new user with programmatic access. You should assign the appropriate permission to the user, which is S3 access at the minimum:
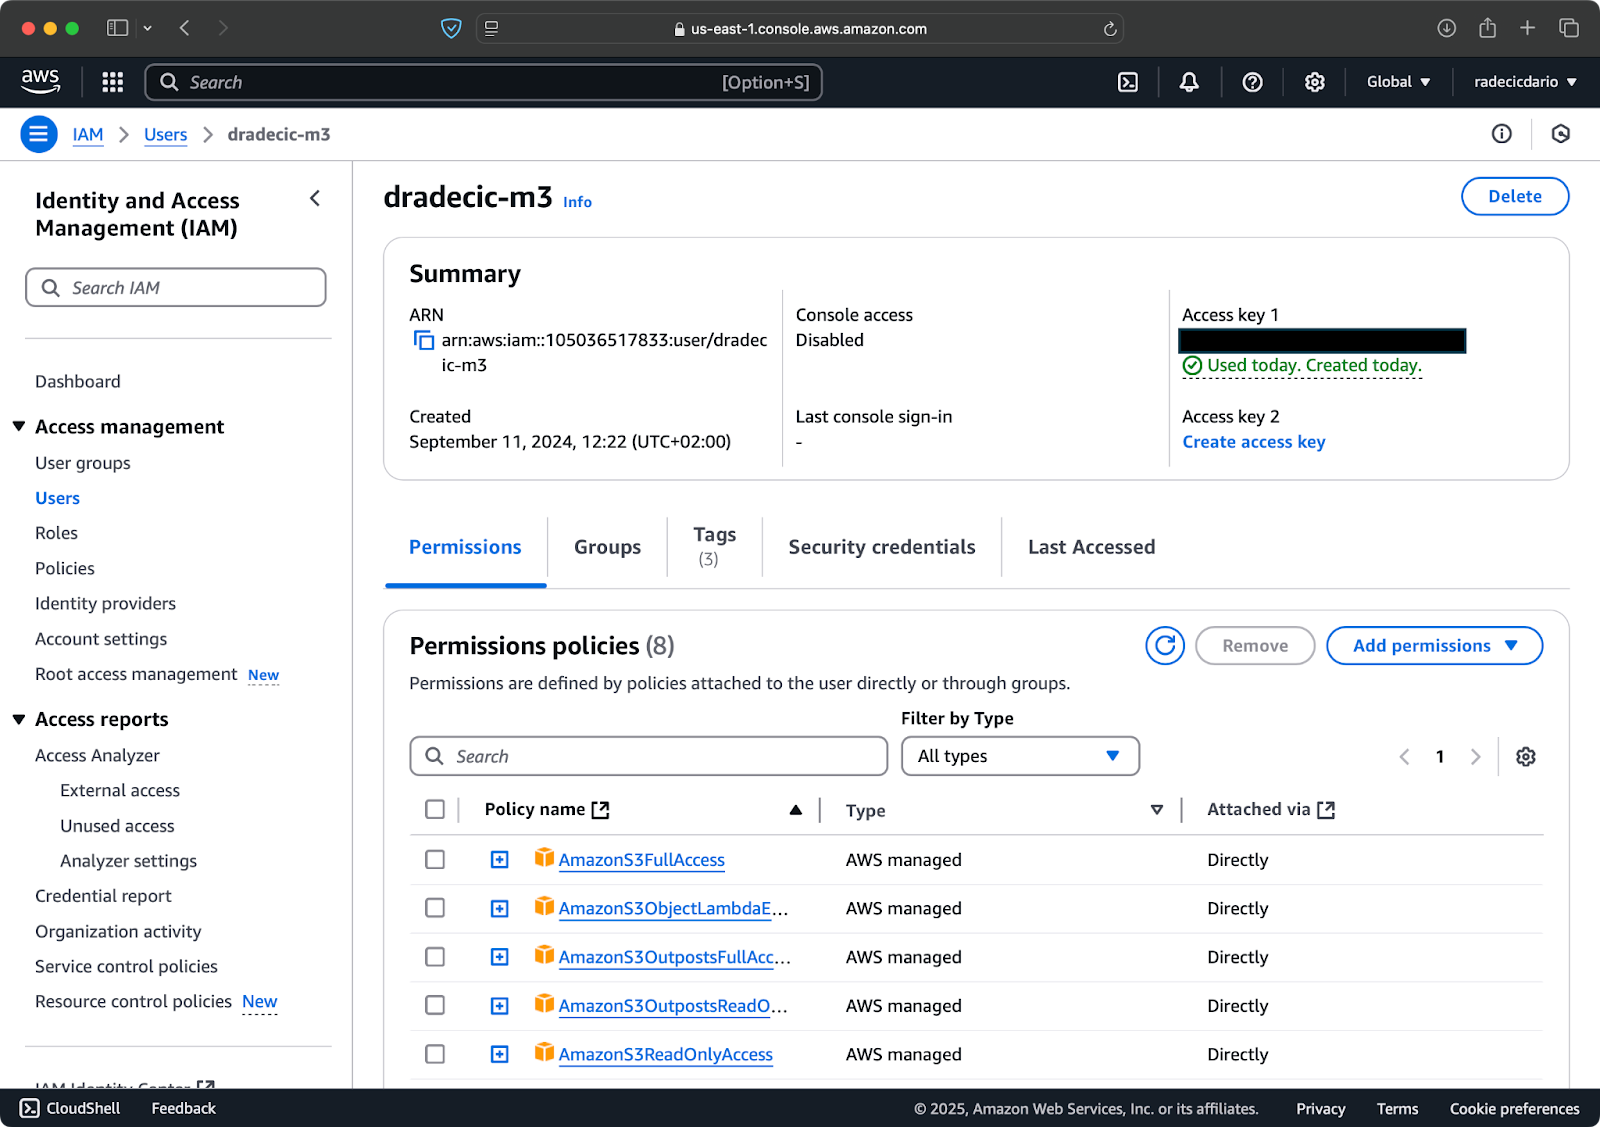
Image 2 - AWS IAM user
Once done, go to "Security credentials" to create a new access key. After creating, you'll have both the Access key ID and Secret access key. Write them down somewhere safe because you won't be able to access them in the future:
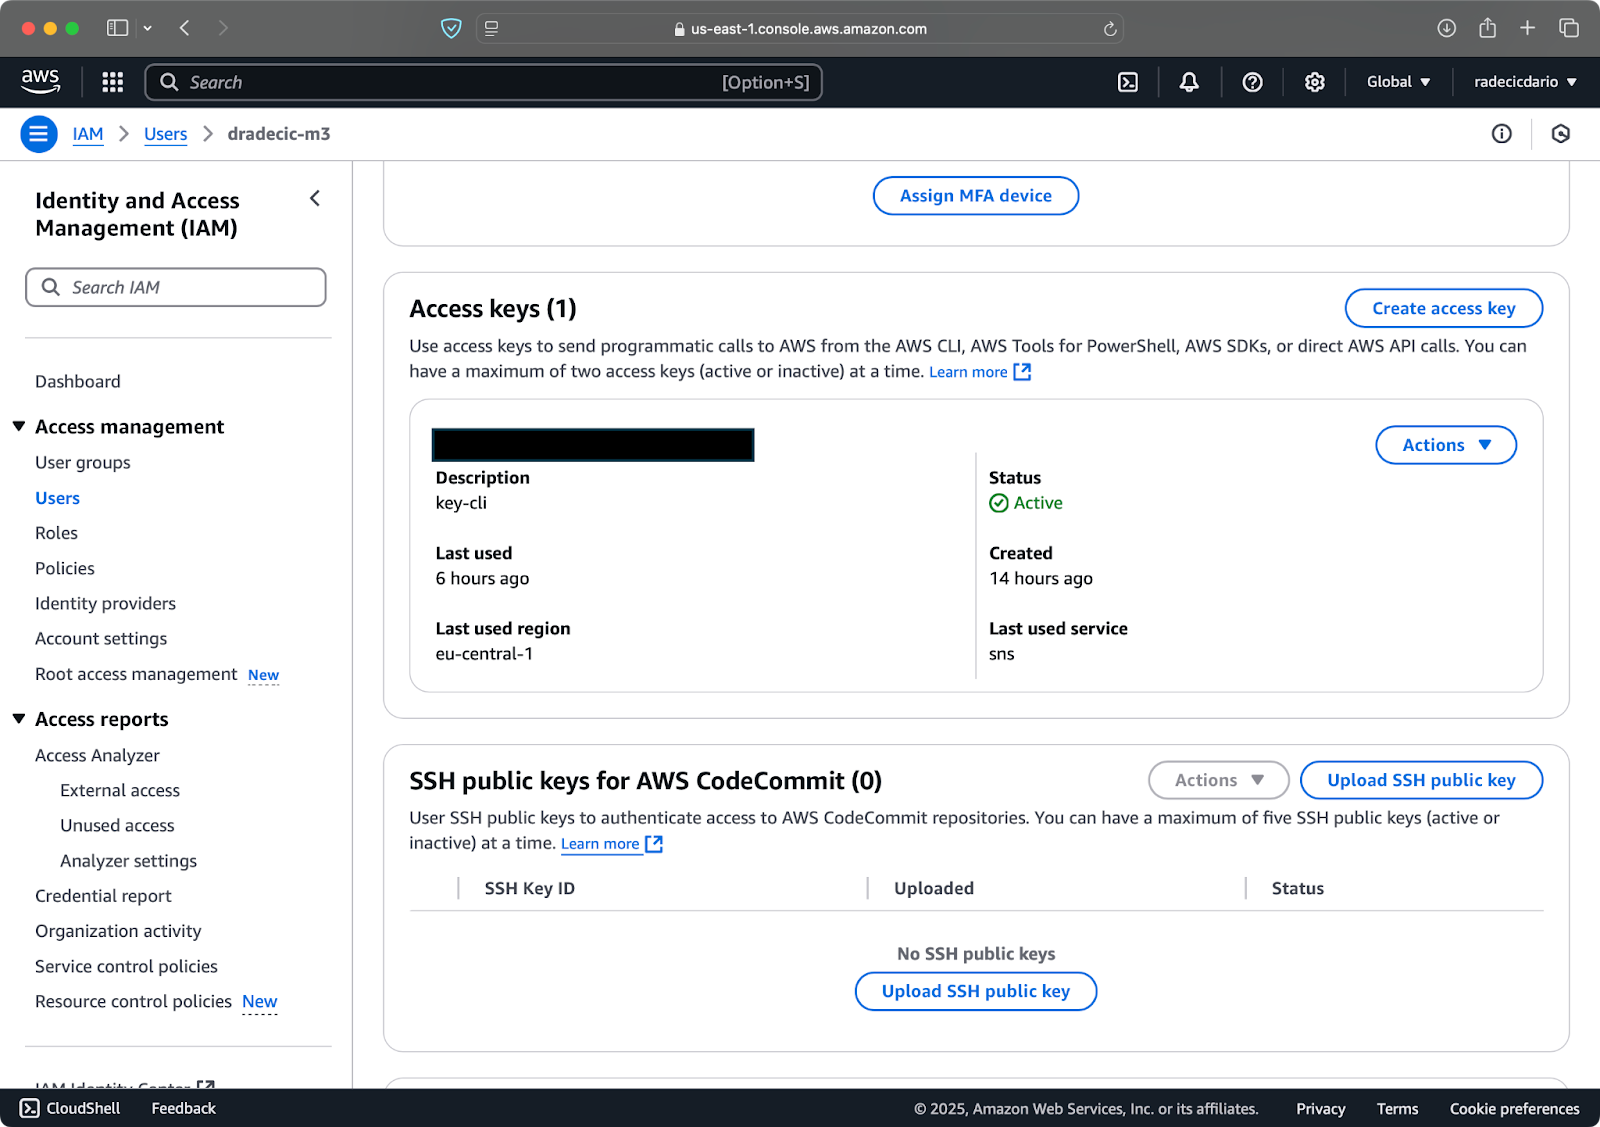
Image 3 - AWS IAM user credentials
Back in the Terminal, run the aws configure command. It will prompt you to enter your Access key ID, Secret access key, region (eu-central-1 in my case), and preferred output format (json):
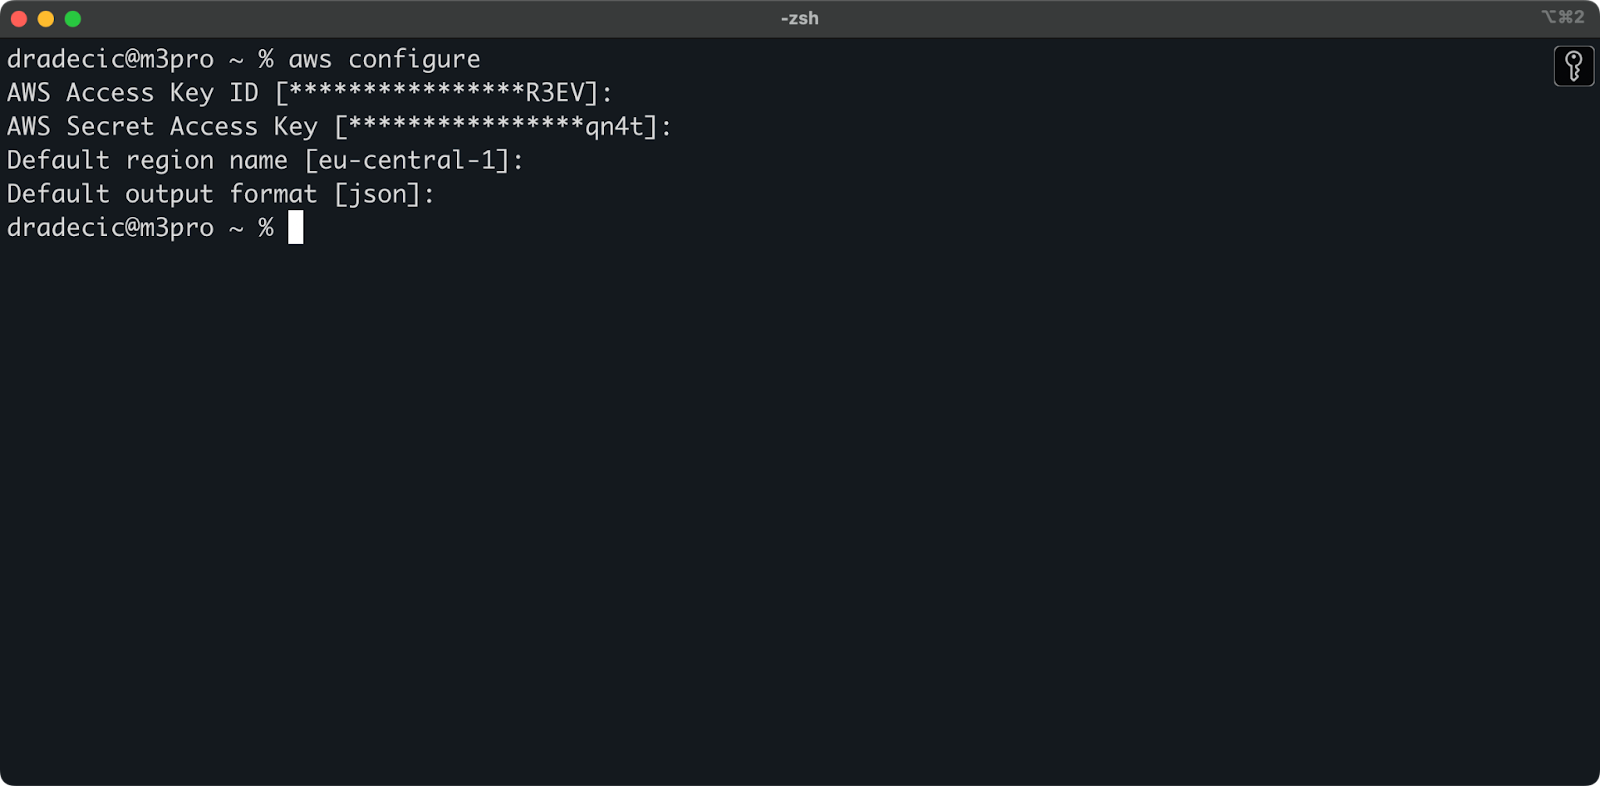
Image 4 - AWS CLI configuration
To verify you're successfully connected to your AWS account from the CLI, run the following command:
aws sts get-caller-identityThis is the output you should see:
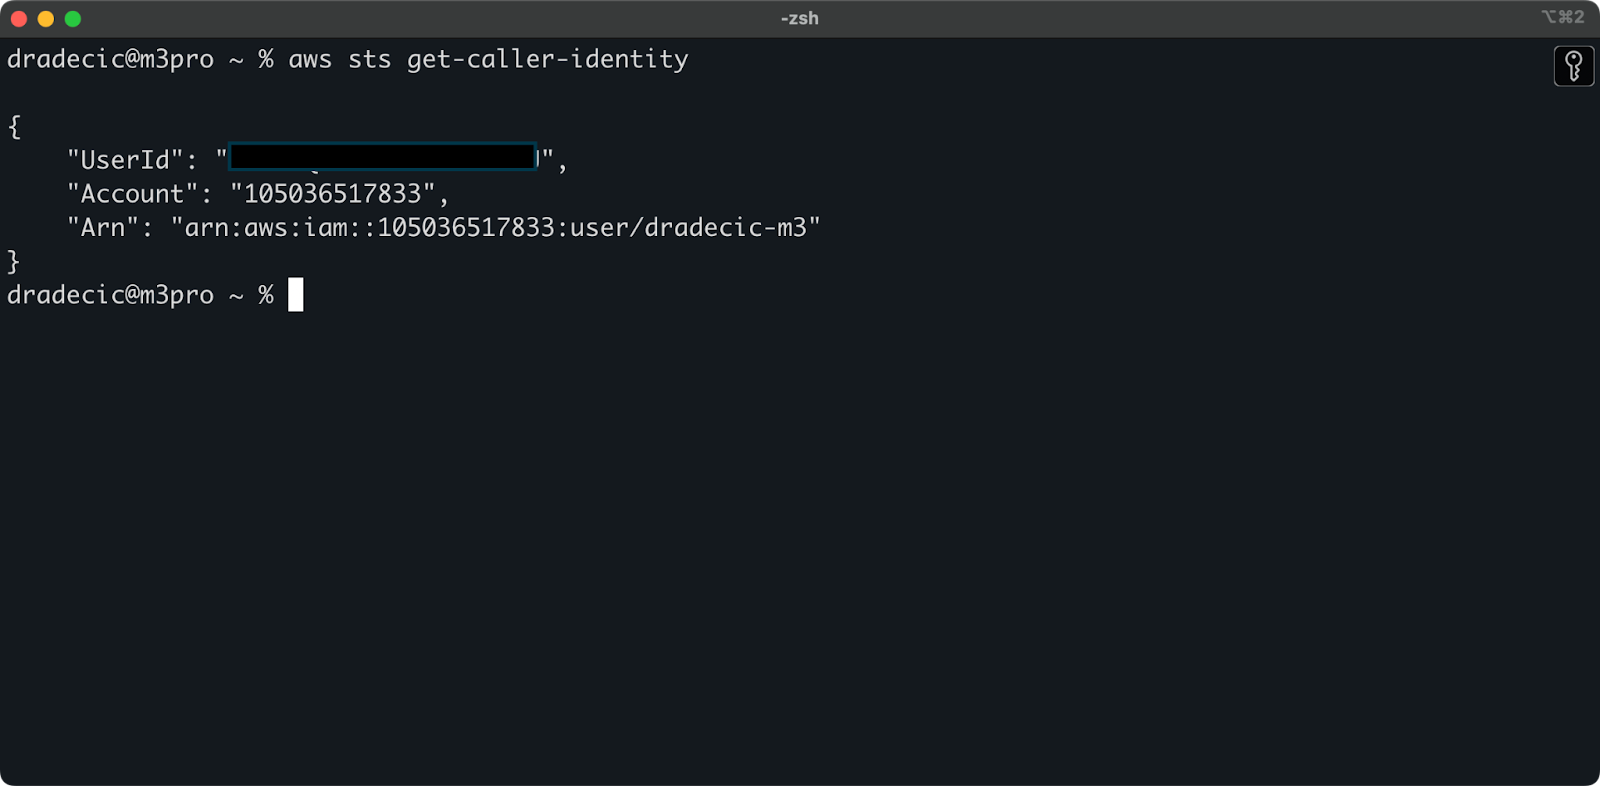
Image 5 - AWS CLI test connection command
And that's it - just one more step before you can start using the S3 sync command!
The final step is to create an S3 bucket that will store your synchronized files. You can do that from the CLI or from the AWS Management Console. I'll go with the latter, just to mix things up.
To start, go to the S3 service page in the Management Console and click on the "Create bucket" button. Once there, choose a unique bucket name (unique globally across all of AWS) and then scroll to the bottom and click on the "Create" button:
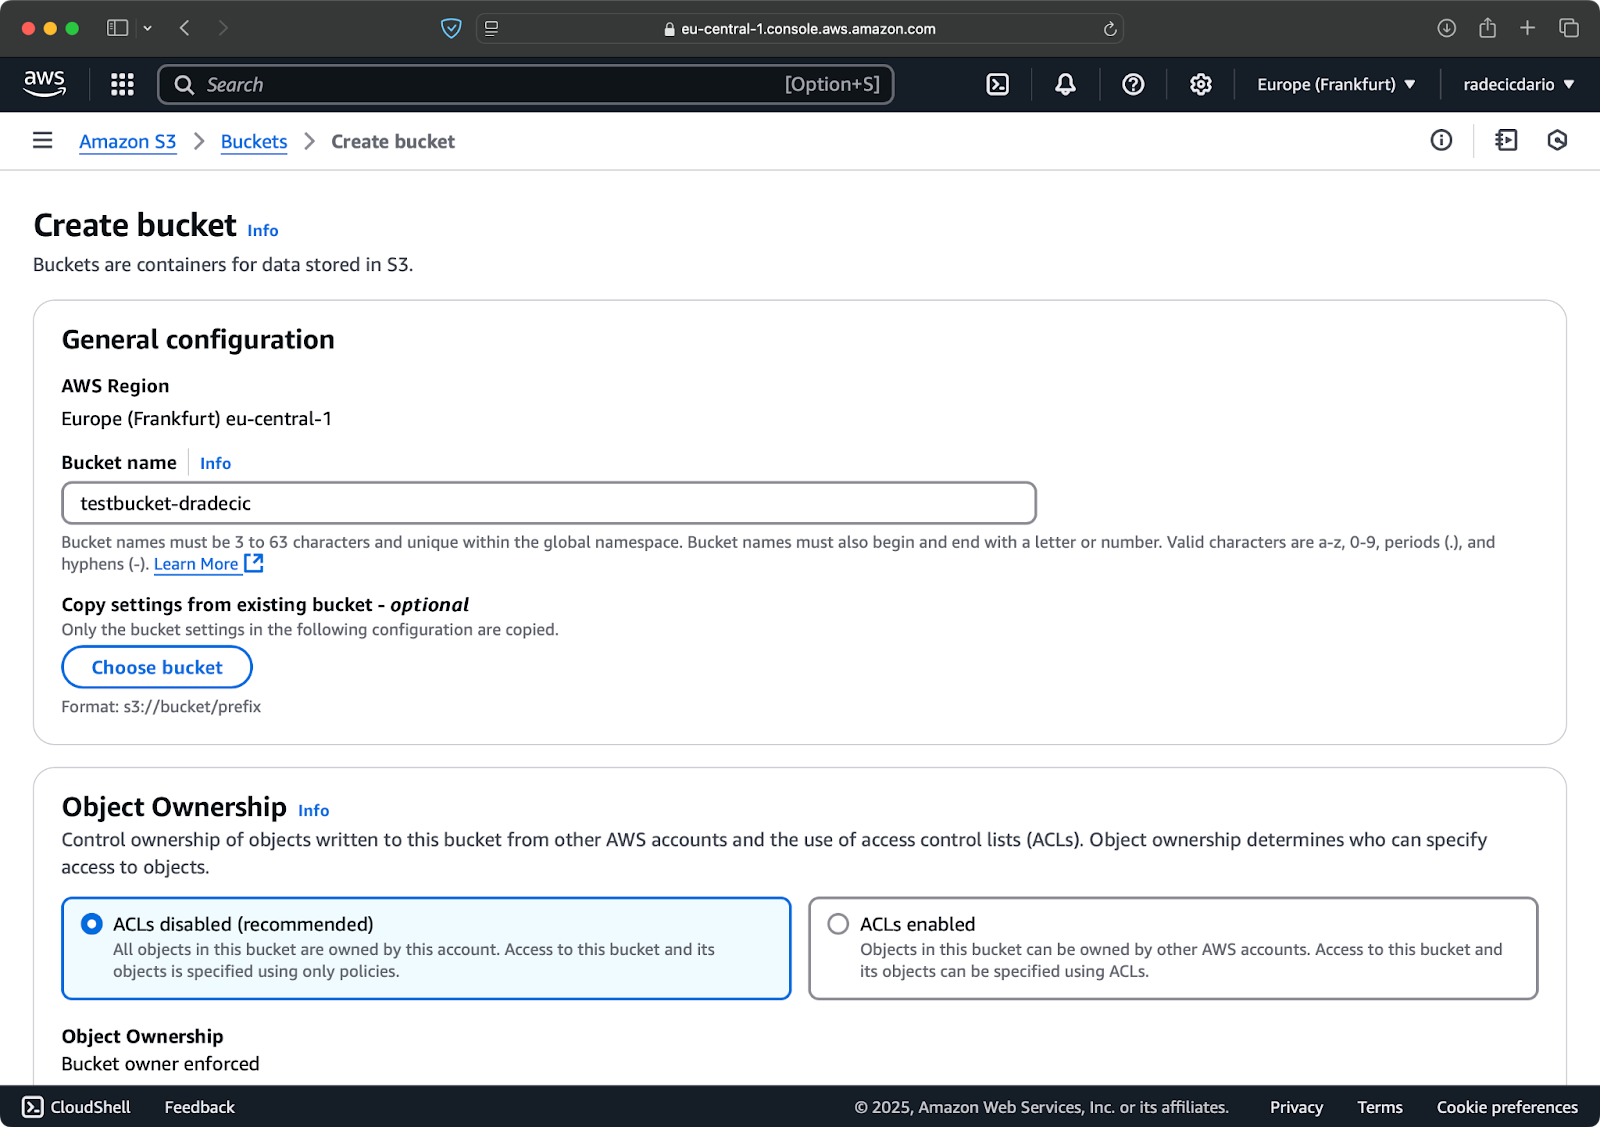
Image 6 - AWS bucket creation
The bucket is now created, and you'll see it immediately in the management console. You can also verify it was created through the CLI:
aws s3 ls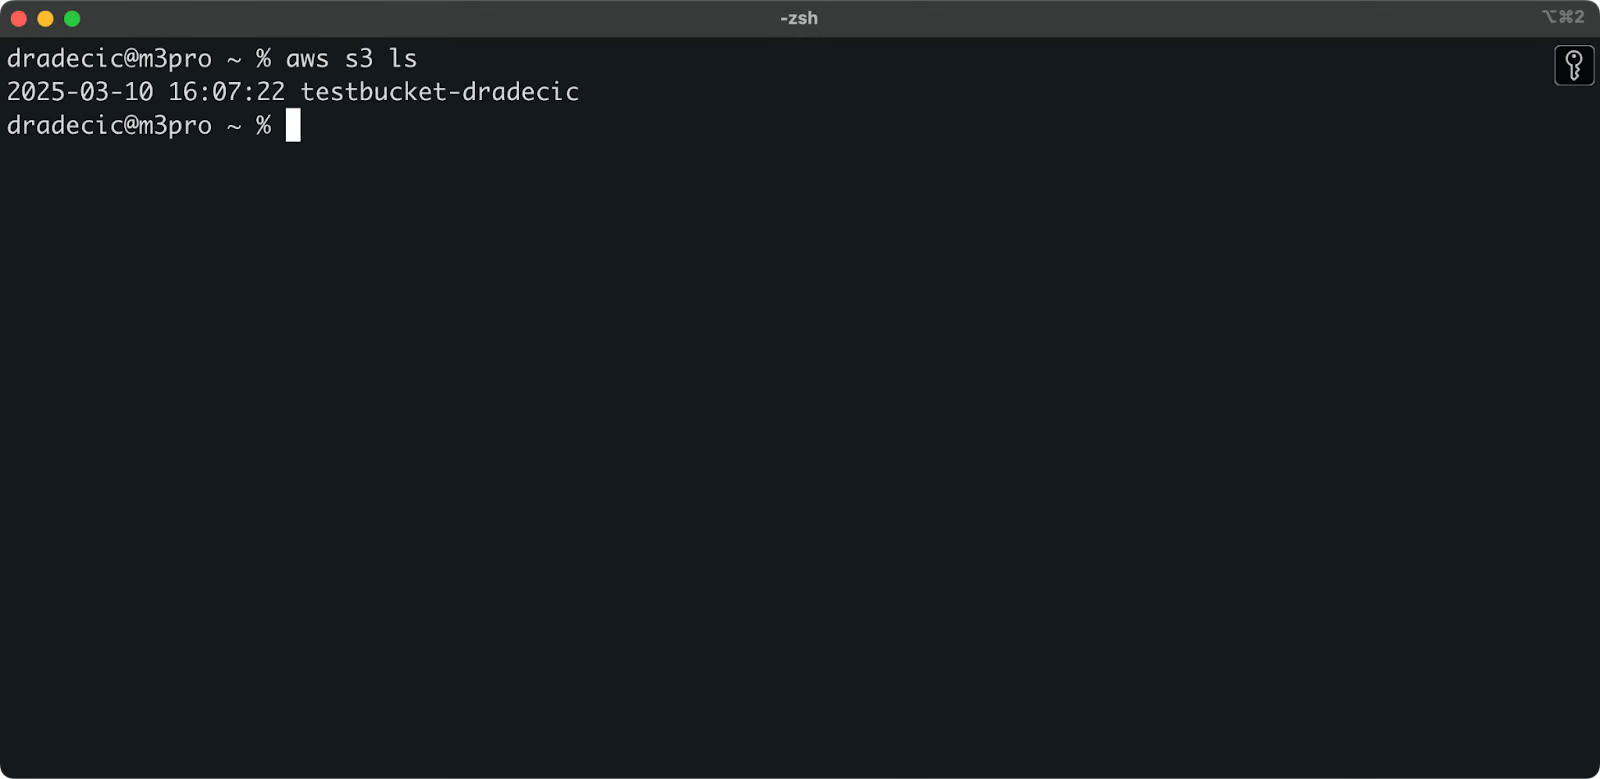
Image 7 - All available S3 buckets
Keep in mind that S3 buckets are private by default. If you're planning to use the bucket for hosting public files (like website assets), you'll need to adjust the bucket policies and permissions accordingly.
Now you're all set up and ready to start syncing files between your local machine and AWS S3!
Now that you have the AWS CLI installed, configured, and an S3 bucket ready to go, it's time to start syncing! The basic syntax for the AWS S3 sync command is pretty straightforward. Let me show you how it works.
The S3 sync command follows this simple pattern:
aws s3 sync <source> <destination> [options]Both the source and destination can be either a local directory path or an S3 URI (starting with s3://). Depending on which way you want to sync, you'll arrange these differently.
I was playing around with Ollama deep research recently. Let's say that's the folder I want to sync to S3. The main directory is located under the Documents folder. Here's what it looks like:
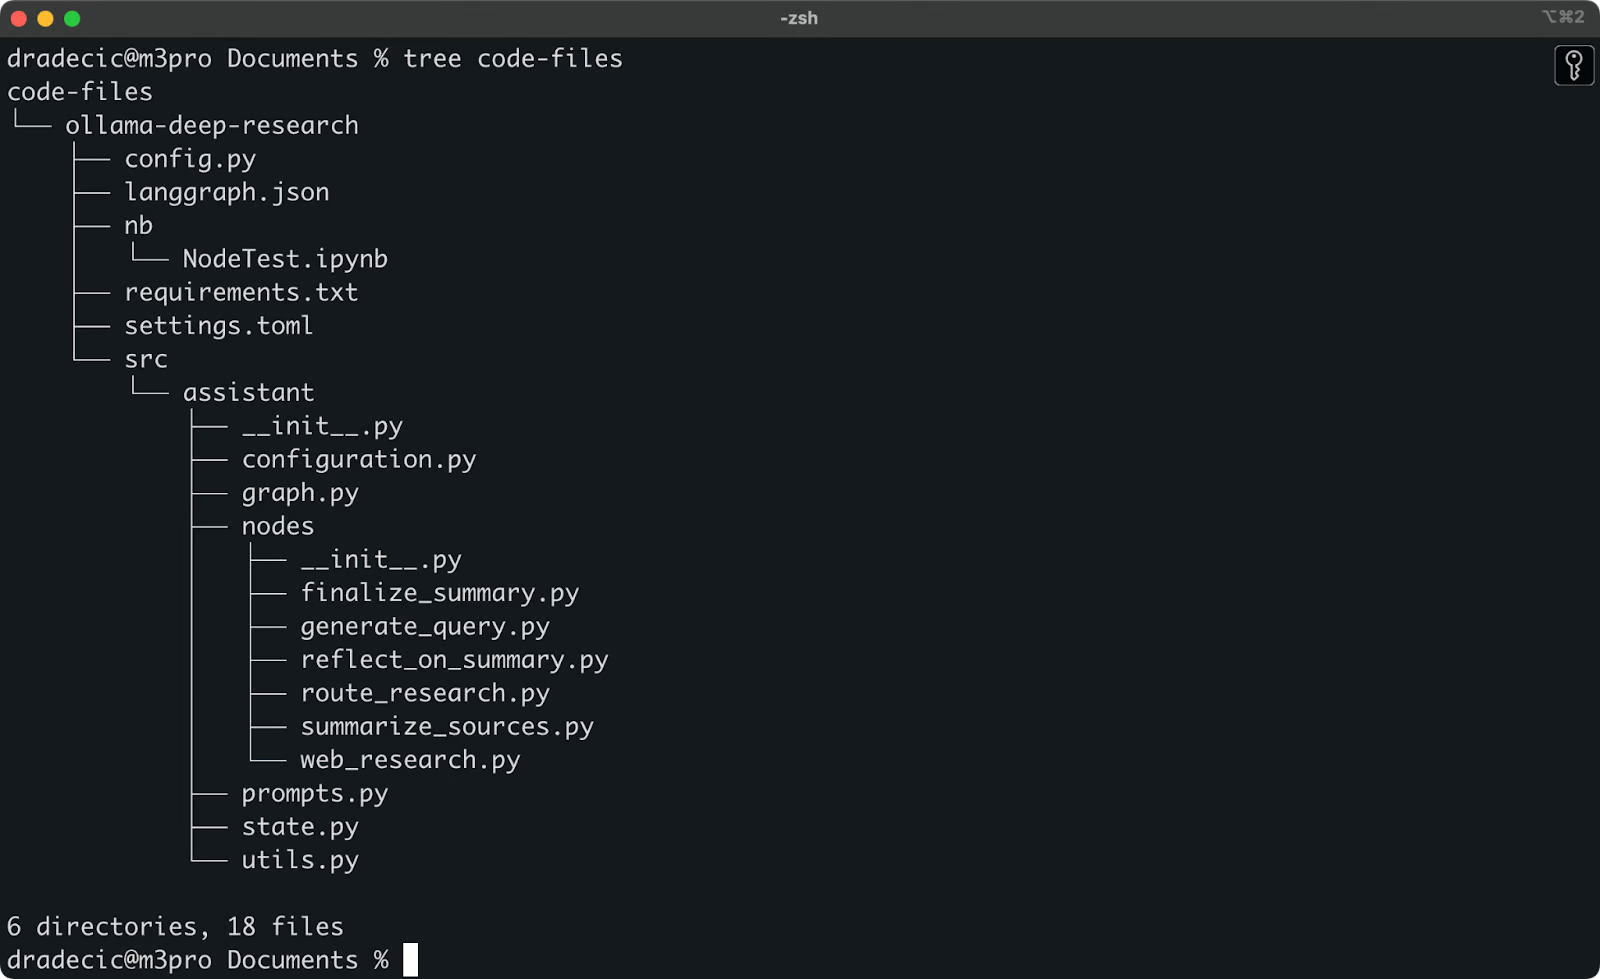
Local folder contents
This is the command I need to run to sync the local code-files folder with the backup folder on the S3 bucket:
aws s3 sync /Users/dradecic/Documents/code-files s3://testbucket-dradecic/backupThe backup folder on the S3 bucket will automatically get created if it doesn't exist.
Here's what you'll see printed on the console:
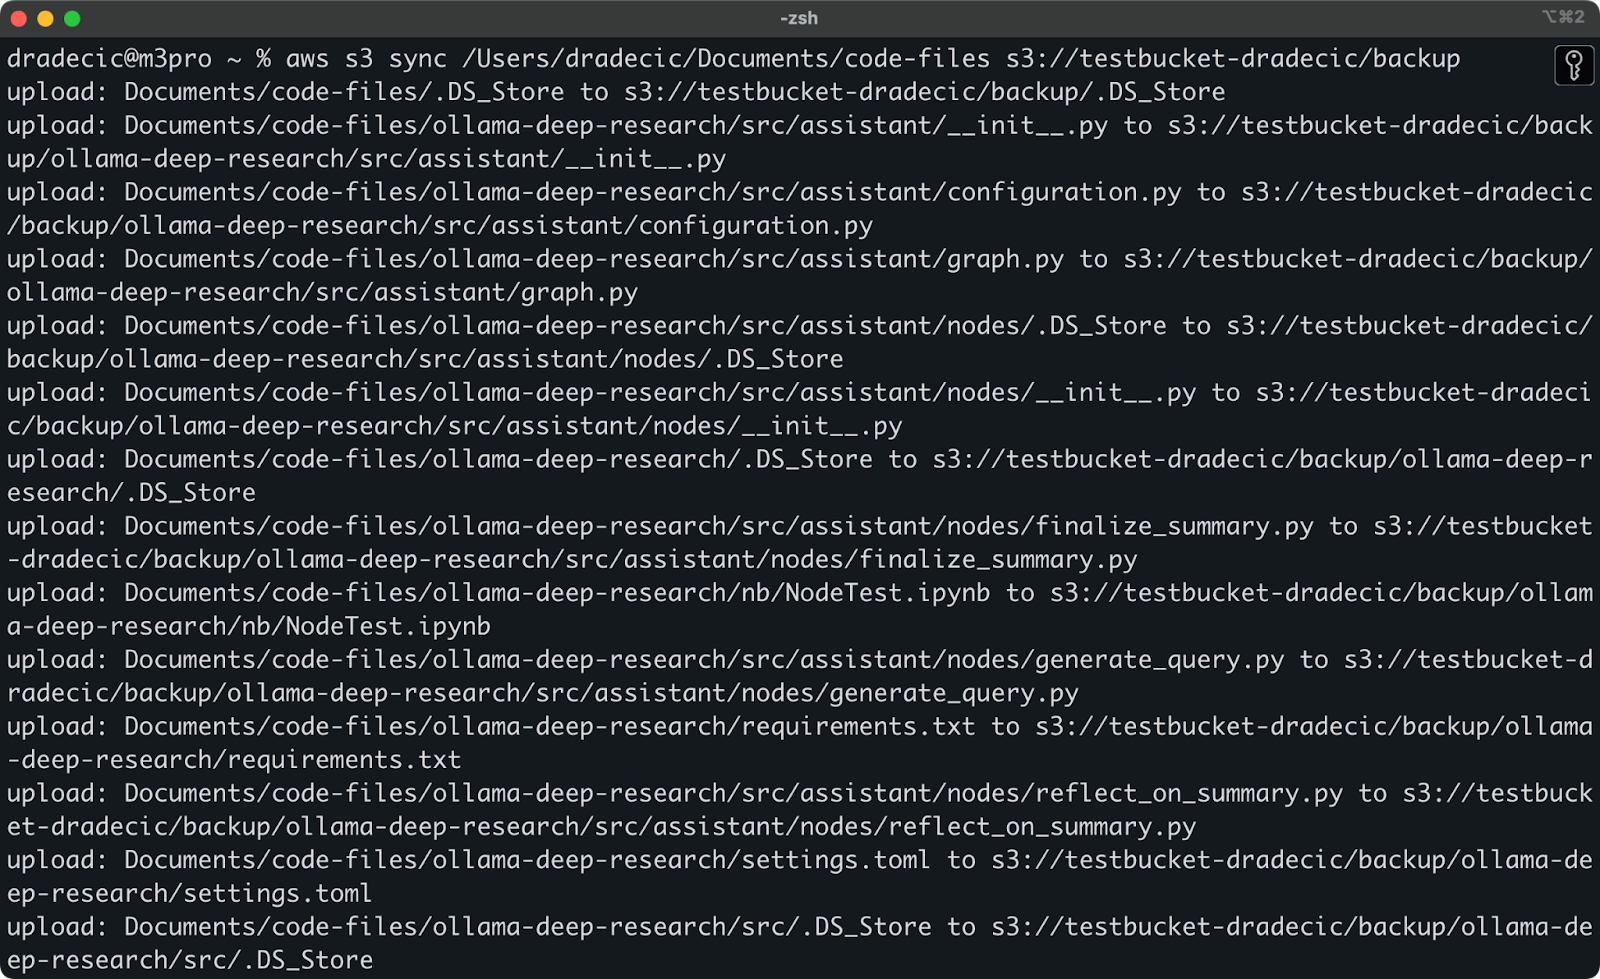
Image 9 - S3 sync process
After a couple of seconds, the contents of the local code-files folder are available on the S3 bucket:
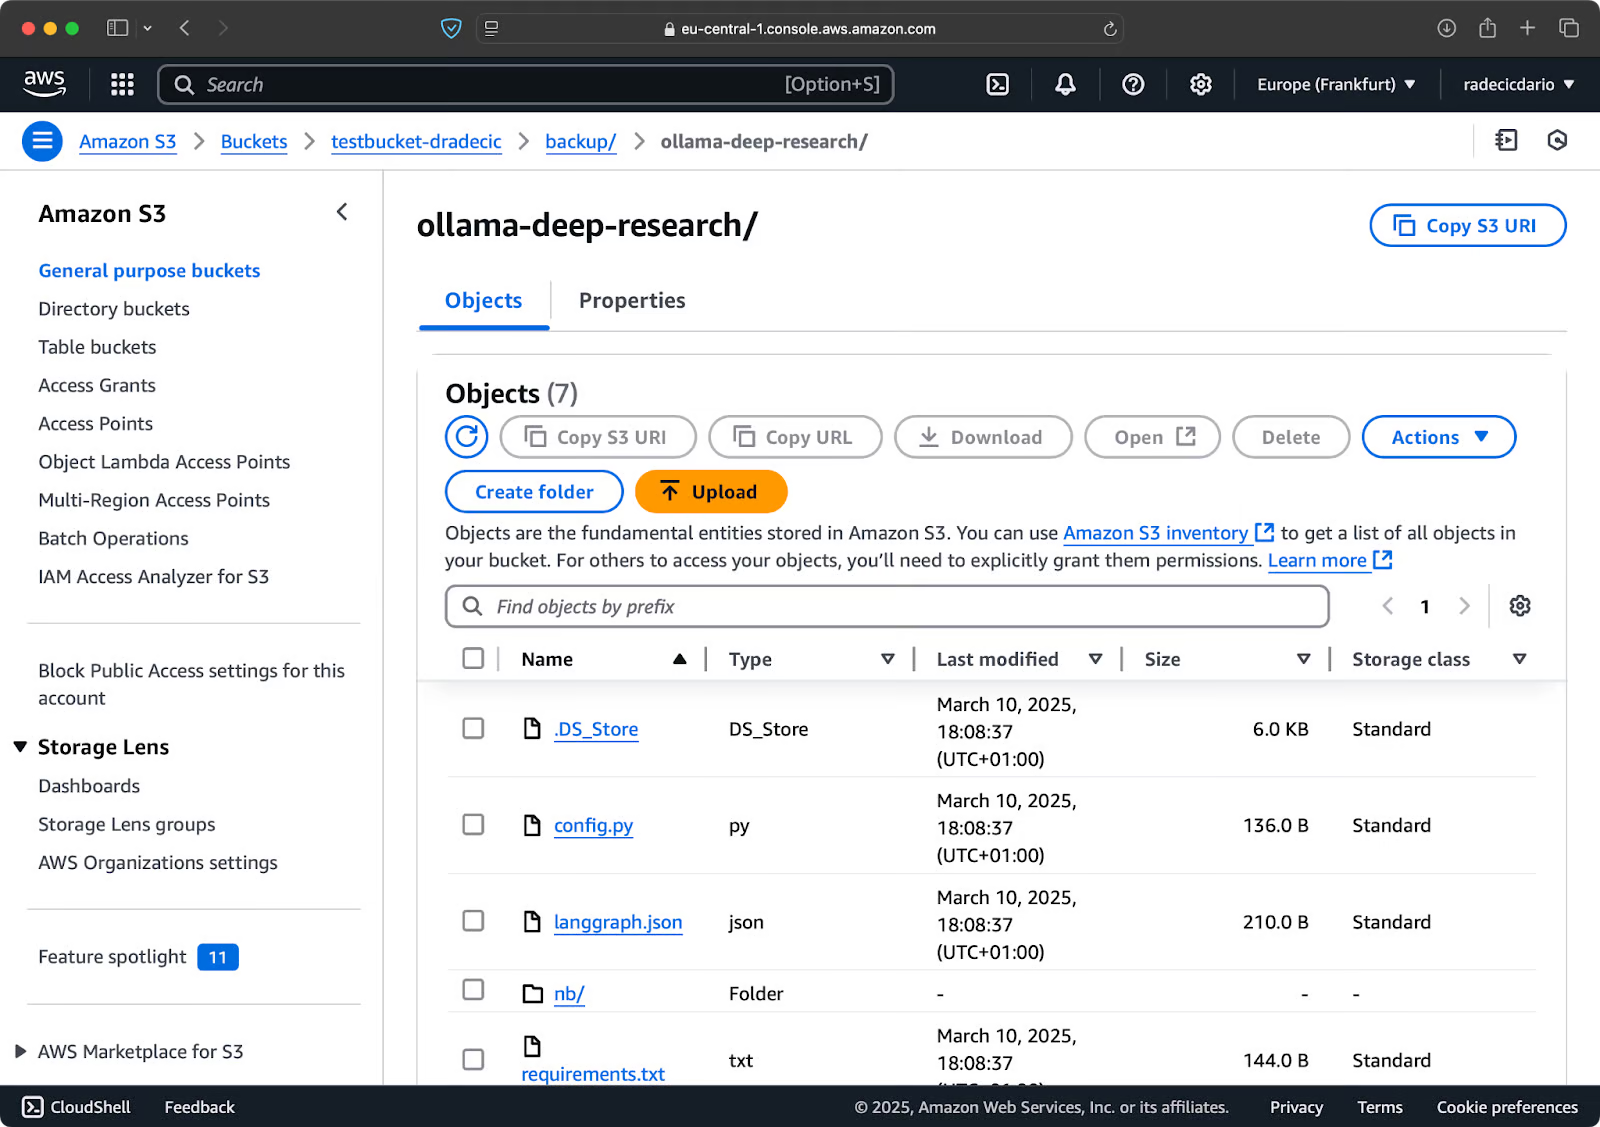
Image 10 - S3 bucket contents
The beauty of S3 sync is that it only uploads files that don't exist in the destination or have been modified locally. If you run the same command again without changing anything, you'll see... nothing! That's because AWS CLI detected that all files are already synced and up to date.
Now, I'll make two small changes - create a new file (new_file.txt) and update an existing one (requirements.txt). When you run the sync command again, only the new or modified files will be uploaded:
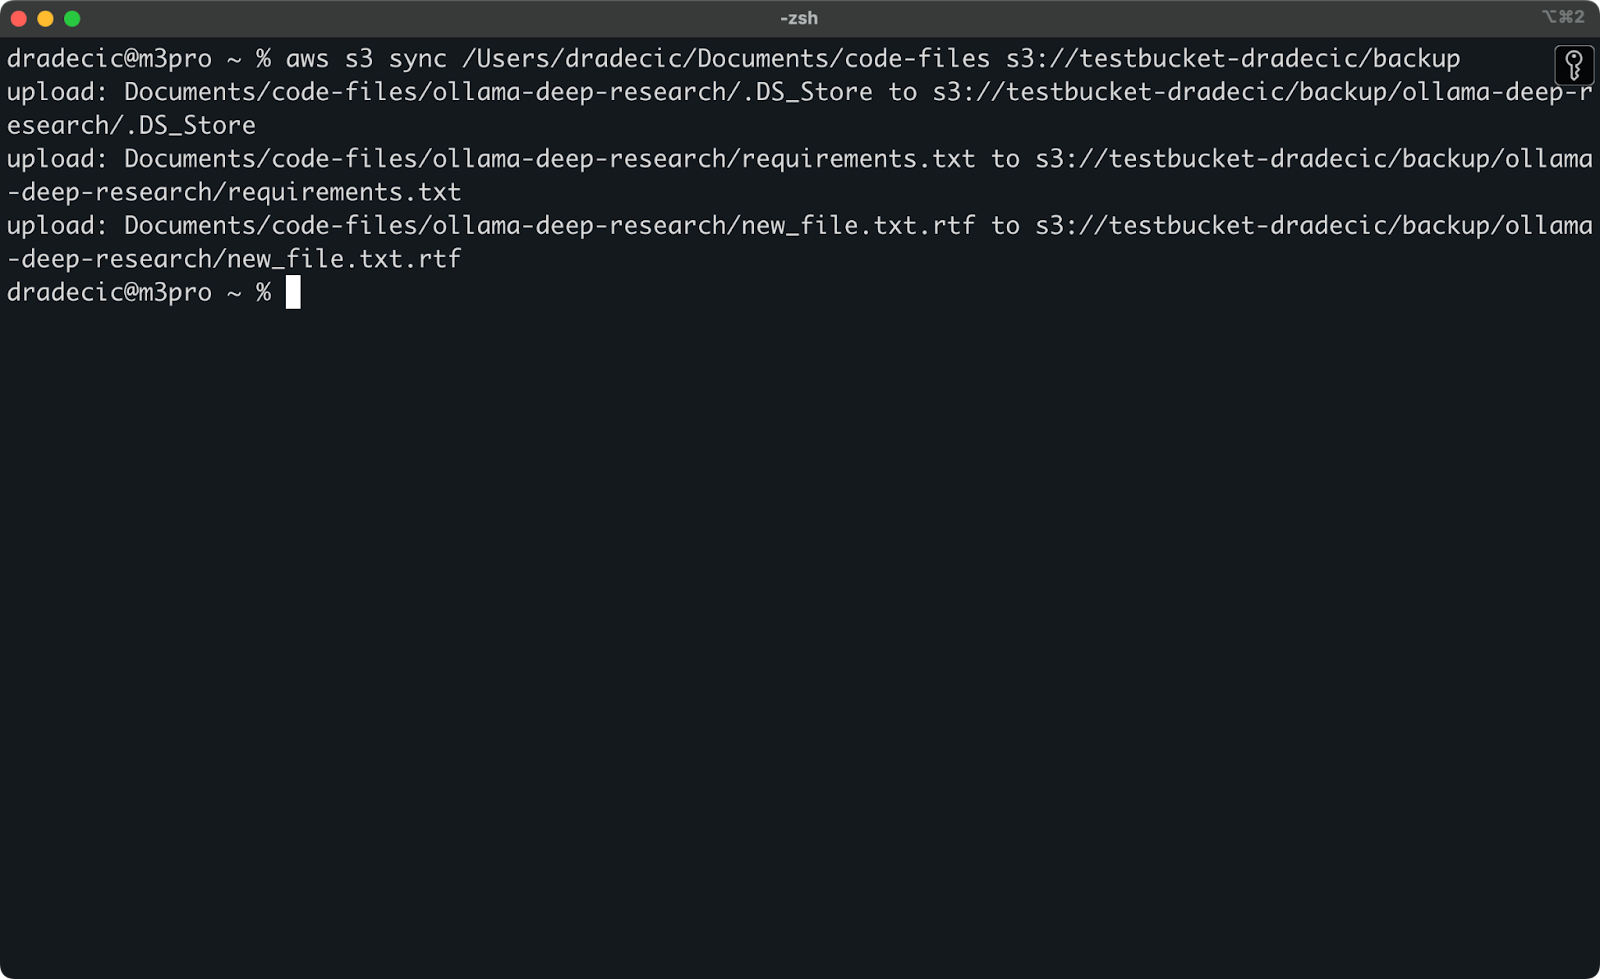
Image 11 - S3 sync process (2)
And that's all you need to know when syncing local folders to S3. But what if you want to go the other way around?
If you want to download files from your S3 bucket to your local machine, just flip the source and destination:
aws s3 sync s3://testbucket-dradecic/backup /Users/dradecic/Documents/code-files-from-s3 This command will download all files from the backup folder in your S3 bucket to a local folder called code-files-from-s3 . Again, if the local folder doesn't exist, the CLI will create it for you:
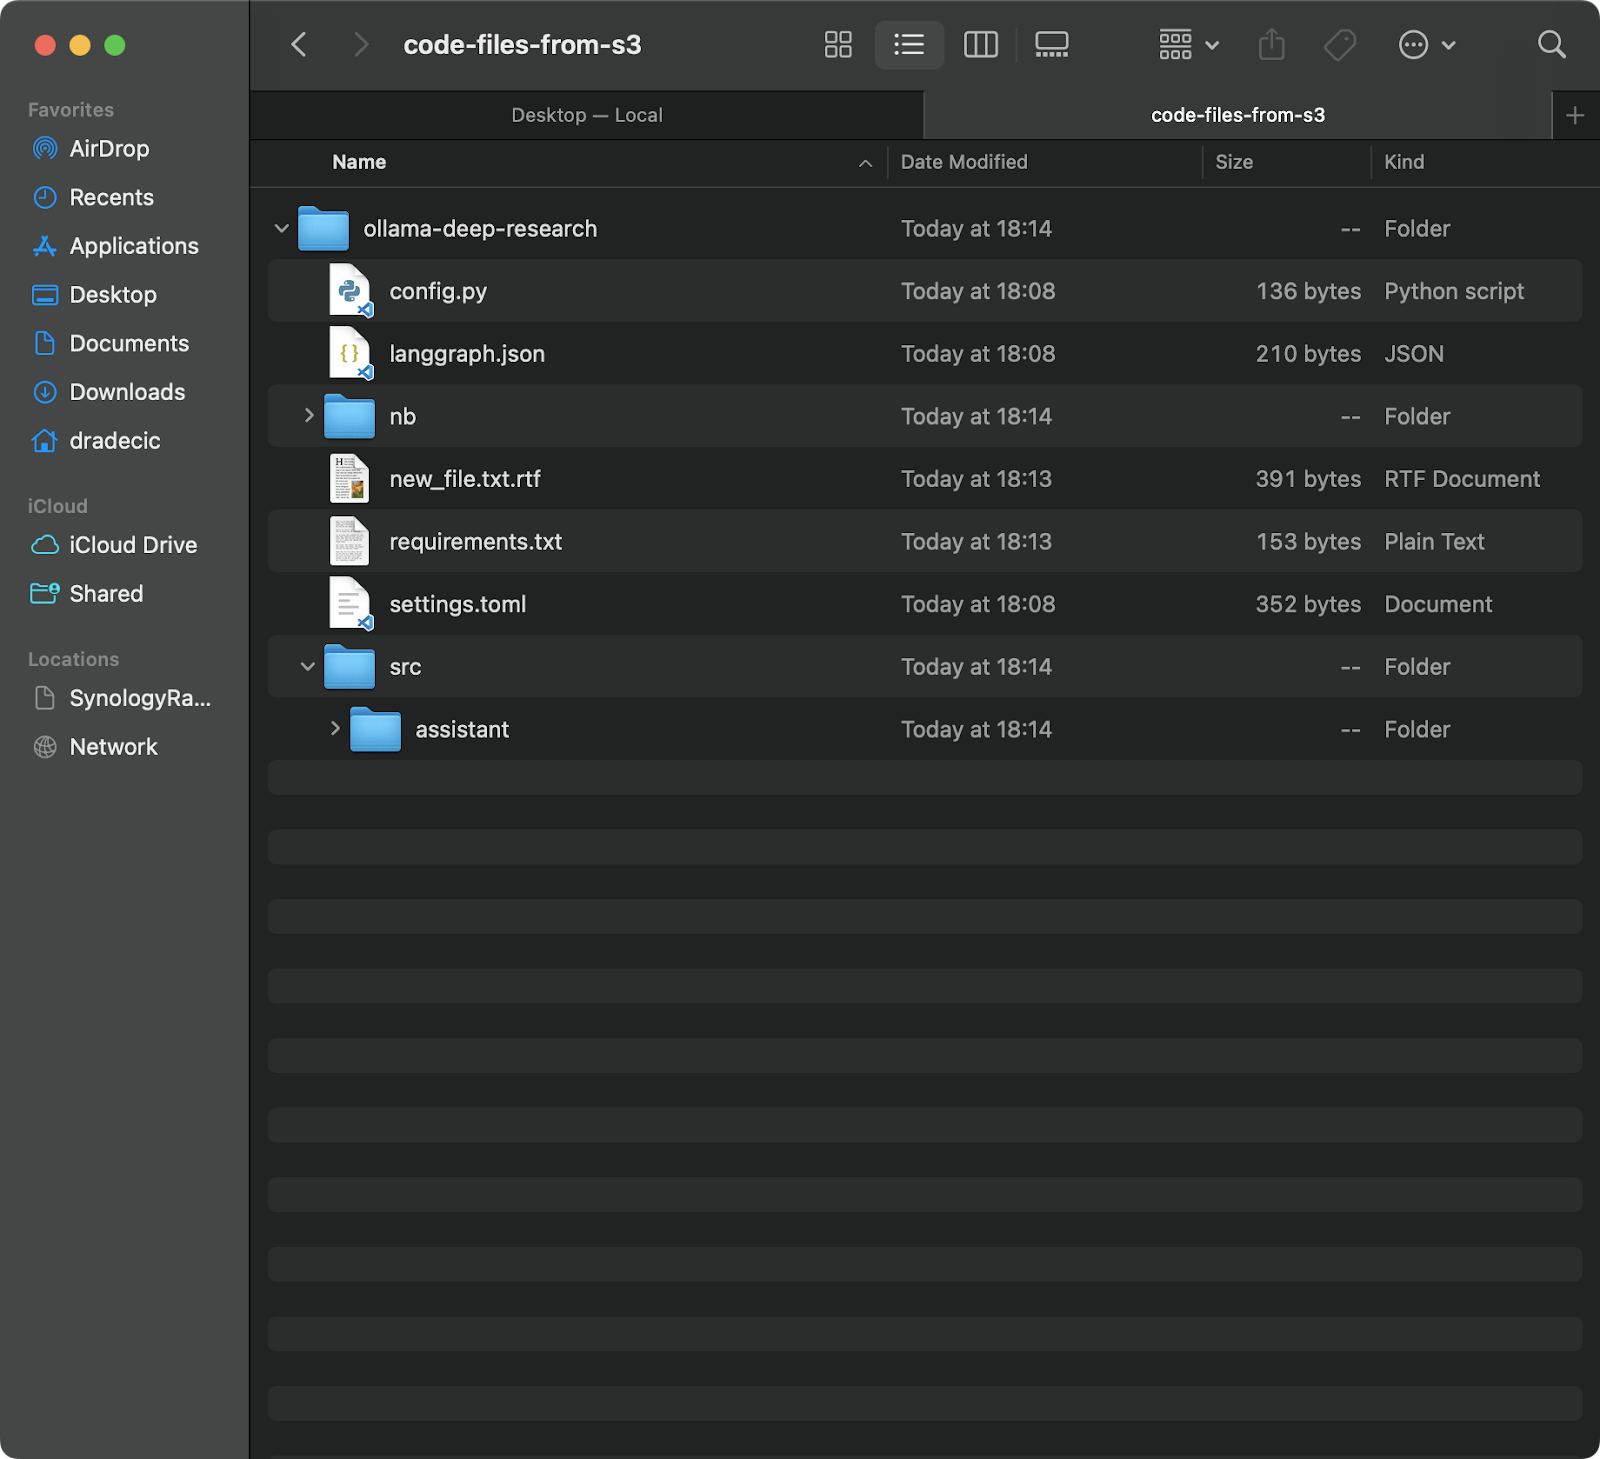
Image 12 - S3 to local sync
It's worth noting that S3 sync is not bidirectional. It always goes from source to destination, making the destination match the source. If you delete a file locally and then sync it to S3, it will still exist in S3. Similarly, if you delete a file in S3 and sync from S3 to local, the local file will remain untouched.
If you want to make the destination exactly match the source (including deletions), you'll need to use the --delete flag, which I'll cover in the advanced options section.
The basic S3 sync command explored previously is powerful on its own, but AWS has packed it with additional options that give you more control over the synchronization process.
In this section, I'll show you some of the most useful flags you can add to the basic command.
By default, S3 sync uses a basic comparison mechanism that checks file size and modification time to determine if a file needs to be synced. However, this approach might not always capture all changes, especially when dealing with files that have been modified but remain the same size.
For more precise synchronization, you can use the --exact-timestamps flag:
aws s3 sync /Users/dradecic/Documents/code-files s3://testbucket-dradecic/backup --exact-timestampsThis forces S3 sync to compare timestamps with precision down to milliseconds. Keep in mind that using this flag might slow down the sync process slightly since it requires more detailed comparisons.
Sometimes, you don't want to sync every file in a directory. Maybe you want to exclude temporary files, logs, or certain file types (such as .DS_Store in my case). That's where the --exclude and --include flags come in handy.
But to illustrate a point, let's say I want to sync my code directory but exclude all the Python files:
aws s3 sync /Users/dradecic/Documents/code-files s3://testbucket-dradecic/backup --exclude "*.py"Now, far fewer files are synced to S3:
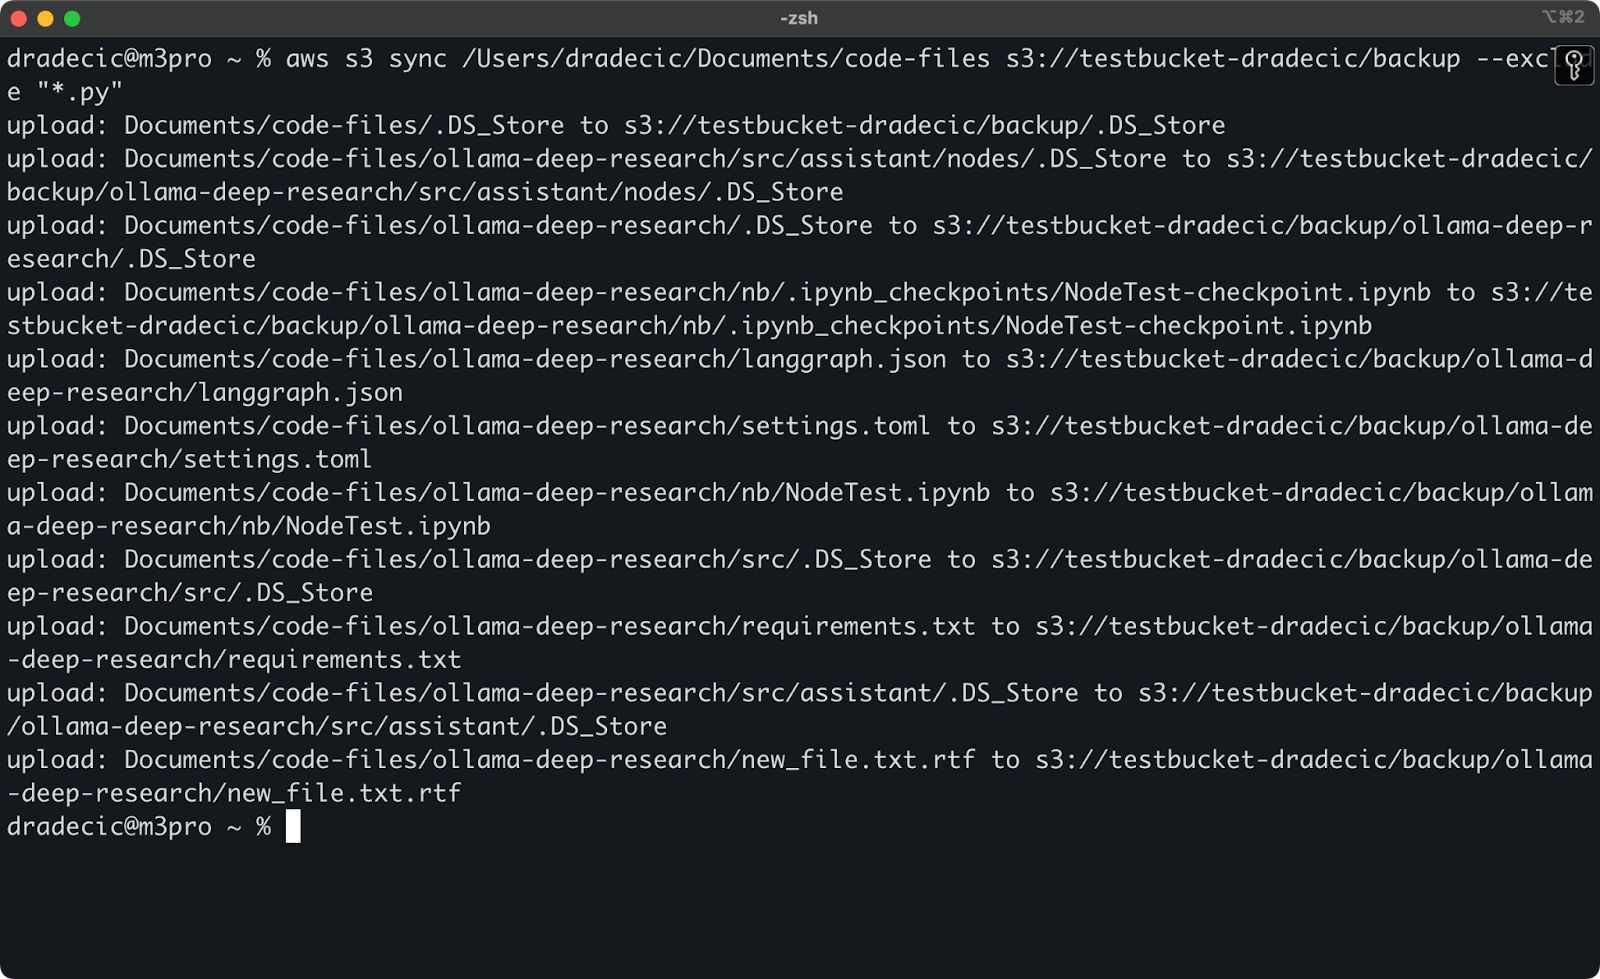
Image 13 - S3 sync with Python files excluded
You can also combine --exclude and --include to create more complex patterns. For example, exclude everything except Python files:
aws s3 sync /Users/dradecic/Documents/code-files s3://testbucket-dradecic/backup --exclude "*" --include "*.py"The patterns are evaluated in the order specified, so order matters! Here's what you'll see when using these flags:
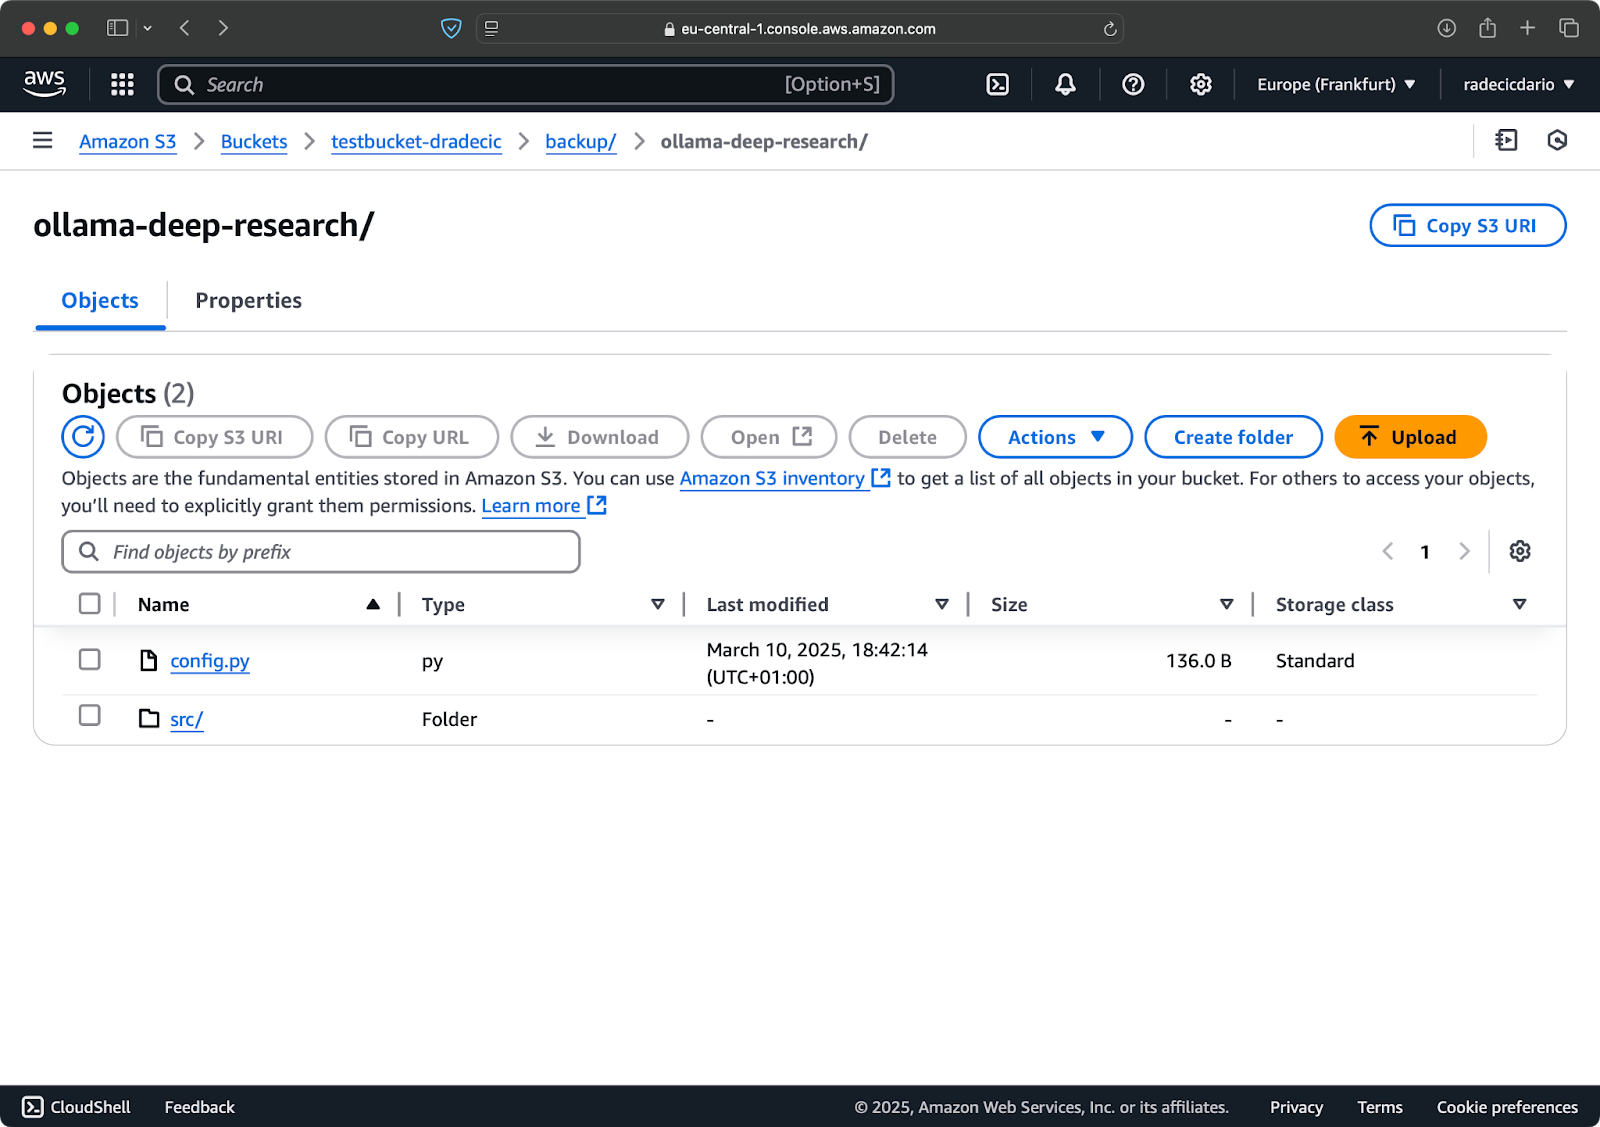
Image 14 - Exclude and include flags
Now only the Python files are synced, and important configuration files are missing.
By default, S3 sync only adds or updates files in the destination—it never deletes them. This means that if you delete a file from the source, it will still remain in the destination after syncing.
To make the destination exactly mirror the source, including deletions, use the --delete flag:
aws s3 sync /Users/dradecic/Documents/code-files s3://testbucket-dradecic/backup --deleteIf you run this the first time, all local files will be synced to S3:

Image 15 - Delete flag
This is particularly useful for maintaining exact replicas of directories. But be careful - this flag can lead to data loss if used incorrectly.
Let's say I delete config.py from my local folder and run the sync command with the --delete flag:
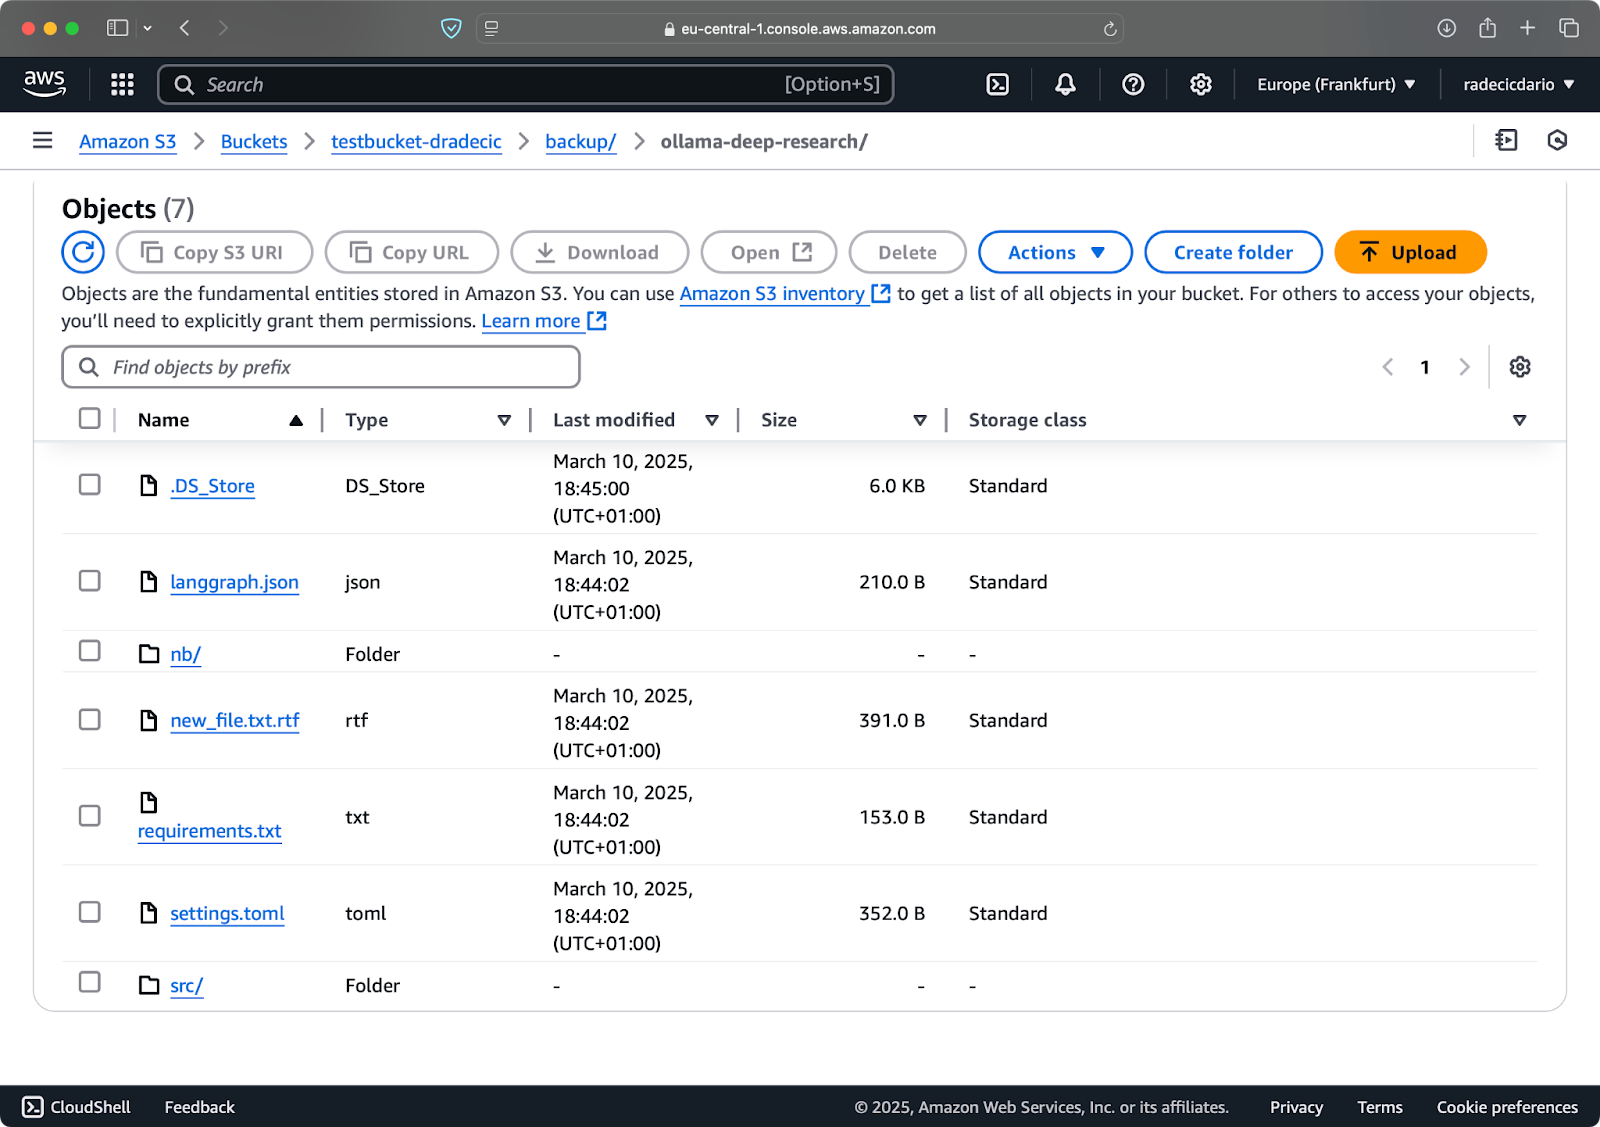
Image 16 - Delete flag (2)
As you can see, the command not only syncs new and modified files but also deletes files from the S3 bucket that no longer exist in the local directory.
The most dangerous S3 sync operations are those involving the --delete flag. To avoid accidentally deleting important files, you can use the --dryrun flag to simulate the operation without actually making any changes:
aws s3 sync /Users/dradecic/Documents/code-files s3://testbucket-dradecic/backup --delete --dryrunTo demonstrate, I've deleted the requirements.txt and settings.toml files from a local folder and then executed the command:
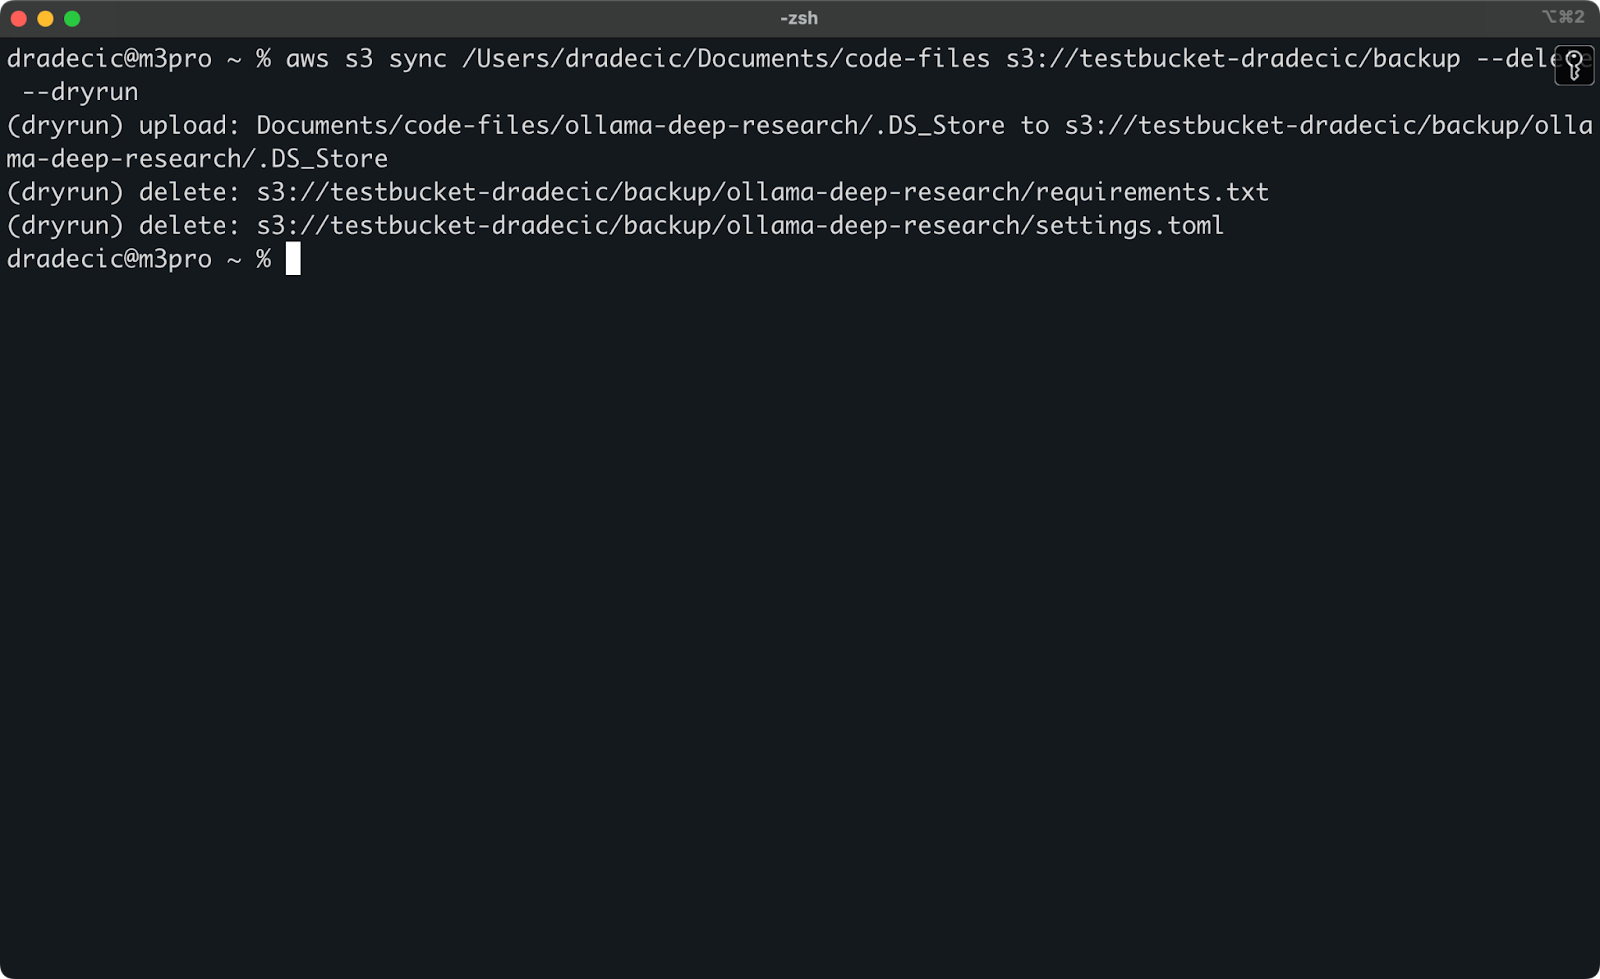
Image 17 - Dry run
This will show you exactly what would happen if you ran the command for real, including which files would be uploaded, downloaded, or deleted.
I always recommend using --dryrun before executing any S3 sync command with the --delete flag, especially when working with important data.
There are plenty of other options available for the S3 sync command, like --acl for setting permissions, --storage-class for choosing the S3 storage tier, and --recursive for traversing subdirectories. Check out the official AWS CLI documentation for a complete list of options.
Now that you're familiar with the basic and advanced S3 sync options, let's look at how to use these commands for practical scenarios like backups and restores.
One of the most popular use cases for AWS S3 sync is backing up important files and restoring them when needed. Let's explore how you can implement a simple backup and restore strategy using the sync command.
Creating backups with S3 sync is straightforward—you just need to run the sync command from your local directory to an S3 bucket. However, there are a few best practices to follow for effective backups.
First, it's a good idea to organize your backups by date or version. Here's a simple approach using a timestamp in the S3 path:
# Create a timestamp variable
TIMESTAMP=$(date +%Y-%m-%d-%H-%M-%S)

# Run the backup
aws s3 sync /Users/dradecic/Documents/code-files s3://testbucket-dradecic/backups/$TIMESTAMP
This creates a new folder for each backup with a timestamp like 2025-03-10-18-56-42. Here's what you'll see on S3:
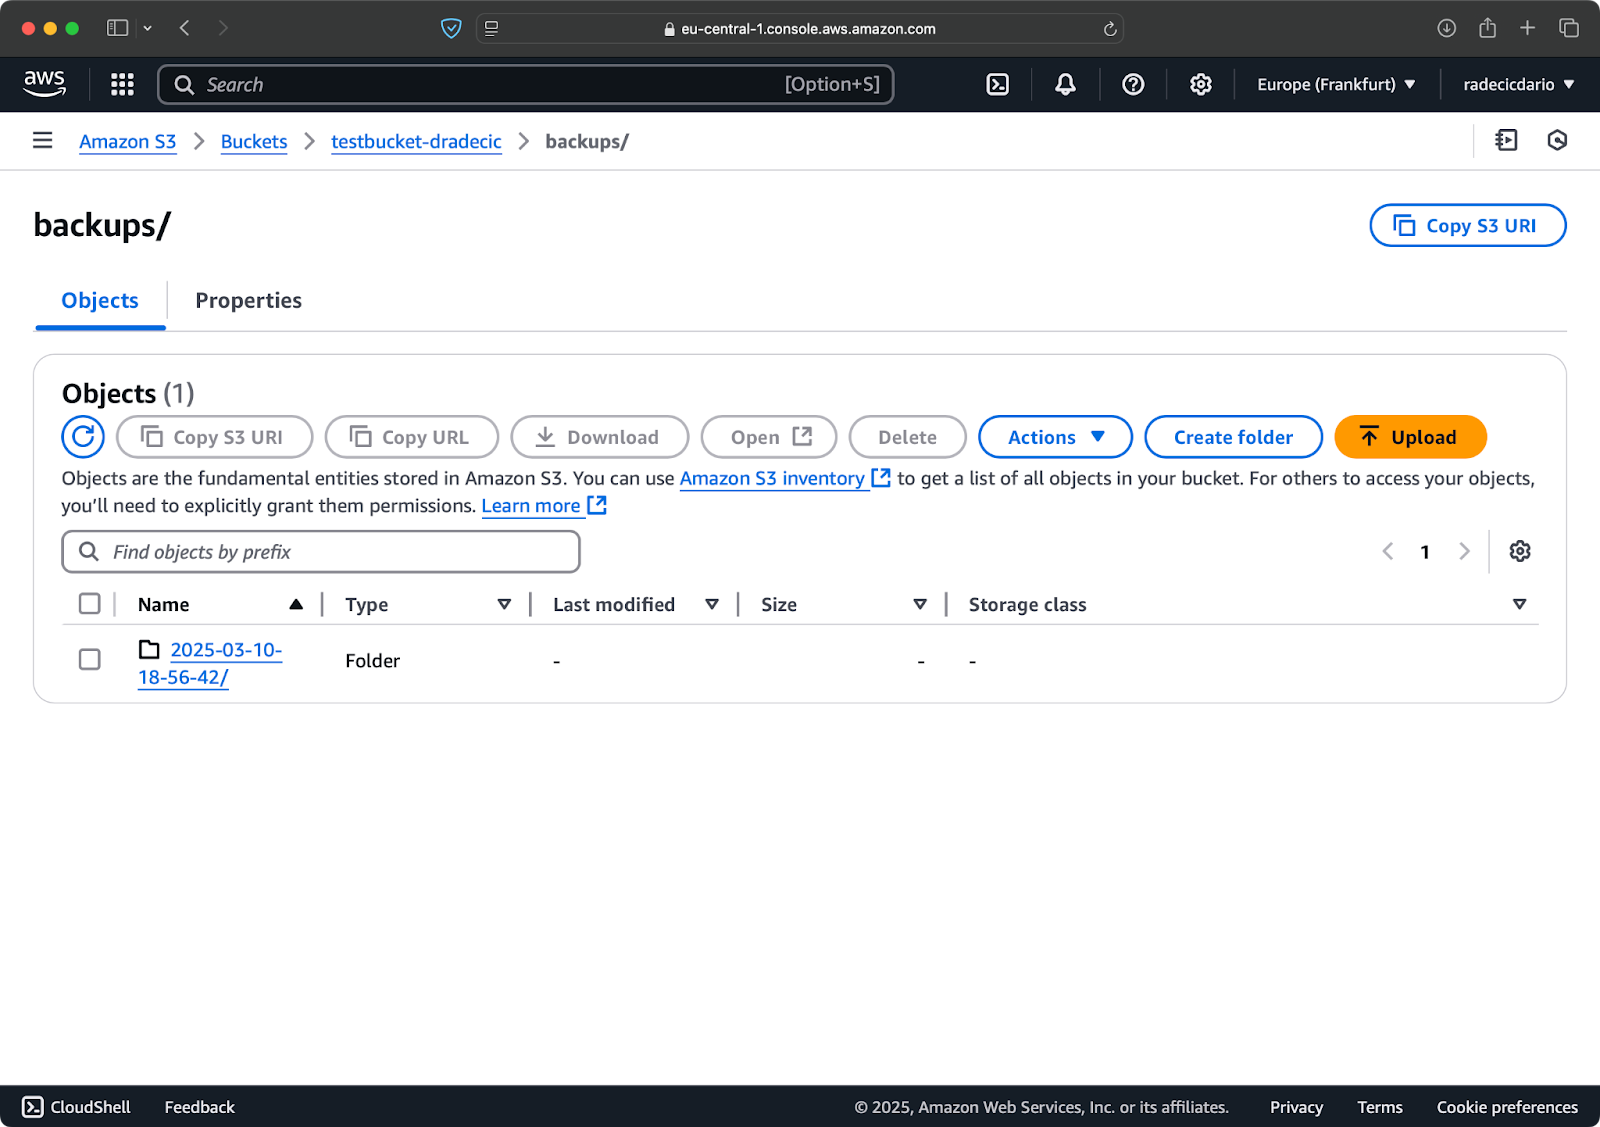
Image 18 - Timestamped backups
For critical data, you might want to keep multiple backup versions. This is easy to do by just running the timestamp-based backup regularly.
You can also use the --storage-class option to specify a more cost-effective storage class for your backups:
aws s3 sync /Users/dradecic/Documents/code-files s3://testbucket-dradecic/backups/$TIMESTAMP --storage-class STANDARD_IA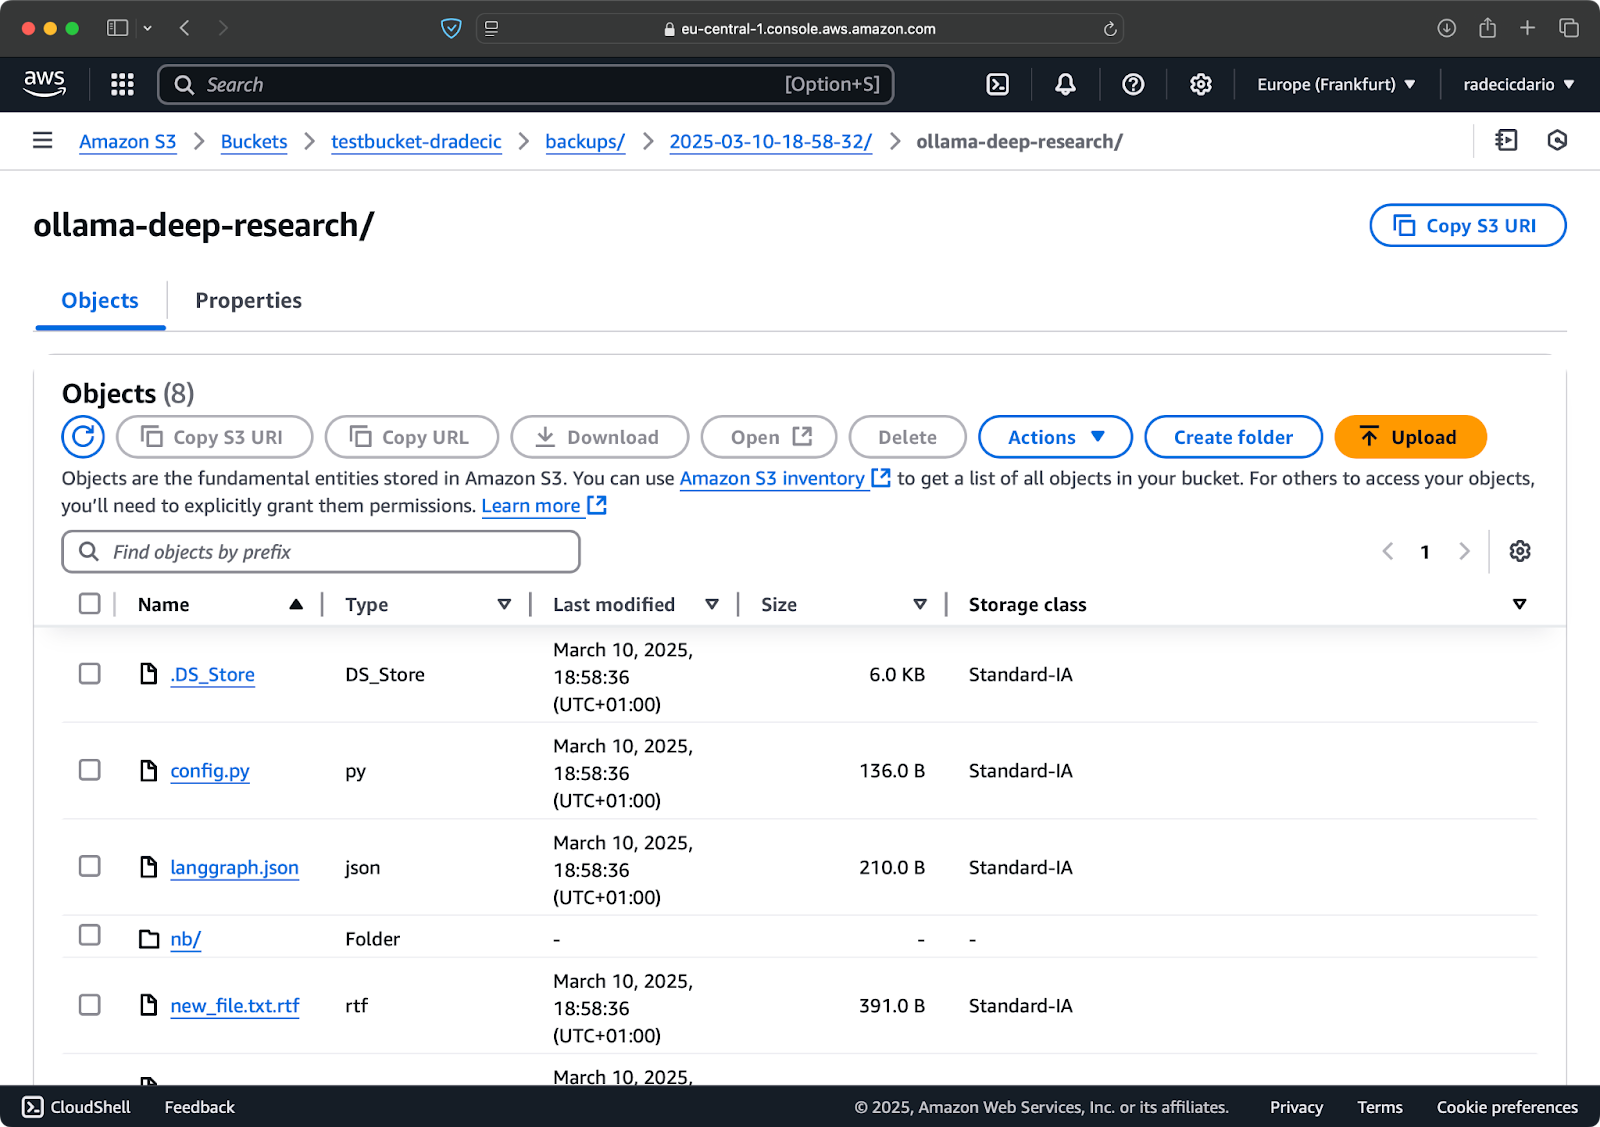
Image 19 - Backup contents with a custom storage class
This uses the S3 Infrequent Access storage class, which costs less but has a slight retrieval fee. For long-term archival, you could even use the Glacier storage class:
aws s3 sync /Users/dradecic/Documents/important-data s3://testbucket-dradecic/backups/$TIMESTAMP --storage-class GLACIERJust keep in mind that Glacier-stored files take hours to retrieve, so they're not suitable for data you might need quickly.
Restoring from a backup is just as easy - simply reverse the source and destination in your sync command:
# Restore from the most recent backup (assuming you know the timestamp)
aws s3 sync s3://testbucket-dradecic/backups/2025-03-10-18-56-42 /Users/dradecic/Documents/restored-data
This will download all files from that specific backup to your local restored-data directory:
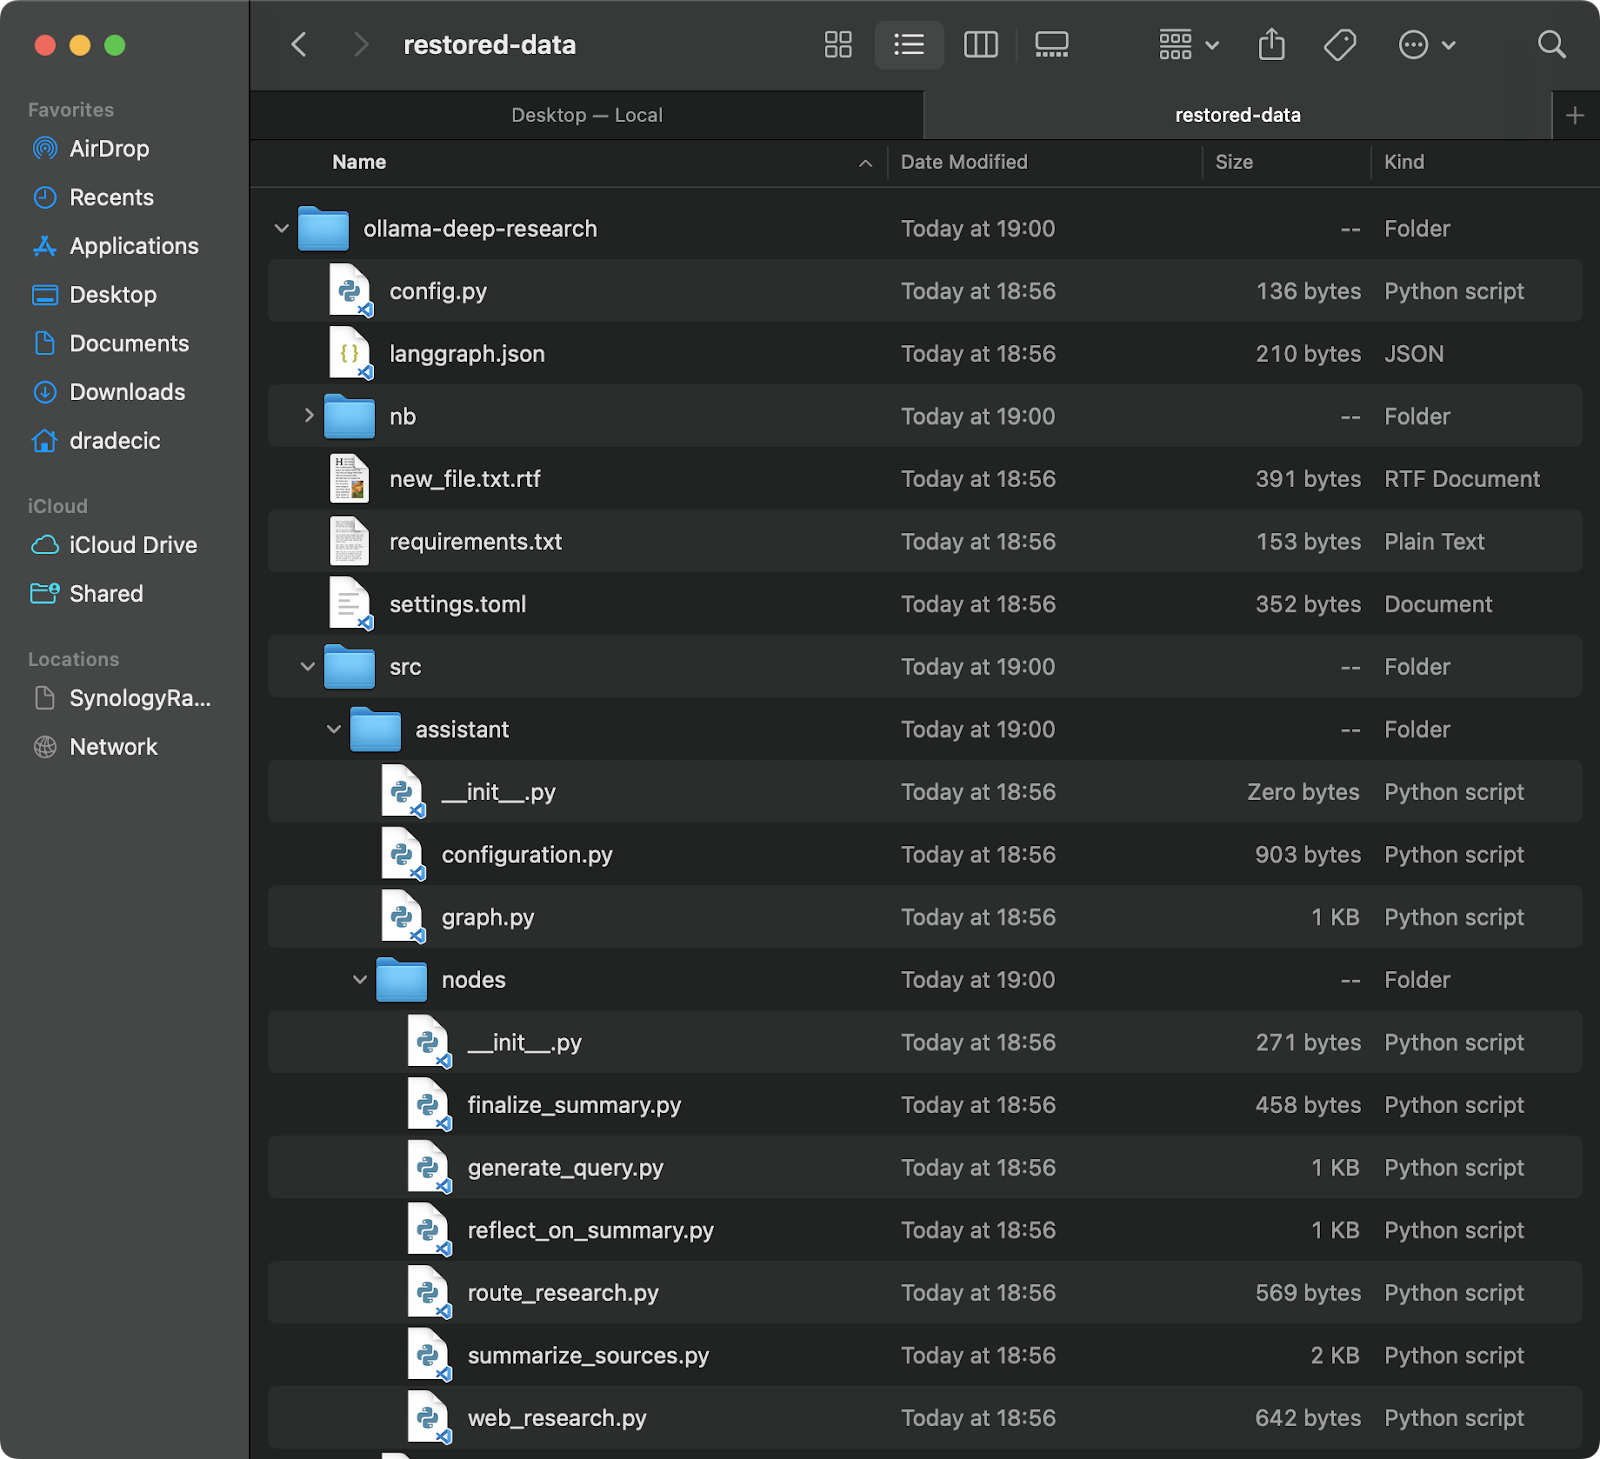
Image 20 - Restoring files from S3
If you don't remember the exact timestamp, you can list all your backups first:
aws s3 ls s3://testbucket-dradecic/backups/Which will show you something like:
Image 21 - List of backups
You can also restore specific files or directories from a backup using the exclude/include flags we discussed earlier:
# Restore only the config files
aws s3 sync s3://testbucket-dradecic/backups/2025-03-10-18-56-42 /Users/dradecic/Documents/restored-configs --exclude "*" --include "*.config" --include "*.toml" --include "*.yaml"
For mission-critical systems, I recommend automating your backups with scheduled tasks (like cron jobs on Linux/macOS or Task Scheduler on Windows). This ensures you're consistently backing up your data without having to remember to do it manually.
AWS S3 sync is a reliable tool, but you might occasionally encounter issues. Still, most errors you'll see are human-based.
Let's go through some common problems and their solutions.
s3:ListBucket, s3:GetObject, s3:PutObject).--only-show-errors flag combined with the --size-only flag. This combination helps with large file transfers by minimizing output and comparing only file sizes:aws s3 sync /Users/dradecic/large-files s3://testbucket-dradecic/large-files --only-show-errors --size-onlyIf your S3 sync is running slower than expected, there are some tweaks you can do to speed things up.
--max-concurrent-requests parameter:aws s3 sync /Users/dradecic/Documents/code-files s3://testbucket-dradecic/backup --max-concurrent-requests 20aws s3 sync /Users/dradecic/large-files s3://testbucket-dradecic/backup --cli-read-timeout 120 --multipart-threshold 64MB --multipart-chunksize 16MB--no-progress for scripts. If you're running S3 sync in an automated script, use the --no-progress flag to reduce output and improve performance:aws s3 sync /Users/dradecic/Documents/code-files s3://testbucket-dradecic/backup --no-progressaws s3 sync /Users/dradecic/Documents/code-files s3://testbucket-dradecic/backup --endpoint-url https://s3.eu-central-1.amazonaws.comThese optimizations can significantly improve sync performance, especially for large data transfers or when running on less powerful machines.
If you're still experiencing issues after trying these solutions, the AWS CLI has a built-in debugging option. Just add --debug to your command to see detailed information about what's happening during the sync process:
aws s3 sync /Users/dradecic/Documents/code-files s3://testbucket-dradecic/backup --debugExpect to see a lot of detailed log messages, similar to these:
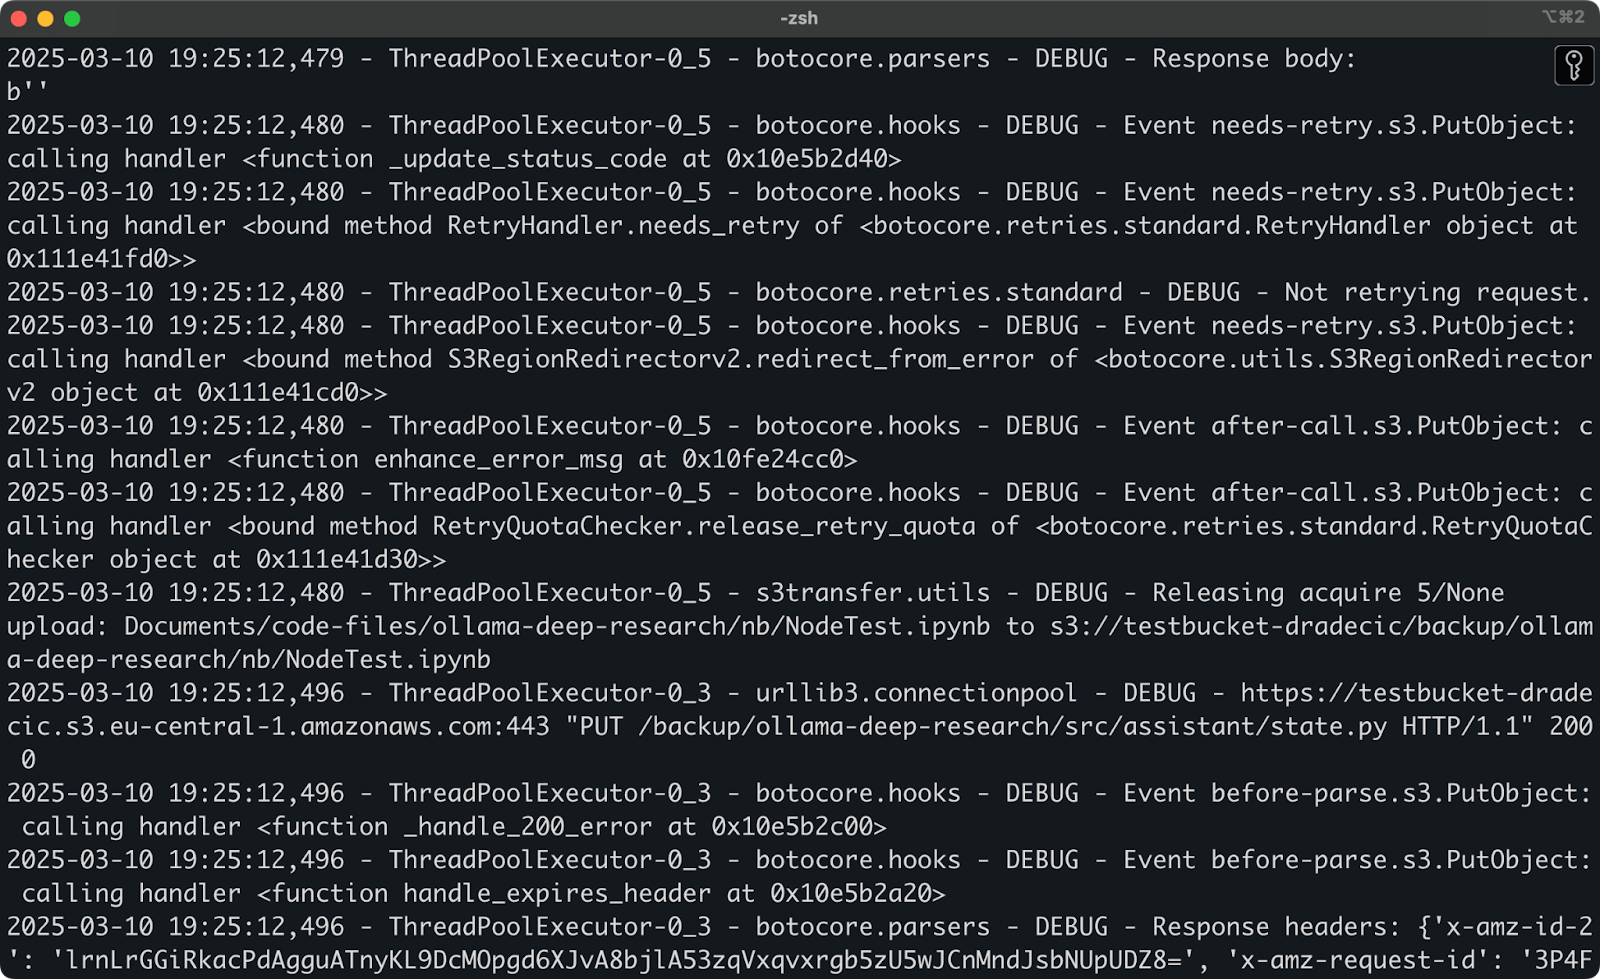
Image 22 - Running sync in debug mode
And that's pretty much it when it comes to troubleshooting AWS S3 sync. Sure, there are other errors that might happen, but 99% of the time, you'll find the solution in this section.
To summarize, AWS S3 sync is one of those rare tools that are both simple to use and incredibly powerful. You've learned everything from basic commands to advanced options, backup strategies, and troubleshooting tips.
For developers, system administrators, or anyone working with AWS, the S3 sync command is an essential tool - it saves time, reduces bandwidth usage, and ensures your files are where you need them, when you need them.
Whether you're backing up critical data, deploying web assets, or just keeping different environments in sync, AWS S3 sync makes the process straightforward and reliable.
The best way to get comfortable with S3 sync is to start using it. Try setting up a simple sync operation with your own files, then gradually explore the advanced options to fit your specific needs.
Remember to always use --dryrun first when working with important data, especially when using the --delete flag. It's better to take an extra minute to verify what will happen than to accidentally delete important files.
To learn more about AWS, check out these courses by DataCamp:
You can even use DataCamp to prepare for AWS certification exams - AWS Cloud Practitioner (CLF-C02).
Learn more about AWS with these courses!
Track
Course
Course
blog
Vikash Singh
8 min
Tutorial
Kenny Ang
Tutorial
Zoumana Keita
Tutorial
Zoumana Keita
Tutorial
Don Kaluarachchi
Tutorial
Bex Tuychiev