
Track
Microsoft Azure Fundamentals (AZ-900)
9 hr
In this section, I show how to set up Azure OpenAI. I assume you have some experience with using Azure.
Note that user interfaces change frequently. So, the layout and text of various sections and titles in the instructions and screenshots can change over time or from region to region.
Go to the Azure OpenAI homepage and select Sign in at the top right. Log in with your Microsoft account. If you don’t have a Microsoft account, select the option to create a new account on the Sign-in page and create a Microsoft account.
Then, create an Azure account following the steps below:

The Microsoft Azure Portal.
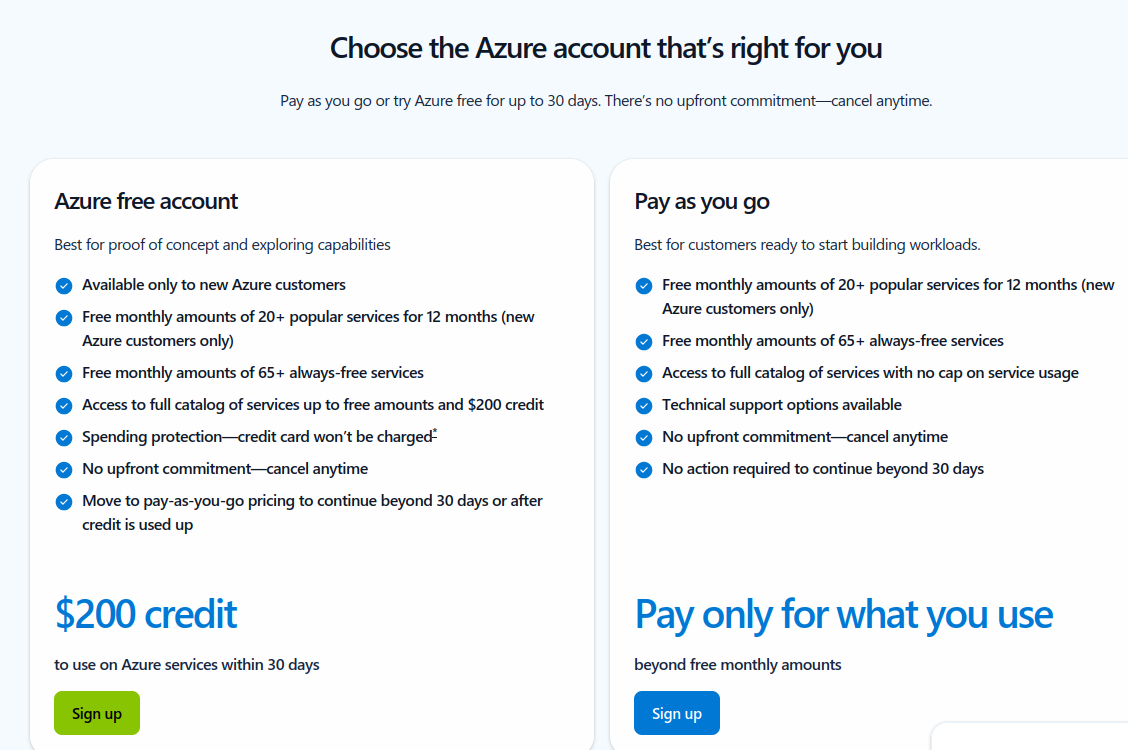
Choose an Azure account type.
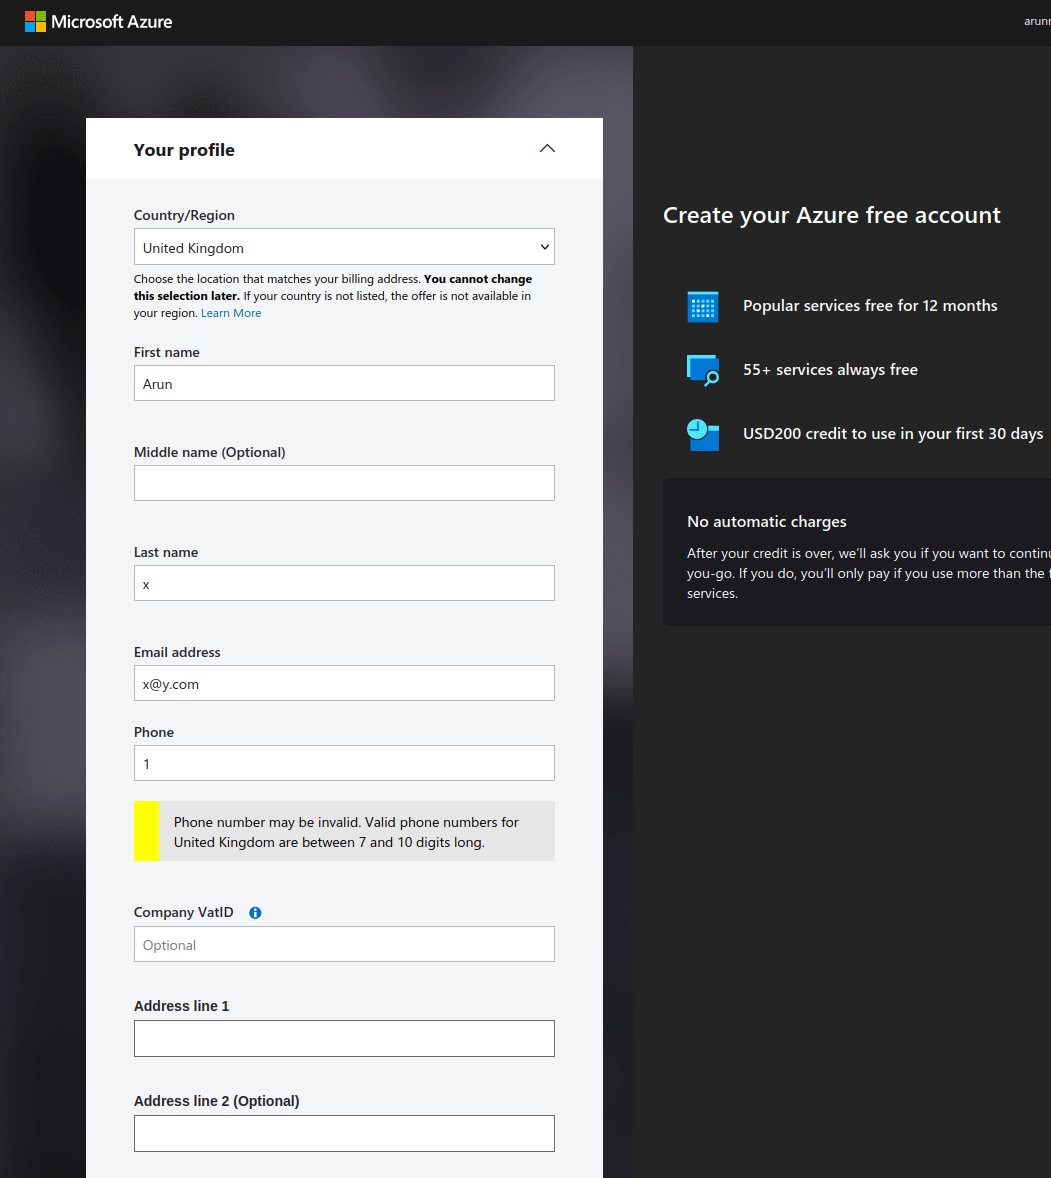
Create a free Azure account.

Verify your Azure account (screenshot by author)

Upgrade your Azure account.
After upgrading to a paid account, you can access OpenAI models.
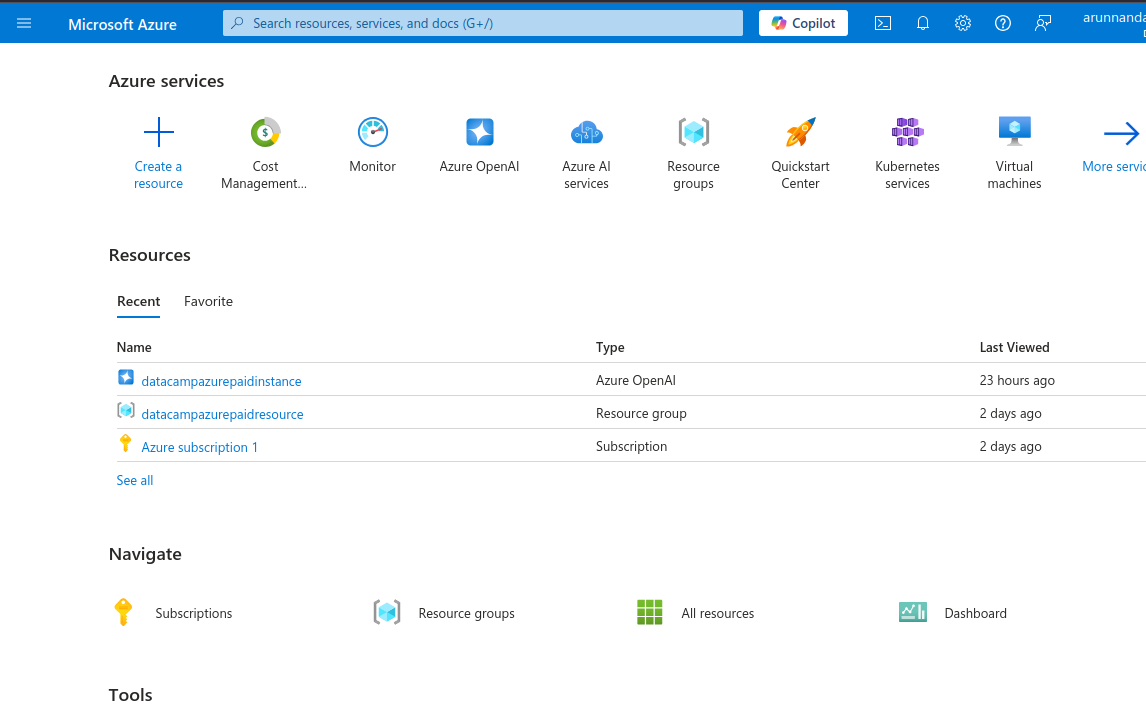
Azure portal showing available services.
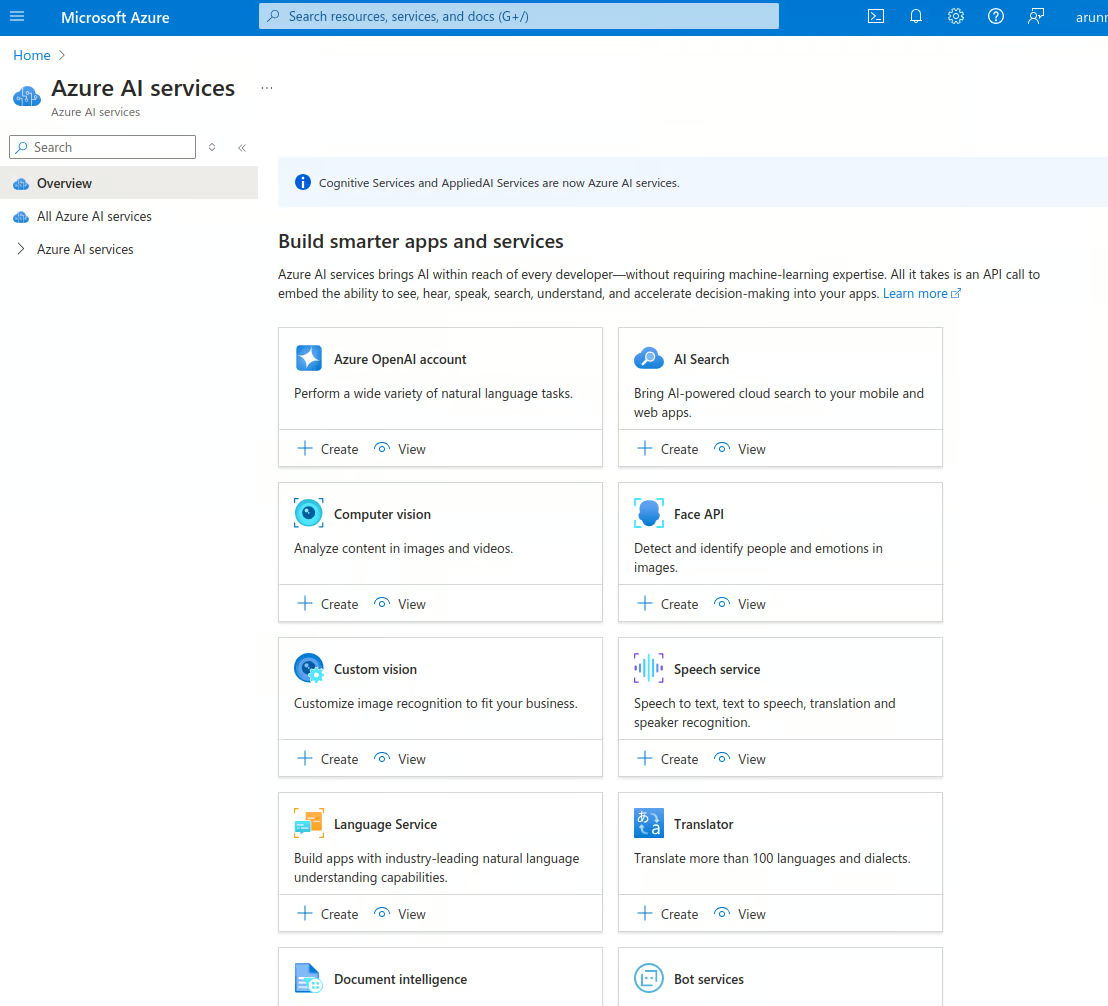
Azure AI services.
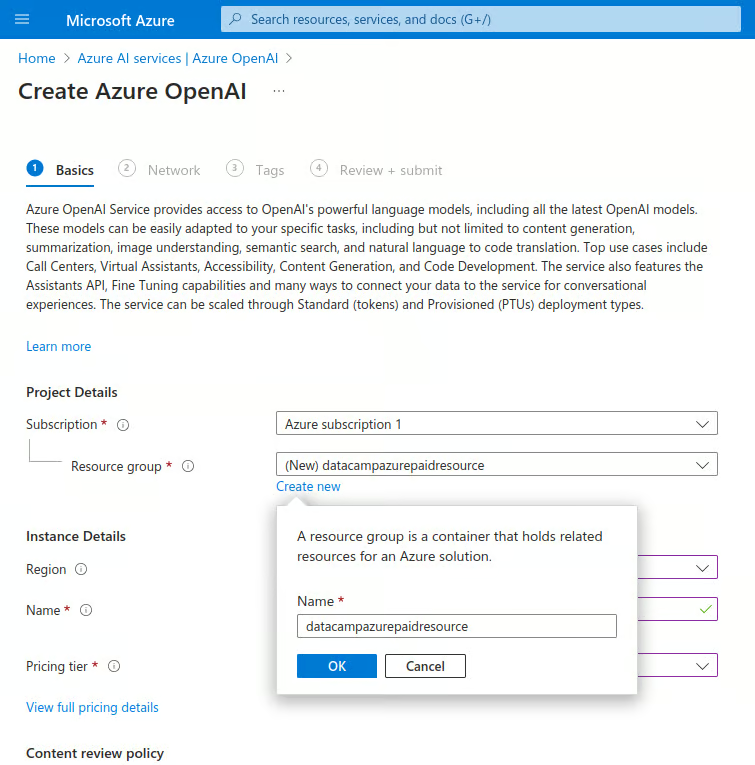
Create a new Azure OpenAI instance.
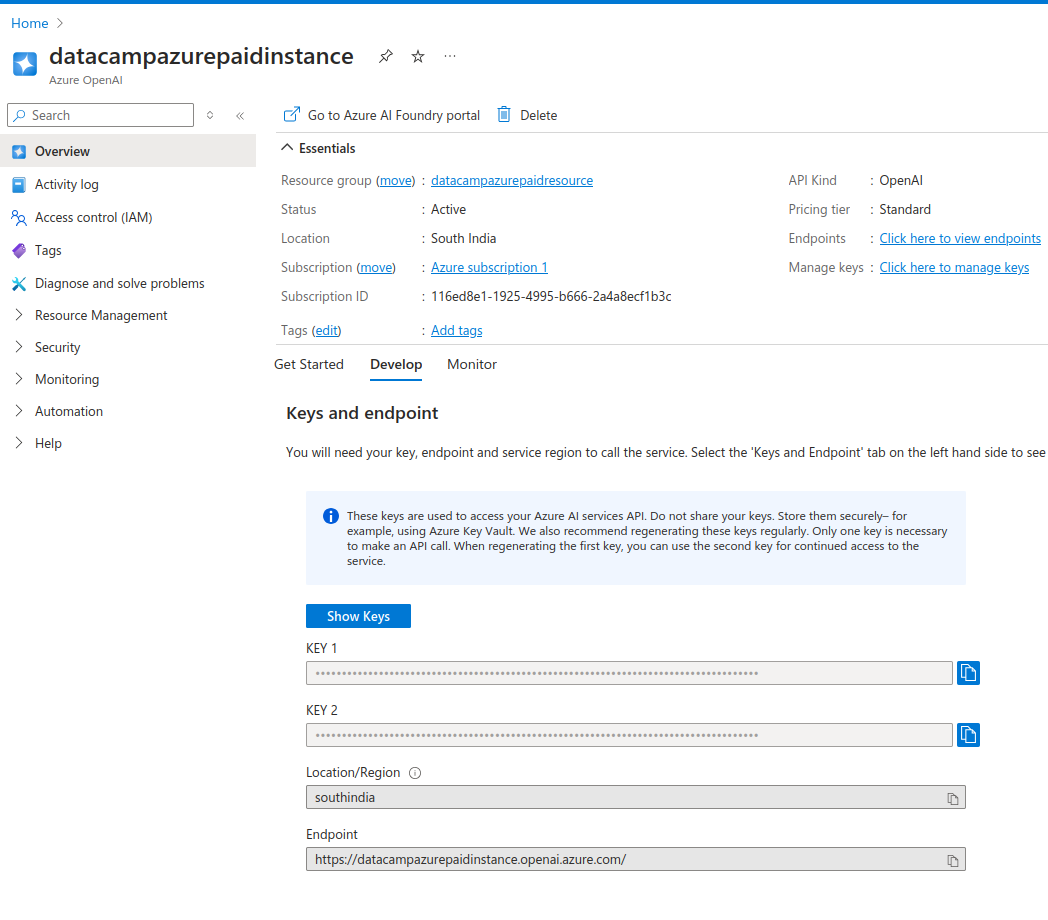
The resource page shows the details of the instance.
The Develop tab shows the API keys and API endpoint URLs for this instance. The keys have been automatically generated for you.
You get two API keys. This allows you to use the second key in case the first is compromised. You can also use the second key while regenerating the first. This allows you to rotate keys periodically without suffering any downtime.
Azure OpenAI instance API keys
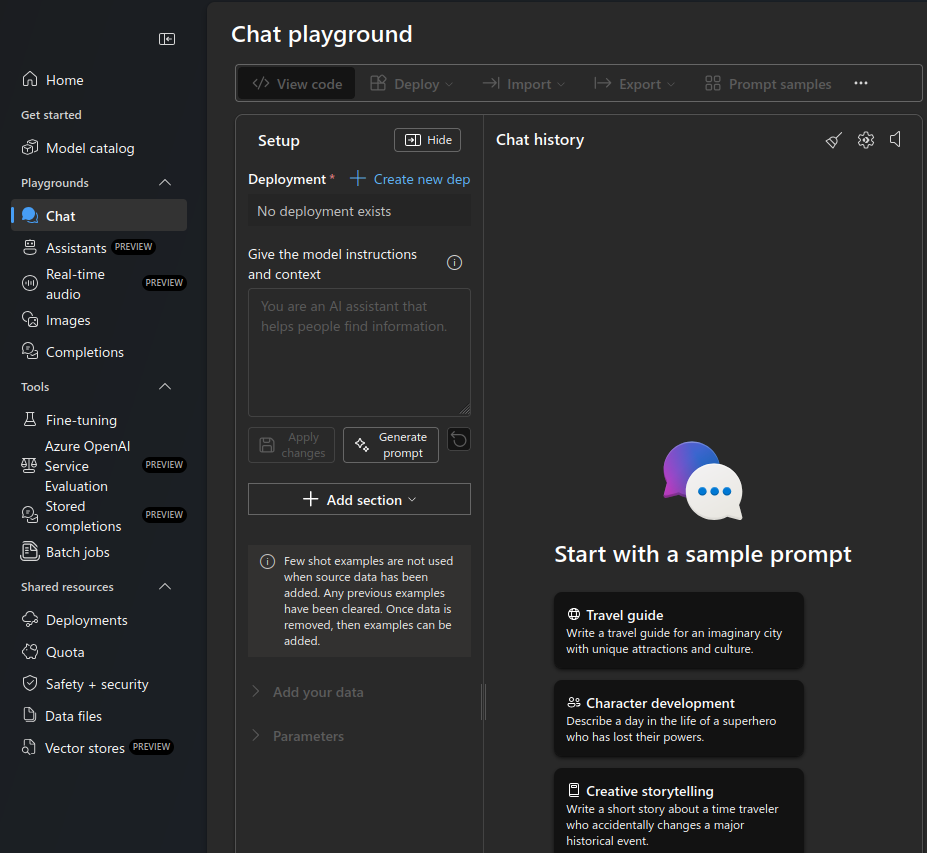
Azure OpenAI chat playground.
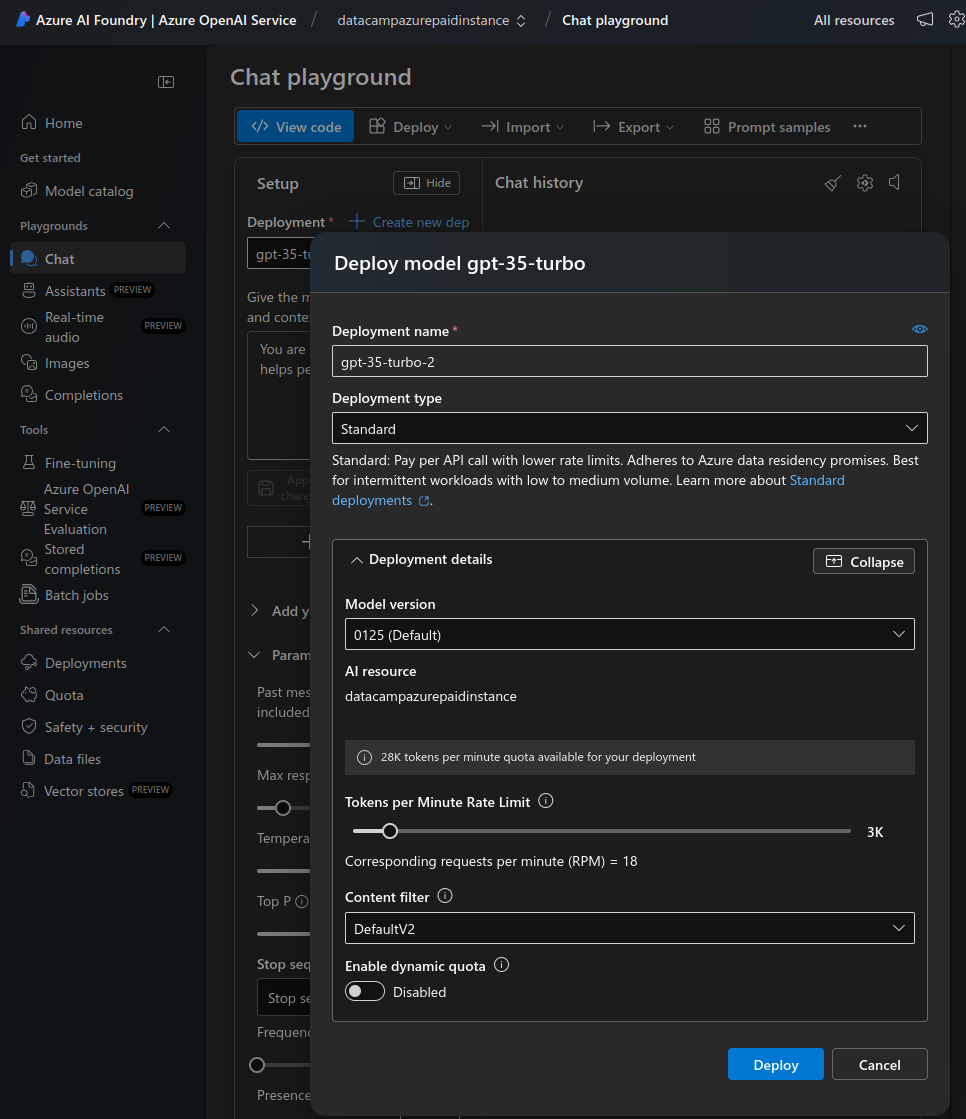
Deploy a new model in the chat playground.
That’s it! In the next section, we will see how to access this deployment of the OpenAI gpt-35-turbo model.
It is advisable to regenerate the API access keys periodically. This ensures the account isn’t compromised if old keys are inadvertently leaked. The steps below describe how to regenerate keys:

Azure OpenAI instance API keys.
After setting up Azure OpenAI and deploying a model, we see how to access it programmatically.
I will show how to use Python to connect to Azure OpenAI. Install the required libraries:
$ pip install openaiIf you’re using a notebook, execute the following command. Note: I am using a DataLab notebook.
!pip install openaiImport the necessary packages within the Python shell or in the notebook:
import os
from openai import AzureOpenAI
The AzureOpenAI module allows access to OpenAI services within Azure. This is different from the OpenAI module used to access the standalone OpenAI API.
Before using Azure OpenAI, set the API key and endpoint in your environment. The previous section showed how to find these values. In principle, you can set these within the programming environment, but I recommend never doing that. Never expose API keys in the program.
To run Python locally, set the environment variable in the shell configuration file. I will show you how to set it up for the Bash shell.
.bashrc file in a text editor. export AZURE_OPENAI_API_KEY=MY_API_KEY'export AZURE_OPENAI_ENDPOINT=MY_ENDPOINT'source ~/.bashrc. sh or zsh, the process can be slightly different. Import the API key and endpoint values in the Python terminal:
azure_openai_api_key = os.getenv["AZURE_OPENAI_API_KEY"]
azure_openai_endpoint = os.getenv["AZURE_OPENAI_ENDPOINT"]DataLab allows you to directly set environment variables for a notebook.
AZURE_OPENAI_API_KEY and AZURE_OPENAI_ENDPOINT, and their respective values. In the notebook, extract these values as shown below:
azure_openai_api_key = os.environ["AZURE_OPENAI_API_KEY"]
azure_openai_endpoint = os.environ["AZURE_OPENAI_ENDPOINT"]You can now use the AzureOpenAI() function to create a client object to accept requests. This function uses the following parameters:
api_version: The version of the Azure OpenAI API. Check the latest version from the Azure documentation. api_key: the Azure OpenAI API key. Get this from the environment variables you set earlier. Do not set this manually here. azure_endpoint: the URL of the Azure OpenAI API endpoint (get this value from the environment). client = AzureOpenAI(
api_version="2024-06-01",
api_key=azure_openai_api_key,
azure_endpoint=azure_openai_endpoint
)Use this client object for tasks like chat completion using the .chat.completions.create() function. This function accepts the following parameters:
model: The model name. In older releases of the OpenAI API, this used to be the engine parameter. Note that the model parameter has to match the model specified during the deployment (on the Azure AI Foundry portal). If you try to use a different model than the one deployed, it throws an error as shown below: NotFoundError: Error code: 404 - {'error': {'code': 'DeploymentNotFound', 'message': 'The API deployment for this resource does not exist. If you created the deployment within the last 5 minutes, please wait a moment and try again.'}}messages: This parameter specifies the conversation between the user and the model. It consists of a set of message objects. Each message object has a key-value pair denoted by role (either system, user, or assistant) and content(the text of the message). These message objects provide context for the interaction and guide the model’s responses. Below, I give examples of key-value (role, content) pairs for different values of role:
user: the prompt entered by the end-user. Example: {“role”: “user”, “content”: “explain the difference between rational and irrational numbers”}
system: the description of the role OpenAI is expected to play in the interaction. Example: {“role”: “system”, “content”: “you are a helpful teacher to guide elementary mathematics students”}
assistant: the response expected from OpenAI. Example: {“role”: “assistant”, “content”: “the difference between rational and irrational numbers is … an example explanation …”}
The assistant role is necessary only when training data is provided to fine-tune the model. When using the client for tasks like chat completion, only the user and system roles are sufficient. For many simple tasks, only the user role is sufficient.
max_tokens: this parameter decides the maximum number of tokens that can be used to process (both the input and output of) the API call. You are directly charged for the tokens you use. The default value is 16. This value is sufficient for simple use cases; hence, this parameter can be omitted. simple_completion = client.chat.completions.create(
model="gpt-35-turbo",
messages=[
{
"role": "user",
"content": "Explain the difference between OpenAI and Azure OpenAI in 20 words",
},
],
)Print the output of the chat completion task:
print(simple_completion.to_json())The output is a JSON object with various key-value pairs. It includes the model’s output, as shown in the example below. Note that assistant is the default role assigned to the model.
"message": {
   "content": "OpenAI is a research organization focused on advancing AI, while Azure OpenAI is a collaboration between Microsoft and OpenAI.",
   "role": "assistant"
},To access any model with Azure OpenAI, you must first deploy the model. In the previous section, you deployed the gpt-35-turbo model. To use a different model:
chat.completions.create() function) using the name of the new model. In older releases of OpenAI, using different models for different tasks was common. There were dedicated models for code generation, NLP, and more. Modern models like GPT-3.5 and GPT-4 can perform all text-based generative tasks. Thus, many of the older task-specific models (like davinci models for code generation) have been phased out.
We now examine how to use the API for various simple tasks like question answering and text summarization. In the example tasks below, we use the same model—GPT-3.5. You can also choose one of the GPT-4 models.
Since these are both text-based tasks, let’s first declare a block of text to work on. I have arbitrarily copied a review of a pair of boots from an e-commerce website. Assign the text of this review to a variable text. Ensure that you escape any single or double quote characters within the text.
text = 'Comfort and Quality wise the boots are absolutely excellent. A 10 miles hike along the city Streets and the alps nearby felt like a smooth sail. The most plus it was quite well ventilated cause of the heavy duty Gore-tex material. After 12 hours when I removed it, there was just very little bit of perspiration (My foot sweats a lot) and absolutely no foul smell. Speaking of the Gore-Tex I would say, I sported this on a heavy rainy day after buying it in India, I was fearing the boot, though not very much like normal boots, would still be drenching with water, instead it was very little soaked. And some 5-6 hours later it was completely dry (Kept inside a closed room in the night). The only disadvantage I think is, that it fits my foot perfectly according to the size I chose, and there is no slight pain from 7 AM till 8 PM due to the shoe weight (of course its 1.2 KG, even though it doesn\'t feel like)' To summarize the above text:
client object created earlier. messages parameter as shown in the example below: summary_completion = client.chat.completions.create(
model="gpt-35-turbo",
messages=[
{
"role": "system",
"content": "You are a helpful assistant for summarizing text"
},
{
"role": "user",
"content": f"Summarize this text in 10 words: {text}",
},
],
)Notice how we pass the text as a variable in the prompt in the above snippet.
print(summary_completion.to_json())The output contains the assistant’s summarization of the long text, as shown in this excerpt:
"message": {
   "content": "Excellent comfort and quality, well-ventilated, quick-drying, lightweight boots, minimal perspiration, no foul smell.",
   "role": "assistant"
},To answer questions (based on the input text above), we modify the prompt to pass the question as a string variable. As before, the prompt also includes the text as a variable. The model answers the question based on the given text.
question = 'Are these shoes heavy?'

qna_completion = client.chat.completions.create(
    model="gpt-35-turbo",
    messages=[
        {"role": "system",
         "content": "You are a helpful assistant for answering questions"
        },
        {
            "role": "user",
            "content": f"Answer this question: {question} in 10 words based on this text: {text}",
        },
    ],
)
Convert the output into JSON and print it:
print(qna_completion.to_json())The output includes the assistant’s answer to the question:
"message": {
   "content": "Lightweight. Not heavy. Comfortable for long hikes. Well-ventilated Gore-tex material.",
   "role": "assistant"
},Now, let’s look at the different use cases for the Azure OpenAI service.
Being a language model at its core, OpenAI’s general purpose models like GPT-3 and GPT-4 excel at NLP tasks, such as:
In the following example, we perform sentiment analysis to classify the customer review text (defined earlier).
sentiment_classification = client.chat.completions.create(
    model="gpt-35-turbo",
    messages=[
        {"role": "system",
         "content": "You are a helpful assistant for classifying customer reviews into one of the following categories: very positive, positive, neutral, negative, very negative"
        },
        {
            "role": "user",
            "content": f"Classify this review: {text}",
        },
    ],
    #max_tokens=16
)

print(sentiment_classification.to_json())
The output contains a snippet resembling the excerpt below. It contains the assistant’s classification of the review:
"message": {
   "content": "This review can be classified as very positive.",
   "role": "assistant"
},OpenAI models can generate code in various programming languages. Previous releases of OpenAI had dedicated code-specific models, like Codex and code-davinci, which were fine-tuned for code generation.
However, newer releases of OpenAI, such as GPT-3.5 and GPT-4 generate code without fine-tuning. The base models are pre-training on coding-based datasets. Thus, Codex, code-davinci, and many other legacy models have been deprecated and are no longer available for new deployments.
OpenAI models can help write code in various common programming languages. Interact with the model in natural language to give instructions for programming tasks like:
Consider a simple example of writing a Python function to open and read a file. It is a task common enough that can be easily automated. We ask OpenAI to generate and explain the code. Use the client object created earlier.
code_completion = client.chat.completions.create(
    model="gpt-35-turbo",
    messages=[
        {"role": "system",
         "content": "You are a helpful assistant for generating programming code"
        },
        {
            "role": "user",
            "content": "Write and explain a Python function to open and read a file",
        },
    ],
)
Print the output:
print(code_completion.to_json())Notice that the output JSON object contains the assistant’s output resembling the sample excerpt below:
"content": "Below is a Python function that opens a file, reads its contents, and returns the content as a string:\n\n```python\ndef read_file(file_path):\n try:\n with open(file_path, 'r') as file:\n …The previous examples were all text-based. They used OpenAI as a large language model (LLM), which is typically built using the transformer architecture. In addition to LLMs, OpenAI includes diffuser-based models, like DALL·E, which generate images given an input prompt.
To use DALL·E, provide a text-based prompt with a detailed description of the image you want to see. Based on this description, DALL·E generates a high-quality image. This is useful for tasks like creating illustrations, designing product concepts, sketching for marketing campaigns, and more.
DALL·E is not currently available in all geographical regions. If it is available in your region, create a new deployment (as explained earlier in this tutorial) but using the model DALL·E-3 instead of GPT-3. Access the DALL·E model using the same client object described previously. Use the client.images.generate() method to generate an image:
dalle3 using the model parameter. prompt parameter. n, which is the number of images to generate. result = client.images.generate(
model="dalle3",
prompt="An owl wearing a Christmas hat",
n=1
)Extract the JSON response object from the model’s response:
import json
json_response = json.loads(result.model_dump_json())
Declare the image directory. Note that the directory images must exist under the current working directory (from which you started the Python shell).
image_dir = os.path.join(os.curdir, 'images')Specify the image path under this directory:
image_path = os.path.join(image_dir, 'generated_image.png')Extract the URL of the generated image from the JSON response object, download the image (as a stream), and write it to the image file:
image_url = json_response["data"][0]["url"]
generated_image = requests.get(image_url).content
with open(image_path, "wb") as image_file:
    image_file.write(generated_image)
Display the image:
from PIL import Image

image = Image.open(image_path)
image.show()Using the Azure OpenAI service is straightforward, but as with every technology, there are some best practices to follow to get the most out of it. Let’s review them in this section.
Azure OpenAI is one of Azure’s more expensive services. Even the free credits available to new accounts are not usable towards the OpenAI API. Thus, it is essential to track usage, even for new users. Unchecked API usage can lead to unexpectedly large bills.
OpenAI charges are based on token usage and consumption. Tokens represent units of text processed by the model - both for input and output. Processing a large text document consumes more tokens than generating a longer response. The more tokens you use, the more you pay. Thus, be economical with the information you give the model or ask it to generate.
Use the max_tokens parameter to limit the number of tokens consumed in that request. For production models, experiment to determine how many tokens your requests or users typically need and limit the usage accordingly. Increase the limit on a case-by-case basis.
To monitor the basic metrics:
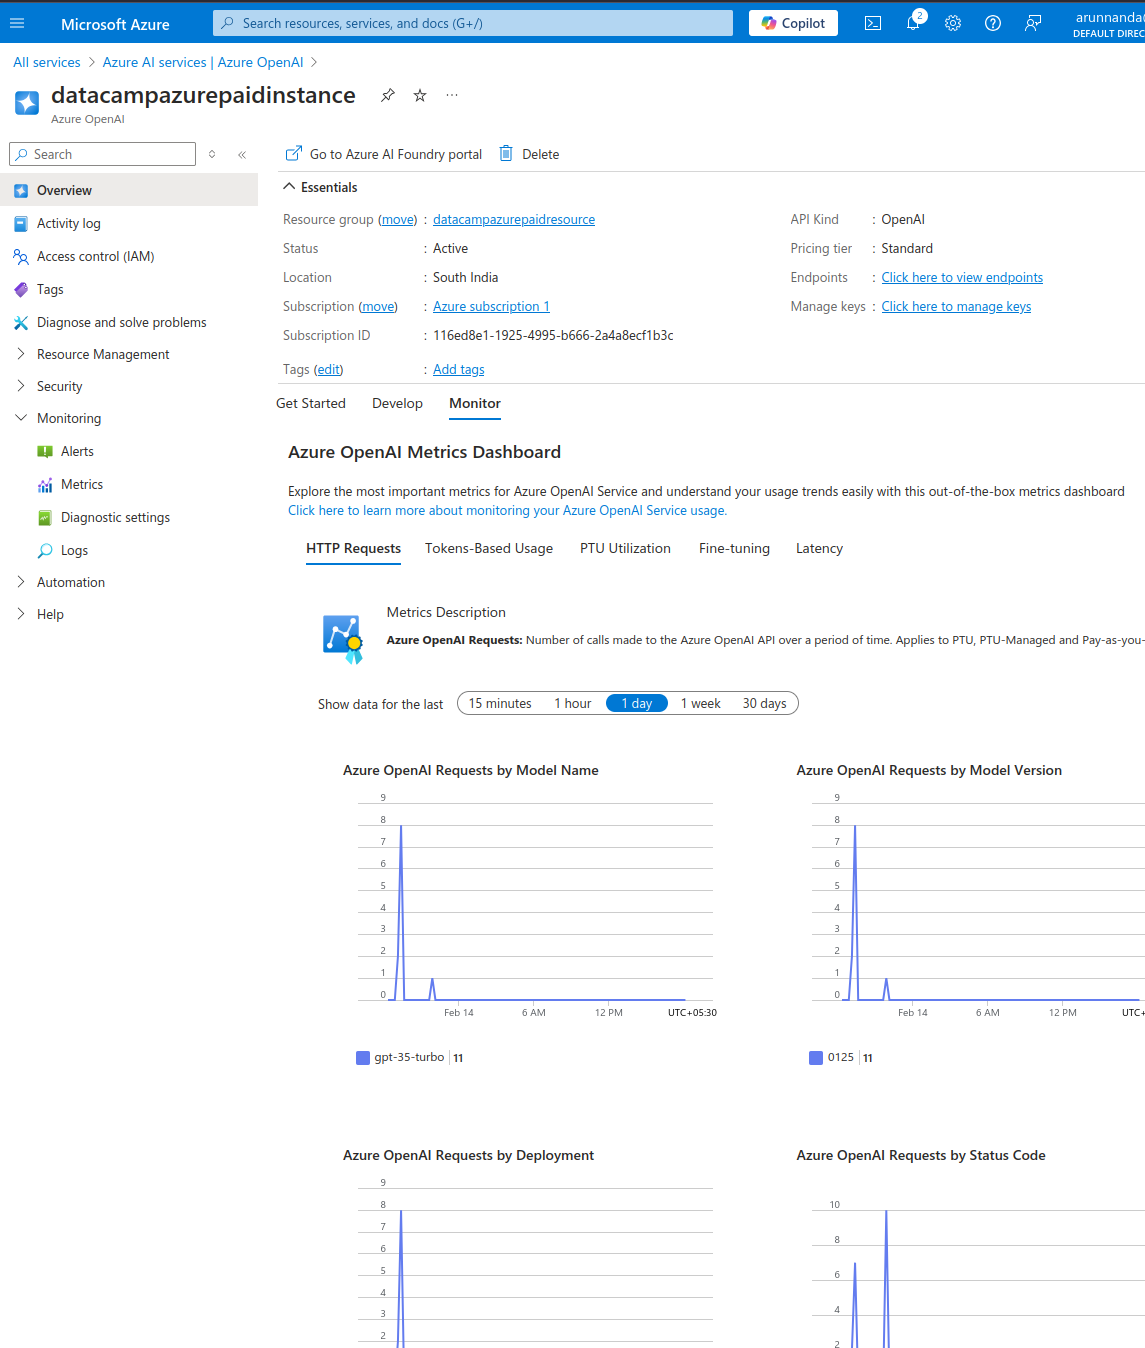
Azure OpenAI metrics dashboard.
You can also view more detailed metrics:

Azure OpenAI detailed metrics.
On the Metrics page:

Azure OpenAI monitoring example.
Lastly, always set up budget limits on API accounts and configure the settings to receive email alerts when you cross a budget threshold.
OpenAI’s base models are trained on huge datasets covering many different domains. Broadly, there are three different ways of getting the desired output from LLM models:
You can fine-tune a base model if few-shot learning and prompt engineering don’t help get the right responses.
Fine-tuning refers to retraining a pre-trained base model on a specialized dataset. In practice, only a few layers of the base model (not the entire model) are retrained on the new data. The Azure fine-tuning tutorial explains the steps for fine-tuning a popular OpenAI model.
Remember that to successfully finetune a base model, you need large volumes of relevant, high-quality data with thousands of training examples. Furthermore, fine-tuning invariably involves large upfront costs to train the model. Additionally, the fine-tuned model has to be hosted at your expense before deploying.
Publicly exposed API keys can be abused to access sensitive information, perform unsafe and/or illegal tasks, or make unauthorized requests, resulting in a large bill for the account owner. Thus, it is crucial to securely manage API keys instead of hardcoding them in the source code. Various approaches can be taken to do this:
.env files to store keys in key-value format. Add this file to the .gitignore list to ensure it doesn’t get committed to the code repository. I advise restricting the permissions for which tasks the keys can be used. It is also helpful to rotate or regenerate keys periodically so that old keys cannot be misused in case they are leaked.
In this tutorial, we discussed starting with an Azure account, setting up OpenAI services, creating a new OpenAI instance, and deploying a model. We then saw examples of using OpenAI models for practical tasks. We also covered how to monitor the usage and performance of Azure OpenAI resources.
For a deeper understanding of Microsoft Azure, follow the DataCamp Azure Fundamentals track. To learn more about the core concepts of OpenAI, follow the DataCamp OpenAI Fundamentals track.
Learn more about Azure with the following courses!
Track
Course
Course
blog
Laiba Siddiqui
15 min
blog
Josep Ferrer
14 min
Tutorial
Moez Ali
Tutorial
Anneleen Rummens
Tutorial
Aashi Dutt
Tutorial
Florin Angelescu