

Course
Claude Code 101
3 hr
28.6K
Practice and track your progress.
Continue with GoogleIn this tutorial, I'll show you how to connect Claude Code to GitHub using a Claude connector (built on the Model Context Protocol) and use it to triage an open-source repository end-to-end.
The workflow clones nothing, needs no vector store, and touches zero rows in the target repo. Instead, Claude Code reads issues through the connector and writes artifacts to your local filesystem that you review before deciding what (if anything) to post.
By the end of this tutorial, you'll have:
langchain-ai/langchain you can compare against.Claude Code is Anthropic's terminal-based coding agent.
Out of the box, it already has your filesystem, shell, and git. Claude Code Connectors extend it to reach external context, such as GitHub issues, Linear tickets, Slack messages, Postgres queries, and so on, that the terminal can't touch alone.
The connector protocol is called MCP (Model Context Protocol), which is an open standard for exposing tools and data to LLM agents.
Anthropic maintains a directory of ready-to-use connectors, and you can also write your own or connect to third-party MCP servers.
For this tutorial, we'll use the official GitHub MCP server, which runs locally via Docker. Some core ideas behind the setup:
claude mcp add command, then the tools are available in every session.Open-source triage is read-heavy, judgment-heavy, and cheap to be wrong about.
Reading 50 issues and clustering them is tedious for a human, but well-suited to a model that can hold everything in context at once.
Also, we write outputs as local files first; a bad cluster or a clumsy draft costs nothing, and you can catch it on review.
In this section, we'll set up the GitHub connector in Claude Code and run four triage prompts against langchain-ai/langchain. It is a large ML repo with a genuinely messy issue tracker. At a high level, here's what we'll build:
Let's build it step by step.
Before we set up the connector, you'll need three things:
Once you have all the prerequisites in place, verify Docker is running:
docker info | head -5If Docker isn't installed or the daemon isn't up, you'll see a "Cannot connect to the Docker daemon" error. On macOS, launch Docker Desktop with:
open -a DockerDocker Desktop takes 15-60 seconds to be fully ready, and docker info will keep erroring during that window. Rather than checking manually, use a small wait one-liner that polls until the daemon is up:
until
docker info >/dev/null 2>&1; do sleep 2; echo "waiting..."; done && echo "Docker ready"Once it prints Docker ready, you can move on.
Once Docker is set up, next go to github.com/settings/tokens and generate a new classic token.
Note: Leave every scope unchecked. An unscoped token can still read public repositories via the GitHub API, which is everything our agent needs. Without any scopes selected, the token can't write, modify, or delete anything on GitHub, no matter what we ask Claude to do. This is a hard guarantee enforced on GitHub's side, not a promise we're making about the agent's behavior.
Copy and save the token immediately after generation, then export it in your shell:
export GITHUB_PERSONAL_ACCESS_TOKEN="ghp_your_token_here"If you're already inside a Claude Code session, you might be tempted to use the ! prefix to run the export command directly in your shell (e.g., ! export GITHUB_PERSONAL_ACCESS_TOKEN="...").
However, because ! spawns a temporary subshell, the variable will vanish the moment the command finishes, and Claude won't see it.
To set the token safely without pasting it into the model prompt, you have two options:
/exit to leave Claude, run the export command in your normal terminal, and restart claude..env file in your working directory, which Claude Code automatically reads on startup.Verify that both prerequisites are ready without echoing the token itself:
docker info | head -3
echo "Token set: ${GITHUB_PERSONAL_ACCESS_TOKEN:+yes}"
The second command prints Token set: yes if the variable exists and Token set: (nothing after the colon) if it's empty.
This is safer than echoing the token directly because there is no chance of it landing in your shell history in plaintext.
The official GitHub MCP server ships as a Docker image.
We register it with Claude Code using claude mcp add:
claude mcp add github \
  -e GITHUB_PERSONAL_ACCESS_TOKEN=$GITHUB_PERSONAL_ACCESS_TOKEN \
  -- docker run -i --rm \
  -e GITHUB_PERSONAL_ACCESS_TOKEN \
  ghcr.io/github/github-mcp-server
The two -e flags are not a typo here::
-e (before --) sets an environment variable for the MCP process that Claude Code launches,-e (inside the docker run arguments) tells Docker to forward that variable into the container.If you miss either one and the container starts with an empty token, then it fails to authenticate against the GitHub API.
To verify if the connector is registered successfully:
claude mcp listYou should see:
github — docker run -i --rm -e GITHUB_PERSONAL_ACCESS_TOKEN ghcr.io/github/github-mcp-server — ConnectedIf you see Failed to connect, the two most common causes are Docker not running or GITHUB_PERSONAL_ACCESS_TOKEN not being exported in the same shell where you ran claude mcp add.
Now, our GitHub token is set. Next, we create a working directory and open the Claude Code CLI:
mkdir demo && cd demo
claude
The claude command launches an interactive session in the current directory.
Any files Claude writes during the triage will land here.
Then ask a simple read-only question to confirm the connector is being used:
Using the GitHub MCP connector, fetch the 5 most recently updated open issues in langchain-ai/langchain. Just list titles and numbers.The first time Claude Code uses a GitHub tool, it will prompt for approval.
Approve read-only tools like list_issues, get_issue, search_issues, etc.
If Claude falls back to curl against the public GitHub API instead of using MCP tools, the connector isn't loaded. Then, exit your session and restart it.
A successful run returns something like:
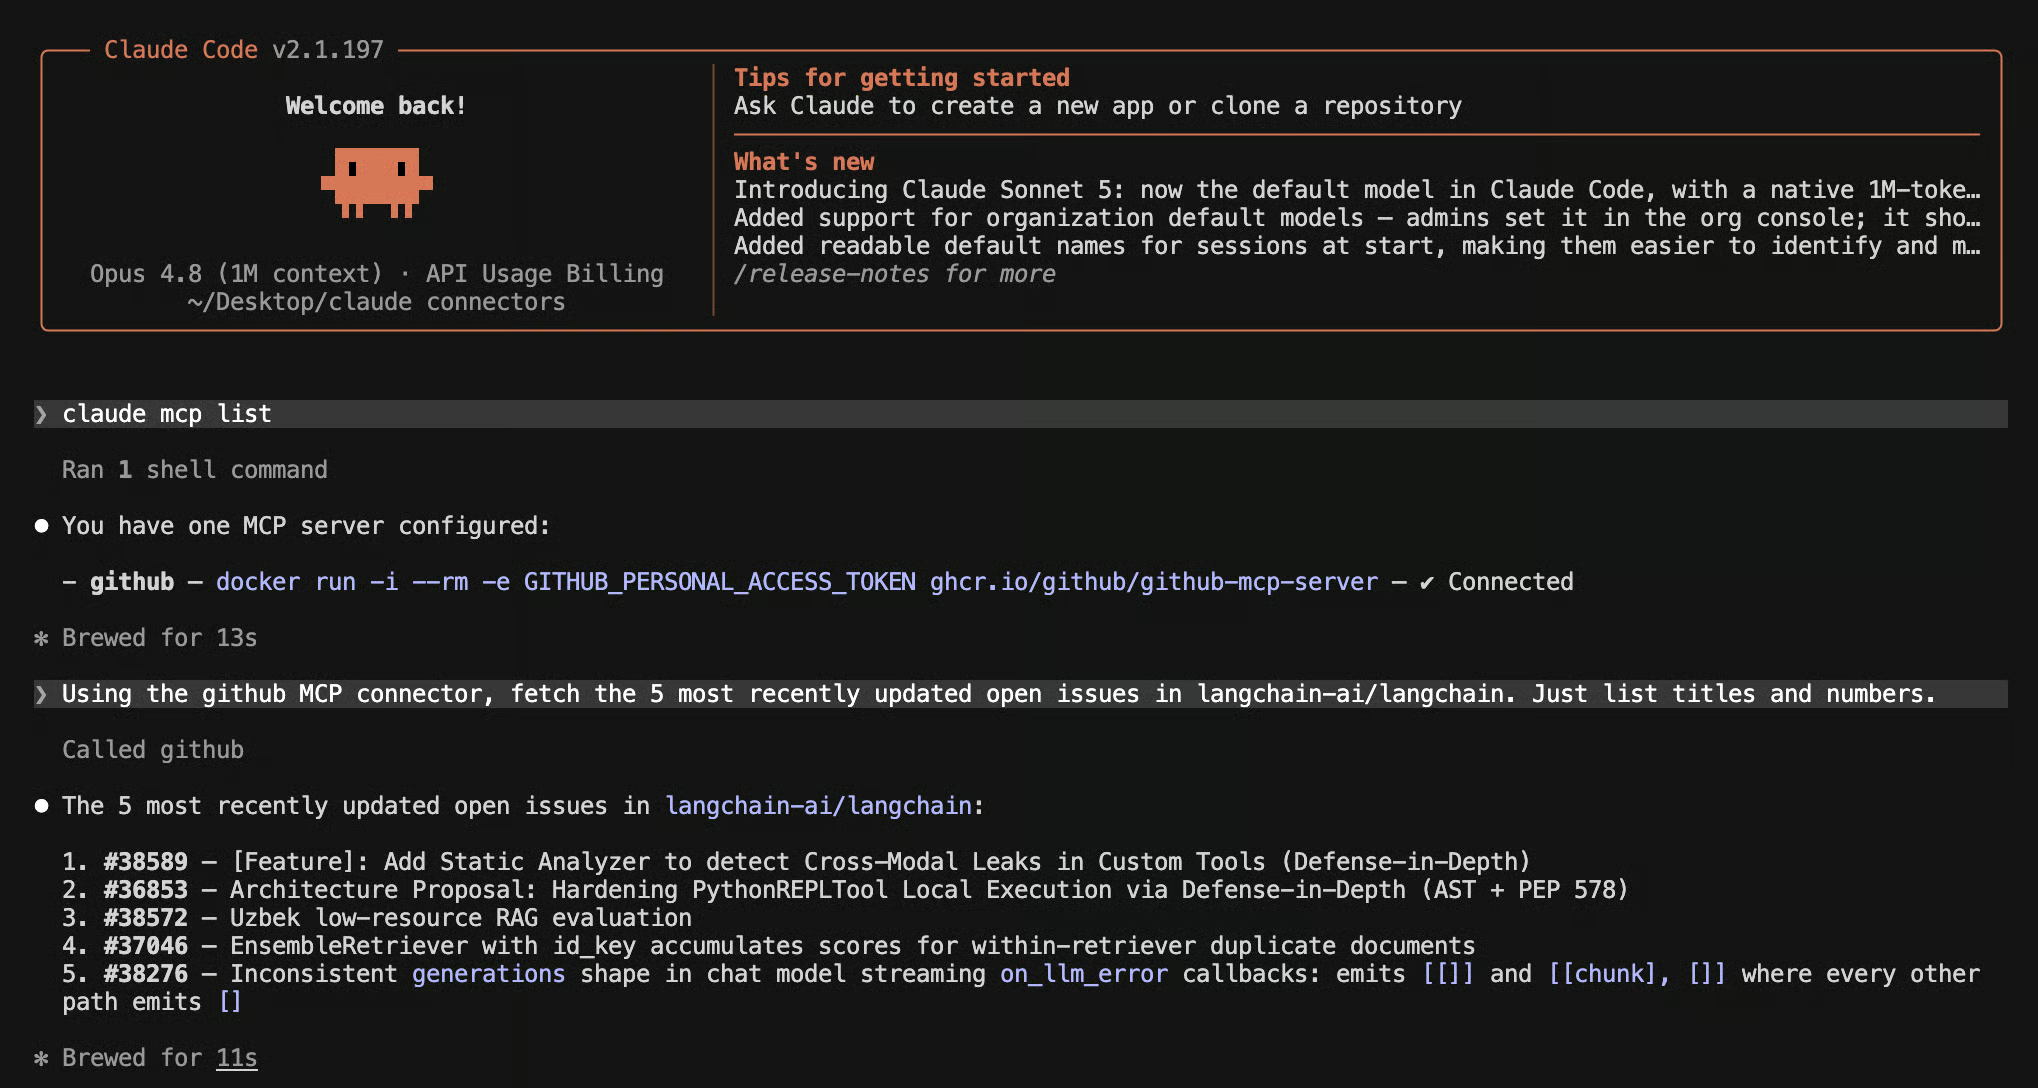
Once you see real issue numbers coming back through MCP, we're ready to run the actual triage.
The warm-up task is pure read-only. Now, we want a map of what's in the issue tracker before doing anything else.
Prompt:
Using the GitHub MCP connector, pull the 50 most recently updated open issues from langchain-ai/langchain.
Read their titles, bodies, and labels. Group them by likely area — bugs, feature requests, documentation, questions, and "needs more info."
For each group, give me a count and 3-5 representative issue numbers with a one-line reason. Save as backlog-summary.md in the current directory.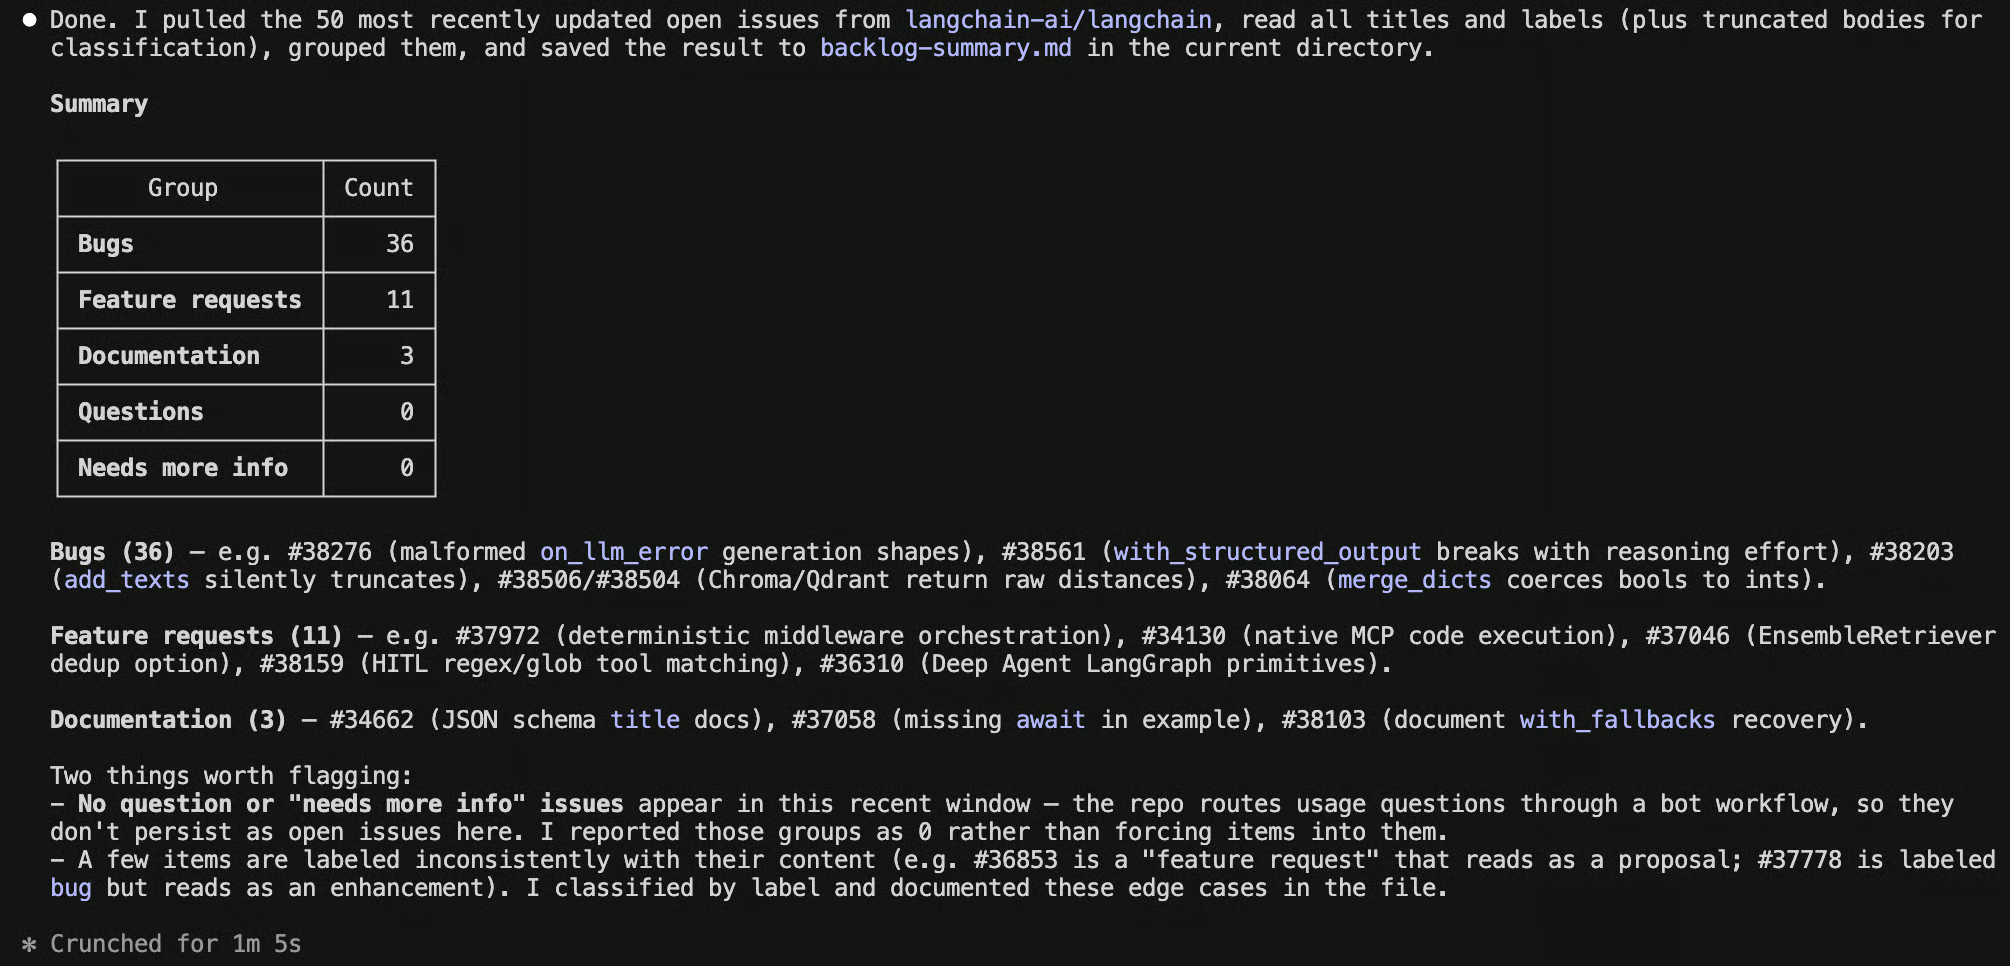
Claude Code fetches the issues via the connector, reads through them, and writes a markdown file grouping them by area with representative issue numbers. This file alone is useful as a maintainer can skim it in 60 seconds and know what kind of week they're walking into.
Duplicate detection is where an agent earns its keep.
Reading 50 issues end-to-end and clustering by underlying problem is tedious for a human, but a model can hold all of them in context and spot overlaps a keyword search would miss.
Prompt:
From the same 50 issues you already pulled, identify clusters of likely duplicates: issues describing the same underlying problem, even if titles differ. For each cluster, output issue numbers, a one-sentence shared-problem description, and confidence (high/medium/low). Save as duplicate-candidates.md.
Here's what Claude actually produced on my run:
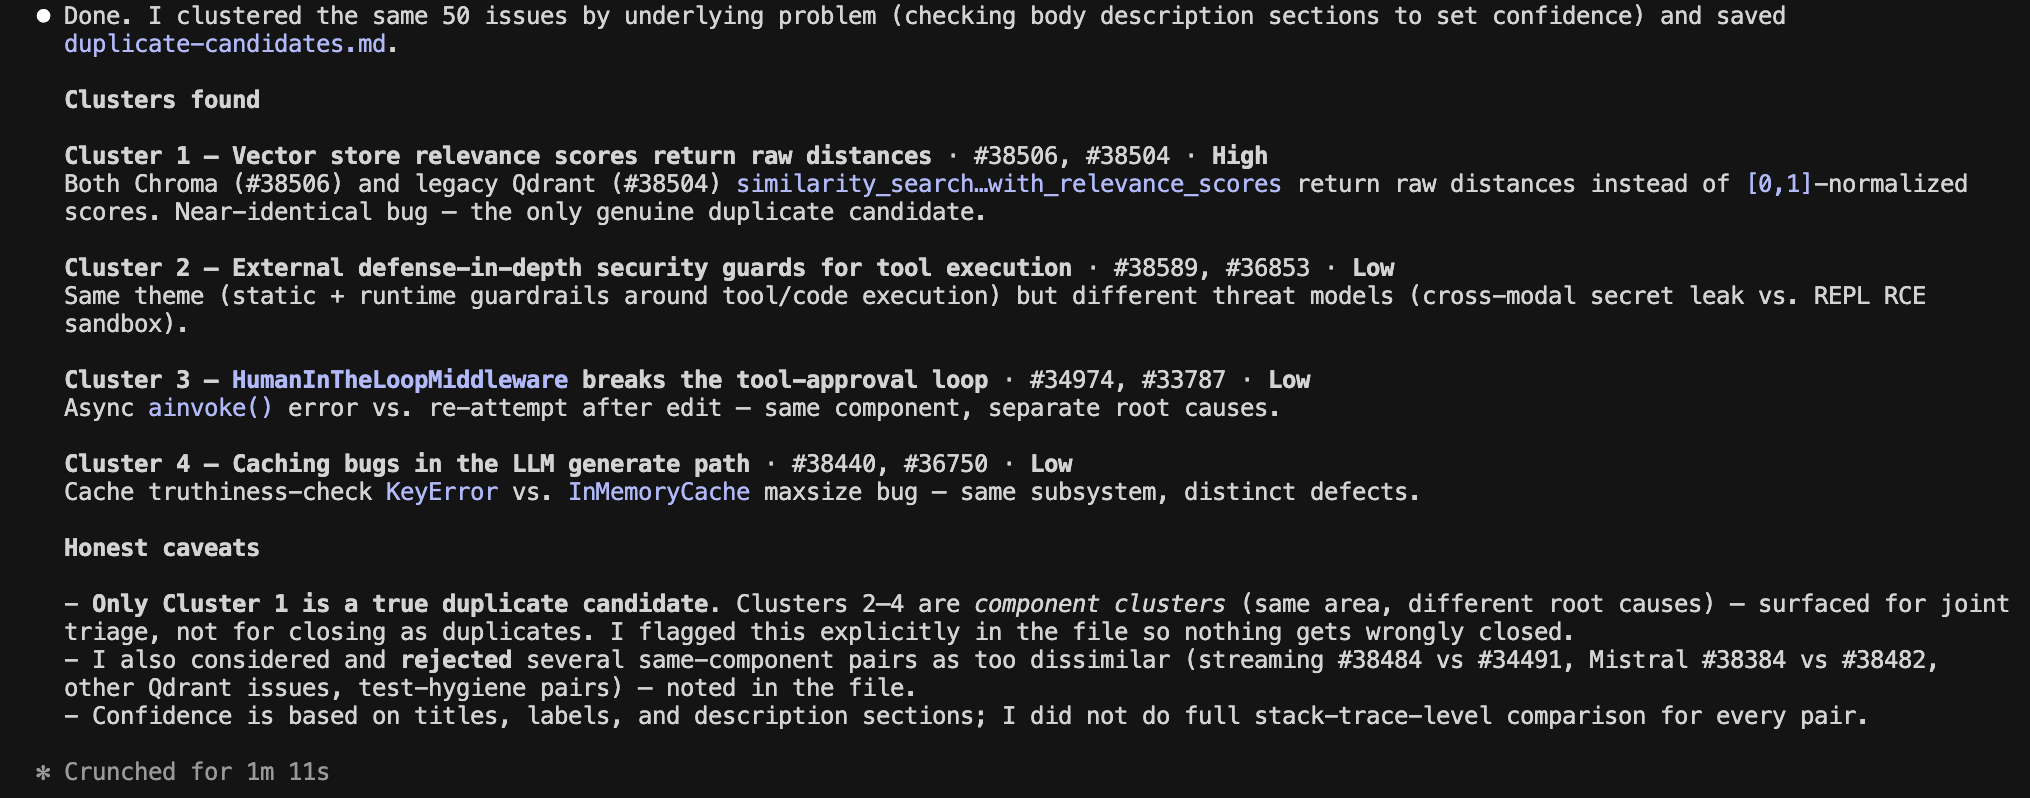
The most interesting part of this output is clusters 2 through 4.
A naive keyword-based duplicate detector would have closed all four clusters as duplicates.
Claude explicitly refused to call them duplicates.
It flagged them as component clusters having the same subsystem, distinct root causes, and told me which ones to actually close (just Cluster 1) versus which ones to triage jointly but keep open.
That's the behavior you'd want from a careful human triager, and it's exactly why the local-files-then-review pattern is worth the extra step.
If we'd wired this straight into GitHub's API and auto-closed everything Claude flagged, we'd have closed three real bugs.
This is the whole point of the local-files pattern.
Before anything touches GitHub, check each .md file saved by Claude and check if the grouping matches your intuition.
Do the high-confidence clusters actually look like duplicates? Read 2-3 draft responses, and check if they sound like you.
If you want to actually post the comments or apply the labels, you have two options:
The key safety move for the write path is keeping read and write tokens separate.
In this tutorial, I demonstrated how to connect Claude Code to GitHub via MCP and use it to triage a real open-source repository end-to-end.
Instead of building a custom GitHub bot or wiring up webhooks, the workflow reads issues through the official GitHub MCP server, writes four triage artifacts as local files, and lets you review everything before deciding what to post.
The broader takeaway is that connectors turn Claude Code from a coding agent into a tool that can read your tools and prepare work for you to review.
The right default is to keep that work local until you've seen it, and once you trust the pattern, you can selectively let the agent take action where the cost of a mistake is low.
From here, you could extend the project in several ways:
Top DataCamp Courses
Course
Course
Practice and track your progress.
Continue with Googleblog
Khalid Abdelaty
10 min
Tutorial
Aashi Dutt
12 min
Tutorial
Aashi Dutt
10 min
Tutorial
Vikash Singh
10 min
Tutorial
Bexruz (Bex) Tuychiev
15 min
Tutorial
Abid Ali Awan
8 min


